adding to the collection, Typhoon 5.3/4L80E turbo build


 01-24-2010, 10:13 PM
#43
Teching In
Join Date: Jan 2010
Location: Bay Area, Ca
Posts: 30
Likes: 0
Received 0 Likes
on
0 Posts
Hello again,
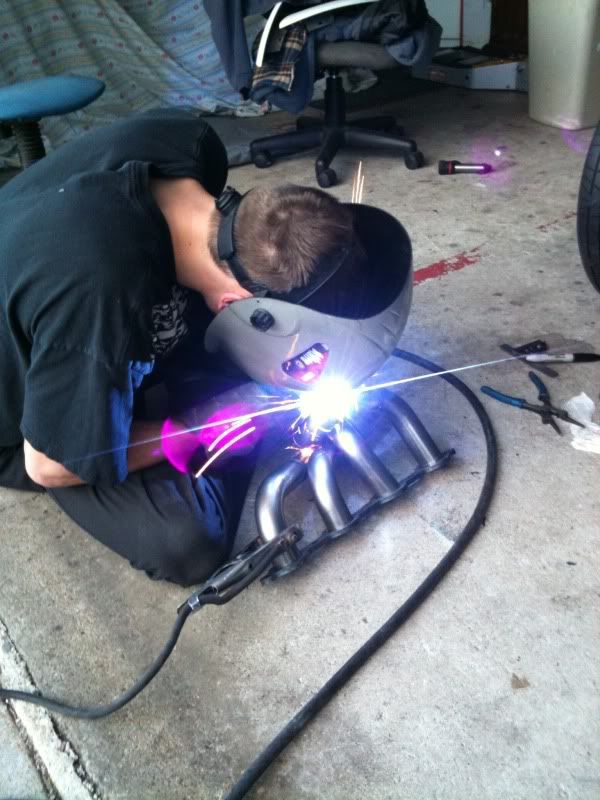
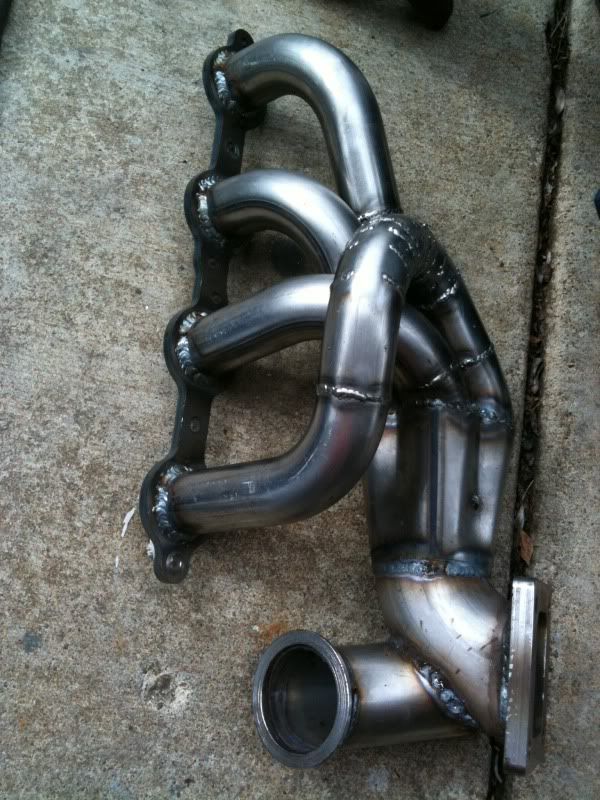
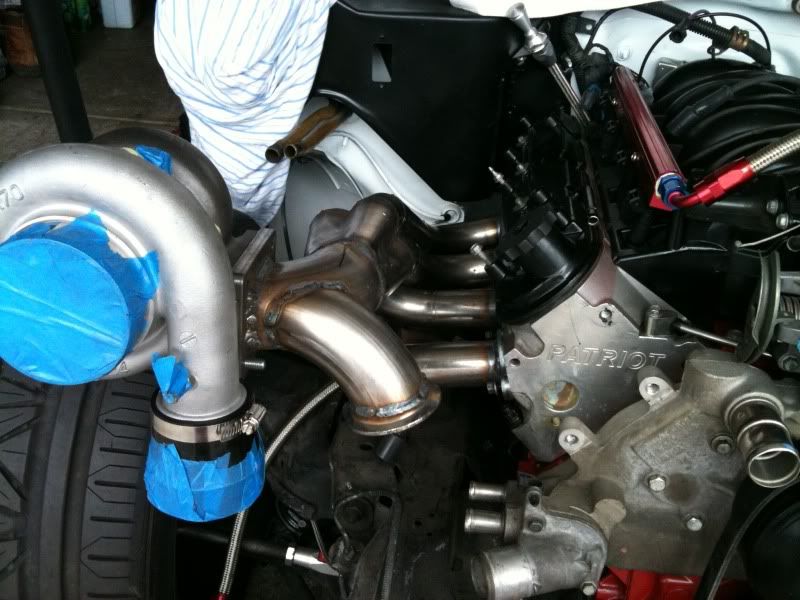
So yesterday eviltwin and I started on the headers. We were able to get the turbo (passenger) side header pretty much finished. Some of the welding just needs to be finished up. Here are some pics:
What the kit started looking like:
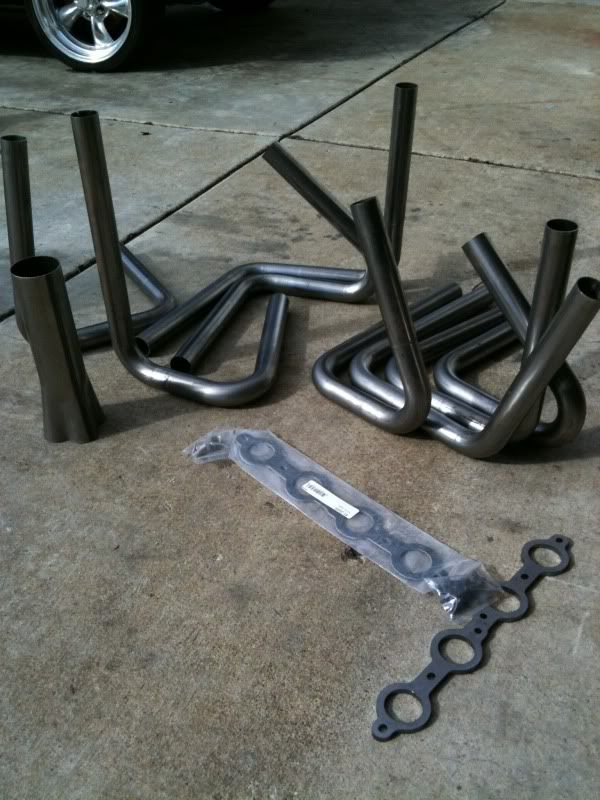
Two of the primaries tacked in place:
Ready to be welded:
Top view:
Thinkin about where the turbo will be situated:
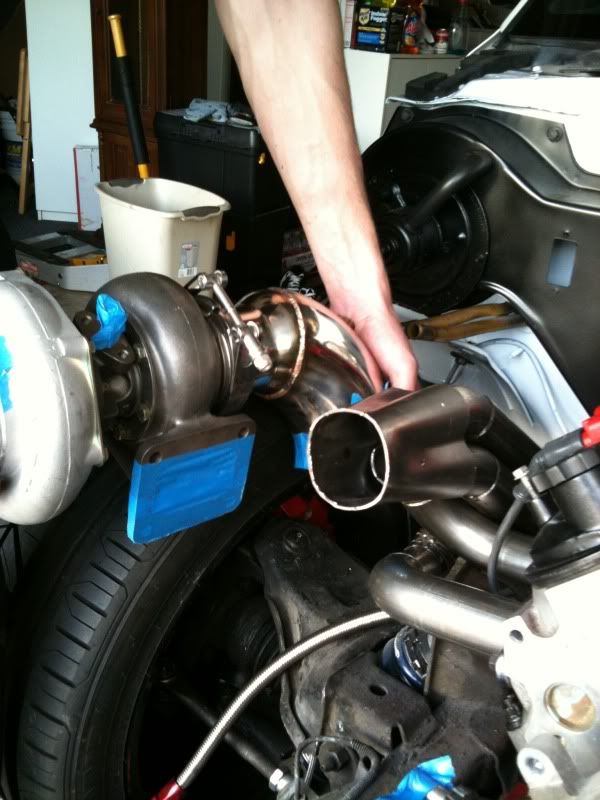
Welding it up:
We both got pretty busy today so didnt really have any time to work on the driver side. Looks like that'll be for next weekend.
So yesterday eviltwin and I started on the headers. We were able to get the turbo (passenger) side header pretty much finished. Some of the welding just needs to be finished up. Here are some pics:
What the kit started looking like:
Two of the primaries tacked in place:
Ready to be welded:
Top view:
Thinkin about where the turbo will be situated:
Welding it up:
We both got pretty busy today so didnt really have any time to work on the driver side. Looks like that'll be for next weekend.
01-29-2010, 10:13 PM
#44
Teching In
Join Date: Jan 2010
Location: Bay Area, Ca
Posts: 30
Likes: 0
Received 0 Likes
on
0 Posts
Thanks! The underside is pretty darn clean too. The benifits of living in CA. Never any salt/gravel all over the road to wreak havoc on ur vehicles
Thank ya. The first time we went to check it out we were surprised how clean it is! It was definitely taken care of... Gotta love it!
Thank ya. The first time we went to check it out we were surprised how clean it is! It was definitely taken care of... Gotta love it!
01-31-2010, 07:12 PM
#45
Teching In
Join Date: Jan 2010
Location: Bay Area, Ca
Posts: 30
Likes: 0
Received 0 Likes
on
0 Posts
Hey guys,
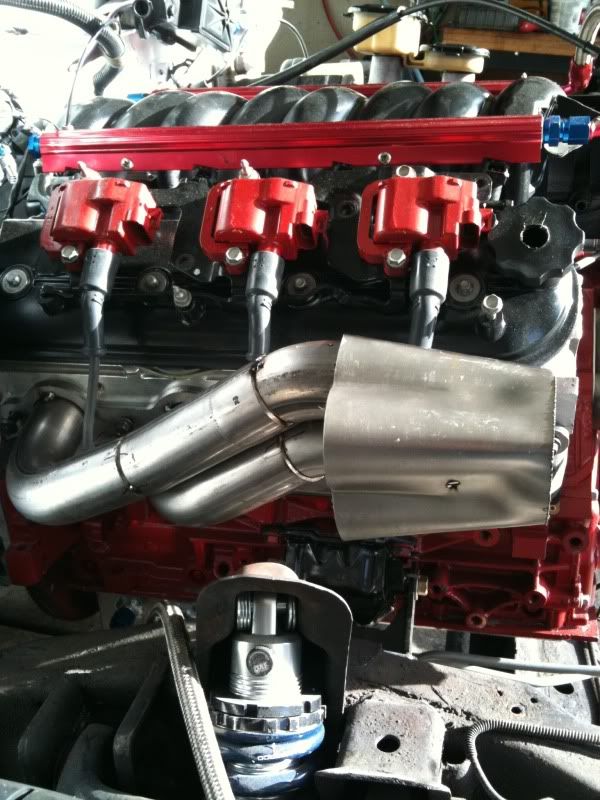
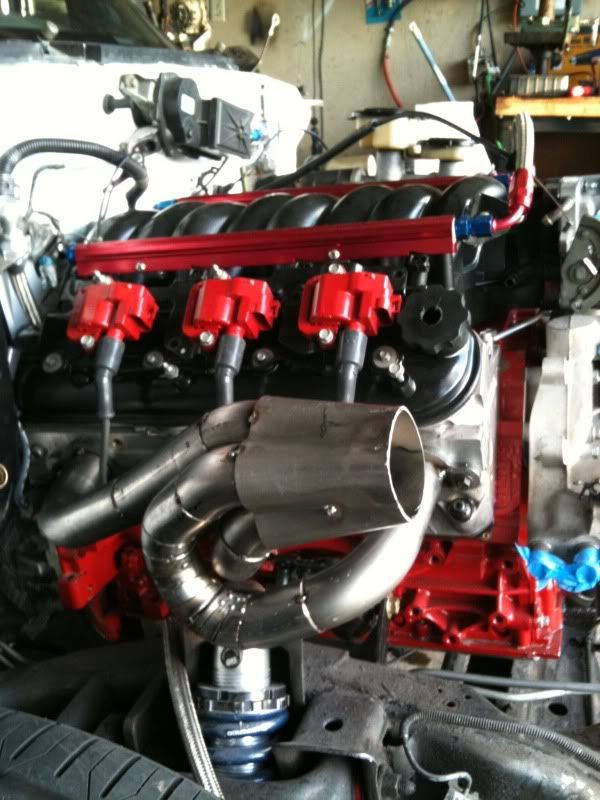
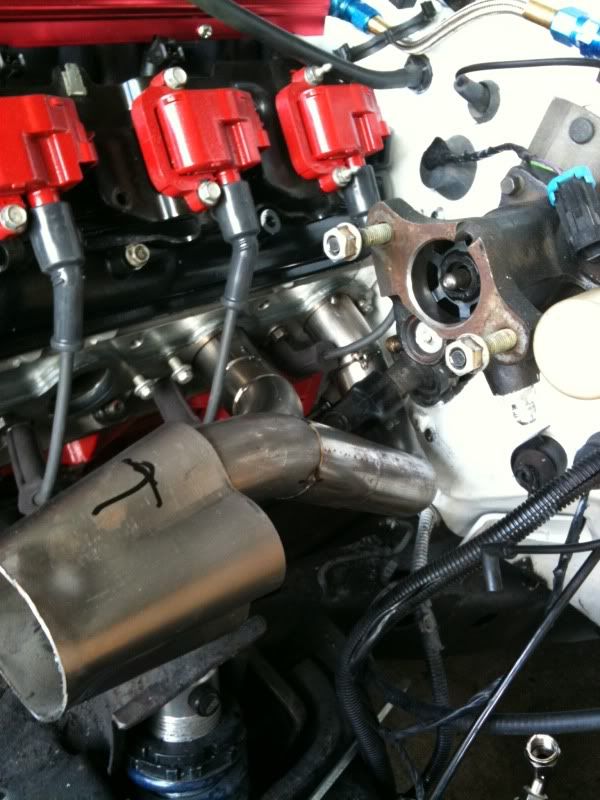
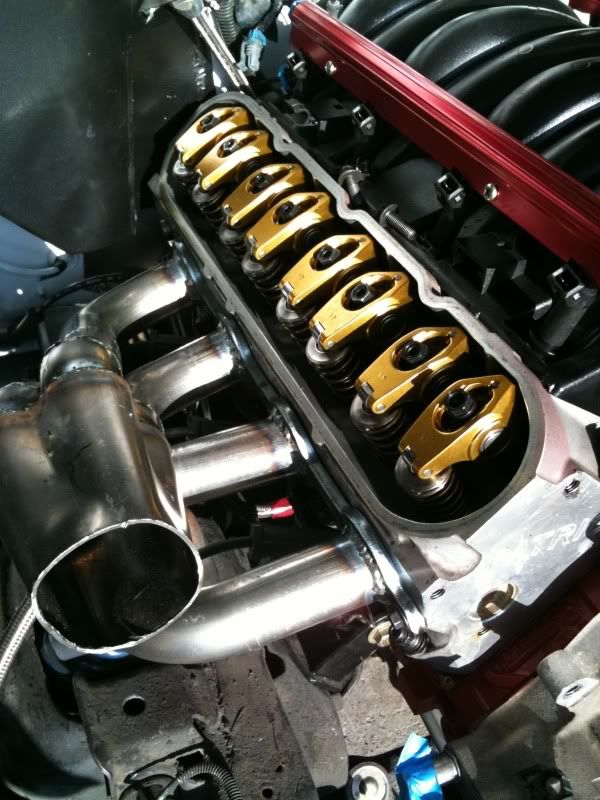
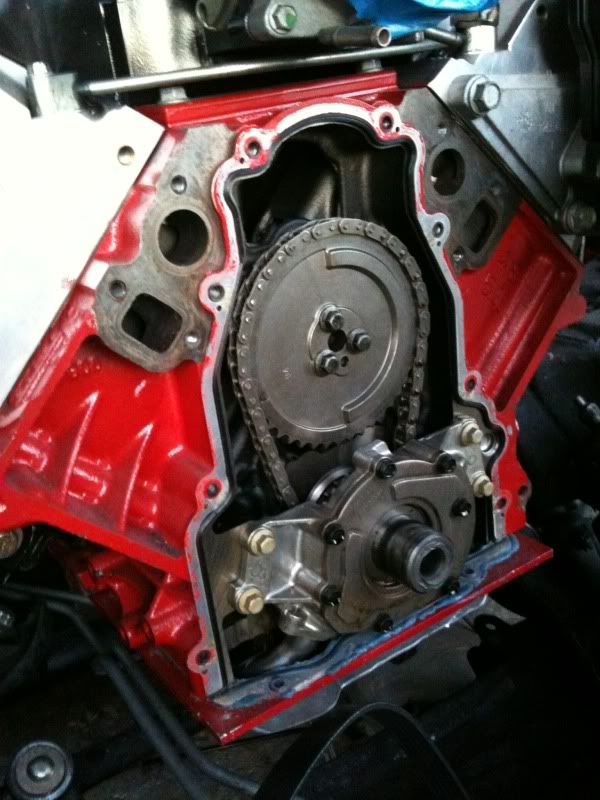
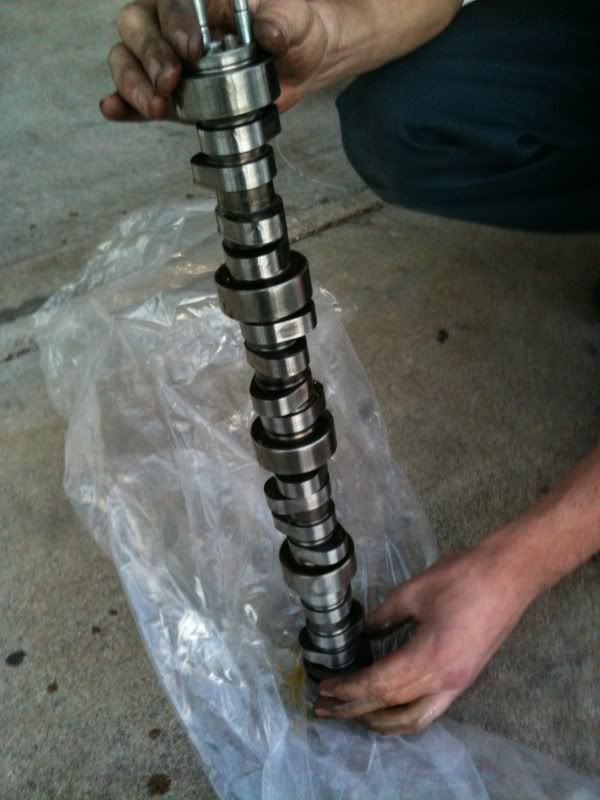
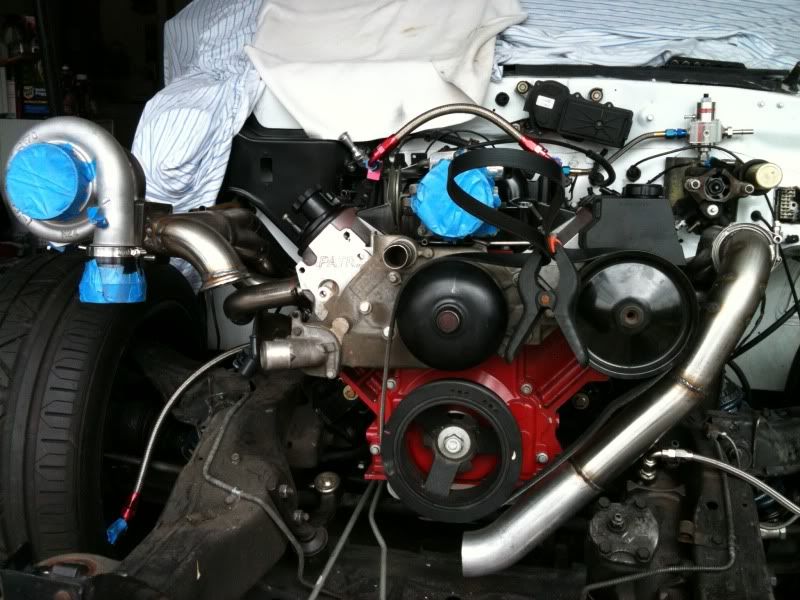
Here is a quick update from this weekend. Got the driver side header finished. It was a bit more tricky cause we had to get around the steering shaft. Think it turned out pretty good though. We also swapped out the cam for one that is a bit more aggressive ( 229/229 .581/.581 114). Should give us a bit more power and sound nice too. We figured we might as well do the swap now while its easily accessible.

And strippin the engine down to get to the cam:
Here is a quick update from this weekend. Got the driver side header finished. It was a bit more tricky cause we had to get around the steering shaft. Think it turned out pretty good though. We also swapped out the cam for one that is a bit more aggressive ( 229/229 .581/.581 114). Should give us a bit more power and sound nice too. We figured we might as well do the swap now while its easily accessible.
And strippin the engine down to get to the cam:
02-13-2010, 06:48 PM
#46
Teching In
Join Date: Jan 2010
Location: Bay Area, Ca
Posts: 30
Likes: 0
Received 0 Likes
on
0 Posts
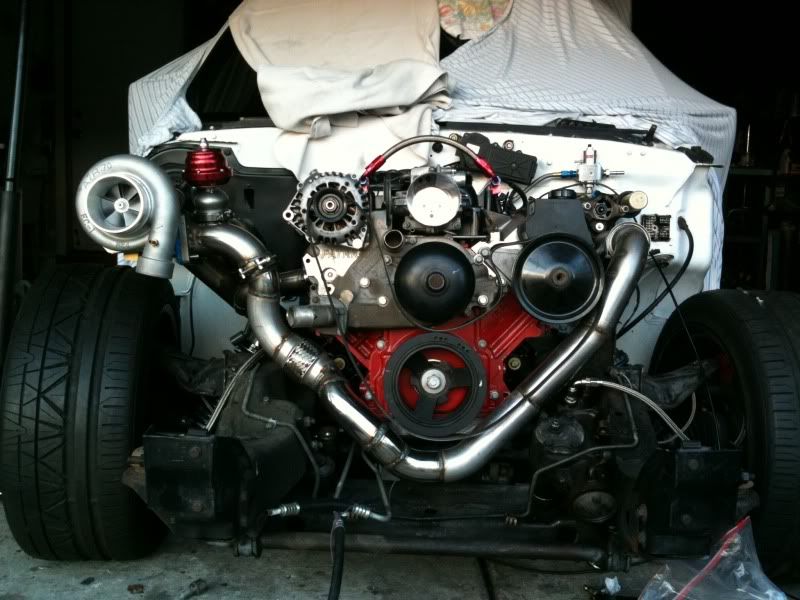
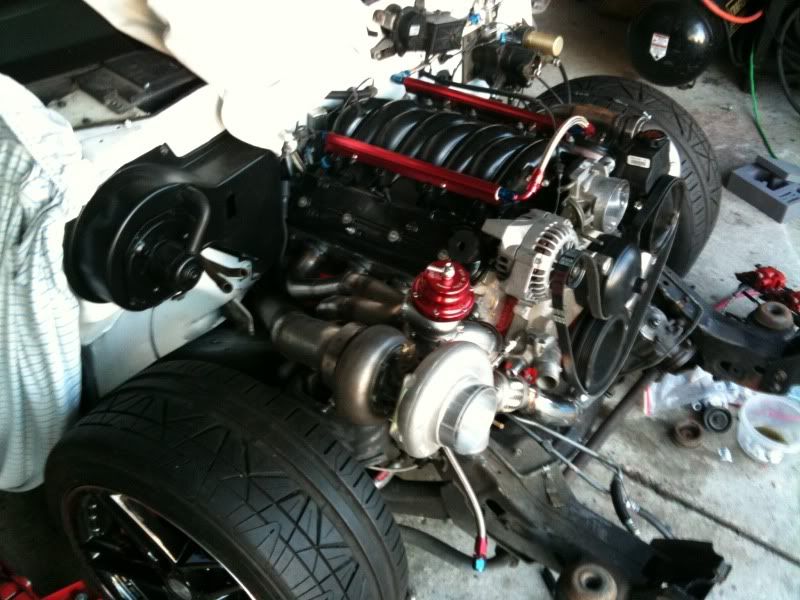
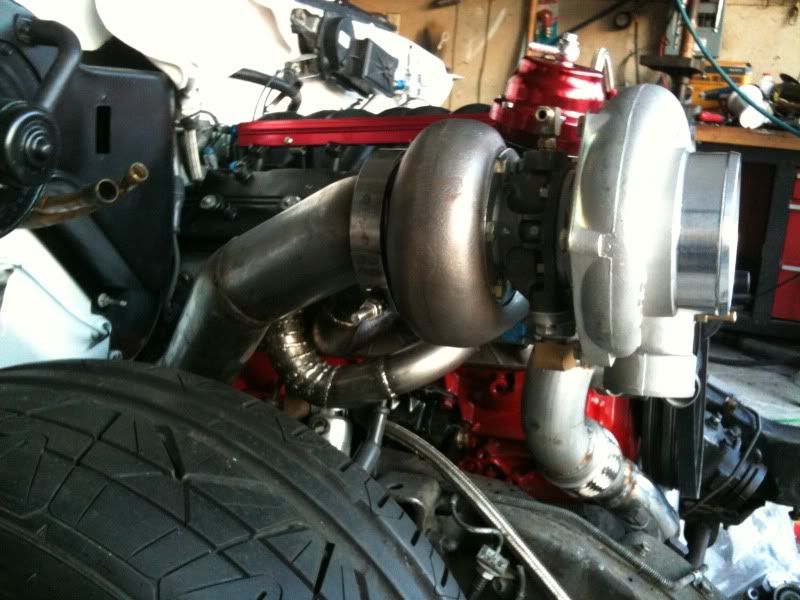
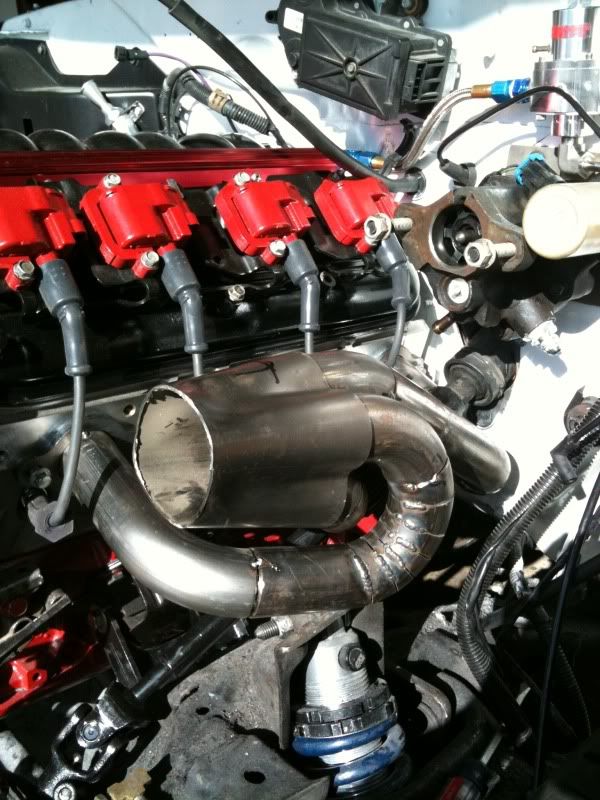
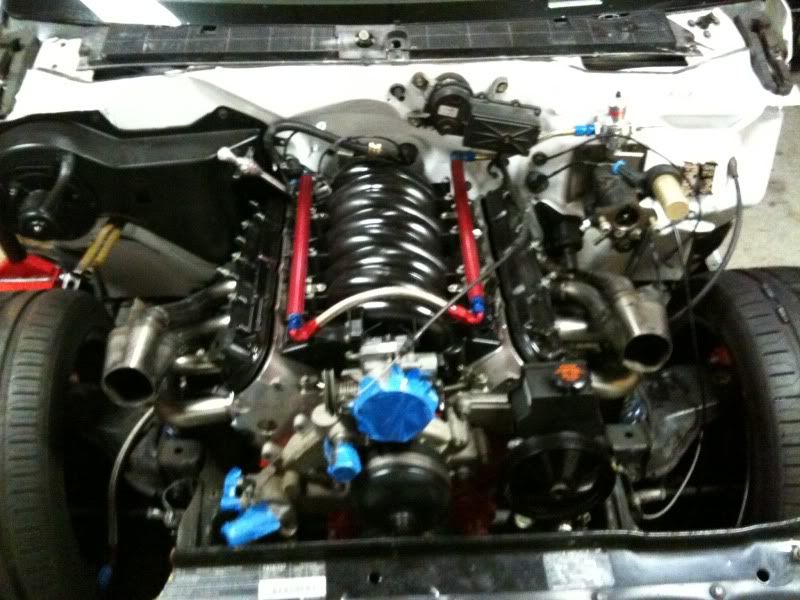
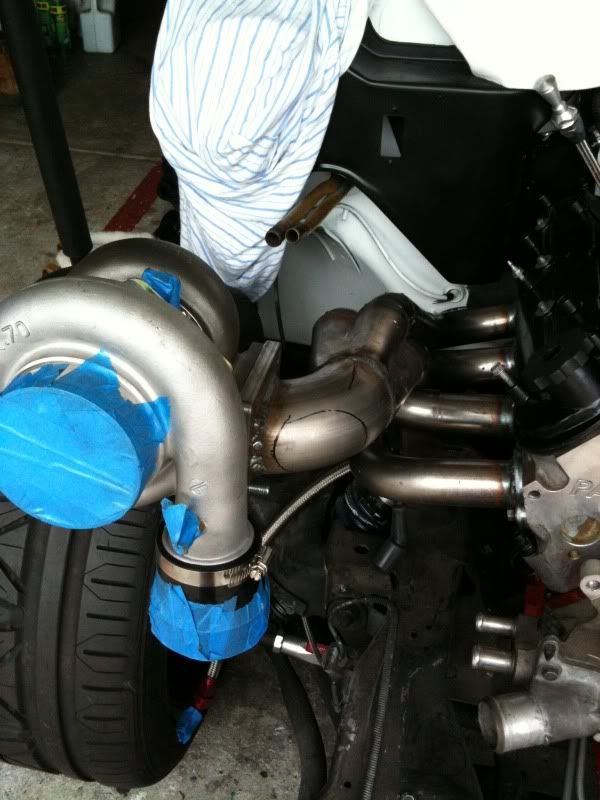
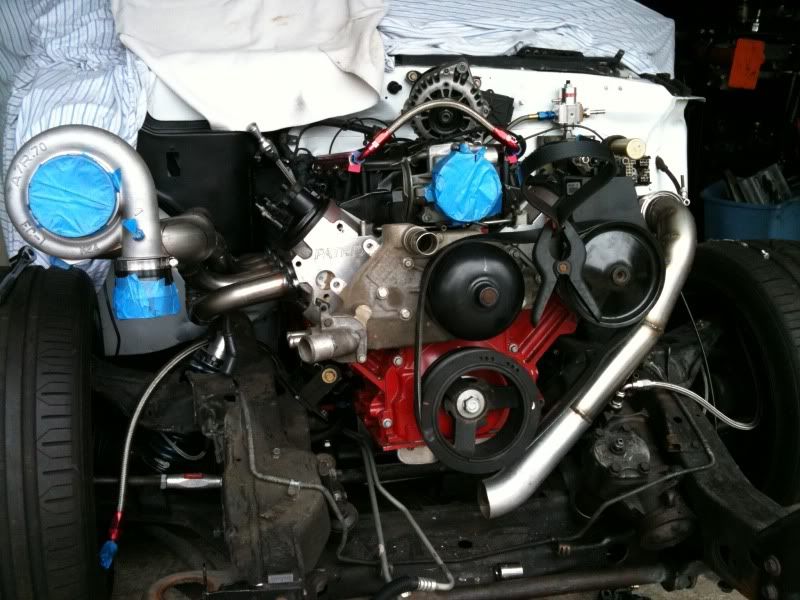
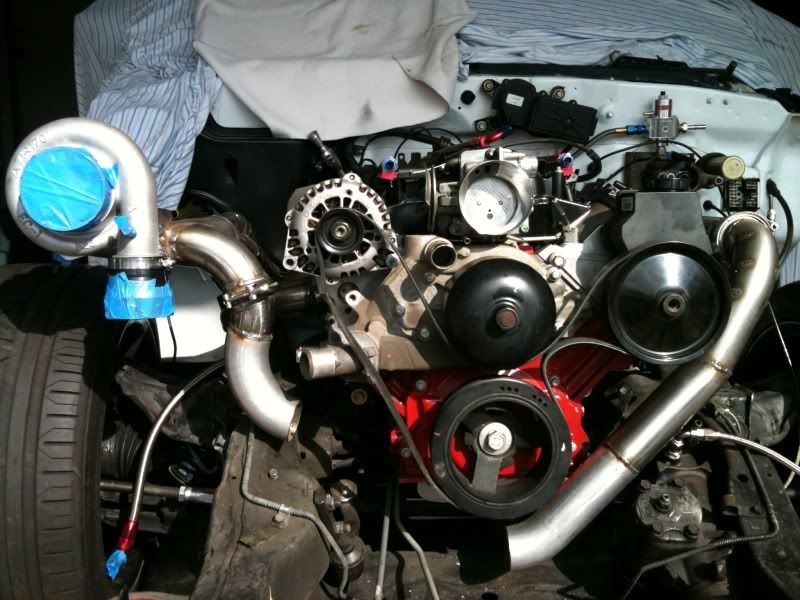
We finally had some time to work on the Ty today. Got the turbo all mounted up and most of the crossover done. Couldnt quite finish, cause we still need to order a flex hose. Its nice to finally see the turbo system starting to come together! We need the tc78 off of the Syclone to start on the downpipe, so hopefully Eviltwin will be able to find a deal on a new turbo soon. Also, we got the alternator situated nice and close to the engine. We are going to make a mounting bracket that will let us pivot the alternator to adjust the tension of the belt. Should look pretty clean! Here are some pics:
Thanks for lookin!
Thanks for lookin!
02-14-2010, 08:46 AM
#48

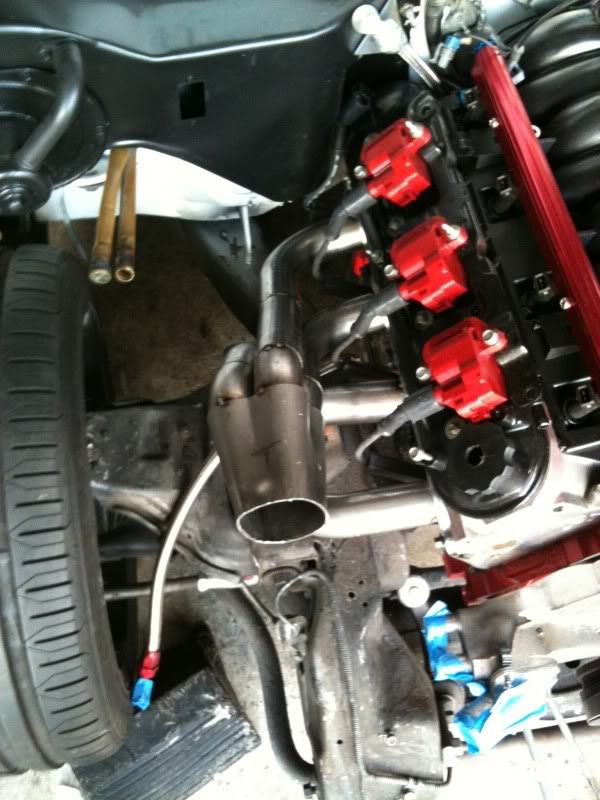
Looks great. On the drivers side, it looks like the steering shaft goes in between the header tubes. How do you remove the header? Is it that easy to remove that steering shaft or is there something I am not seeing or overthinking it? Just curios.
thanks,
---Jim---
thanks,
---Jim---
02-14-2010, 12:07 PM
#51
Teching In
Join Date: Jan 2010
Location: Bay Area, Ca
Posts: 30
Likes: 0
Received 0 Likes
on
0 Posts
02-14-2010, 12:53 PM
#52
11 Second Club
iTrader: (17)

Join Date: Oct 2007
Location: pleasanton ca
Posts: 344
Likes: 0
Received 0 Likes
on
0 Posts

I had a build thread going but it hasn't been updated for quite some time. Now it has a different motor, front mount turbo, cowl hood, narrowed rear, spool, different seats, etc, I'll update it someday but yea you need to go for a ride in it... http://www.s10forum.com/forum/f213/l...a-week-346186/
02-14-2010, 01:13 PM
#53
 02-19-2010, 08:24 PM
#55
TECH Fanatic
Thread Starter
iTrader: (18)
Join Date: Sep 2006
Location: Nor Cal
Posts: 1,002
Likes: 0
Received 0 Likes
on
0 Posts
Got some more parts in. Just need to find the time to work on it
02-21-2010, 01:07 PM
#56
Teching In
Join Date: Jan 2010
Location: Bay Area, Ca
Posts: 30
Likes: 0
Received 0 Likes
on
0 Posts
Well, yesterday we made it out to the junkyard. Picked up a new core support (cause the one that was on the Ty was all cut up) and picked up some wiring stuff. Also got the flex coupler for the crossover in the mail at the end of the week. Now we can finish the crossover, mount up the core support, and start on some wiring. We will see when there is time to work on it again!
 02-21-2010, 06:51 PM
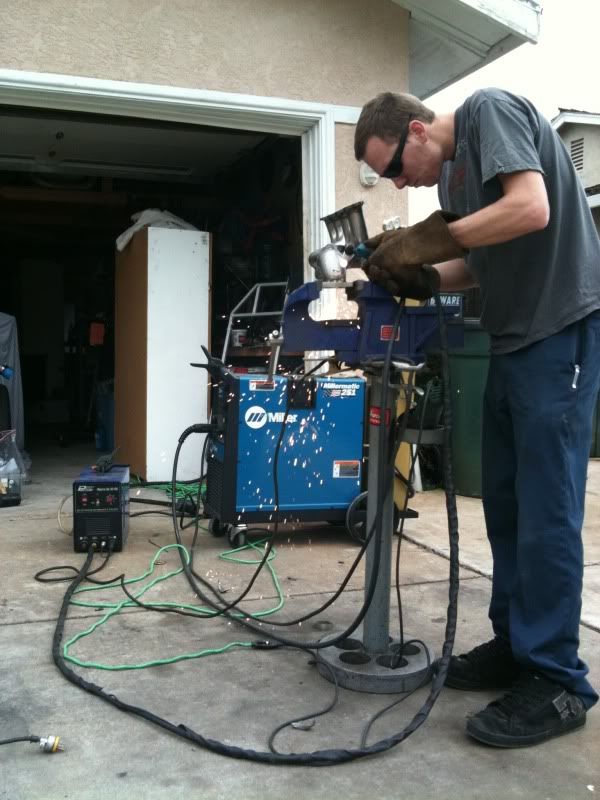
#58
Looks like a plasma cutter. Small box on the ground. Some people use small torching glasses. Some use a light weld lense in their welding helmet.
Just My guess.
Just My guess.
02-22-2010, 12:20 AM
#59
Teching In
Join Date: Jan 2010
Location: Bay Area, Ca
Posts: 30
Likes: 0
Received 0 Likes
on
0 Posts

Just kidding...
you are correct. He was using the plasma cutter to cut a hole where the crossover meets the passenger side.
02-27-2010, 09:33 PM
#60
Teching In
Join Date: Jan 2010
Location: Bay Area, Ca
Posts: 30
Likes: 0
Received 0 Likes
on
0 Posts
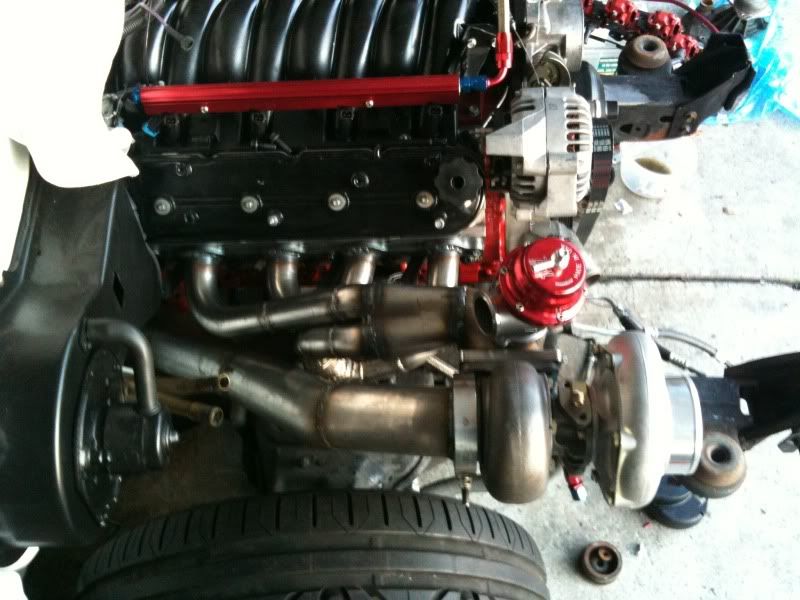
Did some good work today. Finished the crossover, made the downpipe, and mounted the wastegate. Love they way its lookin right now. Going to be even better once we get the BOV mounted in there too...