'64 Chevelle 5.3/4L60E swap build thread
 04-29-2010, 02:34 PM
#1
Launching!
Thread Starter
iTrader: (1)

Join Date: Oct 2008
Location: Russellville, Arkansas
Posts: 215
Likes: 0
Received 0 Likes
on
0 Posts

Wanted to post my LSx swap to hopefully help give back for all the info and advice I have gotten from different forums, most of it from ls1tech.com.
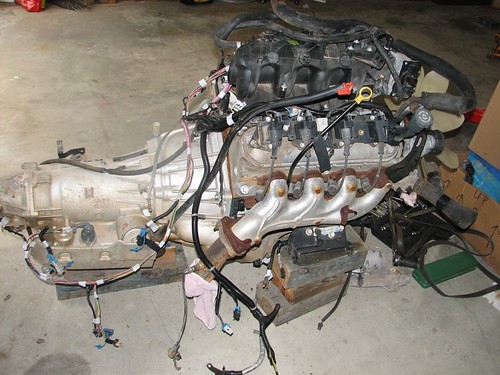
got home with a 2003 5.3L for my 64 chevelle. Will be replacing the 396/700R4. People call me crazy for this swap. I want coil on cylinder, roller cam, aluminum heads, and electronic fuel injection. This would be extremely expensive to put this technology into my 396. I will post cost as they come together but I expect I can get it done with some help from friends for less than $3000. Engine, wiring (in fairly bad shape, cut, missing plugs) computer, accessories, tranny, pedal, TAC module, MAF sensor all was $1200. Started a blog of the swap at http://neal64ss.blogspot.com/
Current engine:

"New" engine:

Currently finding everything was not as expected when I got parts home and started going thru them. Guy at salvage yard assures me he will help make everything right, so looks like another trip to salvage yard to get thing as they should be.
got home with a 2003 5.3L for my 64 chevelle. Will be replacing the 396/700R4. People call me crazy for this swap. I want coil on cylinder, roller cam, aluminum heads, and electronic fuel injection. This would be extremely expensive to put this technology into my 396. I will post cost as they come together but I expect I can get it done with some help from friends for less than $3000. Engine, wiring (in fairly bad shape, cut, missing plugs) computer, accessories, tranny, pedal, TAC module, MAF sensor all was $1200. Started a blog of the swap at http://neal64ss.blogspot.com/
Current engine:
"New" engine:
Currently finding everything was not as expected when I got parts home and started going thru them. Guy at salvage yard assures me he will help make everything right, so looks like another trip to salvage yard to get thing as they should be.
Last edited by neal64ss; 05-02-2010 at 10:48 AM.
 04-29-2010, 03:43 PM
#2

congrats. you will enjoy the 5.3 more IMO. ALOT better on gas. and still pulls decently on accel. I am in the same boat. I bought a 454 them decided I wouldn't be able to afford to gas to drive once I decided I wanted a cruiser vs. weekend car.
keep the pics and progress comming.
jim
keep the pics and progress comming.
jim
Last edited by Jimbo1367; 04-29-2010 at 03:43 PM. Reason: typo
05-13-2010, 03:24 AM
#3
Launching!
Thread Starter
iTrader: (1)
Join Date: Oct 2008
Location: Russellville, Arkansas
Posts: 215
Likes: 0
Received 0 Likes
on
0 Posts
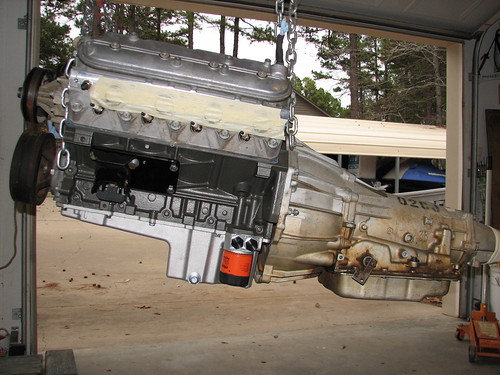
First, a pic of the recipient of this documented struggle to convert from BBC to Gen III SBC.

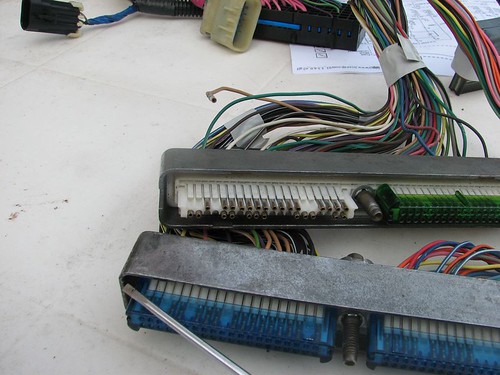
The harness from the salvage yard was not from the same truck as the engine/tranny and was somewhat damaged. I traded this harness for programming on my PCM to make it ready for stand alone operation. Purchased a 2003 6.0L/4L80E harness off truck forum classifieds. Was advertised as in new condition and complete. It arrived in that condition, best $124 I have spent on this project.
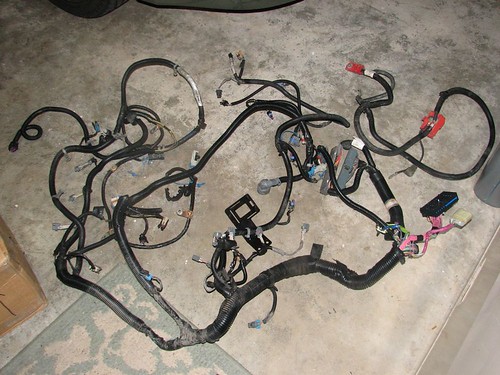
Started by removing plastic split tubing and the back endcaps for the PCM connectors.

Then I laid the harness on the engine/tranny. This helped me to figure out a few more plug ID's. Most of the info I have gotten from LT1swap.com. All the info necessary to convert a harness to standalone. I also looked at a 2004 GMC YUKON engine to figure out where some of the connectors went.
As I determined what each plug was I labeled it accordingly. After determining purpose for all but about 5 plugs I started removing pins/wires from the PCM connectors. Just use the info from LT1swap.com and it is fairly easy to do. Here are some pics of the process. Wires balled up in chair are not needed.

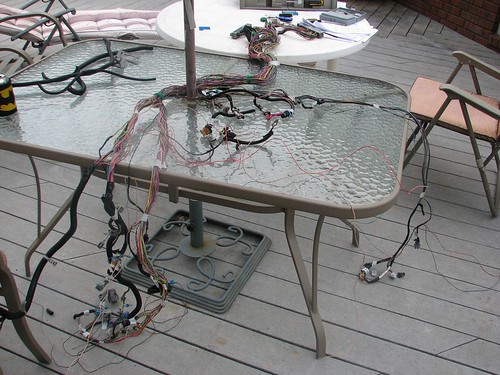
After I removed wires from PCM I then removed the unneeded plugs such as oil level, EVAP, A/C, ect. Then I Labeled all the wires that did not go to a plug. I ended up with a harness that had only the wires I need for my 64 Chevelle, all plugs/loose ends labeled as to function. All thats left is converting the Tranny plug from 4L80E type to 4L60E type, but thats another post.

The harness from the salvage yard was not from the same truck as the engine/tranny and was somewhat damaged. I traded this harness for programming on my PCM to make it ready for stand alone operation. Purchased a 2003 6.0L/4L80E harness off truck forum classifieds. Was advertised as in new condition and complete. It arrived in that condition, best $124 I have spent on this project.
Started by removing plastic split tubing and the back endcaps for the PCM connectors.
Then I laid the harness on the engine/tranny. This helped me to figure out a few more plug ID's. Most of the info I have gotten from LT1swap.com. All the info necessary to convert a harness to standalone. I also looked at a 2004 GMC YUKON engine to figure out where some of the connectors went.
As I determined what each plug was I labeled it accordingly. After determining purpose for all but about 5 plugs I started removing pins/wires from the PCM connectors. Just use the info from LT1swap.com and it is fairly easy to do. Here are some pics of the process. Wires balled up in chair are not needed.
After I removed wires from PCM I then removed the unneeded plugs such as oil level, EVAP, A/C, ect. Then I Labeled all the wires that did not go to a plug. I ended up with a harness that had only the wires I need for my 64 Chevelle, all plugs/loose ends labeled as to function. All thats left is converting the Tranny plug from 4L80E type to 4L60E type, but thats another post.
05-13-2010, 04:49 AM
#5
12 Second Club
iTrader: (39)
Join Date: Jun 2006
Location: surry, va
Posts: 943
Likes: 0
Received 0 Likes
on
0 Posts
Looking good! What are your plans for exhaust? I have a set of longtube hedman headers that are coated that I'm not going to use. They have never been bolted on. I bought them for my 65 malibu and never put them on. They are for a 64-67 abody w/ an ls engine. Let me know if your interested.
05-13-2010, 12:17 PM
#6
Launching!
Thread Starter
iTrader: (1)
Join Date: Oct 2008
Location: Russellville, Arkansas
Posts: 215
Likes: 0
Received 0 Likes
on
0 Posts
Right now I have the truck manifolds and I also have a pair of 98 camaro manifolds. First I will try the truck manifolds, which I expect will not fit on driver side, then i will try the camaro manifolds. If neither will fit I may have to contact you about the headers.
Plan is to get installed and running as inexpensively as possible, then enjoy driving for about a year, then add LS6 cam and headers.
Plan is to get installed and running as inexpensively as possible, then enjoy driving for about a year, then add LS6 cam and headers.
Last edited by neal64ss; 05-13-2010 at 12:30 PM.
05-17-2010, 08:20 AM
#7
Launching!
Thread Starter
iTrader: (1)
Join Date: Oct 2008
Location: Russellville, Arkansas
Posts: 215
Likes: 0
Received 0 Likes
on
0 Posts
First I should note that this is applicable to PCM that uses blue/green connectors. I suspect it will be similar for blue/red PCM, but haven't verified yet. Here is a link to a google doc I made that shows how to convert from 4L80E wiring to 4L60E.
I know that most are going the other way, but I needed to do it so maybe someone else does also.
https://spreadsheets.google.com/ccc?...SOGozNlE&hl=en
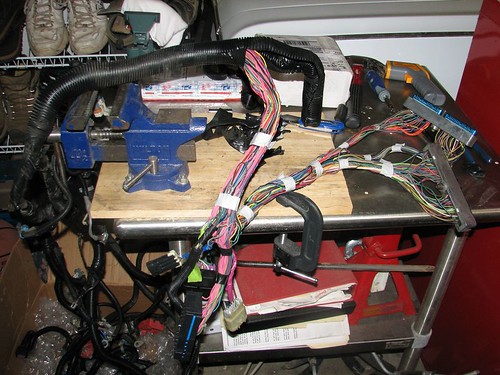
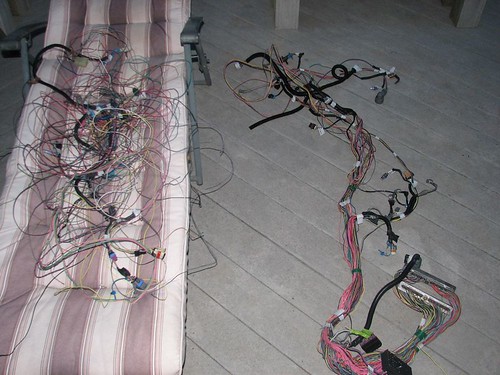
Another pic of finishing up wiring. I sat down at the table and went one wire at a time to make sure I got it right. Be patient and double check at each step. It is easy to do if you get it right the first time. It is a severe headache if you make a mistake and have to track it down later.

I know that most are going the other way, but I needed to do it so maybe someone else does also.
https://spreadsheets.google.com/ccc?...SOGozNlE&hl=en
Another pic of finishing up wiring. I sat down at the table and went one wire at a time to make sure I got it right. Be patient and double check at each step. It is easy to do if you get it right the first time. It is a severe headache if you make a mistake and have to track it down later.
Trending Topics
 05-30-2010, 09:02 PM
#9
Launching!
Thread Starter
iTrader: (1)
Join Date: Oct 2008
Location: Russellville, Arkansas
Posts: 215
Likes: 0
Received 0 Likes
on
0 Posts
I decided that the engine needed to be painted. I decided that I could not easily get all the surface rust off using wire brush or scraping or chemical cleaning. I got a portable sandblaster and a bag of "black diamond" blasting media from Tractor Supply. I taped off everything that I did not want to get blasting grit into. I then put on a clear faceshield and covered myself and the engine with an old bedsheet to contain the blasting spray. Holding a flourescent worklight in one hand and the blasting gun in the other, I blasted all the non-aluminum surfaces on the engine. These LSx iron block engines do not have much exposed iron. Front, rear, and valley covers are aluminum and the heads and oil pan are aluminum. Used about 60# of the 80# bag of "black diamond" and took about 1.5 hours to finish blasting. I will spend the next year cleaning black specs from stuff in my garage, even trying to contain it with the sheet. I then painted it with spray can self etching primer and then spray can krylon engine paint, cast iron grey color. It turned out exactly how I wanted it, a dark grey that has a bit of a gloss to it.

 What does everybody think about the color?

What does everybody think about the color?  06-01-2010, 12:10 AM
#11
Launching!
Thread Starter
iTrader: (1)
Join Date: Oct 2008
Location: Russellville, Arkansas
Posts: 215
Likes: 0
Received 0 Likes
on
0 Posts
Everything else is either plastic or aluminum. Rest will get cleaned, but most likely not painted. I just wanted to paint everything that could rust.
 07-21-2010, 10:52 PM
#13
Launching!
Thread Starter
iTrader: (1)
Join Date: Oct 2008
Location: Russellville, Arkansas
Posts: 215
Likes: 0
Received 0 Likes
on
0 Posts
396 is sold, removed and crated for shipment to its new home. Chevelle is now ready for 5.3/4l60E but engine is not ready for the chevelle.
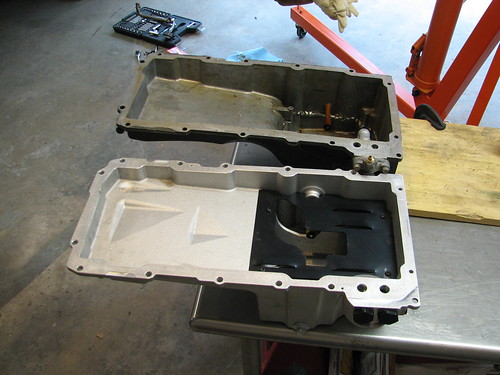
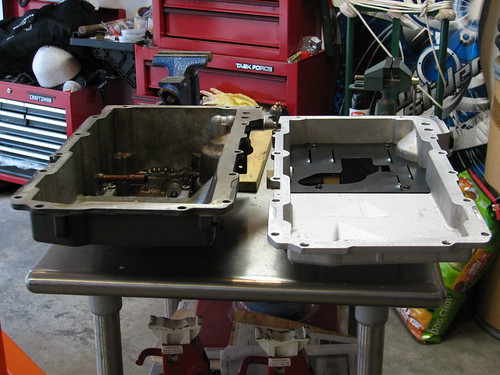
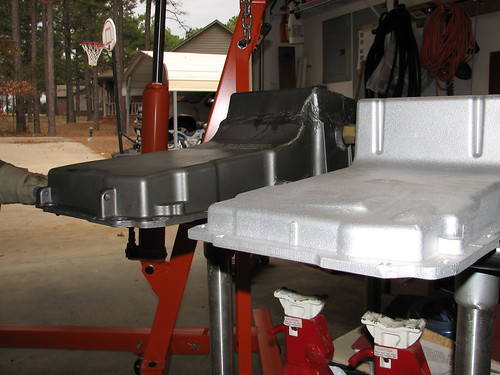
I accidentally dropped a nut into the engine while I had it upside down on the engine stand. Nut went through oil drain-back hole above cam and nested in a lifter pocket. Had to pull both heads to find it. Now waiting on cylinder head bolts and gaskets to put back together before putting in vehicle. Also have to get oil pan welded together. I cut about 2 inches out of the middle of the truck pan.
Before:

After: Notice my 20 yr old sons 2011 camaro in the background.

Packed and crated:


I accidentally dropped a nut into the engine while I had it upside down on the engine stand. Nut went through oil drain-back hole above cam and nested in a lifter pocket. Had to pull both heads to find it. Now waiting on cylinder head bolts and gaskets to put back together before putting in vehicle. Also have to get oil pan welded together. I cut about 2 inches out of the middle of the truck pan.
Before:
After: Notice my 20 yr old sons 2011 camaro in the background.
Packed and crated:
07-22-2010, 09:43 PM
#15
Staging Lane

Join Date: Mar 2009
Posts: 81
Likes: 0
Received 0 Likes
on
0 Posts
Looks sweet! In going to swap an 2007 5.3 in my 65 Conv. Chevelle when I get a lil more time & $. Just finished my 68 camaro with 6.0, love the ls motors! Got a 64 ss chevelle with the conv. As a package, needs a lot of wrk though.
12-30-2010, 10:33 PM
#16
Launching!
Thread Starter
iTrader: (1)
Join Date: Oct 2008
Location: Russellville, Arkansas
Posts: 215
Likes: 0
Received 0 Likes
on
0 Posts
6 months since last post. Short version is I started a business and it has taken most of my time as it is in addition to my job working rotating 12 hr shifts. Also cannot get engine to fit with the truck oil pan. I cannot get the engine to 3 degrees down due to interferrence between tranny and tunnel and oil pan and crossmember. Waiting on the Mast Motorsports pan, got one on pre-order and they keep telling me "next week".
I also recently bought a 2008 silverado with a 5.3/4l60E combo. I love the instrument cluster in this truck. Has anyone found a way to make that cluster fit in a 65/65 chevelle dash? It doesn't look possible to me but sure would be nice if someone could figure it out.
I also recently bought a 2008 silverado with a 5.3/4l60E combo. I love the instrument cluster in this truck. Has anyone found a way to make that cluster fit in a 65/65 chevelle dash? It doesn't look possible to me but sure would be nice if someone could figure it out.
02-19-2011, 10:27 PM
#19
Launching!
Thread Starter
iTrader: (1)
Join Date: Oct 2008
Location: Russellville, Arkansas
Posts: 215
Likes: 0
Received 0 Likes
on
0 Posts
Fuel system is 90% done, wiring is 90% done. Need to locate engine, arrange accessories, figure out exhaust (have a set of 98-02 F-body manifolds), and then all the little stuff like heater hoses and hood clearance and intake plumbing ect.
Lots left to do, and only 3 days off every 2 weeks at the moment. I have a lot of pics of stuff like the fuel system, engine mounts an54d such I need to get posted and up to date.
02-20-2011, 09:03 PM
#20
Launching!
Thread Starter
iTrader: (1)
Join Date: Oct 2008
Location: Russellville, Arkansas
Posts: 215
Likes: 0
Received 0 Likes
on
0 Posts
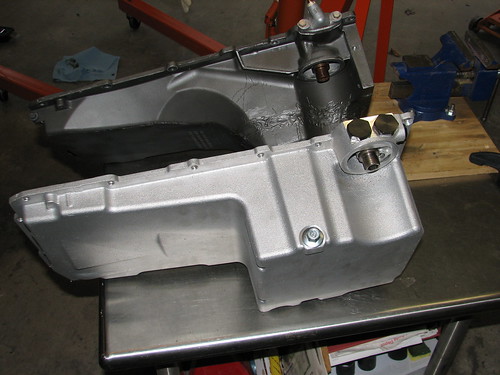
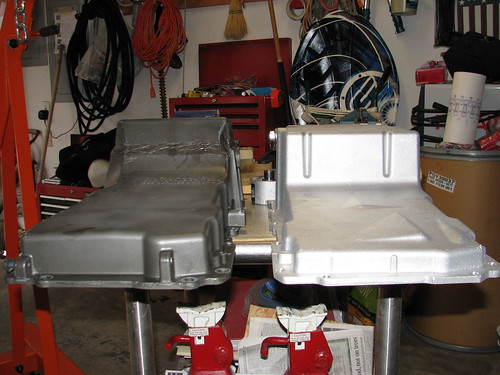
Mast pan installation completed today. Took some pics to show the difference between the Mast pan and a truck pan. I had sectioned 2" out of the middle of the truck pan but it still would not fit in my 64.