When you click on links to various merchants on this site and make a purchase, this can result in this site earning a commission. Affiliate programs and affiliations include, but are not limited to, the eBay Partner Network.
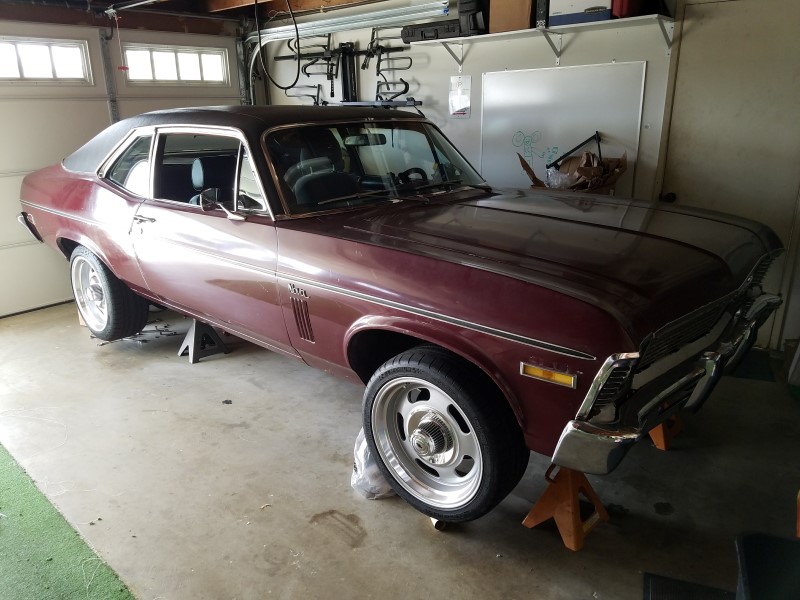
The car hasn't been on jack stands for a couple months and that felt weird so I put it back up where she's used to being.
Then I got the oil and filter changed. Fired it up to make sure it built pressure and everything is good.
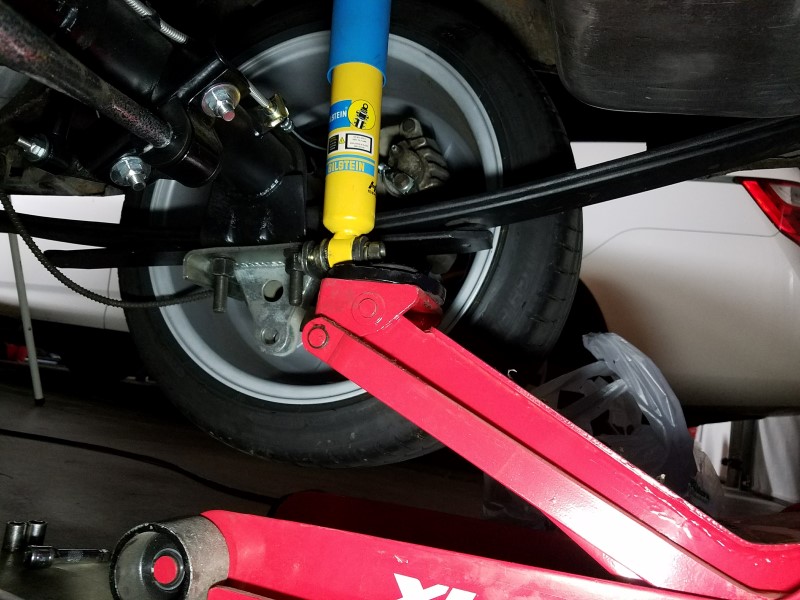
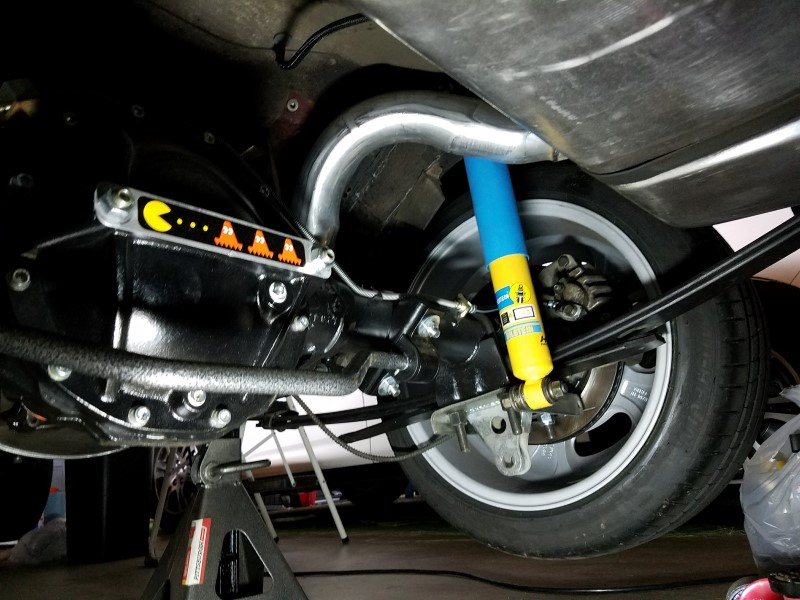
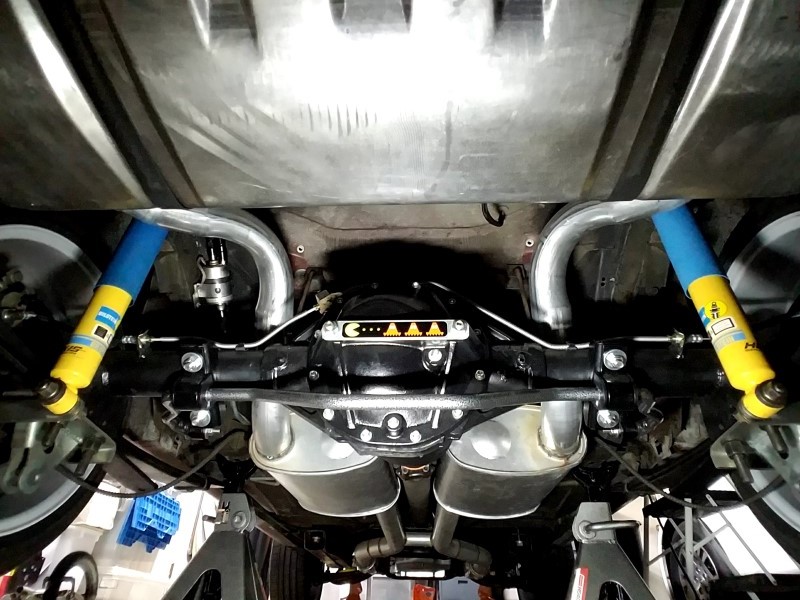
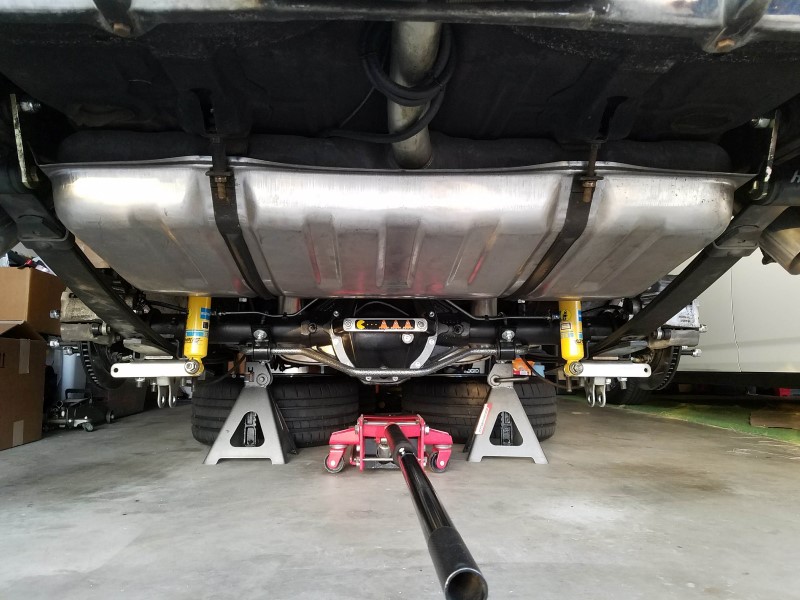
Then I took off the old KYB shocks in the rear and installed the new Hotchkis BIlstein shocks. I had to swap over the lower bushings from the old shocks because the new bushings were about 1/4" smaller ID and wouldn't fit over the mounting studs. I used a jack to compress the shock into place - makes it much easier to get things assembled.
I looked at my schedule and decided to start working on the brake swap. More on that later.
I decided to put off the driver's seat swap and take a stab at the brakes. I have 12 days now until autocross, but my son's baseball season ended last week (opening up several nights a week), I've got a 3 day weekend coming, and the autocross is Sunday (leaving Saturday just in case). I also worked my butt off last weekend assembling/installing cabinets, crown moulding, shelves, and other "stuff" for my wife's craft room, so hpoefully that will buy me some garage time as needed to get through the front brake swap.
Before taking anything apart on the car, I figured I should clear my workbench and do any preassembly work/checks that I can. This way if something doesn't work out, the car is still driveable. Just clearing my workbench took a good hour, but it's nice to have a clean space for once.
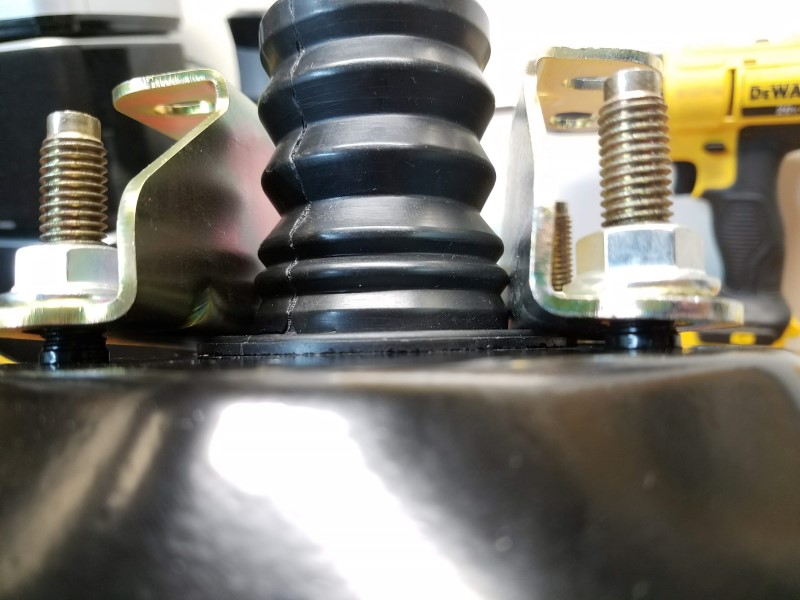
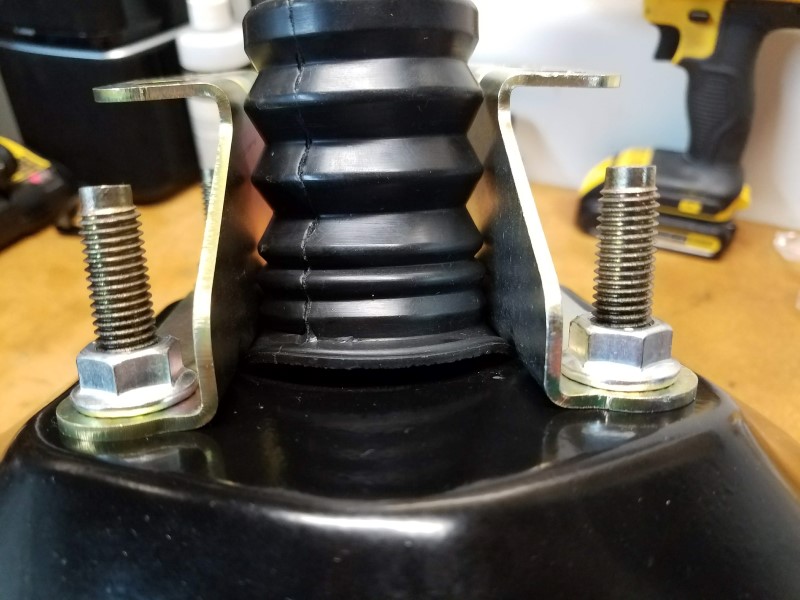
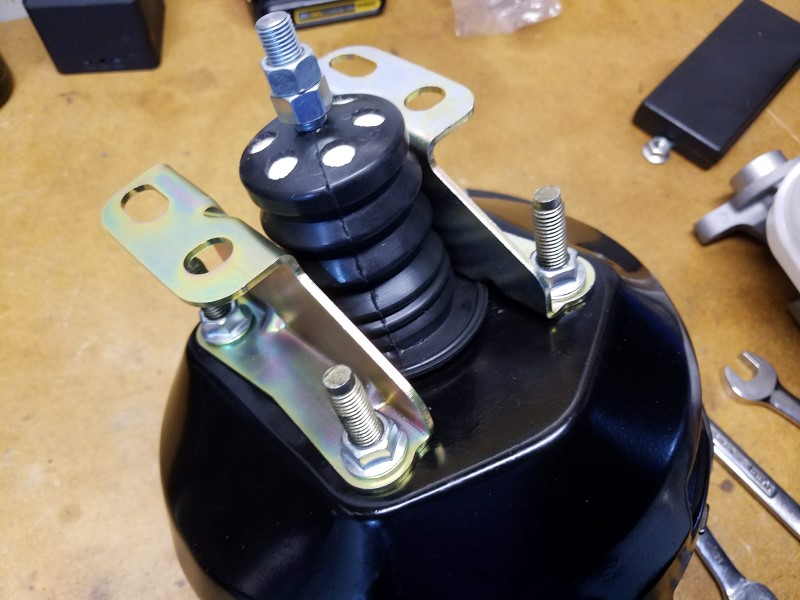
First, I put the low-angle DSE booster brackets 050302 onto the Tuff Stuff 2229NC booster. I noticed the brackets sit on top of the boot/bellows
When snugged down, the boot/bellows distorts a bit. I contacted Tobin at Kore3 (who recommended this master/booster/bracket combo) and he said this is normal and doesn't cause any issues. Personally I don't think this is ideal and I'm thinking I may cut some spacers that contour around the boot so it doesn't do this.
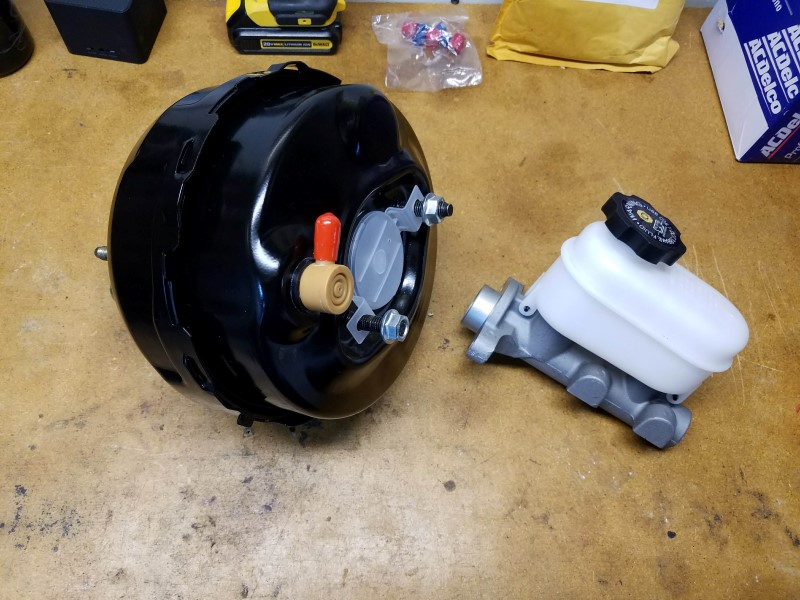
That was snag #1. Next I decided to try mating the 18M974 master to the 2229NC booster.
One thing I've read to look out for is pushrod to master clearance. If the booster pushrod interferes with / presses against the piston in the master upon assembly, it can cause the brakes to lock up because the piston isn't allowed to fully return to the released position. If the pushrod has too much clearance, there can be a lot of extra pedal movement. Ideal clearance is around 0.020in.
So of course when I put the two parts together, I ran into snag #2: the pushrod is interfering with the master piston. I could feel the springs just pushing the master on by hand. When I removed the reservoir cover I could clearly see the piston moving through the intake port. Here is a video
Here is a view down inside the reservoir. The hole on the left is the intake port closest to the booster. This photo is with the master separate from the booster and you can see the back of the piston through the port.
Here is another photo after attaching the master to the booster. The piston has moved because it interfered with the booster pushrod and you can no longer see it through the intake port. I can't tell for sure if the cup seal has moved past the compensating port (the hole on the right); if so that would seal it off and prevent bleeding the system or could lead to lockup. I would rather not risk that!
Based on the size of the hole and how far it moved, I'd estimate there is 0.050-0.060in interference right now. Unfortunately the pushrod on this booster is not adjustable, so I will have to shim the master away from the booster to correct the clearance. I will pick up some shim washers today and see what I can come up with. Once I get the master/booster worked out, I'll start assembling the new hubs.
Put washers on the studs to space it out and see how thick they need to be to stop the valve from opening, then you'll know how much needs to come off the push rod.
What is wrong with using shim washers permanently? I'm not too keen on grinding the pushrod which is irreversible. If I ever have to swap the master I can reshim or eliminate the shims if they're not needed.
Not sure it if would be safe or not, I'm not sure if it would rock and make strain. I'm an over kill type of guy. You could get the washer thickness then get piece of aluminum and make it the shape of the master mating surface and use it like that.
What is wrong with using shim washers permanently? I'm not too keen on grinding the pushrod which is irreversible. If I ever have to swap the master I can reshim or eliminate the shims if they're not needed.
The MC should be flat against the booster. That's what gives it stability.
I agree with Andrew - washers wouldn't be able to prevent the MC from moving in a direction normal to the pushrod force, and vibration would be exascerbated.
Try this:
Create a spacer template using cardboard
Shim the MC using washers, to get an idea of thickness
If you don't think you can make the spacer in time, run the washers short-term, channeling them into a U shape prior to final assembly for ease of removal
Create a spacer with cutouts at the mounting stud holes (and possibly center hole) to drop in at a later date, as shown below. I doubt you'd be able to move the MC enough to clear the mounting studs, but the brake lines would likely have enough give that the center hole wouldn't need to be channeled.
Sage advice and good ideas, thank you. I think this may be a sign to leave the car as is for autocross. Plenty more opportunities for little gremlins like this to cause delays.
I am going to try measuring the pushrod protrusion and see if Tobin @ Kore3 can compare to one on his shelf. If the booster pushrod protrusion is off, I could exchange the booster. If not, I could exchange the master. Maybe one would solve the problem. Tobin checked a pair on his shelf and they didn't have interference like this.
I'm sure I can work through the master/booster interference, but I've decided I will do the brake upgrade AFTER autocross. I also don't want to risk running into issues I can't resolve over the next week. I'm a little disappointed because the current brakes aren't working as well as I'd like and I really want to try out more deep/late corner braking and trail braking this autocross. Oh well - that leaves something fun to try out for the next autocross. Meanwhile I am really looking forward to trying out all the new suspension and tire changes.
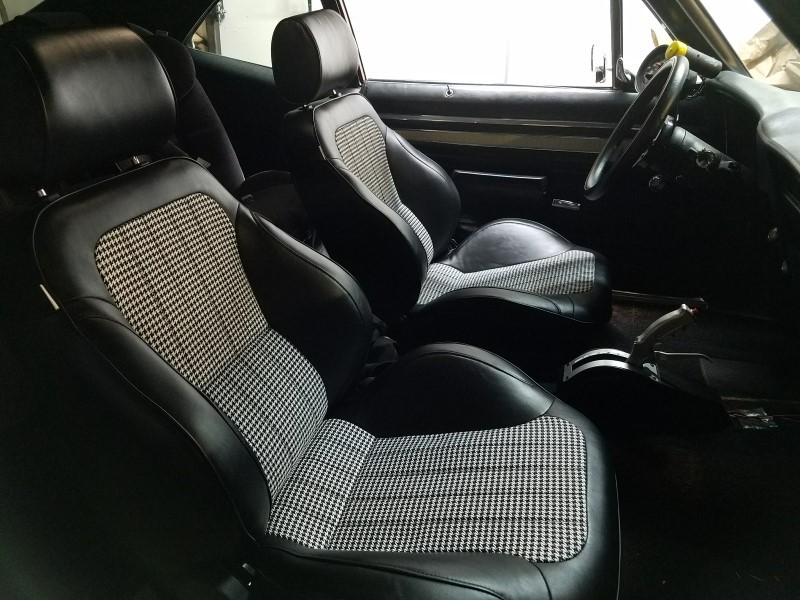
Last night I managed to get the driver's side seat in, completing the install for the Procar Rally houndstooth seats
I am absolutely in love with how these seats look in the car. I am pretty happy with how they feel too. With the high and tight bolstering I feel a lot more integrated with the car. It should help a lot in autocross. I'll share more impressions after I get more "seat" time.
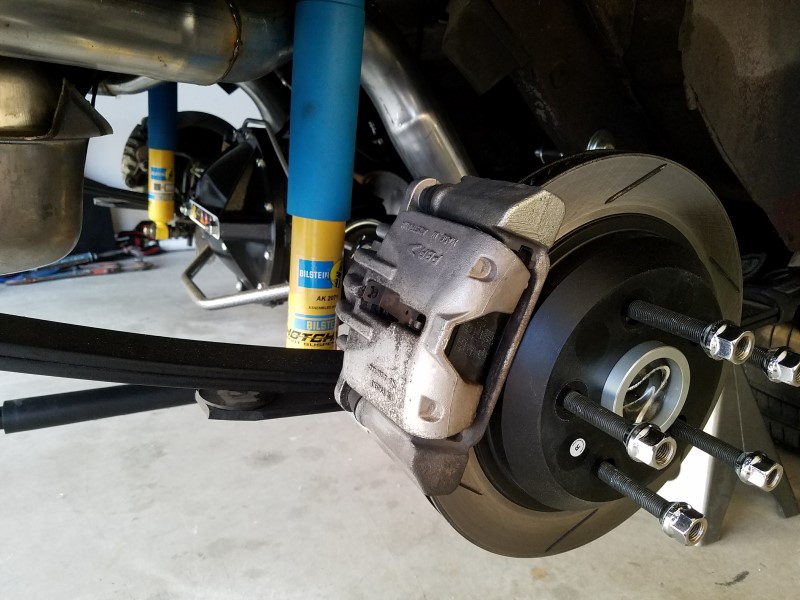
Got the car off stands today and took her for a spin. Found an openish parking lot to practice autocross maneuvers and found the brakes will be a major factor. Front left locks up too easily and it makes it tough to drive deep. There's not nearly enough time to swap the whole system now, but I may try swapping the front right hose and rebleed assuming/hoping it's the hose and not the caliper itself. Seems like it might be worth a shot.
The good news is the seats feel great. It's much more fun to swing the car around now that I'm not swinging around inside of it. The rear shocks are also noticeably better.
Nice job on the seats. Are you using ProCar seat frames? Do you find yourself kissing the roof? My seats sit too high, need to modify the frames to lower them even more. Using the lowest setting on the seat bracket as well.
As for the brakes, that is very odd what you are running into. I have the same setup and I did not have that issue. In fact I had some play between pushrod and MC piston when all bolted together. I ended up by taking the brake pedal pin off, this way i could set the clevis and the pedal correctly by sliding the brake pedal in and out until it matched.
I am using the Procar seat frames, specifically their "bench conversion" frames. I am 6'0" tall and I have head clearance even with a helmet on. I could see wanting them lower but I didn't feel high in them on my initial drive. Looking at the frame stands I think you could lower them roughly 3/4" by cutting the mounting tabs off and rewelding them plus trimming off the lower (unused) mounting positions from the sliders. I have also seen people make their own mounting brackets to get the seats as close to the floorpan as possible.
It is odd that I have booster/master interference. I will probably end up trimming the pushrod. The pedal adjustment has nothing to do with this interference; the booster/master need to have pushrod clearance when assembled together, regardless of the pedal adjustment. The pedal rod adjustment really just sets the initial pedal position relative to the brake switch. If you're adjusting it to take up clearance between the MC pushrod and the master, you might be engaging the booster all the time which could cause an unintentional lockup.
It is odd that I have booster/master interference. I will probably end up trimming the pushrod. The pedal adjustment has nothing to do with this interference; the booster/master need to have pushrod clearance when assembled together, regardless of the pedal adjustment. The pedal rod adjustment really just sets the initial pedal position relative to the brake switch. If you're adjusting it to take up clearance between the MC pushrod and the master, you might be engaging the booster all the time which could cause an unintentional lockup.
I was giving a small tip as for the pedal adjustment, I found it easier by having the pedal free to adjust the clevis. I might have expressed myself incorrectly, sorry about that. LOL
As for the pushrod and MC piston that is a whole other story.
Sorry I probably just wasn't following well. My plan for the booster rod to pedal adjustment is to first adjust on the bench to match the distance from the mounting brackets to the eyelet between the old and new boosters. Then once I get it in the car, I will see if that lines up well with the pedal before installing the clevis pin. If the pin goes in freely and the brake light is working properly I think that's good?
I made it to autocross on Sunday - had a phenomenal day of racing with the Nova and family! It's a completely different car compared to a year ago. I drove it hard and it did nearly everything I asked of it. All the hard work on the rear suspension and new tire setup was worth it! I'm still coming down from the adrenaline two days on!

 05-22-2018, 02:56 PM