
1971 Nova Swap - 02 LS1/A4
 02-08-2012, 01:31 PM
#81

He was one of the better shops in the area.. $450.. I had a few cheaper quotes.. but would have had to travel to get to them. so it was a wash..
When I did my Chevelle Frame. I did that, the radiator support and a few other items.. It was $380 !.. but the shop moved or closed now. If you can find a industrial shop that does PC and not a shop the is know for Auto part.. it is cheaper.. cause they well just throw it in with some other batch of work to be done.
When I did my Chevelle Frame. I did that, the radiator support and a few other items.. It was $380 !.. but the shop moved or closed now. If you can find a industrial shop that does PC and not a shop the is know for Auto part.. it is cheaper.. cause they well just throw it in with some other batch of work to be done.
 02-08-2012, 02:33 PM
#82
That is what I am hoping for. In the Midwest we are blessed to be surrounded by lots of small to mid size manufacturing shops. I am hoping to find one that will throw my subframe and other small parts in for a little scratch.
As a side note, I found that many monument/headstone shops have blasting ability. I called a local shop and I was leery about asking him to blast some headers for me. But to my sursprise the guy said sure, that actually the abrasive blaster sees more use on headers, car parts and small trailers then anything the shop produces! He quoted me $60/hr, and said a set of headers was about 30 minutes. Just and FYI.
As a side note, I found that many monument/headstone shops have blasting ability. I called a local shop and I was leery about asking him to blast some headers for me. But to my sursprise the guy said sure, that actually the abrasive blaster sees more use on headers, car parts and small trailers then anything the shop produces! He quoted me $60/hr, and said a set of headers was about 30 minutes. Just and FYI.
02-09-2012, 12:26 AM
#83
Teching In
iTrader: (2)

Join Date: Jul 2011
Location: wash ch ohio
Posts: 17
Likes: 0
Received 0 Likes
on
0 Posts
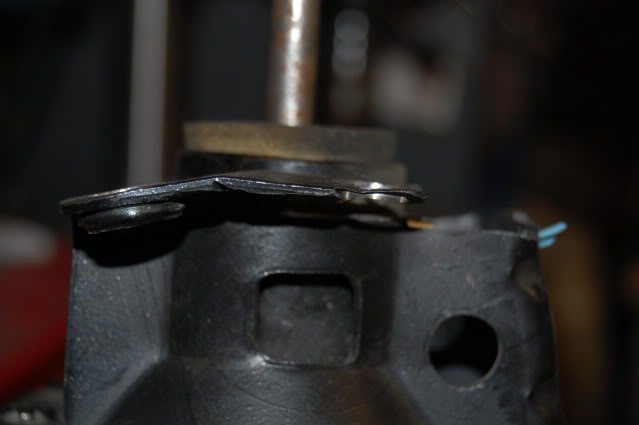
Craig73 - I am still in the process of doing the booster. From looking at in the daylight this morning. I am thinking I will reposition the hole. .as the 4th gen one has the rod coming out of it centered between the mounting bolts. The Nova has the Rod coming out of the firewall level with the bolt.
I cut the bolt off at the base of the 4th Gen booster, plan to use the Nova bolt on the firewall/pedals. I drilled the hole to the correct size. But since I plan to reposition the bolt hole.. I will cut the flange off and weld a new flange on making the Booster/Master level, else it would be at a angle. I have not addressed the rod yet.. I'll get to that later. From FroJoe project, the rod is +5" from the firewall.
The A-Arm seem good, but well have to find out once I get the car on the road. They are POL's. One item I didn't like was the Adjustable Caster Insert.. they are made of cheap alum or metal. I had to order some extra cause i cracked them by over tighting them. I now use washers between the nut and insert to spead the load more evenly.
02-15-2012, 02:13 PM
#84
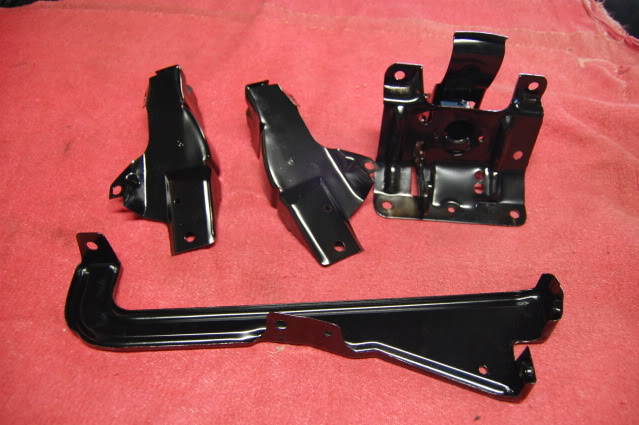
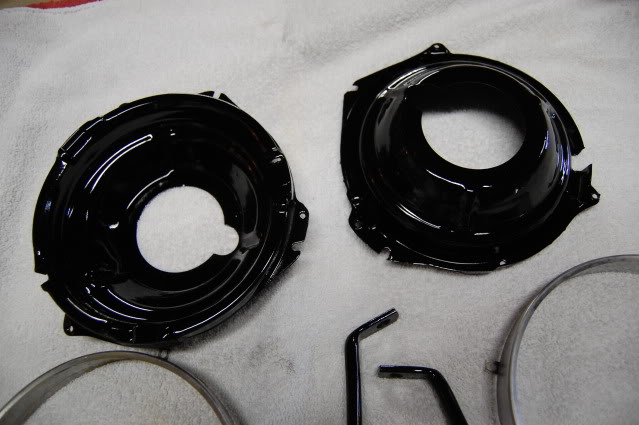
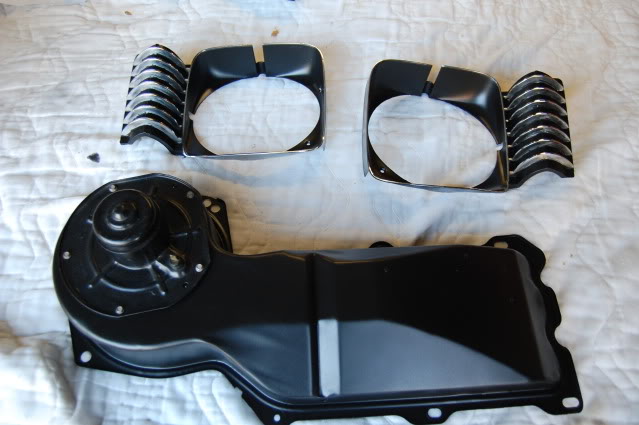
I started to clean up the Radiator Support, inner frenders and make a quick temp Spray Booth..
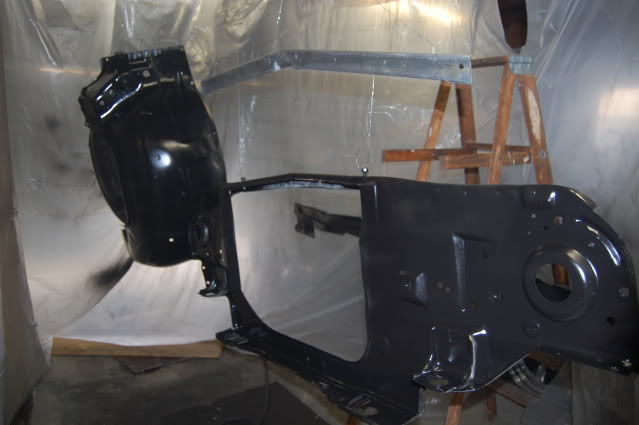
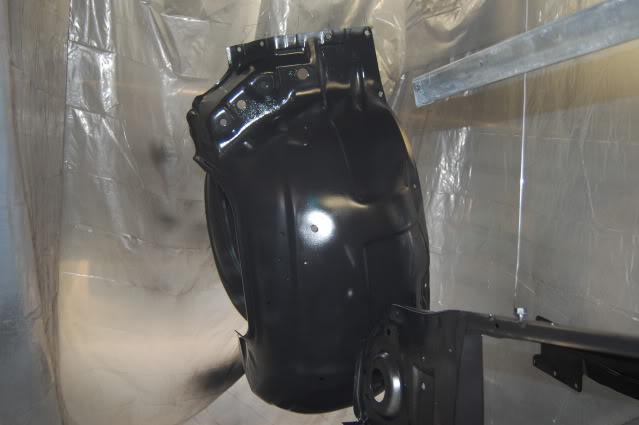
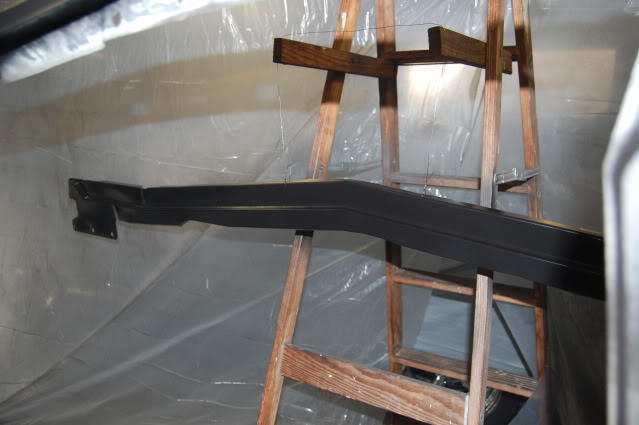
I also did a bit of Powder Coating on some of the Frontend parts.
Headlight buckets

What I am working on now: converting the heater Core to a BB one, finishing up the Brake Booster and some of the Body/Frontend wiring.
Well post more later as I make progress.
BC
I also did a bit of Powder Coating on some of the Frontend parts.
Headlight buckets
What I am working on now: converting the heater Core to a BB one, finishing up the Brake Booster and some of the Body/Frontend wiring.
Well post more later as I make progress.
BC
03-03-2012, 12:10 AM
#85
Got around to doing a little work, Cleaning up and refinishing parts. I am still waiting for more parts. I have a rule, If I remove/touch it. it has to be R n R'd.. refinished or replaced.
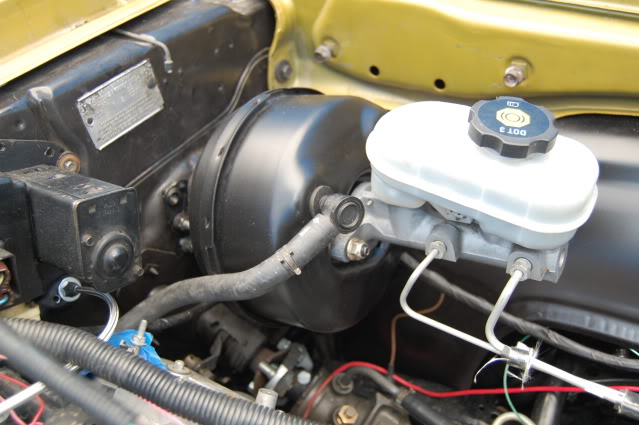
Got the 4th Gen Brake Booster and Master installed. I welded some metal to the bracket, as the Booster mounting holes didn't line up.
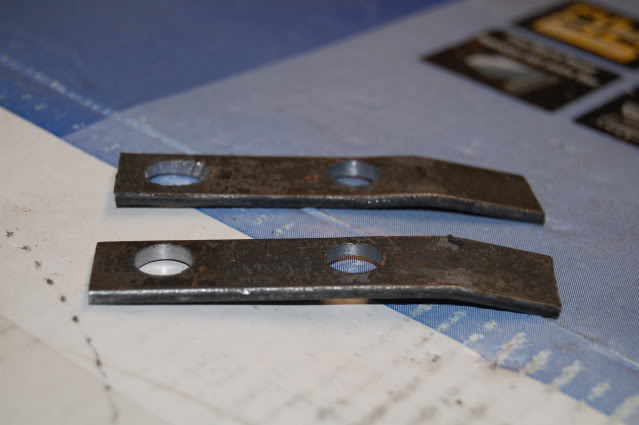
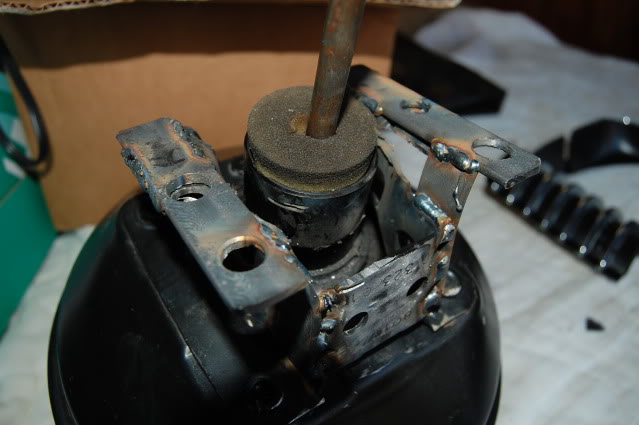

I cut the U-Rod from the Nova and the 4th Gen Booster. Then used a tube, inserted them in and welded them together.
I will have to order some new Brake lines, P-Valve, Adjustable valve and other parts to complete the brake system.
I pulled the Brake / TCC Switch from the 02 Camaro along with the connector. I will wire it up soon, but it mounted up without any issue.
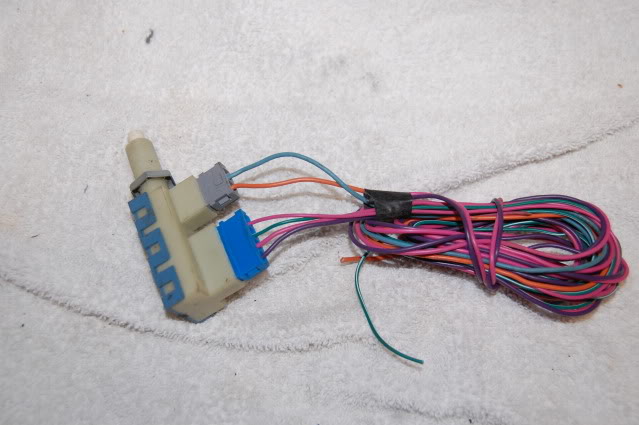
Disassembled the connectors and picked up some new terminal to wire up the harness to.
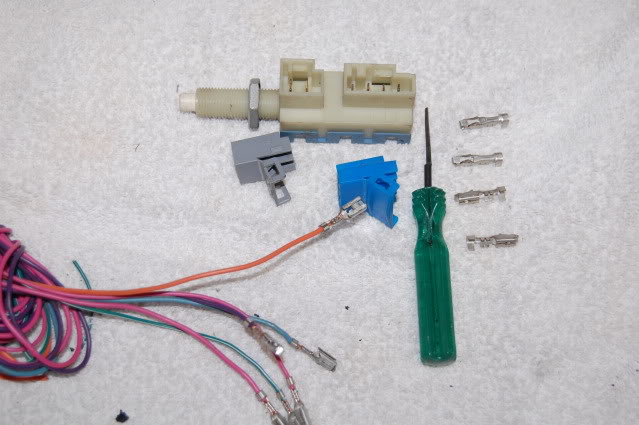

Swapped the Nova single switch for the Camaro's brake/TCC switch. Fit right in.
I got some new terminal end and joinned the wires together for the starter using the Weather pack..
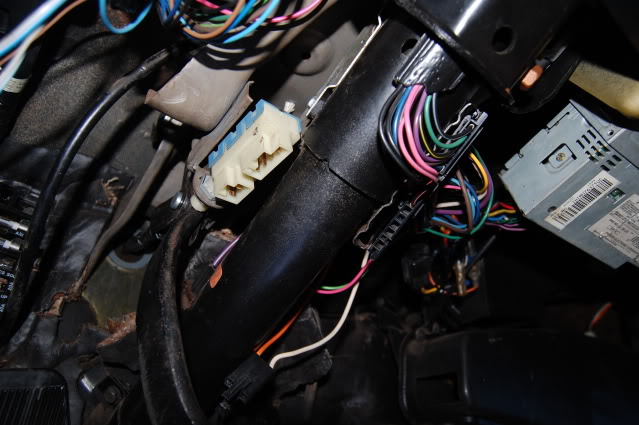
Most likely will drill an hole right where those two holes are and pass the Harness through for the PCM to be mounted above the Glove box.
Also got the BBC heater core in, waiting for the box hose bracket to complete mounting the heater box.
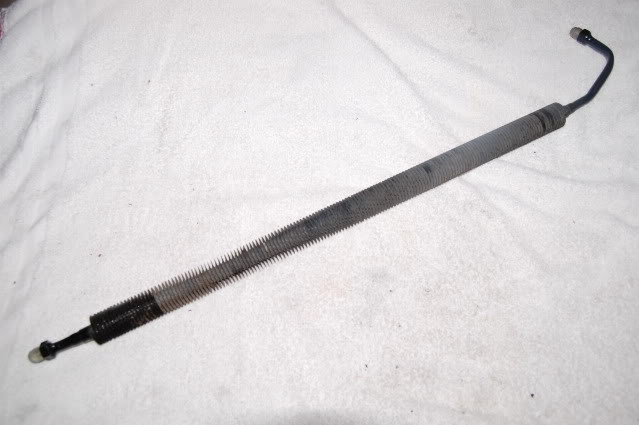
Installed the Lokar Throttle Cable and cut it to the correct length. I've put most of the sheet metal back on for now. Kinda nice to see the fender back on LOL. I needed to be able to see where and how to route the Harnesses and Fuse box.
Got the 4th Gen Brake Booster and Master installed. I welded some metal to the bracket, as the Booster mounting holes didn't line up.
I cut the U-Rod from the Nova and the 4th Gen Booster. Then used a tube, inserted them in and welded them together.
I will have to order some new Brake lines, P-Valve, Adjustable valve and other parts to complete the brake system.
I pulled the Brake / TCC Switch from the 02 Camaro along with the connector. I will wire it up soon, but it mounted up without any issue.
Disassembled the connectors and picked up some new terminal to wire up the harness to.
Swapped the Nova single switch for the Camaro's brake/TCC switch. Fit right in.
I got some new terminal end and joinned the wires together for the starter using the Weather pack..
Most likely will drill an hole right where those two holes are and pass the Harness through for the PCM to be mounted above the Glove box.
Also got the BBC heater core in, waiting for the box hose bracket to complete mounting the heater box.
Installed the Lokar Throttle Cable and cut it to the correct length. I've put most of the sheet metal back on for now. Kinda nice to see the fender back on LOL. I needed to be able to see where and how to route the Harnesses and Fuse box.
Last edited by bczee; 03-10-2012 at 01:06 PM.
03-03-2012, 12:15 AM
#86
After making the mount on the Booster, the hole did line up ok and I didn't have to enlarge the hole any. The plastic cover is a bit tight, but sealed up against the Firewall and Rod Hole.
Also.. after mounting it to the firewall.. the extentions should be flat as is the the old bracket. I didn't have to angle it any after all.. I flatten it back out.
BC
Also.. after mounting it to the firewall.. the extentions should be flat as is the the old bracket. I didn't have to angle it any after all.. I flatten it back out.
BC
03-04-2012, 08:00 PM
#87
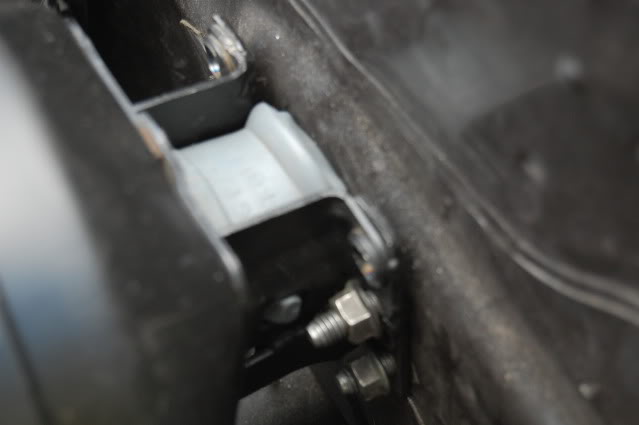
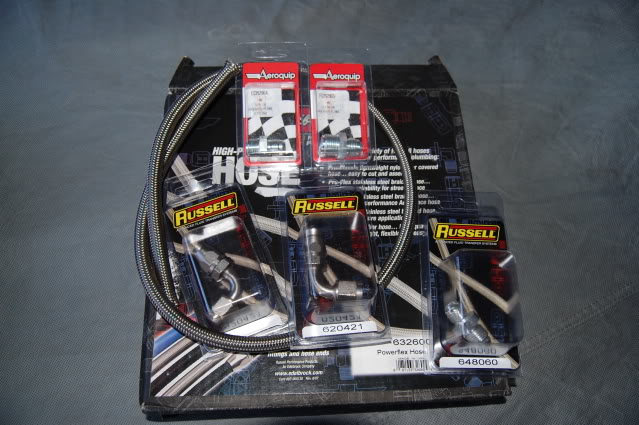
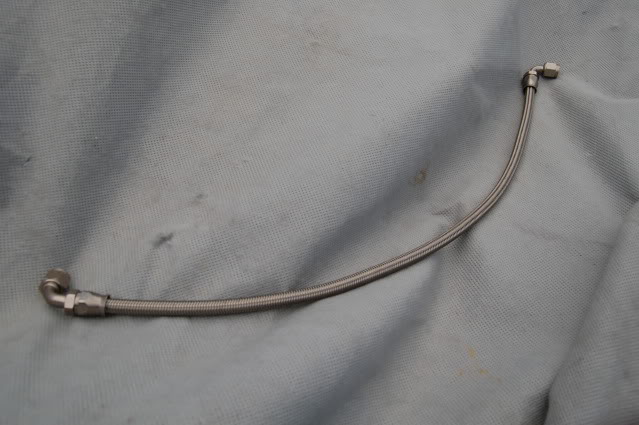
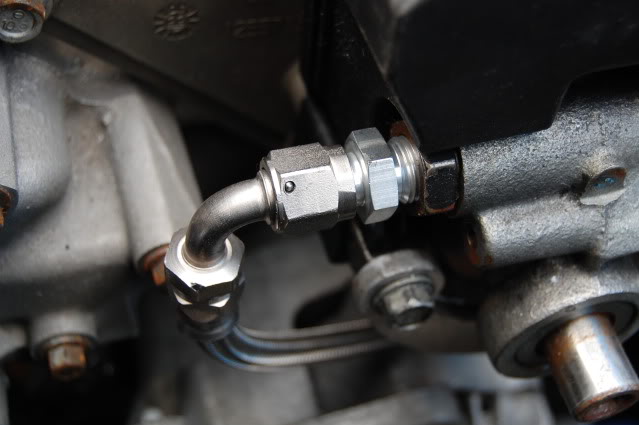
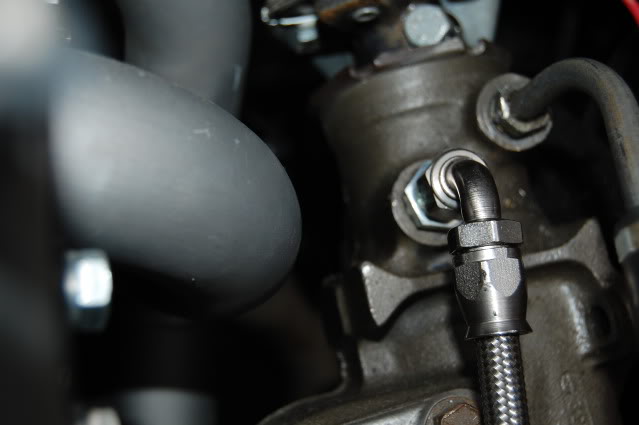
Put together the power Steering High Pressure side. I will do the low side once I find a cooler. Might use a Camaro one or aftermarket one.
Used the following:
Russell
620421 90 degress Endura Hose End
648060 O-ring 16mm x 1.5mm to AN Adapter (power steering Pump).
632600 Power steering / Teflon line SS Braide hose.
Aeroquip
FCM2964 for the power steering to AN -6 to 5/8-18 Inverted Flare.
FCM2965 for the power steering to AN -6 to 11/16-18 Inverted Flare.
 03-10-2012, 12:30 PM
#89
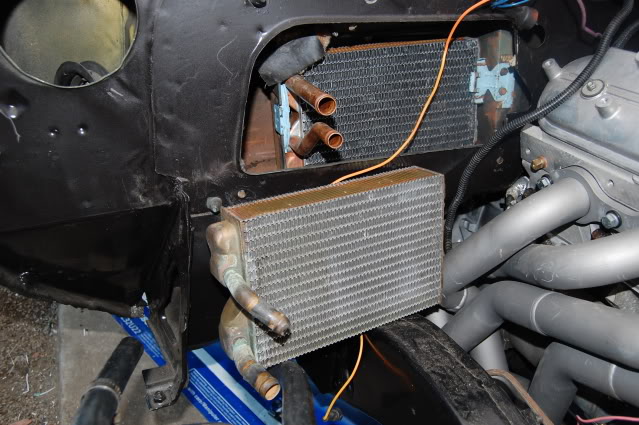
I took the cheap route on doing a BBC Heater Core Conversion. I just picked up a Heater Core from the local parts store, order the BBC holes gasket and bracket, used the old SBC core retainers..
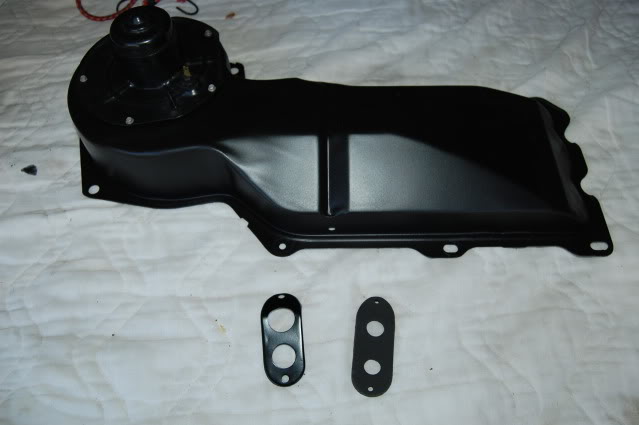
Put the gasket and bracket in place to use as a template to drill the holes for the core tubes.
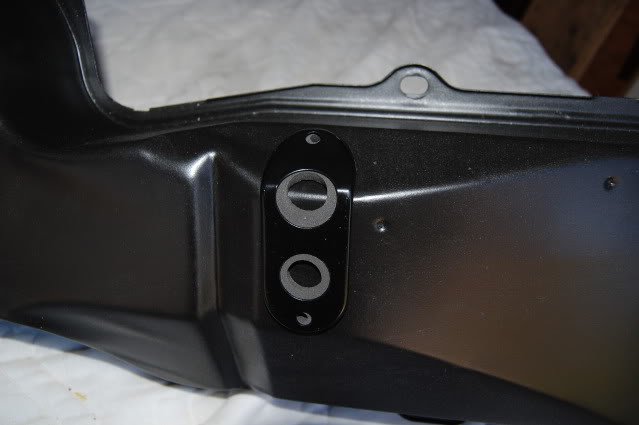
Just drilled a 3/4" and about a 1" hole for the tube to stick out.
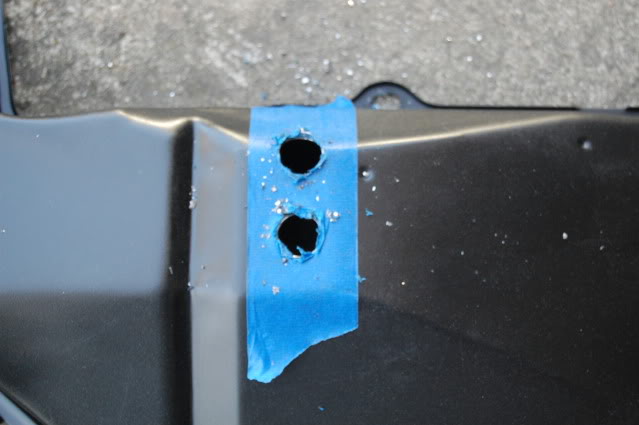
Finshed !
The rest is just normal hose routing and sealing the box. But waiting until I get a seal for the old SBC and making sure the Wiring Harness is in place.
BC
Put the gasket and bracket in place to use as a template to drill the holes for the core tubes.
Just drilled a 3/4" and about a 1" hole for the tube to stick out.
Finshed !
The rest is just normal hose routing and sealing the box. But waiting until I get a seal for the old SBC and making sure the Wiring Harness is in place.
BC
Last edited by bczee; 03-10-2012 at 01:01 PM.
03-10-2012, 12:42 PM
#90
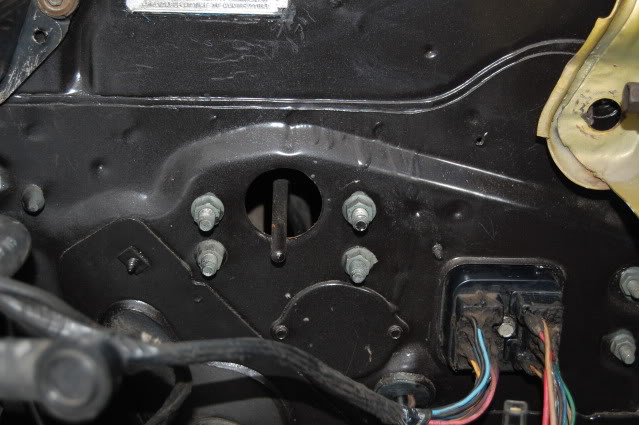
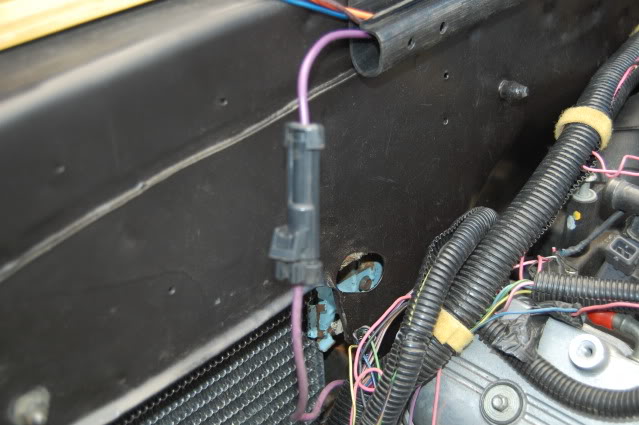
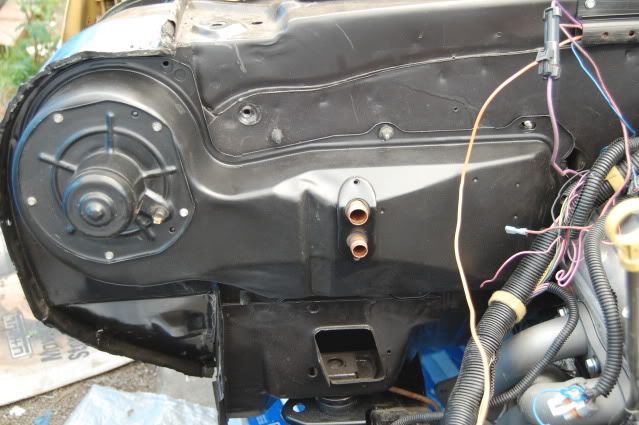
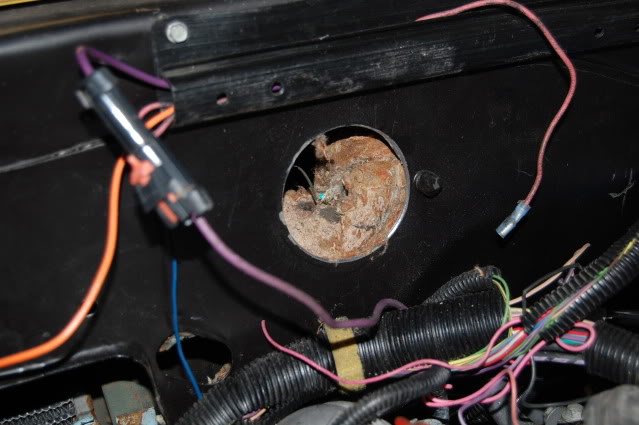
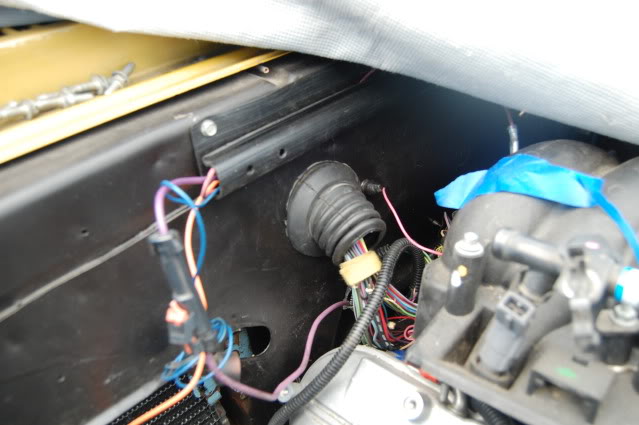
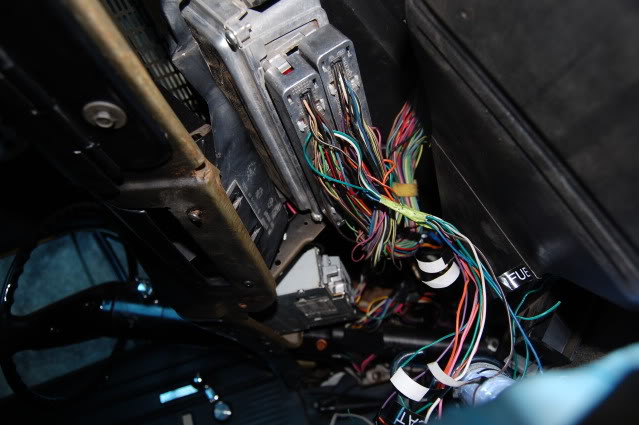
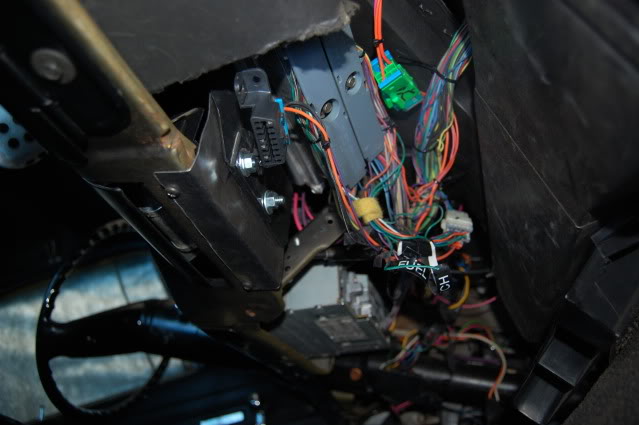
I figure I could mount the PCM right behind the Ask Tray and run the Harness through the firewall just Right of center behind the engine.
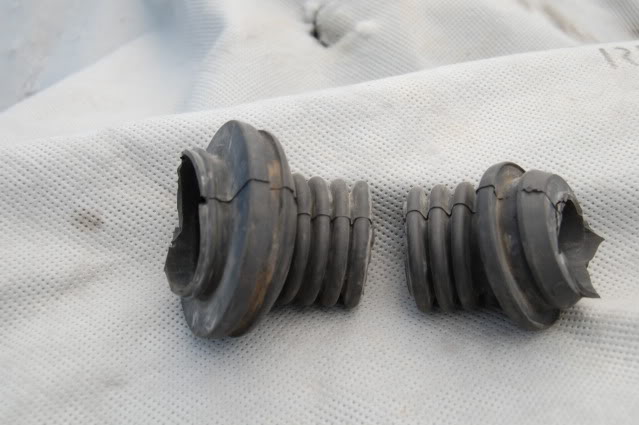
I found a cheap solution for a Gromet for the Firewall.. Since I parted out a 02' Camaro. I found that the Rubber conduct that goes between the body and the Door for the speaker and switches. I cut it in half, if I need it longer, I got a second one !
Drilled a 2 3/4" hole
Fit like a glove. !
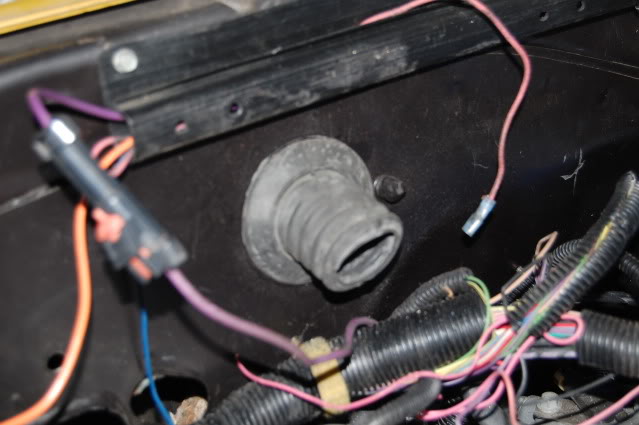
It was a tight fit for the connectors to go through, but a little WD40, removed the gray connector shield and one conector at a time, it worked out.
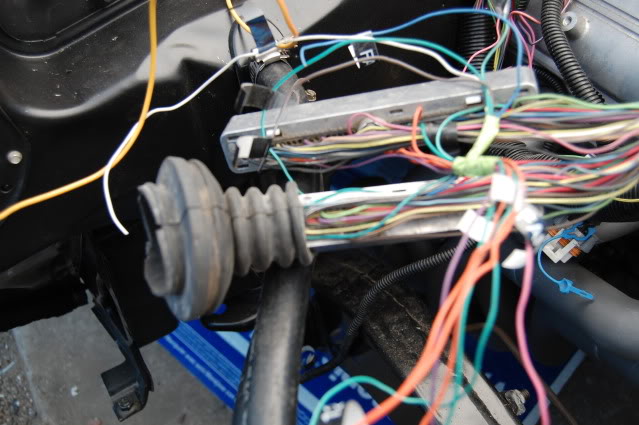
Next I am going to mount the PCM and trial fitting. Well need to make a bracket, but a little more time and trial.. it should work out.

Thats it for the updates.. working on finishing up the Harness, fuse box and harness, Trans Lines, powersteering lines and a cooler. I found a cooler from a old Acura that I had parted out a while ago, trying to figure out how to mount it up. A little at a time.. but it is moving along.. slowly..LOL
Saving some to order new SS tubing kits for the Brakes and Fuel, along with some more AN fitting and SS Braided hose.
BC
I found a cheap solution for a Gromet for the Firewall.. Since I parted out a 02' Camaro. I found that the Rubber conduct that goes between the body and the Door for the speaker and switches. I cut it in half, if I need it longer, I got a second one !
Drilled a 2 3/4" hole
Fit like a glove. !
It was a tight fit for the connectors to go through, but a little WD40, removed the gray connector shield and one conector at a time, it worked out.
Next I am going to mount the PCM and trial fitting. Well need to make a bracket, but a little more time and trial.. it should work out.
Thats it for the updates.. working on finishing up the Harness, fuse box and harness, Trans Lines, powersteering lines and a cooler. I found a cooler from a old Acura that I had parted out a while ago, trying to figure out how to mount it up. A little at a time.. but it is moving along.. slowly..LOL
Saving some to order new SS tubing kits for the Brakes and Fuel, along with some more AN fitting and SS Braided hose.
BC
Last edited by bczee; 03-10-2012 at 07:13 PM.
03-10-2012, 12:58 PM
#91
Instead of buying a BB core I have heard you can just flip the small block heater core. This moves the inlet and outlet to the middle of the heater box. Ive never tried it but do you know if it will work? I'll post this question over at Steves Nova Site too.
Kirk
Kirk
03-10-2012, 01:24 PM
#92
You could, but the Tubes on the SBC ones would not line up well.. you might be able to Bend and solder some new tubes on.. !
If flipped as compared to BBC (Mounted) and the SBC
See the tubes..
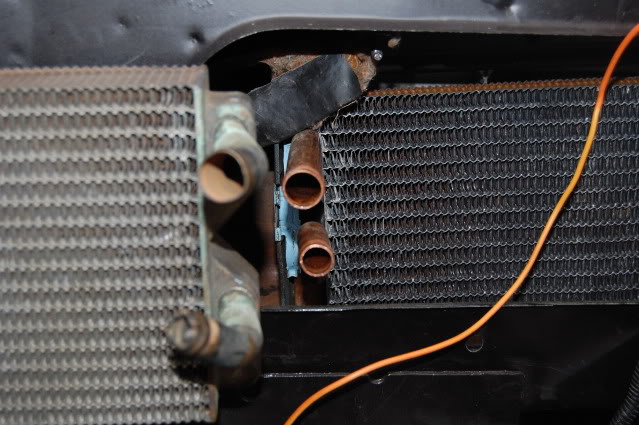
Not impossible, but would be more work that I want to do.. and I needed a new core anyway.. Cheap Insurance as long as you have it out. !
BC
If flipped as compared to BBC (Mounted) and the SBC
See the tubes..
Not impossible, but would be more work that I want to do.. and I needed a new core anyway.. Cheap Insurance as long as you have it out. !
BC
03-13-2012, 06:32 AM
#95
Teching In

Join Date: Feb 2012
Posts: 8
Likes: 0
Received 0 Likes
on
0 Posts
sorry to bring up something if already discussed, but you mentioned you used a RetroLSX Oil Pan.... does this require modification of the sump line (sorry if wrong terminology)? how much is a pan like that gonna set me back?
thanks
thanks
03-13-2012, 08:10 AM
#96
Bczee, thanks for the info on the SB to BB heater core swap. since I have the old one out right now, might as well replace it, and if I can get the BB core for nearly the same price might as well do that and just eliminate the chance of engine interferance. Plus it is a pain to get to the SB core tubes with the engine in place.
I had to replace the heater core right after I got my Nova when I was 16. Of course it failed during a rainy Washington winter. And I was working without a garage, on a gravel driveway using a Autozone 50pc tool kit...ah memories
I am also following your thread over at Steve's, more NOVA specific details there. Thanks for the link to the O'rielly's info on the BB heater core. I will be ordering one soon I suspect! Keep up the good work!
03-14-2012, 10:09 AM
#97
Taylor.. your welcome. I guess if you can recall the good old day. This should be a simple swap for you.. LOL.. Yeah.. I remember them days too.. lots of them..
Anyway, That Cooler that I got from the Accura... I brazed some AN fittings on the end of it, I will moc it up under the Radaitor and route with SS Teflon Line Power Steering Hose and AN Fittings. I am just trying to figure out a way to attached the return hose to the reservoir, as most have found out, not many options.. other than a rubber hose (or SS without the liner) and a hose clamp.
I'll get more picture of this later. Right now it is raining outside and I have to wait until the ground dry so I can get under the car.
BC
Last edited by bczee; 03-14-2012 at 10:25 AM.
03-14-2012, 10:22 AM
#98
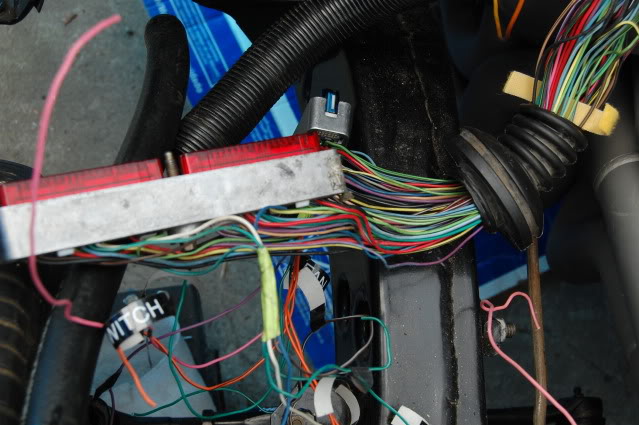
Well as I was planning on using the F-Body fuse box. I had it all wired up and all. But after many attempts to figure out how to mount it and where to mount it.. I have decided to not use it as it was just too much trouble to mount the fuse box, as there are no mounting point on the boxes housing that would work. I also couldn't find a good location that I like without look junky.. I was trying to copy or simulate the OEM harness (C100, etc). I had the box and harness figured out.. but the Mounting killed the effort.
So I have decided to do a stand alone Fan Relay and Harness with inputs from the PCM and a more Conventional Fuse Box under the dash for the circuit that require Fuse; Ign hot and Battery to the PCM, Injectors and Coils
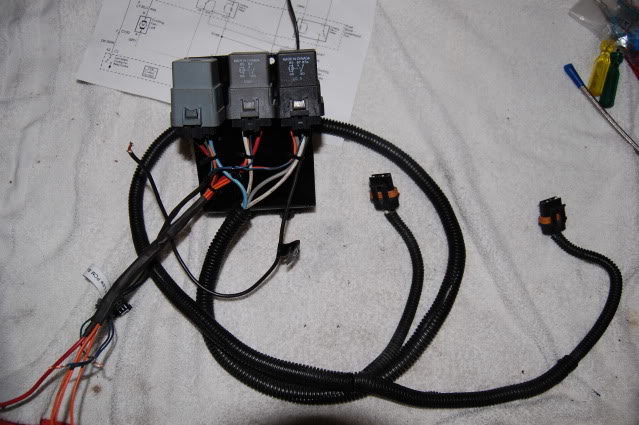
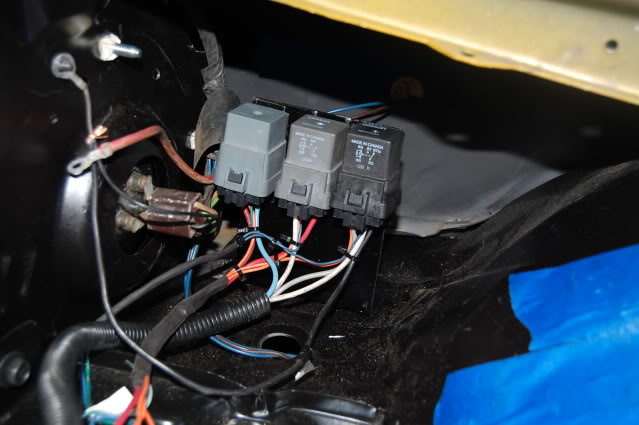
I mounted it in the Fender well next to the Battery. Will clean up the wiring soon.
It was not a waste of time, as it was a good thing to learn about the wriing and connectors/terminals.
I'll get to the under dash fuse box later, will use some Painless Aux Fuse Boxes. Waiting for the rain to stop.. could be a few day they forcast...!
BC
So I have decided to do a stand alone Fan Relay and Harness with inputs from the PCM and a more Conventional Fuse Box under the dash for the circuit that require Fuse; Ign hot and Battery to the PCM, Injectors and Coils
I mounted it in the Fender well next to the Battery. Will clean up the wiring soon.
It was not a waste of time, as it was a good thing to learn about the wriing and connectors/terminals.
I'll get to the under dash fuse box later, will use some Painless Aux Fuse Boxes. Waiting for the rain to stop.. could be a few day they forcast...!
BC
03-31-2012, 07:26 PM
#100
Well.. got out there and start to work on the Wiring Harness and other Electrical parts of the system and car
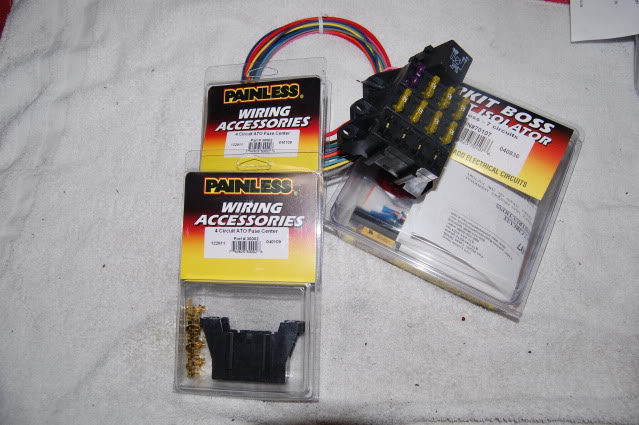
Picked up some Painless Aux Fuse Box/relay
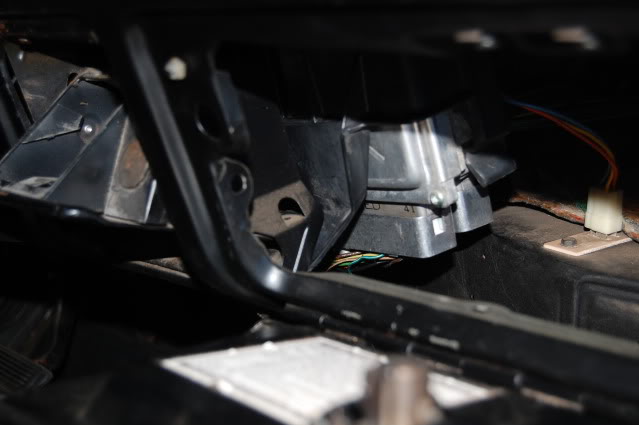
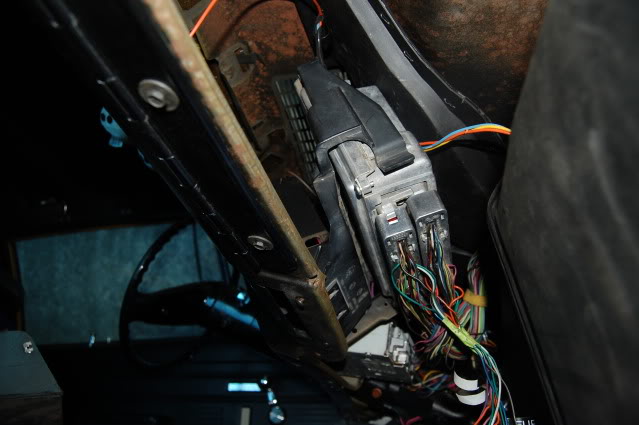
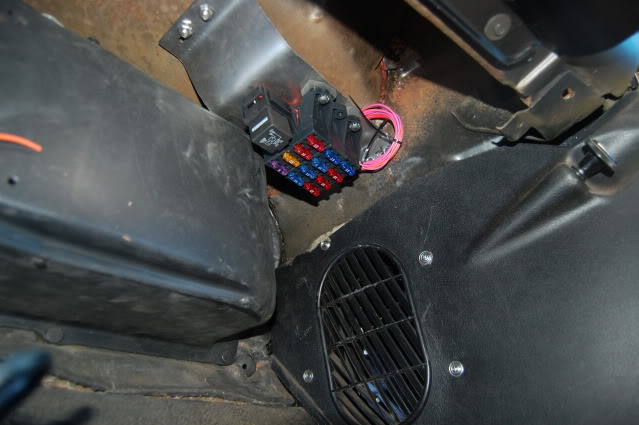
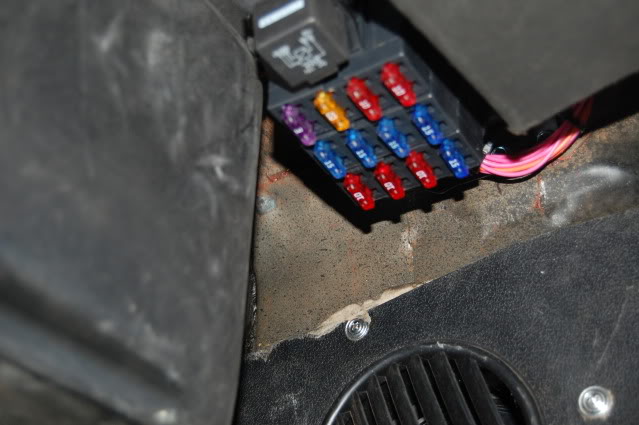
Finished mounting the Fuse box and PCM. Made the mounting plates from some 16 Steel and mounted the Aux Fuse box under the right side of the dash and behind the glove box

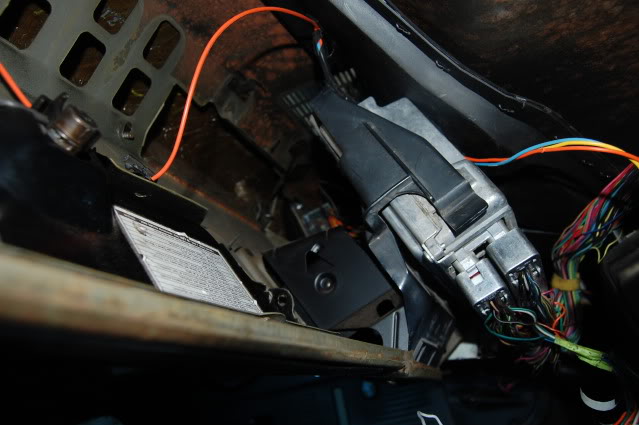
Made the PCM mount and mounted it under the dash behind the Ash Tray. The upper Dash had a hole and lip for AC vents (which I am not using). I was able to mount the upper part of my PCM Mount to it and the bottom of the Dash support.
Mod'd up the PCM with the OEM F-body holder and sitting in place where I wanted to mounted it.
PCM holder and Mounting plate.
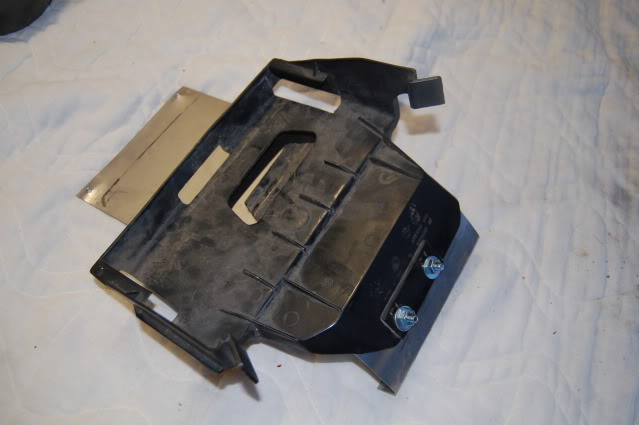
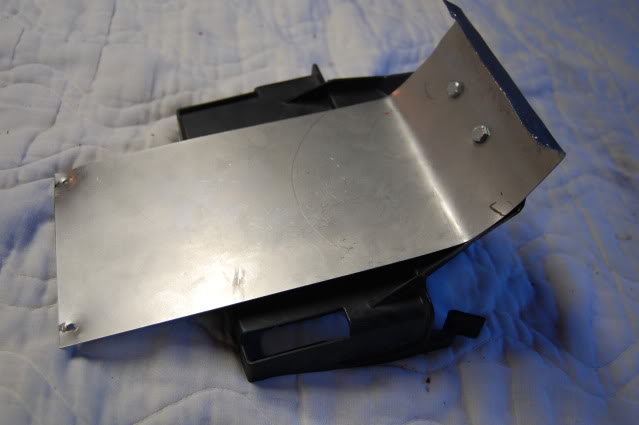
With the mount bolted in place.
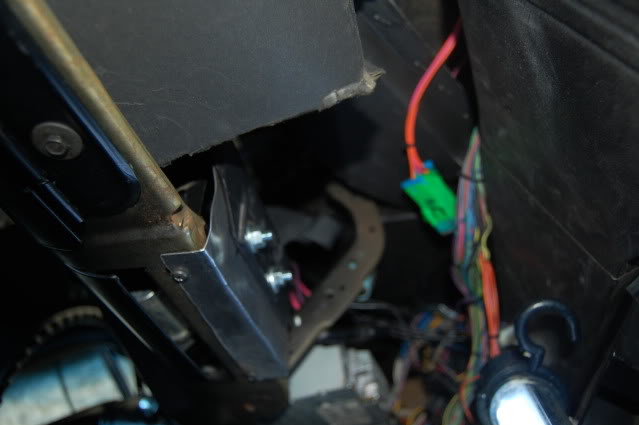
With the PCM in place.
Mounted the Aux Fuse box for the Fan Relay and anything else that will need power in the Engine Bay.
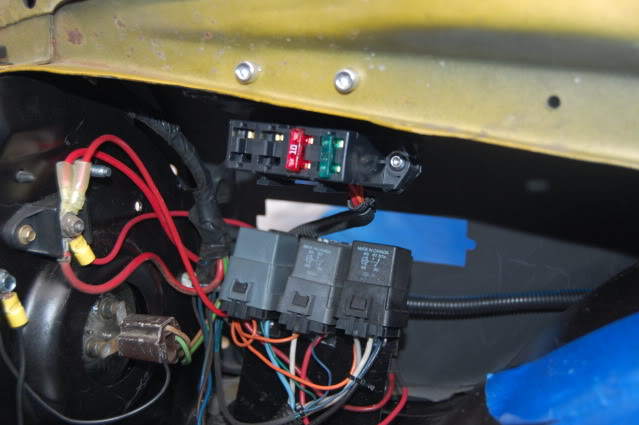
Wiring is about 95% done now, Will work on cleaning up with zip ties and covers where needed. I just have to run some wire for the Fuel Relay. But will have to wait until I figure out what I am going to use for the tank/pump.
Order some Right Stuff SS Brake lines from Summit, but it will be a few weeks before they get here. So I am going to try and start working on the SS Hard lines for the Fuel system. Thats about it for now.
BC
Picked up some Painless Aux Fuse Box/relay
Finished mounting the Fuse box and PCM. Made the mounting plates from some 16 Steel and mounted the Aux Fuse box under the right side of the dash and behind the glove box
Made the PCM mount and mounted it under the dash behind the Ash Tray. The upper Dash had a hole and lip for AC vents (which I am not using). I was able to mount the upper part of my PCM Mount to it and the bottom of the Dash support.
Mod'd up the PCM with the OEM F-body holder and sitting in place where I wanted to mounted it.
PCM holder and Mounting plate.
With the mount bolted in place.
With the PCM in place.
Mounted the Aux Fuse box for the Fan Relay and anything else that will need power in the Engine Bay.
Wiring is about 95% done now, Will work on cleaning up with zip ties and covers where needed. I just have to run some wire for the Fuel Relay. But will have to wait until I figure out what I am going to use for the tank/pump.
Order some Right Stuff SS Brake lines from Summit, but it will be a few weeks before they get here. So I am going to try and start working on the SS Hard lines for the Fuel system. Thats about it for now.
BC