
C3 78' Corvette LS1/T-56 with Holset HX-55 Turbo build
 10-08-2011, 10:22 PM
#41
Launching!
Thread Starter
Join Date: Jul 2011
Location: Detroit, Michigan
Posts: 209
Likes: 0
Received 0 Likes
on
0 Posts
I have thought good and hard about other locations to mount the turbo, Anything to stay under the hood I cant think of it. Rear mount doesnt seem too logical for me. The tank takes up most all the room back there, my suspension puts my car so low that I removed the exhaust that whent under the rear end for rear mounted mufflers becuase it would hit going over even a small road bump. Good lock with fitting it in there with the A/C and everything else, it will be very tight. The only other thing I could think is in front of the radiator in the nose, there is a bunch of room up there, but only if the hood didnt hinge into the open space when opening. Maybe fab up a rear hinged hood to open like most cars do, and a real creative way to run the piping.
The diameter of the Holset I am not aware of, never took any measurements. All I know is its big and heavy, thing is a beast and should last forever.
The diameter of the Holset I am not aware of, never took any measurements. All I know is its big and heavy, thing is a beast and should last forever.
 05-21-2012, 09:22 AM
#42
Launching!
Thread Starter
Join Date: Jul 2011
Location: Detroit, Michigan
Posts: 209
Likes: 0
Received 0 Likes
on
0 Posts
Had a lot of time off from working on the car, just enjoying driving it for the most part and working out little bugs here and there. Built a new garage, and just finally got it finished up and able to start back on the corvette.
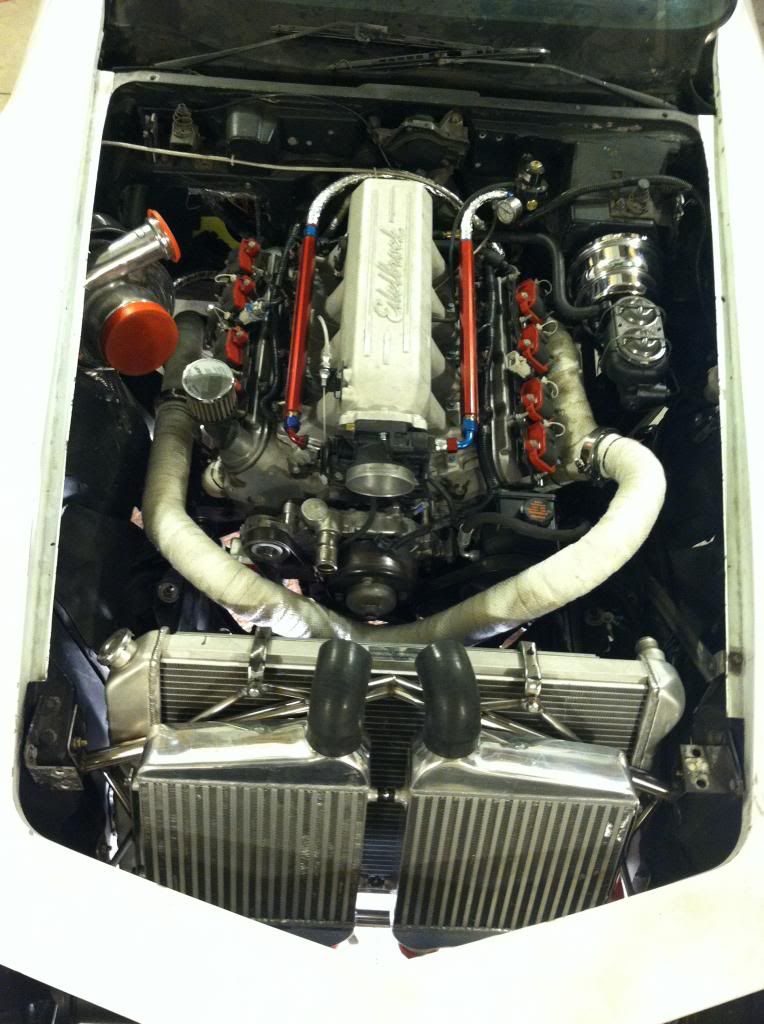
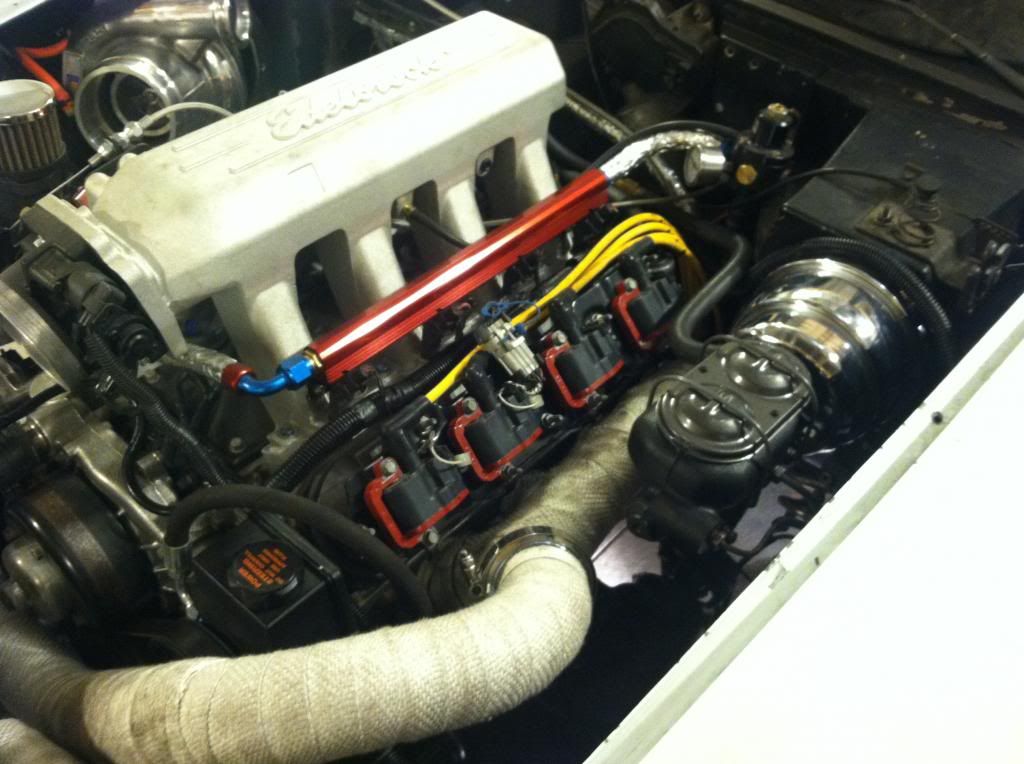
Picked up the edlebrock pro-flo intake manifold. I had to get a different manifold due to the emisions opening behind the throttle body I had pluged up with a freeze plug on the LS1 intake. Cant say thats the best setup to be running when pumping in boost, I could just see that thing being ejected out through my hood. I re routed my fuel lines from the passenger side over to the drivers side to avoid being close to the turbo. This way they will be away from all major heat sources and avoid an incident. Painted the valley cover and steam line black to clean it up, as well as my throttle body. Fabbed some custom brackets for the fuel rails out of some scrap aluminum I had laying around. I didnt buy the edelbrock fuel rails that are for the intake, and found some much cheaper. Saved over $70 this way, and they are for a -8 fitting. Also was having issues with the factory pcv system, was causing speratic idle issues. I rided the suction portion going into the intake and just kept the cross over between both valve covers and installed a breather on the oil cap.
Picked up the edlebrock pro-flo intake manifold. I had to get a different manifold due to the emisions opening behind the throttle body I had pluged up with a freeze plug on the LS1 intake. Cant say thats the best setup to be running when pumping in boost, I could just see that thing being ejected out through my hood. I re routed my fuel lines from the passenger side over to the drivers side to avoid being close to the turbo. This way they will be away from all major heat sources and avoid an incident. Painted the valley cover and steam line black to clean it up, as well as my throttle body. Fabbed some custom brackets for the fuel rails out of some scrap aluminum I had laying around. I didnt buy the edelbrock fuel rails that are for the intake, and found some much cheaper. Saved over $70 this way, and they are for a -8 fitting. Also was having issues with the factory pcv system, was causing speratic idle issues. I rided the suction portion going into the intake and just kept the cross over between both valve covers and installed a breather on the oil cap.
05-21-2012, 09:45 AM
#43
Launching!
Thread Starter
Join Date: Jul 2011
Location: Detroit, Michigan
Posts: 209
Likes: 0
Received 0 Likes
on
0 Posts
Almost forgot, I may have not been working much on the car, but all in preparation. For the most part aside from some v-bands, all parts now accounted for.
10-08-2012, 09:28 AM
#44
Launching!
Thread Starter
Join Date: Jul 2011
Location: Detroit, Michigan
Posts: 209
Likes: 0
Received 0 Likes
on
0 Posts
Added an air temp sensor. I couldnt figure out why I was having crazy idle spikes and issues, and then remembered I cut it out on accident when doing the swap. Got a factory sensor and drilled out a copper fitting to accept it. I used some 2 ton epoxy and sealed it in. This way it is screwed in rather than pressed in.
10-08-2012, 09:32 AM
#45
Launching!
Thread Starter
Join Date: Jul 2011
Location: Detroit, Michigan
Posts: 209
Likes: 0
Received 0 Likes
on
0 Posts
Started the Turbo install. Decided I wanted to polish the turbo as well. I will not be having that bright idea again, unless I have days and days of nothing to do. What a PITA.
10-08-2012, 09:42 AM
#46
Launching!
Thread Starter
Join Date: Jul 2011
Location: Detroit, Michigan
Posts: 209
Likes: 0
Received 0 Likes
on
0 Posts
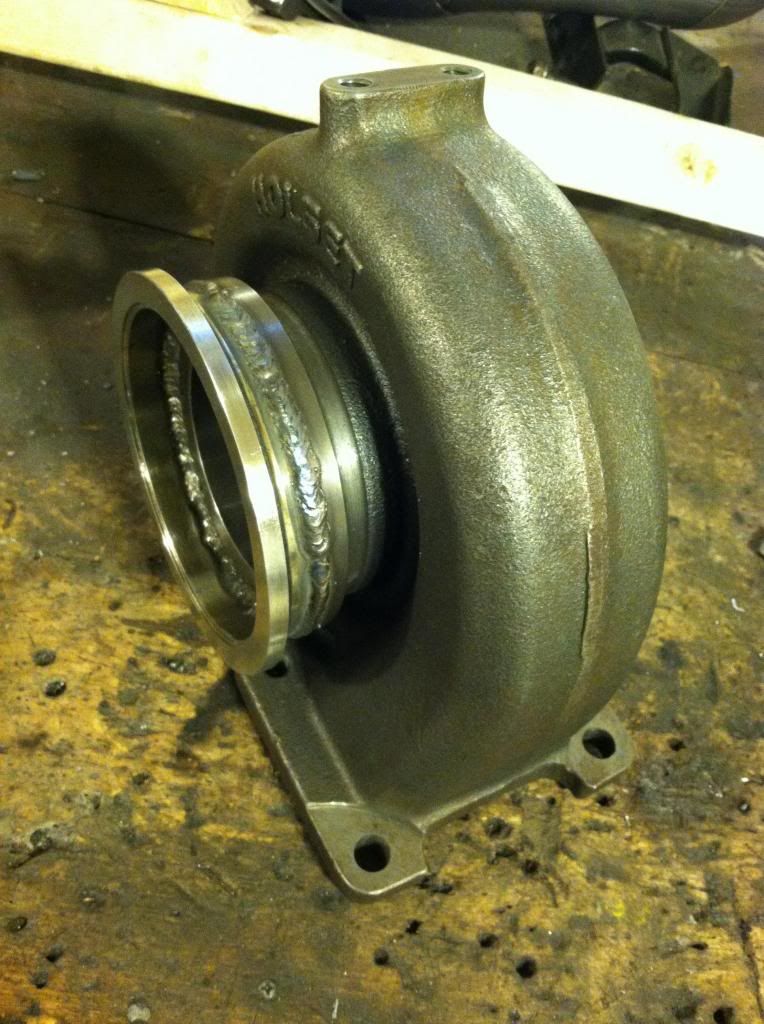
As of now I have welded the V-Bands onto my truck manifolds, and shaved down the heat shield mounts to clean them up so the heat wrap will be a bit tighter and cleaner. Fabricated a beefy mount for the turbo that bolts onto the frame. I used some angle iron to make mounts to weld to the frame and then the turbo bracket bolts up to those frame tab mounts. The Turbo mount is made from Polished stainless tubing I had laying around, and a piece of beefy steel I bended to wrap around the turbo to catch the mount holes on the turbo. At least thats what they look like their for. This thing is heavy and needs all the reinforcing it can get. Should get the job done. I also found out my turbo has an hx55 cold side with an hx50 hot side. This should help greatly with spooling. Got lucky on that deal.
10-08-2012, 09:48 AM
#47
Launching!
Thread Starter
Join Date: Jul 2011
Location: Detroit, Michigan
Posts: 209
Likes: 0
Received 0 Likes
on
0 Posts
There was a thread a while back I found about if a C3 would be a good drift car or not, and a lot of people seeming to talk it down. I'm no proffesional but plan on geeting a lot more slide time in once the turbo is done.
10-12-2012, 08:18 AM
#48
Launching!
Thread Starter
Join Date: Jul 2011
Location: Detroit, Michigan
Posts: 209
Likes: 0
Received 0 Likes
on
0 Posts
Crossover for the most part is done, working on the merge and just waiting on a 3" flex pipe. Hot side should be all wrapped up this weekend. 2.5" cross over with a merg into 3" into the turbo.
10-12-2012, 08:26 AM
#49
Launching!
Thread Starter
Join Date: Jul 2011
Location: Detroit, Michigan
Posts: 209
Likes: 0
Received 0 Likes
on
0 Posts
The large 3" bend needs to be tighter to get around my frame rail and up to my turbo. The idea is to make a series of cuts to tighten the radius of the bend.
10-22-2012, 01:41 PM
#51
Launching!
Thread Starter
Join Date: Jul 2011
Location: Detroit, Michigan
Posts: 209
Likes: 0
Received 0 Likes
on
0 Posts
I have gotten the hot side done and welded. After the oh **** moment of realizing the location for the waste gate wasnt going to work I got that straightened out as well. Luckly had a flex pipe laying around that I found on the street a while back, I wasnt planning on needing one for the waste gate but the new plan required one. While working on it and figure it all out I realized this location was going to make for the most optimal location to allow for the best flow once the gate does start to open up. Better than just simply placing it on the side of a pipe.
10-22-2012, 01:48 PM
#52
Launching!
Thread Starter
Join Date: Jul 2011
Location: Detroit, Michigan
Posts: 209
Likes: 0
Received 0 Likes
on
0 Posts
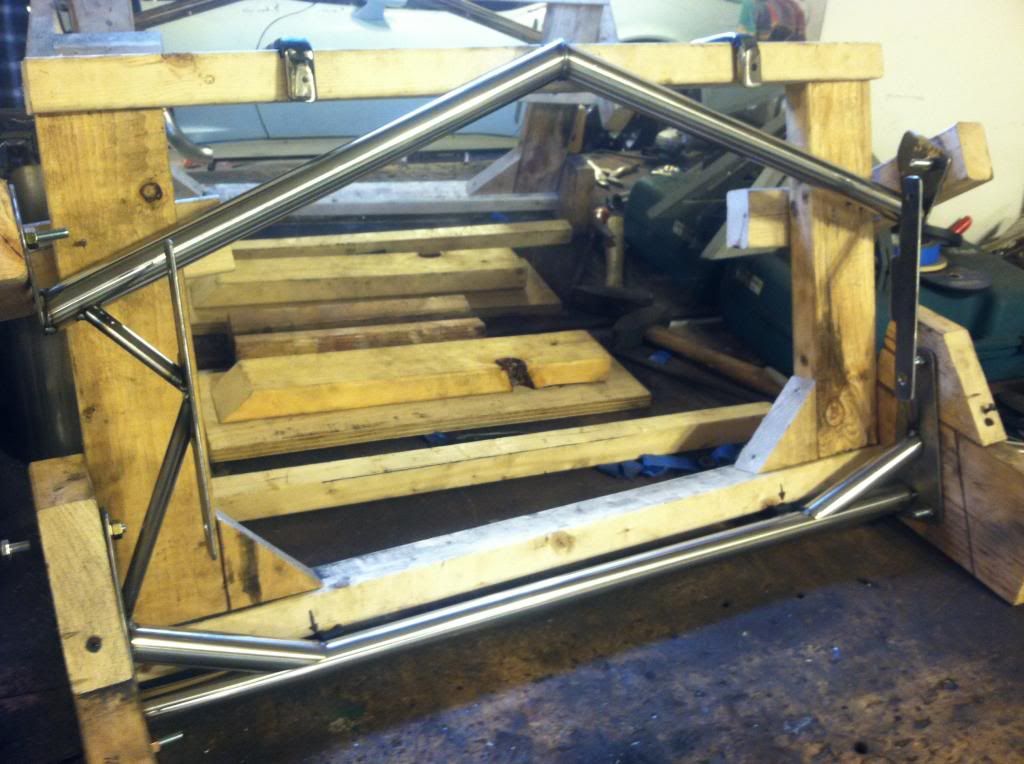
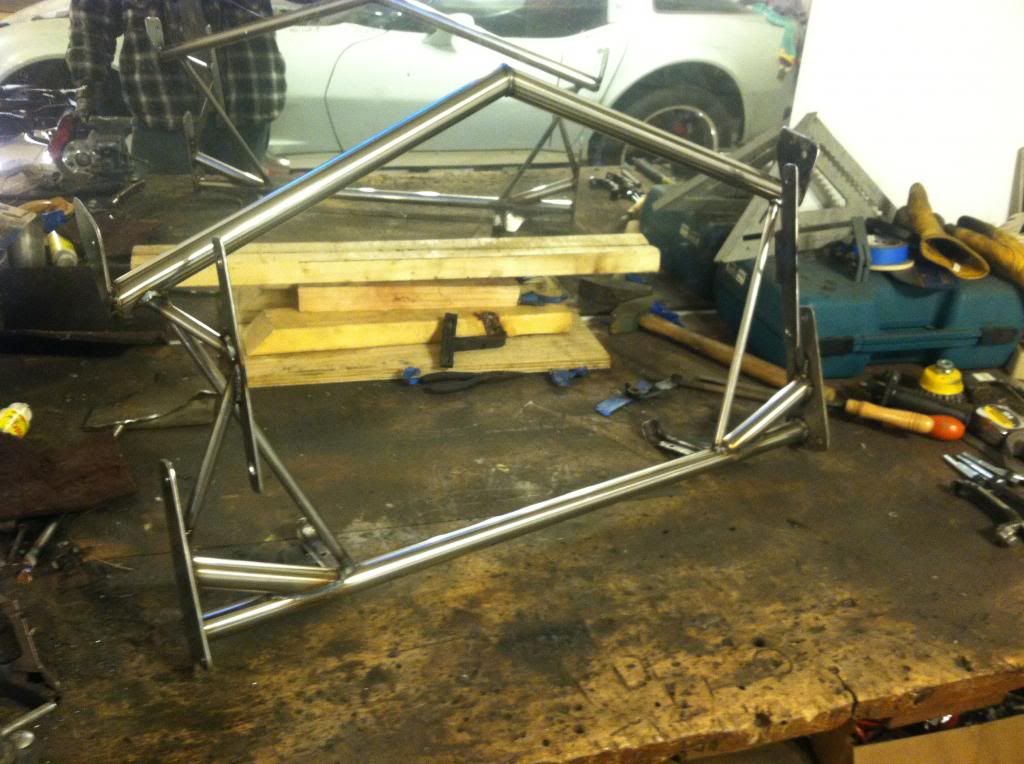
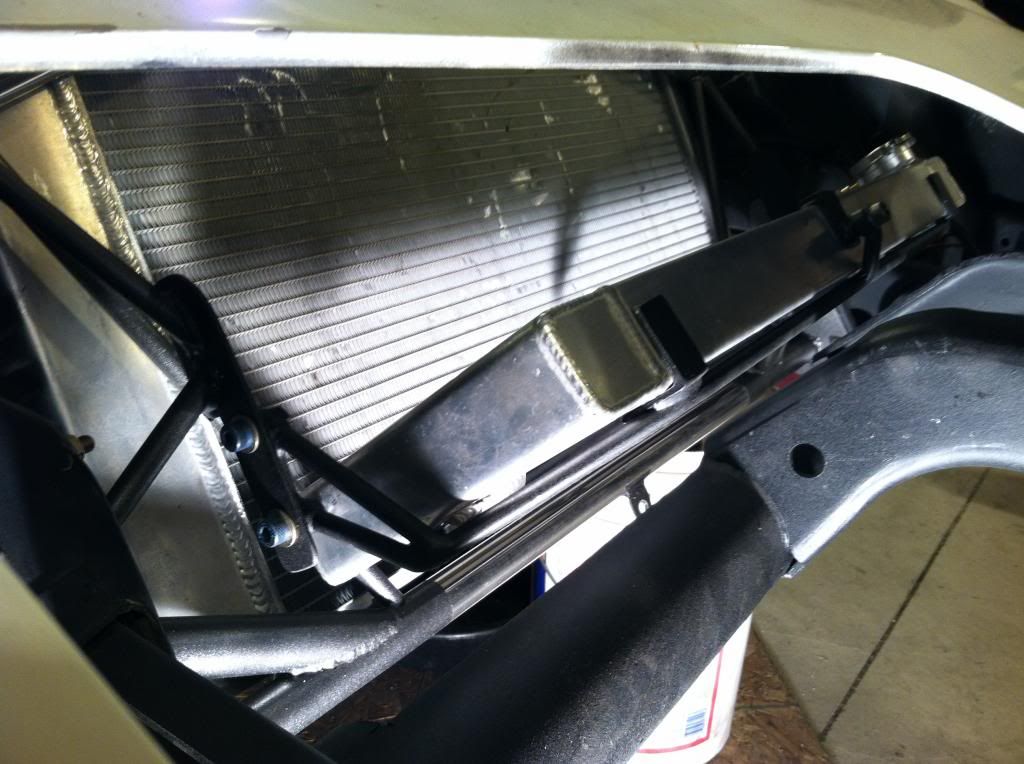
I also worked out an oil feed restrictor. I realized I had a fitting on my turbo that wasnt going to do me any good, but was indeed a reducer of sorts. I got a brass fitting that was the correct size for my turbo and my new feed line, opened it up a bit, threaded the inside and screwed in the fitting with a lot of locktite. Then I simply cut off the other end of the fitting. Should work out just perfect. I also put togther a make shift jig for my radiator surround. I will be fabbing up a new one out of polished stainless tubing to make some room, and double as both the rad and intercooler mount. Should look a lot better than notching out the factory one for the clearances I need.
10-29-2012, 02:33 PM
#53
Launching!
Thread Starter
Join Date: Jul 2011
Location: Detroit, Michigan
Posts: 209
Likes: 0
Received 0 Likes
on
0 Posts
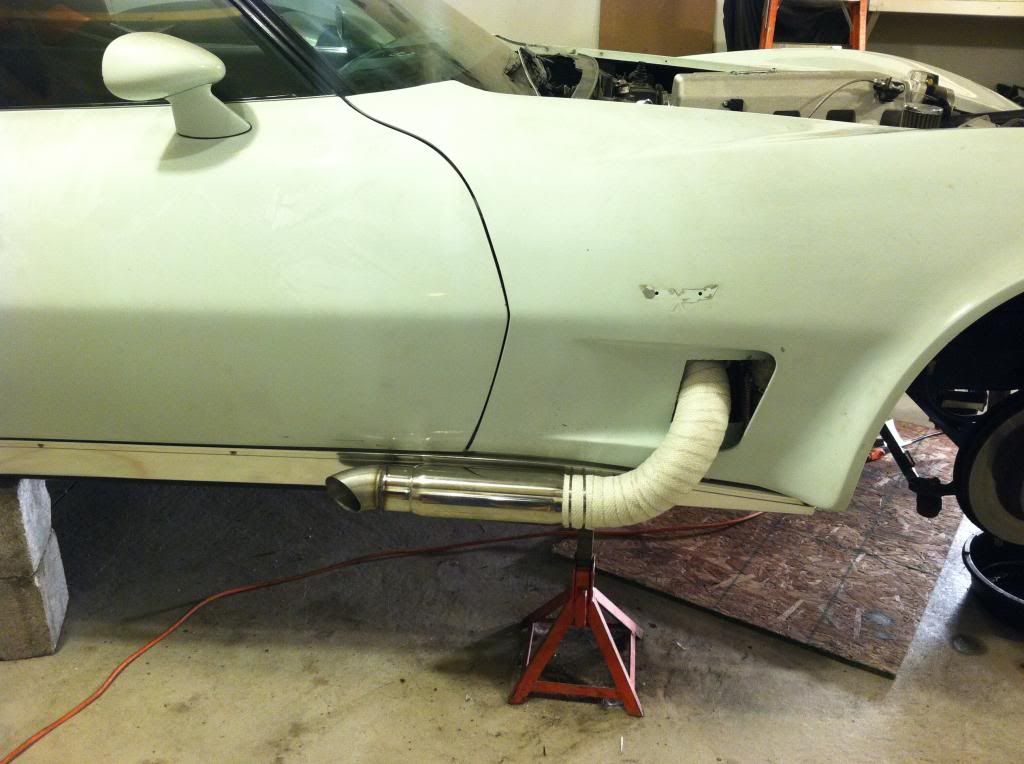
A little downpipe/side pipe work. Going through the fender, going to be one single shorty style sidepipe. A little different from the standard C3 corvette sidepipes.
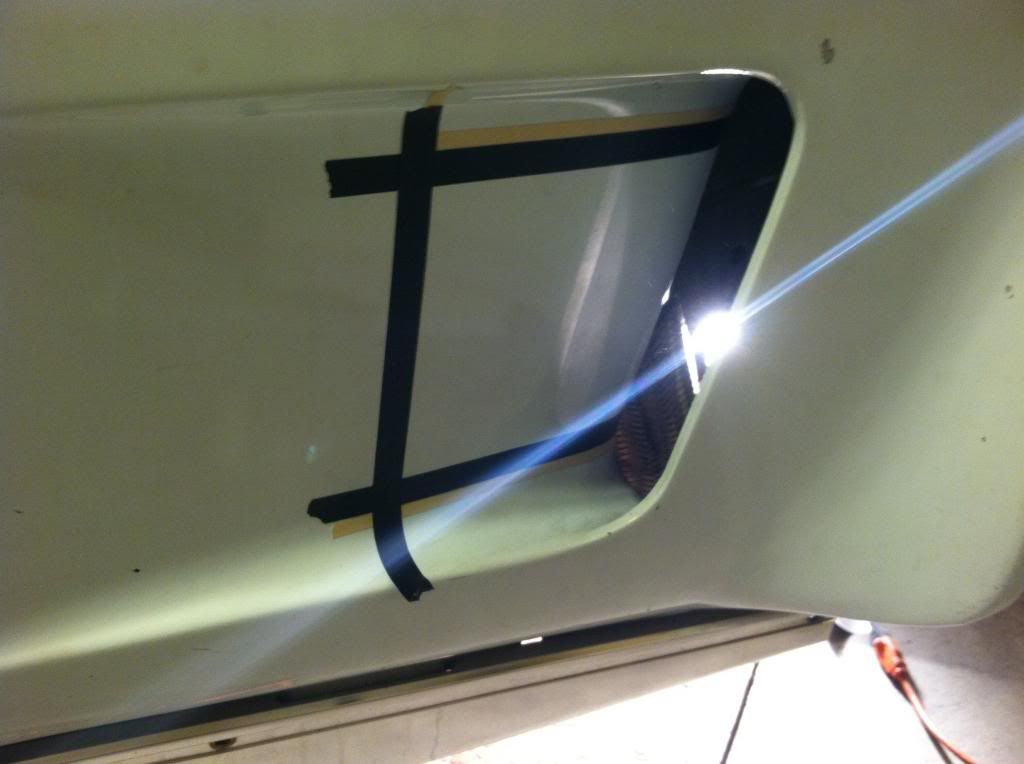
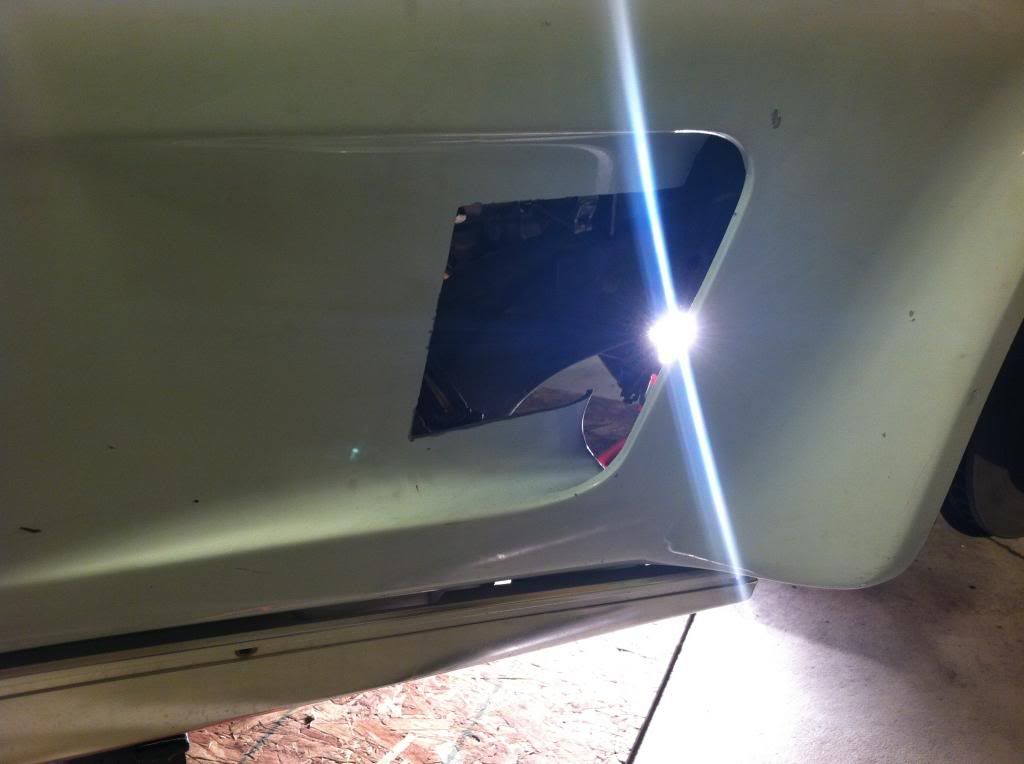
Off the turbo, its so tight I had to come up with this idea. I am running a 4" v-band off the turbo, but only a 3" downpipe/ exhaust right now. I figured that would be plenty, but wanted the option to go bigger if I needed to later. So I cut down a 4-3 stainless reducer and flipped it inside the v-band to but up against the turbo housing.
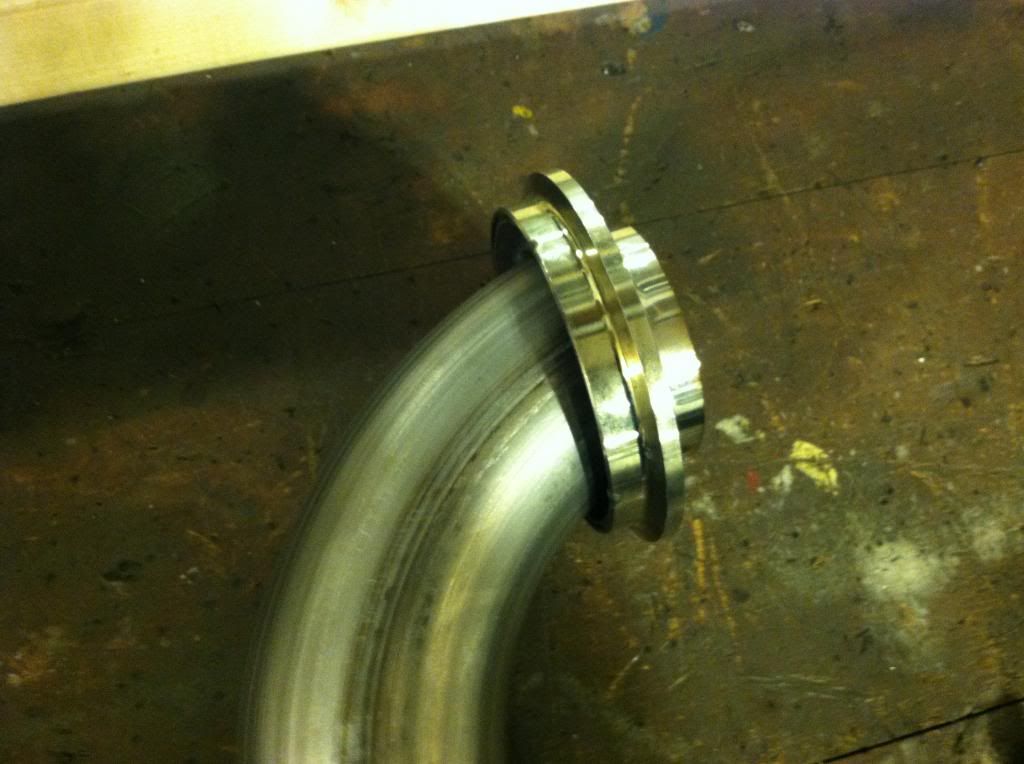
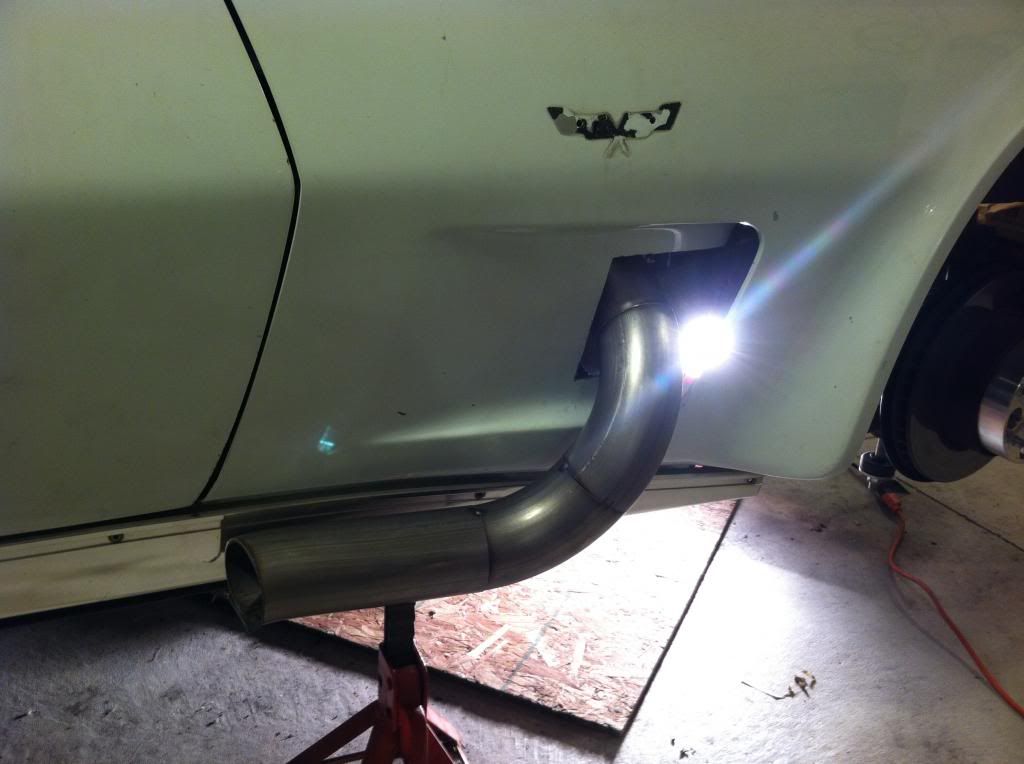
Did some final welding on the downpipe and also welded the 4" v-band to the turbo housing outside and inside. Ordered an OBX resonator that will act as my muffler, as well as a bunch of heat wrap. I started smoothing out the downpipe to polish it, but I think I may just wrap it to the resonator. thoughts?
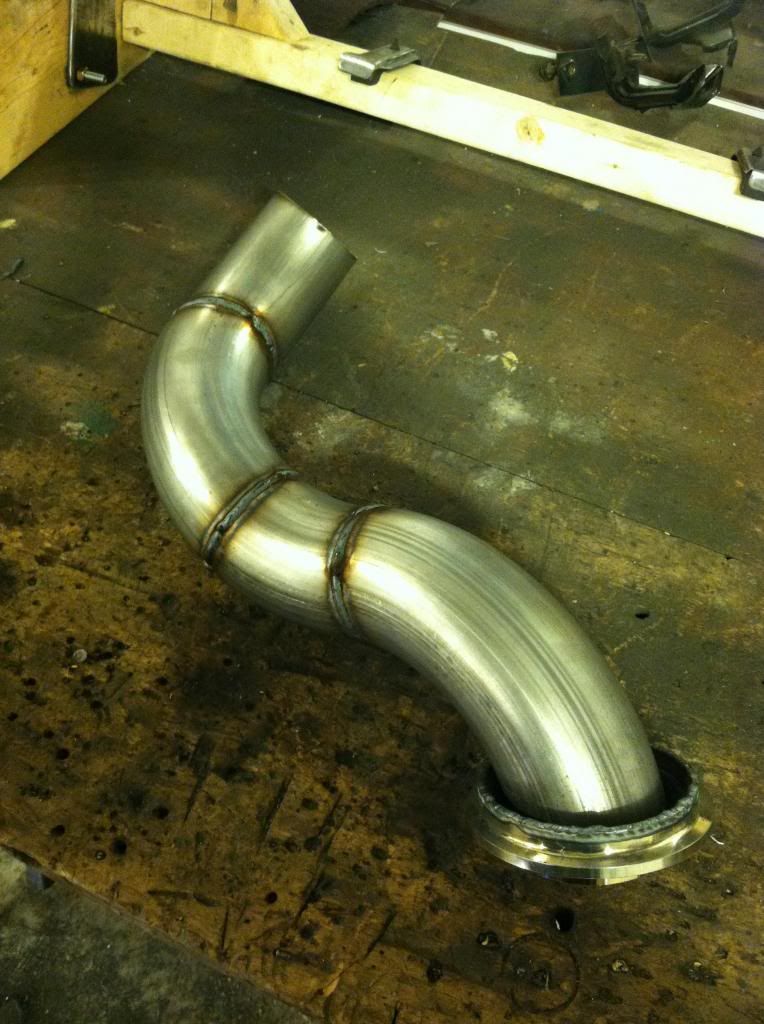
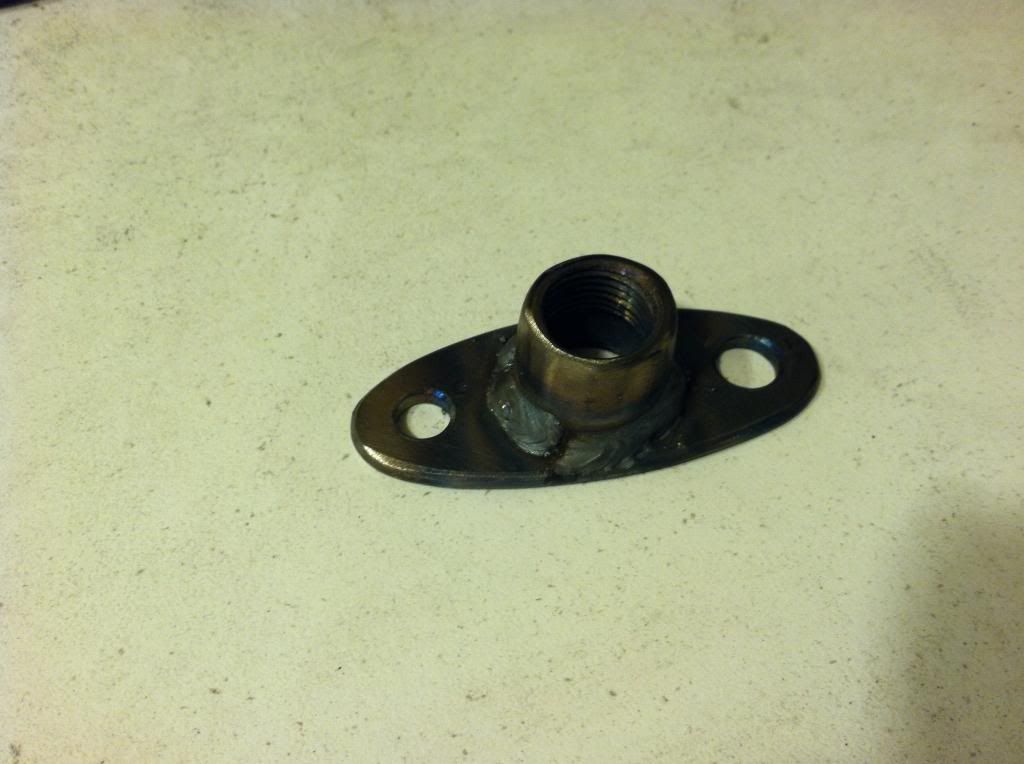
Also made an oil drain bung for the turbo.
Off the turbo, its so tight I had to come up with this idea. I am running a 4" v-band off the turbo, but only a 3" downpipe/ exhaust right now. I figured that would be plenty, but wanted the option to go bigger if I needed to later. So I cut down a 4-3 stainless reducer and flipped it inside the v-band to but up against the turbo housing.
Did some final welding on the downpipe and also welded the 4" v-band to the turbo housing outside and inside. Ordered an OBX resonator that will act as my muffler, as well as a bunch of heat wrap. I started smoothing out the downpipe to polish it, but I think I may just wrap it to the resonator. thoughts?
Also made an oil drain bung for the turbo.


 11-14-2012, 05:13 PM
#57
Launching!
Join Date: May 2012
Location: Mobile, Alabama
Posts: 205
Likes: 0
Received 0 Likes
on
0 Posts
Nice looking build!
Just from what I can see, I was wondering if you thought about all of your hot side and turbo being hard mounted and the poly motor mounts having some flex. I like your side pipe idea.
Just from what I can see, I was wondering if you thought about all of your hot side and turbo being hard mounted and the poly motor mounts having some flex. I like your side pipe idea.
12-21-2012, 10:21 AM
#58
Launching!
Thread Starter
Join Date: Jul 2011
Location: Detroit, Michigan
Posts: 209
Likes: 0
Received 0 Likes
on
0 Posts
Well I had a change of plans. After messing with the intercooler piping coming over the radiator I came to the conclusion it was just not going to fit. I am now doing a water to air intercooler setup and have so far pieced together what should be a very nice setup on the cheap.
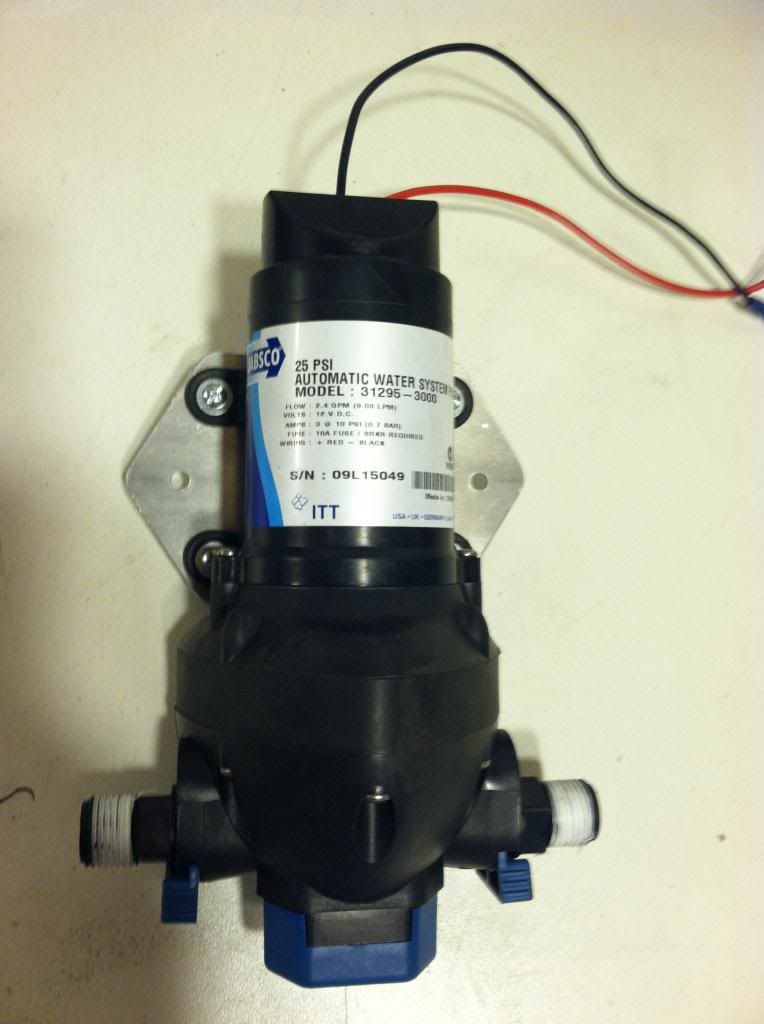
This is the pump I decided to run for now. It's a jabsco pump I picked up for $30 used but still brand new. About $60 cheaper than the bosche units and can run dry without damaging the pump. I made a little aluminum bracket for it and mounted it on an existing mount spot on the inner fender of the driver side nice and tucked away.
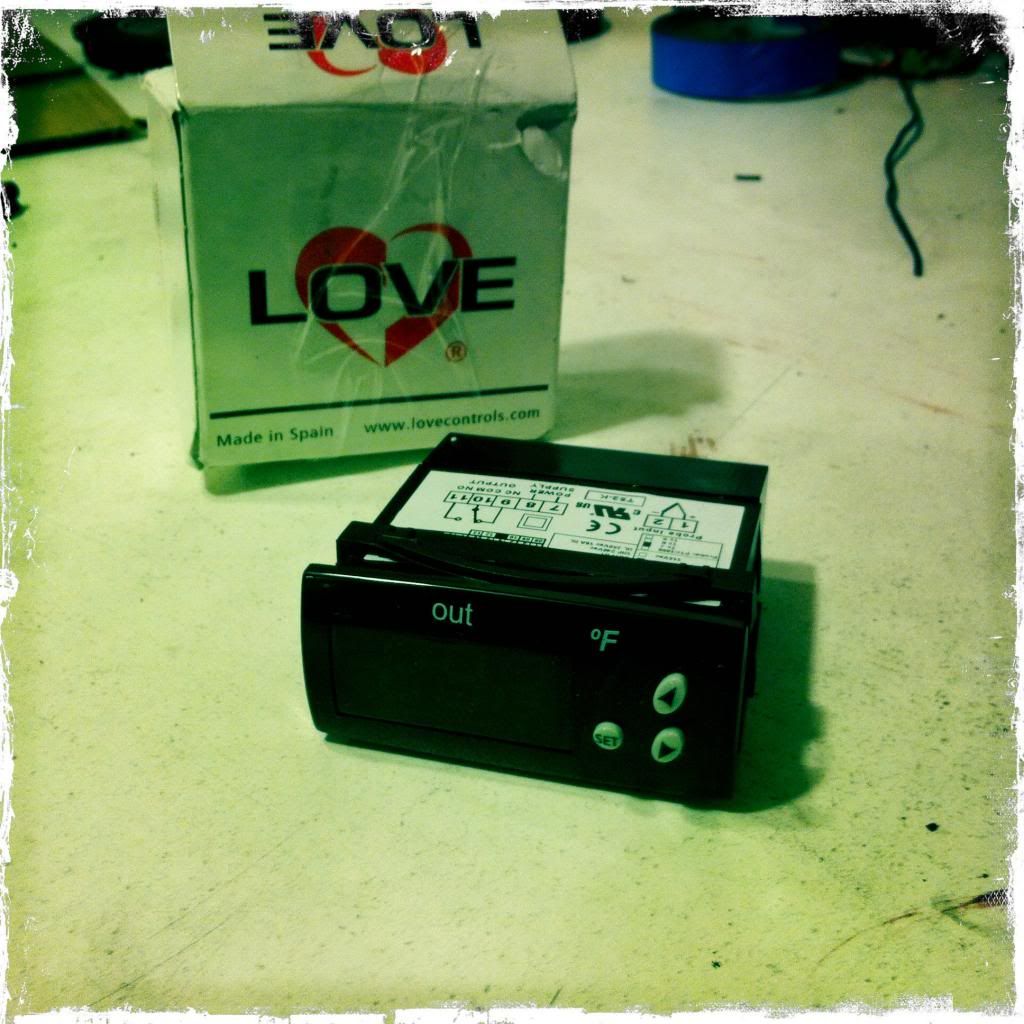
I didnt want the pump running all the time when it isnt needed so I spent a good amount of time figuring out a solid solution for a trigger. I also wanted a gauge to monitor the intake air temps. I wanted all this and didnt want to spend a lot of money as in the theam with every new thing I do to the car. I found this little Love 12 volt thermastatic controler. It has a digital readout and can be set at any temperature. I will probably keep it set around 110-120f so the pump will only kick in once the temps go above that. I found this $90 unit for $15..... Score!! and found a stainless braded thermocoupler for $2
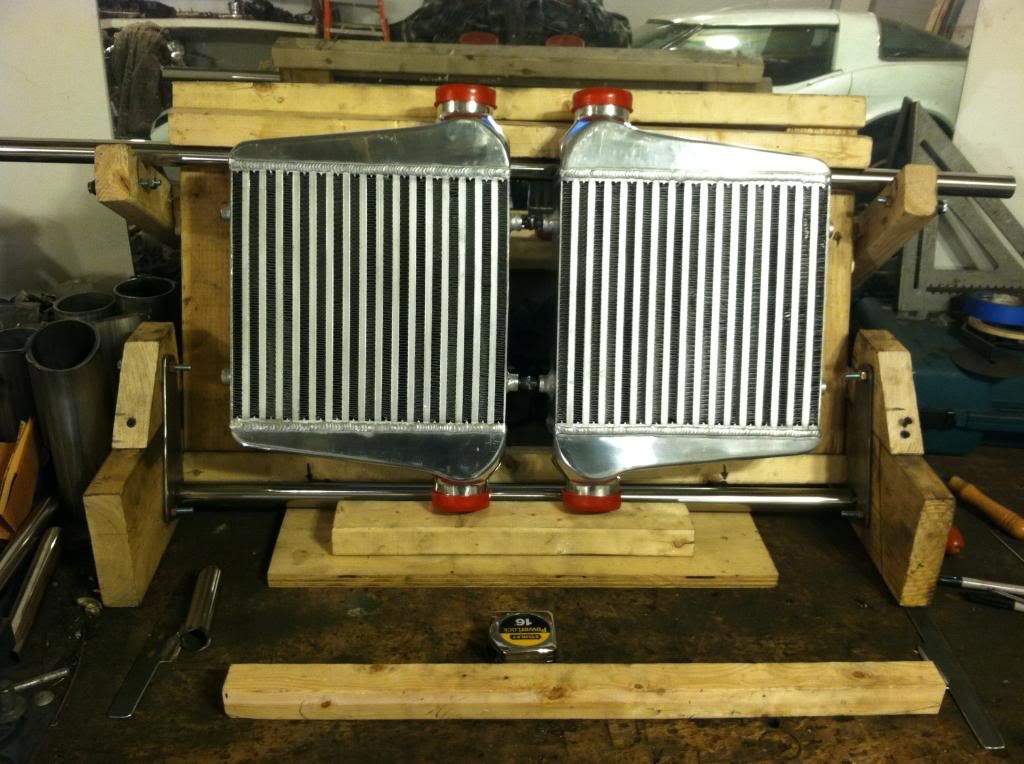
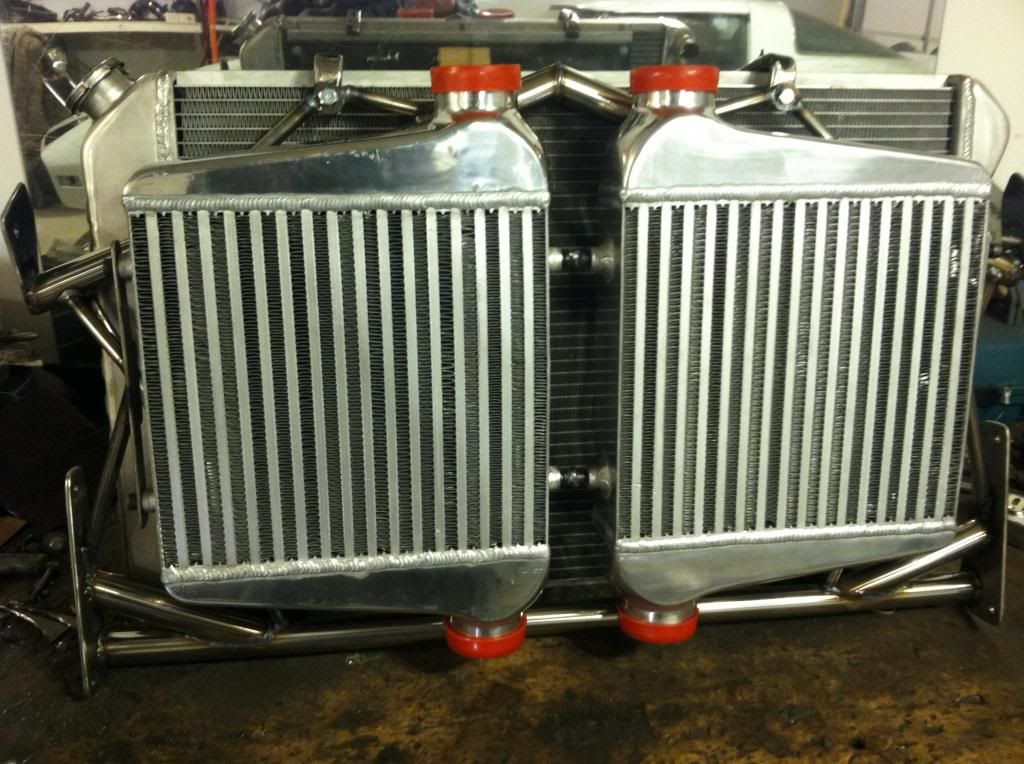
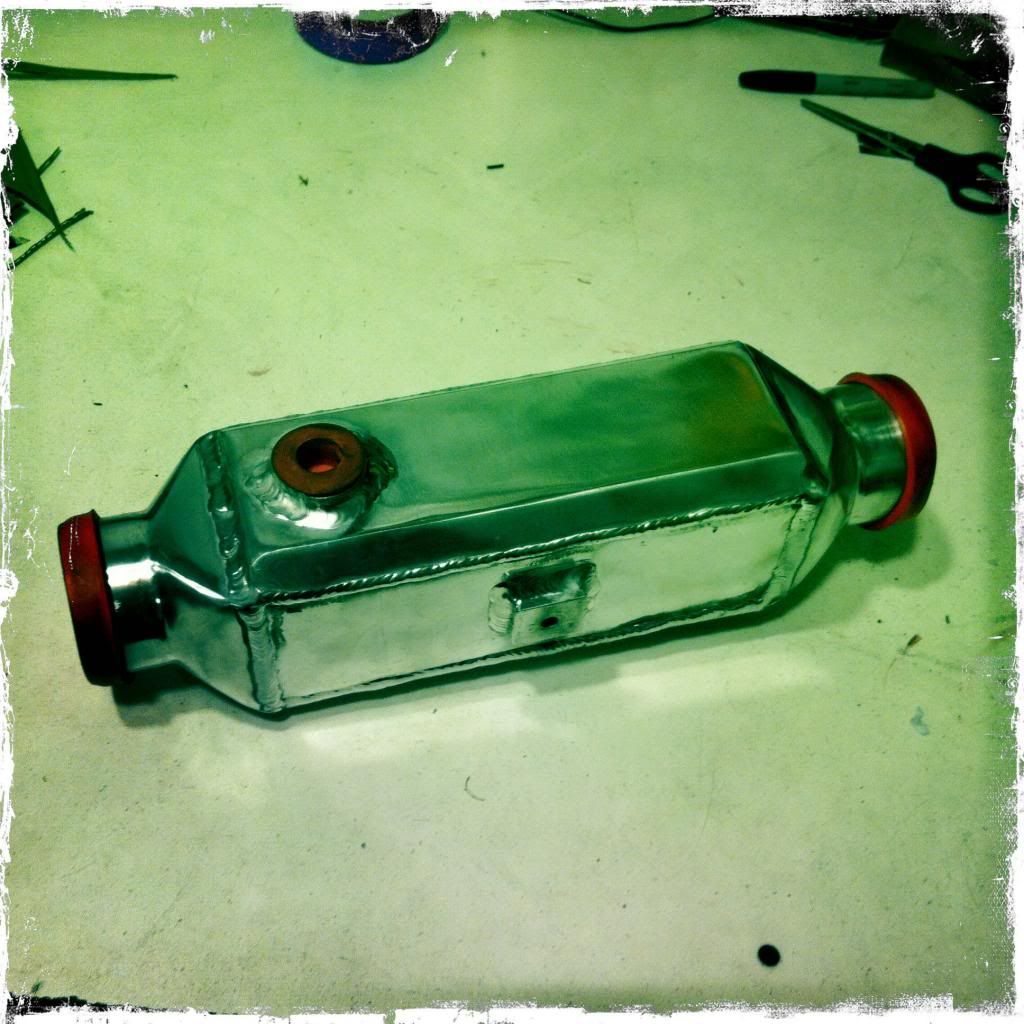
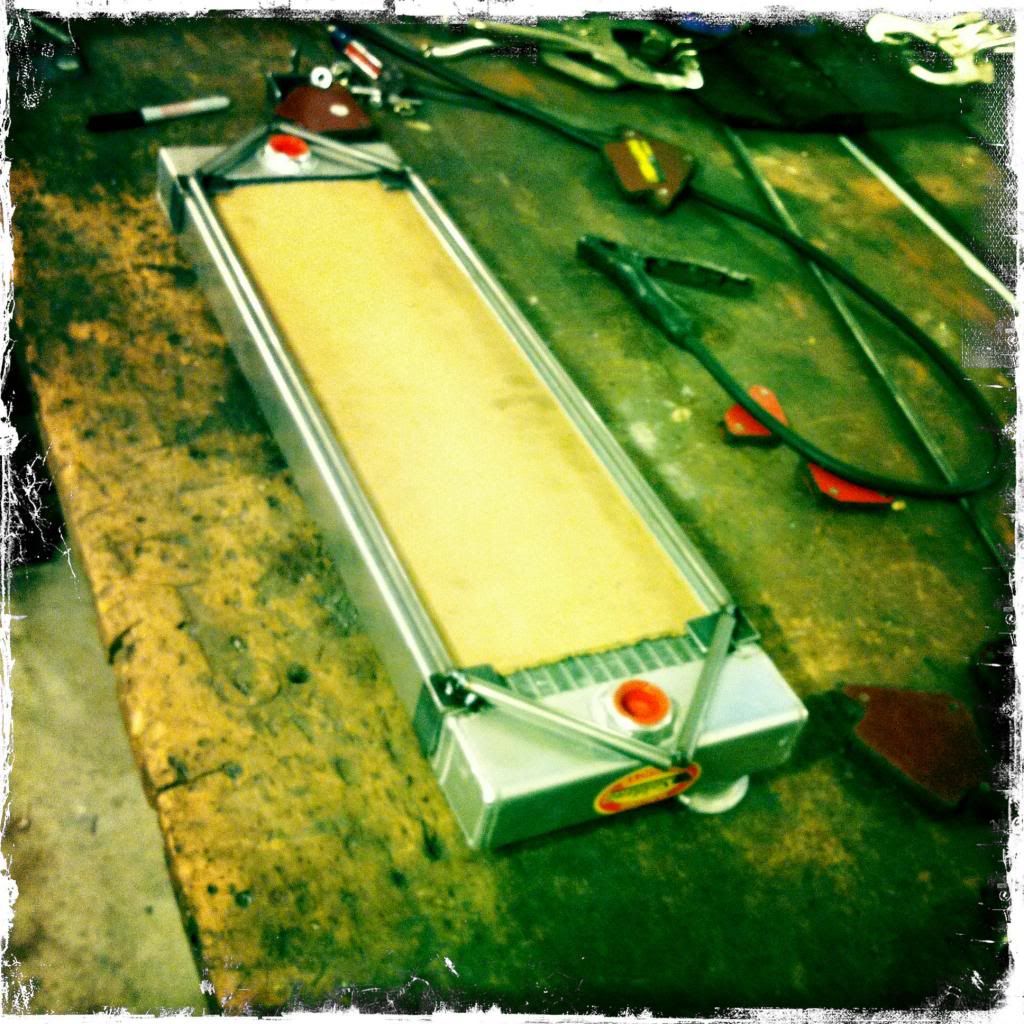
This is the water to air intercooler I decided to go with. It will package very nicely inline with the piping. Its not the biggest but I think the way I am seting up the rest of it there should be sufficient cooling. The core is essentially the same size as most w2a units out there. I wanted a barrel but this one is a fraction of the cost.
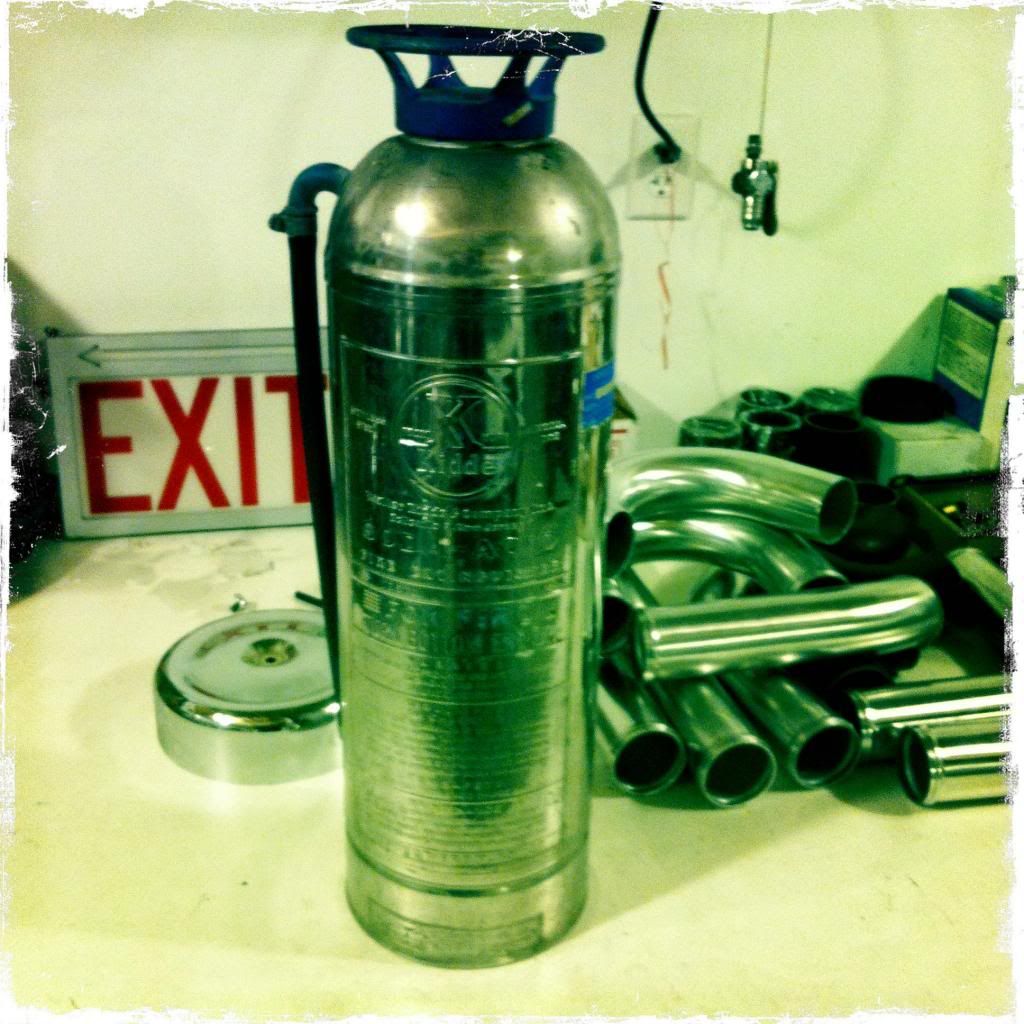
For the water tank I decided to go with a vintage stainless steel fire extinguisher. It's nice and light and will look real cool mounted in the center behind the seats. It's 2.5 gallon and has a large enough opening to put in ice if I want.
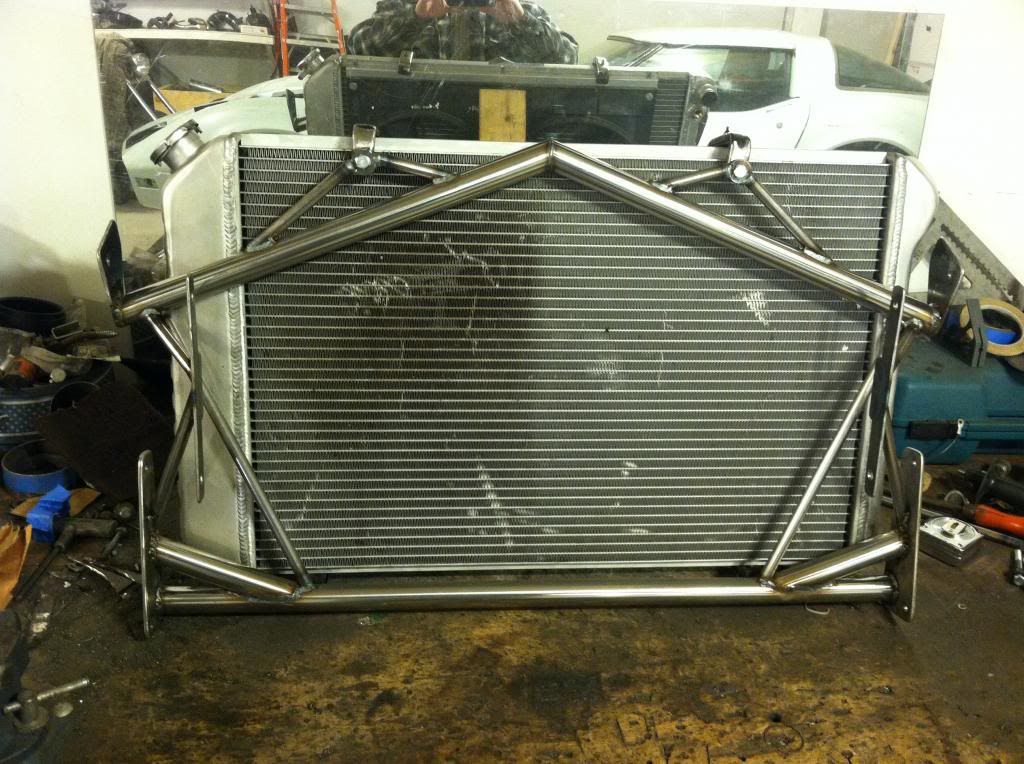
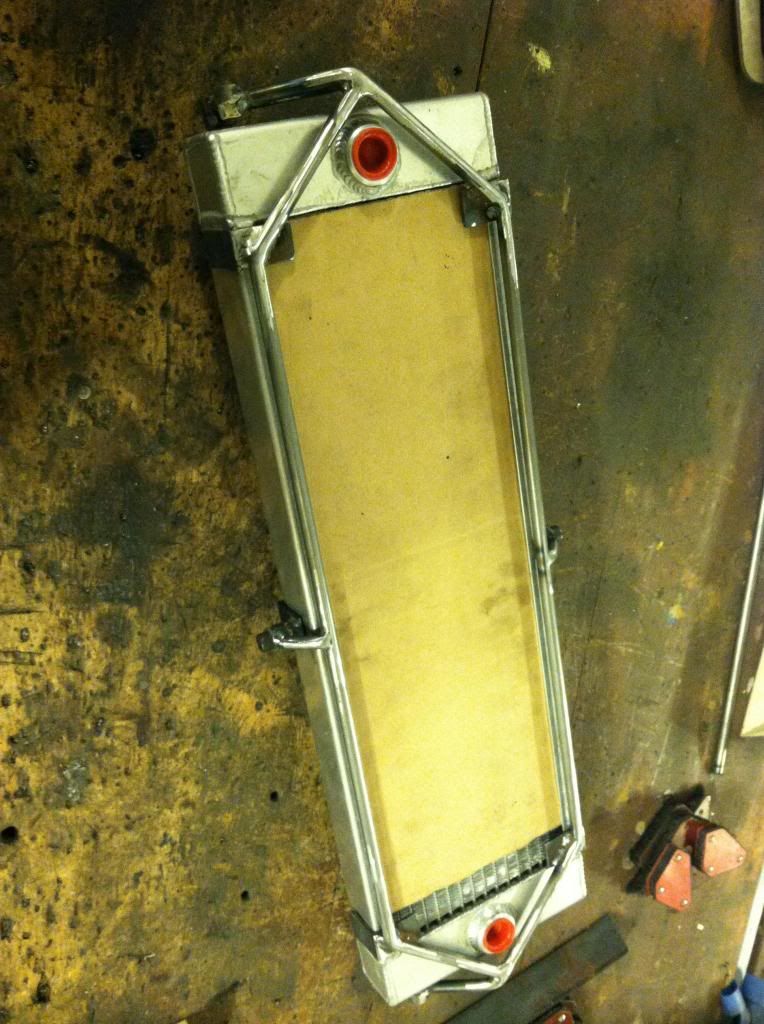
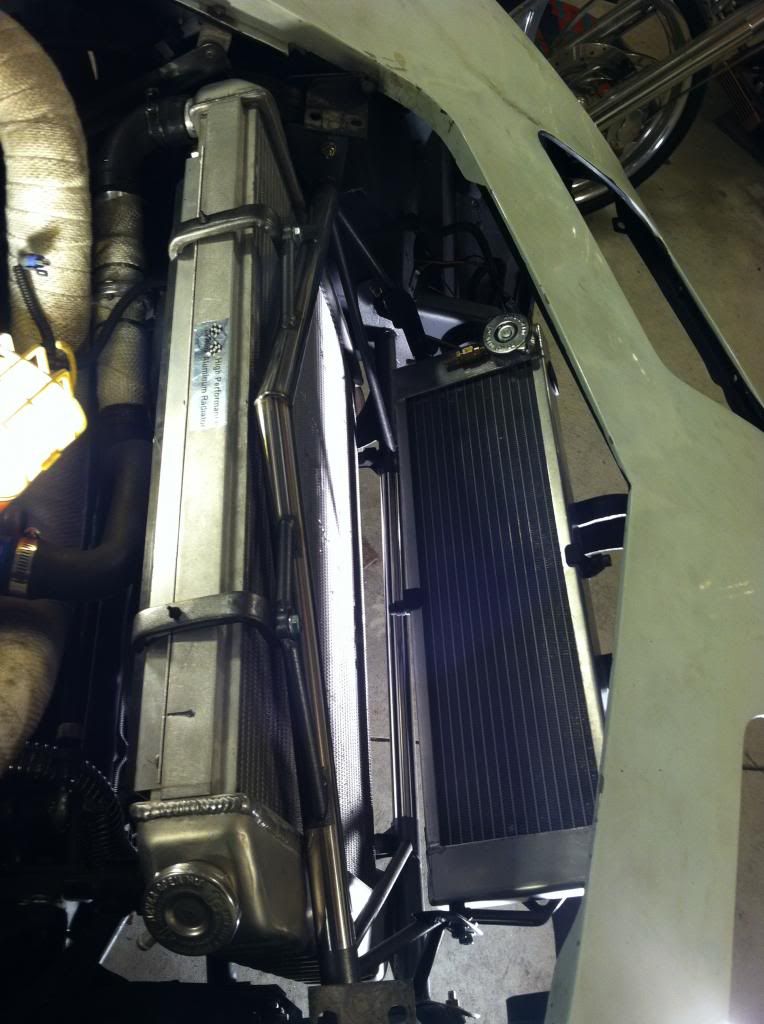
For the heat exchanger, I found this sprint car, or midget racing radiator on ebay. its 2" thick, 26" long, and 8" tall. This thing is legit and will cool wonders. Looked up the manufacturer and found they are going from $200-400. Picked this beaut up for a whopping $35. Cheaper than a small oil cooler. I started making a mount for it to bolt up to where the FMIC was going. I decided to do a V-mount setup and think it will catch great air from the front spoiler and not effect the engine radiator.


This is the pump I decided to run for now. It's a jabsco pump I picked up for $30 used but still brand new. About $60 cheaper than the bosche units and can run dry without damaging the pump. I made a little aluminum bracket for it and mounted it on an existing mount spot on the inner fender of the driver side nice and tucked away.
I didnt want the pump running all the time when it isnt needed so I spent a good amount of time figuring out a solid solution for a trigger. I also wanted a gauge to monitor the intake air temps. I wanted all this and didnt want to spend a lot of money as in the theam with every new thing I do to the car. I found this little Love 12 volt thermastatic controler. It has a digital readout and can be set at any temperature. I will probably keep it set around 110-120f so the pump will only kick in once the temps go above that. I found this $90 unit for $15..... Score!! and found a stainless braded thermocoupler for $2
This is the water to air intercooler I decided to go with. It will package very nicely inline with the piping. Its not the biggest but I think the way I am seting up the rest of it there should be sufficient cooling. The core is essentially the same size as most w2a units out there. I wanted a barrel but this one is a fraction of the cost.
For the water tank I decided to go with a vintage stainless steel fire extinguisher. It's nice and light and will look real cool mounted in the center behind the seats. It's 2.5 gallon and has a large enough opening to put in ice if I want.
For the heat exchanger, I found this sprint car, or midget racing radiator on ebay. its 2" thick, 26" long, and 8" tall. This thing is legit and will cool wonders. Looked up the manufacturer and found they are going from $200-400. Picked this beaut up for a whopping $35. Cheaper than a small oil cooler. I started making a mount for it to bolt up to where the FMIC was going. I decided to do a V-mount setup and think it will catch great air from the front spoiler and not effect the engine radiator.
12-21-2012, 10:28 AM
#59
Launching!
Thread Starter
Join Date: Jul 2011
Location: Detroit, Michigan
Posts: 209
Likes: 0
Received 0 Likes
on
0 Posts
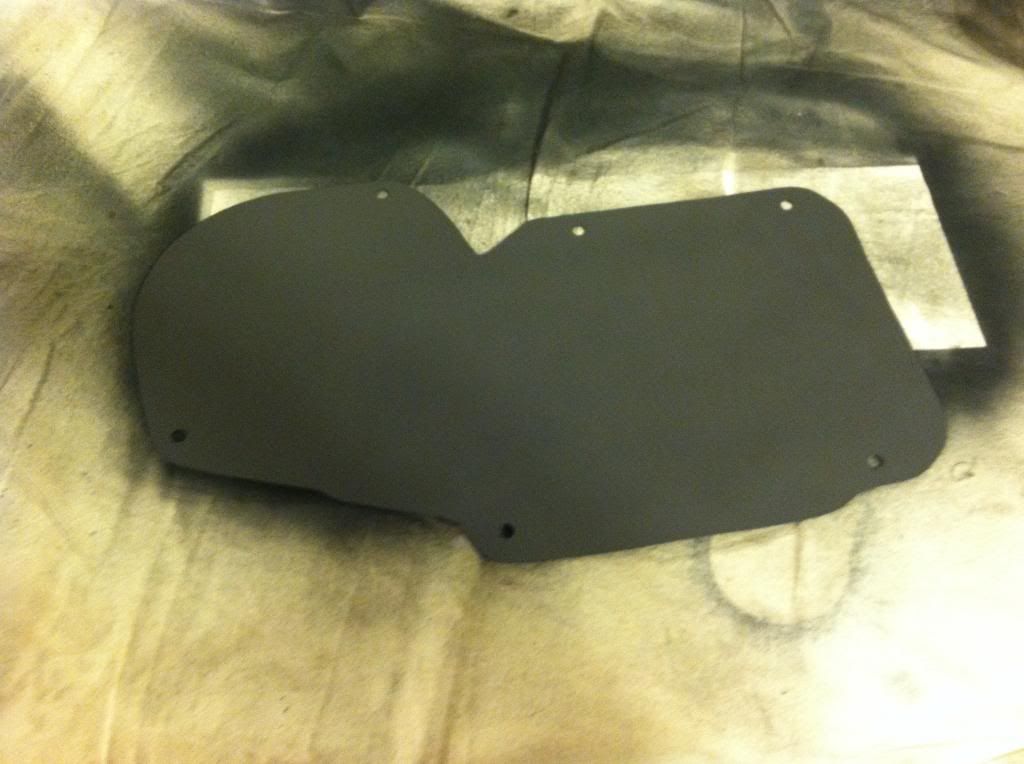
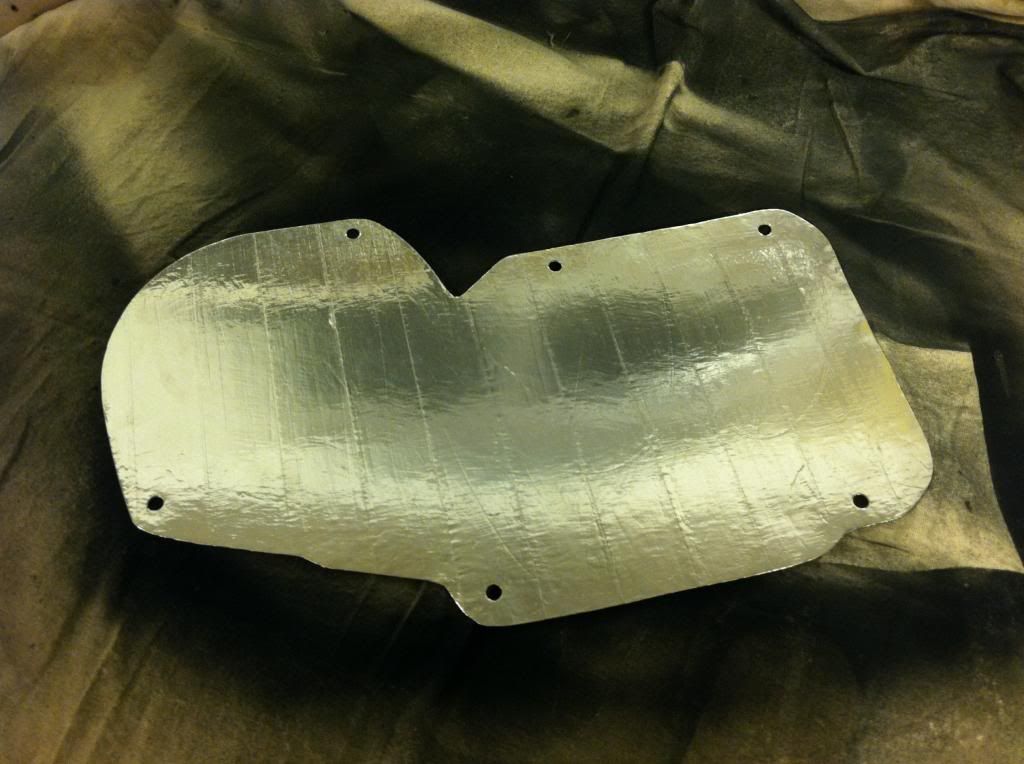
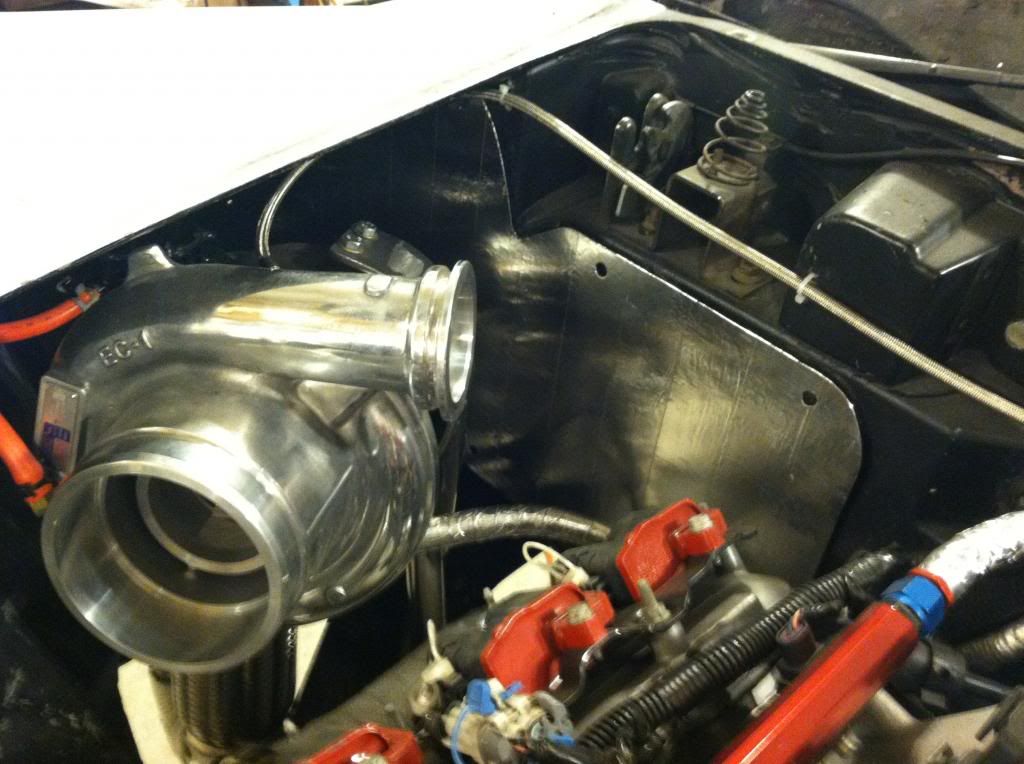
Made a new panel where the AC delete panel was. Just cut out some sheet steel.

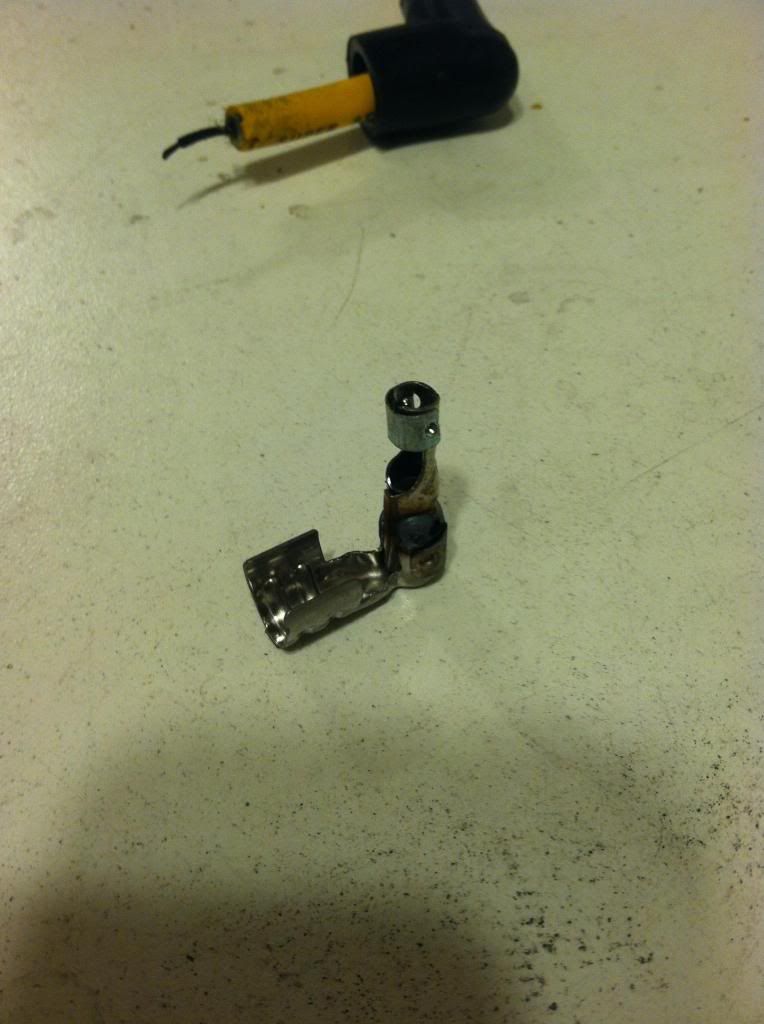
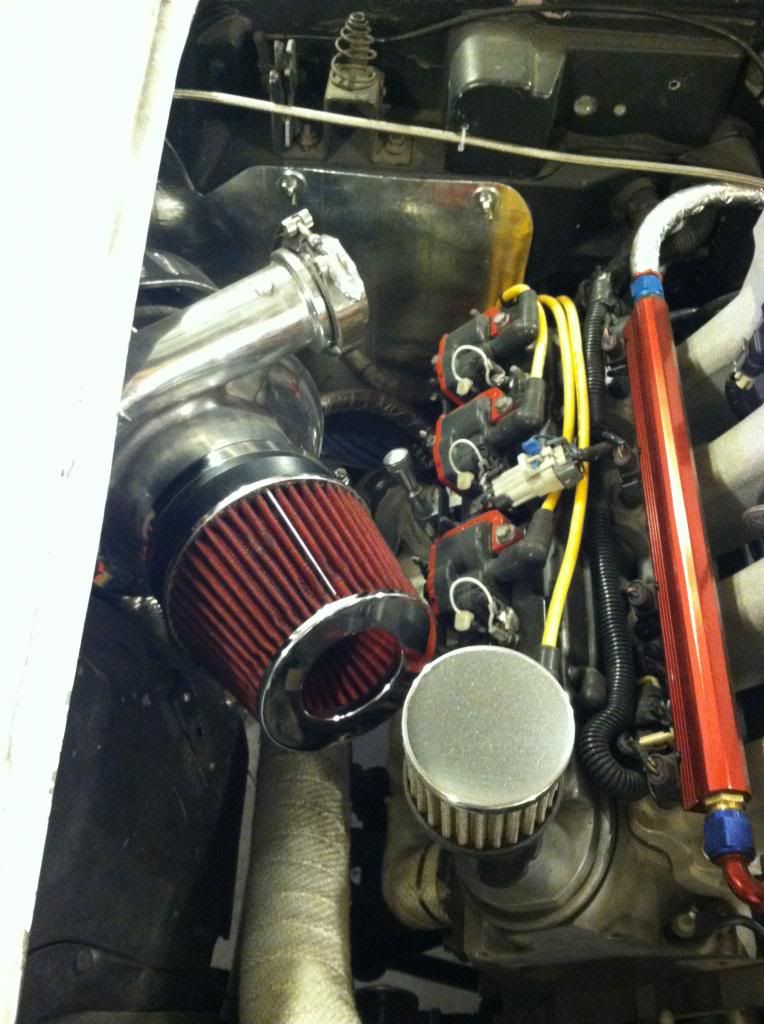
I was alos trying to figure out what I was going to do for the coils and wires for the driver side after flipping the manifold. I decided to flip the coils and make some cut to fit wires. I had to use the clip out of the LS1 wires and modify them into the universal ones. I think it came out ok. May change it down the road.

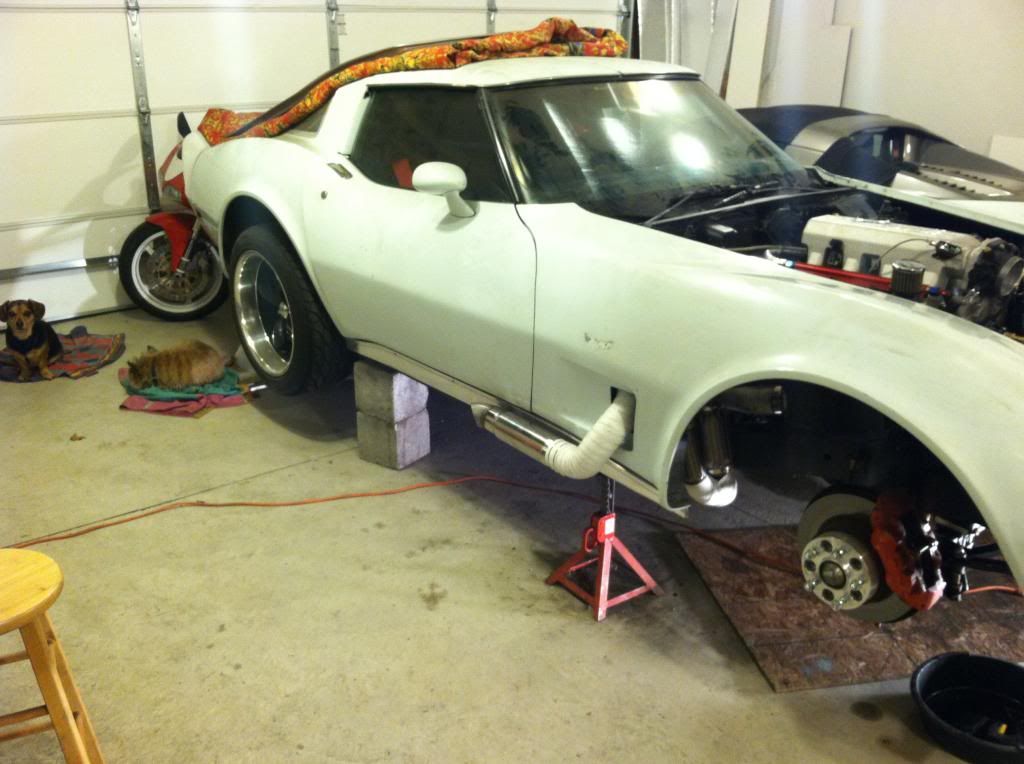
I also finished the shorty side pipe. I used a OBX resignator for a muffler.
I was alos trying to figure out what I was going to do for the coils and wires for the driver side after flipping the manifold. I decided to flip the coils and make some cut to fit wires. I had to use the clip out of the LS1 wires and modify them into the universal ones. I think it came out ok. May change it down the road.
I also finished the shorty side pipe. I used a OBX resignator for a muffler.
01-30-2013, 11:26 AM
#60
Launching!
Thread Starter
Join Date: Jul 2011
Location: Detroit, Michigan
Posts: 209
Likes: 0
Received 0 Likes
on
0 Posts
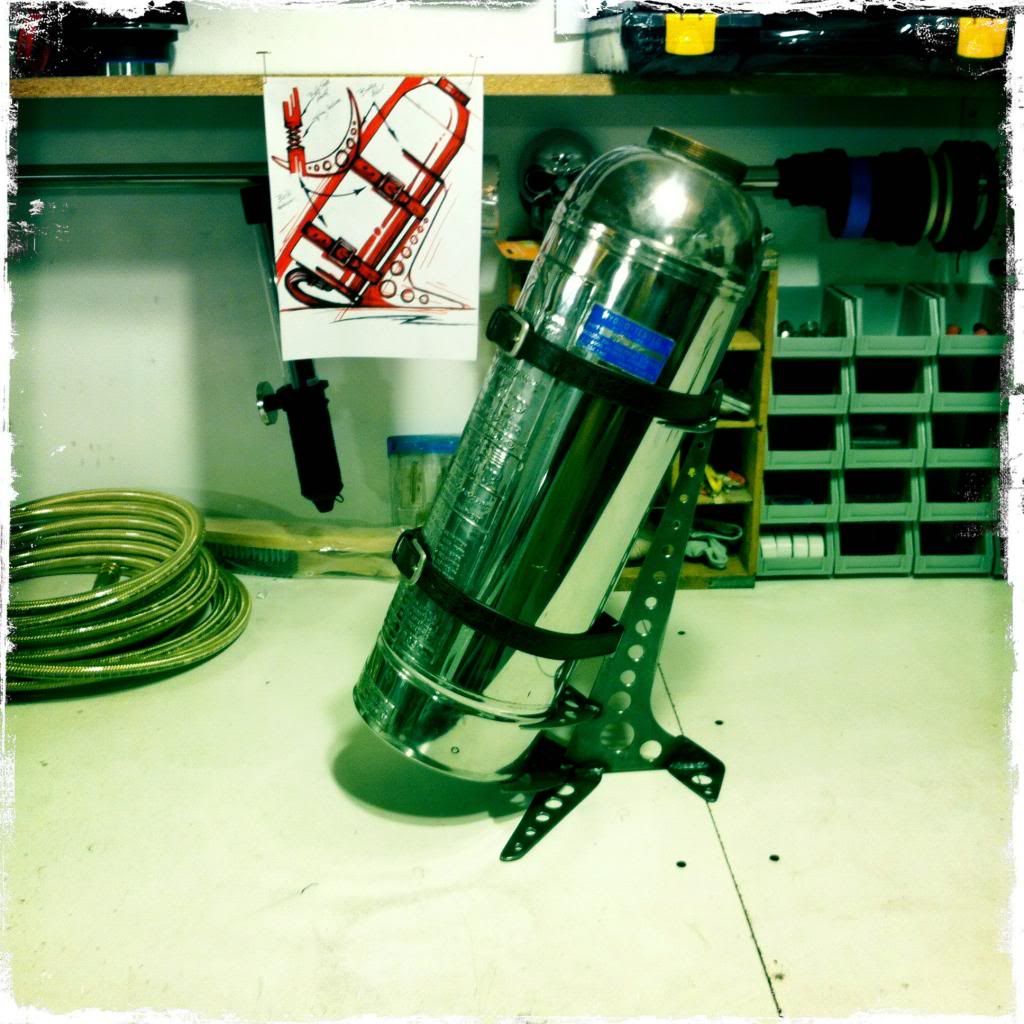
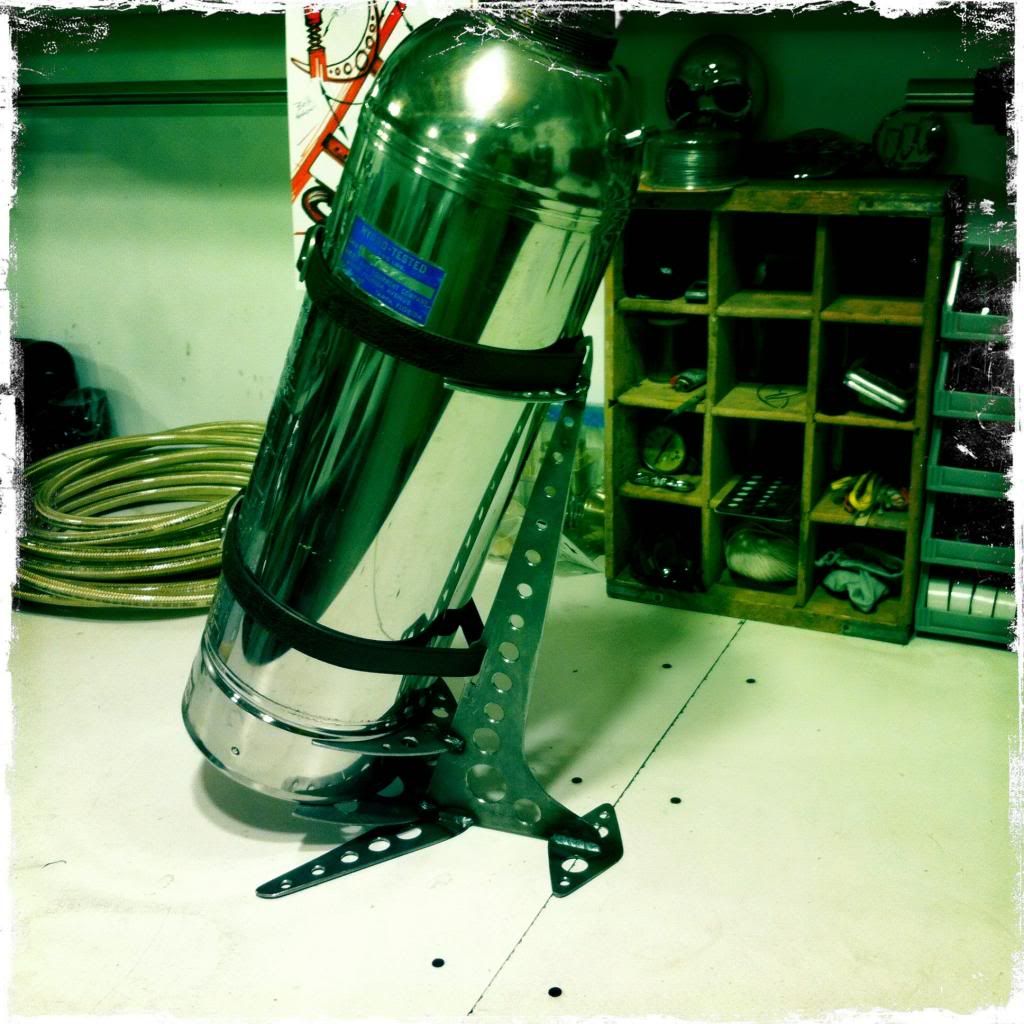
Made a bracket to hold the antique fire extinguisher, aka my intercooler water tank. Its going to be mounted centered behind the seats. in the cabin.

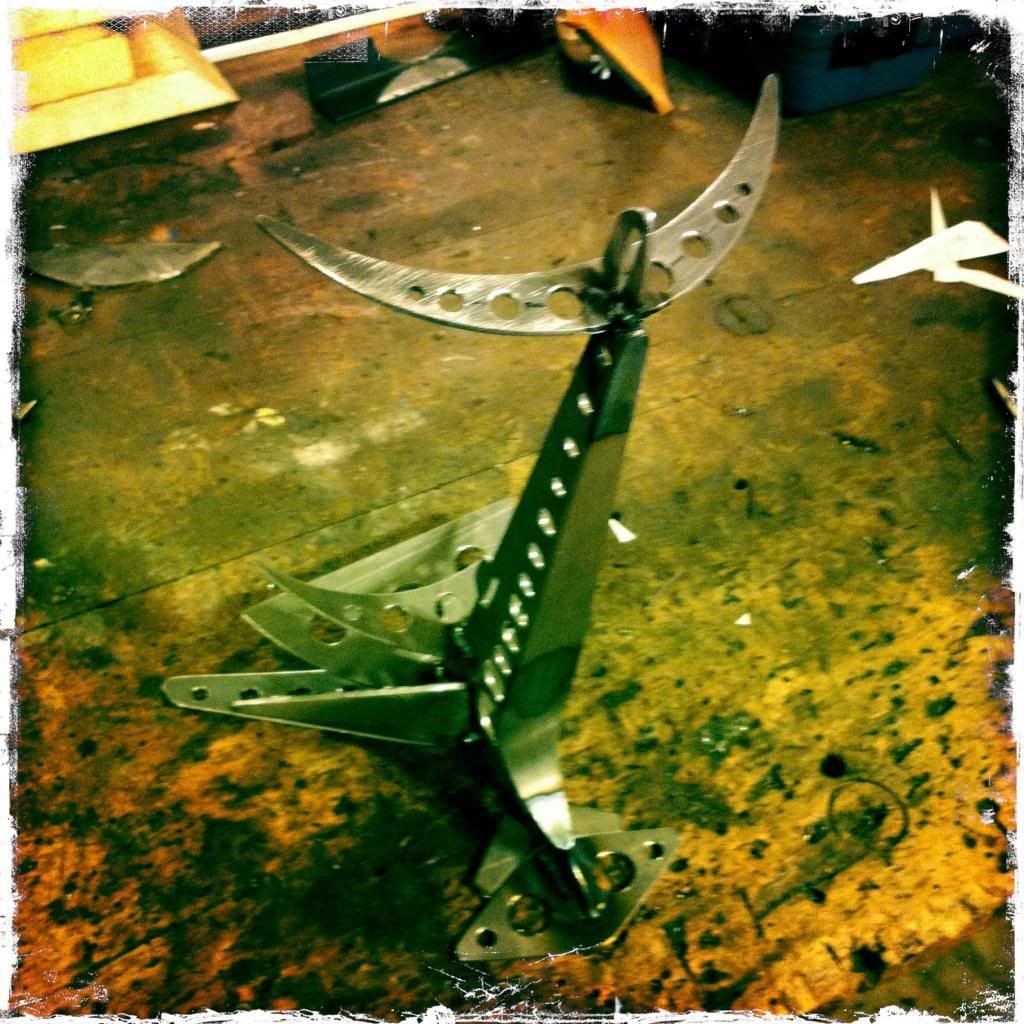
here you can see my attachement method to the mount. 2 leather belts. looks pretty sweet, and I am going to do some matching accents with the interior once I get started on it. you can also see my mediocre sketch in this pic.
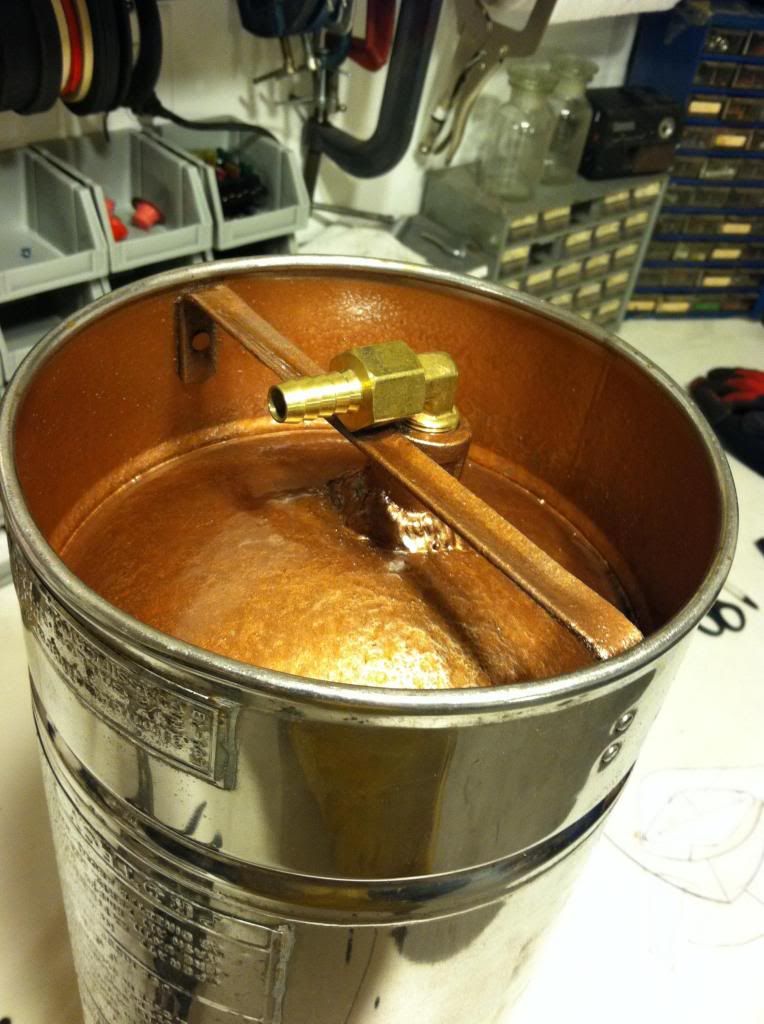
I drilled a hole in the bottom of the tank and welded in a fitting for the hose feed, I'm using the original hose barb off the top side for the return into the tank. I removed it tapped the whole and fitted a hose barb on the inside with a hose going to the bottom. This way I wont be listening to the water pouring back into the tank sounding like someone is taking a **** while I drive.
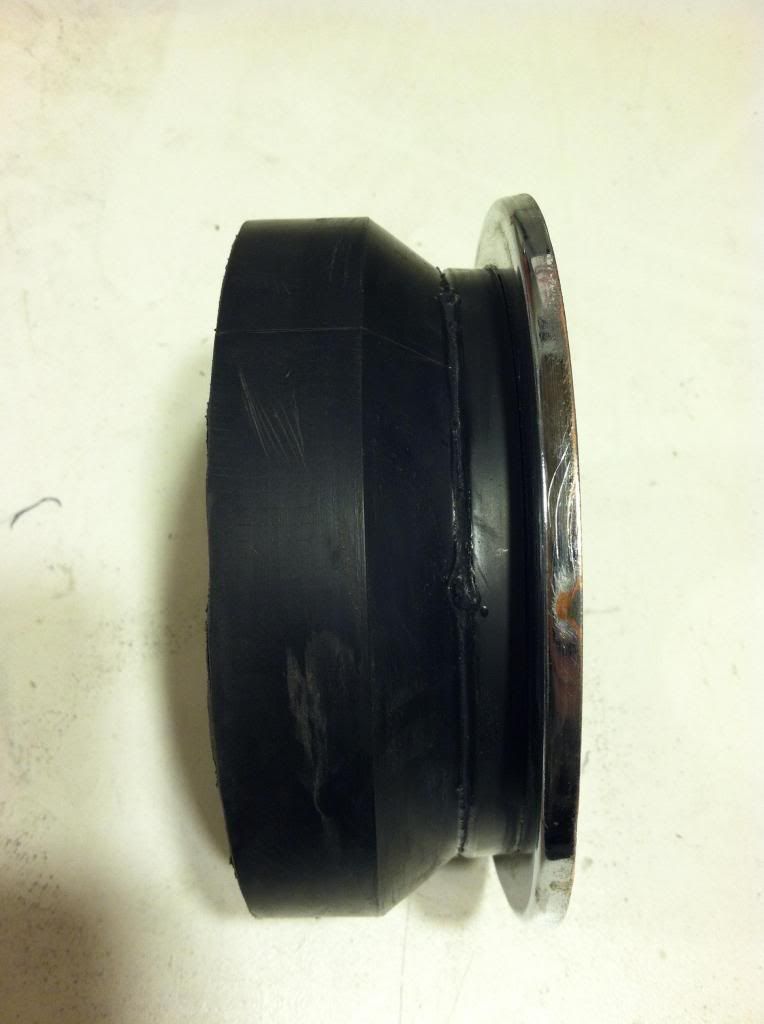
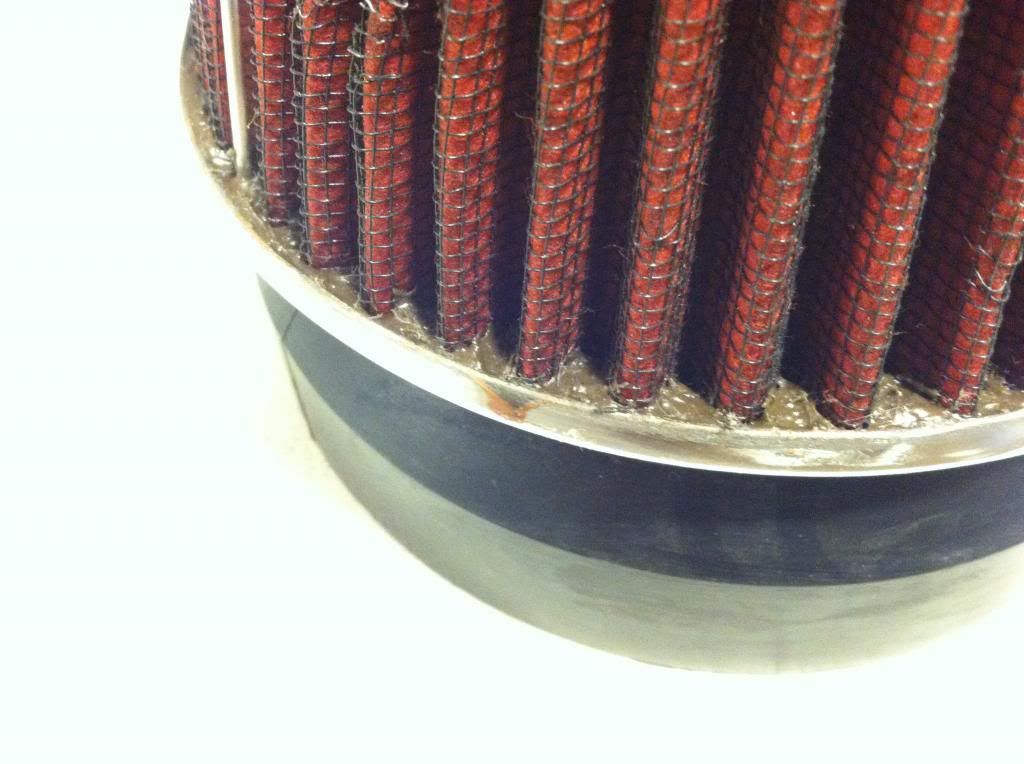
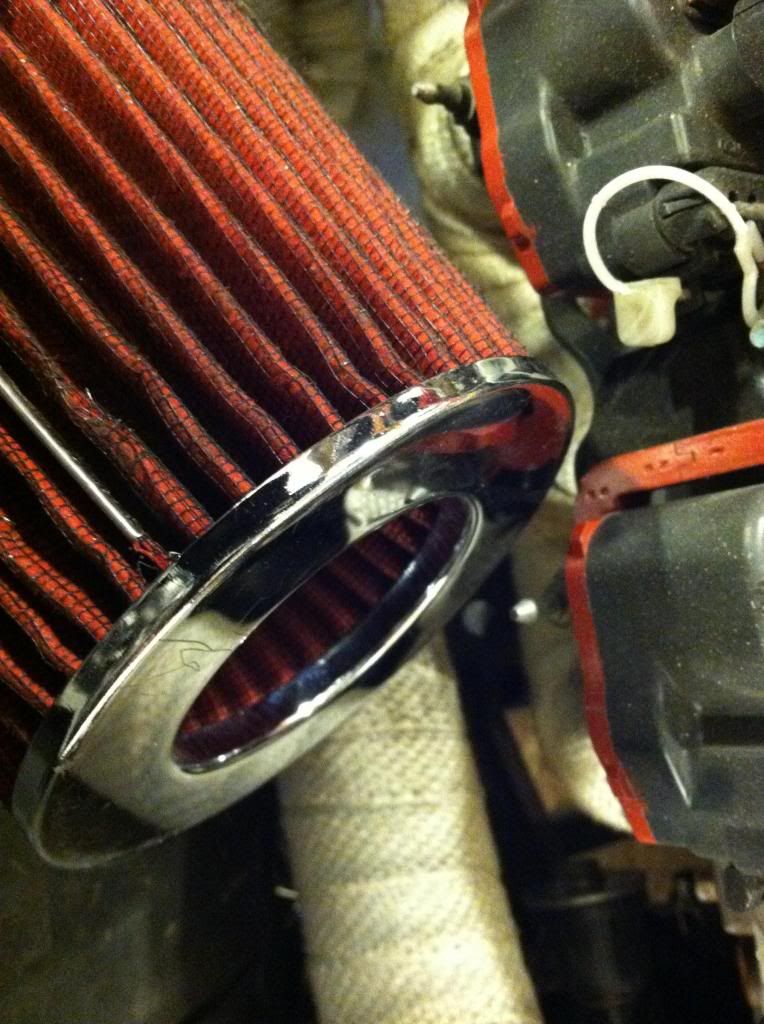
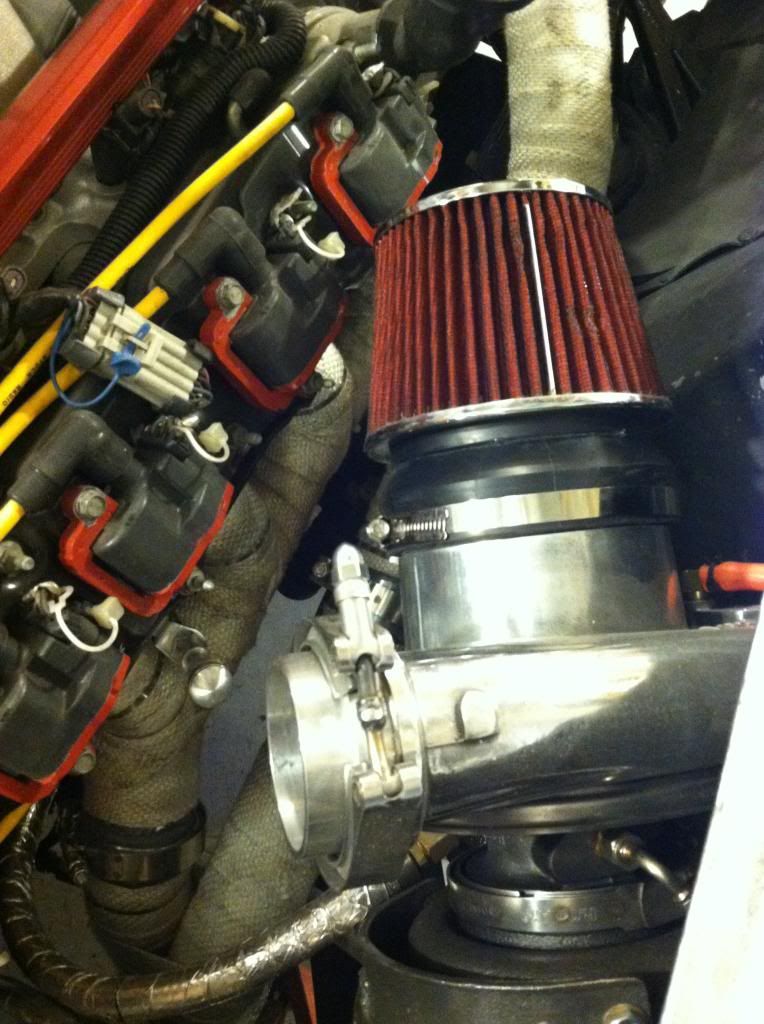
I also had to modify my airfilter to fit my clearances. The filter I had, I wanted to use if I could and save the money on buyng a new one custom for my clearnaces. I cut the filter element down, and removed all the glue/sealant they use to bond the element to the metal base. I cut down the rubber side as well. The rubber inlet was only 4" and my turbo is a 5" so I got a rubber reducer that fit my turbo and the filter rubber just fit inside of that. I cut down the reducer to be just big enough to do the job. I then bonded the 2 together.
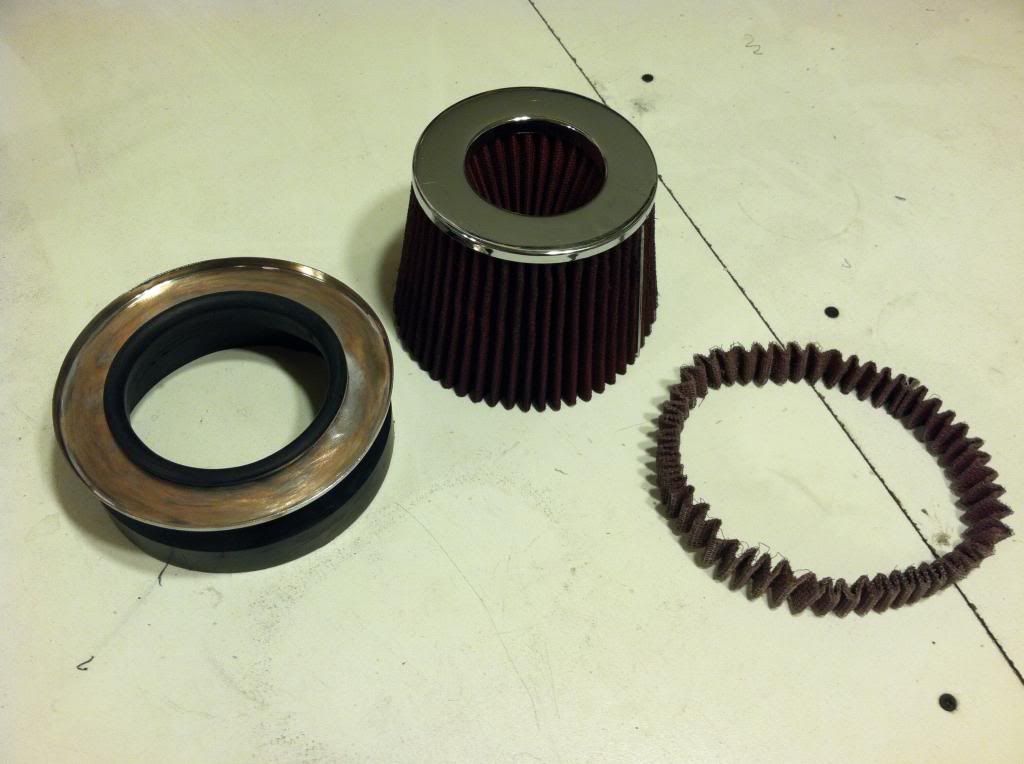

I ended up using bondo glass to seal the element back to the metal. wasnt sure it would work, but it ended up working great.
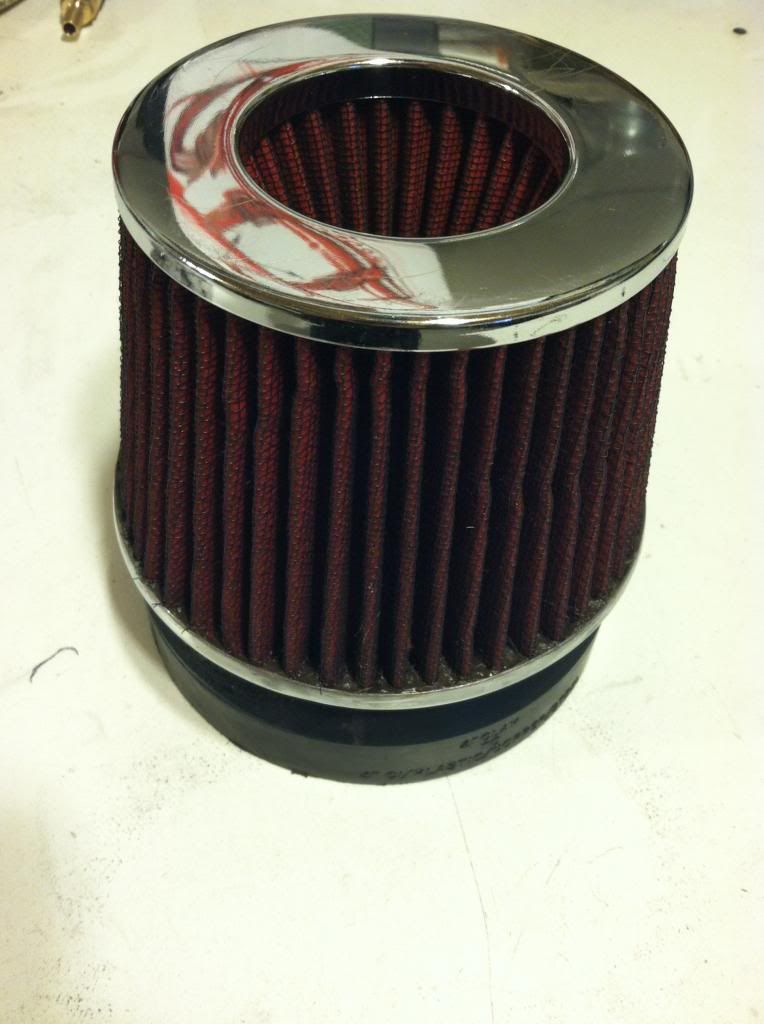
Perfect fit
here you can see my attachement method to the mount. 2 leather belts. looks pretty sweet, and I am going to do some matching accents with the interior once I get started on it. you can also see my mediocre sketch in this pic.
I drilled a hole in the bottom of the tank and welded in a fitting for the hose feed, I'm using the original hose barb off the top side for the return into the tank. I removed it tapped the whole and fitted a hose barb on the inside with a hose going to the bottom. This way I wont be listening to the water pouring back into the tank sounding like someone is taking a **** while I drive.
I also had to modify my airfilter to fit my clearances. The filter I had, I wanted to use if I could and save the money on buyng a new one custom for my clearnaces. I cut the filter element down, and removed all the glue/sealant they use to bond the element to the metal base. I cut down the rubber side as well. The rubber inlet was only 4" and my turbo is a 5" so I got a rubber reducer that fit my turbo and the filter rubber just fit inside of that. I cut down the reducer to be just big enough to do the job. I then bonded the 2 together.
I ended up using bondo glass to seal the element back to the metal. wasnt sure it would work, but it ended up working great.
Perfect fit