
69 Camaro LS2/4L70E install


 the AC condenser was the one I did not want to remove. But thanks for the info!
 09-14-2015, 07:52 PM
#362
I got the motor back together which was a struggle as just about everything that could go wrong did, but I am very happy with the end results. The majority of the parts were purchased through Texas Speed. Here is a rundown of the parts used.
My work hours during this upgrade were pretty hectic, but luckily a local shop, Herring Performance, was able to squeeze me in. I dropped the car off the day before I was leaving for Holley LS Fest. They did an amazing job tuning the motor. I don't have the dyno graph, but the final numbers were 435 rwhp and 437 rwtq! The car is extremely responsive and pulls pretty hard given I still have the stock torque converter and the throttle body I got is not ideal for my setup.
My son and I took the car to Holley LS Fest and the car ran extremely well. I got a couple 1/4 mile runs in and the car performed well. I'll post the timeslips later. There is a lot left in it once I get car sorted out and dialed in, but that will be my winter project.
- LS3 Precision Race Components LS3/L92 CNC Cylinder Heads
- Texas Speed LS3 Boost Camshaft: 227/235.639/.646 114LSA
- GM LS9 head gaskets
- ARP Head bolts
- Brian Tooley Racing Trunion upgrade
- 7.40 Chromemoly pushrods
- GM LS7 Lifters
- Rollmaster LS3 Single Roller Timing Set
- Melling high volume oil pump
- Stock LS3 intake
My work hours during this upgrade were pretty hectic, but luckily a local shop, Herring Performance, was able to squeeze me in. I dropped the car off the day before I was leaving for Holley LS Fest. They did an amazing job tuning the motor. I don't have the dyno graph, but the final numbers were 435 rwhp and 437 rwtq! The car is extremely responsive and pulls pretty hard given I still have the stock torque converter and the throttle body I got is not ideal for my setup.
My son and I took the car to Holley LS Fest and the car ran extremely well. I got a couple 1/4 mile runs in and the car performed well. I'll post the timeslips later. There is a lot left in it once I get car sorted out and dialed in, but that will be my winter project.
02-29-2016, 09:57 PM
#363
Well procrastination and injury delayed most of the winter upgrades. I just ordered an RPM Transmission Level 6 4l70 with a 3200rpm converter. I pulled the trans last weekend and the new rans should be here in a little over a week.
I also plan on getting my QTP electrical exhaust cutouts installed and hopefully a driveshaft loop,
I also plan on getting my QTP electrical exhaust cutouts installed and hopefully a driveshaft loop,
03-01-2016, 11:18 AM
#364

I thought you were going Maggie?
03-01-2016, 09:06 PM
#365
The maggie is sitting on my workbench and won't go on until next winter. For the power I want out of it (550rwhp) and how I will drive it a level 6 4l70 will work.
If the horsepower bug bites in the future I'll just sell the current motor, trans and harness get a motor with forged internals and a 4l80e at that time.
If the horsepower bug bites in the future I'll just sell the current motor, trans and harness get a motor with forged internals and a 4l80e at that time.
04-19-2016, 02:41 PM
#366
Well life has been hectic, but I have manged to get the new transmission installed. I did have to clearance the trans tunnel as the RPM Transmission servo sticks out a 1/2" or so. I need to check fluid levels and perform a few safety checks then turn the key.....hopefully this weekend.
Also wondering if any of you are using the Holley AC bracket experienced this. I went to torque the idler pulley bolt on mine and all the threads came out. The torque spec is only 36 ft\lbs and mine came about at around 20 ft\lbs or less.........ggggrrhhh
Also wondering if any of you are using the Holley AC bracket experienced this. I went to torque the idler pulley bolt on mine and all the threads came out. The torque spec is only 36 ft\lbs and mine came about at around 20 ft\lbs or less.........ggggrrhhh
 04-21-2016, 08:06 PM
#368
I'll work on getting some pics posted...
Last edited by Rocketrod; 05-02-2016 at 07:08 PM.
05-02-2016, 07:14 PM
#369
Good news to report. When I got home today I had a package waiting for me from Holley. They sent me a new Holley LS A/C bracket kit! It is nice to see a company do the right thing and take care of their customers! Now I just need to get the bracket painted and installed before summer get here.
Last edited by Rocketrod; 05-21-2016 at 12:00 PM.
06-13-2016, 05:52 PM
#370
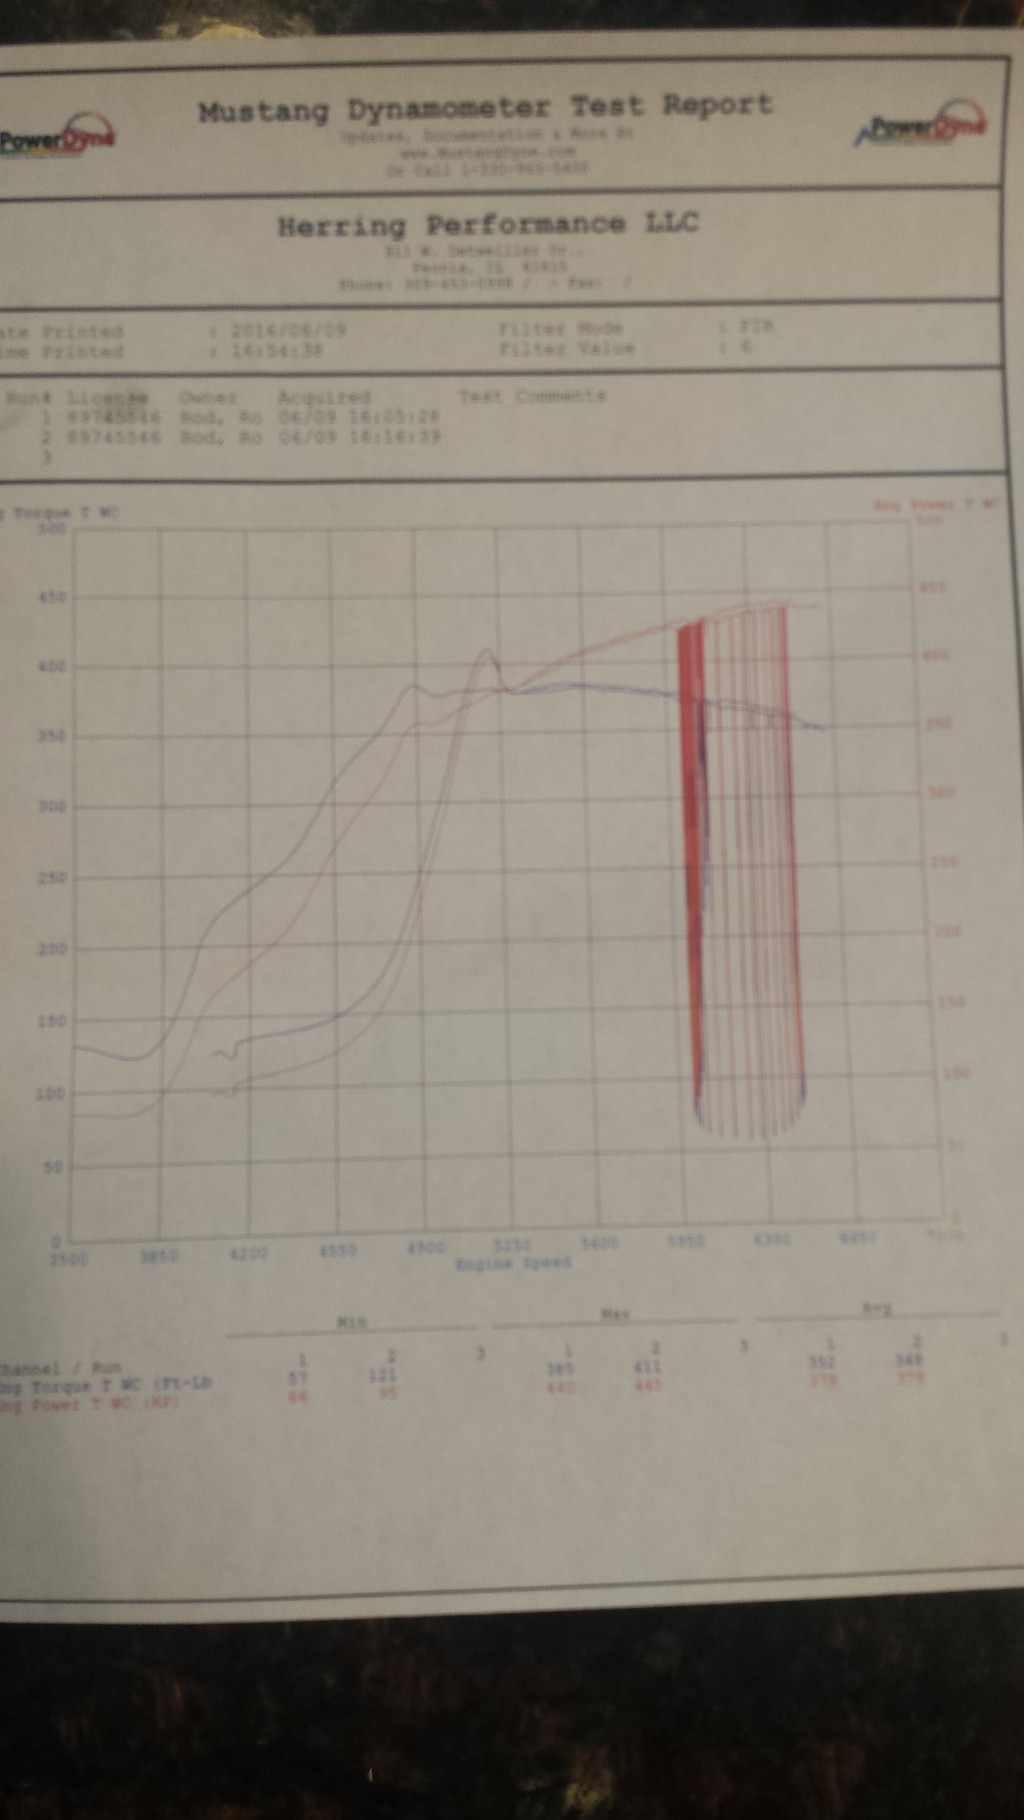
Been a while since my last update but last week I finally got around to having my QTP 2.5" electrical exhaust cutouts installed. They sound really great and I opted for the wireless remote to open/close them. Once that was finished I dropped the car off to adjust the tune and gets all the kinks worked out. The final numbers were 445rwhp/411rwtq. Still needs a little bit of work on the transmission shift points and converter lockup, but the car runs really well. Here is the dyno video.
 12-17-2016, 11:20 AM
#373
Teching In

Join Date: Jan 2016
Posts: 2
Likes: 0
Received 0 Likes
on
0 Posts
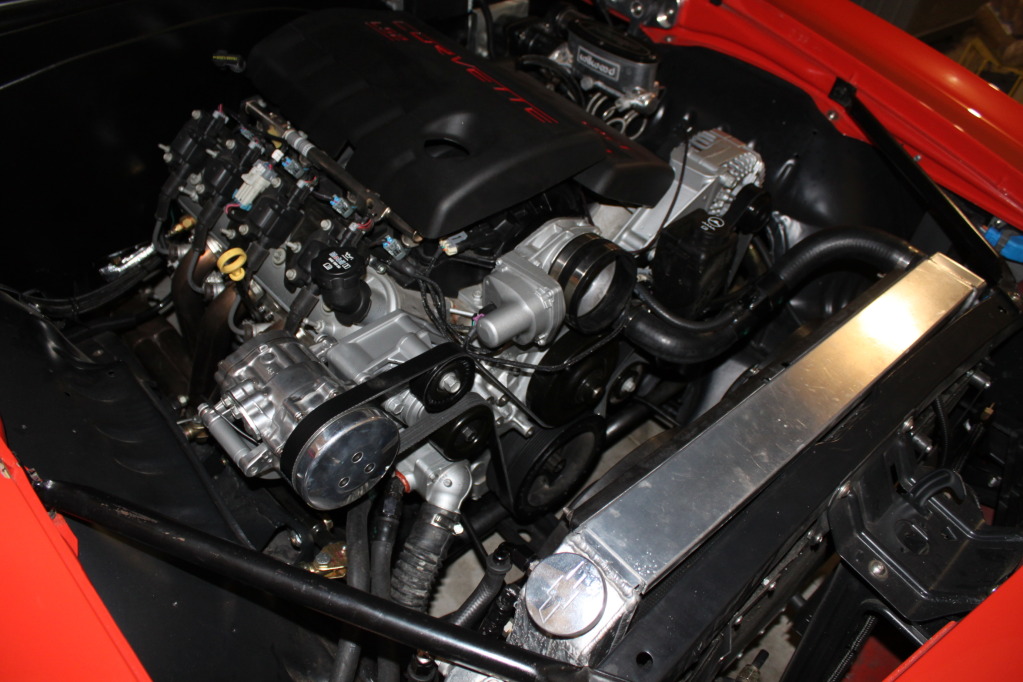
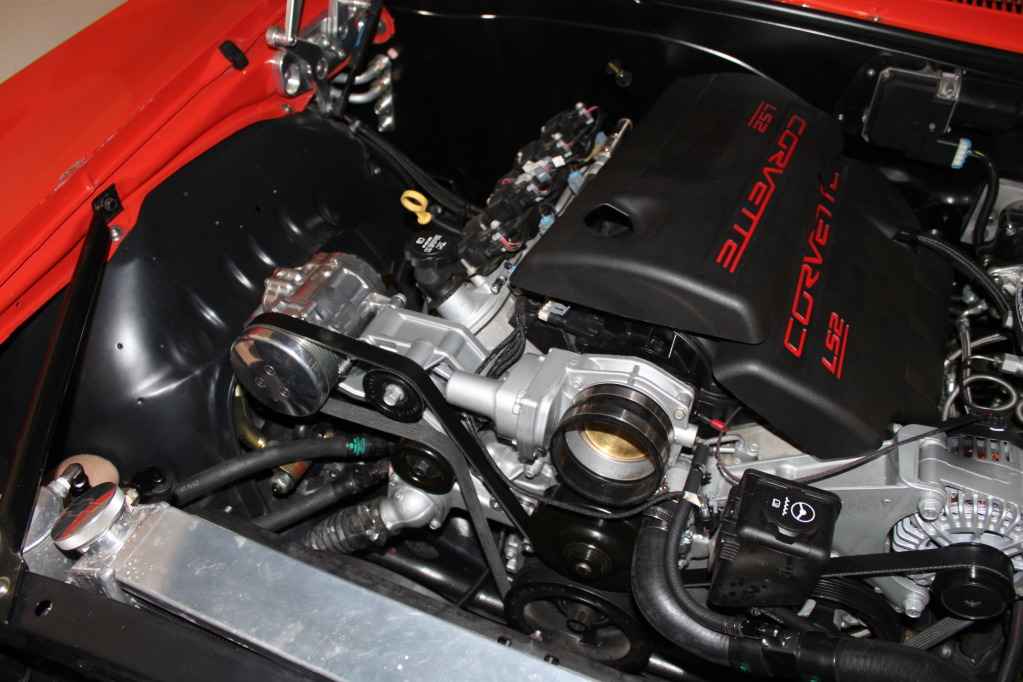
[QUOTE=Rocketrod;16962789]I installed the Holley bracket with a SD7 A/C compressor this weekend. The install was pretty straight forward and Holley's instructions were spot on! It was refreshing to actually have instructions that matched reality.
I still need to still need to check the clearance of the water pump boss and serpentine belt after running the motor as it is pretty close (this was mentioned in Holley's instructions). I also need to find another location to mount the the PVC catch and trim the engine cover to fit. Overall I am very happy with the quality and looks of the bracket, but I did paint it before I installed it.
The only frustration was getting the correct belt. I ended up going to Auto Zone because they were the only ones locally that could look up the belt based on length, 6PKxxxx (where xxxx is the length of belt in millimeters) versus specific application. I ended up buying four different length belts.
I have installed the Kwik and Holley A/C bracket and personally the Holley bracket is a much easier install (fewer pieces), but I doubt you could go wrong with either.
Here is a list of the parts I used, bear in mind I was using a GM 19155067 Corvette accessory drive setup. All of the part number listed, except the belt, were obtained by cross referencing the part numbers listed in Holley's instructions.. I'll post more pics once I get te PVC, CAI and engine cover installed.
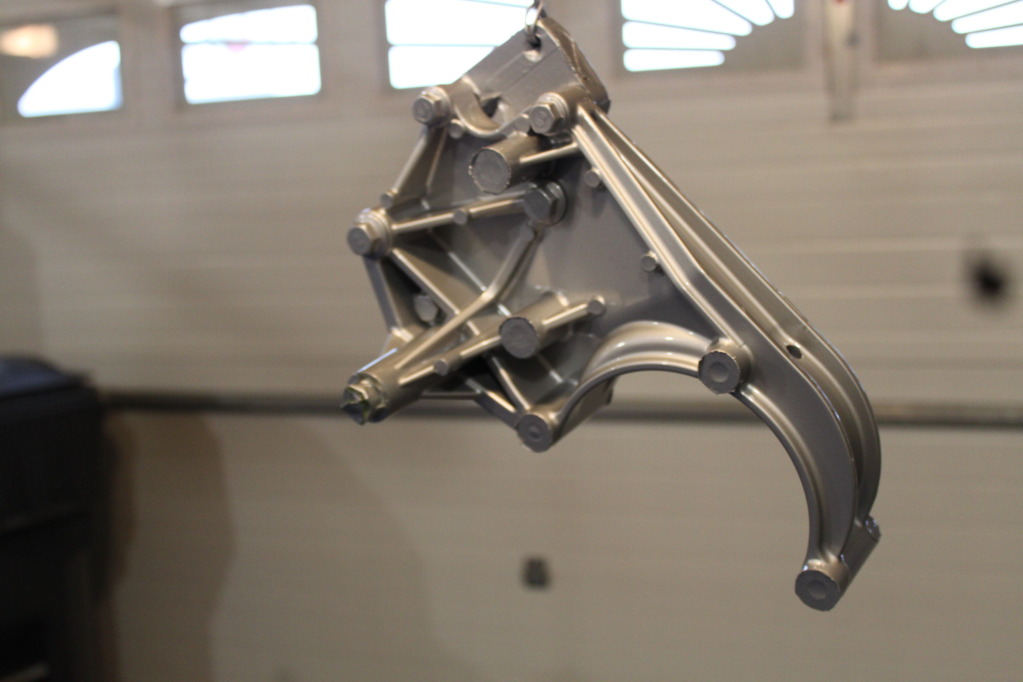
Here is a pic of the bracket after I painted it
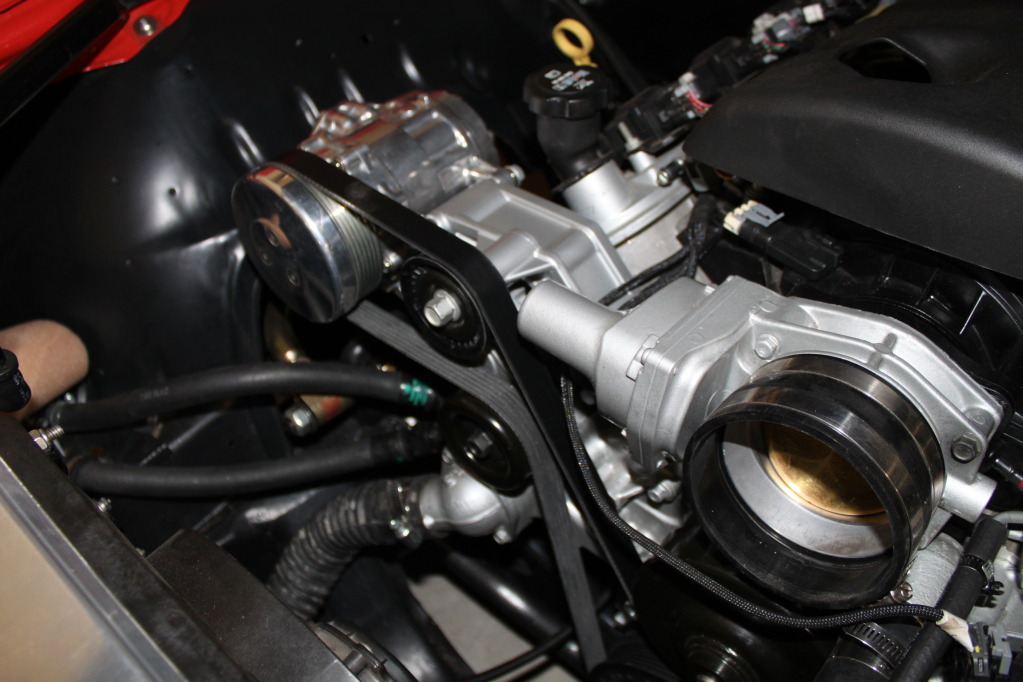
The boss on the water pump directly below the throttle body may have to be ground down a bit as the clearance is pretty tight.
Sorry to hijack the thread but was wondering if you could shed a little light on an issue I am having. I just put an LS3 in my 67 using all of the holley install parts. motor mounts. crossmember, pan, headers and am using their full accessory setup with the SD7 exactly like yours.
I just put the accessories on last night. Since the port of the compressor is out the side (just like yours) what fittings are you using to make that work? I tried using the 90 degree fitting with the port but the compressor sits so wide that the fitting wont fit between the side of the compressor and the inner fender. I am running all hoses for heat and AC around the inner fender and into a bulkhead just like yours.
Are you able to please help me out? Any direction would be super appreciated. Thanks so much. Kris
I still need to still need to check the clearance of the water pump boss and serpentine belt after running the motor as it is pretty close (this was mentioned in Holley's instructions). I also need to find another location to mount the the PVC catch and trim the engine cover to fit. Overall I am very happy with the quality and looks of the bracket, but I did paint it before I installed it.
The only frustration was getting the correct belt. I ended up going to Auto Zone because they were the only ones locally that could look up the belt based on length, 6PKxxxx (where xxxx is the length of belt in millimeters) versus specific application. I ended up buying four different length belts.
I have installed the Kwik and Holley A/C bracket and personally the Holley bracket is a much easier install (fewer pieces), but I doubt you could go wrong with either.
Here is a list of the parts I used, bear in mind I was using a GM 19155067 Corvette accessory drive setup. All of the part number listed, except the belt, were obtained by cross referencing the part numbers listed in Holley's instructions.. I'll post more pics once I get te PVC, CAI and engine cover installed.
- Holley 20-134 LS AC bracket, high mount passenger side
- Holley 21-1 LS Installation kit, basically an adapter to mount bracket to engine based on accessory backspacing
- Dayco p/n 89337, main drive belt tensioner
- Dayco p/n 89059, smooth idler pulley
- Gates p/n 6PK2525, Serpentine belt
Here is a pic of the bracket after I painted it
The boss on the water pump directly below the throttle body may have to be ground down a bit as the clearance is pretty tight.
Sorry to hijack the thread but was wondering if you could shed a little light on an issue I am having. I just put an LS3 in my 67 using all of the holley install parts. motor mounts. crossmember, pan, headers and am using their full accessory setup with the SD7 exactly like yours.
I just put the accessories on last night. Since the port of the compressor is out the side (just like yours) what fittings are you using to make that work? I tried using the 90 degree fitting with the port but the compressor sits so wide that the fitting wont fit between the side of the compressor and the inner fender. I am running all hoses for heat and AC around the inner fender and into a bulkhead just like yours.
Are you able to please help me out? Any direction would be super appreciated. Thanks so much. Kris
12-17-2016, 12:28 PM
#374
....
Sorry to hijack the thread but was wondering if you could shed a little light on an issue I am having. I just put an LS3 in my 67 using all of the holley install parts. motor mounts. crossmember, pan, headers and am using their full accessory setup with the SD7 exactly like yours.
I just put the accessories on last night. Since the port of the compressor is out the side (just like yours) what fittings are you using to make that work? I tried using the 90 degree fitting with the port but the compressor sits so wide that the fitting wont fit between the side of the compressor and the inner fender. I am running all hoses for heat and AC around the inner fender and into a bulkhead just like yours.
Are you able to please help me out? Any direction would be super appreciated. Thanks so much. Kris
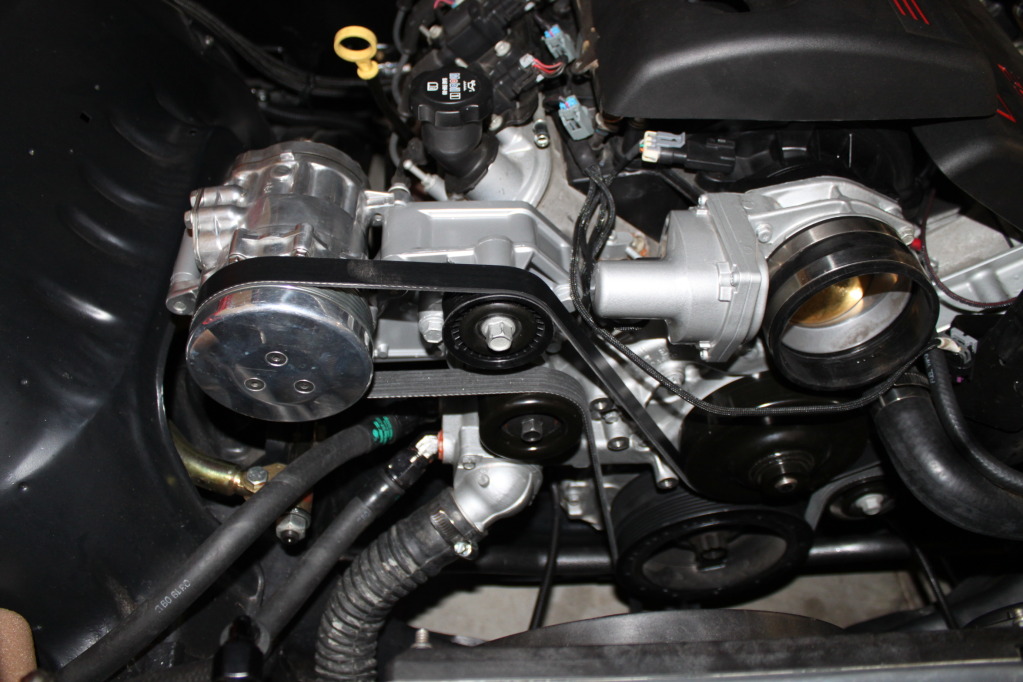
If you have any more questions or need more pics let me know, but here are a few pics that should help.


 12-17-2016, 01:03 PM
#375
Teching In
Join Date: Jan 2016
Posts: 2
Likes: 0
Received 0 Likes
on
0 Posts
Thanks for your response and the suggestion on the EZ-clip. So I see you are running one port in the front of the car behind the dryer but where is the other one??
I thought about doing what you are doing but the stinking port on the 90 coming off the compressor is to tight to the inner fender. Would be nice if they made a 90 with a port but have the port on the side rather than on the back of the 90.
thanks again for your response. I also l liked that you painted your brackets. any suggestions on painting them as far as what you used for paint and prep??
Couple install pics
https://dl.dropboxusercontent.com/u/...216_112223.jpg
https://dl.dropboxusercontent.com/u/...216_153001.jpg
12-17-2016, 02:49 PM
#376
Last edited by Rocketrod; 02-11-2017 at 08:17 PM.
07-30-2017, 07:49 PM
#377
It's been quite a while since my last update, but I will try to get some pics posted of the latest mode which include:
- ChassisWorks minitubs
- ChassisWorks glink with anti-rollbar
- ChassisWorks Fab 9 ford nine inch, aluminum center section with 3.50 gears
- Forgelines 18x12s and 18x8
- BFG Rivals
- Baer 6Ps
- Baer Remaster
- AFX spindles
- Raptor bedliner
07-31-2017, 08:54 AM
#378
Cha ching
08-08-2017, 06:22 PM
#379
Oh yeah. I came close to selling the Camaro last year, but decided to keep it and update it since most of the mods are about 10 years old. It's amazing how much prices have went up, which worked out for me as I was able to sell almost all of the used parts for what I paid for them. Anyways I will try to get some pics up soon.
05-24-2020, 09:47 AM
#380

Oh yeah. I came close to selling the Camaro last year, but decided to keep it and update it since most of the mods are about 10 years old. It's amazing how much prices have went up, which worked out for me as I was able to sell almost all of the used parts for what I paid for them. Anyways I will try to get some pics up soon.