
1981 Second Gen Camaro Berlinetta BUDGET build (Updated FiTech injection/Boost!)
 07-09-2013, 09:36 PM
#141

Thanks man I appreciate it...3.08 should be the highest I can go due to the 3.42 first gear ratio on my transmission it would give me a 10.5 total ratio in first which isn't bad bc I don't wanna just eliminate 1st gear which 3.42/3.73 would probably do, i also still want to have a decent highway cruise ability...
 07-12-2013, 12:42 AM
#142
Staging Lane
iTrader: (4)

Join Date: Oct 2010
Location: Spokane Wa.
Posts: 76
Likes: 0
Received 0 Likes
on
0 Posts
Just went through all your pages/pictures.
I really like the way you painted your L-33 block.
I was wondering what it would look like doing that.... now I have to decide.
Keep up the good work,
Stu
I really like the way you painted your L-33 block.
I was wondering what it would look like doing that.... now I have to decide.
Keep up the good work,
Stu
07-12-2013, 12:46 PM
#143
Yea I tried to get that lsx look with spending the big $...I basically just painted it all orange and then Took time with sanding paper and roloc discs hitting all the machines edges and bosses on the block... You can't see a lot of them In the car but "I" know they are there lol...


 06-27-2014, 07:55 AM
#147
10 Second Club
iTrader: (13)
Join Date: Feb 2006
Location: MOREHEAD KY
Posts: 3,297
Likes: 0
Received 0 Likes
on
0 Posts

Love this build! I just got an 81 camaro my self. It's as,close as I'll ever get to having my first car back so I'm pretty excited to see so many late year 2nd gen crashing built ! Good work and give us some more updates how is the car doing now?
05-30-2016, 11:14 PM
#148
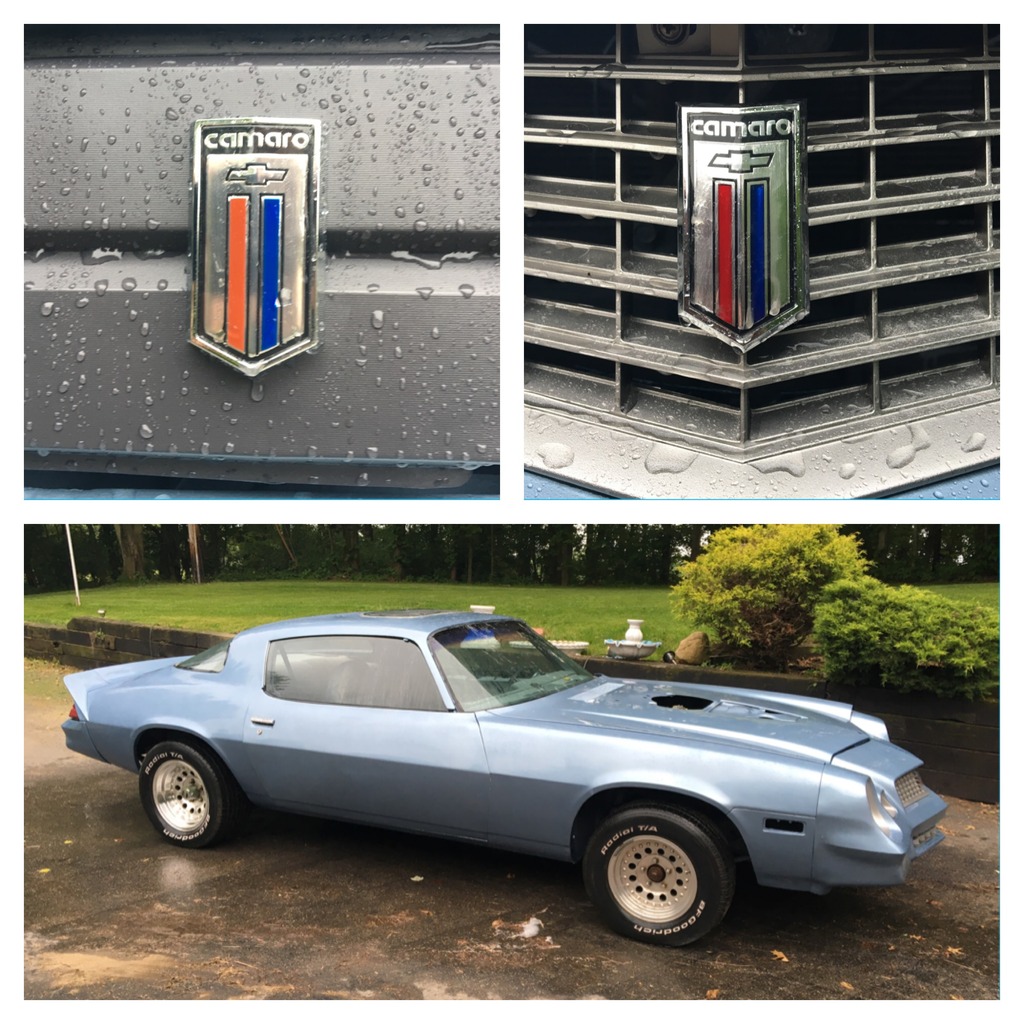
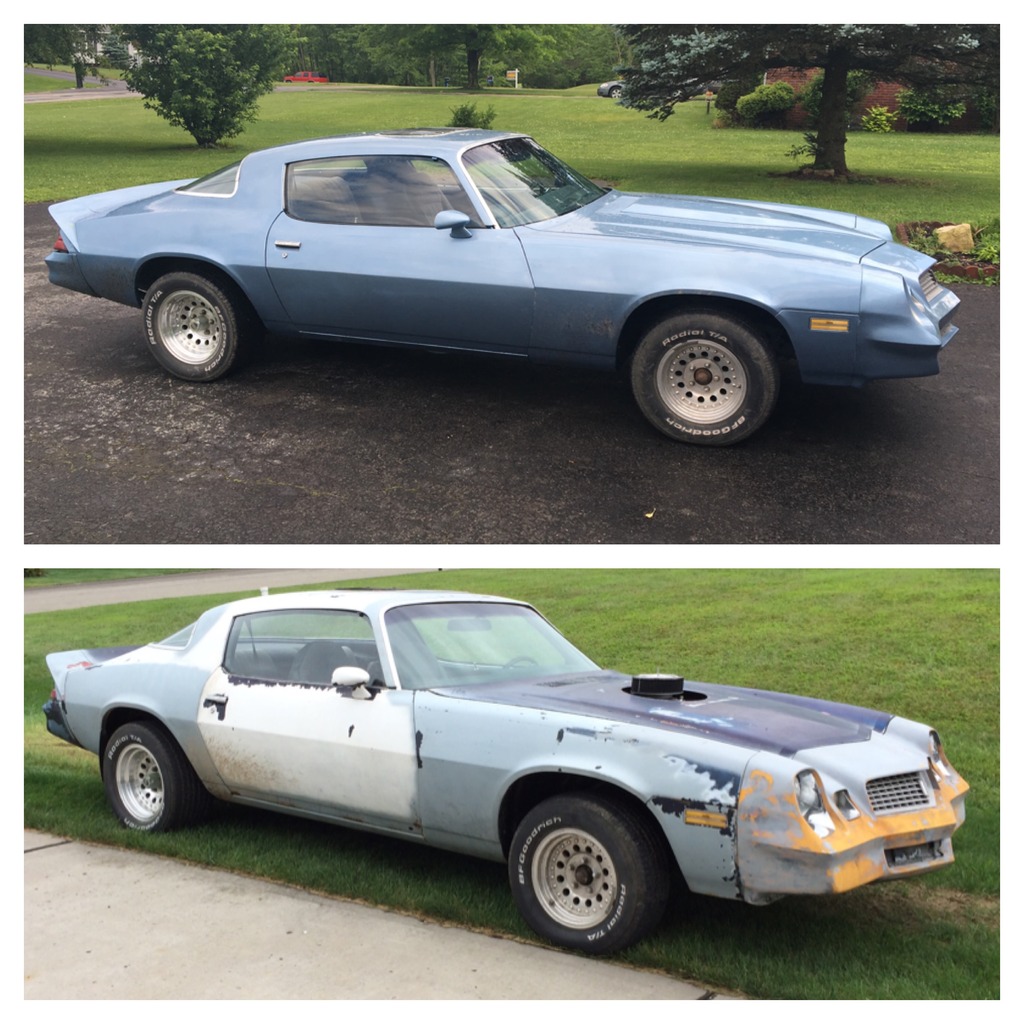
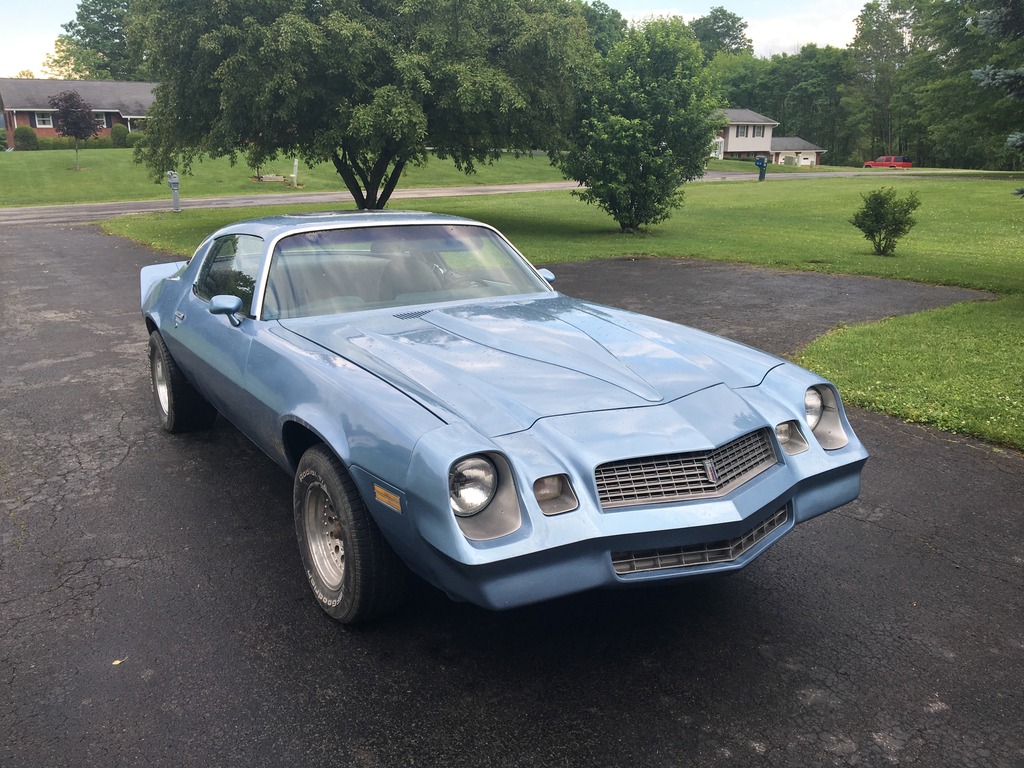
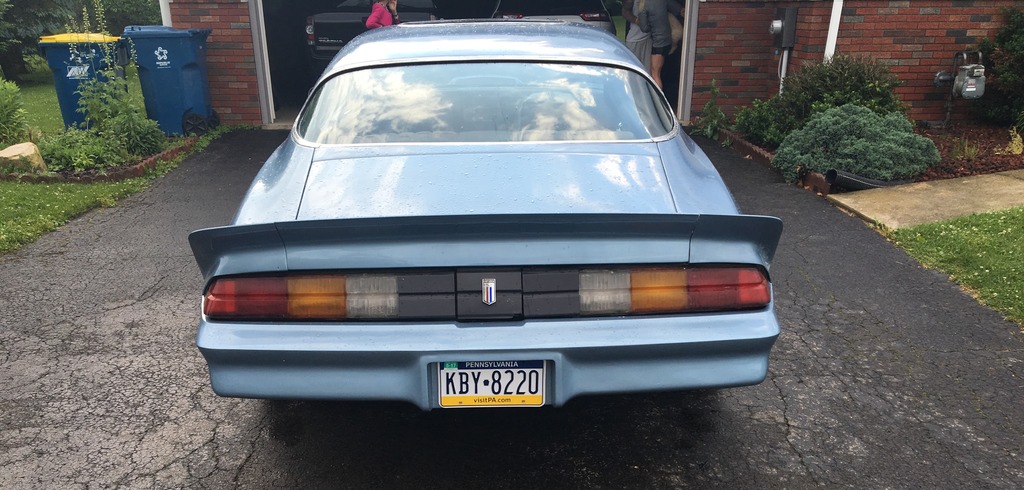
Well 3 years later and I finally got the car painted...Light Blue Mettalic which is the factory color. Definitely don't see many this color which is why I went with it.
I will be swapping the carb out for the fairly new FItech fuel injection kit and reporting back...

I will be swapping the carb out for the fairly new FItech fuel injection kit and reporting back...
05-31-2016, 09:10 AM
#149

I've always loved that color for your late 2nd Gen.
08-03-2016, 02:33 PM
#150
Ok other than the few photos I posted of the car with the new paint job I wanted to update and bring this thread back from the dead (whether anybody cares remains to be seen lol).
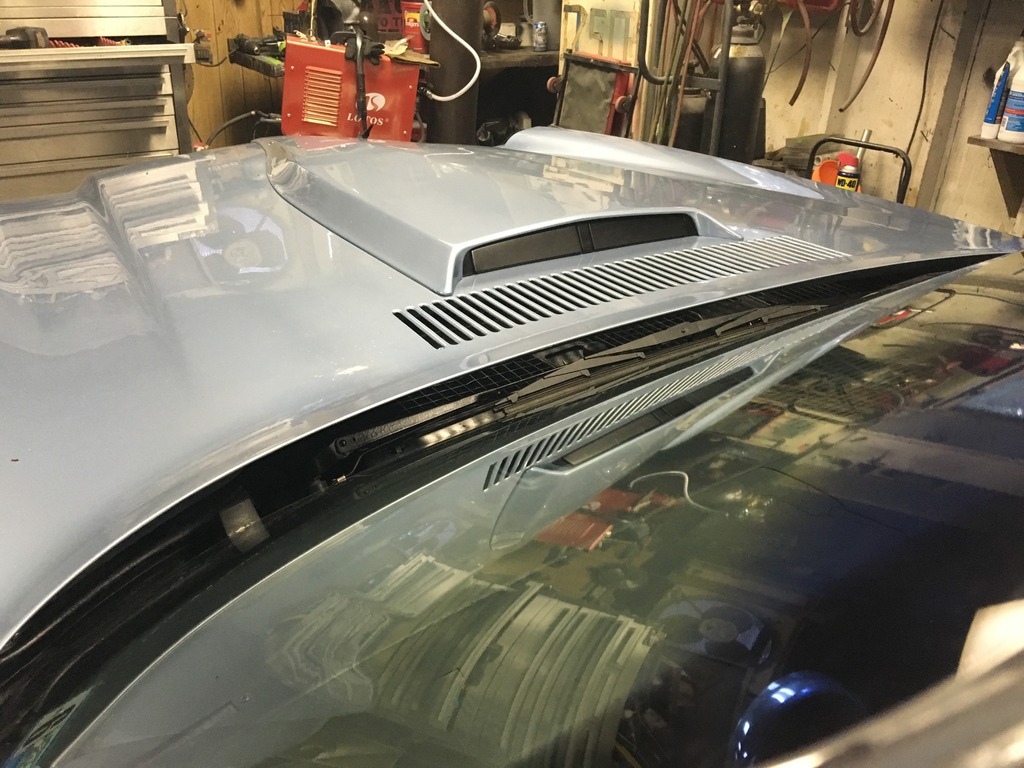
I have the car completely put together which includes the addition of an 80-81 Z28 hood which I was trying to avoid because I wanted the car to be exactly what it looked like from the factory, just a regular Light Blue Metallic Sport Coupe, but with an LS/4 speed power train hiding beneath. The hood scoop was necessary evil as the Ls with Edlebrock performer intake and a 2 �� drop base/ 2 �� filter had to no way of clearing a stock flat hood. The silver lining is that I got the solenoid and hardware necessary to make the flap on the back of the cowl operate. My car didn�t have the provision in the harness since it wasn�t originally equipped, but I fabbed a bracket off the pedal bracket and used a nitrous micro switch for activation. The flap open when the throttle is over 80% and is pretty damn cool in my opinion.
The next big change to the car came in the rearend. If you have read the thread I bought the car with an open 2.73 rearend which was ok at the beginning when my car looked like a rat rod and I was just happy to be driving an LS powered 81 Camaro. But as usual I just wanted more so I found a good deal locally on a used posi and 3.73 gears for the 8.5� 10 bolt rear. I originally thought I wouldn�t be able to do this because of the steep 3.42 first gear in my trans, but I turns out I was incorrect and it has the lower, more desirable, 3 groove 2.64 first gear.
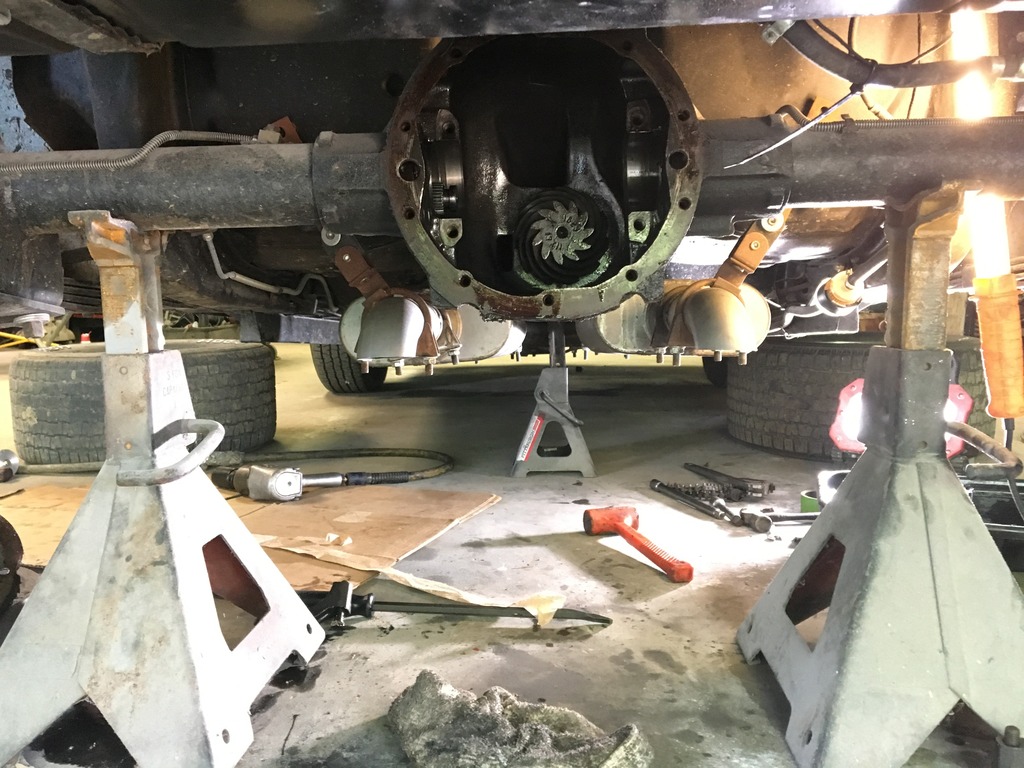
I was sick of one wheeling when I tried to launch the car or drive up the inclinded driveway where I work on the car. Needless to say I got super lucky as I used the used 3.73 pinion gear shim it came with and all I had to was swap the carrier shims side to side and I got a good pattern so It saved me from buying an install kit, shims, etc. This isn�t the optimal way to set up a rearend but the pattern was solid enough I decided to roll with it. I can tell you that 3.73s blow on the highway, the car spins 3K rpm at like 65-70 and you can start out in 2nd gear with ease lol. The speedo is only off 10mph so it isn�t horrible. Im pretty sure im gonna be swapping the rear gear with something in between 2.73/3.73 probably like a 3.23 or even 3.08 with my future mod ill talk about below
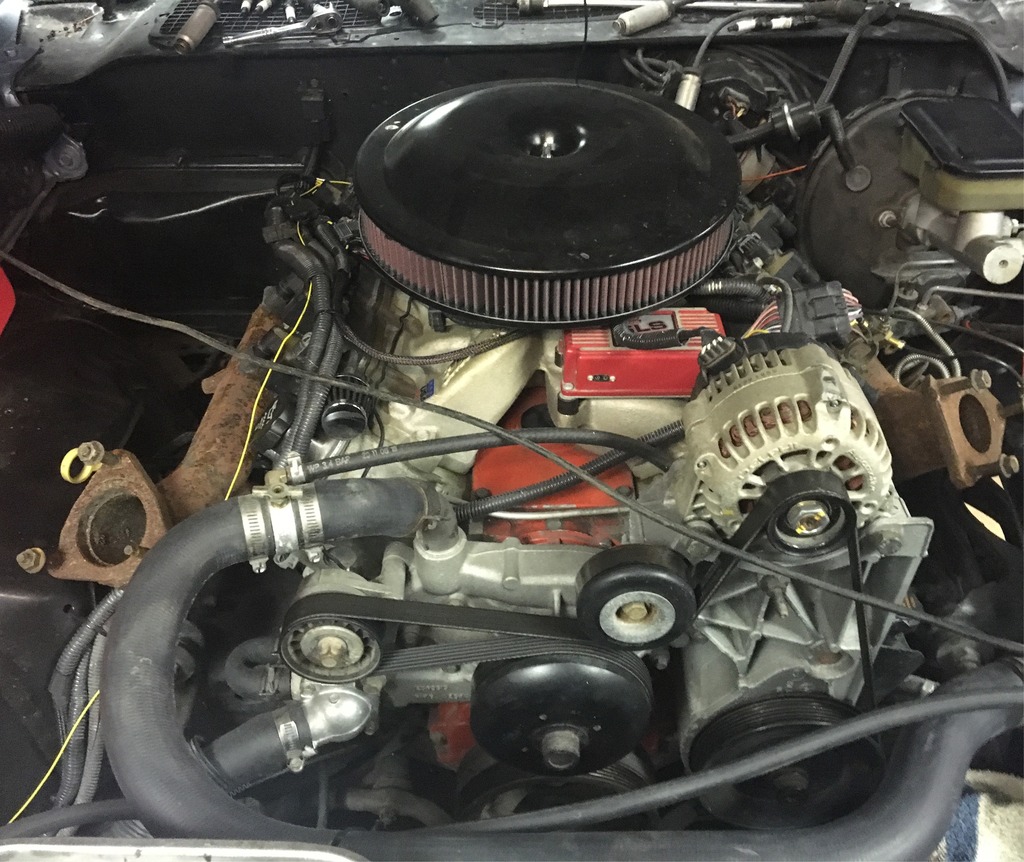
I read an article about FiTech which a new self learning fuel injection kit that is dirt cheap when compared to the big name ones like FAST, Holley, and MSD. I figured what the hell I might as well try it since I am more familiar with a computer than tuning a carb to say the least. I originally had a Proform 650 double pumper that was just dumping fuel so I swapped it for an Edlebrock 600 which a lot better as far as throttle response and gas mileage (even though I only care about smiles per gallon).
So I selected the 600hp kit that was a step above their base model 400hp kit since I figured if I did anything to the engine I would be really limiting it with a 400hp kit that had 4-56lb injectors so the 600hp kit with 4 -80lb injectors seemed like the better choice. It was $1,000 and then I got a $100 mail in rebate from the manufacturer. I am here to tell you the FiTech kit is so stupid easy to install and setup that I was in disbelief. The install setup included the four following sections:
1. Fuel system � I went with FiTech�s inline fuel system which included a 255lph inline pump with all the push lok AN hosing and fittings needed to feed the throttle body. The line and fittings were pretty high quality and looked to be Fragola from their design. The kit included a -8 line from tank to pump and then -6 from pump to TB as well as -6 for the return line. My original fuel tank sender only had a feed line so instead of hacking the tank for a bulkhead I ordered an 81 camaro A/C equipped fuel sender because it had a second feul line I used has a return. I used AN to compression adapters to go from hard line to AN hose. The push lok stuff is easy to wrok with and doesn�t require mangling your fingers line stainless AN hose does.
2. Sensors- The FiTech only used 3 external sensors since sensors like the IAC, TPS, IAT, Fuel regulator are all built into the main unit. The only sensors I had to hook up was the wide band oxygen sensors which I conviently threaded into my driver side fbody manifold. They included an O2 bung that allows you to drill your exhaust and then sandwish the bung with gasket via two hose clamps which I assume would work but isn�t optimal. The next sensor was the coolant temp sensor, they provide a normal �� sender that�s used on older SBC but good old gm used that same plug on the newer LS temp sesnors that thread into the cylinder head so that was easy as well. The third �sensor� I hooked up was the handheld controller which routed through my firewall into the cabin. That was it for sensors!
3. Wiring- This is the part that was so simple I had more time in soldering the connections that figuring how where to wire them up. The first connection was the Battery hot which is expected, the next was tach signal which I spliced into the wire between my tach and MSD 6LS box, third was key power which again is easy, coil wire was not needed since I ddint have a distributor. Last but not least was the fan and fuel pump control. The fan wire goes to a relay and is used as the trigger wire which activates key power and then powers wire to your fan. The on/off temp is controlled by your handheld controller. The final wire was the fuel pump which wired direct from FiTech TB harness to the pump. The TB has an internal relay which makes wiring this a breeze. Now how easy is that?
4. Setting it up- this was the simplest step by far�all you do is enter # of cylinders, cubic inches, what cam (1-4 mild to wild), hot idle speed desired, and rev limit you want. Done!
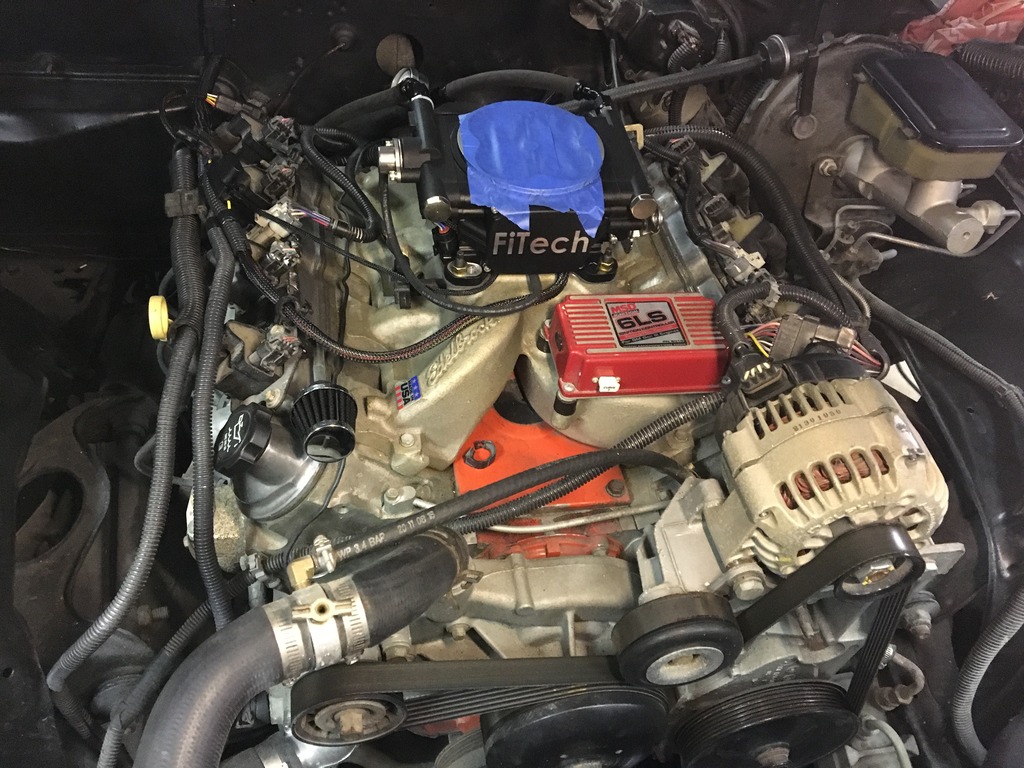
Now the system didn�t fire up the first time I hit the key, because I replaced gas tank, sender, pump, hoses, etc. there was air in the line but after priming and trying a few times the engine came to life and found its idle fairly fast. On my first drive I really noticed excellent throttle response that you would need your carb tuned by an expert tuner to match. Also cold starting issues with a carb are no more, you just get in and hit the key and drive no letting it warm up or anything. I have not had a single issue that I did with a carburetor. Now can a carb be tuned to the point there is no problems�yes, but I didn�t have the experience or time necessary to get there although I eventually do want to become proffieicnet in that aspect. So I recoomend this kit highly to anyone with an older car or carbed LS car and you will consider this the best $1000 you ever spent.
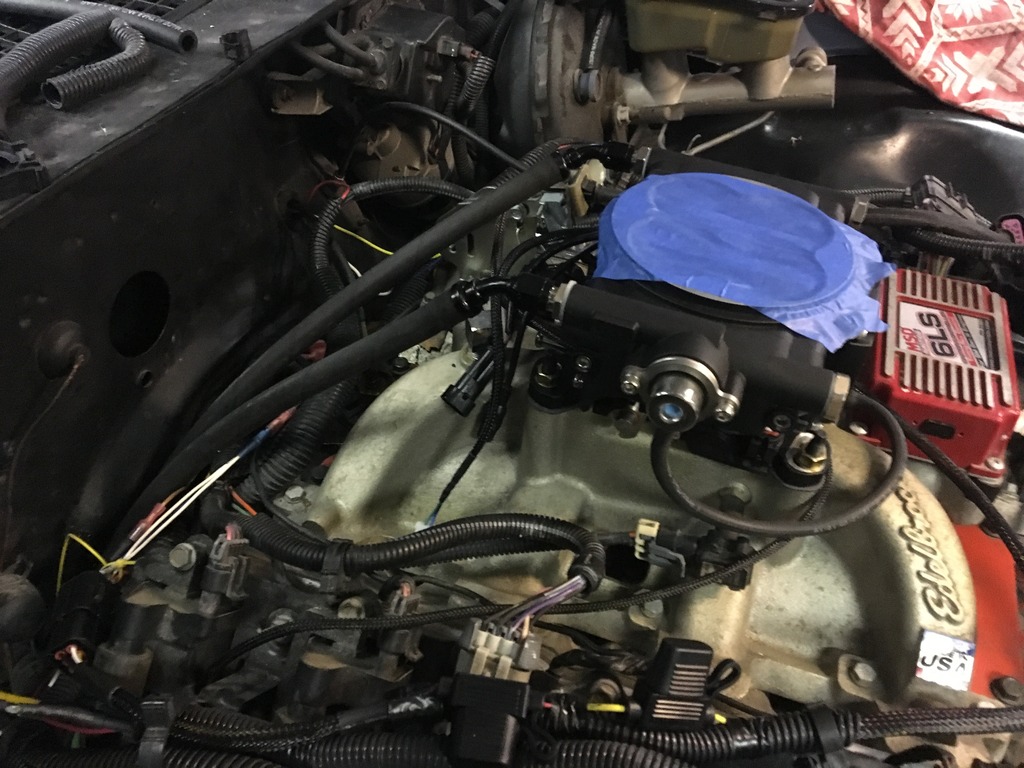
Did I mention I just sold this 600hp kit after only having it for 2 months? The only reason I did is because I just got it my new FiTech 600hp Power Adder kit which allows for boost�more on that later, but I will leave you with this pic�let me know if you pick up what I�m hopefully gonna put down
I have the car completely put together which includes the addition of an 80-81 Z28 hood which I was trying to avoid because I wanted the car to be exactly what it looked like from the factory, just a regular Light Blue Metallic Sport Coupe, but with an LS/4 speed power train hiding beneath. The hood scoop was necessary evil as the Ls with Edlebrock performer intake and a 2 �� drop base/ 2 �� filter had to no way of clearing a stock flat hood. The silver lining is that I got the solenoid and hardware necessary to make the flap on the back of the cowl operate. My car didn�t have the provision in the harness since it wasn�t originally equipped, but I fabbed a bracket off the pedal bracket and used a nitrous micro switch for activation. The flap open when the throttle is over 80% and is pretty damn cool in my opinion.


The next big change to the car came in the rearend. If you have read the thread I bought the car with an open 2.73 rearend which was ok at the beginning when my car looked like a rat rod and I was just happy to be driving an LS powered 81 Camaro. But as usual I just wanted more so I found a good deal locally on a used posi and 3.73 gears for the 8.5� 10 bolt rear. I originally thought I wouldn�t be able to do this because of the steep 3.42 first gear in my trans, but I turns out I was incorrect and it has the lower, more desirable, 3 groove 2.64 first gear.


I was sick of one wheeling when I tried to launch the car or drive up the inclinded driveway where I work on the car. Needless to say I got super lucky as I used the used 3.73 pinion gear shim it came with and all I had to was swap the carrier shims side to side and I got a good pattern so It saved me from buying an install kit, shims, etc. This isn�t the optimal way to set up a rearend but the pattern was solid enough I decided to roll with it. I can tell you that 3.73s blow on the highway, the car spins 3K rpm at like 65-70 and you can start out in 2nd gear with ease lol. The speedo is only off 10mph so it isn�t horrible. Im pretty sure im gonna be swapping the rear gear with something in between 2.73/3.73 probably like a 3.23 or even 3.08 with my future mod ill talk about below
I read an article about FiTech which a new self learning fuel injection kit that is dirt cheap when compared to the big name ones like FAST, Holley, and MSD. I figured what the hell I might as well try it since I am more familiar with a computer than tuning a carb to say the least. I originally had a Proform 650 double pumper that was just dumping fuel so I swapped it for an Edlebrock 600 which a lot better as far as throttle response and gas mileage (even though I only care about smiles per gallon).
So I selected the 600hp kit that was a step above their base model 400hp kit since I figured if I did anything to the engine I would be really limiting it with a 400hp kit that had 4-56lb injectors so the 600hp kit with 4 -80lb injectors seemed like the better choice. It was $1,000 and then I got a $100 mail in rebate from the manufacturer. I am here to tell you the FiTech kit is so stupid easy to install and setup that I was in disbelief. The install setup included the four following sections:
1. Fuel system � I went with FiTech�s inline fuel system which included a 255lph inline pump with all the push lok AN hosing and fittings needed to feed the throttle body. The line and fittings were pretty high quality and looked to be Fragola from their design. The kit included a -8 line from tank to pump and then -6 from pump to TB as well as -6 for the return line. My original fuel tank sender only had a feed line so instead of hacking the tank for a bulkhead I ordered an 81 camaro A/C equipped fuel sender because it had a second feul line I used has a return. I used AN to compression adapters to go from hard line to AN hose. The push lok stuff is easy to wrok with and doesn�t require mangling your fingers line stainless AN hose does.
2. Sensors- The FiTech only used 3 external sensors since sensors like the IAC, TPS, IAT, Fuel regulator are all built into the main unit. The only sensors I had to hook up was the wide band oxygen sensors which I conviently threaded into my driver side fbody manifold. They included an O2 bung that allows you to drill your exhaust and then sandwish the bung with gasket via two hose clamps which I assume would work but isn�t optimal. The next sensor was the coolant temp sensor, they provide a normal �� sender that�s used on older SBC but good old gm used that same plug on the newer LS temp sesnors that thread into the cylinder head so that was easy as well. The third �sensor� I hooked up was the handheld controller which routed through my firewall into the cabin. That was it for sensors!
3. Wiring- This is the part that was so simple I had more time in soldering the connections that figuring how where to wire them up. The first connection was the Battery hot which is expected, the next was tach signal which I spliced into the wire between my tach and MSD 6LS box, third was key power which again is easy, coil wire was not needed since I ddint have a distributor. Last but not least was the fan and fuel pump control. The fan wire goes to a relay and is used as the trigger wire which activates key power and then powers wire to your fan. The on/off temp is controlled by your handheld controller. The final wire was the fuel pump which wired direct from FiTech TB harness to the pump. The TB has an internal relay which makes wiring this a breeze. Now how easy is that?
4. Setting it up- this was the simplest step by far�all you do is enter # of cylinders, cubic inches, what cam (1-4 mild to wild), hot idle speed desired, and rev limit you want. Done!


Now the system didn�t fire up the first time I hit the key, because I replaced gas tank, sender, pump, hoses, etc. there was air in the line but after priming and trying a few times the engine came to life and found its idle fairly fast. On my first drive I really noticed excellent throttle response that you would need your carb tuned by an expert tuner to match. Also cold starting issues with a carb are no more, you just get in and hit the key and drive no letting it warm up or anything. I have not had a single issue that I did with a carburetor. Now can a carb be tuned to the point there is no problems�yes, but I didn�t have the experience or time necessary to get there although I eventually do want to become proffieicnet in that aspect. So I recoomend this kit highly to anyone with an older car or carbed LS car and you will consider this the best $1000 you ever spent.
Did I mention I just sold this 600hp kit after only having it for 2 months? The only reason I did is because I just got it my new FiTech 600hp Power Adder kit which allows for boost�more on that later, but I will leave you with this pic�let me know if you pick up what I�m hopefully gonna put down

 08-04-2016, 09:02 AM
#152

How much drive time (mileage) have you logged with the FI tech injection setup.
Really curious thoughts after some time with it. Was looking at it, or Holley new sniper system. Haven't seen any installs of Holley yet, as its brand new as of June/July.
Thanks
Really curious thoughts after some time with it. Was looking at it, or Holley new sniper system. Haven't seen any installs of Holley yet, as its brand new as of June/July.
Thanks
08-04-2016, 10:19 AM
#153
I logged about 500 miles with the first FiTech unit...like I said the throttle response is great after having a carb. The system does a great job of correcting air fuel ratio and it has the option of allowing you to manually input a/f targets to get the most out of your particular engine. I pulled the spark plugs I installed at the same time as the FiTech system and they basically look perfect which confirms the good a/f.
I wanted to try and calculate fuel mileage but since my speedo is off because of the different rear gears it makes it hard to validate actual mileage. I am a definite believer of the system and I like you had doubts because of its price but I am more than satisfied. You also have the option to data log which will be nice once I have the turbo system I am planning hooked up. The handheld controller is easy to use and you can pick 4 parameters to show you real time what is going on.
I wanted to try and calculate fuel mileage but since my speedo is off because of the different rear gears it makes it hard to validate actual mileage. I am a definite believer of the system and I like you had doubts because of its price but I am more than satisfied. You also have the option to data log which will be nice once I have the turbo system I am planning hooked up. The handheld controller is easy to use and you can pick 4 parameters to show you real time what is going on.
 08-08-2016, 01:34 PM
#155
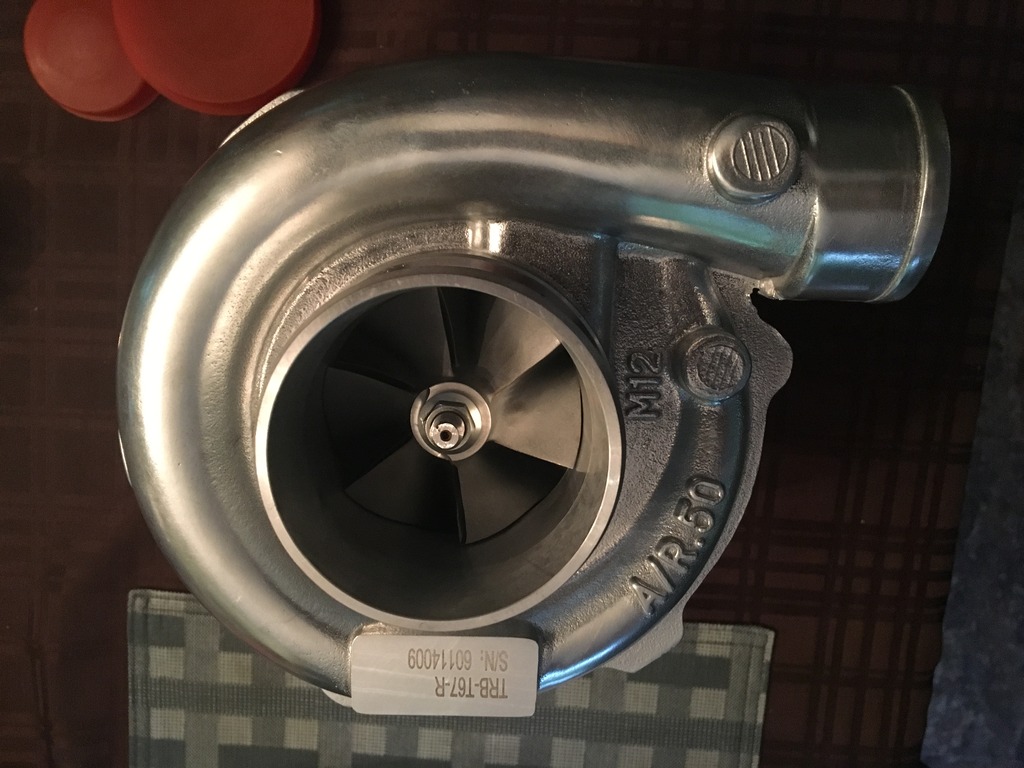
So this past Friday I received notification that FedEx had delivered my turbo from CXRacing. Obviously pretty pumped I open the box and it is the wrong damn turbo. Maybe they thought I wouldn�t notice a 0.50 A/R 67mm turbo with a 2� compressor outlet wasn�t the 0.81 A/R 76mm 2.5� outlet. So I called them up not even a minute after opening the box and they had me send pictures to verify it was in fact the wrong turbo. Long story short they said they couldn�t ship the CORRECT turbo out until I sent out the WONG turbo and they couldn�t even expedite the shipping to cover their mistake. Pretty pissed at this point, but I�ll hold judgement until I get their response for how quick they can have it to me this week. I am pretty much boned finishing the hot side piping with no turbo.
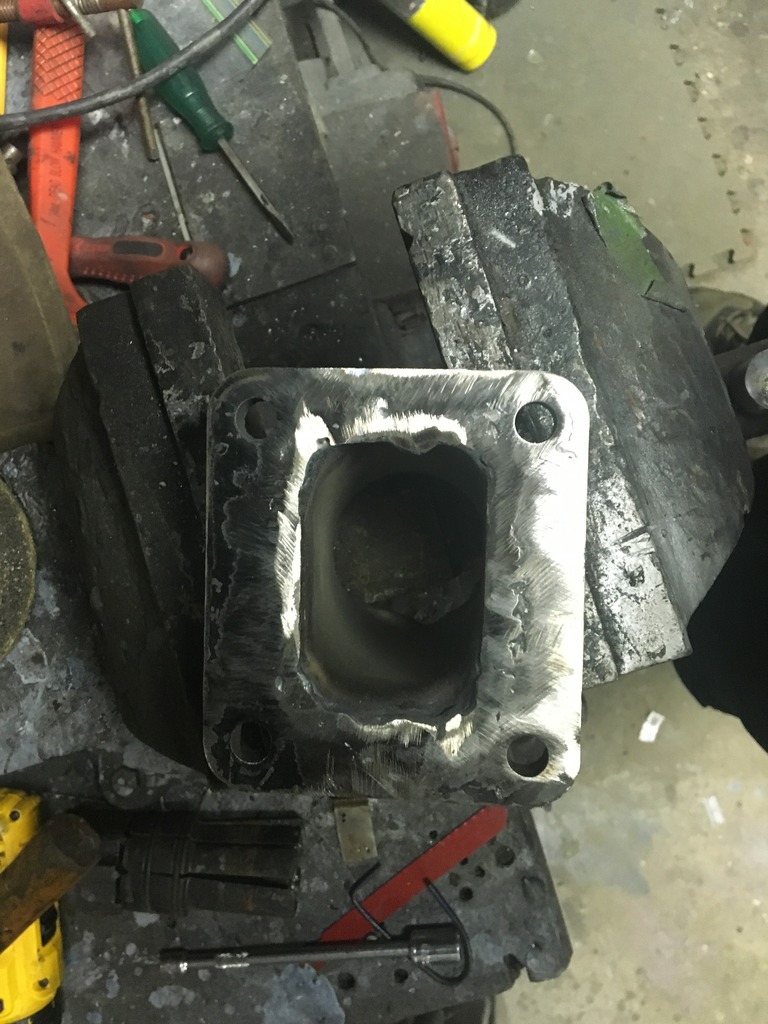
I did however get a few things done this weekend including building a rough merge of the 2.25� pipes to the T4 flange. All tubing and flanges were ordered from Columba Mandrel Bending (mandrelbends.com) because of the high praises I�ve read on the forums here. They didn�t disappoint as they shipped from OR to PA in 4 days with the express shipping (worthless since turbo was wrong). Merge was created from stretching a 2.5� pipe into the T4 flange and then welding merge of two 2.25� into that 2.5�. Welds aren�t the best looking in the world but as long as they get the job done I am not worried. Still learning the nuances of TIG welding. Plus now I get to show off my weld grinding skills lol.

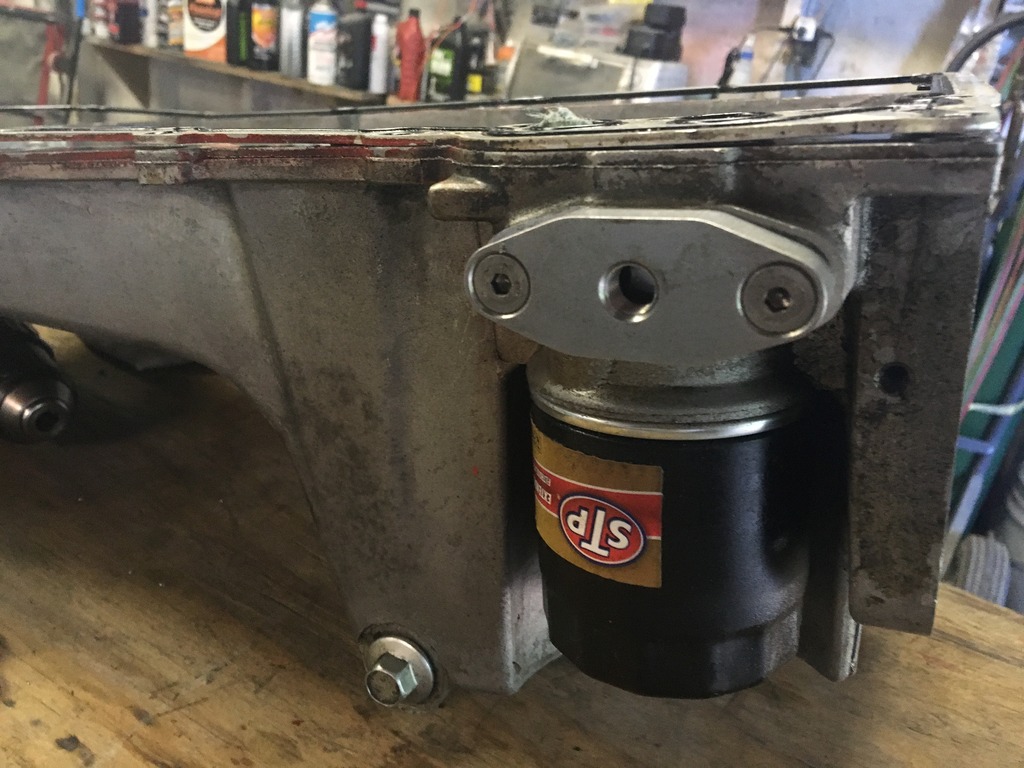
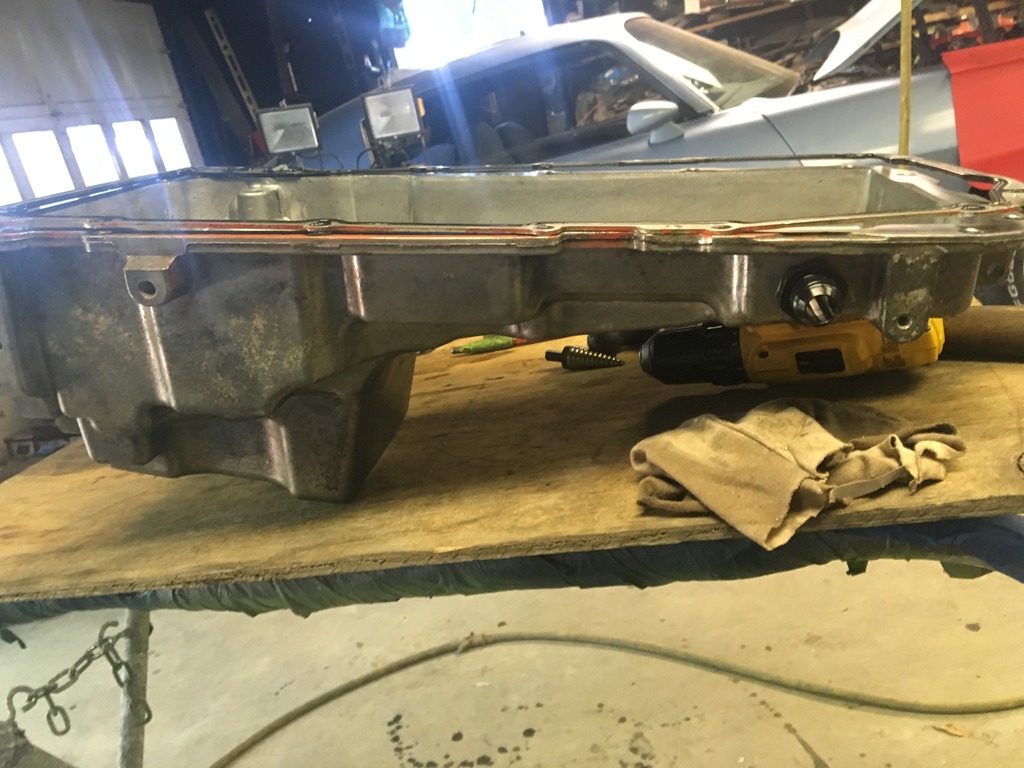
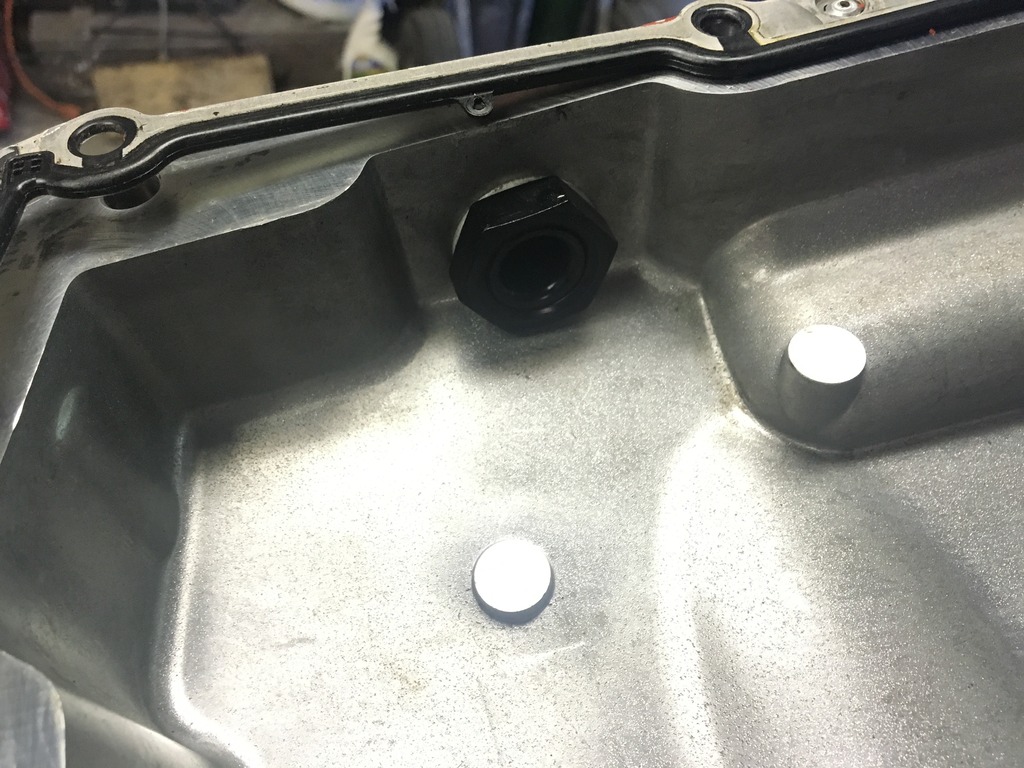
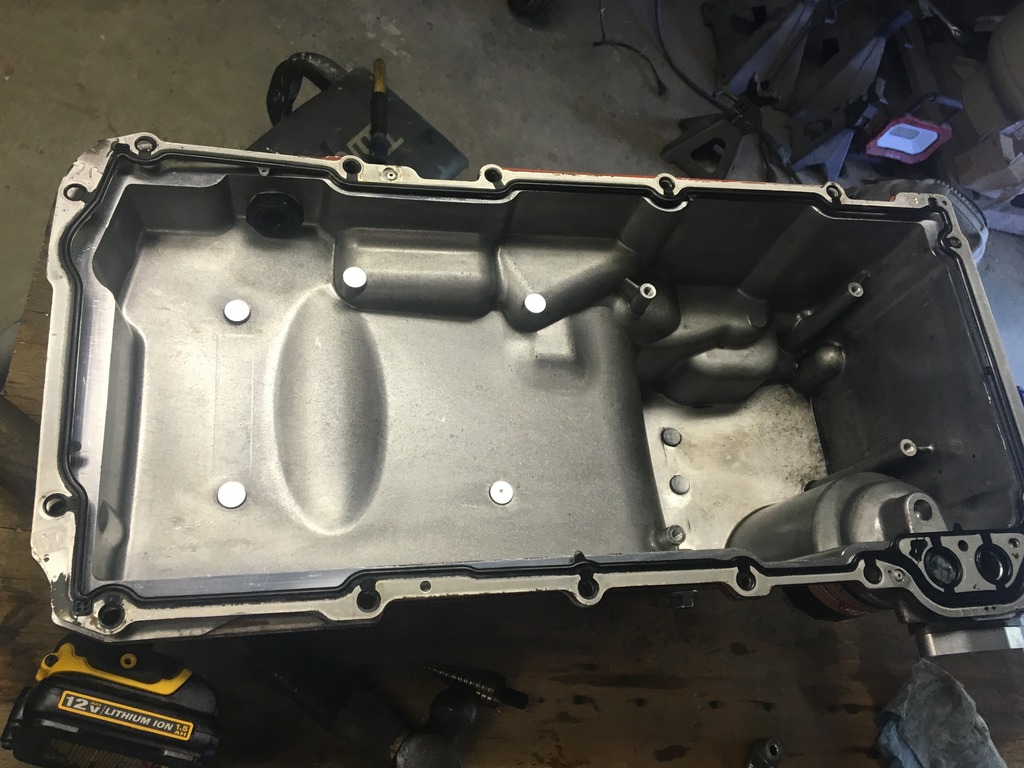
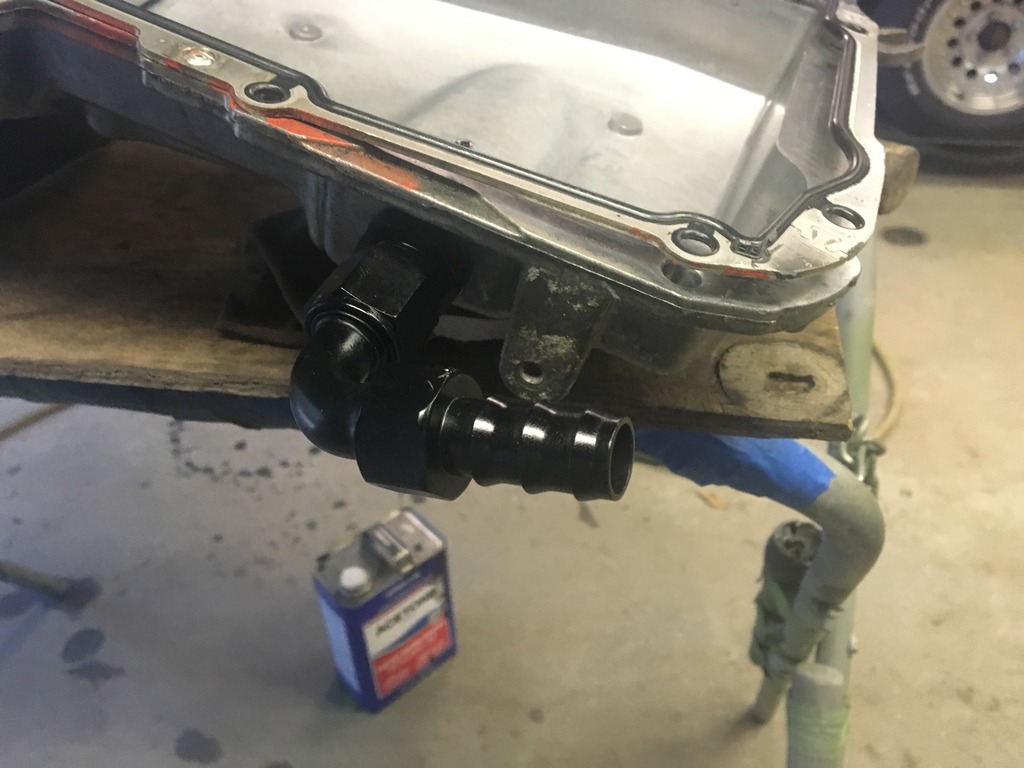
Also was able to get both the oil feed and drain handled on the Musclecar oil pan. I used the ICT Billet oil cooler adapter and then an 1/8npt to -4AN elbow. This made things very easy, I was going tot tap stock oil cooler plate but this nice adapter plate was only $9 and it was o ring sealed instead of paper gasket so I went with it.
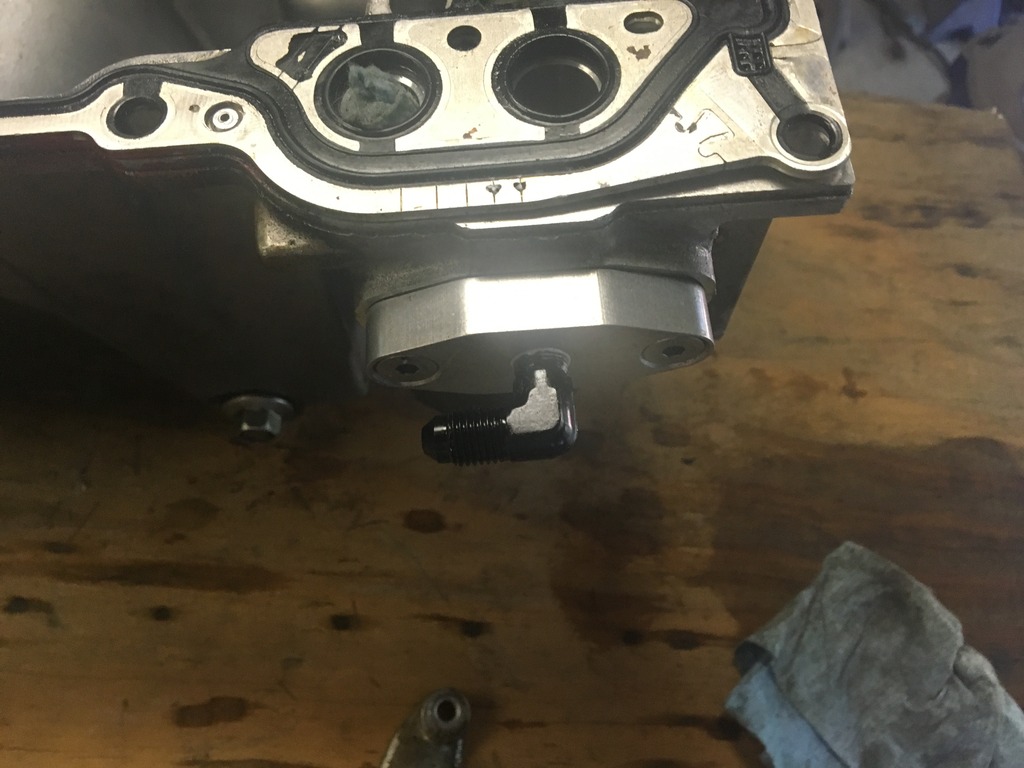
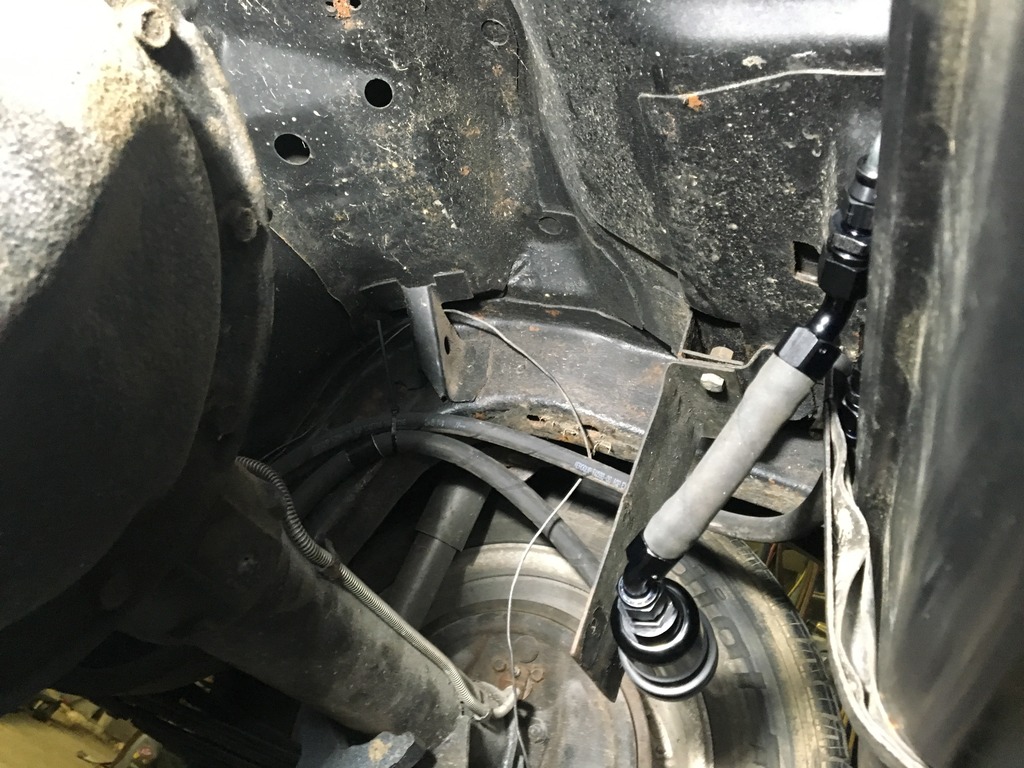
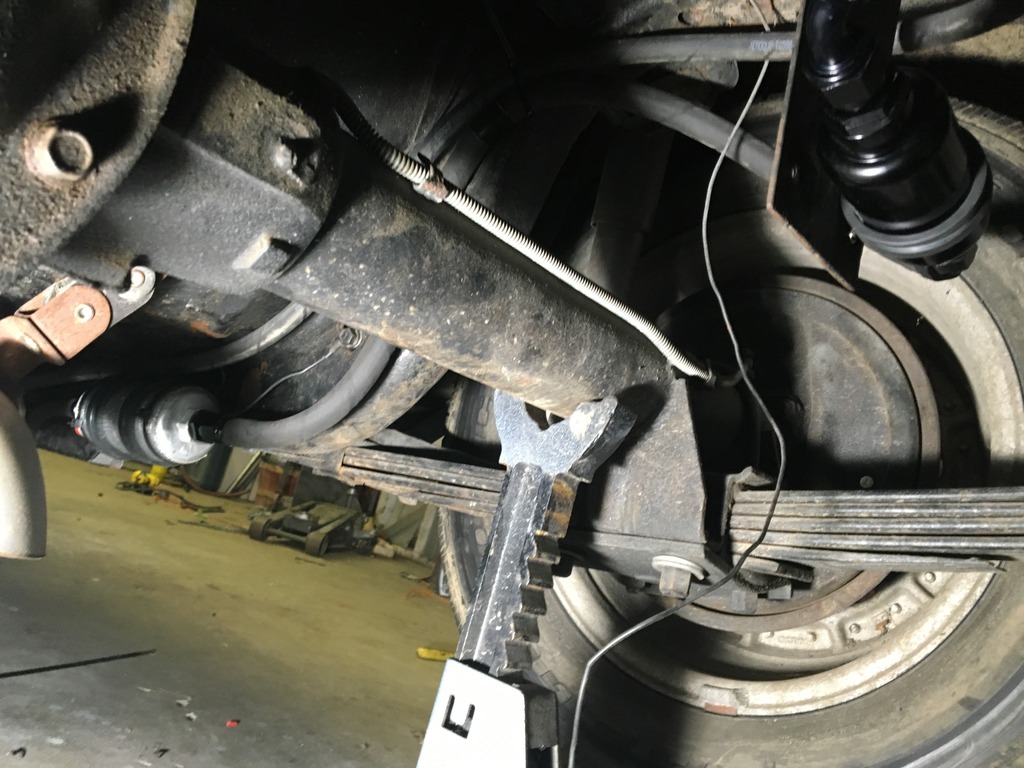
The oil drain was the reason I had to take the oil pan off as I can�t see anyway to not get tons of shaving in the pan when drilling on the car. I used a step drill and drilled the first �pad� on the oil pan closest to passenger front in an effort to make the drain path as short as possible. I used a -10AN fuel bulkhead to get my male end and then am using a 90 degree twist-lok AN fitting as shown. I couldn�t find a 7/8�-14 tap locally and the cheapest I found on the net was like $60 so I just drilled all the way to 7/8� and then tightened the bulkhead on as flat as possible. It looked like the Teflon washers on both sides are completely flush with inside and outside of pan but ill have to wait until I fill with oil to tell the true tale. The 90 degree fits nice and clears the subframe nicely.
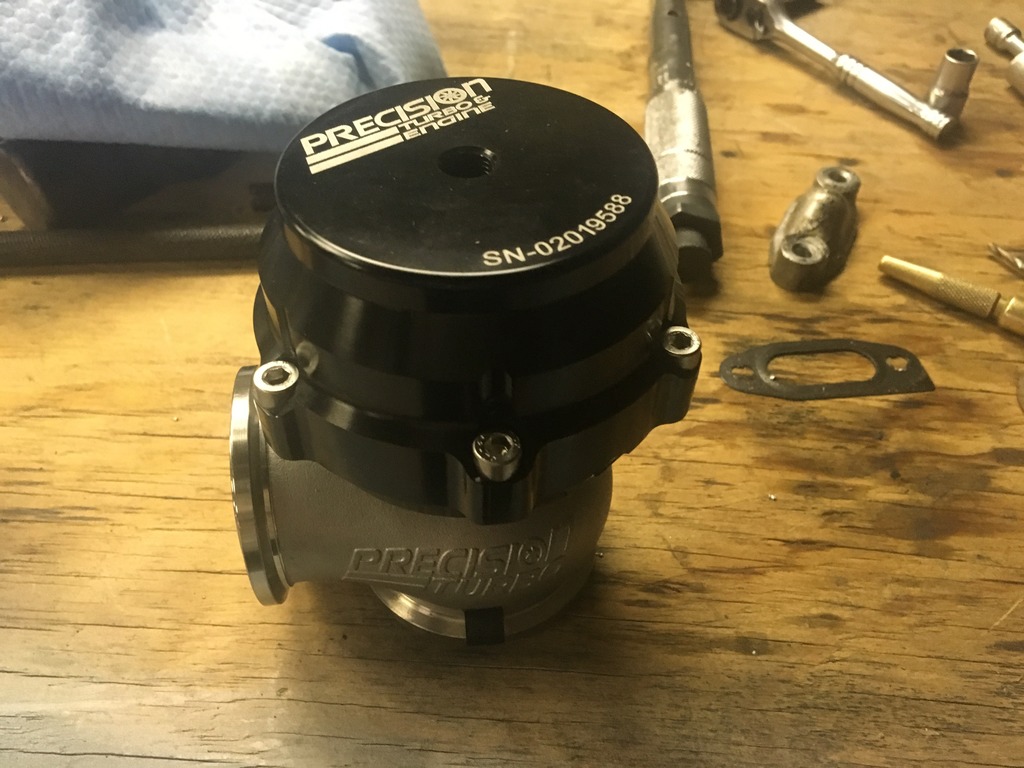
Final part I got in was a Precision Turbo PW46 46mm wastegate. I went with this wastegate because I plan on running lower boost (5-7) so the larger diameter will give me more control over my boost level. Nice this is this waste gate came with V-band flanges, clmaps, and all the springs needed to go all the way up to 25psi if I choose to later on. Very nice quality piece. I may have went with a cheaper turbo, but controlling the boost is the most important aspect of keeping the system able to survive long term in my opinion so it was worth the $350.

I did however get a few things done this weekend including building a rough merge of the 2.25� pipes to the T4 flange. All tubing and flanges were ordered from Columba Mandrel Bending (mandrelbends.com) because of the high praises I�ve read on the forums here. They didn�t disappoint as they shipped from OR to PA in 4 days with the express shipping (worthless since turbo was wrong). Merge was created from stretching a 2.5� pipe into the T4 flange and then welding merge of two 2.25� into that 2.5�. Welds aren�t the best looking in the world but as long as they get the job done I am not worried. Still learning the nuances of TIG welding. Plus now I get to show off my weld grinding skills lol.


Also was able to get both the oil feed and drain handled on the Musclecar oil pan. I used the ICT Billet oil cooler adapter and then an 1/8npt to -4AN elbow. This made things very easy, I was going tot tap stock oil cooler plate but this nice adapter plate was only $9 and it was o ring sealed instead of paper gasket so I went with it.


The oil drain was the reason I had to take the oil pan off as I can�t see anyway to not get tons of shaving in the pan when drilling on the car. I used a step drill and drilled the first �pad� on the oil pan closest to passenger front in an effort to make the drain path as short as possible. I used a -10AN fuel bulkhead to get my male end and then am using a 90 degree twist-lok AN fitting as shown. I couldn�t find a 7/8�-14 tap locally and the cheapest I found on the net was like $60 so I just drilled all the way to 7/8� and then tightened the bulkhead on as flat as possible. It looked like the Teflon washers on both sides are completely flush with inside and outside of pan but ill have to wait until I fill with oil to tell the true tale. The 90 degree fits nice and clears the subframe nicely.


Final part I got in was a Precision Turbo PW46 46mm wastegate. I went with this wastegate because I plan on running lower boost (5-7) so the larger diameter will give me more control over my boost level. Nice this is this waste gate came with V-band flanges, clmaps, and all the springs needed to go all the way up to 25psi if I choose to later on. Very nice quality piece. I may have went with a cheaper turbo, but controlling the boost is the most important aspect of keeping the system able to survive long term in my opinion so it was worth the $350.
