
L33 Valkyrie, 1800 LBS 310 horse 330 FPT death machine

 06-27-2012, 10:26 AM
#62


Don't worry about it, I have taught my son the lefty loosey and righty tightey about a dozen times and he still gets it wrong 1/2 the time especially when working under the car, some people are better off sticking to their Xbox controls he can work that thing faster than anything I have seen when he plays them stupid combat games.
 06-27-2012, 11:11 PM
#64
On The Tree
Thread Starter

Join Date: Jun 2012
Posts: 191
Likes: 0
Received 0 Likes
on
0 Posts
Another frustrating day. I guess I need to expect those.
Took a couple days off cus I was in a poor mood and yelling at the kids (this is supposed to be fun, when it ceases to be fun, go watch TV!)
I cant get the trans in while the motor is in the car and with the clutch assembled.
So tomorrow I have to take the back end back off, take the clutch back off, reattach the tranny minus the clutch (or the motor will tip over onto the ground when we try to move it)
Push the frame forward under the block and tackle, pull the motor and tranny out, push the frame out of the way, lower the motor, remove the trans, re install the clutch, join the tans to the motor, lift motor back up and then slowly finagle the motor/trans combo back into the frame, then push the frame back and spend an hour leveling out the frame again so that I can be sure the motor is square and level when I weld in the motor mounts.
Now in and of itself, this isnt that big of a deal, however it illustrates that when needing to do repairs to the front of the motor or motor work that require removal of the motor, the ENTIRE body will have to come off. That wouldn't be that big a deal either, as I plan a bolt in cage and the bolts from the cage will be what attaches the body.
The problem will be the wires cables pipes and steering column that have to be dissembled to get the front of body off.
I think I can redesign the "transmission cross member" to be a bolt in unit, being able to drop that would allow me to pull the trans out of the car without pulling the motor, and once the trans is out, the motor should be able to come out the back.
Also Ive never done a clutch before, and I couldn't figure out how the pilot bearing was supposed to be installed, i THINK it just sits in there and I didn't have to pull anything or press anything in, but I guess I will find out if I did it right when I put the trans in?
06-27-2012, 11:27 PM
#65
On The Tree
Thread Starter
Join Date: Jun 2012
Posts: 191
Likes: 0
Received 0 Likes
on
0 Posts
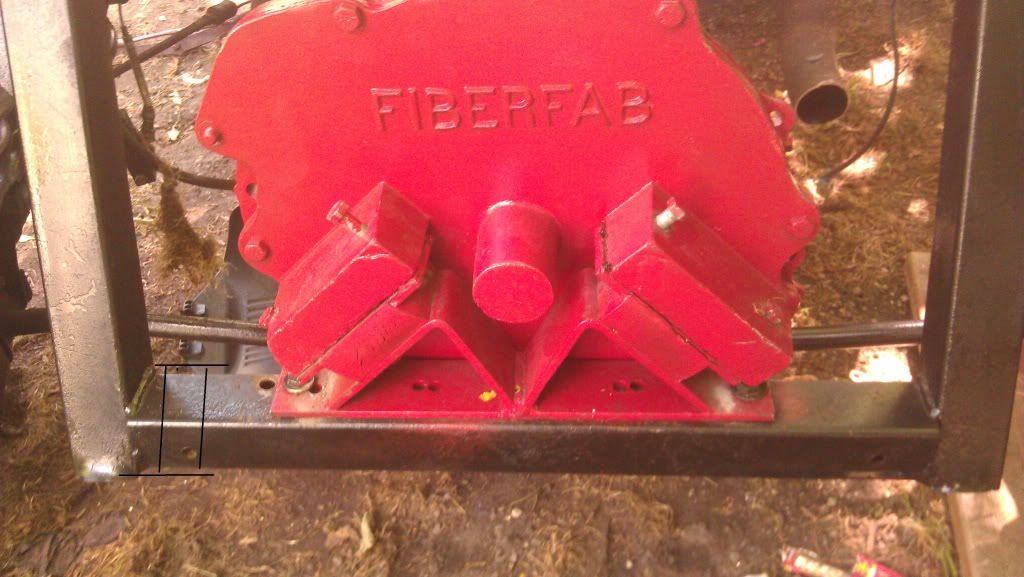
My drawing skills way worse then suck, the two horizontal lines represent the C bracket and the two up and down ones represent bolts.
If I make a "C" bracket that covers three sides of that brace, out of heavy guage steel, and then cut the brace in the middle of the bracket and then run two bolts through it, I would be able to unbolt and raise the trans slightly on a jack, then slide the trans unit out. Probably would be smartest to have the "open" part of the "c" bracket faceing up
The motor mount I am useing should allow the motor to tilt up or down slightly.
An entire motor pull out could be accomplished by removing 6 bolts on the rear body hinges, 8 bolts on the rear trailing arms 8 bolts for the drive shafts 5 bolts from teh bellhouseing and two motor mount bolts (plus about 6 wires and one fuel line)
Question being if using that type of set up would cause me structural stability problems,. I have no idea how much stress that part actually gets or how much such a set up would hold.
 06-28-2012, 08:31 AM
#67
On The Tree
Thread Starter
Join Date: Jun 2012
Posts: 191
Likes: 0
Received 0 Likes
on
0 Posts
In this set up with the rear trailing arms bolting to the diff I think that the diff/tranny combo becomes a stressed component of the suspension, that's why I am worried about it. In a RWD application the diff may be supporting weight, but it is separated from the motor and trans by the drive shaft, putting no stress from the wheels on the cross member.
06-28-2012, 05:51 PM
#68
On The Tree
Thread Starter
Join Date: Jun 2012
Posts: 191
Likes: 0
Received 0 Likes
on
0 Posts
OK, shoot me LOL
This pilot bearing doesn't fit, at first I thought I was jsut stupid, and blamed it on never doing a clutch swap before. But after asking a bunch of people and visiting 3 parts store, I know for sure that it doesn't fit, the question is why?
I got the bearing when I got my flywheel at Orieghly's I gave them the part number 12557583, they said they didnt have that part, but cross referenced it and came back with a national 302-cc and said that it was the same bearing, and upon going back today they again said it ws the same bearing and that it was the exact same dimensions.
Is it possible the aftermarket national bearing is slightly smaller then the GM bearing? becouse three stores confirmed that the national bearing I have is the correct one?
I am very frustrated at the moment.
we used the micrometer and confirmed that it is
Bore Size: 0.5906 in. (15mm)
Outside Diameter: 1.6535 in. (42mm)
Width: 0.5118 in. (13mm)
Just like the specs from national claim
Last edited by Crazier; 06-28-2012 at 05:57 PM.
06-28-2012, 07:00 PM
#69

Got mine from SDparts, cheap amd it works.
[UOTE=Crazier;16465956]OK, shoot me LOL
This pilot bearing doesn't fit, at first I thought I was jsut stupid, and blamed it on never doing a clutch swap before. But after asking a bunch of people and visiting 3 parts store, I know for sure that it doesn't fit, the question is why?
I got the bearing when I got my flywheel at Orieghly's I gave them the part number 12557583, they said they didnt have that part, but cross referenced it and came back with a national 302-cc and said that it was the same bearing, and upon going back today they again said it ws the same bearing and that it was the exact same dimensions.
Is it possible the aftermarket national bearing is slightly smaller then the GM bearing? becouse three stores confirmed that the national bearing I have is the correct one?
I am very frustrated at the moment.
we used the micrometer and confirmed that it is
Bore Size: 0.5906 in. (15mm)
Outside Diameter: 1.6535 in. (42mm)
Width: 0.5118 in. (13mm)
Just like the specs from national claim[/QUOTE]
06-28-2012, 07:14 PM
#70
On The Tree
Thread Starter
Join Date: Jun 2012
Posts: 191
Likes: 0
Received 0 Likes
on
0 Posts
06-28-2012, 11:38 PM
#71
On The Tree
Thread Starter
Join Date: Jun 2012
Posts: 191
Likes: 0
Received 0 Likes
on
0 Posts
should be able to get a 2 or 3 inch drop just from tires, I think that will pin it to the ground quite a bit. and it DEFINITELY needs to be dropped some.
06-29-2012, 04:31 AM
#72
Your OD is too small. Check out the PN on Rock Auto.
SKF Part # 6302VSP43 {#12557583} Width=.511"; Outside diameter=1.7040"; Inside diameter=.5905IN
I think it's used in CTS-V, C6 vettes, and 2010+ camaros, but the PN might be different.
Also from Rock Auto, 2010 camaro and corvette
ACDELCO Part # CT1082 {#12557583}
BEARING,CLU PILOT 22.7MM ID, 43.3MM OD, 13 THK
Last edited by garys 68; 06-29-2012 at 04:40 AM.
06-29-2012, 02:58 PM
#73
On The Tree
Thread Starter
Join Date: Jun 2012
Posts: 191
Likes: 0
Received 0 Likes
on
0 Posts
I picked up the bearing from the dealership, 19.95 + tax, it is 1.6 MM bigger then the national bearing. I gave several people hell about telling me it was the right part 
Good news is they are going to take the bearing back. now I jsut need to figure out what end of it to put in first.
Good news is they are going to take the bearing back. now I jsut need to figure out what end of it to put in first.
06-29-2012, 09:32 PM
#74
On The Tree
Thread Starter
Join Date: Jun 2012
Posts: 191
Likes: 0
Received 0 Likes
on
0 Posts
Clutch installed, trans attached to motor and motor/trans combo lowered into the corect spot, now jsut need my front motor mounts to come in and I can hook up the rear trailing arms and drive shafts.
I finally feel like I made some progress and it feels good.
I finally feel like I made some progress and it feels good.
06-30-2012, 06:47 AM
#75
Just looking at the rear suspension. It looks like the lower control arm is attached to the frame or trans and the axle acts as the upper arm to control camber, similar to a C3 corvette.
If that's the case, you'll have a tremendous amount of torsion at the rear. You migh want to cut the rear frame crossmember and weld a couple triangle shaped steel plates, both front and rear. Then bolt through the uprights. Be sure to put sleves in the uprights to prevent crushing when you bolt it tight.
If that's the case, you'll have a tremendous amount of torsion at the rear. You migh want to cut the rear frame crossmember and weld a couple triangle shaped steel plates, both front and rear. Then bolt through the uprights. Be sure to put sleves in the uprights to prevent crushing when you bolt it tight.
07-03-2012, 10:07 PM
#76
On The Tree
Thread Starter
Join Date: Jun 2012
Posts: 191
Likes: 0
Received 0 Likes
on
0 Posts
WOW, got hit with a BAD 3 day flue type virus, when I finally beat the virus I got hit with nasty case of bronchitis. Ive basically slept 19 hours a day since Friday evening.
Yes, gary it is nearly the same set up as the c3 corvette. and while I couldnt come up with the word torsion, thats exactly what I was worried about
how about something like this?
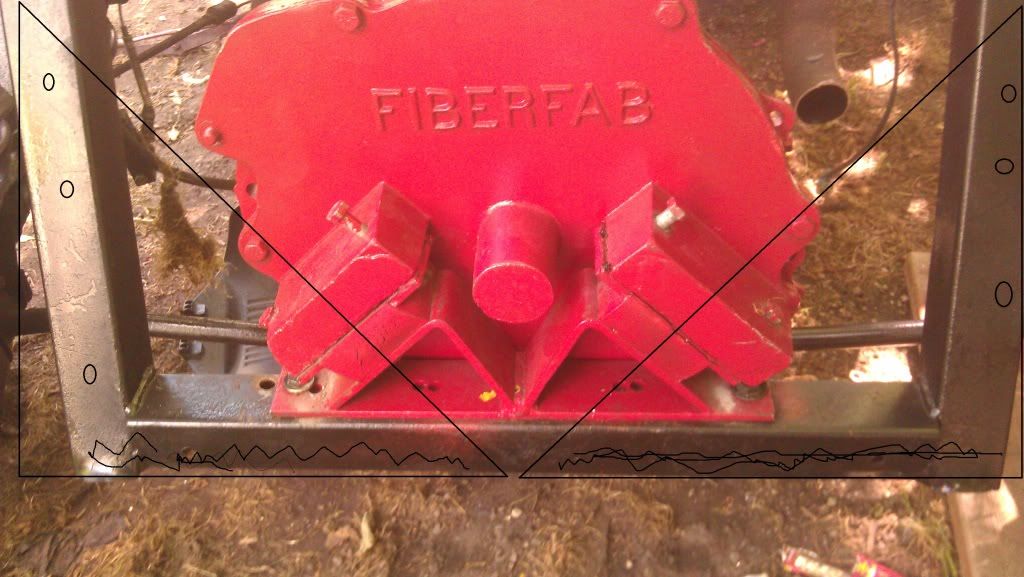
cut the uprights level with the bottom crossbrace. weld all the way across it, and 3 to 4 bolts on each of the uprights.
I would not be able to weld a piece into both sides though, in order for it to work I would need to be able to slide the whole unit out of the back far enough to take the transmision off the motor.
If I welded it in in the back and then bolted on the one in front?
I've got part5s to pick up all over town, my motor mounts, alternator bracket and other misc parts are waiting. then I can start mocking up the body panels where they will need to be trimmed to clear the intake, and if clearancing for the intake will make enough room for the water pump outlet.
Yes, gary it is nearly the same set up as the c3 corvette. and while I couldnt come up with the word torsion, thats exactly what I was worried about
how about something like this?
cut the uprights level with the bottom crossbrace. weld all the way across it, and 3 to 4 bolts on each of the uprights.
I would not be able to weld a piece into both sides though, in order for it to work I would need to be able to slide the whole unit out of the back far enough to take the transmision off the motor.
If I welded it in in the back and then bolted on the one in front?
I've got part5s to pick up all over town, my motor mounts, alternator bracket and other misc parts are waiting. then I can start mocking up the body panels where they will need to be trimmed to clear the intake, and if clearancing for the intake will make enough room for the water pump outlet.
Last edited by Crazier; 07-03-2012 at 10:18 PM.
07-04-2012, 09:45 PM
#78
On The Tree
Thread Starter
Join Date: Jun 2012
Posts: 191
Likes: 0
Received 0 Likes
on
0 Posts
Thanks again for the nod in the right direction, I am very new at this.
Heat was to bad today, it was 102 in Michigan, and I couldn't breath outside.
I got one motor mount top section bolted to the motor before i had to give it up.
I am not sure I am going to be able to make the motor mounts work, not sure there will be enough support, will take a picture of what progress I make tomorow afternoon to get some opinions.
07-06-2012, 12:11 AM
#79
On The Tree
Thread Starter
Join Date: Jun 2012
Posts: 191
Likes: 0
Received 0 Likes
on
0 Posts
Second set of motor mounts are defective as well. I called hedman performance who makes transdapt parts.... yup, they know they made a bad batch. all the ones they have are bad and I have to wait.
Tried to bolt up my trailing arm suspension, seems that some of the rubber bushings are bad, and I think one of the trailing arm mounts are bad on the drivers side.
So, at a stand still again, time to do some research and buy some more parts.... this certainly isnt going as fast as I had hoped lol
Tried to bolt up my trailing arm suspension, seems that some of the rubber bushings are bad, and I think one of the trailing arm mounts are bad on the drivers side.
So, at a stand still again, time to do some research and buy some more parts.... this certainly isnt going as fast as I had hoped lol
07-08-2012, 09:53 PM
#80
On The Tree
Thread Starter
Join Date: Jun 2012
Posts: 191
Likes: 0
Received 0 Likes
on
0 Posts
http://www.retrorat.com/2012/05/lsx-...nator-diy.html
This is pure sex... saves me so much time money and trial and error, I am going to find that guy and kiss him.
Anyone needing this swap, don't use anyone online, call your stealership, they can special order, total is $22.95 after tax no shipping.
I may have to make a kit to sell online, buy the parts, make some spacers and sell them for $100 on eBay.
I cant find my printed copy of this blog post, and they have taken it down.... Ive most all the parts, but don't remember how the tensioner goes on.