
L33 Valkyrie, 1800 LBS 310 horse 330 FPT death machine
 07-09-2012, 12:42 AM
#81
On The Tree

Join Date: Apr 2011
Location: Vancouver, WA
Posts: 129
Likes: 0
Received 0 Likes
on
0 Posts

Very cool build.
Fiberfab is just a few hours from where I live. Next time I'm that way I'll have to see if I can get a tour.
Fiberfab is just a few hours from where I live. Next time I'm that way I'll have to see if I can get a tour.
Last edited by 1bigoldman; 07-10-2012 at 08:37 PM.
 07-11-2012, 09:48 PM
#82
On The Tree
Thread Starter

Join Date: Jun 2012
Posts: 191
Likes: 0
Received 0 Likes
on
0 Posts
Clutch fork fell out while I was wiggling some stuff around, pulled the whole unit took it apart to re install the fork, but now I cant seem to get it in in any stable way. I may have to replace it even though I cant physically see anything wrong with it. or does it normally just sit in there that loosely until the hydraulics are hooked up? Or is there some trick to installing it that I dont know?
 07-14-2012, 11:50 PM
#85
On The Tree
Thread Starter
Join Date: Jun 2012
Posts: 191
Likes: 0
Received 0 Likes
on
0 Posts
Not sure how to describe this, but the spring looking part on the end of the fork where it hooks to the throw out bearing was bent and out of place, preventing it from "locking" onto the throwout bearing. After I bent it back into place and installed the new clutch fork "boot" it seems to hold fine.
The first two times I put the trans on the motor I did it myself with no real problems, putting it on this time was a nightmare, me and my kid and my nephew had to try like 6 times over three days before it finally went on. I just hope nothing in there got damaged in the process, it was a real struggle, but its finally on.
I got tired of waiting for trans-dapt to send me a solution to the motor mount problem, so I bought a grinder (that I needed anyhow) and ground the bottom motor mounts down, I measured the distance between the ridges on the poly parts of the mounts and then ground the housing they fit into down to that measurement, and now they fit.
The things I have been calling trailing arms for want of a better term are apparently called torque rods or torque arms. The drivers side bracket that holds the torque rod was in fact bent, ordered a used one for $10 plus $8 shipping and the whole thing bolted together in minutes.
Next up is welding the motor mounts in place, and installing the drive/axle shafts. My neighbor was supposed to bring his welder over on Thursday, but he never showed. So anyone in Michigan want to come over with a welder, let me know
I cant get the old U joints out of the axles, Iv'e beat on them as hard as I dare and I think I am going to have to take them somewhere.
As soon as I find a welder I can get some accurate measurements and start cutting under the rear window to make the "cowl" fit over the intake and water pump.
I wont be able to mount the front part of the body for real until I figure out and mount the radiator and fuel and steering box/rack and pinion as the front doesn't open and the only access is from the bottom once its mounted.
07-15-2012, 12:11 AM
#86
Teching In

Join Date: Nov 2010
Posts: 27
Likes: 0
Received 0 Likes
on
0 Posts
Do you have any line of sight to the throwout/fork usually when the metal straps on the forks do not hold the bearing and need bending the are brittle you can get replacement springs or new fork with new springs. Best to replace fork. Excellent Build!
07-15-2012, 12:41 AM
#87
On The Tree
Thread Starter
Join Date: Jun 2012
Posts: 191
Likes: 0
Received 0 Likes
on
0 Posts
My old clutch fork "boot" was very worn, and did not hold the fork very much at all, in the process of trying to get the trans on I am pretty sure my nephew tried to use the fork to push on the trans and ripped it off the bearing, and I believe that is how it got bent, becouse it wasn't bent the first two times I put it on, It seemed to be in pretty good shape still when I put it back in place.
After I get it all together, and I know the drive line geometry is right, I am going to pull it all back apart when I make the rear brace or crossmemeber removable, at that point I am going to reexamine all the parts, and replace anything even slightly suspect.
I am low on funds at the moment, and I am trying to get it into a rolling condition, so that I can take it places with a two wheel dolly so I dont always have to try to get people to come to my house to help me
07-15-2012, 04:52 PM
#89
On The Tree
Thread Starter
Join Date: Jun 2012
Posts: 191
Likes: 0
Received 0 Likes
on
0 Posts
No new pictures, I need to get the motor mounts welded, and find the corect dimensions for the alternator bracket spacers and I will take some picks with the stuff all hooked up and the intake bolted on.
07-15-2012, 10:51 PM
#90
On The Tree
Thread Starter
Join Date: Jun 2012
Posts: 191
Likes: 0
Received 0 Likes
on
0 Posts
I love the internet, and the popularity of the lsx motors.
Spacers I need for the alternator are 3/4 of an inch. and I may be able to cut them out of the existing aluminum components from the brackets I am not using.
Near 20 years ago I worked as a grunt in a shop, we did a lot of crazy stuff, and we mostly had to figure it all out on our own, or look through endless back issues of magazines. A lot of times we just tried stuff over and over and over, endless cutting and welding and test fitting. Now a few hours of research can solve the same problems with little trouble becouse of all of our collective efforts and sharing our build stories.
07-17-2012, 09:03 PM
#91
On The Tree
Thread Starter
Join Date: Jun 2012
Posts: 191
Likes: 0
Received 0 Likes
on
0 Posts
My extra long 140 MM alternator bolts are in, but I was 15 minutes late to pick them up. I was able to cut the ears off the old bracket for the spacers.
I tired to test fit the things and I couldn't get the belt to fit, it seemed about 1.5 inches too short. I am hoping some how that the bolts being to short made the alignment off and that caused the problem, and that when I try again tomorrow with the new bolts it will fit.
IF the bolts make it so the belt fits...
Low mount non AC (though I bet you could still hook up the AC) non power steering conversion:
Bracket $30 (probably could get it cheaper at the boneyard.
Pulley $10
Bolts $10
conversion total $50, and if you cut and place the ears right, it looks stock.
I cant find the write up I followed, I am hoping to find the part numbers I had written down so that others can follow it like I did. My L33 had all the bolt holes, but the iron blocks have to have one of the bolt holes drilled and tapped. the place for the bolt hole is there, it just isn't finished.
Have the frame up in the air and level, and the motor placed and leveled inside the frame, held in place by my pulley set up and floor jack, still waiting on a welder to make it perminate so that I can use the pulley set up to life and mount the body (is to heavy for me to HE-Man it)
07-18-2012, 11:20 AM
#92
On The Tree
Thread Starter
Join Date: Jun 2012
Posts: 191
Likes: 0
Received 0 Likes
on
0 Posts
Damnit, there was a 2 minute rain shower here right about noon today. Caught me with my intake and tarp off the motor, so I am sure some moisture must have gotten inside it,
question is, what do I need to do about it?
question is, what do I need to do about it?
07-18-2012, 02:48 PM
#94
On The Tree
Thread Starter
Join Date: Jun 2012
Posts: 191
Likes: 0
Received 0 Likes
on
0 Posts
The intake was off, so the ports in the head were uncovered. so I am sure moisture was able to get directly into the calendars that had open valves. I don't think much got in, but how much does it really take?
07-18-2012, 03:34 PM
#95
yeah, even a little water will start to rust stuff. You do not want the water anywhere near the bearings, so change the oil before turning over the engine. Then blow out and oil the cylinders.
If you're really worried, pickle it by filling the whole thing with diesel. It will absorb the water.
I work on marine motors. Even one completely filled with water can be saved by pickling as soon as the water is drained.
If you're really worried, pickle it by filling the whole thing with diesel. It will absorb the water.
I work on marine motors. Even one completely filled with water can be saved by pickling as soon as the water is drained.
07-18-2012, 05:30 PM
#96
On The Tree
Thread Starter
Join Date: Jun 2012
Posts: 191
Likes: 0
Received 0 Likes
on
0 Posts
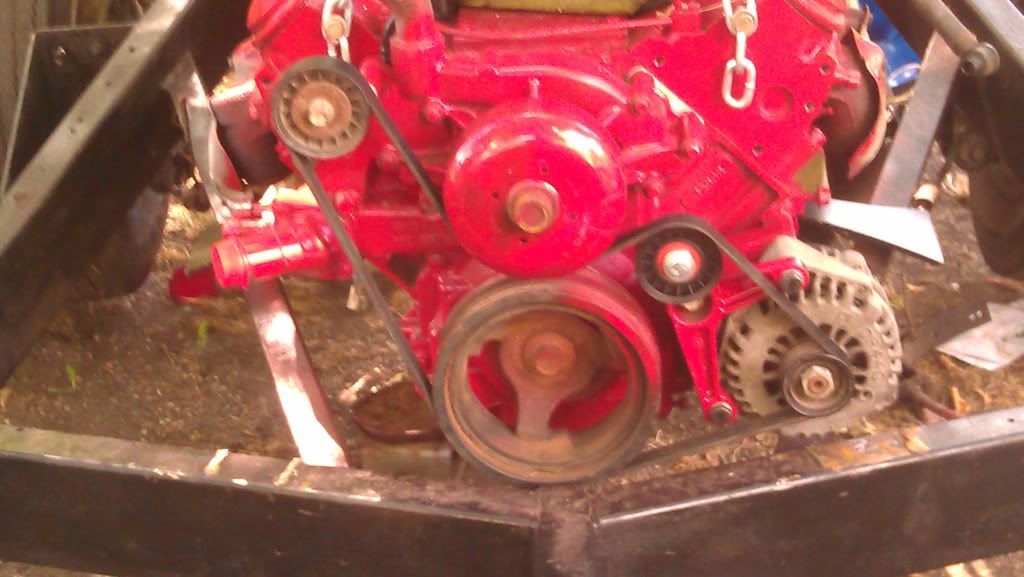
Alternator is installed. In order to install the belt you have to take the alternator and bracket off, then depress the tensioner pulley fully. Once the Tensioner is extended you can put the belt into the grooves and when the belt is fully seated in the grooves the alternator easily bolts up. No matter how I tried I could not get the belt to go over the lip on any of the pulleys with the alternator bolted in. It should be noted that after I cut the ears off from the original alternator bracket to get the 3/4 spacers, I had to drill out the threads in the tabs so the bolts could slide through.
That alternator is ugly, but I didn't know If I could just spray paint it without tearing it apart. meaning if the paint would damage things inside the alternator, so iv'e just left it alone for the moment.
There is no water in the oil, maybe just a few drips of water in whatever cylinders might have been open and a few drips of water on top of the valves that were closed. But I cant think of any way to be sure without pulling the heads and I really didn't want to do that. IF I pull a head will I have to get new head gaskets?
Low mount alternator LSX part numbers 4.8 5.3 6.0
Belt is a gates k060547 however the fit is super snug to the point of being an issue, I am on the hunt for a slightly longer belt
pulley is gates 38008
got the both from o'reilly's
Bracket is a stock F body , you will need bolts just like the original alternator bolts only they need to be 120 MM and you can cut the tabs from your original alternator bracket and drill out the middles to get two 3/4 inch bolts.
Last edited by Crazier; 07-20-2012 at 04:59 PM.
07-18-2012, 05:53 PM
#97
On The Tree
Thread Starter
Join Date: Jun 2012
Posts: 191
Likes: 0
Received 0 Likes
on
0 Posts
Also you can see in the picture how the drivers side motor mount sits on the frame.
Plan is to cut it to match the angle of that frame rail, and t hen use the left overs to cut a piece to fit under the front of the motor mount and then weld it on all three sides.
Plan is to cut it to match the angle of that frame rail, and t hen use the left overs to cut a piece to fit under the front of the motor mount and then weld it on all three sides.
07-19-2012, 08:28 AM
#98
On The Tree
Join Date: Apr 2011
Location: Vancouver, WA
Posts: 129
Likes: 0
Received 0 Likes
on
0 Posts
yeah, even a little water will start to rust stuff. You do not want the water anywhere near the bearings, so change the oil before turning over the engine. Then blow out and oil the cylinders.
If you're really worried, pickle it by filling the whole thing with diesel. It will absorb the water.
I work on marine motors. Even one completely filled with water can be saved by pickling as soon as the water is drained.
If you're really worried, pickle it by filling the whole thing with diesel. It will absorb the water.
I work on marine motors. Even one completely filled with water can be saved by pickling as soon as the water is drained.