Conversions & Swaps LSX Engines in Non-LSX Vehicles
Sponsored by:
Sponsored by:

My 1965 Buick Skylark L92/6L80 Swap

Thread Tools
 
Search this Thread
 
Old 11-20-2012, 07:19 PM
  #81  
TECH Junkie
Thread Starter
 
1989GTA's Avatar
 
Join Date: Dec 2005
Posts: 3,092
Likes: 0
Received 5 Likes on 5 Posts

Default

Originally Posted by speedtigger
Where are your turn signal indicators?
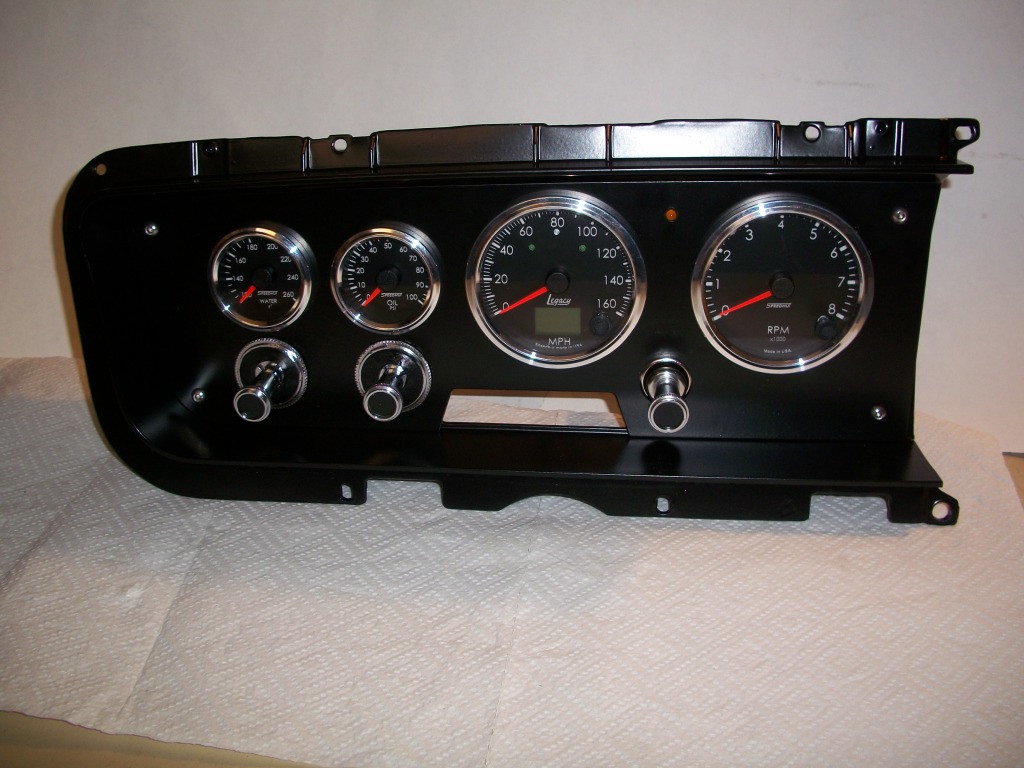
The two green dots in the speedometer. The high beam is also in the speedometer right below the 80mph mark. The orange LED in the top middle between the gauges is the "check engine light".
Old 11-20-2012, 07:34 PM
  #82  
Old School Heavy
iTrader: (16)
 
speedtigger's Avatar
 
Join Date: May 2010
Location: Florida
Posts: 8,826
Received 50 Likes on 32 Posts

Default

Originally Posted by 1989GTA
The two green dots in the speedometer. The high beam is also in the speedometer right below the 80mph mark. The orange LED in the top middle between the gauges is the "check engine light".
Pretty slick gauge.

Are you sticking with the brushed stainless look. That will be a recipe for serious glare.
Old 11-20-2012, 08:47 PM
  #83  
TECH Junkie
Thread Starter
 
1989GTA's Avatar
 
Join Date: Dec 2005
Posts: 3,092
Likes: 0
Received 5 Likes on 5 Posts

Default

Originally Posted by speedtigger
Pretty slick gauge.

Are you sticking with the brushed stainless look. That will be a recipe for serious glare.
You would be correct but as of now I am going to have the panels powder coated a satin black including the factory pieces that they mount to as shown in the picture.

Last edited by 1989GTA; 11-20-2012 at 08:53 PM.
Old 11-20-2012, 08:50 PM
  #84  
Old School Heavy
iTrader: (16)
 
speedtigger's Avatar
 
Join Date: May 2010
Location: Florida
Posts: 8,826
Received 50 Likes on 32 Posts

Default

Originally Posted by 1989GTA
You would be correct but as of now I am going to have the panels powder coated a satin black including the factory pieces that they mount to.
Nice. You can also get Formica that matches the faux leather grain that the car has from the factory. I used it on my console.
Old 11-20-2012, 08:56 PM
  #85  
TECH Junkie
Thread Starter
 
1989GTA's Avatar
 
Join Date: Dec 2005
Posts: 3,092
Likes: 0
Received 5 Likes on 5 Posts

Default

Originally Posted by speedtigger
Nice. You can also get Formica that matches the faux leather grain that the car has from the factory. I used it on my console.
Hmmmm, that is interesting. I was talking with a guy at lunch today and he says there is a process that uses wet decals with any "picture" you want on them including wood. I may hold off a little bit and do some more research before making a final decision.
Old 12-04-2012, 05:22 PM
  #86  
TECH Junkie
Thread Starter
 
1989GTA's Avatar
 
Join Date: Dec 2005
Posts: 3,092
Likes: 0
Received 5 Likes on 5 Posts

Default

A little update that is picture worthy. Been working on the car almost daily but doing small odds and ends with the wiring and some interior painting. Here is a picture of the almost completed LH dash panel that is completely wired up and ready to plug in and install in the car.

The one thing left to do is the Park, reverse, neutral, drive and drive 1 label that goes in the opening below the speedometer. I went with the semi-gloss black paint as that was the easiest and cheapest to do. Should have the RH panel done by the end of the week. I was a little worried about the 4 screws that hold the panel on but they are stainless steel and did not come out to bad. Here is a picture.
Name:  LHPanelDone.jpg
Views: 1500
Size:  167.6 KB
Old 12-04-2012, 11:48 PM
  #87  
Teching In
 
66fasty's Avatar
 
Join Date: Oct 2009
Location: Palm Springs,CA
Posts: 19
Received 0 Likes on 0 Posts

Default

Looks good, I just started a swap on my 65 Skylark as well. You wouldn't happen to have a template for your gauges would you?
Old 12-05-2012, 09:26 AM
  #88  
TECH Junkie
Thread Starter
 
1989GTA's Avatar
 
Join Date: Dec 2005
Posts: 3,092
Likes: 0
Received 5 Likes on 5 Posts

Default

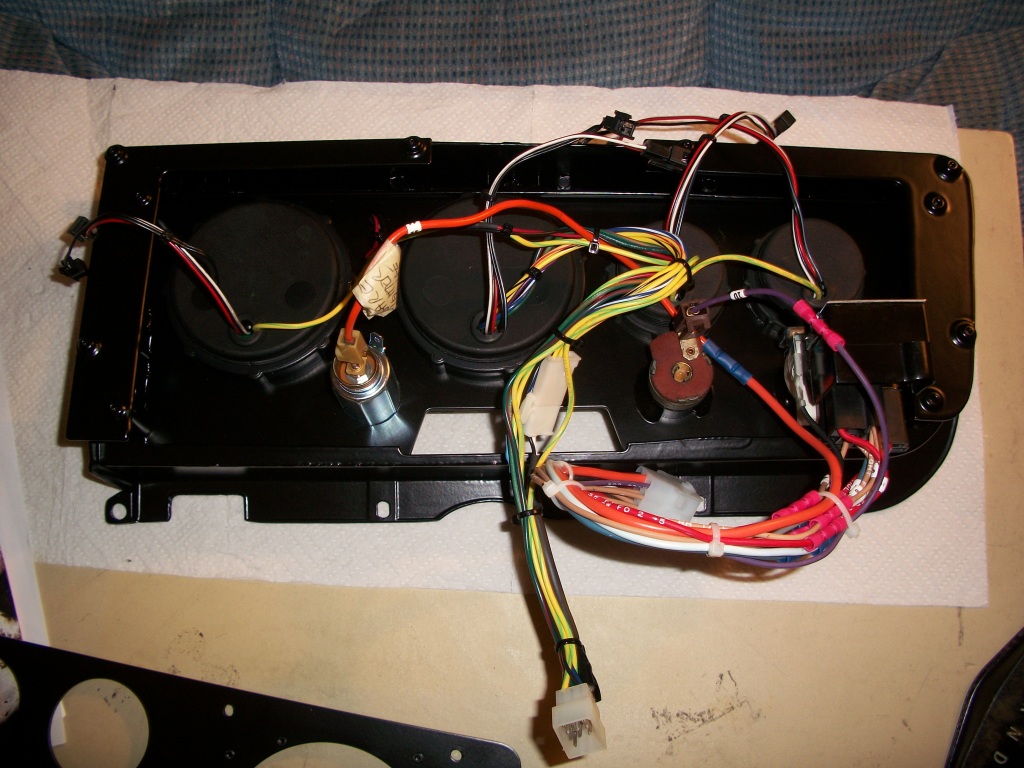
I might still have the paper cutout. I also had to modify the factory panel. Maybe later today I will show a picture of the backside as it is revealing as to what I did. I have to run for now. Be sure to start a thread on your car.

Last edited by 1989GTA; 12-05-2012 at 02:26 PM.
Old 12-05-2012, 09:36 AM
  #89  
Old School Heavy
iTrader: (16)
 
speedtigger's Avatar
 
Join Date: May 2010
Location: Florida
Posts: 8,826
Received 50 Likes on 32 Posts

Default

That looks really really good. Are you going to put a silver highlight on the bezel edge or go with the blacked out look?
Old 12-05-2012, 02:33 PM
  #90  
TECH Junkie
Thread Starter
 
1989GTA's Avatar
 
Join Date: Dec 2005
Posts: 3,092
Likes: 0
Received 5 Likes on 5 Posts

Default

Originally Posted by speedtigger
That looks really really good. Are you going to put a silver highlight on the bezel edge or go with the blacked out look?
Well, that is something I thought a lot about and would have liked to have done but in the end it came down to money. So I went with the blacked out look. One of the reasons is I noticed on my car that the plastic mold trim piece that envelopes the gauge panels seems to cover up a portion of that anyways.
Old 12-05-2012, 02:47 PM
  #91  
TECH Junkie
Thread Starter
 
1989GTA's Avatar
 
Join Date: Dec 2005
Posts: 3,092
Likes: 0
Received 5 Likes on 5 Posts

Default

Here is the backside of the panel to show how I mounted the gauges. We made up two L shaped bracked that mounted to 6 screw holes in the original casting. Then there were four spacers that we made up to bolt the new flat guage panel to the L shaped brackets. Hopefully you can see that in the picture. The edge sticking up from the back of the origina panel where the 6 screw holes go was milled down to be in the same plane as the new flat panel. That was so the 4 mounting screws would be on the same plane and not screwed into an angle so to speak. Here is the picture.
Name:  LHPanelDoneBackside.jpg
Views: 1419
Size:  237.2 KB
Old 12-11-2012, 07:57 PM
  #92  
Teching In
 
ringo234's Avatar
 
Join Date: Sep 2012
Posts: 11
Likes: 0
Received 0 Likes on 0 Posts
Default

Hi Allen
Is the speedometer one of their GPS speedometers?
Old 12-11-2012, 09:27 PM
  #93  
TECH Junkie
Thread Starter
 
1989GTA's Avatar
 
Join Date: Dec 2005
Posts: 3,092
Likes: 0
Received 5 Likes on 5 Posts

Default

Originally Posted by ringo234
Hi Allen
Is the speedometer one of their GPS speedometers?
No it's not. I may have to go that route though. As of now I am tapping into the signal that runs from the 6L80 transmission to the E38 ECM. I will have to wait and see if that works. If not maybe the GPS will be the way to go.
Old 12-11-2012, 09:58 PM
  #94  
TECH Apprentice
iTrader: (6)
 
sierrac3_s2000's Avatar
 
Join Date: Jan 2004
Location: Americus, GA
Posts: 368
Likes: 0
Received 2 Likes on 2 Posts

Default

If you don't want to swap out your speedo Dakot Digital now has a device that gives you a tach signal and a VSS signal for your speedo. It connects to the OBDII port but I bet you could hard wire it in so that your port was free for a scanner. Pretty slick setup.
Old 12-11-2012, 10:24 PM
  #95  
TECH Junkie
Thread Starter
 
1989GTA's Avatar
 
Join Date: Dec 2005
Posts: 3,092
Likes: 0
Received 5 Likes on 5 Posts

Default

Originally Posted by sierrac3_s2000
If you don't want to swap out your speedo Dakot Digital now has a device that gives you a tach signal and a VSS signal for your speedo. It connects to the OBDII port but I bet you could hard wire it in so that your port was free for a scanner. Pretty slick setup.
Thanks, I will look into that for a plan "B" backup.
Old 12-12-2012, 10:05 PM
  #96  
Teching In
 
Zoomin's Avatar
 
Join Date: Feb 2012
Posts: 14
Likes: 0
Received 0 Likes on 0 Posts

Default

Love what you're doing to the Buick. Especially since you're months ahead of me, so I will definitely be following along.

Did your car also have the suspension modified? Curious to know your plans for that.
Old 12-12-2012, 10:43 PM
  #97  
TECH Junkie
Thread Starter
 
1989GTA's Avatar
 
Join Date: Dec 2005
Posts: 3,092
Likes: 0
Received 5 Likes on 5 Posts

Default

Originally Posted by Zoomin
Love what you're doing to the Buick. Especially since you're months ahead of me, so I will definitely be following along.

Did your car also have the suspension modified? Curious to know your plans for that.
I do have the adjustable Edelbrock control arms for the back. This will help in getting the pinion angle correct. I also have the larger sway bar for the front. We are going to open the rear wheel well up and see how large of a tire we can fit in without cutting the frame. Going with 17" rims on the back.

So basically that is it for now. My main goal is to get the car on the road and drivable and reliable. I also want to get the stance right. As to shocks and other items they will come down the road.
Old 12-23-2012, 06:58 PM
  #98  
jss
Teching In
 
jss's Avatar
 
Join Date: Oct 2011
Location: Petaluma
Posts: 12
Likes: 0
Received 0 Likes on 0 Posts
Default

Originally Posted by 1989GTA
Thanks Old Goat. More information for everyone to use. I have pretty much finished my cold air intake and ECM mounting bracket. On the ECM mounting bracket are the battery voltage terminal strip and the ignition voltage terminal strip.

For the CAI I have to cut out the clear plastic cover that will go on the box portion and get it painted along with a few other parts. I also will have to trim the 4" intake tube once the L92 motor is in place, then I can get an exact measurement. Here are a couple of progress pictures. `


Where did you get the air intake. It looks good.
Old 12-23-2012, 07:44 PM
  #99  
TECH Junkie
Thread Starter
 
1989GTA's Avatar
 
Join Date: Dec 2005
Posts: 3,092
Likes: 0
Received 5 Likes on 5 Posts

Default

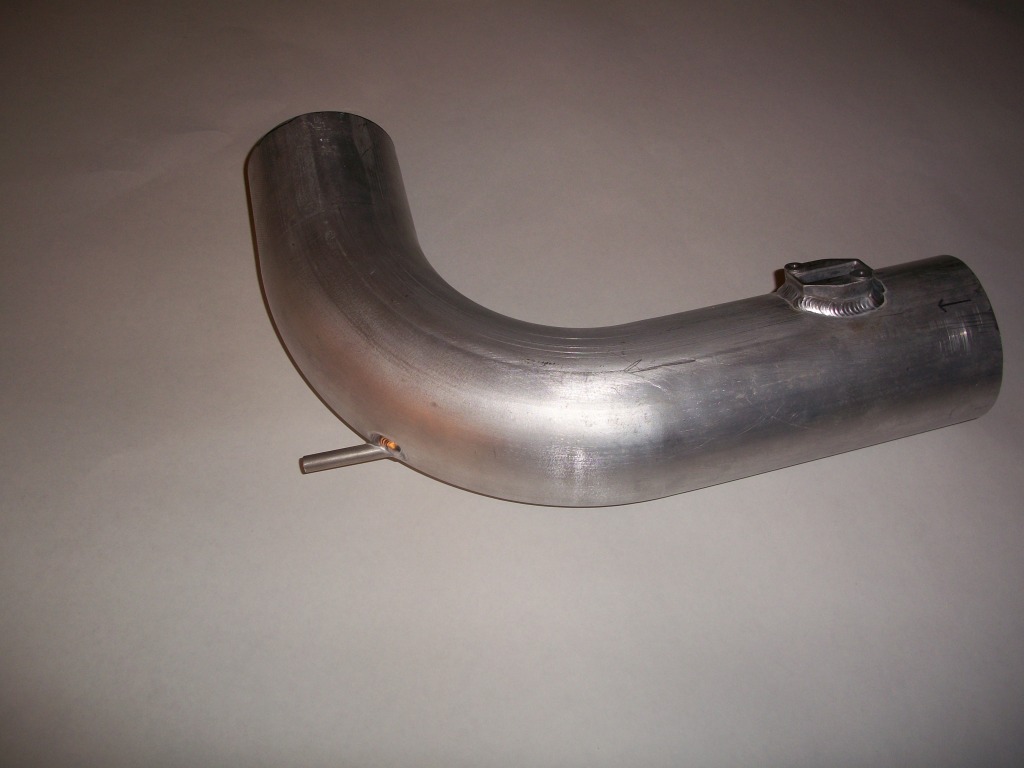
I bought all the parts, cut and shaped them and then had them welded up. The aluminum tubing is 4" diameter with a .062" wall and 6" radius. The MAF holder is available from GM. I have since had the parts powder coated and the plastic cover made for the CAI. I also have added the tube for the filtered air supply for the PCV system. It is 3/8" tubing with a 1/4" hole. I will add that picture.
Name:  CAIIntakeTubeUpdate001.jpg
Views: 1374
Size:  100.5 KB
Old 12-23-2012, 08:54 PM
  #100  
Staging Lane
iTrader: (4)
 
Killer66's Avatar
 
Join Date: Jul 2009
Location: Killeen, Texas
Posts: 99
Likes: 0
Received 0 Likes on 0 Posts
Default Hardware

Awsome job and hardware update.


Quick Reply: My 1965 Buick Skylark L92/6L80 Swap


All times are GMT -5. The time now is 01:35 AM.