
1972 C20 Suburban LS1 4L60E
 11-06-2013, 04:16 PM
#21
TECH Fanatic

Join Date: Aug 2005
Posts: 1,004
Likes: 0
Received 0 Likes
on
0 Posts

Love your burban. I have a 94 that i have had for about 13 years. I dont daily it but i think it rides better than most new trucks if not all. Yours looks great and solid. I have been wanting to do the swap also. I must admit though i dont think i would have sold that big block. But, to each their own. I hope this swap goes great for ya. It will help for sure for the vette. Another super cool car. Stay safe overseas and i hope to catch more of the build when you get back.
 11-06-2013, 05:28 PM
#23

Yea, I figured some people would be upset about breaking up a numbers matching car, especially one that by every indication, only has 39K original miles on it  The fact of the matter is that I bought it to build a really cool and unique, relatively practical, daily driver. I thought about rebuilding the big block with aluminum heads and intake, adding fuel injection, etc, and I probably could have gotten to 400 horse power as this LS1 has, but I certainly wouldnt be pulling down 18 mpg on the highway.
My thought was to keep everything on the car as original as possible while building a reliable modern drive train. As you'll see tomorrow when we get the motor and trans in, Ive got a giant aluminum radiator from entropy with dual electric fans and an internal trans cooler. The whole thing is probably over kill, but I wanted it to be dead on reliable, even if I want to drive it across the country. Again, original is cool, but if you want to drive the car and enjoy it every day, you cant beat modern drive trains!
Should have some good pics and progress tomorrow!
The fact of the matter is that I bought it to build a really cool and unique, relatively practical, daily driver. I thought about rebuilding the big block with aluminum heads and intake, adding fuel injection, etc, and I probably could have gotten to 400 horse power as this LS1 has, but I certainly wouldnt be pulling down 18 mpg on the highway. My thought was to keep everything on the car as original as possible while building a reliable modern drive train. As you'll see tomorrow when we get the motor and trans in, Ive got a giant aluminum radiator from entropy with dual electric fans and an internal trans cooler. The whole thing is probably over kill, but I wanted it to be dead on reliable, even if I want to drive it across the country. Again, original is cool, but if you want to drive the car and enjoy it every day, you cant beat modern drive trains!
Should have some good pics and progress tomorrow!
11-06-2013, 07:37 PM
#24
TECH Fanatic
Join Date: Aug 2005
Posts: 1,004
Likes: 0
Received 0 Likes
on
0 Posts
I agree on the modern drivetrain part for sure. I just think you should have kept the original drivetrain too under a cover. In case you want to sell it one day. But sometimes you gotta get rid of stuff to fund your desires which i also totally understand. Either way i cant wait to see results cause this looks like its gonna be great.
 11-06-2013, 09:13 PM
#26
It wasnt so much a funding issue as a space issue. We rent a condo at the moment with a garage thats 1 car wide by 1 1/2 deep....just enough for my tools and one car, so unfortunately keeping the original motor and trans was out of the question. Some day when we move back to Texas Ill have a small shop out back with a couple of bays and enough room to keep spare parts and old motors.
Not positive about the springs yet....I measured the ride height before any disassembly for that very reason. I may end up having to switch to different springs up front.
Not positive about the springs yet....I measured the ride height before any disassembly for that very reason. I may end up having to switch to different springs up front.
 11-07-2013, 02:54 PM
#29
Teching In

Join Date: Jun 2013
Posts: 21
Likes: 0
Received 0 Likes
on
0 Posts
Thank you for your service! This is a very cool build / direction. Very similar to what I'm doing to a CJ7. I love the old 'Burbs!!! Always wanted a 4 wheel drive. I'll be watching this.
 11-07-2013, 08:43 PM
#31
Thanks guys!! On a side note, I also love Rottweilers, and some day when we have a house with a yard, we will have multiples of both, but for right now, we couldnt pass up such a loyal and handsome GSD that was already named "Chevy"!!
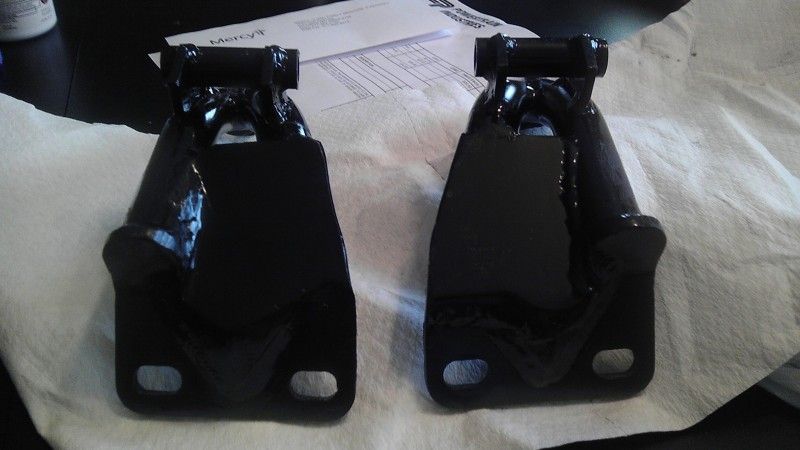
Now for the good stuff....motor mounts installed. For anyone planning on this swap into a C10 or C20, the CPP mounts are the way to go. I tried another brand, but those mounted directly to the factory perches and the '72 had some sort of special, one year only mount and perch. If you want to avoid any problems, the CPP mounts completely eliminate all the factory hardware. That being said, the instructions SUCKED, and we ended up flipping the mounts upside down and sided to side to mount the motor far enough forward for the Holley oil pan to clear the cross member. We also eliminated the bracket spacer because they were too wide for the mounts on my application. After three attempts, everything dropped right in with minimal fuss. All things considered, these would be the perfect mounts with slightly better install instructions.

Next we mated the engine and trans. All together not terribly painful as long as you have the crank snout adapter, the bowed flex plate, and a transmission jack. The whole shebang went together in 15 minutes. Torquing the flex plate - torque converter bolts was a bit of a challenge, but the 15mm crows foot really helped out.

After pulling the big block, the LS slipped in with minimal fuss....

And finally all torqued down. We did manage to strip the threads out of the transmission crossmember mount in the transmission, so I need to get a tap and drill the two holes one size bigger and tap them for the bigger bolts. The factory crossmember bolt holes in the frame needed minimal finessing for the CPP cross member.

Lastly, I did measure the ride height before pulling the big block....rear wheel wells were 35 inches off the deck, fronts were right around 33 1/4. With the LS1 in the bay and bolted down, the front also sits right at 35 inches. Ill have to decide if I want to cut the factory springs, or switch to the small block units to drop the front back down.....call me crazy, but even on the truck, I like the 2" rake
Now for the good stuff....motor mounts installed. For anyone planning on this swap into a C10 or C20, the CPP mounts are the way to go. I tried another brand, but those mounted directly to the factory perches and the '72 had some sort of special, one year only mount and perch. If you want to avoid any problems, the CPP mounts completely eliminate all the factory hardware. That being said, the instructions SUCKED, and we ended up flipping the mounts upside down and sided to side to mount the motor far enough forward for the Holley oil pan to clear the cross member. We also eliminated the bracket spacer because they were too wide for the mounts on my application. After three attempts, everything dropped right in with minimal fuss. All things considered, these would be the perfect mounts with slightly better install instructions.
Next we mated the engine and trans. All together not terribly painful as long as you have the crank snout adapter, the bowed flex plate, and a transmission jack. The whole shebang went together in 15 minutes. Torquing the flex plate - torque converter bolts was a bit of a challenge, but the 15mm crows foot really helped out.
After pulling the big block, the LS slipped in with minimal fuss....
And finally all torqued down. We did manage to strip the threads out of the transmission crossmember mount in the transmission, so I need to get a tap and drill the two holes one size bigger and tap them for the bigger bolts. The factory crossmember bolt holes in the frame needed minimal finessing for the CPP cross member.
Lastly, I did measure the ride height before pulling the big block....rear wheel wells were 35 inches off the deck, fronts were right around 33 1/4. With the LS1 in the bay and bolted down, the front also sits right at 35 inches. Ill have to decide if I want to cut the factory springs, or switch to the small block units to drop the front back down.....call me crazy, but even on the truck, I like the 2" rake
11-08-2013, 04:29 AM
#32
TECH Fanatic
Join Date: Aug 2005
Posts: 1,004
Likes: 0
Received 0 Likes
on
0 Posts
I agree, the rake would look good. If you cut the springs, let the vehicle settle for a couple days. I have heard people say a couple hours but in my experience its a couple days. Between my friends and I we have cut springs on at least 20 vehicles. That is the experience we have had anyhow.
11-08-2013, 05:01 AM
#33
Everything looks good! I just did a similar setup in my 69 SWB.
http://67-72chevytrucks.com/vboard/s...358692&page=20
FYI, cutting off 1 round of coil, equates to approximately 2" of drop. I would start with a half coil at a time.
http://67-72chevytrucks.com/vboard/s...358692&page=20
FYI, cutting off 1 round of coil, equates to approximately 2" of drop. I would start with a half coil at a time.
11-08-2013, 10:15 AM
#35
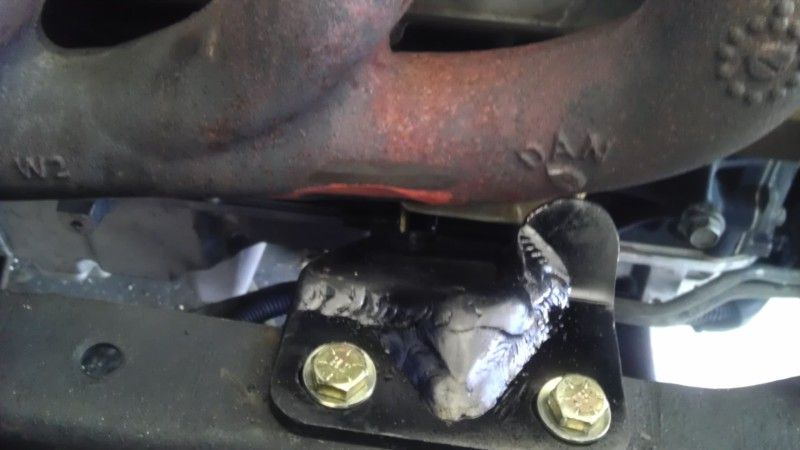
Heres a pic of the crossmember....it bolted right into the factory holes, I just had to VERY slightly elongate the rear hole, but its a nice clean set up.....after I drill and tap the transmission 

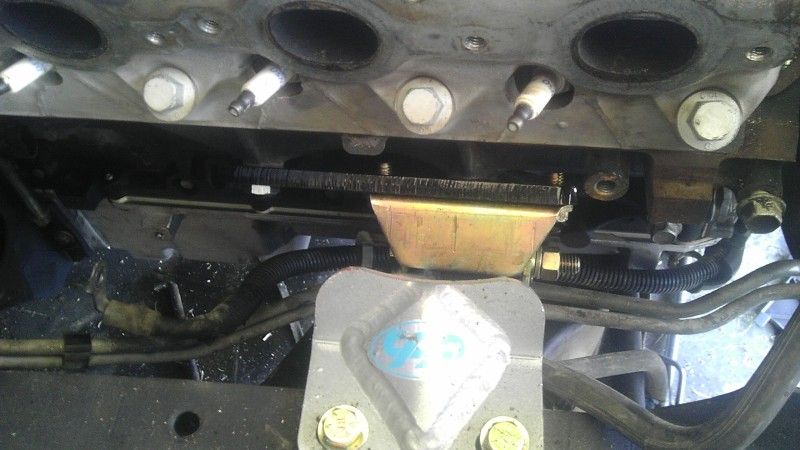
I found some nice, stainless steel headers on ebay for $200 bucks so I figured Id give them a shot.....not a chance....passenger side hits the frame rail and the drivers side hits the CPP mount. They're a quality piece, so if anyone is swapping an LS into something other than a C10, and want some nice shorties, give me a shout.....$150 shipped, special friend price!


I found some nice, stainless steel headers on ebay for $200 bucks so I figured Id give them a shot.....not a chance....passenger side hits the frame rail and the drivers side hits the CPP mount. They're a quality piece, so if anyone is swapping an LS into something other than a C10, and want some nice shorties, give me a shout.....$150 shipped, special friend price!
 11-09-2013, 08:44 AM
#37
TECH Regular
iTrader: (3)

Join Date: Jan 2011
Location: Springfield, MO
Posts: 429
Likes: 0
Received 0 Likes
on
0 Posts
I swapped a 5.3/4l60e into a 68 c10 and used the cpp motor mounts also, and hated every minute of it. I ended up cutting them up and rewelding them so I could fit any kind of exhaust manifold on.
And btw, sick suburban!
And btw, sick suburban!
11-09-2013, 09:11 AM
#39
TECH Regular
iTrader: (3)
Join Date: Jan 2011
Location: Springfield, MO
Posts: 429
Likes: 0
Received 0 Likes
on
0 Posts
The thorley headers are great, but they are proud of them. I can't justify the $7-800 when I plan on throwing a turbo on it next summer. I just think the CPP mounts are a terrible design from the start and would use stock SBC mounts if I were to do it again. Sorry for the hijack, keep going on the build!
11-09-2013, 09:32 AM
#40
Yea, I think the problem is the Thorley headers interfere with the factory column shift linkage....and they're $700. I'm going to give the Holley cast manifolds a shot. Unfortunately, the CPP mounts were the simplest option due to my one year only, super secret motor mounts and perches....well see what happens....