
1952 Chevy Coupe w/ 5.3 LS
 11-01-2013, 11:59 AM
#1

I started this thread on the HAMB, but the old geezers on that site are bashing my "non traditional" build... so I'm bringing it over here!
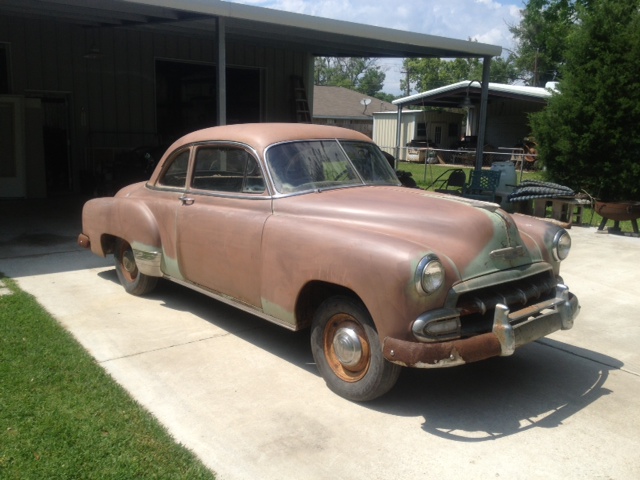
It's a 52 Chevy Styleline Coupe that hasn't been on the road since 1973. It needs pretty much everything but the body is straight and there is very little rust, so that's a plus. So far I've installed a TCI Mustang II front end, dropped in a 5.3 & 4l60e from a 06 Silverado and mounted a 10 bolt posi rear end from a 3rd gen camaro. Up next is getting it wired and plumbed so it is road worthy, then it will get tan leather interior and a dark red metallic paint job with some throw back style 18's!
This being my first car build, there will be a lot of lessons learned (most likely the hard way), but I have already learned a lot from the HAMB and LS1tech.
I will try to take pictures along the way and use this thread as a "build thread". Here is what I've done up to now:
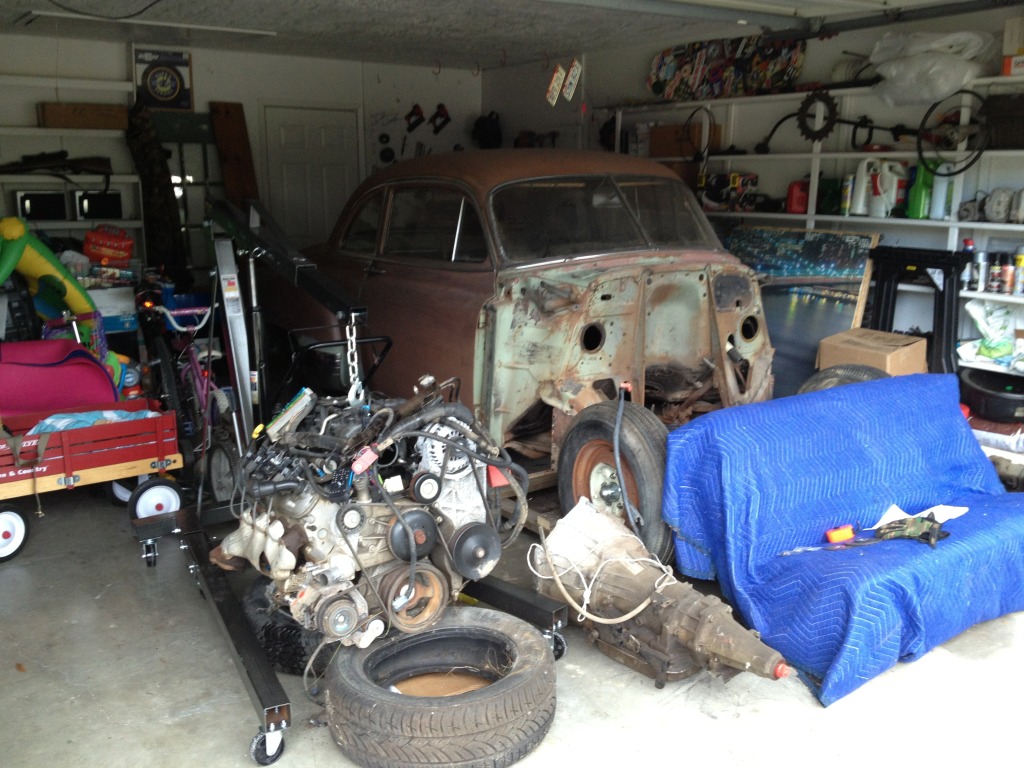
When I first got it
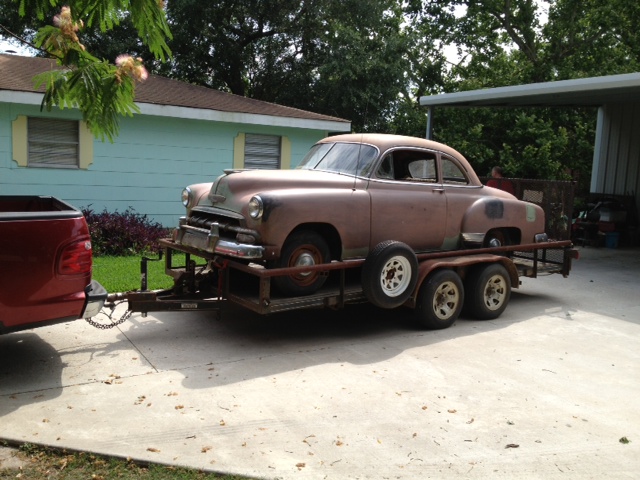
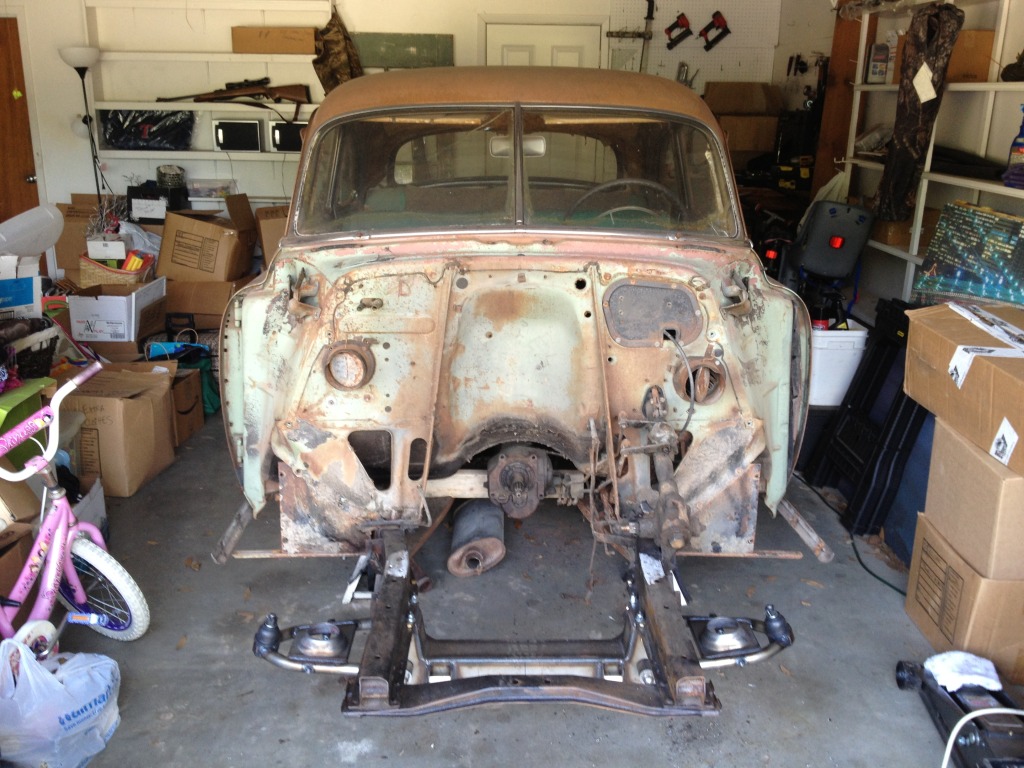
Starting tear down
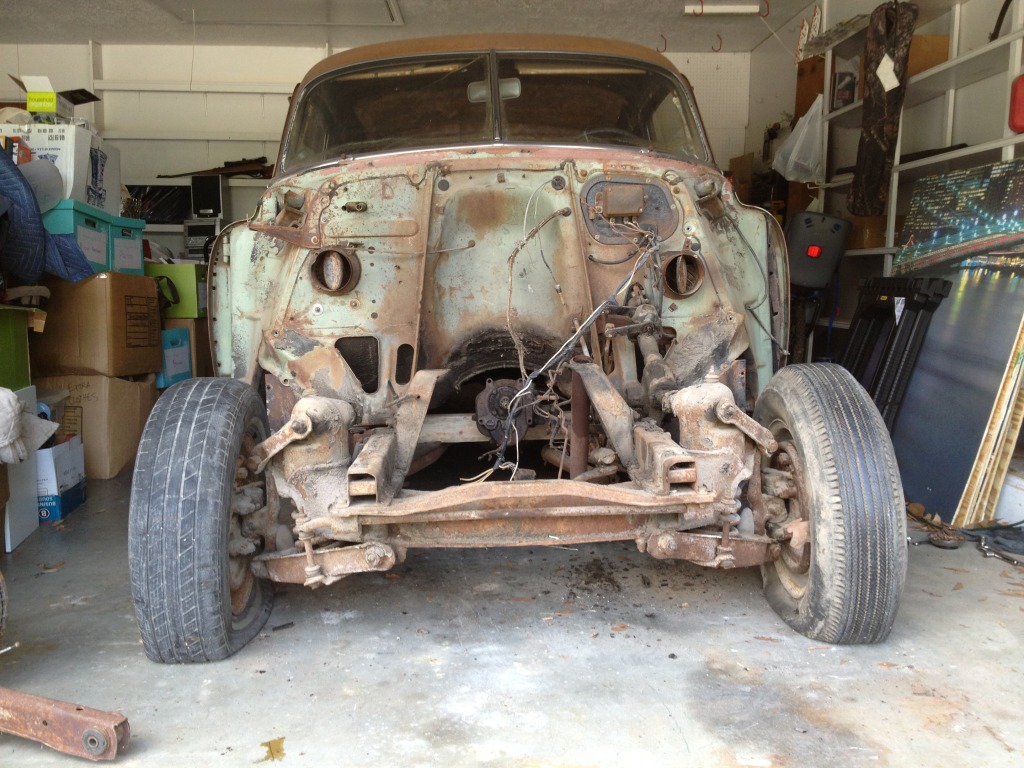
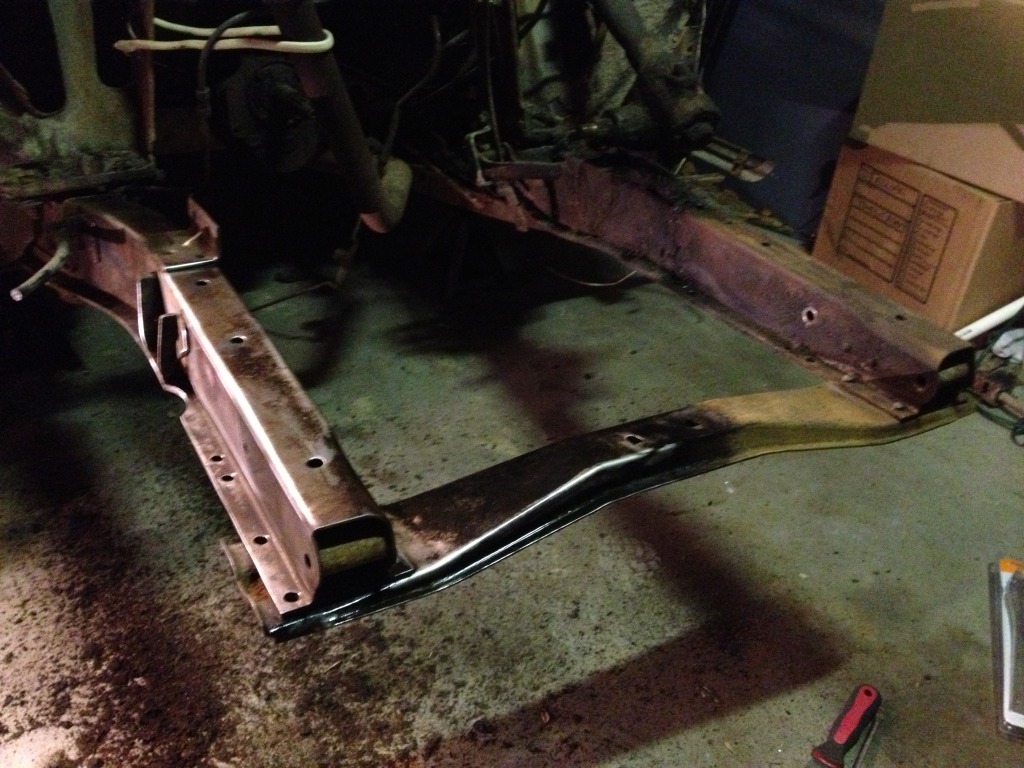
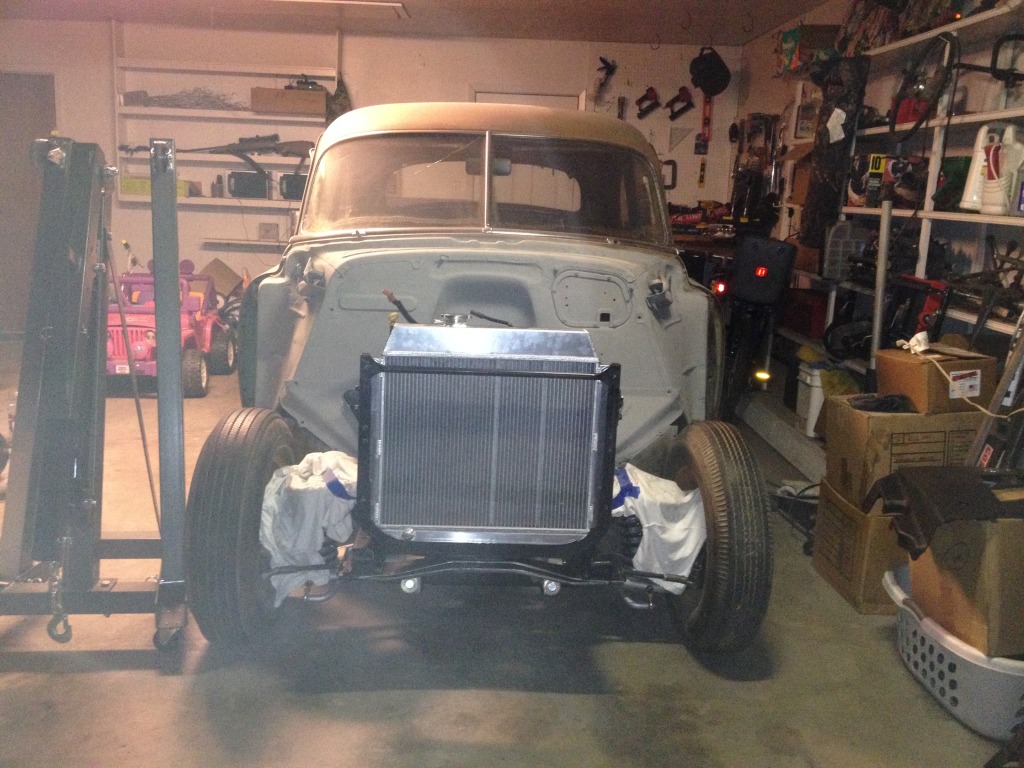
TCI Mustang II crossmember installed
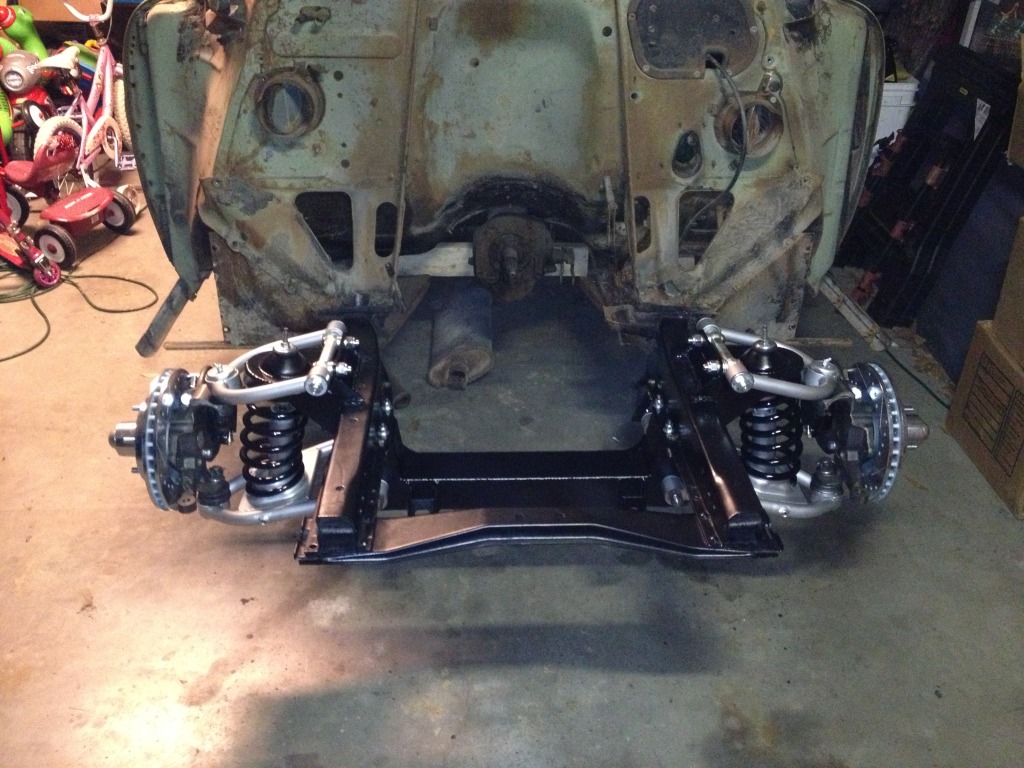
TCI Front Suspension Complete
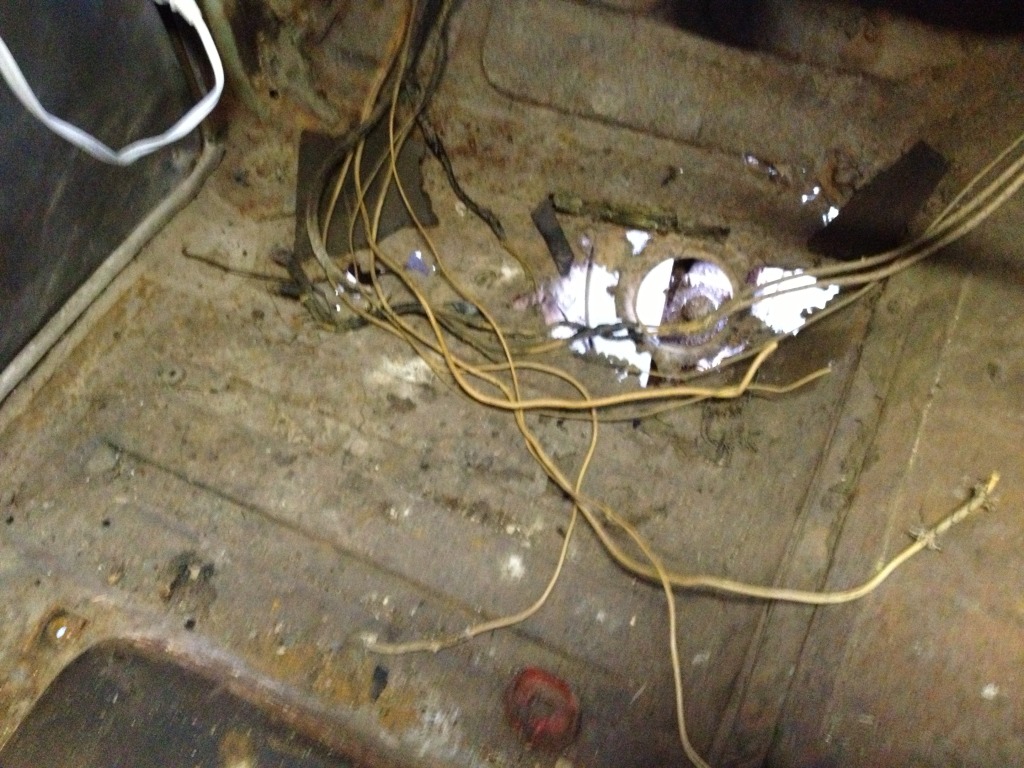
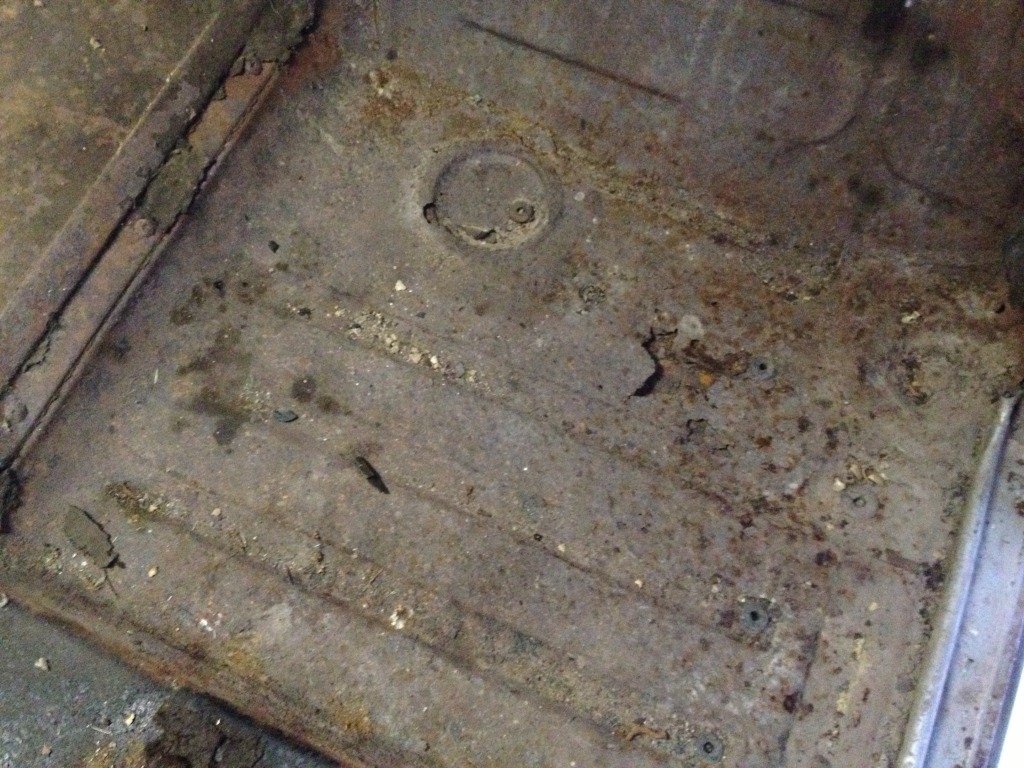
Pulled the seat for some rust repair on the floor pan

Driver's side floorboard
Passenger's side wasn't as bad
Got my motor and transmission
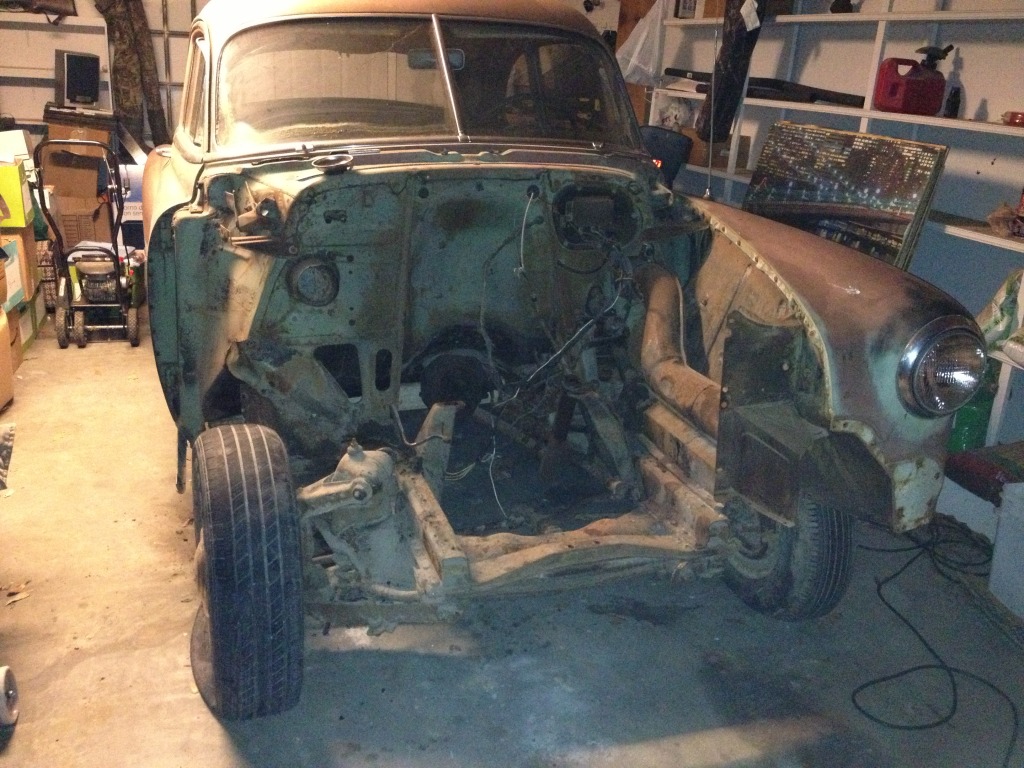
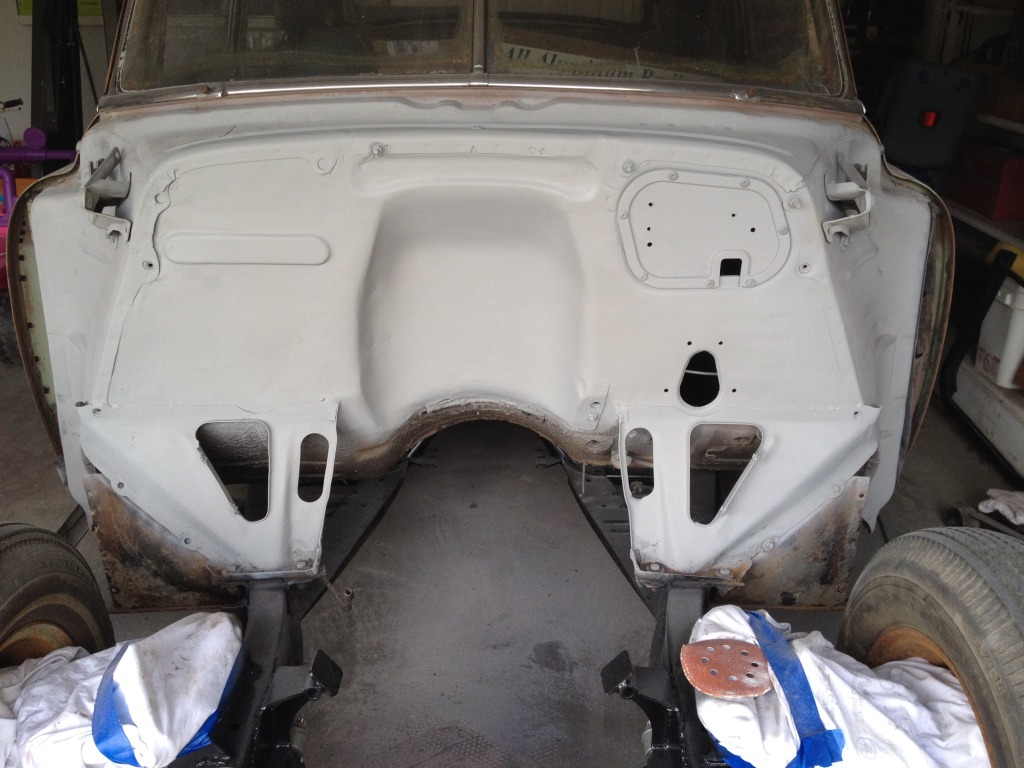
Shaved the firewall
Installing motor/trans
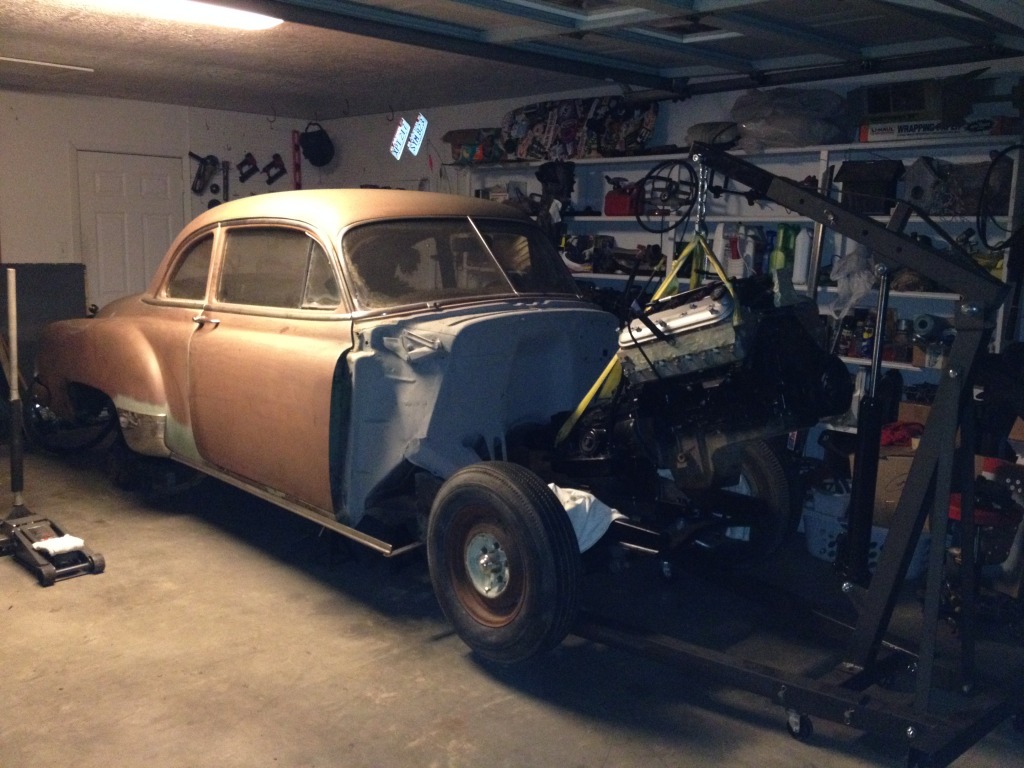
Bolted up using Walton Fab motor mounts and Trans Xmember
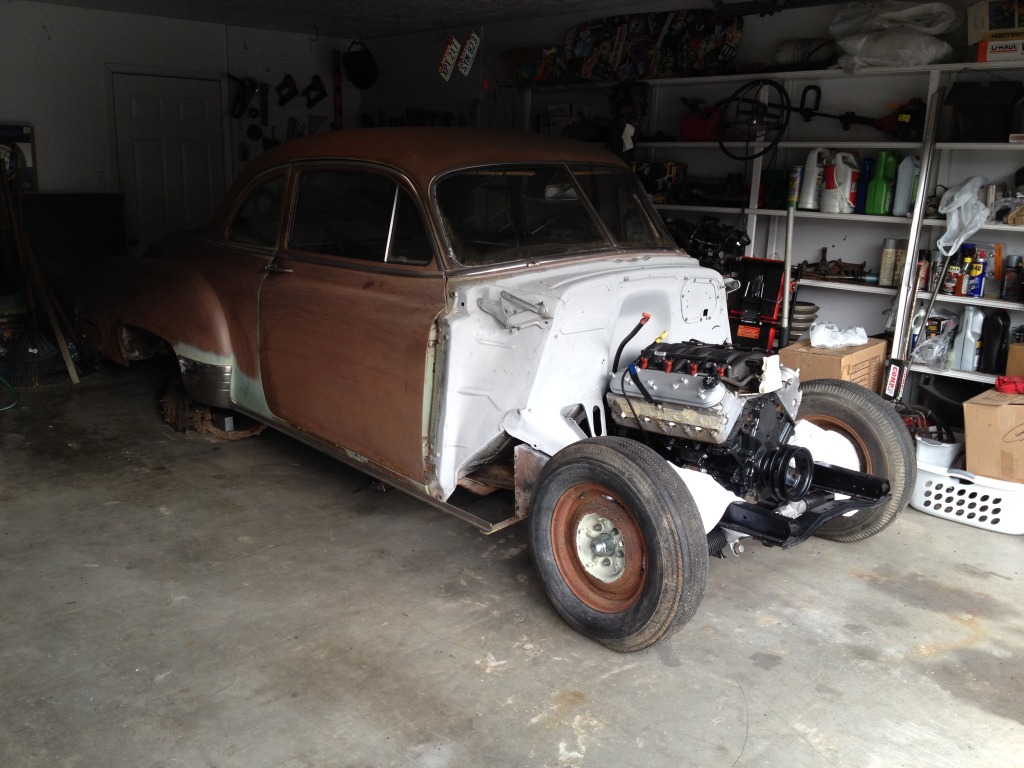
This is how it sits now. Radiator is mounted and brake MC is bolted in under the driverside floor. my goal is to get it running & driving by the end of the year... we'll see how that goes!
It's a 52 Chevy Styleline Coupe that hasn't been on the road since 1973. It needs pretty much everything but the body is straight and there is very little rust, so that's a plus. So far I've installed a TCI Mustang II front end, dropped in a 5.3 & 4l60e from a 06 Silverado and mounted a 10 bolt posi rear end from a 3rd gen camaro. Up next is getting it wired and plumbed so it is road worthy, then it will get tan leather interior and a dark red metallic paint job with some throw back style 18's!
This being my first car build, there will be a lot of lessons learned (most likely the hard way), but I have already learned a lot from the HAMB and LS1tech.
I will try to take pictures along the way and use this thread as a "build thread". Here is what I've done up to now:
When I first got it

Starting tear down


TCI Mustang II crossmember installed

TCI Front Suspension Complete

Pulled the seat for some rust repair on the floor pan

Driver's side floorboard

Passenger's side wasn't as bad

Got my motor and transmission

Shaved the firewall

Installing motor/trans

Bolted up using Walton Fab motor mounts and Trans Xmember

This is how it sits now. Radiator is mounted and brake MC is bolted in under the driverside floor. my goal is to get it running & driving by the end of the year... we'll see how that goes!


The following users liked this post:
Lynchmob79 (06-25-2019)
11-01-2013, 01:02 PM
#2

lol, i like the argument of non-traditional. guy buys a car, takes it apart, puts in a newer model engine, gives it a custom paint job, different wheels....and thats not traditional?
if thats not the definition of hot rodding, i dont know what is!
if thats not the definition of hot rodding, i dont know what is!
The following 2 users liked this post by 99ssleeper:
dcooper45 (04-22-2020), Slow Steve (11-29-2022)
11-01-2013, 01:40 PM
#3
Teching In

Join Date: Jul 2012
Location: Calfornia from L.A. to Upland
Posts: 2
Likes: 0
Received 0 Likes
on
0 Posts
I have been reading this from day one keep it up. Im all with the LS power. The crazy thing is I hope we dont feel the same way when the next generation takes our cars and puts electric motors in them
11-01-2013, 05:47 PM
#5
TECH Enthusiast
iTrader: (15)
Join Date: Aug 2006
Location: DFW....TX
Posts: 624
Likes: 0
Received 0 Likes
on
0 Posts

Yeah I got the same BS on the HAMB. Tell them if they want a voice in it to pay you for the labor and parts....Oh that's right, it would be there car then!
Looking great so far!
Looking great so far!
11-01-2013, 07:51 PM
#6
9 Second Club
iTrader: (2)
Join Date: Jul 2002
Location: on the dyno tuning in MD
Posts: 2,583
Likes: 0
Received 1 Like
on
1 Post
Sweet! Screw them haters - isn't this exactly what they did back in the day? just that their LS1 was a flathead or a hemi... I think most that are against it are scared of fuel injection - they don't know what they are missing! Awesome job so far, I'll be watching for sure!
11-13-2013, 09:32 PM
#7
Making good progress on the car. I laid out the PSI harness and modified my alt bracket to clear the TB. Also hooked up all of the coolant and oil blow by hoses on the intake manifold.
Yesterday I got my -6AN braided line and fittings in so running the lines and mounting fuel pump & reg will be next! Then I need to wire up the rest if the car with the rebel wire harness. Lots of tedious work ahead, but having a running car is coming soon!
Yesterday I got my -6AN braided line and fittings in so running the lines and mounting fuel pump & reg will be next! Then I need to wire up the rest if the car with the rebel wire harness. Lots of tedious work ahead, but having a running car is coming soon!
Trending Topics
11-14-2013, 08:21 PM
#8
11 Second Club
iTrader: (8)

Join Date: Feb 2007
Location: Atlanta
Posts: 99
Likes: 0
Received 0 Likes
on
0 Posts
HA! My build thread on HAMB lasted 3 minutes before it was locked so I know what you mean.
http://www.jalopyjournal.com/forum/s...d.php?t=815158
Are you going with a vintage style interior? And what is your plan for gauges?
http://www.jalopyjournal.com/forum/s...d.php?t=815158
Are you going with a vintage style interior? And what is your plan for gauges?
11-14-2013, 09:39 PM
#9
The interior is going to be very clean and simple. Tan leather, rolled and pleated similar to stock pattern.
As for gauges, I plan on using an aftermarket set with electronic speedo to run off my TSS output. I wanted to keep the original ones, but I would have to convert them to 12v and I would have to run a cable-x. Not worth it in my opinion.
As for gauges, I plan on using an aftermarket set with electronic speedo to run off my TSS output. I wanted to keep the original ones, but I would have to convert them to 12v and I would have to run a cable-x. Not worth it in my opinion.
11-15-2013, 02:09 AM
#10
Nice build, I like where you are going.
Leadfoot85 and Stancel, I feel your pain with HAMB so I rarely go there. I had a quick topic about my car on a Thunderbird forum - no love. I couldn't understand why those people put so much money into an unreliable V6 platform and celebrate when they cracked 300HP when there were several easier, cheaper and more reliable ways to go.
All I can assume is people are scared of different. Here we celebrate different. Welcome, come in and have a cookie!
11-15-2013, 08:06 AM
#11
TECH Apprentice
iTrader: (10)
Join Date: Aug 2008
Location: Winnipeg, Manitoba
Posts: 310
Likes: 0
Received 0 Likes
on
0 Posts
I have a very similar project on the go right now...'50 Fleetline Deluxe
I'm using a Paul Horton mustang II kit. How did you place your front cross member and what ride height do you plan on going with?
I'm using a Paul Horton mustang II kit. How did you place your front cross member and what ride height do you plan on going with?
11-15-2013, 06:00 PM
#12
gofastwclass - I think you nailed it. Some people are afraid of different and if its not what they're used to then they hate on it. But I don't let it get to me, it actually motivates me to keep doing what I like and what I think is cool.
ttls1gp - I'm glad to see another 49-54 Chevy getting the LS treatment! Have you made a build thread? I'd like to see what you have done so far!
The TCI crossmember uses the factory bolt holes in the frame to locate it. I had to drill out 4 additional holes to complete the "bolt in" install. The upper spring hats are centered on the crossmember and welded in place.
As far as ride height, the front will sit about 3-4" lower than stock with the springs as-is. The kit came with 2" drop spindles and I might cut the spring some once they settle. I am using 3" blocks in the rear so about 4-5" total drop in the front should get me where I want to be with the "stance".
11-15-2013, 07:53 PM
#13
TECH Apprentice
iTrader: (10)
Join Date: Aug 2008
Location: Winnipeg, Manitoba
Posts: 310
Likes: 0
Received 0 Likes
on
0 Posts
Any possible chance you can take some measurements from the front of the frame horn to the forward face of the cross member? I'd like to see where TCI places it.
I do not have a build thread as of yet. It's getting a 5.3L with either a GT45 or two GT35R's. Haven't decided on my trans yet. It may just get my T56 i have laying around! I'm using SN95 spindles with FFR strut to Chrysler ball joint conversion so i can use Mustang II upper control arms, 14" GT500 rotors and 2012 Camaro SS Brembo Calipers. Everything bolts together.
But i digress. I'm waiting for more pics!!
Cheers.
11-16-2013, 08:56 AM
#15
Leadfoot the progress is looking good. Keep us posted.
I never made a build thread on the HAMB for the reasons stated. I bolted a holley two barrel on mine and it wasn't period correct. I looked at putting the holley projection and 5-speed in mine and the cost was close to that of the ls swap. I kinda took things too far, but for just a little bit more money I get over 300+hp and fuel mileage that the little 6 banger could never get.
TTLS, the measurement you're looking for is 16", from the center of the front bumper bolt hole in the frame to the centerline of the crossmember. I used 16-1/2". I read from several sources that this places the wheel in the center of the wheel well, but my car is a 54'. Hope this helps.
I never made a build thread on the HAMB for the reasons stated. I bolted a holley two barrel on mine and it wasn't period correct. I looked at putting the holley projection and 5-speed in mine and the cost was close to that of the ls swap. I kinda took things too far, but for just a little bit more money I get over 300+hp and fuel mileage that the little 6 banger could never get.
Any possible chance you can take some measurements from the front of the frame horn to the forward face of the cross member? I'd like to see where TCI places it.
I do not have a build thread as of yet. It's getting a 5.3L with either a GT45 or two GT35R's. Haven't decided on my trans yet. It may just get my T56 i have laying around! I'm using SN95 spindles with FFR strut to Chrysler ball joint conversion so i can use Mustang II upper control arms, 14" GT500 rotors and 2012 Camaro SS Brembo Calipers. Everything bolts together.
But i digress. I'm waiting for more pics!!
Cheers.
I do not have a build thread as of yet. It's getting a 5.3L with either a GT45 or two GT35R's. Haven't decided on my trans yet. It may just get my T56 i have laying around! I'm using SN95 spindles with FFR strut to Chrysler ball joint conversion so i can use Mustang II upper control arms, 14" GT500 rotors and 2012 Camaro SS Brembo Calipers. Everything bolts together.
But i digress. I'm waiting for more pics!!
Cheers.
11-16-2013, 09:43 AM
#16
TECH Apprentice
iTrader: (10)
Join Date: Aug 2008
Location: Winnipeg, Manitoba
Posts: 310
Likes: 0
Received 0 Likes
on
0 Posts
TTLS, the measurement you're looking for is 16", from the center of the front bumper bolt hole in the frame to the centerline of the crossmember. I used 16-1/2". I read from several sources that this places the wheel in the center of the wheel well, but my car is a 54'. Hope this helps.
Visually, how is the wheel placed in your fender well at 16.5" centerline?
11-16-2013, 09:57 AM
#17
Looks good to me. Yes the frames are the same (49-54), but I'm unsure of the sheetmetal; wheel well placement. Here's a couple pics.
https://ls1tech.com/forums/conversio...ls1-4l60e.html
11-16-2013, 10:05 AM
#18
Here is a link to the install instructions that includes some measurements. It shows 16.25" from the front of the frame rail to the center of the crossmember. This is the measurement you want to use since it's not a guarantee ours are the same width. Hope this helps!
http://http://www.totalcostinvolved.com/pdf/install/cchev/1937-1948_Chevy_Car_Coil-Spring%20_FE.pdf
http://http://www.totalcostinvolved.com/pdf/install/cchev/1937-1948_Chevy_Car_Coil-Spring%20_FE.pdf
12-06-2013, 10:31 AM
#19
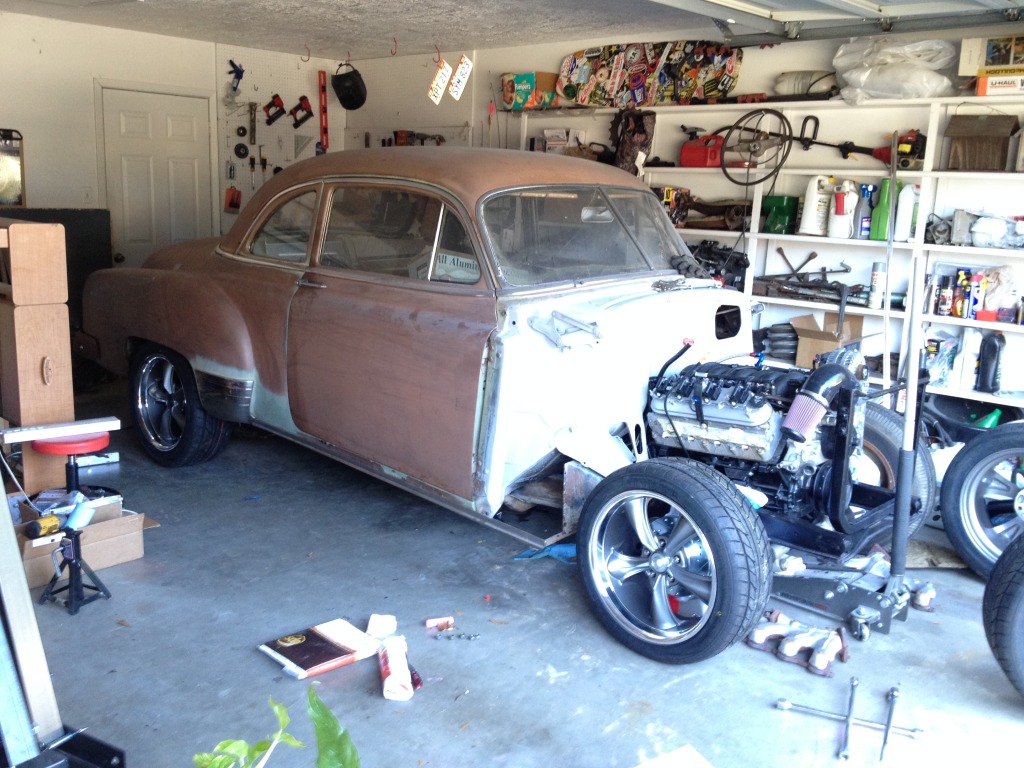
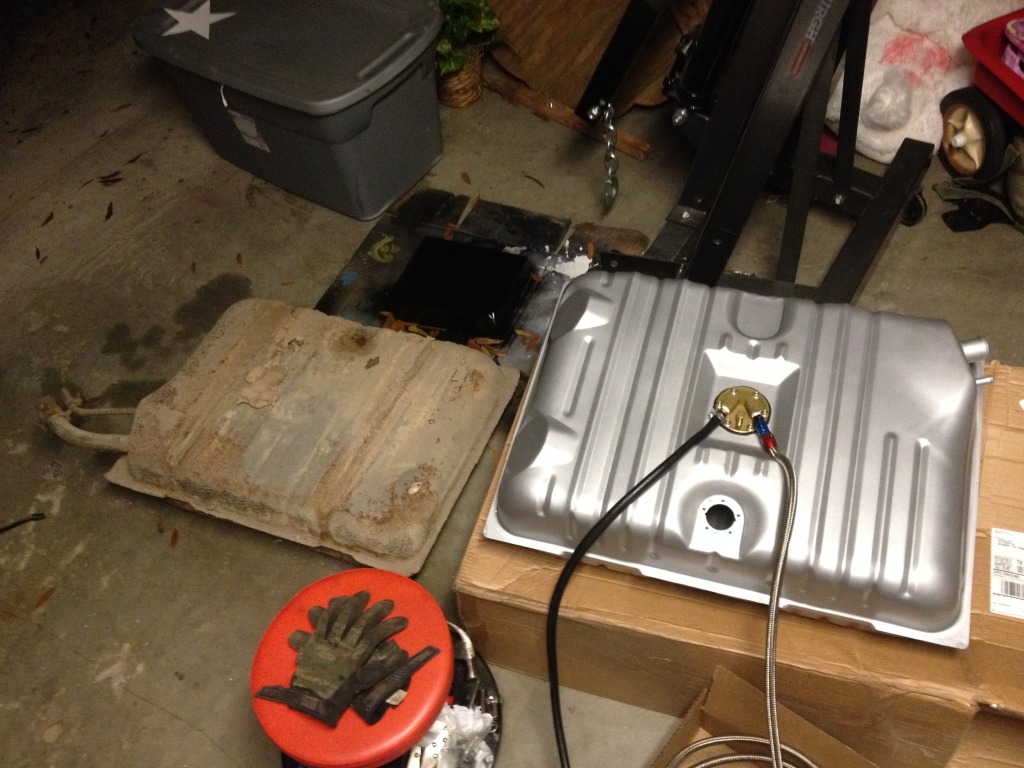
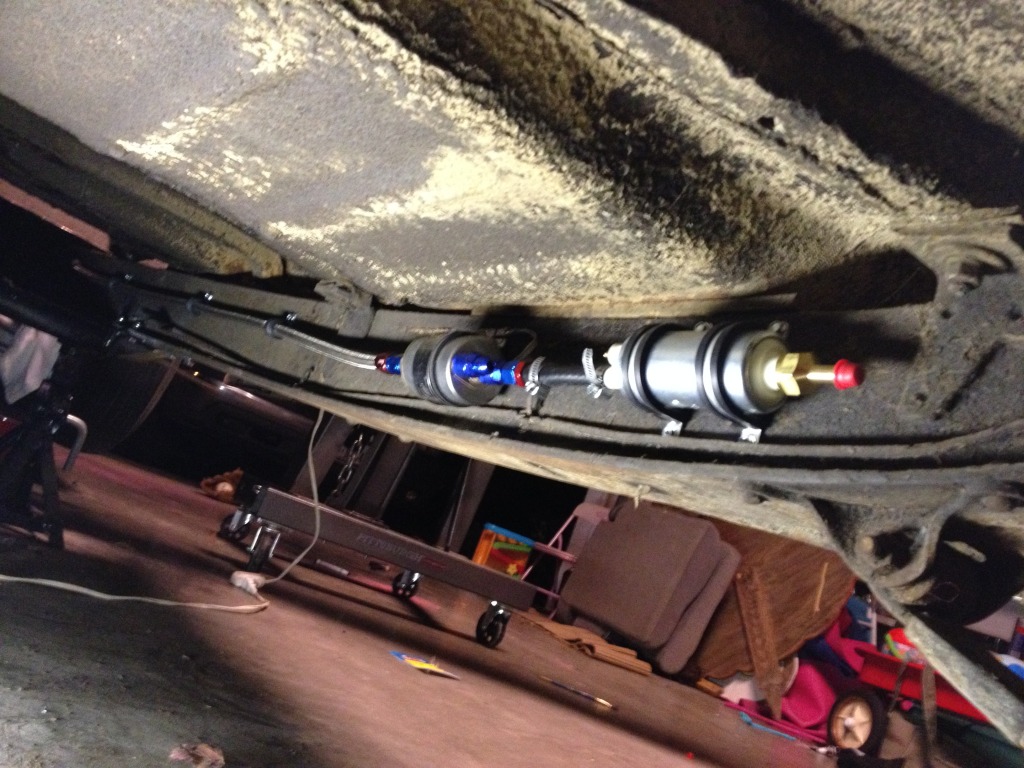
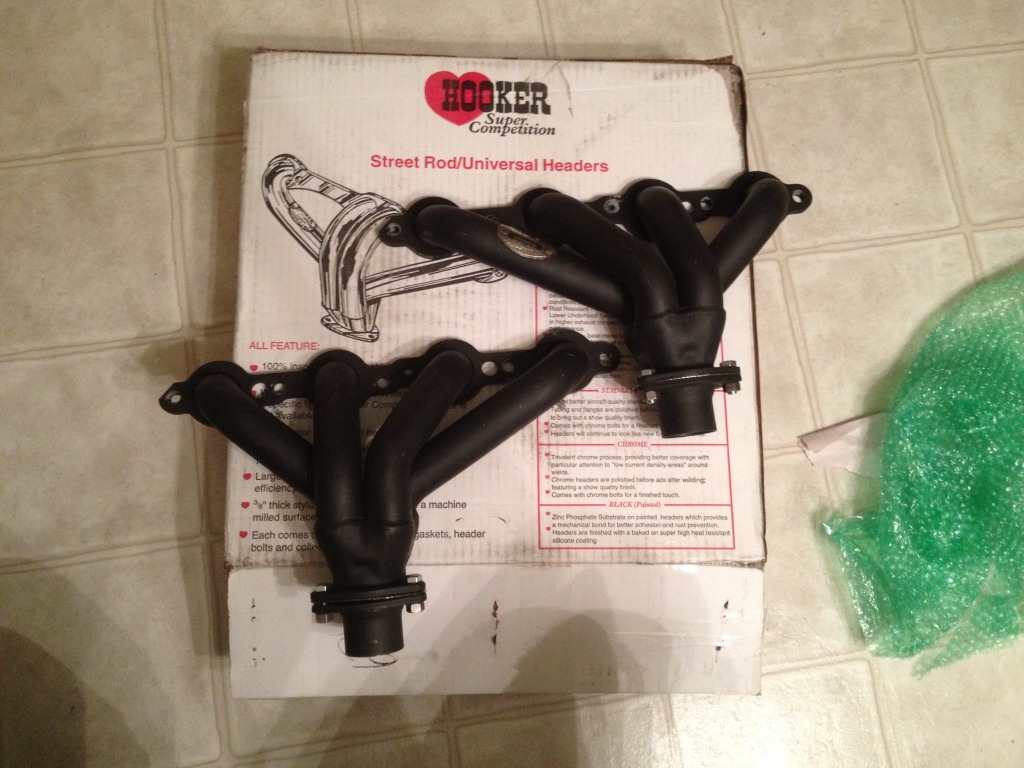
Since my last post I have been steadily working on the wiring and fuel system. As of last night I have the PSI engine harness installed & connected, the battery installed and all charging system wires run, new gas tank installed and all fuel lines connected, hooker headers installed & I got my wheels and tires!!! I still have to run the body wiring harness (i keep putting this off...), mount the fuse panel and PCM and install my new gauges when they get here.
I am still hoping to get it started by the end of the year... :fingerscrossed:
Not much to take pictures of, but here are a few:
Wheels & Tires (rears are just mocked up, axle is not bolted in yet)
Gas tank - Old vs. New
Fuel Pump and regulator (tank line not connected in this pic)
Hooker Headers (thanks to Nwayne)
I am still hoping to get it started by the end of the year... :fingerscrossed:
Not much to take pictures of, but here are a few:
Wheels & Tires (rears are just mocked up, axle is not bolted in yet)

Gas tank - Old vs. New

Fuel Pump and regulator (tank line not connected in this pic)

Hooker Headers (thanks to Nwayne)

Last edited by Leadfoot85; 12-06-2013 at 11:03 AM.
