
68 Camaro LS1/4L60E my swap
 11-24-2013, 04:43 PM
#1
Teching In
Thread Starter

Adding my experience with my conversion to the others done here. I've been lurking for a while and am so grateful to everyone who has put forth the effort to post their experience to help prevent me from reinventing the wheel.
My 68

No drive train
No interior

I do have most of the interior in storage. I'll be updating and installing it as I go.
98 Camaro Z28 donor car.

Only 50k miles on the car.

Thanks to Kelly's amazing how to sticky, I removed the drivetrain with ease.


My 68
No drive train
No interior
I do have most of the interior in storage. I'll be updating and installing it as I go.
98 Camaro Z28 donor car.
Only 50k miles on the car.
Thanks to Kelly's amazing how to sticky, I removed the drivetrain with ease.
Last edited by Bossman6241; 11-08-2022 at 03:54 PM.
 11-24-2013, 05:37 PM
#2

I'm doing a 6.0 swap into my 68 camaro too and I see you have a stock brake booster. Just fyi itll sit very close to the coils. What headers and oil pan do you plan on running?
11-24-2013, 08:25 PM
#3
Teching In
Thread Starter
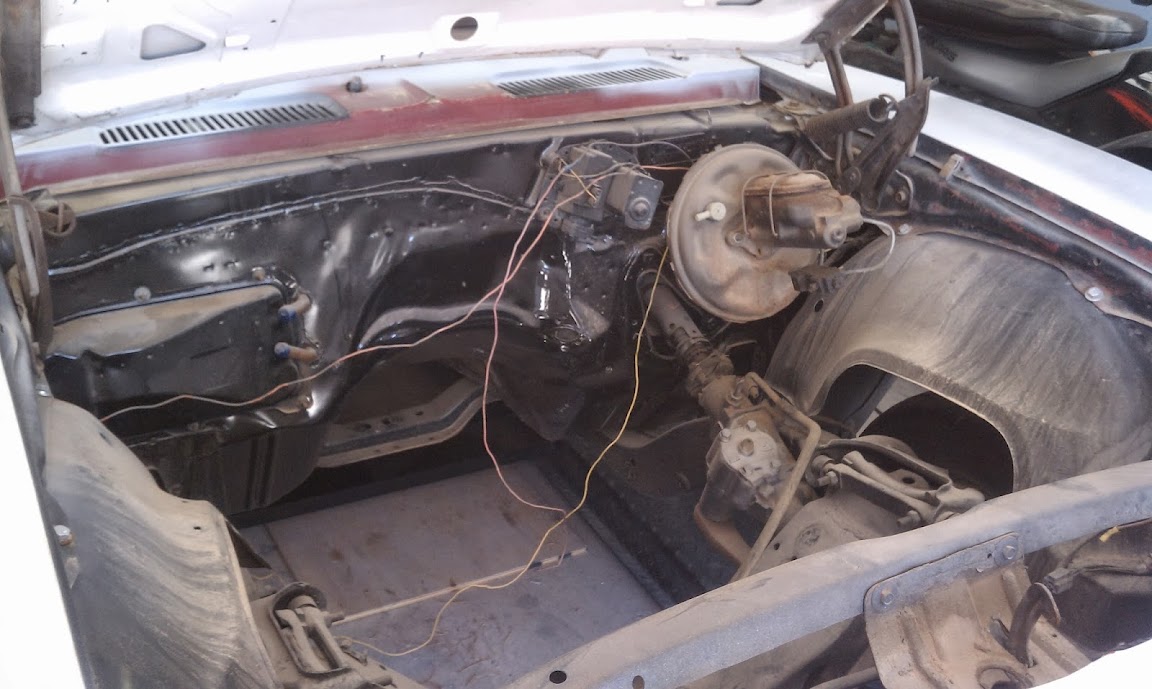
I removed the booster shortly after that picture was taken. I'll definitely be ordering a smaller one.
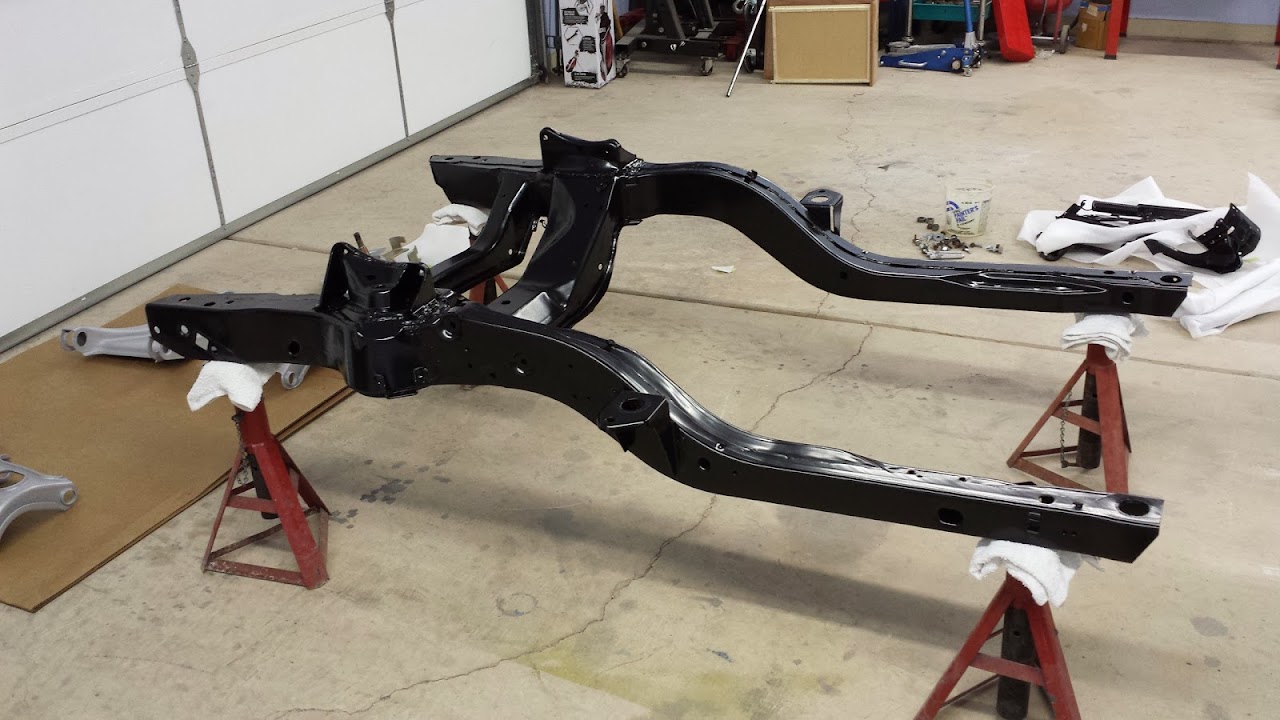
I pulled the subframe, stripped it down and it is currently out for sandblast and powdercoat.
I'm thinking about running either an Autokraft pan or the modified S&P. I have not decided on headers yet.


Here's the firewall as it looks right now.

I pulled the subframe, stripped it down and it is currently out for sandblast and powdercoat.
I'm thinking about running either an Autokraft pan or the modified S&P. I have not decided on headers yet.
Here's the firewall as it looks right now.
Last edited by Bossman6241; 11-08-2022 at 03:56 PM.


Trending Topics
11-25-2013, 05:31 PM
#8
Teching In
Thread Starter
Amen! It really was easy. At first I didn't know how I was going to work it with my 4 post lift instead of a 2 post. As you can see in that pic, I had to get creative and just chained the core support to the cross bar on my lift.
11-25-2013, 07:51 PM
#10
Teching In
Thread Starter
Matt, I see you and I suffer from the same disease. Power===never enough! I read your thread and chuckled when I saw you make the move to the TVS. So sweet! My wallet fears that a move like that will be in my future as well. But its down the road a bit.
My plan is a weekend driver. I think it was 67rsss that said he wanted it looking 68 from 10 feet and then from there on in it's creature comforts the whole way. That described me exactly. Here's what I've decided on so far:
1. All new American Autowire chassis wiring.
2. Dynamat or comparable for sound and temp.
3. Vintage Air
4. All new custom interior with good buckets and rear seat to match. I wonder if I can use the seats from the gen 4 since I have them and they're still in good shape.
5. It has the stock 10 bolt rear in it now. I hope it's good enough for the first drive. I don't wanna build a rear unless I have to or when I get the blower. I will need to find out what R&P is in it though. No clue right now.
6. It already has front disc brakes and I plan on using them.
Once I get the sub frame and suspension back from powder coat, I have P-S-T urethane bushings, ball joints and tie rod ends. It already has a later sport steering box from a Z28.
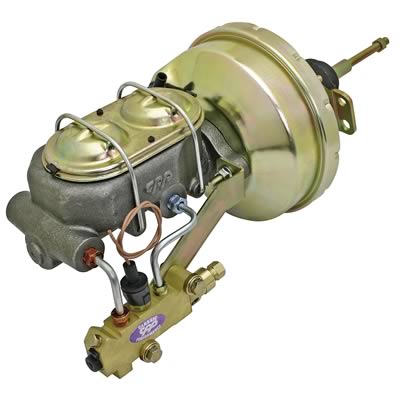
As 406 pointed out, I need another brake booster. Yours looks exactly like what I'm looking for. Did you get yours from Summit?
My plan is a weekend driver. I think it was 67rsss that said he wanted it looking 68 from 10 feet and then from there on in it's creature comforts the whole way. That described me exactly. Here's what I've decided on so far:
1. All new American Autowire chassis wiring.
2. Dynamat or comparable for sound and temp.
3. Vintage Air
4. All new custom interior with good buckets and rear seat to match. I wonder if I can use the seats from the gen 4 since I have them and they're still in good shape.
5. It has the stock 10 bolt rear in it now. I hope it's good enough for the first drive. I don't wanna build a rear unless I have to or when I get the blower. I will need to find out what R&P is in it though. No clue right now.
6. It already has front disc brakes and I plan on using them.
Once I get the sub frame and suspension back from powder coat, I have P-S-T urethane bushings, ball joints and tie rod ends. It already has a later sport steering box from a Z28.
As 406 pointed out, I need another brake booster. Yours looks exactly like what I'm looking for. Did you get yours from Summit?
Last edited by Bossman6241; 11-08-2022 at 03:58 PM.
11-26-2013, 07:38 AM
#11
Wow, Bossman, I think our builds are very similar. I also pulled my drivetrain out from the bottom, I plan to go with the Autowire harness and just recently installed an 8" dual diaphragm booster in place of the stock 11". I only paid about $85 for it on E-bay from Rodpartsdealer. I am also converting my Master cylinder over to the 4th gen since it is so much lighter. I just started my vintage air install by welding in the block off plates on the firewall. good luck with your build and hopefuly we can help each other out. Subscribed.
11-30-2013, 12:58 PM
#12
Teching In
Thread Starter
Wow, Bossman, I think our builds are very similar. I also pulled my drivetrain out from the bottom, I plan to go with the Autowire harness and just recently installed an 8" dual diaphragm booster in place of the stock 11". I only paid about $85 for it on E-bay from Rodpartsdealer. I am also converting my Master cylinder over to the 4th gen since it is so much lighter. I just started my vintage air install by welding in the block off plates on the firewall. good luck with your build and hopefuly we can help each other out. Subscribed.
Awesome that we get to go through this "adventure" at the same time. I found that booster on ebay. Thanks for the referral. I assume you liked the quality and appearance when it arrived. You'll also have to let me know how things work out with the 4 gen master. I still have that old car so if you can make it work then I'll definitely follow suit. Same thing for the Vintage Air. Let me know how that goes and post up some pictures of the install either here or over in your thread. I've been subscribed to yours for a while now.
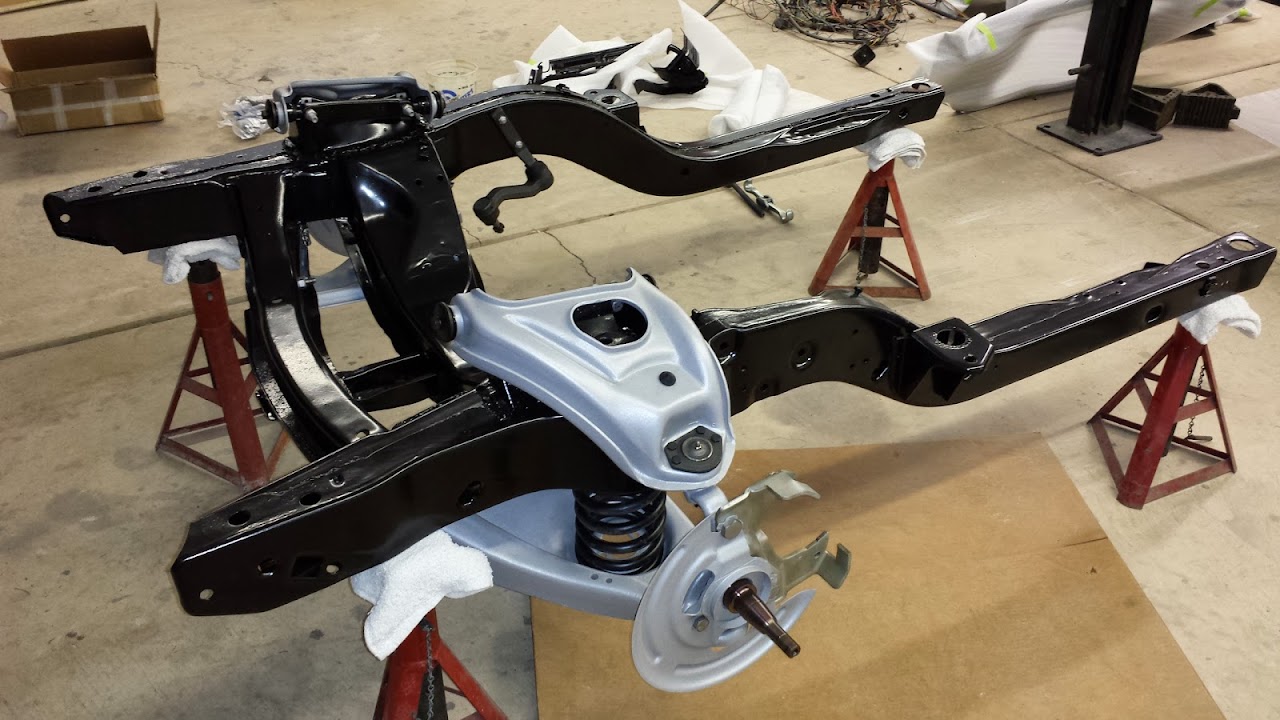
The front end parts came back from powdercoat and look good.

I had the control arms, spindles, and backing plates done in silver to mix it up a little so not everything was a boring black.
Now I'm just waiting for the bushings, ball joints and tie rod ends to arrive from P-S-T so I can put it all together.
I still need to order my oil pan. I like the Autokraft pan but am still open to suggestions if someone has used something that they think is better.
I'm also hoping that PSI will have another sale on their harnesses so I can order one. I missed their black friday sale because I wasn't on the internet for a couple of days.

In the meantime I have started rewiring.

Which brings me to this question for any 1st gen Camaro guys. Does anyone know what this bracket is for?

As the picture shows, it's right above the fuse panel. It looks like something is supposed to be mounted there but I can't find any info on it including in my factory assembly manual.
Thanks.
12-01-2013, 09:23 PM
#14
Teching In
Thread Starter
Also, for anyone wondering the same thing, I was informed what that bracket is. It's simply to mount the connector for the rear harness.

Credit to daven1256 over at Team Camaro.
12-02-2013, 08:10 AM
#15
You just saved me some head scratching on my rewiring.
The brake booster I ordered looks real nice and bolted up without any problems. I have the 4th gen master bolted up now and I started bending new lines this weekend. I need an M12X1.0 to 7/16-24 adapter before I can finish, but so far I think it will work. I will post pictures in a week or so once I finish all the bending and flaring.
The brake booster I ordered looks real nice and bolted up without any problems. I have the 4th gen master bolted up now and I started bending new lines this weekend. I need an M12X1.0 to 7/16-24 adapter before I can finish, but so far I think it will work. I will post pictures in a week or so once I finish all the bending and flaring.
12-03-2013, 08:57 PM
#16
Teching In
Thread Starter
Eventually I know I'll be upgrading the LS. I see that the LS6 manifold is a popular improvement but I also have a serious addiction to forced induction. So I think that as opposed to spending $400+ for a manifold I'll wait for the time that I make the BIG move. So in the meantime I'll keep the engine completely stock with exception of headers during the install.
While I was waiting for my front end parts to return, I ordered a nice billet egr block off plate.

Looks pretty nice on the engine too. Watch out though. The O-ring that came with it is too big. Luckily I had a large assortment and used another one that fit the groove much better.

Meanwhile, I got my parts back from powdercoating and reassembled the front end with new P-S-T bushings and ball joints. I gotta clean up the centerlink and repaint it before I reassemble the steering.
Tomorrow I'm ordering the Vintage Air kit. I do not want to notch my frame to make clearance for the a/c comp so I'm planning on ordering the bracket kit to relocate it to the top. Probably do the same thing for the alternator too.
Another bite of the elephant.
While I was waiting for my front end parts to return, I ordered a nice billet egr block off plate.
Looks pretty nice on the engine too.
Watch out though. The O-ring that came with it is too big. Luckily I had a large assortment and used another one that fit the groove much better.Meanwhile, I got my parts back from powdercoating and reassembled the front end with new P-S-T bushings and ball joints. I gotta clean up the centerlink and repaint it before I reassemble the steering.
Tomorrow I'm ordering the Vintage Air kit. I do not want to notch my frame to make clearance for the a/c comp so I'm planning on ordering the bracket kit to relocate it to the top. Probably do the same thing for the alternator too.
Another bite of the elephant.
Last edited by Bossman6241; 12-08-2013 at 06:44 PM.
12-04-2013, 06:42 AM
#17
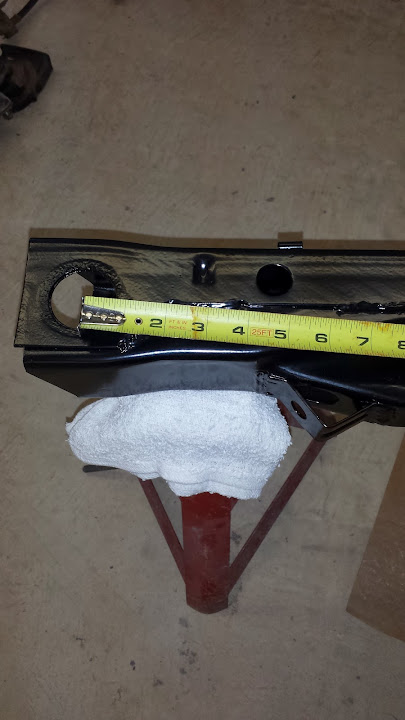
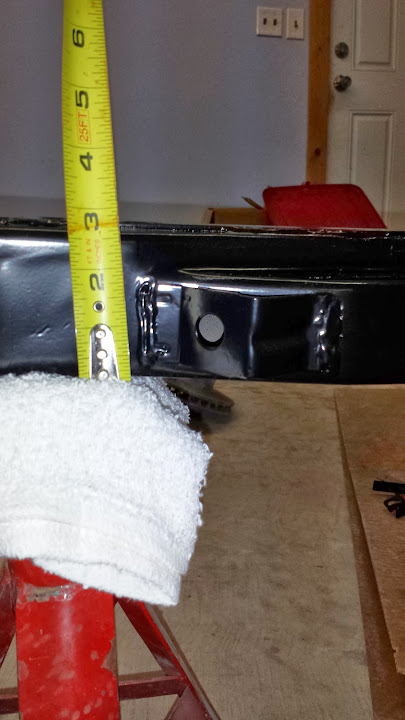
Hey Bossman, since you have the subframe out, I was wondering if you could take some measurements for me. My Art Morrison sub didn't come with parking brake provisions, and I want to use the stock setup. I am prepared to drill holes and weld brackets on the sub, but I need to know where they are on the stock sub. We could discuss here or by PM, let me know.
12-04-2013, 01:24 PM
#18
Bossman, I am getting an E-mail that you responded, but it is not showing up on here, weird. Here is what you said, "No problem at all. I believe there is only one bracket on the subframe unless I'm clueless. Do you want measurements from the body mount holes or is there something else that will work better?"
You are correct one bracket on the inside driver side. Distance in front of the rear mounting hole and how high up the side of the frame will be good. On the ouside of the driver side sub there is a hole that the E-brake cable goes through. I would like distance from the rear mounting hole on that also. On the passenger side there is a hole for the link that acts as support for the intermediate cable. Distance from the rear mounting hole and how high up the sid eof the frame will be good for that one also. Thank you very much.
You are correct one bracket on the inside driver side. Distance in front of the rear mounting hole and how high up the side of the frame will be good. On the ouside of the driver side sub there is a hole that the E-brake cable goes through. I would like distance from the rear mounting hole on that also. On the passenger side there is a hole for the link that acts as support for the intermediate cable. Distance from the rear mounting hole and how high up the sid eof the frame will be good for that one also. Thank you very much.
12-04-2013, 09:58 PM
#19
Teching In
Thread Starter
Hopefully these give you what you need.
Driver's side


Passenger side
I don't know how the mount for the intermediate cable works, so I just took what pics I could of this side with the one hole on the inside.


Driver's side
Passenger side
I don't know how the mount for the intermediate cable works, so I just took what pics I could of this side with the one hole on the inside.