
72 Nova - The Booboo Project LS/4L65e
 01-20-2014, 06:12 AM
#41
 I then had a LQ9 6.0L bored to 6.2L added LS3 internals and LS3 heads and the intake. It all runs with a LS1 harness.
 Thank you
 01-21-2014, 05:54 AM
#42
One of the member at stevenovasite suggesting in looking into the pitting on the frame.

I had the frame sand blasted prior to painting it but I guess it shows even worse on pictures. Now I am torn in taking everything out and welding new plates on the frame or let it be. What would you do? Also is the frame 16ga?
I had the frame sand blasted prior to painting it but I guess it shows even worse on pictures. Now I am torn in taking everything out and welding new plates on the frame or let it be. What would you do? Also is the frame 16ga?
01-21-2014, 02:04 PM
#43

It's definitely thicker than 16 gauge (0.060in), probably in the neighborhood of 12 gauge (0.105in) but you can take a set of calipers to it to know for sure. At one time I knew, but have long forgotten.
I don't think I would bother plating over that. You may cause more damage and headache than what it's worth. The most I would do is weld some large washers where the lower control arms bolt on, but if you didn't notice this when the frame was blasted it probably isn't as bad as it looks. Hard to make a call just from the photos you've posted. Did you take any pictures of it before or after sandblasting, prior to paint?
I don't think I would bother plating over that. You may cause more damage and headache than what it's worth. The most I would do is weld some large washers where the lower control arms bolt on, but if you didn't notice this when the frame was blasted it probably isn't as bad as it looks. Hard to make a call just from the photos you've posted. Did you take any pictures of it before or after sandblasting, prior to paint?
01-21-2014, 04:07 PM
#44
I think I have some pictures of the frame when the frame was sandblasted. Will have to look for them. I also spoke with the person that did my floors and he said to fill the holes up with the welder at a low setting.
I also got something in the mail. Cannot wait to put the engine and the rest.

I also got something in the mail. Cannot wait to put the engine and the rest.
01-21-2014, 06:59 PM
#46
Not sure, maybe Todd can check the order history and see who got it first.
Also my friend found the pictures. The frame does not look that bad in my opinion. This is the only ones that I found that shows the cross member.

Also my friend found the pictures. The frame does not look that bad in my opinion. This is the only ones that I found that shows the cross member.
Last edited by Sebtarta; 01-22-2014 at 06:37 AM.
01-22-2014, 12:57 PM
#47

The first install of these headers by someone outside of Hooker/Holley would have been the ones used by the Roadkill crew doing the LS7/4L75 swap into the Crusher Camaro during the PRI show last month in Indianapolis. Our system does show that units are shipping out of inventory, but I have no idea where they were shipped to. I have many install photos of all the new Hooker parts for this application, so if there's anything in particular that you want to see, just let me know and I'll post em' up.
01-22-2014, 01:34 PM
#48
Thanks Toddoky; I will ask in another thread so we don't hijack Serbarta's thread with general info on new products. I was just curious since he is the first I've seen on LS1tech to start using your system and this is the first I've seen of the new headers shipping.
01-24-2014, 07:01 PM
#49
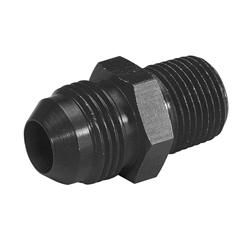
Just gathering parts. I bought the 3/8 SS fuel line, the tube sleeve and tube nut. I then added the fittings needed for the steam vent. I was going to go with the Trickflow TFS-306SB601 but after looking at what other people did, specially with the LS2 and LS3 intakes, you basically can only route the rears to the front going along the injectors and the valve covers. So i decide to piece it out and not using a braided line either. I think just a plain rubber line for this small amount of coolant is more than enough.
This is the list of fitting that I decided to go with for the steam vent line.
Earl's Performance 90* Couplers AT935104ERL x2
Fragola Performance Systems Tee Adapter Fittings 498302-BL x1
Russell Tee Adapter Fittings 661003 x2
Summit Racing� AN to NPT Adapter Fittings SUM-220446B x4
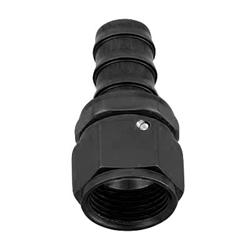
Summit Racing� Twist-Tite Swivel Hose Ends SUM-220700-B x5
Summit Racing� Twist-Tite Swivel Hose Ends SUM-220705-B x2


I have some fittings in back order. Somebody snatched them before I manged to pay for my order. Granted it took me all day to place the order as I went back and forth with fittings and different routing options, even contemplating if the rear steam vents was even worth it. But I then decided to go ahead as I had already bought all 4 corners from Wagner Motorsports.
The fittings missing are these:
 x4
x4
and
 x4
x4
Both fittings are not arriving until late February
So the way that i have in mind in routing the steam vents is very simple. Use the 45* fitting for the rear then routing the hose to the front. Using the -4AN straight fitting going into a T on each side. The T on the driver side will connect to the 90* coupler which then connect to the -4AN to 1/8th NPT. On the passenger side you will have the -4AN 1/8 NPT to the 90* coupler then to the regular T which connects to the swivel T. You then use the -4AN straight adapter to connect the front together with a hose. I will make a drawing and update the thread with it eventually.
This is the list of fitting that I decided to go with for the steam vent line.
Earl's Performance 90* Couplers AT935104ERL x2
Fragola Performance Systems Tee Adapter Fittings 498302-BL x1
Russell Tee Adapter Fittings 661003 x2
Summit Racing� AN to NPT Adapter Fittings SUM-220446B x4
Summit Racing� Twist-Tite Swivel Hose Ends SUM-220700-B x5
Summit Racing� Twist-Tite Swivel Hose Ends SUM-220705-B x2
I have some fittings in back order. Somebody snatched them before I manged to pay for my order.
Granted it took me all day to place the order as I went back and forth with fittings and different routing options, even contemplating if the rear steam vents was even worth it. But I then decided to go ahead as I had already bought all 4 corners from Wagner Motorsports.The fittings missing are these:
x4and
x4Both fittings are not arriving until late February
So the way that i have in mind in routing the steam vents is very simple. Use the 45* fitting for the rear then routing the hose to the front. Using the -4AN straight fitting going into a T on each side. The T on the driver side will connect to the 90* coupler which then connect to the -4AN to 1/8th NPT. On the passenger side you will have the -4AN 1/8 NPT to the 90* coupler then to the regular T which connects to the swivel T. You then use the -4AN straight adapter to connect the front together with a hose. I will make a drawing and update the thread with it eventually.
Last edited by Sebtarta; 01-24-2014 at 07:10 PM.
01-26-2014, 06:53 PM
#50
So I have decided to start searching for a front bare subframe. I need to replace mine as it is in bad shape. The area where the control arms go is pitted as well, you can even see it on one of the pictures from the Hooker engine mounts installation post.
I will keep working on the rest, still use the current frame for mock up on the engine etc, but eventually change the frame for a better one. Oh well....
I will keep working on the rest, still use the current frame for mock up on the engine etc, but eventually change the frame for a better one. Oh well....
01-29-2014, 08:16 PM
#51
So my wallet last week decided to purchase a few things without my knowledge. Or, I was sleepwalking and when I woke up I saw a few email confirming my purchases.
I purchased the Holley brackets from Amazon which they were at a great price. Part# 20-135 for $124 and Part# 21-2 for $58. They are no longer available on Amazon.


I also purchased the belt tensioner for the F=Body water pump, and idler pulley that Holley suggest in purchasing for their brackets. All part numbers can be found, http://www.holley.com/data/Products/Technical/199R10607rev5.pdf. I also got the rest of the fittings I needed for the steam vents. I changed the fittings to Fragola ones instead of Summit brand and having to wait till the end of February.
So after buying that CBM LS1-LS3 throttle body adapter, I started looking into the Nick Williams TB, not sure why but I guess I did not want an adapter between the TB and intake. I called Texas-Speed, and with great info I ended up buying the new Fast Big Mouth LT throttle body 54090. I bought it without sensors, which is fine as I will end up buying new ones when the time comes. It is a new product, so texas-speed's website is not updated yet with the LT TB.


Unfortunatley I will need to see how I will mount the cable to the TB, because the cable bracket that was suggested will not work as the FAST TB 54090 does not have a mounting point for it. Bracket suggested was the SD90BRKT

But this TB is a beauty. I don't even want to take out of the box.
I purchased the Holley brackets from Amazon which they were at a great price. Part# 20-135 for $124 and Part# 21-2 for $58. They are no longer available on Amazon.
I also purchased the belt tensioner for the F=Body water pump, and idler pulley that Holley suggest in purchasing for their brackets. All part numbers can be found, http://www.holley.com/data/Products/Technical/199R10607rev5.pdf. I also got the rest of the fittings I needed for the steam vents. I changed the fittings to Fragola ones instead of Summit brand and having to wait till the end of February.
So after buying that CBM LS1-LS3 throttle body adapter, I started looking into the Nick Williams TB, not sure why but I guess I did not want an adapter between the TB and intake. I called Texas-Speed, and with great info I ended up buying the new Fast Big Mouth LT throttle body 54090. I bought it without sensors, which is fine as I will end up buying new ones when the time comes. It is a new product, so texas-speed's website is not updated yet with the LT TB.
Unfortunatley I will need to see how I will mount the cable to the TB, because the cable bracket that was suggested will not work as the FAST TB 54090 does not have a mounting point for it. Bracket suggested was the SD90BRKT
But this TB is a beauty. I don't even want to take out of the box.
Last edited by Sebtarta; 02-06-2014 at 06:06 AM. Reason: No idea WTF is going on but the link for holley will not accept the URL command
02-06-2014, 05:57 AM
#54
But I made my own steam vent lines, I was hoping to get what I needed yesterday but thanks to the snow it never got delivered. So hopefully today that box is sitting at my house by the time I get home. I will install it and take some pictures as well.
Thank you!
02-07-2014, 12:56 PM
#56
Unfortunately I do not have any links. I have searched like a mad man trying to find that particular kit installed. Not even TrickFlow has a picture of it installed, which is kind of stupid to be honest.
But I made my own steam vent lines, I was hoping to get what I needed yesterday but thanks to the snow it never got delivered. So hopefully today that box is sitting at my house by the time I get home. I will install it and take some pictures as well.
Thank you!
But I made my own steam vent lines, I was hoping to get what I needed yesterday but thanks to the snow it never got delivered. So hopefully today that box is sitting at my house by the time I get home. I will install it and take some pictures as well.
Thank you!
02-08-2014, 08:08 AM
#57
I had some ice buildup around the garage door once I got back from work from all the snow melting off the roof. I skated towards the door and went inside. Put on my Eskimo costume and went back outside to start a fight with the ice. After 5 minutes I gave up and started working on the steam vent lines and the power steering pump to mount on the Holley 20-135 accessory bracket.
I ended up getting the 1/8" NPT to -4 AN 45* fitting for the back ports, SUM-220455B. Used some thread sealer and bolted it down to the heads. Stupid focus went to the back of the engine

Before you finish tightening the fitting make sure to install the steam block on the head as the fitting will interfere with the head bolt. You can then keep tightening the fitting until it is in place.
From there you measure the hose, a 1/4" radiator hose that you can get at any auto parts store. While you are at the store get some 1/2" Corbin clamps as well. Use the Fragola Push-Lite Race Hose Ends 200104-BL for each end of the hoses you cut. Make sure to place the clamp on the hose before you push the fitting on. I used some PB Blaster or Triflow to help slip the fitting on.

And yes I know, I am missing a clamp, I have no clue where it went but I will get another one when I go to the auto part store to buy the belt.
So mount everything together and you end up with this.


These are the parts used on the front of the engine. You will need 2 x Fragola AN to Pipe Thread Fittings 481604-BL that you use on the steam blocks. From there you add the 90* fitting Earl's Performance Couplers AT935104ERL with the Russell Tee Adapter Fittings 661003. On the driver side you just add the Fragola 90* Swivel 498102-BL and the passenger side you have the Fragola 90* plus the Fragola Tee Adapter Fittings 498302-BL. Currently right now everything is loose in order to test fit everything. Later on I will tighten everything. Now do I need to use thread sealer on all sections with the AN fittings?
Now time to work on the power steering pump. I bought the Holley 20-135 as mentinoed before and I had a 2002 Camaro power steering pump (came with the engine) which did not work with the bracket as it would sit on top of one of the lower mounting bolts. Plus it did not have the nipple pipe for the power steering reservoir and nobody has that part or knew what I was talking about. So I order a new pump Cardone 20-822 and the pulley Chevrolet Performance 12568997.
I rented a power steering installer/puller and installed the pulley on the 20-822 power steering pump, very easy to do.


Make sure to lube the steering pump shaft before you start tightening the pulley. Tighten until it is flush with the pump shaft.
Here is the comparison of the pumps, I do not know the part number for the right pulley, but big difference in size. I will keep the smaller pulley either way jsut in case I need it for when I test fit the engine and the big pulley is to close to the upper control arm.

And here is the comparison on the pump with the pipe that I needed.


I ended up getting the 1/8" NPT to -4 AN 45* fitting for the back ports, SUM-220455B. Used some thread sealer and bolted it down to the heads. Stupid focus went to the back of the engine
Before you finish tightening the fitting make sure to install the steam block on the head as the fitting will interfere with the head bolt. You can then keep tightening the fitting until it is in place.
From there you measure the hose, a 1/4" radiator hose that you can get at any auto parts store. While you are at the store get some 1/2" Corbin clamps as well. Use the Fragola Push-Lite Race Hose Ends 200104-BL for each end of the hoses you cut. Make sure to place the clamp on the hose before you push the fitting on. I used some PB Blaster or Triflow to help slip the fitting on.
And yes I know, I am missing a clamp, I have no clue where it went but I will get another one when I go to the auto part store to buy the belt.
So mount everything together and you end up with this.
These are the parts used on the front of the engine. You will need 2 x Fragola AN to Pipe Thread Fittings 481604-BL that you use on the steam blocks. From there you add the 90* fitting Earl's Performance Couplers AT935104ERL with the Russell Tee Adapter Fittings 661003. On the driver side you just add the Fragola 90* Swivel 498102-BL and the passenger side you have the Fragola 90* plus the Fragola Tee Adapter Fittings 498302-BL. Currently right now everything is loose in order to test fit everything. Later on I will tighten everything. Now do I need to use thread sealer on all sections with the AN fittings?
Now time to work on the power steering pump. I bought the Holley 20-135 as mentinoed before and I had a 2002 Camaro power steering pump (came with the engine) which did not work with the bracket as it would sit on top of one of the lower mounting bolts. Plus it did not have the nipple pipe for the power steering reservoir and nobody has that part or knew what I was talking about. So I order a new pump Cardone 20-822 and the pulley Chevrolet Performance 12568997.
I rented a power steering installer/puller and installed the pulley on the 20-822 power steering pump, very easy to do.
Make sure to lube the steering pump shaft before you start tightening the pulley. Tighten until it is flush with the pump shaft.
Here is the comparison of the pumps, I do not know the part number for the right pulley, but big difference in size. I will keep the smaller pulley either way jsut in case I need it for when I test fit the engine and the big pulley is to close to the upper control arm.
And here is the comparison on the pump with the pipe that I needed.
Last edited by Sebtarta; 02-09-2014 at 01:20 PM. Reason: Belt size
02-09-2014, 01:28 PM
#59
Here we go with the belt sizing dilemma. I measured the way Holley had on their instructions with a string. I got a total of 2020mm. As per Holley you are supposed to substract 28mm from the total to compensate on the unsprung belt tensioner. Well the thing is it seems belts are measure on the outside of the belt and not inside on the grooves which is where the string sits.

So after buying 3 different sizes, specially the one where I ended up with 1992mm on the first measurement I finally made it work with......a 6PK2020 belt or 5060795. I used this site to cross reference the belt part #s.
So after buying 3 different sizes, specially the one where I ended up with 1992mm on the first measurement I finally made it work with......a 6PK2020 belt or 5060795. I used this site to cross reference the belt part #s.
