
1967 Cougar build (over 500 pictures and videos)


 02-13-2015, 05:14 PM
#242
TECH Senior Member
Thread Starter
iTrader: (7)

I am honestly not sure. I know it needs to go on the side where the thermostat is. The Trailblazers with the 5.3L engine have the crossover tube going into the bigger heater hose. I just moved it a few inches and put it in the water pump. I did this with my GTO and it's been fine for years.
Andrew
Andrew
02-13-2015, 05:50 PM
#243


Andrew,
I really like seeing when you update this thread. You always seem to come up with something new.
I really like seeing when you update this thread. You always seem to come up with something new.
02-13-2015, 07:07 PM
#244
TECH Senior Member
Thread Starter
iTrader: (7)
I got a long winter to get through, which is why I am doing all this little stuff on the engine now. Hopefully it will all come together nicely this spring.
I've also been talking to Ridetech about their front suspension system with triple adjustable shocks valved for street/drag...

Andrew
Last edited by Project GatTagO; 02-16-2015 at 04:10 PM.
02-16-2015, 04:10 PM
#245
TECH Senior Member
Thread Starter
iTrader: (7)
Got a few pictures back from the blaster this afternoon. The parts look really good. I am really impressed how the texture of the machined surfaces and the texture of the cast finish look so similar.
Tomorrow the parts will get to the anodizer and hopefully he can turn them around fairly quickly.
Andrew
Tomorrow the parts will get to the anodizer and hopefully he can turn them around fairly quickly.
Andrew
02-18-2015, 10:54 PM
#246
TECH Senior Member
Thread Starter
iTrader: (7)
Had a chance to stop by the anodizer today to check out the freshly blasted parts and to discuss what they are going to do. The blaster did an amazing job. I took some better pictures.
So this is one of the adapters that goes on the throttle body that allows a standard air cleaner to fit on top. They were already anodized black, but one of the was a little beat up and I wanted it to have a softer texture.

Next is the coil cover. I really didn't like the shiny machined finish, but I really like how they look now. The tool marks still show through but the sharp edges are much softer now.

This is the billet screw oil filler cap that came with the Holley valve covers. Again, the shiny billet finish wasn't doing it for me, so it got softened up.

The parts above are all billet and from what Troy (at Green Bay Anodizing) said, with the hard coat, they will all take on a dark gray/bronze color, which I think will look awesome. He also said that hard coat has a hardness of 60 Rockwell, which will make these parts very durable.
Here is the cast Hi-Ram top with the biller spacers. The spacers will end up having the same color as the other billet parts, but the cast parts will take on a dark gray color with a slightly different shade than the billet parts.

Finally the intake base. Since it's a casting it will take on the same color as the manifold top.

I am also having the valley cover and the Holley alternator bracket done. Since they are die cast, they will have a slightly different look than the manifold casting.
I am OK with the color variations since my goal is not to have all pieces matching exactly. I think the various combination of finishes and textures makes for a more interesting look than having everything be monochromatic.
Hopefully these will be done on Friday.
Andrew
So this is one of the adapters that goes on the throttle body that allows a standard air cleaner to fit on top. They were already anodized black, but one of the was a little beat up and I wanted it to have a softer texture.
Next is the coil cover. I really didn't like the shiny machined finish, but I really like how they look now. The tool marks still show through but the sharp edges are much softer now.
This is the billet screw oil filler cap that came with the Holley valve covers. Again, the shiny billet finish wasn't doing it for me, so it got softened up.
The parts above are all billet and from what Troy (at Green Bay Anodizing) said, with the hard coat, they will all take on a dark gray/bronze color, which I think will look awesome. He also said that hard coat has a hardness of 60 Rockwell, which will make these parts very durable.
Here is the cast Hi-Ram top with the biller spacers. The spacers will end up having the same color as the other billet parts, but the cast parts will take on a dark gray color with a slightly different shade than the billet parts.
Finally the intake base. Since it's a casting it will take on the same color as the manifold top.
I am also having the valley cover and the Holley alternator bracket done. Since they are die cast, they will have a slightly different look than the manifold casting.
I am OK with the color variations since my goal is not to have all pieces matching exactly. I think the various combination of finishes and textures makes for a more interesting look than having everything be monochromatic.
Hopefully these will be done on Friday.
Andrew
02-19-2015, 03:41 AM
#247
Great call on blasting everything.!!!
02-19-2015, 07:11 PM
#248
TECH Senior Member
Thread Starter
iTrader: (7)
It was the only thing that I could think of to even out the texture between the cast and machined finish on the manifold.
Here is a teaser picture of the hard anodized manifold.

I'll be picking the parts up tomorrow, so stay tuned for more pictures of everything.
Andrew
Here is a teaser picture of the hard anodized manifold.
I'll be picking the parts up tomorrow, so stay tuned for more pictures of everything.
Andrew
 02-20-2015, 09:07 AM
#250
TECH Senior Member
Thread Starter
iTrader: (7)
Andrew
02-20-2015, 03:45 PM
#251
TECH Senior Member
Thread Starter
iTrader: (7)
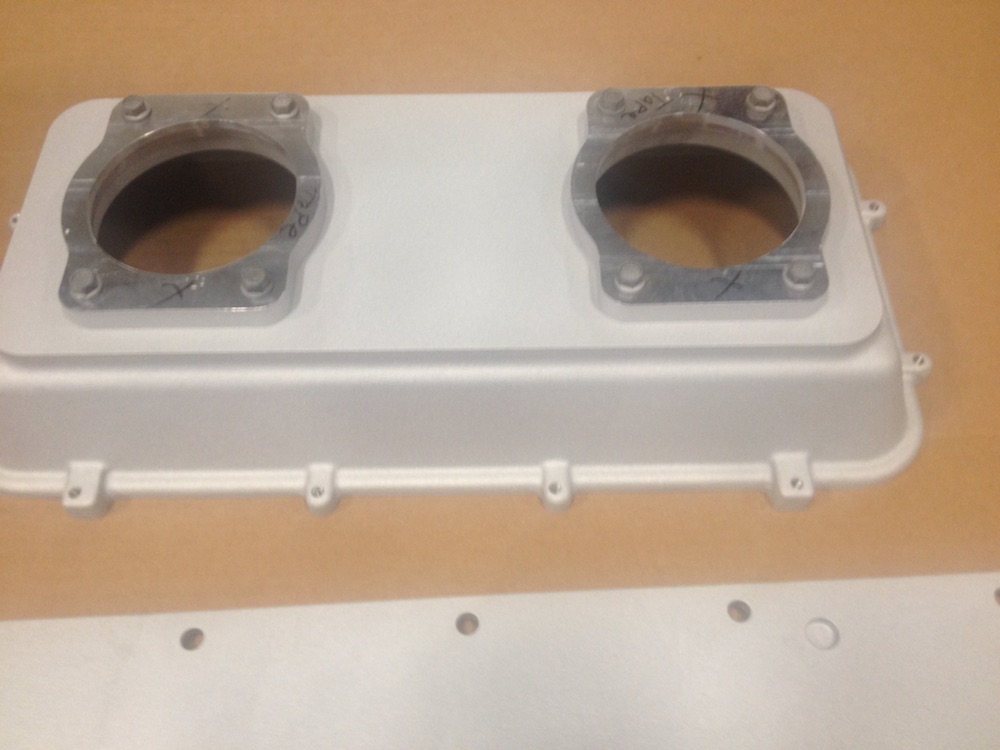
Picked up the hard anodized parts today and I am very pleased with how everything turned out. I had to get my good camera out because my cell phone was not able to get the color right. With my other camera I was able to set a custom white balance which reproduced the shade of the coating much better.
I am really glad that I had everything blasted because it made the textures very consistent. Here is the manifold base:

The coil covers turned out just as nice and match the manifold pretty well.

The valley cover and the Holley alternator brackets are die cast, and they turned out better than I expected. (valley cover not pictured)

The color match between the manifold base and the top is also very good.
Here you can see the difference in color between the machined surface and the blasted surface. Again, good thing I had the machined surfaces blasted because the machined surfaces ended up being a little blotchy.

Can't wait to get the manifold assembled for the last time and have everything ready to go. I can't quite install the valley cover yet because I al using a lift plate that attached there, but you get the idea.
Andrew
I am really glad that I had everything blasted because it made the textures very consistent. Here is the manifold base:
The coil covers turned out just as nice and match the manifold pretty well.
The valley cover and the Holley alternator brackets are die cast, and they turned out better than I expected. (valley cover not pictured)
The color match between the manifold base and the top is also very good.
Here you can see the difference in color between the machined surface and the blasted surface. Again, good thing I had the machined surfaces blasted because the machined surfaces ended up being a little blotchy.
Can't wait to get the manifold assembled for the last time and have everything ready to go. I can't quite install the valley cover yet because I al using a lift plate that attached there, but you get the idea.
Andrew
02-20-2015, 07:11 PM
#253
TECH Senior Member
Thread Starter
iTrader: (7)
Thanks Doug. I am pretty stocked myself!
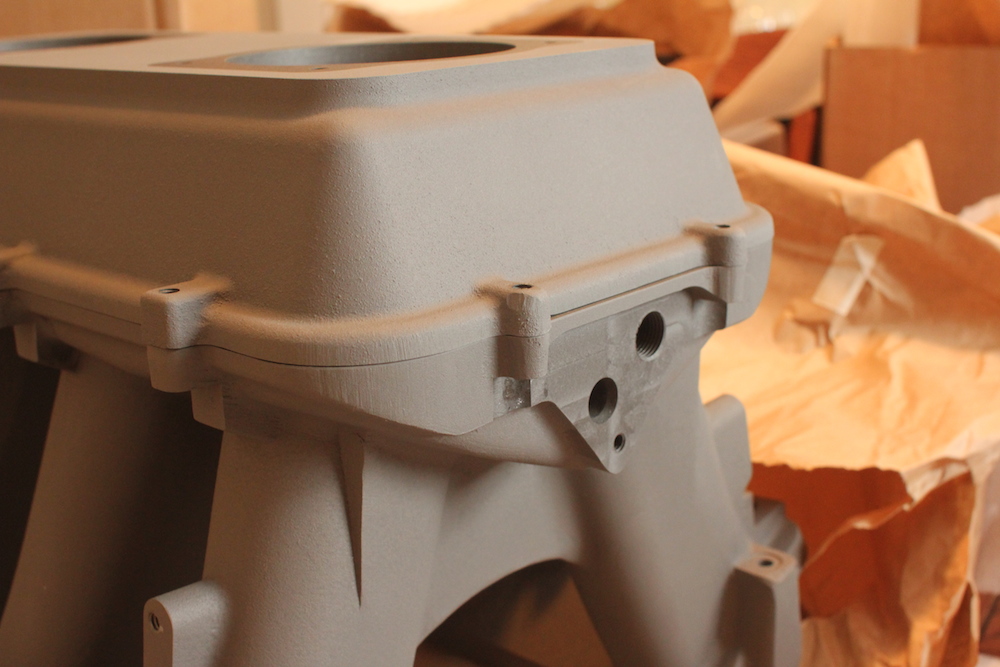
Despite the 15 degree temperature, I decided to bundle up and put the manifold back together.
Holley includes a long piece of Viton rope that has to be trimmed and super glued together to form the seal between the base and the top. I took a couple of pictures of that, but they were all blurry. It's a fairly straightforward process.
Once the top was on, I needed to install the throttle bodies. Since I am using spacers, I need a total of 4 gaskets. For some reason these gaskets are pink in color, so I needed for them to somehow disappear.
I took a Sharpie and went around the edge of the gasket so they wouldn't stand out so much.

With the gasket down, the spacer down, then another gasket on top.

All was good except the throttle body doesn't cover nearly as much area as the spacer.

So, some more work with the Sharpie and I was good to go.

Here is a close-up of the oil fill cap.

The coil covers.

And the overall shot as it sits now.

The camera is still messing up the color somewhat. In natural sunlight it doesn't look nearly that gray. t think I am going to order some more ARP hardware and then call it done.
Andrew
Despite the 15 degree temperature, I decided to bundle up and put the manifold back together.
Holley includes a long piece of Viton rope that has to be trimmed and super glued together to form the seal between the base and the top. I took a couple of pictures of that, but they were all blurry. It's a fairly straightforward process.
Once the top was on, I needed to install the throttle bodies. Since I am using spacers, I need a total of 4 gaskets. For some reason these gaskets are pink in color, so I needed for them to somehow disappear.
I took a Sharpie and went around the edge of the gasket so they wouldn't stand out so much.
With the gasket down, the spacer down, then another gasket on top.
All was good except the throttle body doesn't cover nearly as much area as the spacer.
So, some more work with the Sharpie and I was good to go.
Here is a close-up of the oil fill cap.
The coil covers.
And the overall shot as it sits now.
The camera is still messing up the color somewhat. In natural sunlight it doesn't look nearly that gray. t think I am going to order some more ARP hardware and then call it done.
Andrew
02-21-2015, 08:06 AM
#254

Freak'in Awsum !!!!!.....................Just Say'in.......
02-22-2015, 05:38 PM
#256
TECH Senior Member
Thread Starter
iTrader: (7)
I got some PMs so I figured I should just post the information here.
The blasting was done by:
DeGrave Mediablasting and Painting, LLC
2364 County Road QQ
Green Bay, WI 54311
920-391-4000
The anodizing was handled by:
Green Bay Anodizing
2074 S Ashland Avenue
Green Bay, WI 54304
920-857-9701
Andrew
The blasting was done by:
DeGrave Mediablasting and Painting, LLC
2364 County Road QQ
Green Bay, WI 54311
920-391-4000
The anodizing was handled by:
Green Bay Anodizing
2074 S Ashland Avenue
Green Bay, WI 54304
920-857-9701
Andrew
02-26-2015, 10:47 AM
#257
TECH Senior Member
Thread Starter
iTrader: (7)
So I think I am a little sick in the head. I got some stainless cap head bolts from McMasterCarr because I didn't like the bolts that came with the Holley alternator bracket. They look pretty nice:

Except now, the ARP bolts that I got for the water pump don't match and it's really bugging me. So more matching bolts are on the way from McMaster....sigh.
Andrew
Except now, the ARP bolts that I got for the water pump don't match and it's really bugging me. So more matching bolts are on the way from McMaster....sigh.
Andrew
02-26-2015, 01:50 PM
#259
I'd be happy to take those arp w/p bolts off your hands...lol
Just curious, has the setup you have with the lid and 2 TBs been done before? I haven't ever seen you exact setup. I assume it has since the lid looks like it came from holley
Just curious, has the setup you have with the lid and 2 TBs been done before? I haven't ever seen you exact setup. I assume it has since the lid looks like it came from holley
02-26-2015, 02:27 PM
#260
TECH Senior Member
Thread Starter
iTrader: (7)
The Hi-Ram top came from Holley, but it wasn't machined for anything, it was just a flat top. If you scroll up a bit you will see pictures where Ken machined that top for me to accept the dual DBW TBs.
Andrew