
1967 Cougar build (over 500 pictures and videos)


 12-04-2014, 06:15 PM
#103


Thats not too bad. I was hoping it would't be over 800.oo I figured I was probably gonna go this route if I ever get to the "final piece". I don't like the idea of chasing vibrations around. I'm just glad someone found a true easy fix.
What HP/TQ is that rated for? Any guarantee or just a rating?
thanks in advance,
Jim
What HP/TQ is that rated for? Any guarantee or just a rating?
thanks in advance,
Jim
12-04-2014, 09:37 PM
#104

After loading the Tremec driveline app on my phone and seeing Red....And now that the car is sitting for the winter I decided to get around to starting the process of changing to the -2 pan.....so....After double checking everything....... it ended up with the Drivetrain Angle at 5 Deg down ....... Driveshaft 2 Deg up....... Pinion -1......The car rode well without any Vibration.....But.....at 70 MPH when I let off the gas I could feel where the universals were fighting themselves.........after calculating how much I would have to drop the front of the engine to get to 3 Deg ......It ended up that I would have needed to drop the engine mounts down 1 5/16.......Even with the -2 pan it would be problematic..........so.......After seeing Andrews purchase I called Frank at The Driveshaft shop.....Gave him all the info and he is building me a 3 1/2" Aluminum driveshaft with the trans end having a CV joint and a conventional universal at the rear end........Should be here in a couple of weeks.........Again.....The car drove perfect, but.....I just knew the I didn't hit the "Sweet Spot" with the angles.........This should be the final fix that will let me feel 100% about the Chevelle..........Thanks for posting those pic's Andrew........After looking at everything closer....everything was built around the engine sitting where it is and lowering it much would have really opened up a can of worms.....
I also was concerned about the joints being able to handle the torque.......Frank wasn't even concerned......Kewl!!
Ken
I also was concerned about the joints being able to handle the torque.......Frank wasn't even concerned......Kewl!!
Ken
12-04-2014, 09:54 PM
#105
TECH Senior Member
Thread Starter
iTrader: (7)
Thats not too bad. I was hoping it would't be over 800.oo I figured I was probably gonna go this route if I ever get to the "final piece". I don't like the idea of chasing vibrations around. I'm just glad someone found a true easy fix.
What HP/TQ is that rated for? Any guarantee or just a rating?
thanks in advance,
Jim
What HP/TQ is that rated for? Any guarantee or just a rating?
thanks in advance,
Jim
The CVs were originally designed for axles that see way more torque that is seen at the driveshaft. Of course there are no guarantees...When was the last time you got a guarantee for a u-joint?
Andrew
12-04-2014, 09:54 PM
#106
TECH Senior Member
Thread Starter
iTrader: (7)
After loading the Tremec driveline app on my phone and seeing Red....And now that the car is sitting for the winter I decided to get around to starting the process of changing to the -2 pan.....so....After double checking everything....... it ended up with the Drivetrain Angle at 5 Deg down ....... Driveshaft 2 Deg up....... Pinion -1......The car rode well without any Vibration.....But.....at 70 MPH when I let off the gas I could feel where the universals were fighting themselves.........after calculating how much I would have to drop the front of the engine to get to 3 Deg ......It ended up that I would have needed to drop the engine mounts down 1 5/16.......Even with the -2 pan it would be problematic..........so.......After seeing Andrews purchase I called Frank at The Driveshaft shop.....Gave him all the info and he is building me a 3 1/2" Aluminum driveshaft with the trans end having a CV joint and a conventional universal at the rear end........Should be here in a couple of weeks.........Again.....The car drove perfect, but.....I just knew the I didn't hit the "Sweet Spot" with the angles.........This should be the final fix that will let me feel 100% about the Chevelle..........Thanks for posting those pic's Andrew........After looking at everything closer....everything was built around the engine sitting where it is and lowering it much would have really opened up a can of worms.....
I also was concerned about the joints being able to handle the torque.......Frank wasn't even concerned......Kewl!!
Ken
I also was concerned about the joints being able to handle the torque.......Frank wasn't even concerned......Kewl!!
Ken
That is all good to hear!!!
Andrew
12-06-2014, 03:27 PM
#107
TECH Senior Member
Thread Starter
iTrader: (7)
Got a few more goodies the other day. The scoop is from Holley and I needed to mock everything up before having the top for the Hi-Ram machined for the throttle bodies. So here is the final mock up:
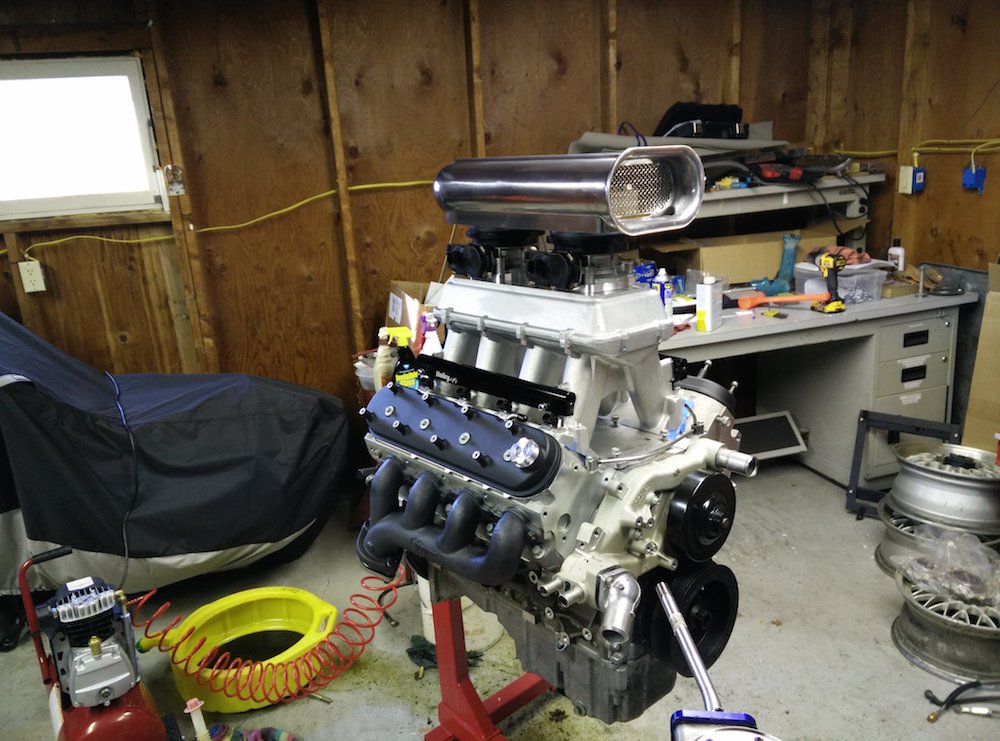
I basically centered each throttle body over the front and rear ports. This should result in good air distribution to all cylinders, not that I am overly concerned about this.

I also picked up a few fittings from Earl's to start working on the plumbing. I like the look of the hard anodized fittings and to keep from marking them during installation I used some painters masking take:

The fuel rail fittings seal with an o-ring so no need for over-tightening.

I'll be using the Dominator EFI system, so I ordered the injector and main harness to see how it all fits together. I was thinking that running the injector harness through the middle of the Hi_ram would give a cleaner look, but there wasn't enough length to do that. I am probably going to modify the harness for a cleaner look:

I ran a portion of the main harness down the middle of the Hi-Ram. With the exception of the cam, IAT, and fuel pressure sensors, I won't be using the other plugs. There are previsions for an IAC, TPS, and a couple of other plugs that aren't needed when running DBW throttle bodies. So this harness will be opened and re-loomed.

I'll be sending off the intake top do be machined and that should just about take care of the engine build. Now if only spring would get here already...LOL
Andrew
I basically centered each throttle body over the front and rear ports. This should result in good air distribution to all cylinders, not that I am overly concerned about this.
I also picked up a few fittings from Earl's to start working on the plumbing. I like the look of the hard anodized fittings and to keep from marking them during installation I used some painters masking take:
The fuel rail fittings seal with an o-ring so no need for over-tightening.
I'll be using the Dominator EFI system, so I ordered the injector and main harness to see how it all fits together. I was thinking that running the injector harness through the middle of the Hi_ram would give a cleaner look, but there wasn't enough length to do that. I am probably going to modify the harness for a cleaner look:
I ran a portion of the main harness down the middle of the Hi-Ram. With the exception of the cam, IAT, and fuel pressure sensors, I won't be using the other plugs. There are previsions for an IAC, TPS, and a couple of other plugs that aren't needed when running DBW throttle bodies. So this harness will be opened and re-loomed.
I'll be sending off the intake top do be machined and that should just about take care of the engine build. Now if only spring would get here already...LOL
Andrew
12-07-2014, 08:12 AM
#108
Great progress. Kinda old school look. I like it ALOT !!! What was you reason for choosing the Dominator EFI vs. GM ?
12-07-2014, 02:41 PM
#110
Beautiful!!!!!!........................Great Job!!!!
12-08-2014, 04:22 PM
#114
TECH Senior Member
Thread Starter
iTrader: (7)
I never thought I would dig the look, but I am getting nostalgic in my old age...LOL
I consulted with a couple of my buddies that have done some wiring modifications and decided that I am going to build my own coil harnesses and modify the existing injector harness to suite my aesthetic. I ordered a bunch of tools, terminals, insulators, heat shrink, and a few other tidbits from Waytek and McMaster Carr. The idea is to turn this:

Into something more aesthetically pleasing and just as functional.
Andrew
I consulted with a couple of my buddies that have done some wiring modifications and decided that I am going to build my own coil harnesses and modify the existing injector harness to suite my aesthetic. I ordered a bunch of tools, terminals, insulators, heat shrink, and a few other tidbits from Waytek and McMaster Carr. The idea is to turn this:
Into something more aesthetically pleasing and just as functional.
Andrew
12-11-2014, 05:48 PM
#115
TECH Senior Member
Thread Starter
iTrader: (7)
Some goodies showed up this week. There has been a lot of negative buzz around the older style Russell fittings coming off and causing leaks at best, and big fires at worst. However, Russell has changed the design of these fittings, so I thought I would give them a try.

Needless to say, I see very little chance of these fittings coming off. They have an internal o-ring that seals on the tube and the back of the fitting screws into the main body to form a very positive retention method.

The main body of the fittings are fairly slim and two of them fit side by side pretty well. I may need to tweak them a little once I get the hose ends on them, but that't not a big deal.

For the outlet side, Russell sells this conversion fitting that goes from the clip in o-ring OEM attachment to a AN -6 line.

This fitting is steel and looks to be well made.

The fuel filter/regulator is by WIX PN 33737.
More to come.
Andrew
Needless to say, I see very little chance of these fittings coming off. They have an internal o-ring that seals on the tube and the back of the fitting screws into the main body to form a very positive retention method.
The main body of the fittings are fairly slim and two of them fit side by side pretty well. I may need to tweak them a little once I get the hose ends on them, but that't not a big deal.
For the outlet side, Russell sells this conversion fitting that goes from the clip in o-ring OEM attachment to a AN -6 line.
This fitting is steel and looks to be well made.
The fuel filter/regulator is by WIX PN 33737.
More to come.
Andrew
12-11-2014, 07:33 PM
#116
Those fittings are great!!!!.........
12-12-2014, 08:28 AM
#117
TECH Resident

Got a couple of beautiful driveline parts today from The DriveShaft Shop. Goodbye 100 years old u-joint technology and welcome to the 21st century...
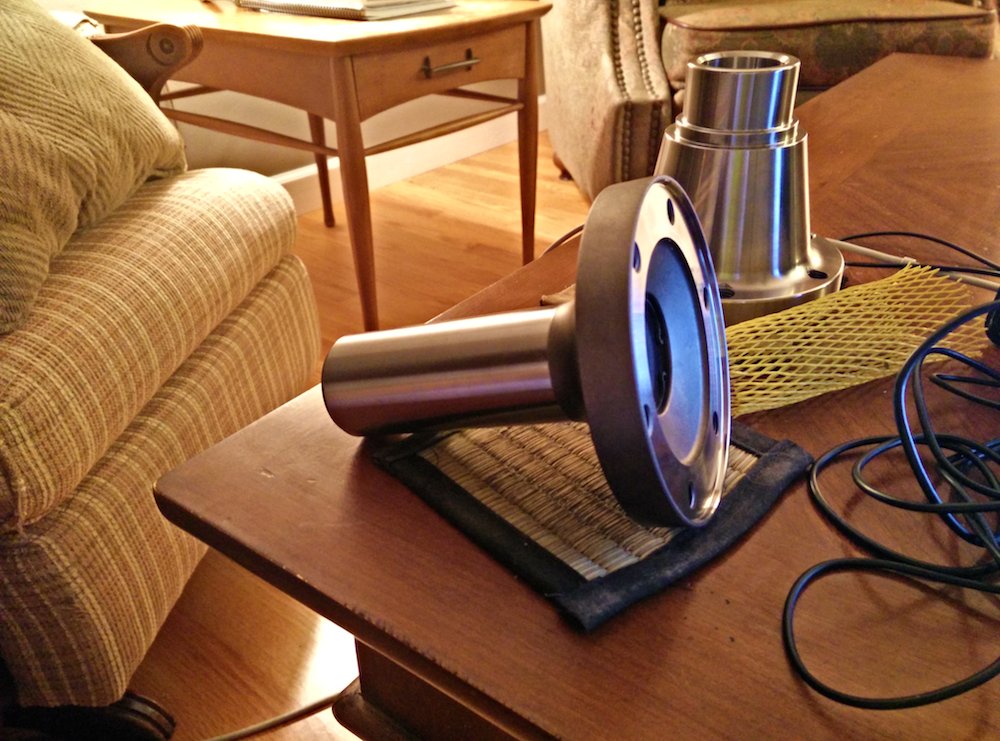
First is this 27 spline slip yoke for my T56 transmission:

It is set up to use one of their 100mm CV joints.

This beauty is a pinion flange for the 9" rear end.
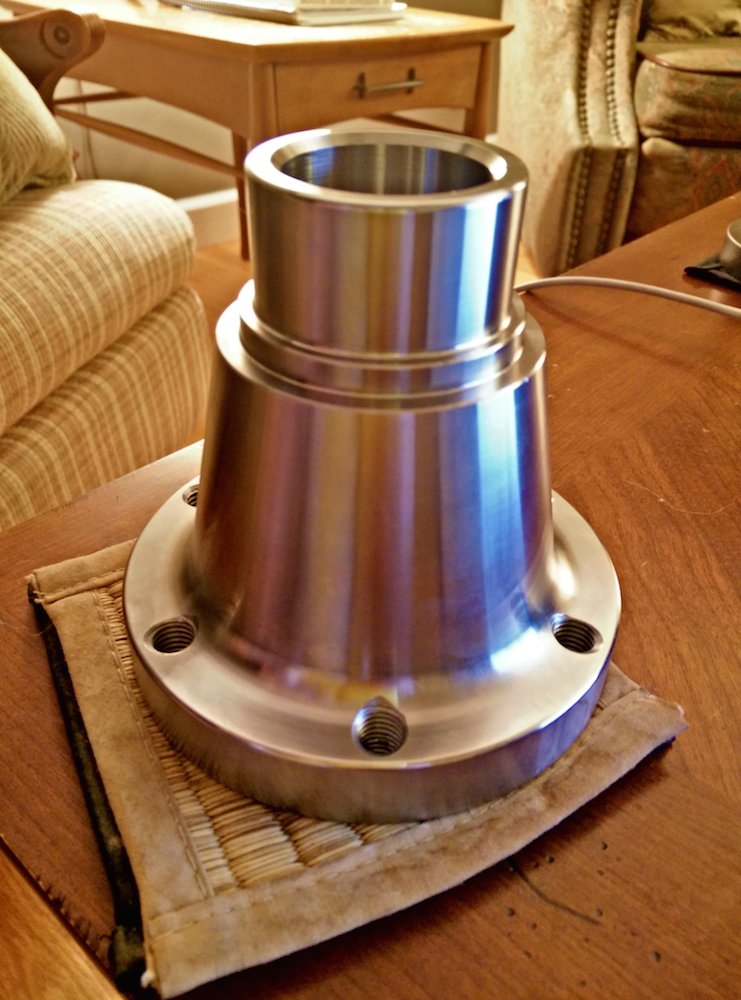
It is machined to accept one of their 108 mm CV joints.

Once I get everything installed I will measure for an aluminum driveshaft to go in the middle. Concerns about driveline angles will be a thing of the past. The front and rear operating angles don't have to be equal and opposite anymore, as long as the operating angles don't exceed 9 degrees.
This should be one smooth running cat...
Andrew
First is this 27 spline slip yoke for my T56 transmission:
It is set up to use one of their 100mm CV joints.
This beauty is a pinion flange for the 9" rear end.
It is machined to accept one of their 108 mm CV joints.
Once I get everything installed I will measure for an aluminum driveshaft to go in the middle. Concerns about driveline angles will be a thing of the past. The front and rear operating angles don't have to be equal and opposite anymore, as long as the operating angles don't exceed 9 degrees.
This should be one smooth running cat...
Andrew
Doug
12-12-2014, 10:05 AM
#119
TECH Senior Member
Thread Starter
iTrader: (7)
I also got a bunch of wiring supplies from McMaster Carr and Waytek wire. In order to clean up the coil harness I decided that I need to lengthen in so that it plugs into the harness under the intake. But before doing anything, I needed to get the proper tools for the job.
First, a proper ratcheting crimping tool. This one is from Waytek and will do Delghi GT 150 and GT 280 terminals:

Next, a nice set of wire strippers from McMaster (made in the USA):

I also ordered a bunch of terminals, connectors, wire, silicone cable shields, and plugs. I was impressed that it was all US made:

The stock coil harness uses a GT150 style connector (gray). I decided to replace it with a GT280 8 pin connector (black):

I had plenty of terminals and after a few tries, I was crimping like a Boss!

The new primary wire has thicker insulation but the gauge remains the same. To make the harness more flexible, I will most likely braid the wires together, since I don't need to economize on wire like GM does.

Looks nice and tidy...
Andrew
First, a proper ratcheting crimping tool. This one is from Waytek and will do Delghi GT 150 and GT 280 terminals:
Next, a nice set of wire strippers from McMaster (made in the USA):
I also ordered a bunch of terminals, connectors, wire, silicone cable shields, and plugs. I was impressed that it was all US made:
The stock coil harness uses a GT150 style connector (gray). I decided to replace it with a GT280 8 pin connector (black):
I had plenty of terminals and after a few tries, I was crimping like a Boss!
The new primary wire has thicker insulation but the gauge remains the same. To make the harness more flexible, I will most likely braid the wires together, since I don't need to economize on wire like GM does.
Looks nice and tidy...
Andrew
12-12-2014, 02:08 PM
#120
Teching In
iTrader: (1)
Join Date: Jan 2012
Location: Port Clinton, OH
Posts: 28
Likes: 0
Received 0 Likes
on
0 Posts
Hey buddy ol pal....hows about posting some part numbers for the stuff you ordered im gearing up for a harness makeover myself! I sure would appreciate it !!