
'03 S-10 Build
 04-19-2017, 11:17 AM
#121
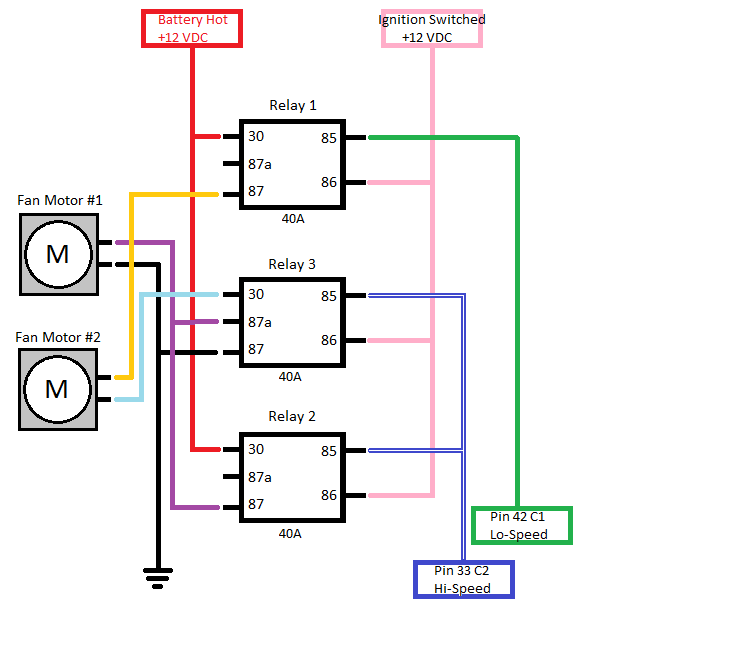
This is to run dual fans at two speeds.
 04-19-2017, 12:34 PM
#122
TECH Apprentice
Thread Starter


Brandon - Since the S-10 never came with electric fans, what parts do I need to make it work?
I see that I need some fan relays and that the Fan1/fan 2 wires run to the relay, relay to hot side at the fan motor, then ground as I currently have it. 12v constant to relays.
BTW - electricity is magic
Jim
I see that I need some fan relays and that the Fan1/fan 2 wires run to the relay, relay to hot side at the fan motor, then ground as I currently have it. 12v constant to relays.
BTW - electricity is magic
Jim
04-19-2017, 12:39 PM
#123
TECH Apprentice
Thread Starter
Just filled and checked the MPG. 15.56
Not good, and explains why the truck smells rich. Possible bad O2's & knock sensor (bank 1). I have the parts on hand, need to swap now. Original test drive showed 20.96mpg. So I guess she runs on closed loop and dumps in too much fuel.
Anyone know a good tuner in the Madison, WI area?
Not good, and explains why the truck smells rich. Possible bad O2's & knock sensor (bank 1). I have the parts on hand, need to swap now. Original test drive showed 20.96mpg. So I guess she runs on closed loop and dumps in too much fuel.
Anyone know a good tuner in the Madison, WI area?
04-19-2017, 12:43 PM
#124

 05-04-2017, 08:09 AM
#128
TECH Apprentice
Thread Starter
Been driving the hell out of this truck! I have almost 1000 miles on the driveline now. Found a guy to do the tune for me, but I still need to resolve a few annoying things.
Have an O2 issue (wired wrong, stuck in closed loop), knock sensor code (most likely tripped when the steam line puked) and I need to build a fan relay. Tires are worn out and giving me a vibration. When I first took it out, the vibration was in the 62-65 mph range. Then I discovered low tire pressure, so I topped off the pressure and guess what? The vibration has moved up to the 71-74 mph range. Guess the tires are junk (kinda knew that anyway)
So now I have to save my pennies and get this stuff addressed.
05-04-2017, 12:57 PM
#129
I have a small 62ish mph vibration in mine. I have since day 1. I have chased it and given up. I think mine is a combo of poly engine/trans and body mounts. I have changed basically everything. Wheels, tires, driveshaft, transmission, and engine over the course of a few years. Its still there. More so in the winter/cold months, which, again, leads me to mounts.
Defiantly work out all of the issues before getting it tuned, make SURE you don't have any exhaust hitting anything, causing knock, and get that knock code fixed before tuning. You MPG's will be better once the VE table and MAF are both corrected. Make sure that tuner knows what he is doing, which is way harder to figure out than you would think. I had almost 1k in bs tunes in my truck, before I got HP Tuners and finally learned myself.
The sad part is, in 1 week, I had my truck running better, and getting better mpg's than a so called "tuner" with almost 20 years experience. He has since closed his shop at least.
05-04-2017, 02:57 PM
#130
TECH Apprentice
Thread Starter
Sounds like I need to take a cruise to your house!
I'm running inexpensive tires that are about rock hard. Had a new D-shaft built a year ago, and it took care of a wheel hop do to failed CV joint system that Chevy did. I also found a failed driver side engine mount on the 4.3
Tires are 60 series and should be the 55R/235's. Will get that straightened out next. I also know that the exhaust is hitting the pass side frame rail at the turn down section. I'll have to get it up on a hoist to address that with a torch. once clearanced for that I can replace the knock sensors (pull the intake, fun)
I used a standard trans mount and poly engine mounts. Still off just a little bit due to the exhaust not letting me shift any further to the pass side. Everything is bolted down, just off more than I would like.
I also have to pin out the O2 harness to correct the mismatch on the wires.
05-10-2017, 10:09 AM
#131
TECH Apprentice
Thread Starter
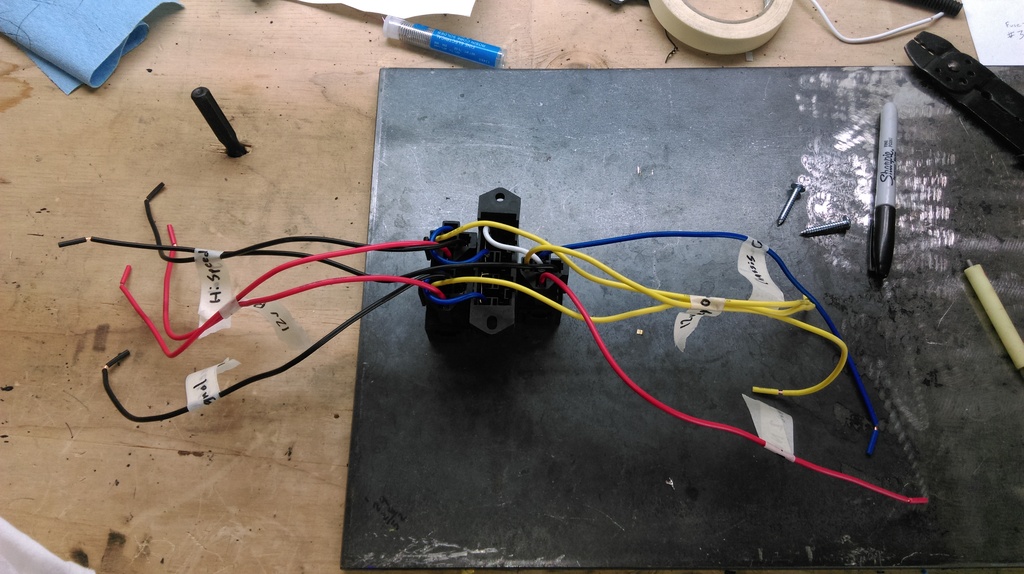
So last night I built the fan relay and harness. (Electricity is voodoo magic). Took about an hour & a half, looks like the photos, with longer leads. For the wires, I cut up an old harness (S10) to get all the correct colors and sizes. Shrink wrapped everything.
To night I take the plunge and get the fans wired in. Trying to figure out placement for the relay. Thinking that I should go to the bracket on the under hood fuse box. I know that there is a BATT Hot (post) and should be a keyed 12v source (pink wire). I'll need to route the Hi/Low fan wires along the firewall to my relay. The rest is already in place.
As of right now, air temp of 70*, the truck runs at 198*. But if it sits and idles too long temps start to climb according to the GM gauge. So with air temps only going up, it's time to finish this up.
Also, replaced the rear shocks. Seemed to help some with the 71mph vibration. Still think the tires are my culprit.
BTW - MPG is 18.58 in closed loop. Just another thing I have to finish.
05-15-2017, 11:33 AM
#132
TECH Apprentice
Thread Starter
If you have been following this build, you know that I rebuilt the front suspension on the truck (uppers, lowers, springs, shocks). Well on Friday as I was getting onto the highway, I turned right and started to go. Then got a big bang under the drivers side wheel well, followed by the tire blowing out and the truck hitting the pavement.
Forced it to the side of the road to figure out what happened (lucky wasn't highway speed). Now there sits my truck, on the lower A arm, street all scraped up hazards going. Pop the hood to look, nothing I can see. Look through the wheel well and see a separated lower ball joint, no nut, threads all messed up.
Found the nut back by the stop light, lower part of the threads stripped & pulled (WTF).
When I built the truck I noticed that there were 2 different styles of lower ball joint. One side was pinned, the other not drilled, but running a pinch nut with serrated flange. This was the side that let go.
So about $500 bucks later (tow, lower ball joint - MOOG, 2 tires, tool rental and so forth) and a full day of work to get it fixed. I'm able to drive. Lucky that the arm didn't also bend. I have a message into the seller regarding this. Ball is in his court, hoping for a good out come
05-17-2017, 09:31 AM
#133
TECH Apprentice
Thread Starter
I have about 150 miles on the repaired A-arm. All seems to be functioning as it should (Moog replacement). Still have not heard back from the company that sold the a-arms. Time to move up the process. Have to think that there are a few sets of these arms on S-10's and g-bodies that could fail.
05-24-2017, 08:23 AM
#134
TECH Apprentice
Thread Starter
Talked to the company. Was unable to make actual contact with anyone through eBay channels. I did however get them though an internet search.
Parts were rec'd December 27, 2016 and installed mid Feb. Didn't actually drive the truck until April. But when speaking to the guy in customer service about the issues, he immediately went to the original sale date and would only off a replacement arm.
Went through the part failure, part design and related issue of cut tire and so forth. Got some line about their product testing area approving this. So at that point I cut ties with them. Not posting any names, send a PM if you need to know. They sell replacement OEM suspension parts on eBay.
Part design: Lower ball joint, using a pinch nut, with flanged base and knurled on the bottom side. No provision for a cotter key (undrilled shaft) No jamb nut.
OK, I knew this was a funky set-up. But all went together fine. At least the failure was not at highway speed.
Jim
05-26-2017, 08:58 AM
#135
TECH Apprentice
Thread Starter
Wife is out of town, so I am attempting to get the truck box & tail gate painted black to match the truck. Time permitting, I will also scuff & shoot the rest of the cab (time for a new truck I think). Would like to have a single color truck again!
Just doing single stage black (on-hand). Box, spare hood, and a drivers door. Hood is about ready to go, rest will need a scuff. No rust on this stuff for a change
Just doing single stage black (on-hand). Box, spare hood, and a drivers door. Hood is about ready to go, rest will need a scuff. No rust on this stuff for a change
05-30-2017, 09:27 AM
#136
TECH Apprentice
Thread Starter
Got some more accomplished. Saturday we finished detailing a M60A3 Main Battle Tank display in New Lisbon, WI. I then headed home to make the truck all one color. Saturday evening was spent doing prep work on the cab and box. Was able to spray out the flat hood and get reasonable results (driveway paint job). Then the bugs started swimming in the fresh paint (grrr.).
So, Sunday am, back to refinishing the hood. I now have a total of 6 coats of single stage ful-thane black on it. Hope to wet-sand this week and buff up. Yes it does have some dings, but much straighter than the Stinger hood that I have on the truck right now.
Then I got to building a temp paint booth using my EZ-up and some plastic tarps. Kept the wind to a minimum. I was able to get 2 good coats of black on the cab, and another 2 coats (med-wet) on the box, along with doing the tail gate and inner box sides.
Last was a finish coat on the tops of the bed rail area....got some dry spray on the side of the box in a couple places. Should wet sand off ok. I'm hoping for enough material build to allow for a reasonable buff job.
I did note a total of 3 small runs. Will have to get these off (razor blade and wet sand them down). Remember that this is a driver and not a show truck. Dents paint too!
Next up, getting those darn O2 sensors wired right. Getting 16-18 mpg now, should be 23-24 mpg.
05-31-2017, 08:40 AM
#137
TECH Apprentice
Thread Starter
Started the cut & buff on the truck last nite. Did the tailgate, was able to get the grit out of the paint and a reasonable shine to the paint. Needs a bit more work, but have to get some new buffing pads and more 1500 & 2000 grit wet or dry paper. Also took a stab at the driver's side of the box. Did wool pad, followed by flat foam and then a waffle foam pad.
Compounds used were H-D 3m, diluted, then finesse-it, and finally Race Glaze. Took a lot of the buggers out of the paint, but the top rail area needs to be wet-sanded to fully remove the dry spray. I think I have enough material to do this (paint thickness).
Still need to get truck bed liner onto the floor of the box and then on the rocker panels. Also will finish the red pin stripe that runs in the body style line.
By doing all of this on the exterior, makes the interior look very ratty!