
New Gen V project...


 09-03-2018, 08:20 PM
#66
TECH Regular
Thread Starter
iTrader: (8)
Join Date: May 2002
Location: Tampa FL
Posts: 429
Likes: 0
Received 0 Likes
on
0 Posts

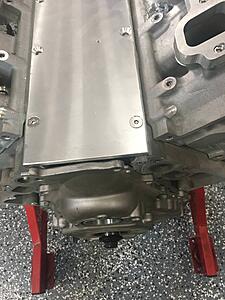
Hey there everyone, I just wanted to drop back in to the thread I started to announce a revival. All the things that were getting in the way of working on the project, have now been finished, so it's back at it. I have just ordered a bunch of parts to get going again. The heads will likely come off in a week or two and the cam sent out for a regrind. I made the executive decision to dump the balance shaft. I really don't care about nvh in my application. I pulled the intake, valley cover and front cover, and removed the shaft, secondary gear and chain, and retainer. I did have to pull the cam bolt out and pop the cam gear off to get the balance shaft and retainer out. The balance shaft is heavy. Like 5-10 lbs heavy. So heavy in fact, it through an error code on my wifes kitchen scale when I went to weigh it. I plan on making another GM parts order here soon and will be ordering two new balance shaft bearings, and I will put them in clocked to close off the oil holes. Here's a couple of pics, I definitely have some exciting plans for this thing, all will be revealed in due course. One interesting thing that i found once I removed the balance shaft is that the passenger side lifter valley is vented to the lifter valley with several machined holes, and one cast hole. The Driver's side has no such venting. Weird.

 09-03-2018, 09:01 PM
#67
TECH Regular
Thread Starter
iTrader: (8)
Join Date: May 2002
Location: Tampa FL
Posts: 429
Likes: 0
Received 0 Likes
on
0 Posts
Also, I have no idea why there is all that crusty white crap in the injector wells in the head. This engine has no miles on it, I believe it came out of a truck that was in an accident during shipping to the dealer. Very strange. It certainly didn't get there while sitting under a cover in my garage.
09-04-2018, 09:31 AM
#68
TECH Enthusiast
iTrader: (9)
Join Date: Apr 2005
Location: springfield MO
Posts: 526
Likes: 0
Received 0 Likes
on
0 Posts

Good to see you bringing this back up. I have one sitting in my shop but I wont get quite as extensive on the engine mods as you are I don't believe. Now of course that is subject to change...
Did you get the oil pan modified? I am curious about this as if so it would help me along too I believe.
Thanks
Dave
Did you get the oil pan modified? I am curious about this as if so it would help me along too I believe.
Thanks
Dave
09-04-2018, 09:50 AM
#69
TECH Regular
Thread Starter
iTrader: (8)
Join Date: May 2002
Location: Tampa FL
Posts: 429
Likes: 0
Received 0 Likes
on
0 Posts
I ended up picking the oil pan back up from the guy that was going to modify it. The work never got done. I am evaluating all options, and I am considering a dry sump setup. One of the other things I did purchase for the new house/shop was a CNC mill and a tig machine so I can just do the work myself now, if I chose to move forward with that option.
09-04-2018, 11:10 AM
#70
TECH Enthusiast
iTrader: (9)
Join Date: Apr 2005
Location: springfield MO
Posts: 526
Likes: 0
Received 0 Likes
on
0 Posts
It sounds like during all your moving and setup you have gotten your shop a little more equipped. That will be nice to have more capabilities.
I will keep following along.
Thanks,
Dave
I will keep following along.
Thanks,
Dave
09-07-2018, 10:38 AM
#71
TECH Regular
Thread Starter
iTrader: (8)
Join Date: May 2002
Location: Tampa FL
Posts: 429
Likes: 0
Received 0 Likes
on
0 Posts
So the UPs man dropped off a couple of goodies for me. I couldn't help myself and starting cutting and hacking.
Before:
After:
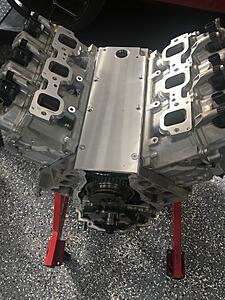
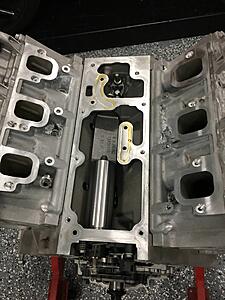
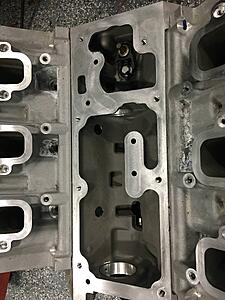
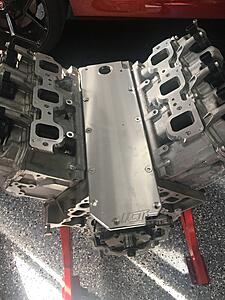
The ICT Billet stuff is pretty nice. I almost felt bad putting in my saw and cutting it. I cleaned up the edges and deburred everything, it came out nice. Even the post that mounts the fuel line splitter is in the right place. However, not all is sunshine and rainbows. For whatever reason, GM decided to put the deactivation lifters for the LV3 on different cylinders then the V8 variants, so all those nice rubber o ring ports on the bottom of the ICT valley cover wouldn't actually do anything. So I am going to have to plug them the old fashioned way. I usually use 1/4 20 grub screws and tap the lifter towers. If I was going to keep the engine together, I would take off the back cover and send pressurized air up the lifter gallery to keep the chips from getting in there. Since it's coming apart, it's less of an issue.
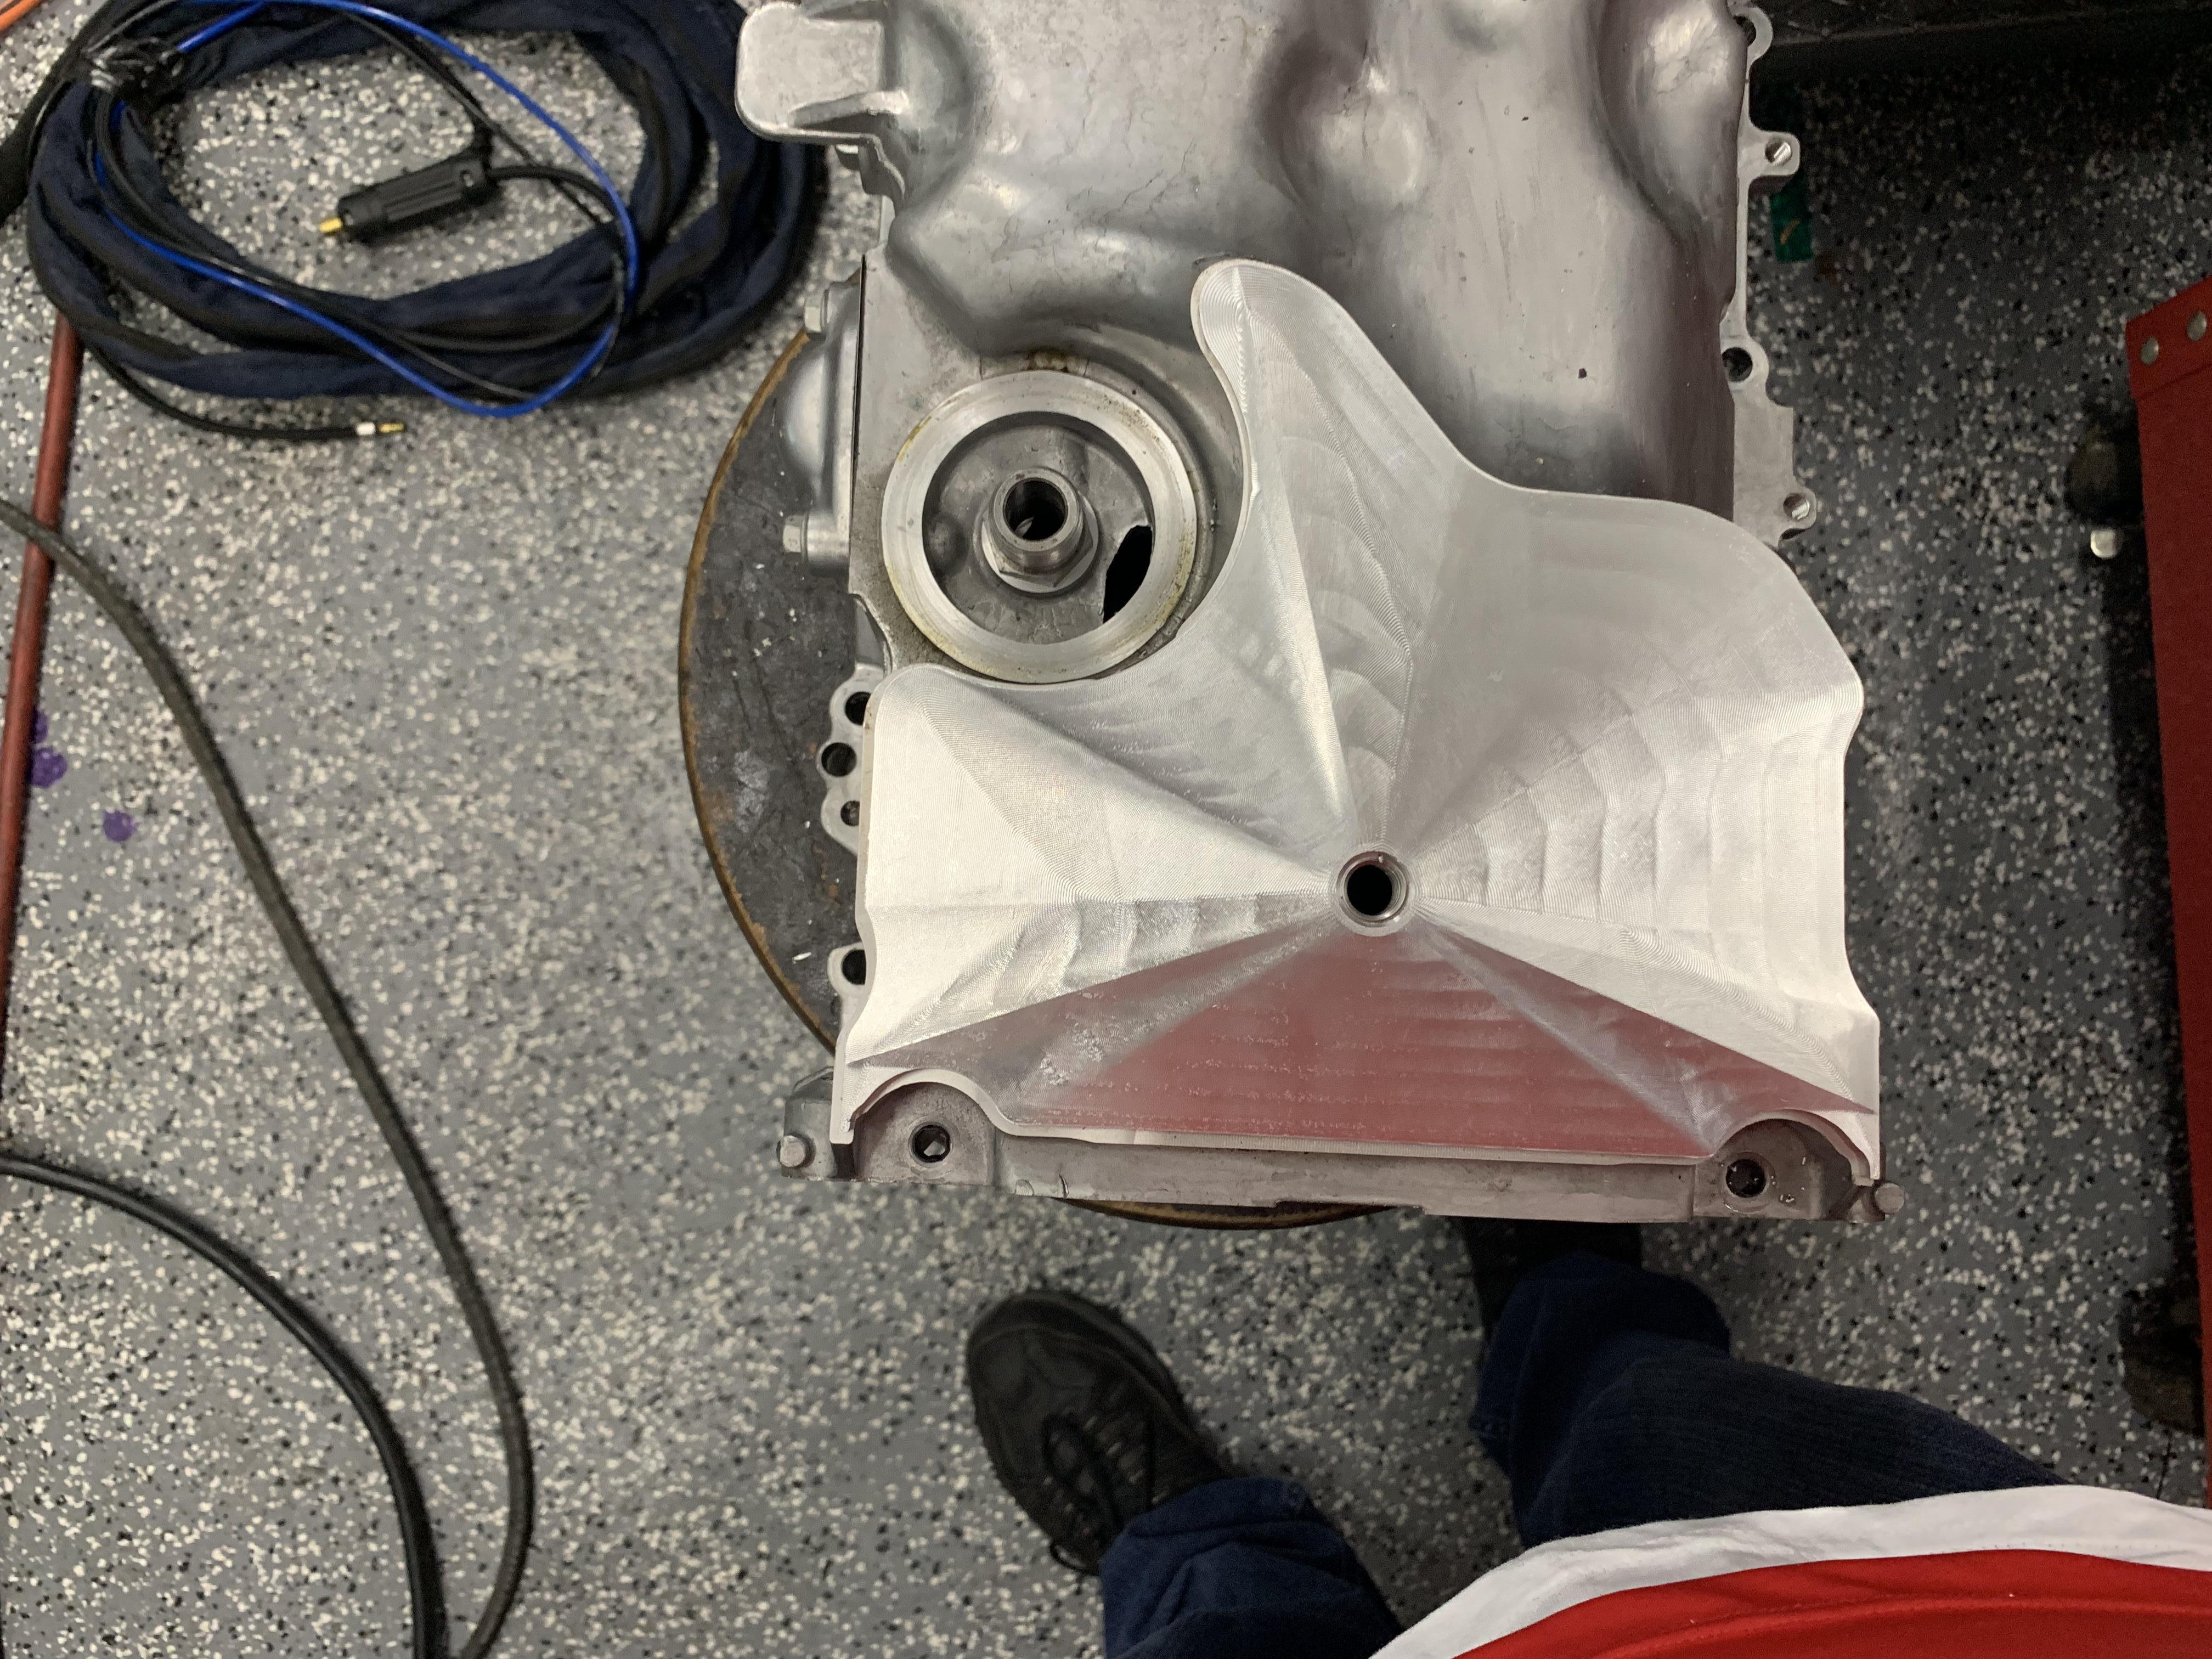
The final big issue to face is the front cam cover. I am not using the stock cover because the balance shaft drive and assembly stick way up over the valley pan of the motor, and will not work with the water pump and belt drive setup I am going with. So the top of the block at the front is different then a V8. I will need to make a piece that fills in the gaps and can be secured to the valley cover and the regular LT1 front cover I just bought. I have a friend of a friend with a 3d printer. I might try some rapid prototyping in plastic, then cut the final one in the mill. We'll see.
In a couple weeks I will be reaching out to some Camshaft companies to see if they can either grind (or regrind) me a camshaft with some real lobes on it.
Before:

After:

The ICT Billet stuff is pretty nice. I almost felt bad putting in my saw and cutting it. I cleaned up the edges and deburred everything, it came out nice. Even the post that mounts the fuel line splitter is in the right place. However, not all is sunshine and rainbows. For whatever reason, GM decided to put the deactivation lifters for the LV3 on different cylinders then the V8 variants, so all those nice rubber o ring ports on the bottom of the ICT valley cover wouldn't actually do anything. So I am going to have to plug them the old fashioned way. I usually use 1/4 20 grub screws and tap the lifter towers. If I was going to keep the engine together, I would take off the back cover and send pressurized air up the lifter gallery to keep the chips from getting in there. Since it's coming apart, it's less of an issue.
The final big issue to face is the front cam cover. I am not using the stock cover because the balance shaft drive and assembly stick way up over the valley pan of the motor, and will not work with the water pump and belt drive setup I am going with. So the top of the block at the front is different then a V8. I will need to make a piece that fills in the gaps and can be secured to the valley cover and the regular LT1 front cover I just bought. I have a friend of a friend with a 3d printer. I might try some rapid prototyping in plastic, then cut the final one in the mill. We'll see.

In a couple weeks I will be reaching out to some Camshaft companies to see if they can either grind (or regrind) me a camshaft with some real lobes on it.
09-17-2018, 04:52 PM
#72
TECH Regular
Thread Starter
iTrader: (8)
Join Date: May 2002
Location: Tampa FL
Posts: 429
Likes: 0
Received 0 Likes
on
0 Posts
So a little bit of progress, but not a lot to show for it.
1. I have made the decision to go Corvette Water Pump and Belt routing. That seemed to be the best option for me, it also keeps the accessory drives closer to the block which is of value in my application. I will have to make an idler to go in place of the AC Compressor.
2. I bought the Vette water pump and it does seem to fit, with either the original 4.3 front cover or wet sump LT1. After studying it for a bit more, I think modifying the stock 4.3 cover is the better option for sealing up the engine, rather than trying to get something to fit in to the cast area in the front of the block and seal to the timing cover.
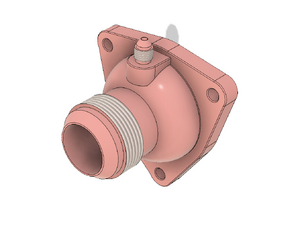
3. No one seems to be offering an AN Water Pump Thermostat housing for these engines yet, so I will make one. I modeled one up in Fusion 360. Once I get my CNC mill tooled up, this will be one of my first projects for it. I designed it to use the LS3 style thermostat, because this other thing they have in the new engines is a mess, and would double the cost to make it with the new thermostat style. It's got a gigantic spring and a second spring with a bypass deal.
4. I also figured out that for whatever reason the LV3 has an extra inch on the front part of the block. So it.s really about 3.5" shorter than an LT1. Bummer. The oil pump in these is gigantic, I am not sure if that has any impact on the situation or not.
1. I have made the decision to go Corvette Water Pump and Belt routing. That seemed to be the best option for me, it also keeps the accessory drives closer to the block which is of value in my application. I will have to make an idler to go in place of the AC Compressor.
2. I bought the Vette water pump and it does seem to fit, with either the original 4.3 front cover or wet sump LT1. After studying it for a bit more, I think modifying the stock 4.3 cover is the better option for sealing up the engine, rather than trying to get something to fit in to the cast area in the front of the block and seal to the timing cover.
3. No one seems to be offering an AN Water Pump Thermostat housing for these engines yet, so I will make one. I modeled one up in Fusion 360. Once I get my CNC mill tooled up, this will be one of my first projects for it. I designed it to use the LS3 style thermostat, because this other thing they have in the new engines is a mess, and would double the cost to make it with the new thermostat style. It's got a gigantic spring and a second spring with a bypass deal.
4. I also figured out that for whatever reason the LV3 has an extra inch on the front part of the block. So it.s really about 3.5" shorter than an LT1. Bummer. The oil pump in these is gigantic, I am not sure if that has any impact on the situation or not.
 09-23-2018, 04:35 PM
#73
TECH Regular
Thread Starter
iTrader: (8)
Join Date: May 2002
Location: Tampa FL
Posts: 429
Likes: 0
Received 0 Likes
on
0 Posts
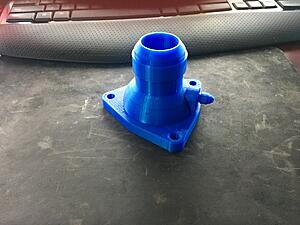
So before I went and cut one of these on the mill, I had a friend 3d print one so I could check fitment. Pretty neat! I found a couple of dimensions that needed some minor alterations, so I made those changes. This will use the late LS3 style thermostat, not the LT style.
I'm also working on the front cover solution too. Pics of that sooner rather than later.

I'm also working on the front cover solution too. Pics of that sooner rather than later.
11-22-2018, 09:04 AM
#74
Teching In

Join Date: Oct 2017
Posts: 14
Likes: 0
Received 0 Likes
on
0 Posts
Hi,
my E78 harness looks a lot like your E92. The connector in grey / white. Is that the body control module? What did you keep from that? It looks like it was mostly gone in the second picture.
Did you happen to add a pin to X1 pin 48 for a tach signal output?
Are you running 2, 3 or 4 relays? My plan is to run one as a 12v hot w/ignition, one for primary fuel pump, one for secondary fuel pump, and then the engine controls ignition relay (I realize I could combine this with the first relay, but I'm following the wiring schematic pretty closely for the first run).
Love the project - I'm thinking this will be going into a dune buggy?
Phil
11-22-2018, 10:45 PM
#75
TECH Regular
Thread Starter
iTrader: (8)
Join Date: May 2002
Location: Tampa FL
Posts: 429
Likes: 0
Received 0 Likes
on
0 Posts
1. I do not have a BCM, nor do I intend to use one, so I stripped a lot of that stuff out. It's been a good 2 years since I have looked really closely at the harness so you'll have to forgive me if I don't remember the specifics. I hope to be revisiting the wiring by summertime next year.
2. I did not add a pin for a tach output, I plan to run a digital dash pulling directly from the OBD2 datastream.
3. I will run separate fuses and relays for the computer and the ignition. I will likely use a Bussman waterproof relay/fuse panel that I have used in the past, or a PDM like an SPOD or even Racepak or Motec. It remains to be seen what I will do for the fuel pump relay, I'm not sure what exactly I need to do for a fuel pump controller. It's been a little while since I looked at the computer code, but if I remember correctly, I have the option in HPT to bypass the fuel controller and run a standard style electric fuel pump.
4. I have a lot of updates I haven't posted up on here yet, I hope to post something in the next couple of weeks, once I get the enclosure for the CNC mill finished. I started making parts, but ended up flinging chips all over the garage, so I stopped to build an enclosure and I needed to buy a second vise. That will be completed next week so I can run some parts that I have designed. Then pictures and updates.
5. I can say I will be swapping to the LT4 pump and injectors to keep up with the new fuel demands. I do like the idea of a modulated fuel pump design. In the environment I will be in, it's hot, and packaging and cooling will be an issue, anything I can do to prevent heating fuel unnecessarily is a good thing, so I will have to figure it out sooner or later.
6. Yes, going in a buggy.
11-25-2018, 03:43 PM
#77
Staging Lane

Join Date: Dec 2009
Posts: 78
Likes: 0
Received 0 Likes
on
0 Posts
Hey this is a great resource of a swap I am planning.
From all the information I have gathered it looks like there is a lot of compatibility with the gen v v8 parts.
i am considering using the Holley mid mount drive system for the LT engines. From what I can find it looks as though the ballancer for the LT1 and the LV3. I am looking at this setup because it was the most compact unit available when I did my LT swap in my other project..
02-13-2019, 07:15 PM
#78
TECH Regular
Thread Starter
iTrader: (8)
Join Date: May 2002
Location: Tampa FL
Posts: 429
Likes: 0
Received 0 Likes
on
0 Posts
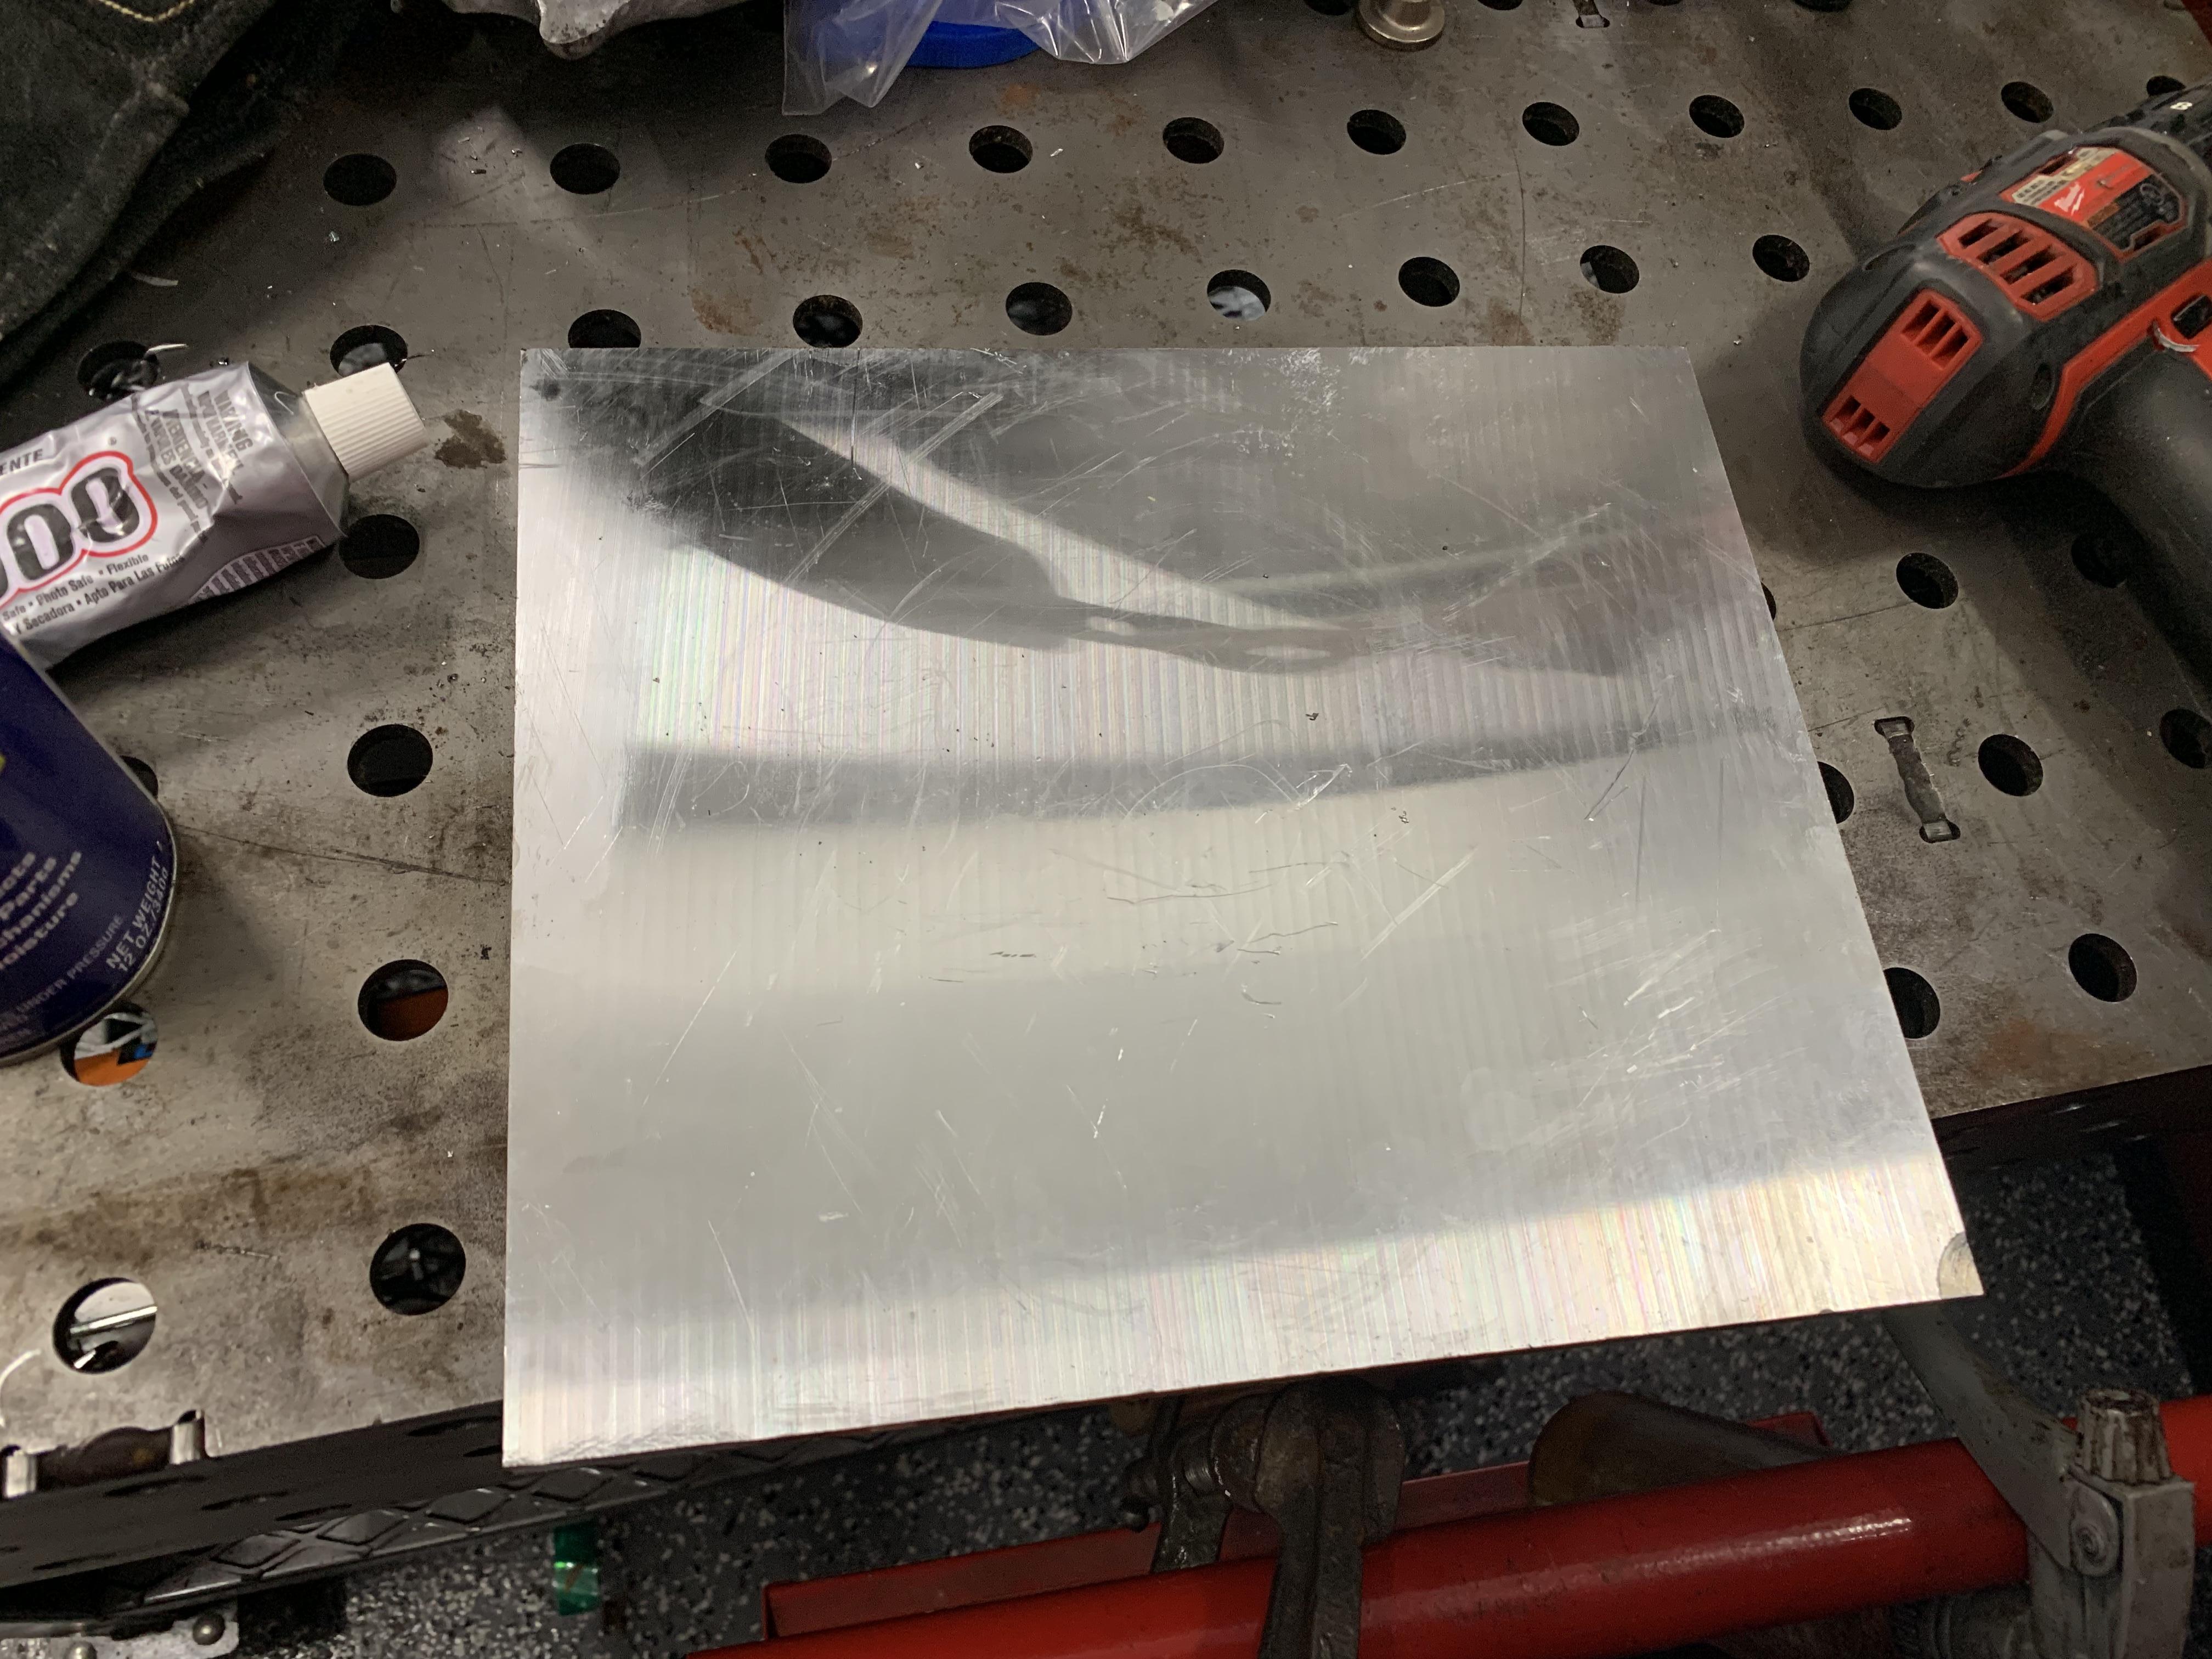
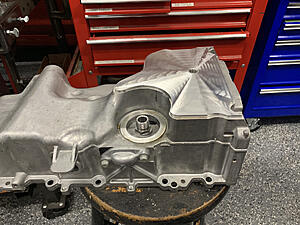
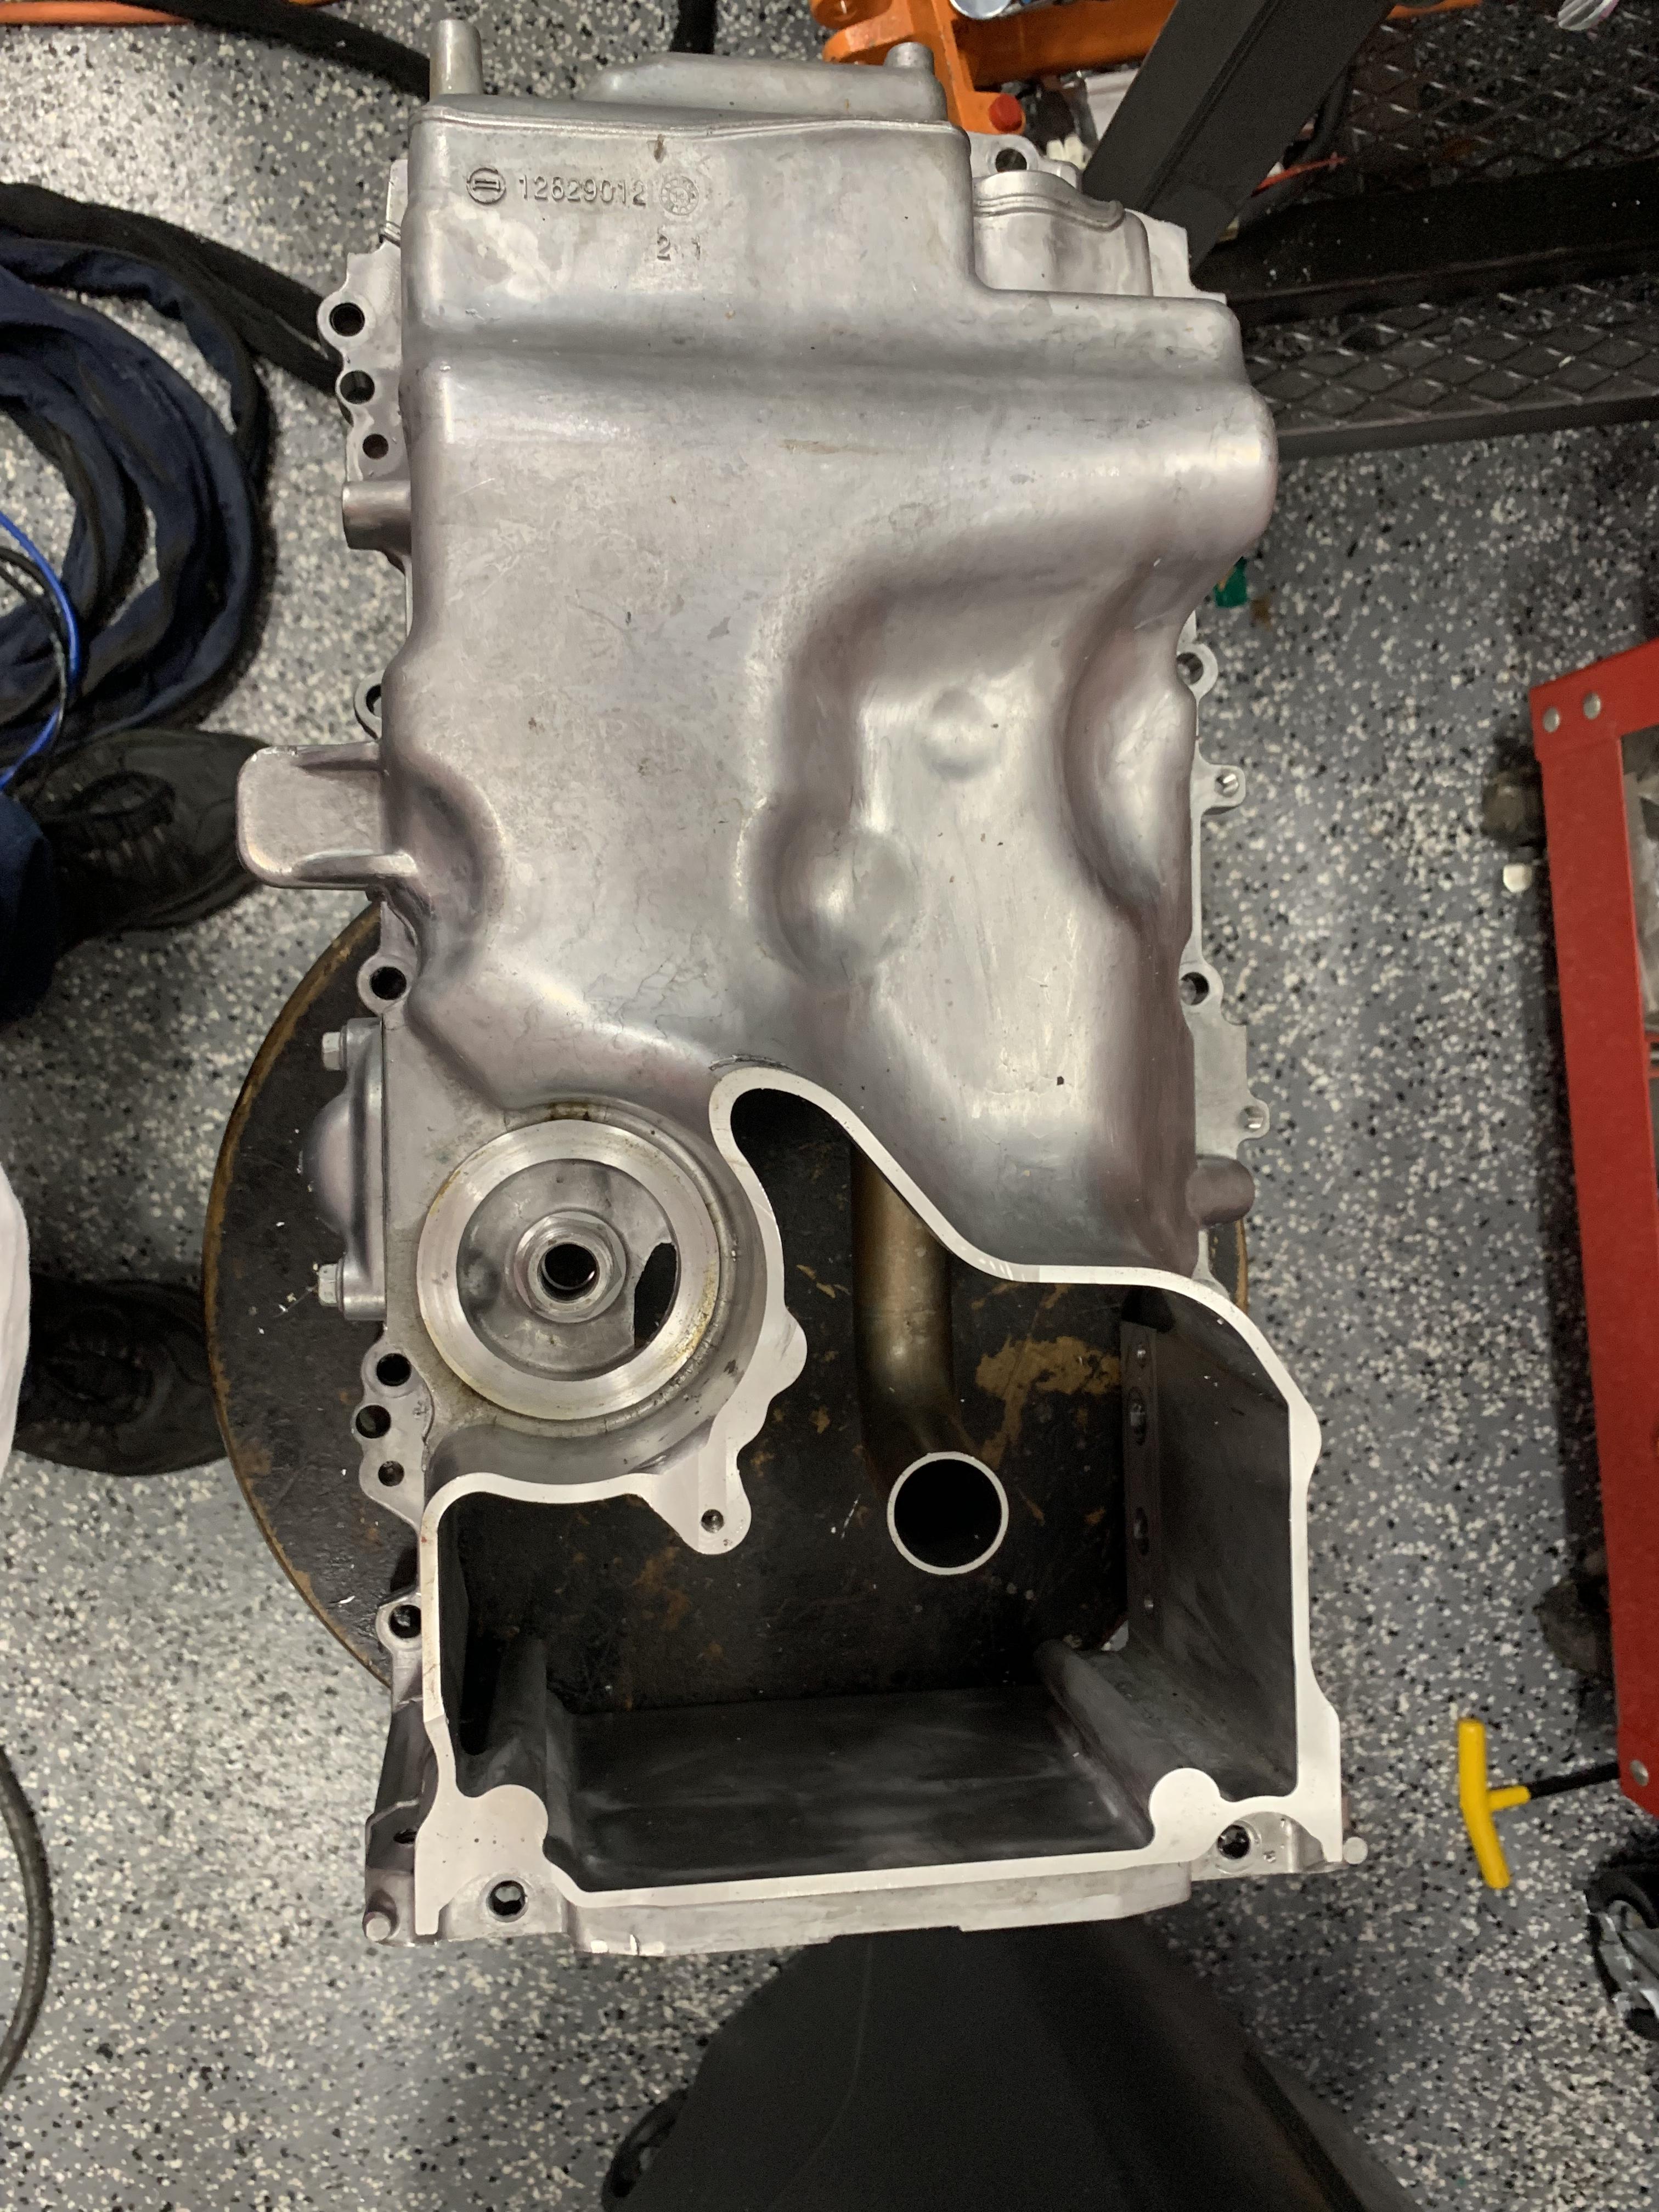
So time for an update. I've spent a lot of time learning CAD and CNC machining over the last 6 months. I've done a lot of projects on the machine tools and pieces to finish out all my fab equipment, but I am all caught up on that so I started working on the oil pan this week.
I cut the bottom off the oil pan even with where the bolts come in from the transmission side. This was pretty easy to do with the mill, and it gave me a nice straight cut all the way around.
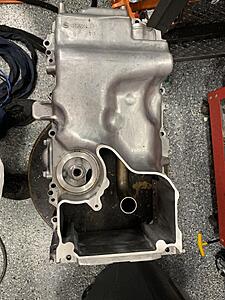
Then I turned this:
In to this:
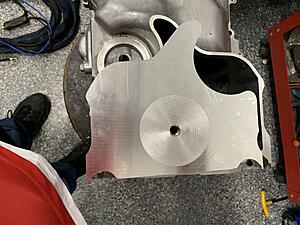
The eagle eyed among you will notice that there is a heli-coil in the drain plug hole, that simply was me grabbing the wrong drill bit.
It's been a couple of years since I tig welded anything aluminum so I will be practicing up on that before I attempt to weld this baby up. Next up is the valley cover. I came up with a solution to deal with the front cover - valley cover interface. I will be machining a completely new valley cover, and *maybe a new front cover too. I also found a machine shop here in Florida that is within driving distance that has a VMC large enough to do Darton sleeves, and is willing to tackle this. I'll hopefully have some more stuff to post in the next week or so.
I cut the bottom off the oil pan even with where the bolts come in from the transmission side. This was pretty easy to do with the mill, and it gave me a nice straight cut all the way around.
Then I turned this:
In to this:


The eagle eyed among you will notice that there is a heli-coil in the drain plug hole, that simply was me grabbing the wrong drill bit.
It's been a couple of years since I tig welded anything aluminum so I will be practicing up on that before I attempt to weld this baby up. Next up is the valley cover. I came up with a solution to deal with the front cover - valley cover interface. I will be machining a completely new valley cover, and *maybe a new front cover too. I also found a machine shop here in Florida that is within driving distance that has a VMC large enough to do Darton sleeves, and is willing to tackle this. I'll hopefully have some more stuff to post in the next week or so.