
1966 Chevy II Nova mordor build... LM7/TH400...78/75 turbo...
 06-09-2016, 09:56 PM
#41
On The Tree
Thread Starter
Join Date: Aug 2013
Location: Lake Stevens, WA
Posts: 174
Likes: 0
Received 0 Likes
on
0 Posts
throttle pedal...
tried a couple different things. S10 pedal, Venture pedal...dug the stock pedal linkage **** out stared at it. got ideas. threw that halfass back in. held all them up to it. mmm.
cut the S10 pedal up some. i think i can make it work almost stock style (more 68+ or lokar). shaft is the same size. etc. then im looking at the venture one after i had taken it part to cut up. throw it back together...
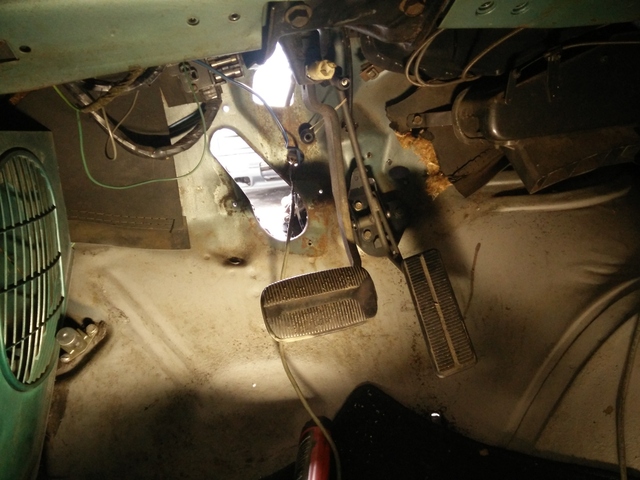
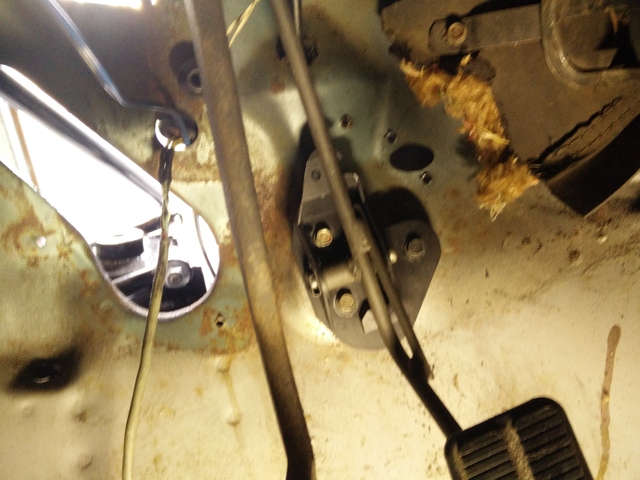
i got slightly creative. but mostly how GM made the pedal. i shimmed out the mounting holes to the firewall, ground the pedal arm for more pad (still needs little more). cable needs a little shimming also, like the piece i broke at the JY :
dont think im going to be running a booster with this setup lol.
tried a couple different things. S10 pedal, Venture pedal...dug the stock pedal linkage **** out stared at it. got ideas. threw that halfass back in. held all them up to it. mmm.
cut the S10 pedal up some. i think i can make it work almost stock style (more 68+ or lokar). shaft is the same size. etc. then im looking at the venture one after i had taken it part to cut up. throw it back together...
i got slightly creative. but mostly how GM made the pedal. i shimmed out the mounting holes to the firewall, ground the pedal arm for more pad (still needs little more). cable needs a little shimming also, like the piece i broke at the JY :
dont think im going to be running a booster with this setup lol.
 06-13-2016, 12:41 AM
#42
On The Tree
Thread Starter
Join Date: Aug 2013
Location: Lake Stevens, WA
Posts: 174
Likes: 0
Received 0 Likes
on
0 Posts
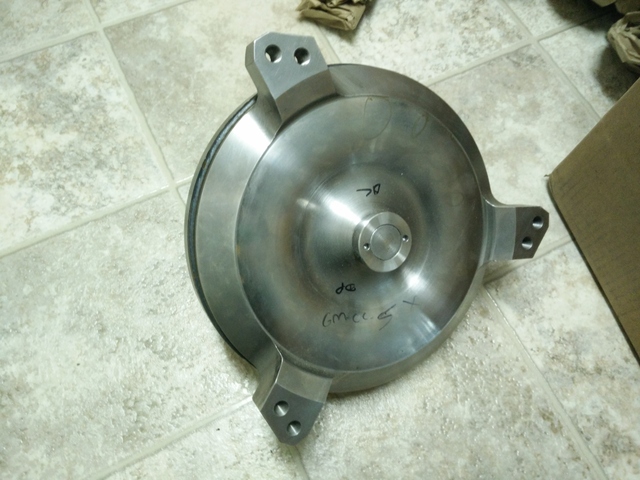
transmission is together!
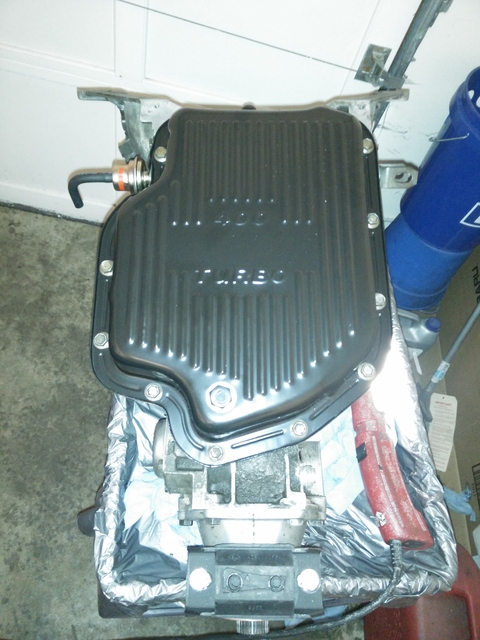
now lets hope the damn thing works LOL. as you can see i bought a brand new oil pan w/drain. black of course, dont line shiny. think its all together. all the brackets, mount, etc. just needs a converter, lines, yoke...?
oh yeah, is there, or should i buy some magnets to throw in the bottom of this pan?
and the left over parts...
some gaskets and orings also....and a whole bag of orings that never made it into the trans lol. not sure where they went, but i think i replaced them when i noticed.
it does have new:
oe style sprag
pump oring
pump gasket
shift shaft seal
valve body gaskets
rear housing gasket
rear housing seal
rear housing bushing
oil filter, gasket, pan.
Jakes free mods.
so i think my total is around $250 into this transmission.
going to call Jakes in the morning and hopefully buy a converter.
 06-20-2016, 08:26 PM
#44
On The Tree
Thread Starter
Join Date: Aug 2013
Location: Lake Stevens, WA
Posts: 174
Likes: 0
Received 0 Likes
on
0 Posts
little update here, probably wont get much work done this weekend as im sick.
i did do a couple small things to the motor. put the front and rear covers, accessory drive, etc.
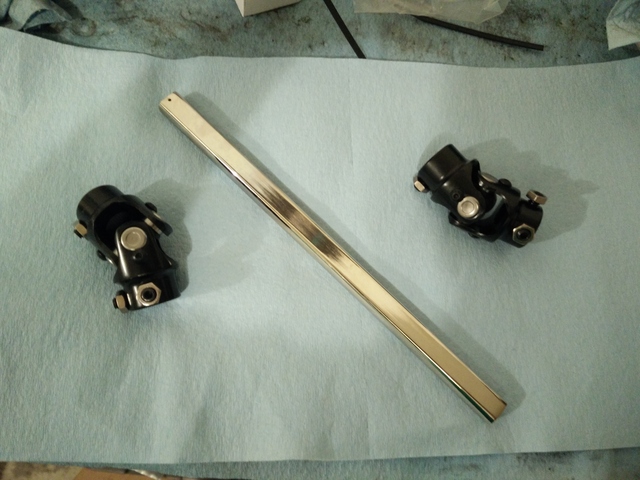
steering linkage stuff. ordered a 12" DD shaft, looks like it needs to be about 8.5" or so, probably needs a couple more test fits before any cutting.
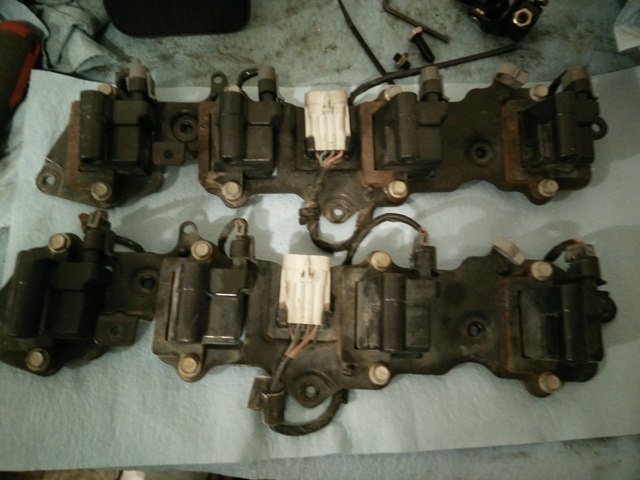
i got coils. they are truck coils i think. fuel lines need a little tweak to clear, no big deal.
my converter showed up from Jake's Performance also:
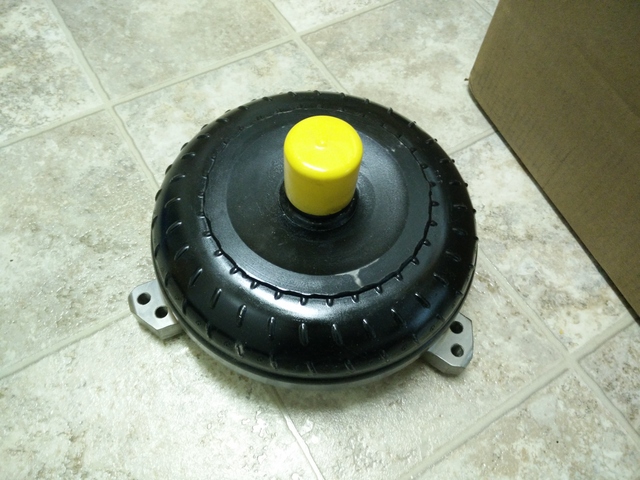
~3500 rpm stall (at 600hp)
billet cover
tig welded fins
anti balloon plate
245mm/9.5" core
etc.

i did do a couple small things to the motor. put the front and rear covers, accessory drive, etc.
steering linkage stuff. ordered a 12" DD shaft, looks like it needs to be about 8.5" or so, probably needs a couple more test fits before any cutting.
i got coils. they are truck coils i think. fuel lines need a little tweak to clear, no big deal.
my converter showed up from Jake's Performance also:
~3500 rpm stall (at 600hp)
billet cover
tig welded fins
anti balloon plate
245mm/9.5" core
etc.
06-30-2016, 11:34 PM
#45
On The Tree
Thread Starter
Join Date: Aug 2013
Location: Lake Stevens, WA
Posts: 174
Likes: 0
Received 0 Likes
on
0 Posts
ok. so late weekend update. i didnt get too much done. but the **** i did get done was big win. at least in my book.
first off i bought some more things i needed. shipping UPS sucks as its like 8days from east coast. then i forgot that PA = rust...
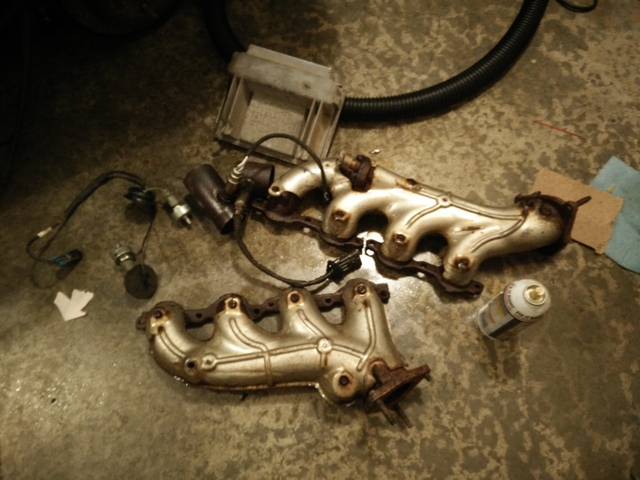
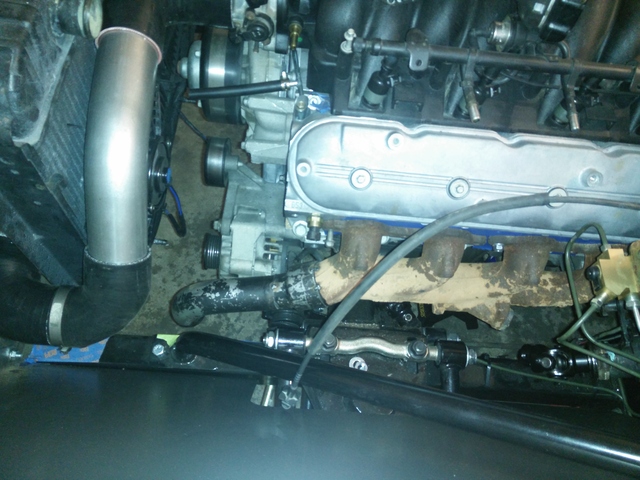
so thats a lake a PB Blaster (my fav). probably spray that **** down some more over the next couple days. no real big deal with the manifolds, kinda would like the O2's broke free. but ill just weld them in like that if needed lol. speaking of, i might go sloppy status on my crossover pipe, there is plenty of 2" pipe under the Nova right now that someone was calling an exhaust system anyway:
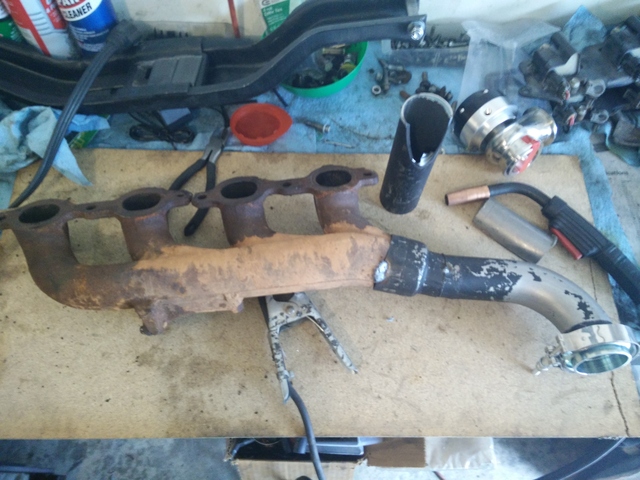
truck (aka turbo) manifolds w/EGR. not first choice, but got hooked up with deals.
O2 sensors
knock sensors
00'ish ECU.... from the looks of it it can be OS updated to 01+? to run the 3bar, fans, etc.??
got all that for like $90 shipped.
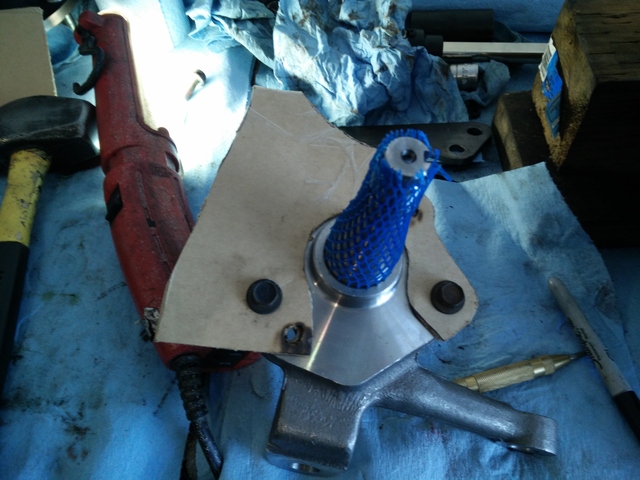
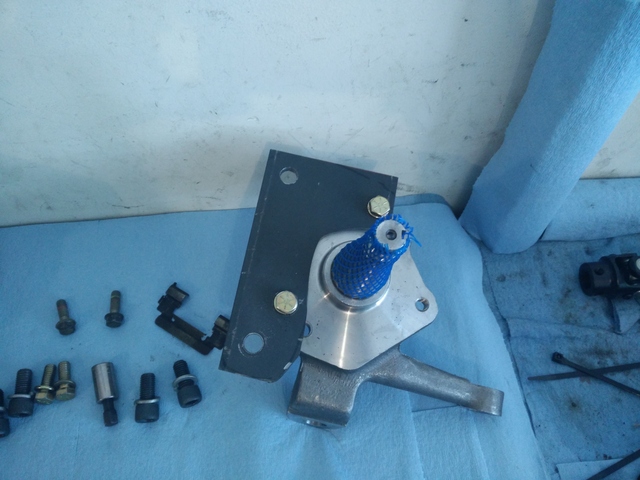
ok...so ill need to dig out some info here because someone asked about this....
this is:
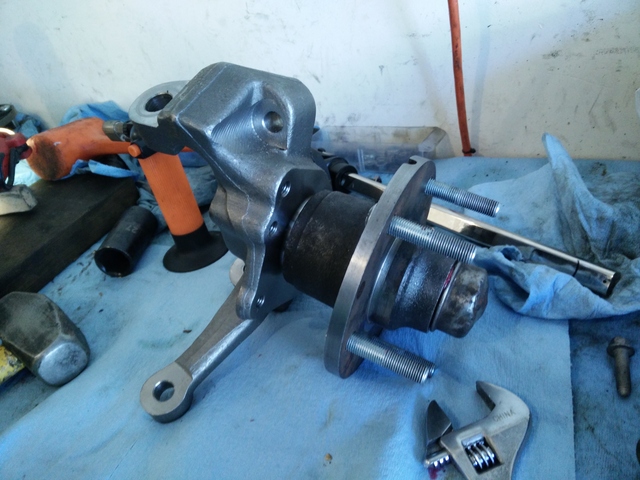
MustangII drop spindle.
65'ish Nova front DRUM brake hub, turned down to fit into 98+ Camaro 12" brake rotor, and some extended Dorman studs (forgot the part number, but easy search)
Speedway wheel bearing kit for GM 11" rotors to MII spindles... should be this ~> http://www.speedwaymotors.com/Bearin...g-II,9814.html
part numbers on studs and specs on the drum hubs might be in my build towards the beginning, but also all over the internet.
ok, so thats the simple part. just SWAP THE RACES! and pack bearings, etc. all pounded together like it should (ok, i have never done this before. but seems like it should).
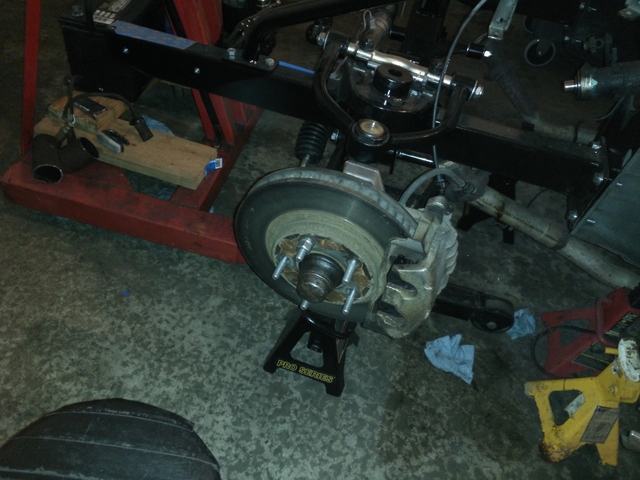
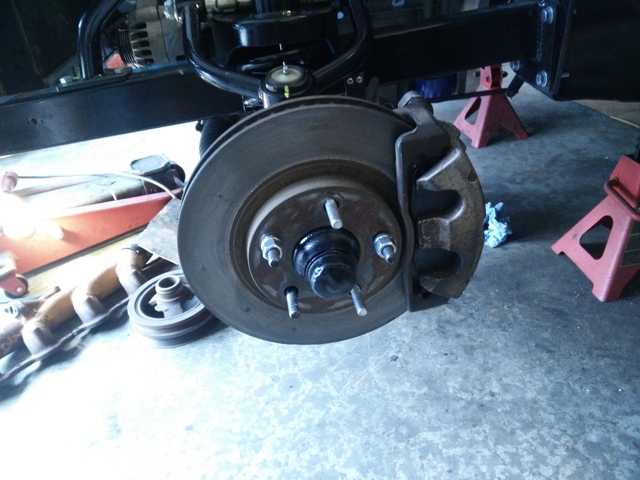
me mocking up my brakes.
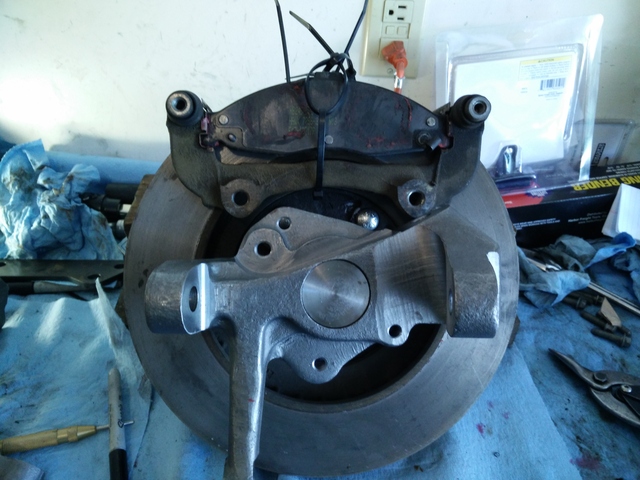
yup, some zip ties holding the pads in, got a couple bolts holding the caliper bracket at ok height. etc. precision. i tried to just eye ball the caliper to the center of the back side of the spindle, quick mock on the car shows to have a ton of steering angle before caliper bolt hits the lower arm. and even then im running 215's up front, sure they will hit the rail first.
helpful tip, only assemble one spindle at a time
making cardboard caliper brackets on the other side spindle.
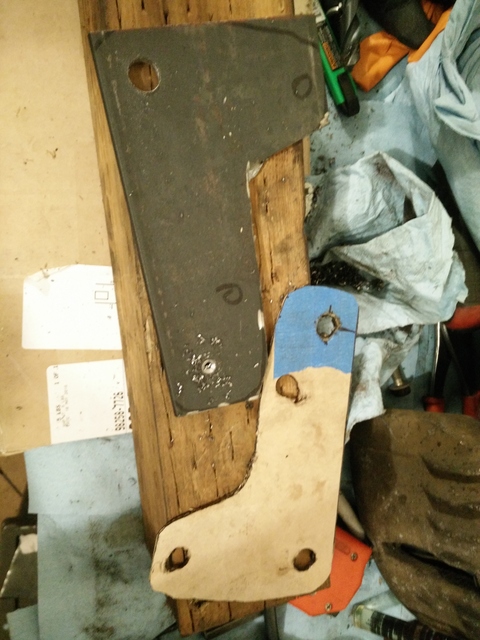
trimmed down. all super ghetto. anyway. trimming it down to this L shape also helped me to only use one piece of 4x12" steel plate. so that was a bonus. also way easier to cut out. and only like 10bucks lol.
so it was hot in the garage. grinder started to sound like crap (was hot as hell), both my batteries died for drill, and i gave up right there.
btw. i have the set of caliper bracket adapters for the STOCK GM drum spindles/hubs to 98+ Camaro brackets for sale. only bolted up and driven around the block once lol.
that badass template may be for sale too when im done. gotta be worth like 100bucks+ lol....

first off i bought some more things i needed. shipping UPS sucks as its like 8days from east coast. then i forgot that PA = rust...
so thats a lake a PB Blaster (my fav). probably spray that **** down some more over the next couple days. no real big deal with the manifolds, kinda would like the O2's broke free. but ill just weld them in like that if needed lol. speaking of, i might go sloppy status on my crossover pipe, there is plenty of 2" pipe under the Nova right now that someone was calling an exhaust system
anyway:truck (aka turbo) manifolds w/EGR. not first choice, but got hooked up with deals.
O2 sensors
knock sensors
00'ish ECU.... from the looks of it it can be OS updated to 01+? to run the 3bar, fans, etc.??
got all that for like $90 shipped.
ok...so ill need to dig out some info here because someone asked about this....
this is:
MustangII drop spindle.
65'ish Nova front DRUM brake hub, turned down to fit into 98+ Camaro 12" brake rotor, and some extended Dorman studs (forgot the part number, but easy search)
Speedway wheel bearing kit for GM 11" rotors to MII spindles... should be this ~> http://www.speedwaymotors.com/Bearin...g-II,9814.html
part numbers on studs and specs on the drum hubs might be in my build towards the beginning, but also all over the internet.
ok, so thats the simple part. just SWAP THE RACES! and pack bearings, etc. all pounded together like it should (ok, i have never done this before. but seems like it should).
me mocking up my brakes.
yup, some zip ties holding the pads in, got a couple bolts holding the caliper bracket at ok height. etc. precision. i tried to just eye ball the caliper to the center of the back side of the spindle, quick mock on the car shows to have a ton of steering angle before caliper bolt hits the lower arm. and even then im running 215's up front, sure they will hit the rail first.
helpful tip, only assemble one spindle at a time
making cardboard caliper brackets on the other side spindle.
trimmed down. all super ghetto. anyway. trimming it down to this L shape also helped me to only use one piece of 4x12" steel plate. so that was a bonus. also way easier to cut out. and only like 10bucks lol.
so it was hot in the garage. grinder started to sound like crap (was hot as hell), both my batteries died for drill, and i gave up right there.
btw. i have the set of caliper bracket adapters for the STOCK GM drum spindles/hubs to 98+ Camaro brackets for sale. only bolted up and driven around the block once lol.
that badass template may be for sale too when im done. gotta be worth like 100bucks+ lol....
07-01-2016, 08:40 AM
#47
On The Tree
Thread Starter
Join Date: Aug 2013
Location: Lake Stevens, WA
Posts: 174
Likes: 0
Received 0 Likes
on
0 Posts
cheap one on eBay... http://m.ebay.com/itm/12-quot-3-4-quot-DD-Universal-Plated-Steering-Shaft-Black-3-4-36-quot-x-3-4-quot-DD-U-Joint-/191679705390?txnId=1276643367009
07-05-2016, 01:04 AM
#48
On The Tree
Thread Starter
Join Date: Aug 2013
Location: Lake Stevens, WA
Posts: 174
Likes: 0
Received 0 Likes
on
0 Posts
ok. so not much to update, might do some other small work tomorrow. did go over to a friends place, watched them make progress lol. it did get me a little motivated.
so i said the truck manifold on the drivers side was hitting the alternator.
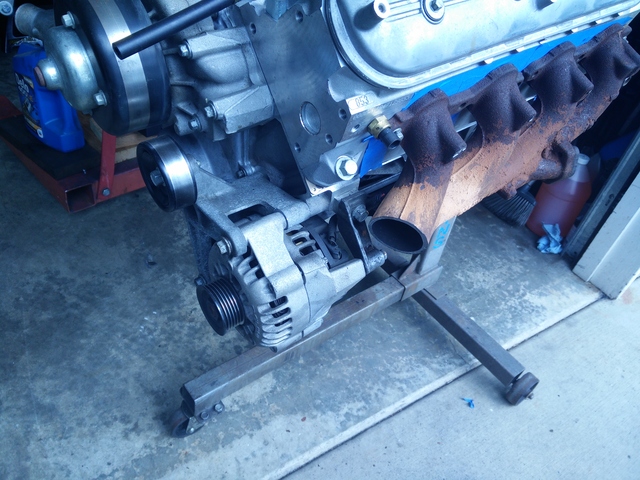
wasnt going to use the stock flange anyway. it has a ball socket flange, those suck. anyway. HF sawzalled that and had no real plan after that. did hold up some random scrap up to it. doesnt look like i can weld 2" pipe to it. going to need a reducer. oh and i got one heat shield bolt out. cut 3 others, one was just there for show i guess.
here is the i think completed brake caliper relocation bracket.
1/4" plate from hardware store, cut with angle grinder, drilled with a cordless drill. some rhmt/sloppy **** right there. lol.
note. if your going to steal my brake system idea, the brake caliper brackets will need machined down as the offset is bad, and hits the rotor so it wont turn. guessing 3-4mm. but not 100% done with that either.
so i said the truck manifold on the drivers side was hitting the alternator.
wasnt going to use the stock flange anyway. it has a ball socket flange, those suck. anyway. HF sawzalled that and had no real plan after that. did hold up some random scrap up to it. doesnt look like i can weld 2" pipe to it. going to need a reducer. oh and i got one heat shield bolt out. cut 3 others, one was just there for show i guess.
here is the i think completed brake caliper relocation bracket.
1/4" plate from hardware store, cut with angle grinder, drilled with a cordless drill. some rhmt/sloppy **** right there. lol.
note. if your going to steal my brake system idea, the brake caliper brackets will need machined down as the offset is bad, and hits the rotor so it wont turn. guessing 3-4mm. but not 100% done with that either.
07-12-2016, 06:32 PM
#49
On The Tree
Thread Starter
Join Date: Aug 2013
Location: Lake Stevens, WA
Posts: 174
Likes: 0
Received 0 Likes
on
0 Posts
this weekends update:
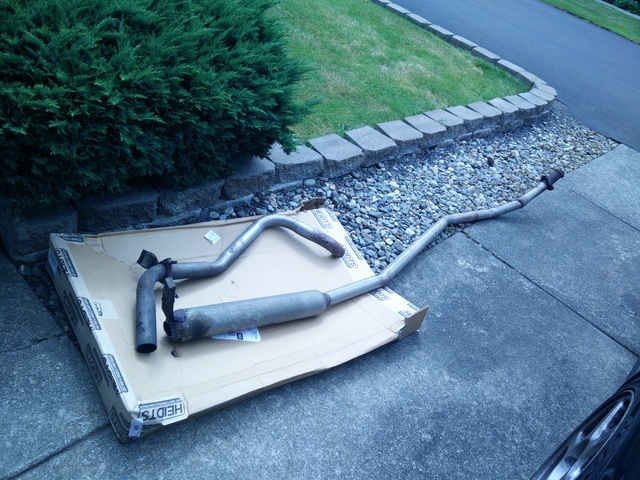
cut the 2" exhaust off the drivers side of the car. give me some more room to work. not even sure why it was still in there. not like i would have ran a 2" exhaust NA.
parts are piled on the other side of the car, ill get that later.
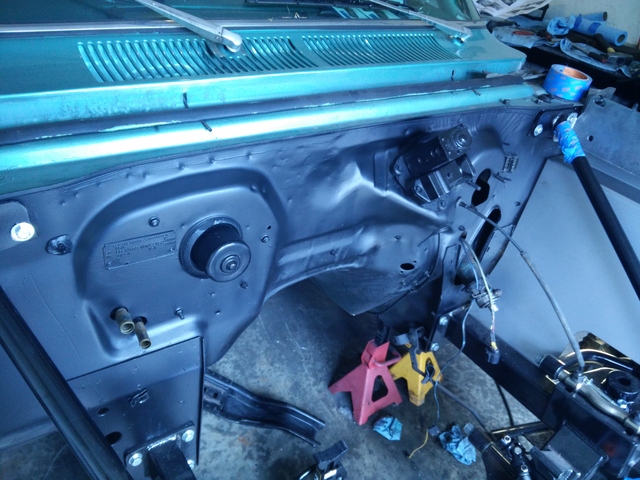
think after 5 colors of "black" this is the color its staying.... Duplicolor bumper/trim paint if anyone cares.
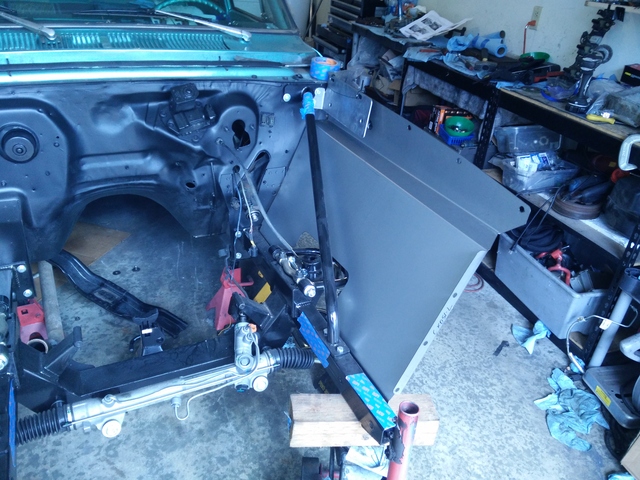
got my Heidt's inner fenders, so i halfassed one into place so i could mock up and check some ideas, etc. i dug the core support out too.
first impressions of the inner fenders is that the one seems to fit nicely. one corner was bent slightly in shipping (no big deal). the sheet metal is way thicker than i expected. was expecting a shitty tin, and its like 22g or something, seems solid.
got the brakes bolted up. what a bitch. million test fits. grinding. etc. once again if i had the right tools (band saw, mill, drill press, etc) oh and fabrication skill, life would have been easier.
brackets are straight forward as pictured. you need to grind material off the caliper mounting bracket as the offset puts it into the rotor. i just went till i had 3-4mm or so clearance, not quite centered, but good enough so it doesnt rub. didnt want to take too much off the caliper.
might finish assembling the other side (all fab is done), and/or start some engine harness wiring... or do nothing....
cut the 2" exhaust off the drivers side of the car. give me some more room to work. not even sure why it was still in there. not like i would have ran a 2" exhaust NA.
parts are piled on the other side of the car, ill get that later.
think after 5 colors of "black" this is the color its staying.... Duplicolor bumper/trim paint if anyone cares.
got my Heidt's inner fenders, so i halfassed one into place so i could mock up and check some ideas, etc. i dug the core support out too.
first impressions of the inner fenders is that the one seems to fit nicely. one corner was bent slightly in shipping (no big deal). the sheet metal is way thicker than i expected. was expecting a shitty tin, and its like 22g or something, seems solid.
got the brakes bolted up. what a bitch. million test fits. grinding. etc. once again if i had the right tools (band saw, mill, drill press, etc) oh and fabrication skill, life would have been easier.
brackets are straight forward as pictured. you need to grind material off the caliper mounting bracket as the offset puts it into the rotor. i just went till i had 3-4mm or so clearance, not quite centered, but good enough so it doesnt rub. didnt want to take too much off the caliper.
might finish assembling the other side (all fab is done), and/or start some engine harness wiring... or do nothing....
 08-09-2016, 12:43 AM
#51
On The Tree
Thread Starter
Join Date: Aug 2013
Location: Lake Stevens, WA
Posts: 174
Likes: 0
Received 0 Likes
on
0 Posts
its hot out, saving money for parts, lazy...whatever...
ordered a bunch of turbo parts/materials...
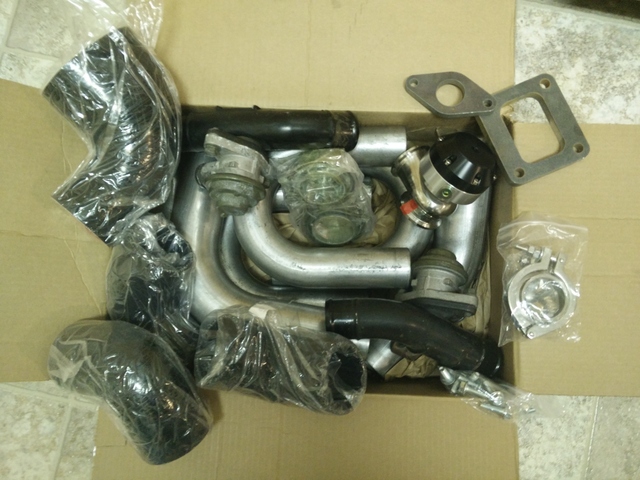
this is the first stack of parts to arrive.
i have had a couple of DSM blow off valves i grabbed at local junkyard. probably use one of these.
T4 flange
bov flange
44mm wastegate
2" vband flanges
2" ubends
2.5" bends
bunch of couplers
intercooler will probably be here tomorrow. i ordered a turbo also, of course it was out of stock, he said they should be there next week. i know im forgetting stuff, i had a nice organized list, but it was on my PC and i think that is toasted now lol.
i have those 60lbs installed already. and ill order a 3bar map later. along with downpipe/exhaust stuff once i have the turbo positioned to get more idea what i will need.
ordered a bunch of turbo parts/materials...
this is the first stack of parts to arrive.
i have had a couple of DSM blow off valves i grabbed at local junkyard. probably use one of these.
T4 flange
bov flange
44mm wastegate
2" vband flanges
2" ubends
2.5" bends
bunch of couplers
intercooler will probably be here tomorrow. i ordered a turbo also, of course it was out of stock, he said they should be there next week. i know im forgetting stuff, i had a nice organized list, but it was on my PC and i think that is toasted now lol.
i have those 60lbs installed already. and ill order a 3bar map later. along with downpipe/exhaust stuff once i have the turbo positioned to get more idea what i will need.
08-09-2016, 09:58 AM
#52

here is the i think completed brake caliper relocation bracket.

1/4" plate from hardware store, cut with angle grinder, drilled with a cordless drill. some rhmt/sloppy **** right there. lol.
note. if your going to steal my brake system idea, the brake caliper brackets will need machined down as the offset is bad, and hits the rotor so it wont turn. guessing 3-4mm. but not 100% done with that either.
Seems kind of ghetto, but they've been doing fine for the last 93k miles. On a side note, the calipers will polish up nicely and it's not that hard to do.
08-09-2016, 10:32 AM
#53
On The Tree
Thread Starter
Join Date: Aug 2013
Location: Lake Stevens, WA
Posts: 174
Likes: 0
Received 0 Likes
on
0 Posts
yeah i have seen that also. it offsets the wheel out some more. S10 guys seem to do it often.
sorry, i dont polish things, i paint them black actually the brakes are finished product there. just OE junkyard look. lol. notice i didnt paint the engine or covers either.
i do plan on blacking out all the chrome on the car at some point also.
sorry, i dont polish things, i paint them black
actually the brakes are finished product there. just OE junkyard look. lol. notice i didnt paint the engine or covers either.i do plan on blacking out all the chrome on the car at some point also.
08-16-2016, 09:57 PM
#54
On The Tree
Thread Starter
Join Date: Aug 2013
Location: Lake Stevens, WA
Posts: 174
Likes: 0
Received 0 Likes
on
0 Posts
so my intercooler showed up a couple days ago, along with some other crap i think.
i got around to taking it out the box and looking at it... yup. they sent me the wrong ****** one. 4" core with 3" in/out... i measured it all out for a 3" core and 2.5" pipes. infact i ordered 2.5" pipe and couplers already. so not too much surprise, but lots of hate. not letting that get me down though. i emailed them. on the wrong size in/out. he said they would send me new couplers for 3-2.5"... but even still not sure i can fit 4" core. too much of a pain in the *** to send it back, might sell it, might just buy a new one and move on. idk.

dug my radiator back out. plan to tuck the intercooler into that spacer thing....damnit. just remembered looking at that pic. i need to measure that it will even fit with that spacer as far as engine accessory drive clearance.
oh. i also bought argon gas for my welder... only have had this welder for like 13years, never put gas threw it. LOL. probably be a whole new world. while i was at it i got some new welding gloves, some welding sleeves...should have bought a helmet, but didnt. HF helmet will stay in service for now (or till i go blind im sure)
giant *** intercooler behind that.

just in place for mockup. couple zip ties, and bolts that are size small just poked into the couple random holes LOL dont lean it on!
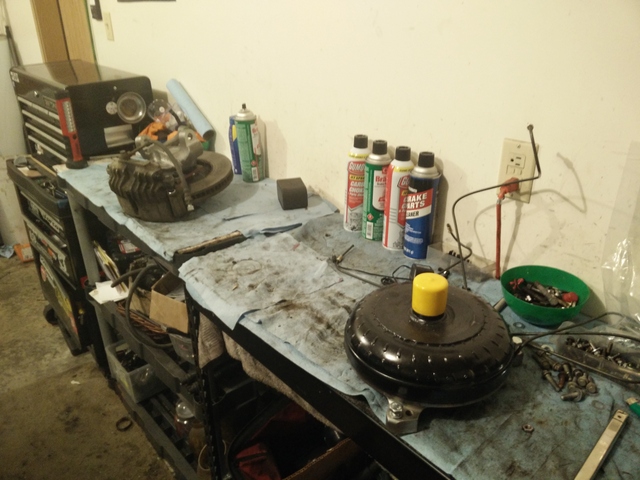
brakes for passenger side all assembled. with that done, cleaning the bench was pretty easy. oh and a $600 torque converter just sitting there waiting to be called on for its expertise.
i got confirmation of my turbo doing something. didnt see a tracking number in email. but guessing its on its way.
other than that. its hot, im lazy. dont fell like dressing down to grind/weld. or getting burned cuz i didnt.
been staring at Tanks Inc fuel injection swap tank with all the trimmings aside from pump. they charge too damn much (save 100bucks). ill buy the pump elsewhere. will be buying a Walbro 400lph.
i got around to taking it out the box and looking at it... yup. they sent me the wrong ****** one.
dug my radiator back out. plan to tuck the intercooler into that spacer thing....damnit. just remembered looking at that pic. i need to measure that it will even fit with that spacer as far as engine accessory drive clearance.
oh. i also bought argon gas for my welder... only have had this welder for like 13years, never put gas threw it. LOL. probably be a whole new world. while i was at it i got some new welding gloves, some welding sleeves...should have bought a helmet, but didnt. HF helmet will stay in service for now (or till i go blind im sure)
giant *** intercooler behind that.
just in place for mockup. couple zip ties, and bolts that are size small just poked into the couple random holes LOL
dont lean it on!brakes for passenger side all assembled. with that done, cleaning the bench was pretty easy. oh and a $600 torque converter just sitting there waiting to be called on for its expertise.
i got confirmation of my turbo doing something. didnt see a tracking number in email. but guessing its on its way.
other than that. its hot, im lazy. dont fell like dressing down to grind/weld. or getting burned cuz i didnt.
been staring at Tanks Inc fuel injection swap tank with all the trimmings aside from pump. they charge too damn much (save 100bucks). ill buy the pump elsewhere. will be buying a Walbro 400lph.
08-21-2016, 11:45 PM
#55
On The Tree
Thread Starter
Join Date: Aug 2013
Location: Lake Stevens, WA
Posts: 174
Likes: 0
Received 0 Likes
on
0 Posts
ok, so the intercooler as been bothering me. even before i was sent the wrong core after all my measuring, theory, guessing, etc. wanted to tackle this before it killed me.
so more measuring, marking, etc...
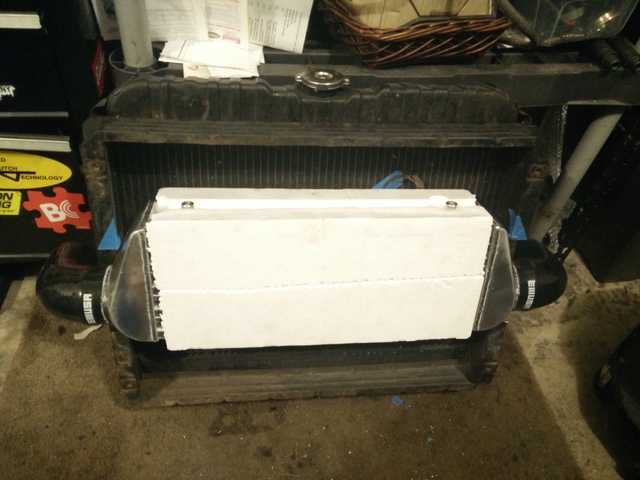
i cut up the radiator spacer and set it in there.

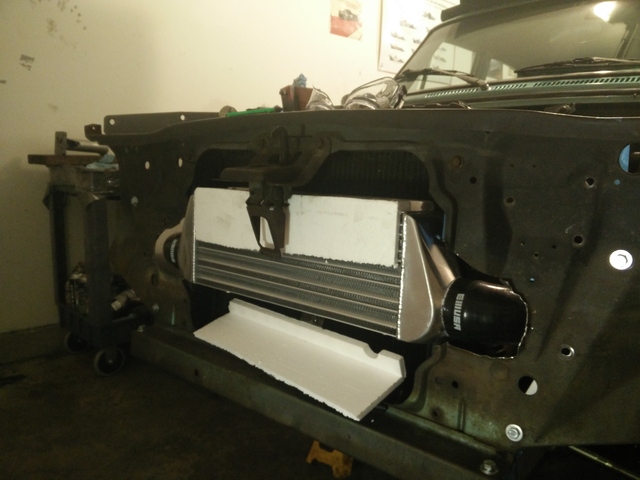
even with this giant *** 4" core, it sticks out about an inch or so? which, i think, still puts me in a good spot. i dont have thick sausage fingers, so i should still be able to get a grip on the hood release.
theoretically lol.
oh yeah, the hacking has officially began! lol
just done the one side so far, once it all fits like i think it will, its gonna get cleaned up some. maybe even some rubber edge trim to keep the core support from cutting me or the intercooler couplers.
thats it for now... oh so in my measuring i did placement of the intercooler to put/keep the battery up front and on the drivers side. was measuring for a small group 75 side post. but i may even be able to use the big group 24 that came with the car. measurments/marks i have made make the clearance between the radiator and engine DAMN CLOSE! like i hope i can get a decent radiator fan with shroud in there. but probably going to be crap *** fans mounted to radiator. we will see.
so more measuring, marking, etc...
i cut up the radiator spacer and set it in there.
even with this giant *** 4" core, it sticks out about an inch or so? which, i think, still puts me in a good spot. i dont have thick sausage fingers, so i should still be able to get a grip on the hood release.
theoretically lol.
oh yeah, the hacking has officially began! lol
just done the one side so far, once it all fits like i think it will, its gonna get cleaned up some. maybe even some rubber edge trim to keep the core support from cutting me or the intercooler couplers.
thats it for now... oh so in my measuring i did placement of the intercooler to put/keep the battery up front and on the drivers side. was measuring for a small group 75 side post. but i may even be able to use the big group 24 that came with the car. measurments/marks i have made make the clearance between the radiator and engine DAMN CLOSE! like i hope i can get a decent radiator fan with shroud in there. but probably going to be crap *** fans mounted to radiator. we will see.
08-23-2016, 10:51 PM
#56
On The Tree
Thread Starter
Join Date: Aug 2013
Location: Lake Stevens, WA
Posts: 174
Likes: 0
Received 0 Likes
on
0 Posts
ok, **** just got real :o
VSRacing 7875... dont remember the specs or care to look, but it has wheels and housings :-* oh and more importantly, i have seen enough dyno charts, burnout videos, and reviews to have me sold that this turbo is going to help my burnout mission.

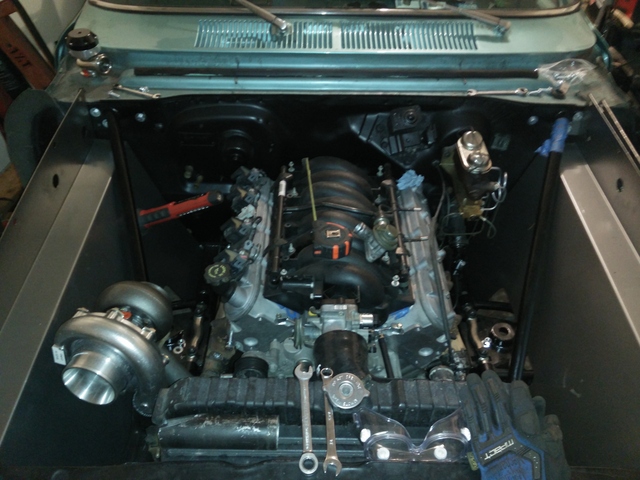
i put the engine back in. AJ kept shooting questions at me, and really all i had was measurements, tape marks, etc. so i threw the engine back in to make sure all this crap is actually going to fit in this car LOL.
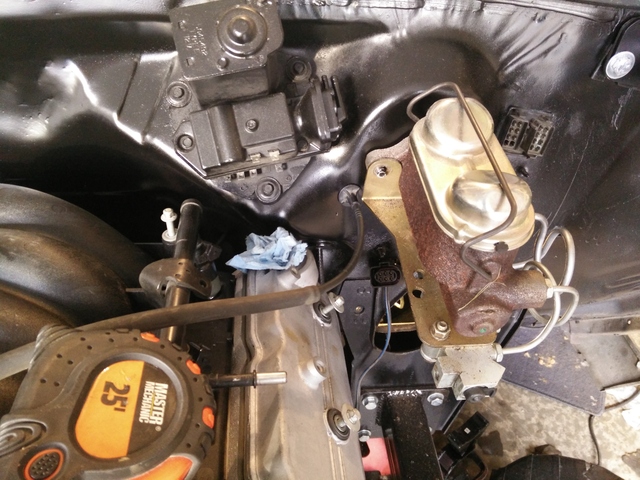
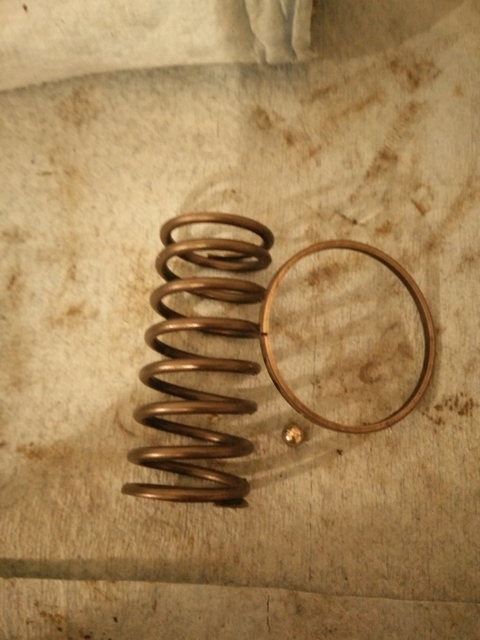
got the brake lines in, mostly secured. passenger brake unit on. then remembered i should probably cut the springs and install those too. lol. oh swapped out my disc/drum proportioning valve (had a buggered up thread) for a disc/disc... then once again thought i should swap in a damn corvette 1" and adjustable valve, probably a line lock. but ill save that for later i guess. or never if this brakes work as well as i hope. cut the passenger side 2" exhaust off the car also.
cleaned up the garage some. threw some more **** on my back porch lol, probably scrap a bunch of crap next weekend, make more room.
VSRacing 7875... dont remember the specs or care to look, but it has wheels and housings :-* oh and more importantly, i have seen enough dyno charts, burnout videos, and reviews to have me sold that this turbo is going to help my burnout mission.
i put the engine back in. AJ kept shooting questions at me, and really all i had was measurements, tape marks, etc. so i threw the engine back in to make sure all this crap is actually going to fit in this car LOL.
got the brake lines in, mostly secured. passenger brake unit on. then remembered i should probably cut the springs and install those too. lol. oh swapped out my disc/drum proportioning valve (had a buggered up thread) for a disc/disc... then once again thought i should swap in a damn corvette 1" and adjustable valve, probably a line lock. but ill save that for later i guess. or never if this brakes work as well as i hope. cut the passenger side 2" exhaust off the car also.
cleaned up the garage some. threw some more **** on my back porch lol, probably scrap a bunch of crap next weekend, make more room.
08-28-2016, 10:05 PM
#57
On The Tree
Thread Starter
Join Date: Aug 2013
Location: Lake Stevens, WA
Posts: 174
Likes: 0
Received 0 Likes
on
0 Posts
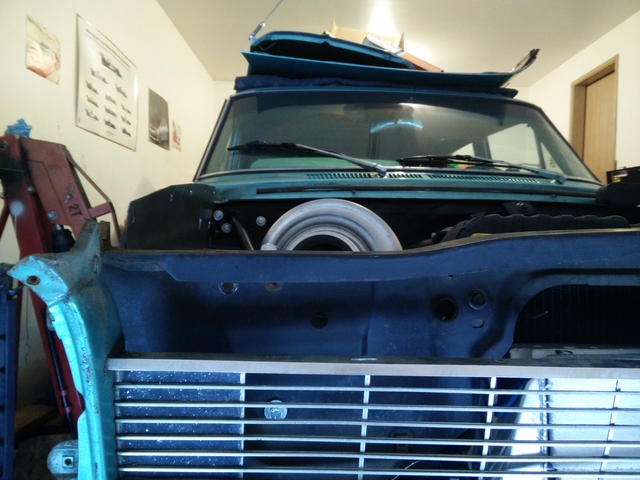
ok. so i threw some stuff together here. looks like my measurements where good, others are concerning like i thought, and a thing or two are not so much planned for lol.
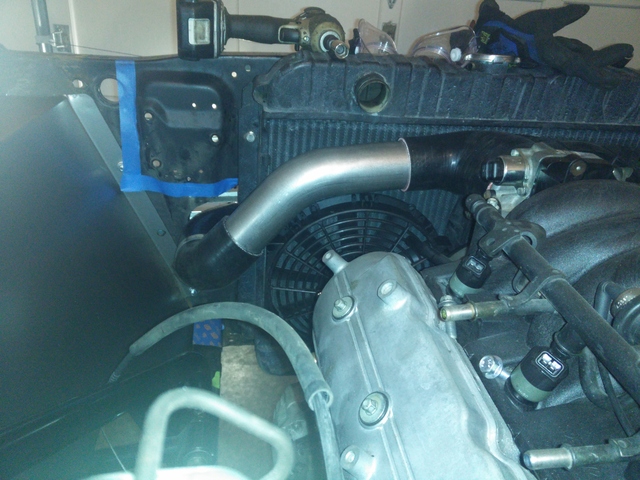
first up... what you think of these fans/radiator setup? going to cool for a ****? or cause motor meltdown?

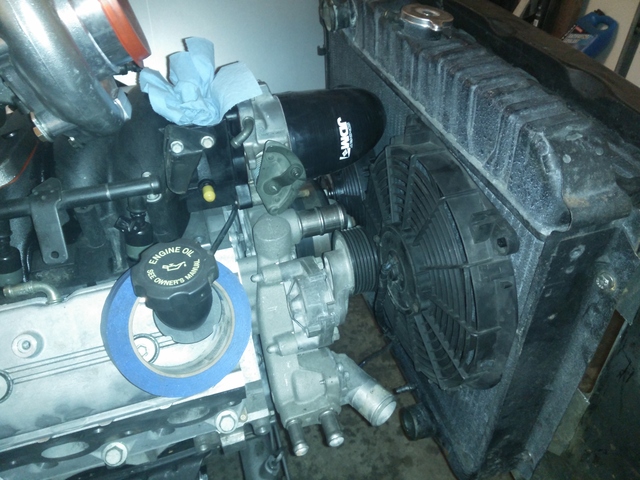
obviously the throttle body elbow is hitting the radiator. so a full on fan with shroud isnt going to happen. and before you say pull the spacer, thats not going to happen as the intercooler will be sitting in there. i cant move the intercooler forward because i will not loose my hood latch.
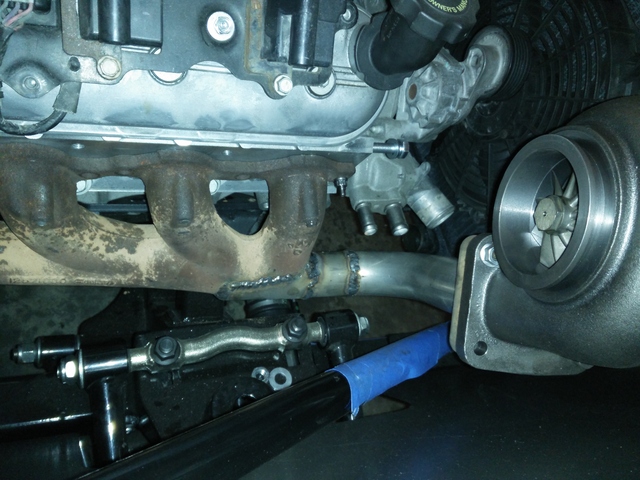
teaser of the monstrosity that will hopefully be the drivers side manifold. passenger side not going as well. might need a new one lol.
first up... what you think of these fans/radiator setup? going to cool for a ****? or cause motor meltdown?
obviously the throttle body elbow is hitting the radiator. so a full on fan with shroud isnt going to happen. and before you say pull the spacer, thats not going to happen as the intercooler will be sitting in there. i cant move the intercooler forward because i will not loose my hood latch.
teaser of the monstrosity that will hopefully be the drivers side manifold. passenger side not going as well. might need a new one lol.
08-30-2016, 09:39 PM
#58
On The Tree
Thread Starter
Join Date: Aug 2013
Location: Lake Stevens, WA
Posts: 174
Likes: 0
Received 0 Likes
on
0 Posts
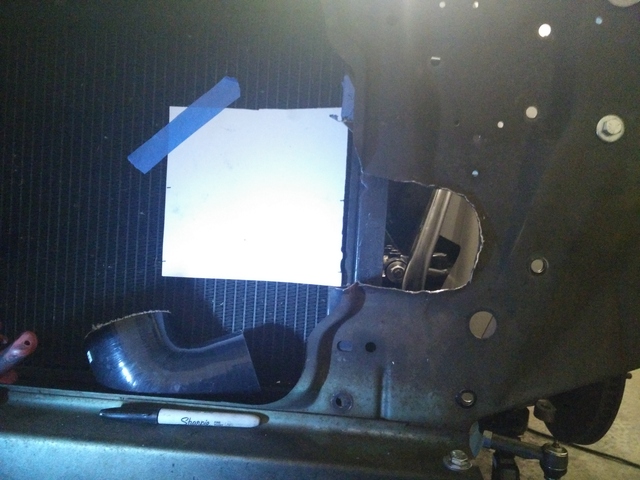
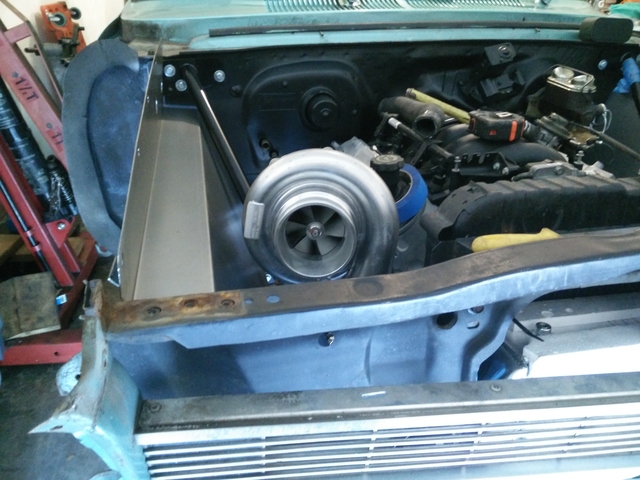
little update.
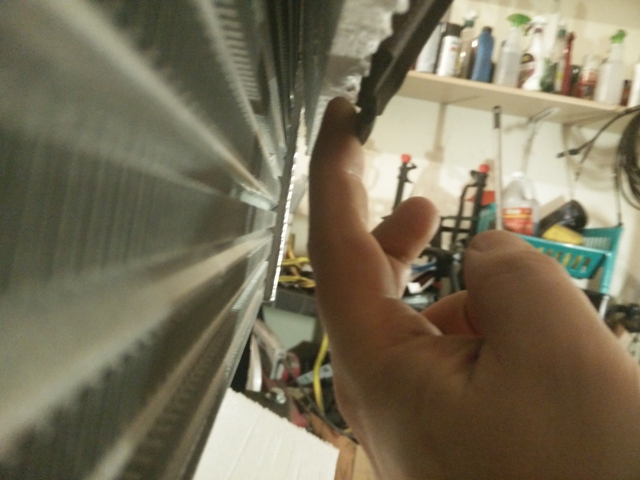
sorry i left the foam on the intercooler. always seem to bend lots of fins if i dont lol.
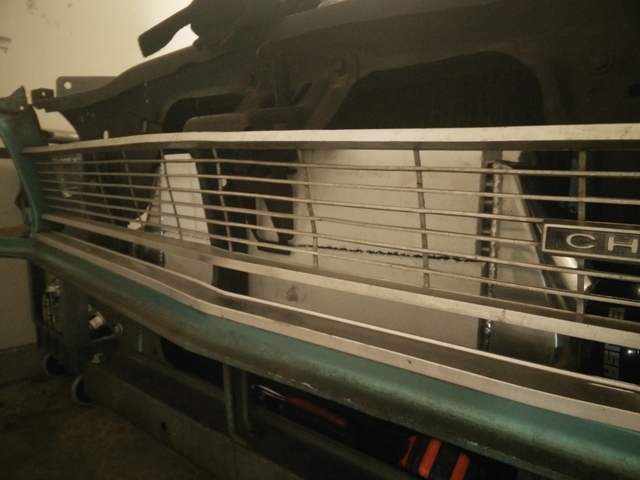

just enough room to get my fingers on the latch.
ok. this looks great right? totally not what i was planning on. lol. hope the left over 2.5" pipes i have left make a nice new upper chargepipe like this for the Galant LOL.
blue tape to the left is me marking off for the battery. not moving that to the trunk, too much work. think this will be easier. or at least whats going to happen at this point. (for those that dont know, battery is factory mounted on passenger side)
think that is going to work.
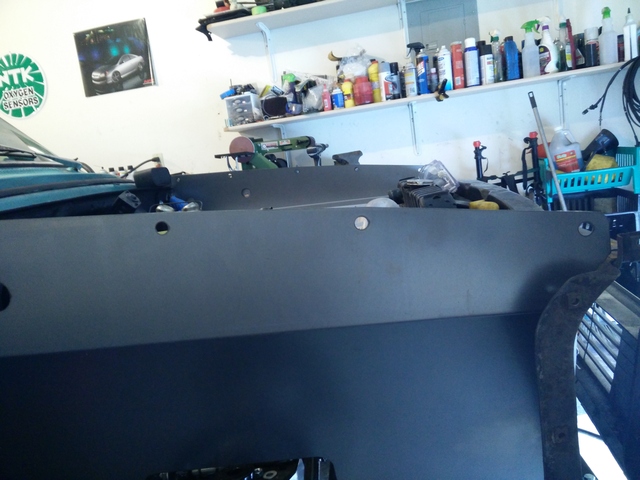
thats it for now. think thats all my pics...well i have some of the turbo sitting on random boxes and crap to get idea where i want it lol... hell...

blurry pic for ya till i get some more creativity flowing to hang it proper.

sorry i left the foam on the intercooler. always seem to bend lots of fins if i dont lol.
just enough room to get my fingers on the latch.
ok. this looks great right? totally not what i was planning on. lol. hope the left over 2.5" pipes i have left make a nice new upper chargepipe like this for the Galant LOL.
blue tape to the left is me marking off for the battery. not moving that to the trunk, too much work. think this will be easier. or at least whats going to happen at this point. (for those that dont know, battery is factory mounted on passenger side)
think that is going to work.
thats it for now. think thats all my pics...well i have some of the turbo sitting on random boxes and crap to get idea where i want it lol... hell...
blurry pic for ya till i get some more creativity flowing to hang it proper.
09-04-2016, 09:36 PM
#59
On The Tree
Thread Starter
Join Date: Aug 2013
Location: Lake Stevens, WA
Posts: 174
Likes: 0
Received 0 Likes
on
0 Posts
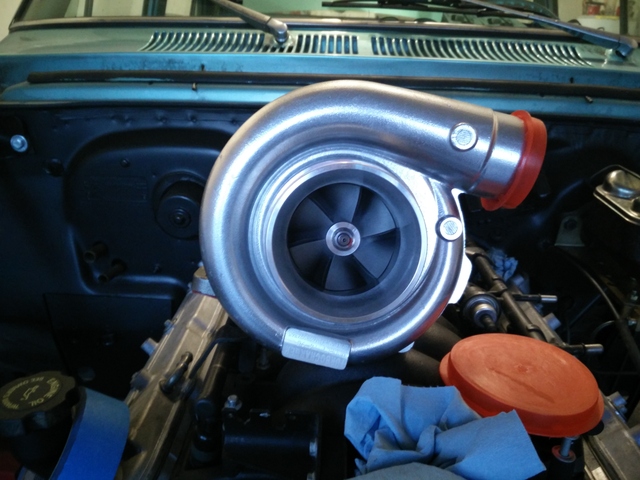
TODAY:
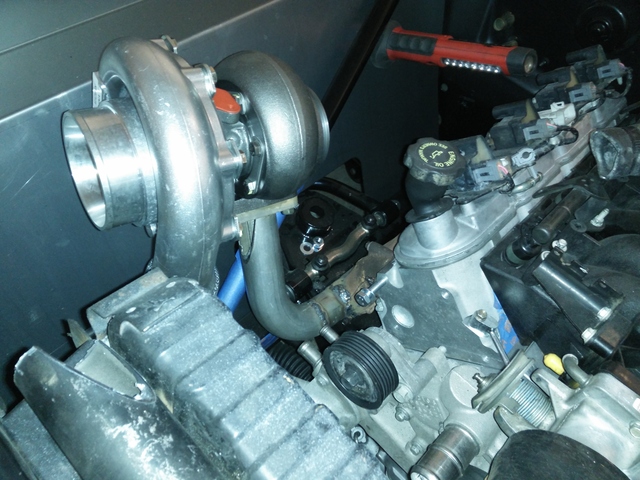
who is that hiding in there??
its....
turbo! 
looks like it will clear the hood just fine.
then i finish welded most all the passenger side of the manifold. so now it will actually support the turbo for more than 2sec without fear of it falling on my frame rail. lol. tomorrow i will probably tackle the crossover.
not sure how the hell im going to do the exhaust/downpipe. there is barely enough room for a 3" pipe to clear the manifold/frame rail. i dont have a starter, but i doubt ill have any more clearance there. might just poke it threw the inner fender panel, then down the firewall under the car? or just at the ground. not sure yet. would like the exhaust to go at least to the front of the rear tire.
who is that hiding in there??
its....
turbo!
looks like it will clear the hood just fine.
then i finish welded most all the passenger side of the manifold. so now it will actually support the turbo for more than 2sec without fear of it falling on my frame rail. lol. tomorrow i will probably tackle the crossover.
not sure how the hell im going to do the exhaust/downpipe. there is barely enough room for a 3" pipe to clear the manifold/frame rail. i dont have a starter, but i doubt ill have any more clearance there. might just poke it threw the inner fender panel, then down the firewall under the car? or just at the ground. not sure yet. would like the exhaust to go at least to the front of the rear tire.
10-11-2016, 07:00 PM
#60
On The Tree
Thread Starter
Join Date: Aug 2013
Location: Lake Stevens, WA
Posts: 174
Likes: 0
Received 0 Likes
on
0 Posts
so i was asked to update my thread... and now looking at it, i guess there are some pics i didnt post, but really looks about the same. i keep taking **** apart, putting it together, then back apart.
i made myself a list on paper to keep some focus (lol, right), and at least see myself checking **** off. or get more frustrated that im not.
like the first thing i went to tackle. it should have been a slam back together, mount, done. fought it for a couple hours got pissed then gave up. well moved on to other stuff. i do have another plan or 2. but requires buying some parts im not so ready for yet, but should have anyway...
anyway pics:
pics i think i promised someone? maybe it was on FB...
one of my mocks. looking like a complete engine bay.
speaking of.

i dug out some fenders and threw them on. i painted the hood hinge mounts. put them on, threw the inner fenders in, outer fenders on, tightened all that crap up. was looking good!...was. took it back apart.
paint/undercoat going on inners. plus i still need to get to some stuff, and inner/fenders will be in my way. oh and i dont want to mount the passenger yet as i think i might be blasting a hole in it for exhaust to go threw into fender...??
oops. forgot..

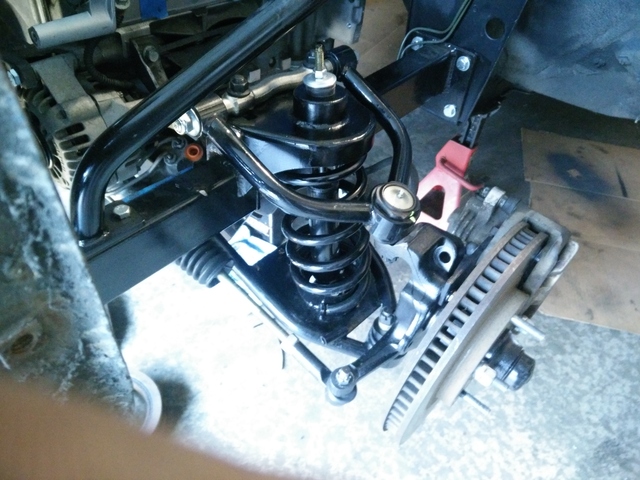
got the springs cut/trimmed and thrown in, along with shocks. tie rods (painted), drop spindles (painted), caliper brackets (painted), calipers final adjusted (grinded lol) and all mounted. just needs torque checked, marked, cotter pinned.
oh and those are the 98+ F-Body dual piston aluminum calipers mounted on the MII spindles. they have fresh Hawk pads, fresh turned rotors. i thought i had a pic showing the offset of the wheels to the fenders...
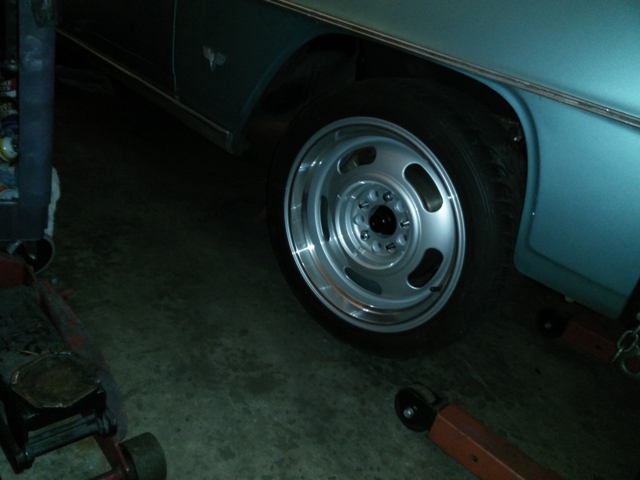
ok, picture sucks for that. plus i dont have any weight on the suspension. wheel is tucked in a couple inches, its a 17x7 zero offset. 215 tire.
so i think the downpipe/exhaust is going to go out the inner fender, down the firewall, then straight back a couple feet, 45* out before the back tire.

thats about 3.5" worth of blue towels lol, anyway, again no weight on suspension (couldnt get jack under tire) but i think i should have no issue doing the downpipe/exhaust like this?
i have a video also of me wondering around the car/garage. maybe i should upload that to youtube also?...

i made myself a list on paper to keep some focus (lol, right), and at least see myself checking **** off. or get more frustrated that im not.
like the first thing i went to tackle. it should have been a slam back together, mount, done. fought it for a couple hours got pissed then gave up. well moved on to other stuff. i do have another plan or 2. but requires buying some parts im not so ready for yet, but should have anyway...
anyway pics:
pics i think i promised someone? maybe it was on FB...
one of my mocks. looking like a complete engine bay.
speaking of.
i dug out some fenders and threw them on. i painted the hood hinge mounts. put them on, threw the inner fenders in, outer fenders on, tightened all that crap up. was looking good!...was. took it back apart.
paint/undercoat going on inners. plus i still need to get to some stuff, and inner/fenders will be in my way. oh and i dont want to mount the passenger yet as i think i might be blasting a hole in it for exhaust to go threw into fender...??
oops. forgot..
got the springs cut/trimmed and thrown in, along with shocks. tie rods (painted), drop spindles (painted), caliper brackets (painted), calipers final adjusted (grinded lol) and all mounted. just needs torque checked, marked, cotter pinned.
oh and those are the 98+ F-Body dual piston aluminum calipers mounted on the MII spindles. they have fresh Hawk pads, fresh turned rotors. i thought i had a pic showing the offset of the wheels to the fenders...
ok, picture sucks for that. plus i dont have any weight on the suspension. wheel is tucked in a couple inches, its a 17x7 zero offset. 215 tire.
so i think the downpipe/exhaust is going to go out the inner fender, down the firewall, then straight back a couple feet, 45* out before the back tire.
thats about 3.5" worth of blue towels lol, anyway, again no weight on suspension (couldnt get jack under tire) but i think i should have no issue doing the downpipe/exhaust like this?
i have a video also of me wondering around the car/garage. maybe i should upload that to youtube also?...