
Simple IS300 LS1 Swap


 09-12-2016, 05:49 PM
#24
Teching In
Thread Starter
iTrader: (1)

Join Date: Feb 2016
Posts: 25
Likes: 0
Received 0 Likes
on
0 Posts
Anything in particular you want to see? I haven't fully bolted everything in yet as the past 3 months have seen no progress with family stuff coming up.
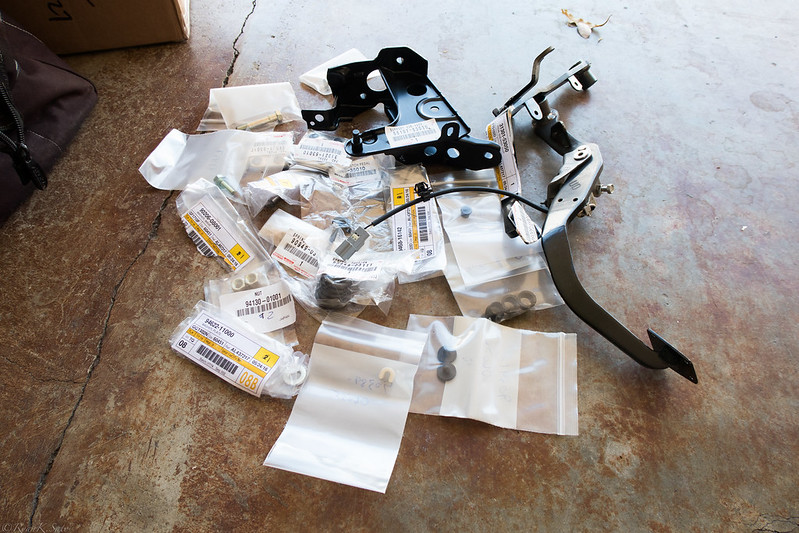
I used all oem parts for the clutch pedal assembly. Dedicated Motorsports kit uses an aftermarket 7/8" master with an adapter plate to bolt up to the stock clutch master holes in the firewall. My car was an auto so I had to drill these out. There's a bulge on the firewall where the adapter plate sits so it doesn't sit flush. I'm going to tighten everything up to see if I can make it work.
I used all oem parts for the clutch pedal assembly. Dedicated Motorsports kit uses an aftermarket 7/8" master with an adapter plate to bolt up to the stock clutch master holes in the firewall. My car was an auto so I had to drill these out. There's a bulge on the firewall where the adapter plate sits so it doesn't sit flush. I'm going to tighten everything up to see if I can make it work.
09-22-2016, 02:23 PM
#25
Teching In

Join Date: Feb 2016
Posts: 5
Likes: 0
Received 0 Likes
on
0 Posts
Anything in particular you want to see? I haven't fully bolted everything in yet as the past 3 months have seen no progress with family stuff coming up.
I used all oem parts for the clutch pedal assembly. Dedicated Motorsports kit uses an aftermarket 7/8" master with an adapter plate to bolt up to the stock clutch master holes in the firewall. My car was an auto so I had to drill these out. There's a bulge on the firewall where the adapter plate sits so it doesn't sit flush. I'm going to tighten everything up to see if I can make it work.
I used all oem parts for the clutch pedal assembly. Dedicated Motorsports kit uses an aftermarket 7/8" master with an adapter plate to bolt up to the stock clutch master holes in the firewall. My car was an auto so I had to drill these out. There's a bulge on the firewall where the adapter plate sits so it doesn't sit flush. I'm going to tighten everything up to see if I can make it work.
10-08-2016, 05:45 AM
#26
Teching In
Thread Starter
iTrader: (1)
Join Date: Feb 2016
Posts: 25
Likes: 0
Received 0 Likes
on
0 Posts
Just wanted a few pic from inside the cabin of the pedals bolted in. I started moving the piece around to get the pedal in there but not quite sure where I need to bolt in the bracket. it looks simply but I work better with picture examples. My car is going from auto to manual as well using the dedicated matt swap parts.
 20160529_IMG_2647 by satoman44, on Flickr
 20160529_IMG_2648 by satoman44, on Flickr
 20160625_IMG_2771 by satoman44, on Flickr
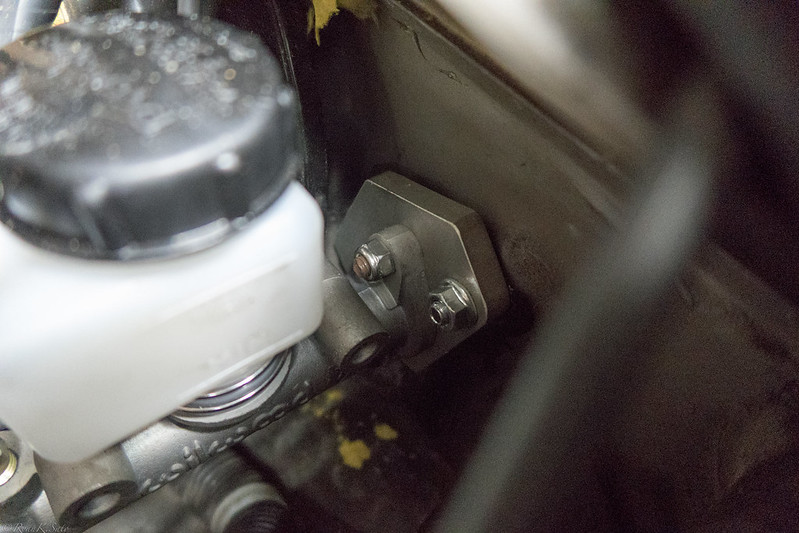 20161001_IMG_2887 by satoman44, on Flickr
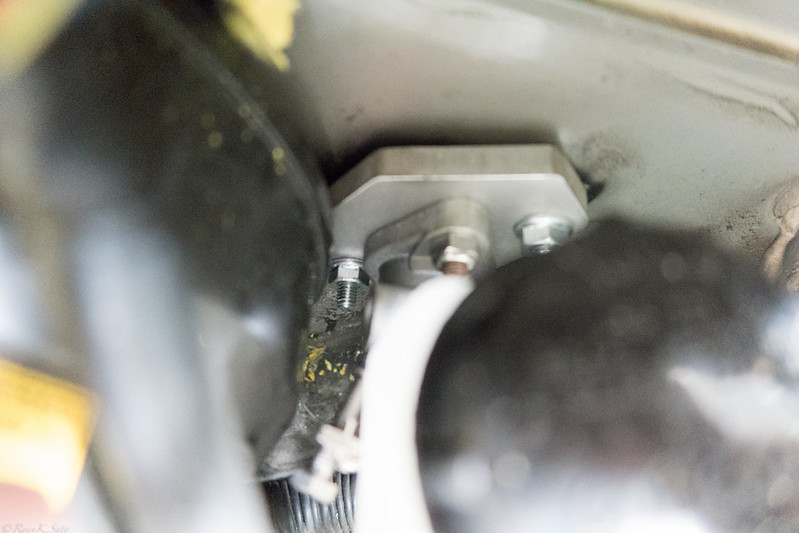 20161001_IMG_2888 by satoman44, on Flickr
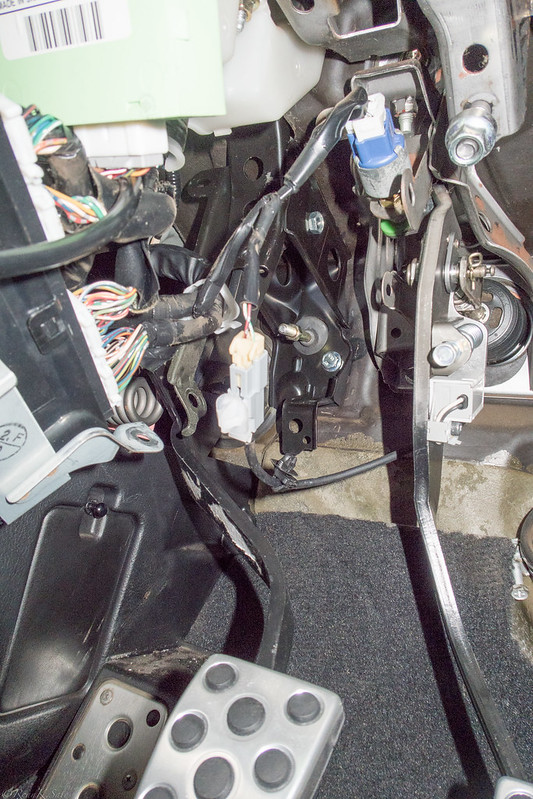 20161001_IMG_2893 by satoman44, on Flickr
12-27-2016, 03:15 PM
20161001_IMG_2893 by satoman44, on Flickr
12-27-2016, 03:15 PM
#28
Teching In
Thread Starter
iTrader: (1)
Join Date: Feb 2016
Posts: 25
Likes: 0
Received 0 Likes
on
0 Posts
I was hoping I would be able to get a solid weekend of work this xmas weekend, but I got sick and I'm just recovering now. Hopefully this weekend I'll get a few hours. Since the last update I started the wiring so no pics worth sharing, but still have a lot to do. Need to run the power cables for the battery and alternator. Need to wire up my gauges. Need to install radiator and fill. Then get injectors cleaned before first start.
12-30-2016, 12:28 PM
#30
On The Tree

Join Date: Mar 2012
Posts: 194
Likes: 0
Received 0 Likes
on
0 Posts
Is that a F body t56 Magnum? If you don't mind where did you buy trans and what did it cost shipped to Hawaii? I bought a Jake's 80e and shipping alone to Hawaii cost me $300. Get well and Happy New Year!!!
12-30-2016, 01:18 PM
#31
Teching In
Thread Starter
iTrader: (1)
Join Date: Feb 2016
Posts: 25
Likes: 0
Received 0 Likes
on
0 Posts
I have a White Lightning shifter from American Powertrain that offsets 3" to the rear. I'll be posting up pics later.
It's a regular T56 Magnum from Tremec that I bought through summit. I used a freight forwarder so total shipping cost was probably around $400 I think.
It's a regular T56 Magnum from Tremec that I bought through summit. I used a freight forwarder so total shipping cost was probably around $400 I think.
01-01-2017, 03:04 PM
#32
Teching In
Thread Starter
iTrader: (1)
Join Date: Feb 2016
Posts: 25
Likes: 0
Received 0 Likes
on
0 Posts
Been a while since I've updated with pics. Since the last update, still hasn't been much progress due to life.
I decided to get new accessories and had my new power steering line made and installed. New alternator installed. New AC compressor and lines will be installed after I get the car running and everything else installed.
 20161029_IMG_2922 by satoman44, on Flickr
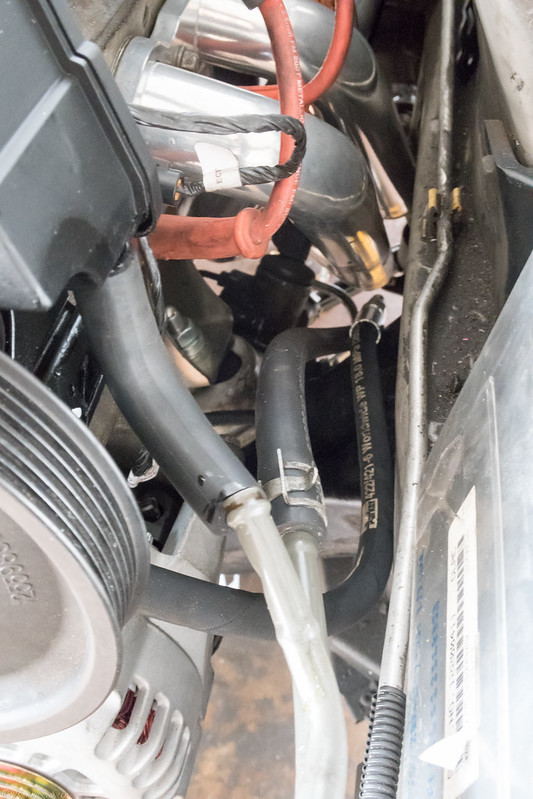
Heatshielding on the fuel lines and regulator.
 20161029_IMG_2923 by satoman44, on Flickr
Got the clutch bleed after having to drop the transmission twice! First time, the remote bleeder wasn't tightened enough to the slave. Dropped the trans to tighten it up. Noticed I couldn't bleed the clutch. Dropped it a second time, finding out I pinched the bleeder line between trans and bellhousing. I luckily had a new remote bleeder which I installed. Also took the time to change out the clutch master from a 7/8" to a 3/4" because it was too hard on my wussy leg. This is meant to be a daily, so I wanted the pedal as light as possible. There should still be enough stroke to properly disengage the pressure plate.
American Powertrain White Lightning shifter with a 3" rear offset. Also, an ebay shifter and **** set which was actually a nice piece.
 20161231_IMG_2957 by satoman44, on Flickr
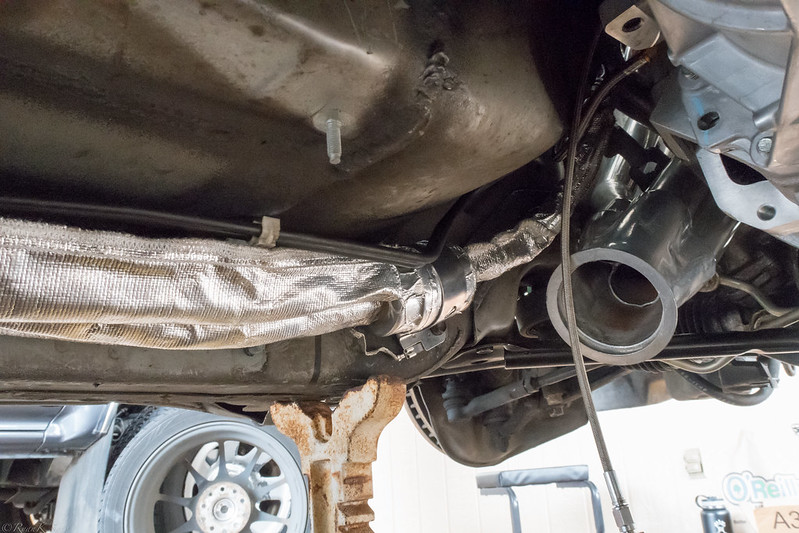
Did other minor things like drop the subframe to get more clearance between the oil pan and subframe. Wish I had done this when I had the motor out.
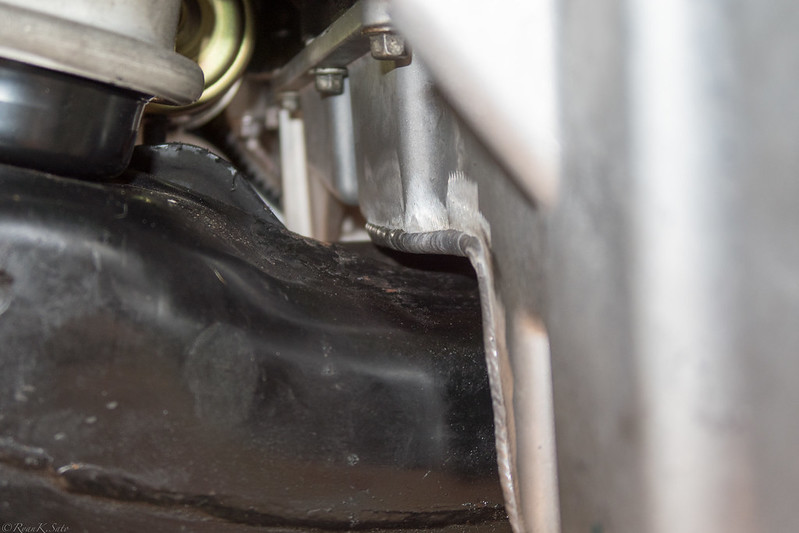 20161231_IMG_2956 by satoman44, on Flickr
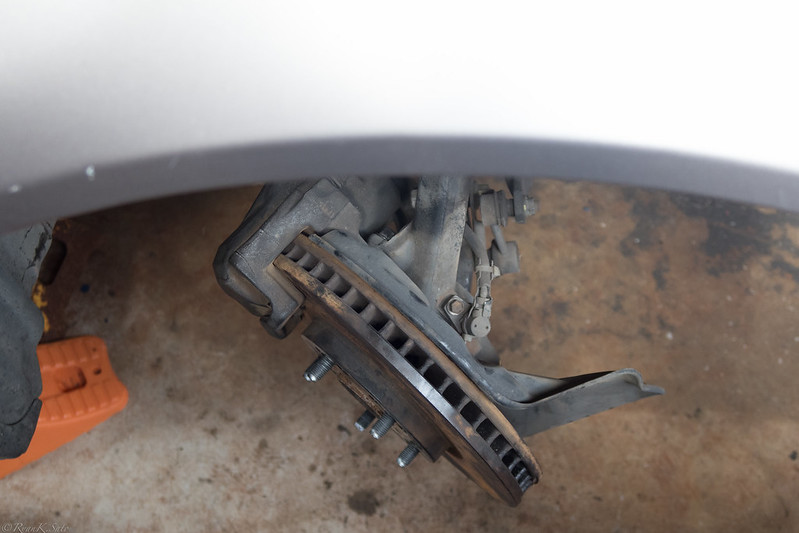
Installed new knuckles for quicker steering
 20161231_IMG_2958 by satoman44, on Flickr
 20161231_IMG_2962 by satoman44, on Flickr
Still need to finish the wiring, including mounting a new gauge cluster from Dakota Digital. I kind of regret getting it since I probably need to hack up the gauge surround integrated to the dash.
I decided to get new accessories and had my new power steering line made and installed. New alternator installed. New AC compressor and lines will be installed after I get the car running and everything else installed.
20161029_IMG_2922 by satoman44, on FlickrHeatshielding on the fuel lines and regulator.
20161029_IMG_2923 by satoman44, on FlickrGot the clutch bleed after having to drop the transmission twice! First time, the remote bleeder wasn't tightened enough to the slave. Dropped the trans to tighten it up. Noticed I couldn't bleed the clutch. Dropped it a second time, finding out I pinched the bleeder line between trans and bellhousing. I luckily had a new remote bleeder which I installed. Also took the time to change out the clutch master from a 7/8" to a 3/4" because it was too hard on my wussy leg. This is meant to be a daily, so I wanted the pedal as light as possible. There should still be enough stroke to properly disengage the pressure plate.
American Powertrain White Lightning shifter with a 3" rear offset. Also, an ebay shifter and **** set which was actually a nice piece.
20161231_IMG_2957 by satoman44, on FlickrDid other minor things like drop the subframe to get more clearance between the oil pan and subframe. Wish I had done this when I had the motor out.
20161231_IMG_2956 by satoman44, on FlickrInstalled new knuckles for quicker steering
20161231_IMG_2958 by satoman44, on Flickr20161231_IMG_2962 by satoman44, on FlickrStill need to finish the wiring, including mounting a new gauge cluster from Dakota Digital. I kind of regret getting it since I probably need to hack up the gauge surround integrated to the dash.
01-03-2017, 01:43 PM
#34
Teching In
Thread Starter
iTrader: (1)
Join Date: Feb 2016
Posts: 25
Likes: 0
Received 0 Likes
on
0 Posts
Thanks! For the exhaust, the header collectors are 3". I ideally would like to reduce down to 2.5" and then Y into a single 3" resonator and muffler. Haven't decided on those components yet, but I am willing to sacrifice some power in order to keep it quiet.


 03-23-2017, 09:50 AM
#39
TECH Enthusiast
iTrader: (54)
Join Date: Jul 2007
Location: Memphis, TN
Posts: 669
Likes: 0
Received 0 Likes
on
0 Posts

Love the build thread and love the color of that IS! Thundercloud Grey Metallic is rare and amazing looking! I just recently got my old IS300 back and I'm right behind you on this build once I sell my C5Z.
Are you running coilovers or springs and shocks? I have the Eibsch Pro Kit and Takico shocks and I really like it, but I'm wondering if the lighter LS makes the front end sit up weird after the swap if you don't go with coilovers.
Are you running coilovers or springs and shocks? I have the Eibsch Pro Kit and Takico shocks and I really like it, but I'm wondering if the lighter LS makes the front end sit up weird after the swap if you don't go with coilovers.
03-23-2017, 12:43 PM
#40
Teching In
Thread Starter
iTrader: (1)
Join Date: Feb 2016
Posts: 25
Likes: 0
Received 0 Likes
on
0 Posts
Love the build thread and love the color of that IS! Thundercloud Grey Metallic is rare and amazing looking! I just recently got my old IS300 back and I'm right behind you on this build once I sell my C5Z.
Are you running coilovers or springs and shocks? I have the Eibsch Pro Kit and Takico shocks and I really like it, but I'm wondering if the lighter LS makes the front end sit up weird after the swap if you don't go with coilovers.
Are you running coilovers or springs and shocks? I have the Eibsch Pro Kit and Takico shocks and I really like it, but I'm wondering if the lighter LS makes the front end sit up weird after the swap if you don't go with coilovers.
The major pieces of work I have left are wiring the battery relocation, installing catch can, and finishing up the cooling system install which includes an external reservoir. I had to delete the overflow that was built into the radiator shroud because the radiator line and intake wouldn't fit with it there.