When you click on links to various merchants on this site and make a purchase, this can result in this site earning a commission. Affiliate programs and affiliations include, but are not limited to, the eBay Partner Network.
It's time for a build thread. The project is about half way through.
I've built lots of fast turbo cars before, but with only half the cylinders. The goal for my first american muscle car is to cruise the streets with the GF and race at the strip, somewhere in the 10s, both equally well. The GF likes the old vettes, and project C3s are a dime a dozen. Bought this:
It's going to look stock, not with some huge hood bulge. As most of you who have worked with C3s before know, it's tight for turbo and stock appearance.
I like to do things a little different from most, so I'm not just dropping in some bolt ons. It's also a platform for me to test out some of my crazy ideas.
It would cost about 10k to beef up the rear, so I decided to go with a 4 link rear solid rear instead. I gutted the weak independent GM rear. I fabbed up a 4 link setup (not a kit) and I narrowed a Ford 8.8 (from a heavy duty F150) with 31 spline, 9 inch internals. Currently it's a 4.10 ratio.
Got an 2002 5.3 and 4l60e from a 12,000 mile wreck for $400 from JY. But water got into the engine while it sat for 13 years and needed a rebuild. Sold the trans for $350 which paid for the re-bore and new pistons and rings. I'm keeping this engine's internals stock for starters, but expect to someday replace it with a forged 6.0.
In my opinion, 4l80E fits the bill for a street/strip car since it has overdrive and huge power capabilities, Got a couple of 4l80E cores and built up one that hopefully will hold about 750hp. nothing crazy, just dual feed, extra clutches, wide range boost valve, rollerized rear, and some other stuff.
Had some spare time between jobs, so I built a 4l80e controller using an Arduino. Had a major case of scope creep and kept adding features. Has multiple driving modes. Cruise mode, Dyno mode, Drag Mode, Burnout Mode, Joystick (paddle shift) more, shifter mode. I integrated some of the trans controller with the engine management computer (AEM Infinity) The trans controller also serves as boost control and a dashboard. Each driving mode has it's own shift rules for each gear and also boost for each gear. For example drag mode only shifts by RPM and goes up to 3rd gear, Cruise mode shifts on MPH and Map Sensor, goes to all 4 gears and lockup, burnout mode only goes to 2nd or 3rd gear with it's own boost tables. Burnout mode goes right into drag mode as soon as the burnout is over.
After I get most everything mocked up and tested, I'm going to tear it all down and send the chassis out for powder coating.
I'll fill in build steps along the way, but about 2 months ago, got the car started. Here's the video:
Then I designed a 4l80e controller. In the video, I'm shifting the 4l80e using an Xbox Joystick which is part of the control and display console of my 4L80E controller. I can change modes and re-map any variables such as shift points, boost in any gear, right from control panel. display shows lots of info including mph, rpm, boost, boost target, current gear, battery voltage, oil pressure, fuel pressure, trans temp, oil temp and lots more.
The arduino controller is sweet! I know enough C++ to be dangerous, and that's about it. lol. I like the linear actuated lights, but the speed would drive me insane. Needs to be quicker IMHO. Had you thought about later model Corvette or say Fiero headlight motors?
Also, I'm amazed nobody had picked that username before you. lol
It's been almost 2 years and way overdue for an update. Lots has changed since, most for the better, some not under my control for the worse. I'll try to provide updates in sequence for continuity.
Roll Bar...
For mid 10s, a 5 or 6 point roll bar will do. Because I'm doing lots of fab work, and want to keep the ability to raise and lower the body, I don't want to weld the bars to the frame. Instead I'm bolting the bars to the frame. I added additional plates, with nuts welded to reinforce the frame and provide bolt-in location. The bars have an equivalent plate welded to them so it's plate to plate bolt in.
Until now, I used a cut up driveshaft that I got from a JY, for testing only. Now I got the final driveshaft. 3" chromolly, 1350 ends. Should be good for 1000hp.
Ok, I know I should be working more on the mechanical stuff to get this car on the road. But I really enjoy designing electronics as well.
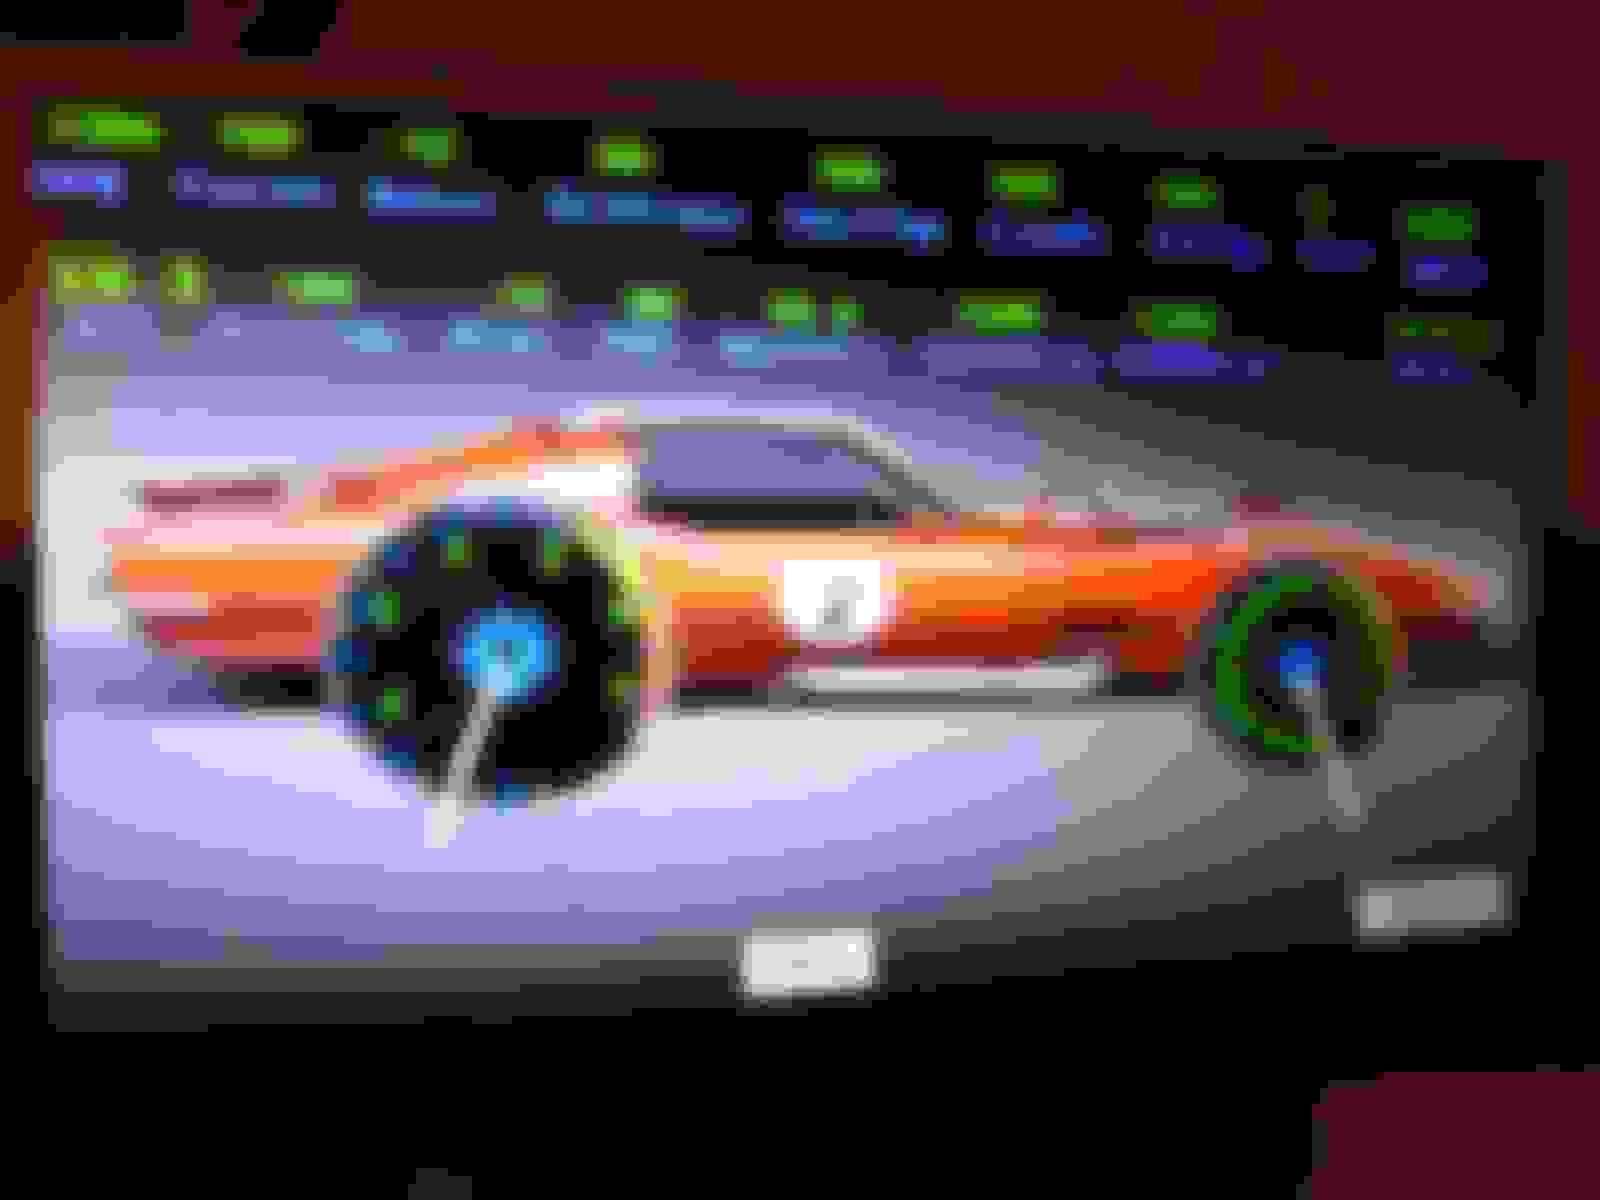
I saw this killer 7" display and thought it would be great for the dash. So I'm playing with it, to see how much more work it will be to integrate this.
Here's what I have so far. It's not attached to the transmission controller yet, the numbers a just a mock up being run by the Arduino.
I pulled some photos off the internet and made them backgrounds for each of the driving modes. If anyone has some nice graphics that they think might look nice as a background, LMK and I can change these easily.
This display allows me to move anything around easily, so if I don't like where any part is, I can mode it around, add other stuff, graphics etc. It's also a touch screen, so I won't need lots of buttons to run this.
The Cruise/Sport mode screen has a bunch of digital info as well as a Tach and Speedo.
The bottom of the screen will graph RPM, boost, A/F.
Hmm, I could plug in the weight of the car and have it calculate HP and graph that too.
The black text on top of the screen is not my dyno run, just part of the background photo of a random dyno sheet. It's a nice target to shoot for..... or maybe surpass.
One more screen for editing things like max RPM for a gear in a particular driving mode, or max boost for a gear, low oil pressure to alarm at, etc. it's a 7" touch screen to make it easy to edit. Settings can be changed on the fly and saved to the arduino non volatile memory so they are remembered after power off.
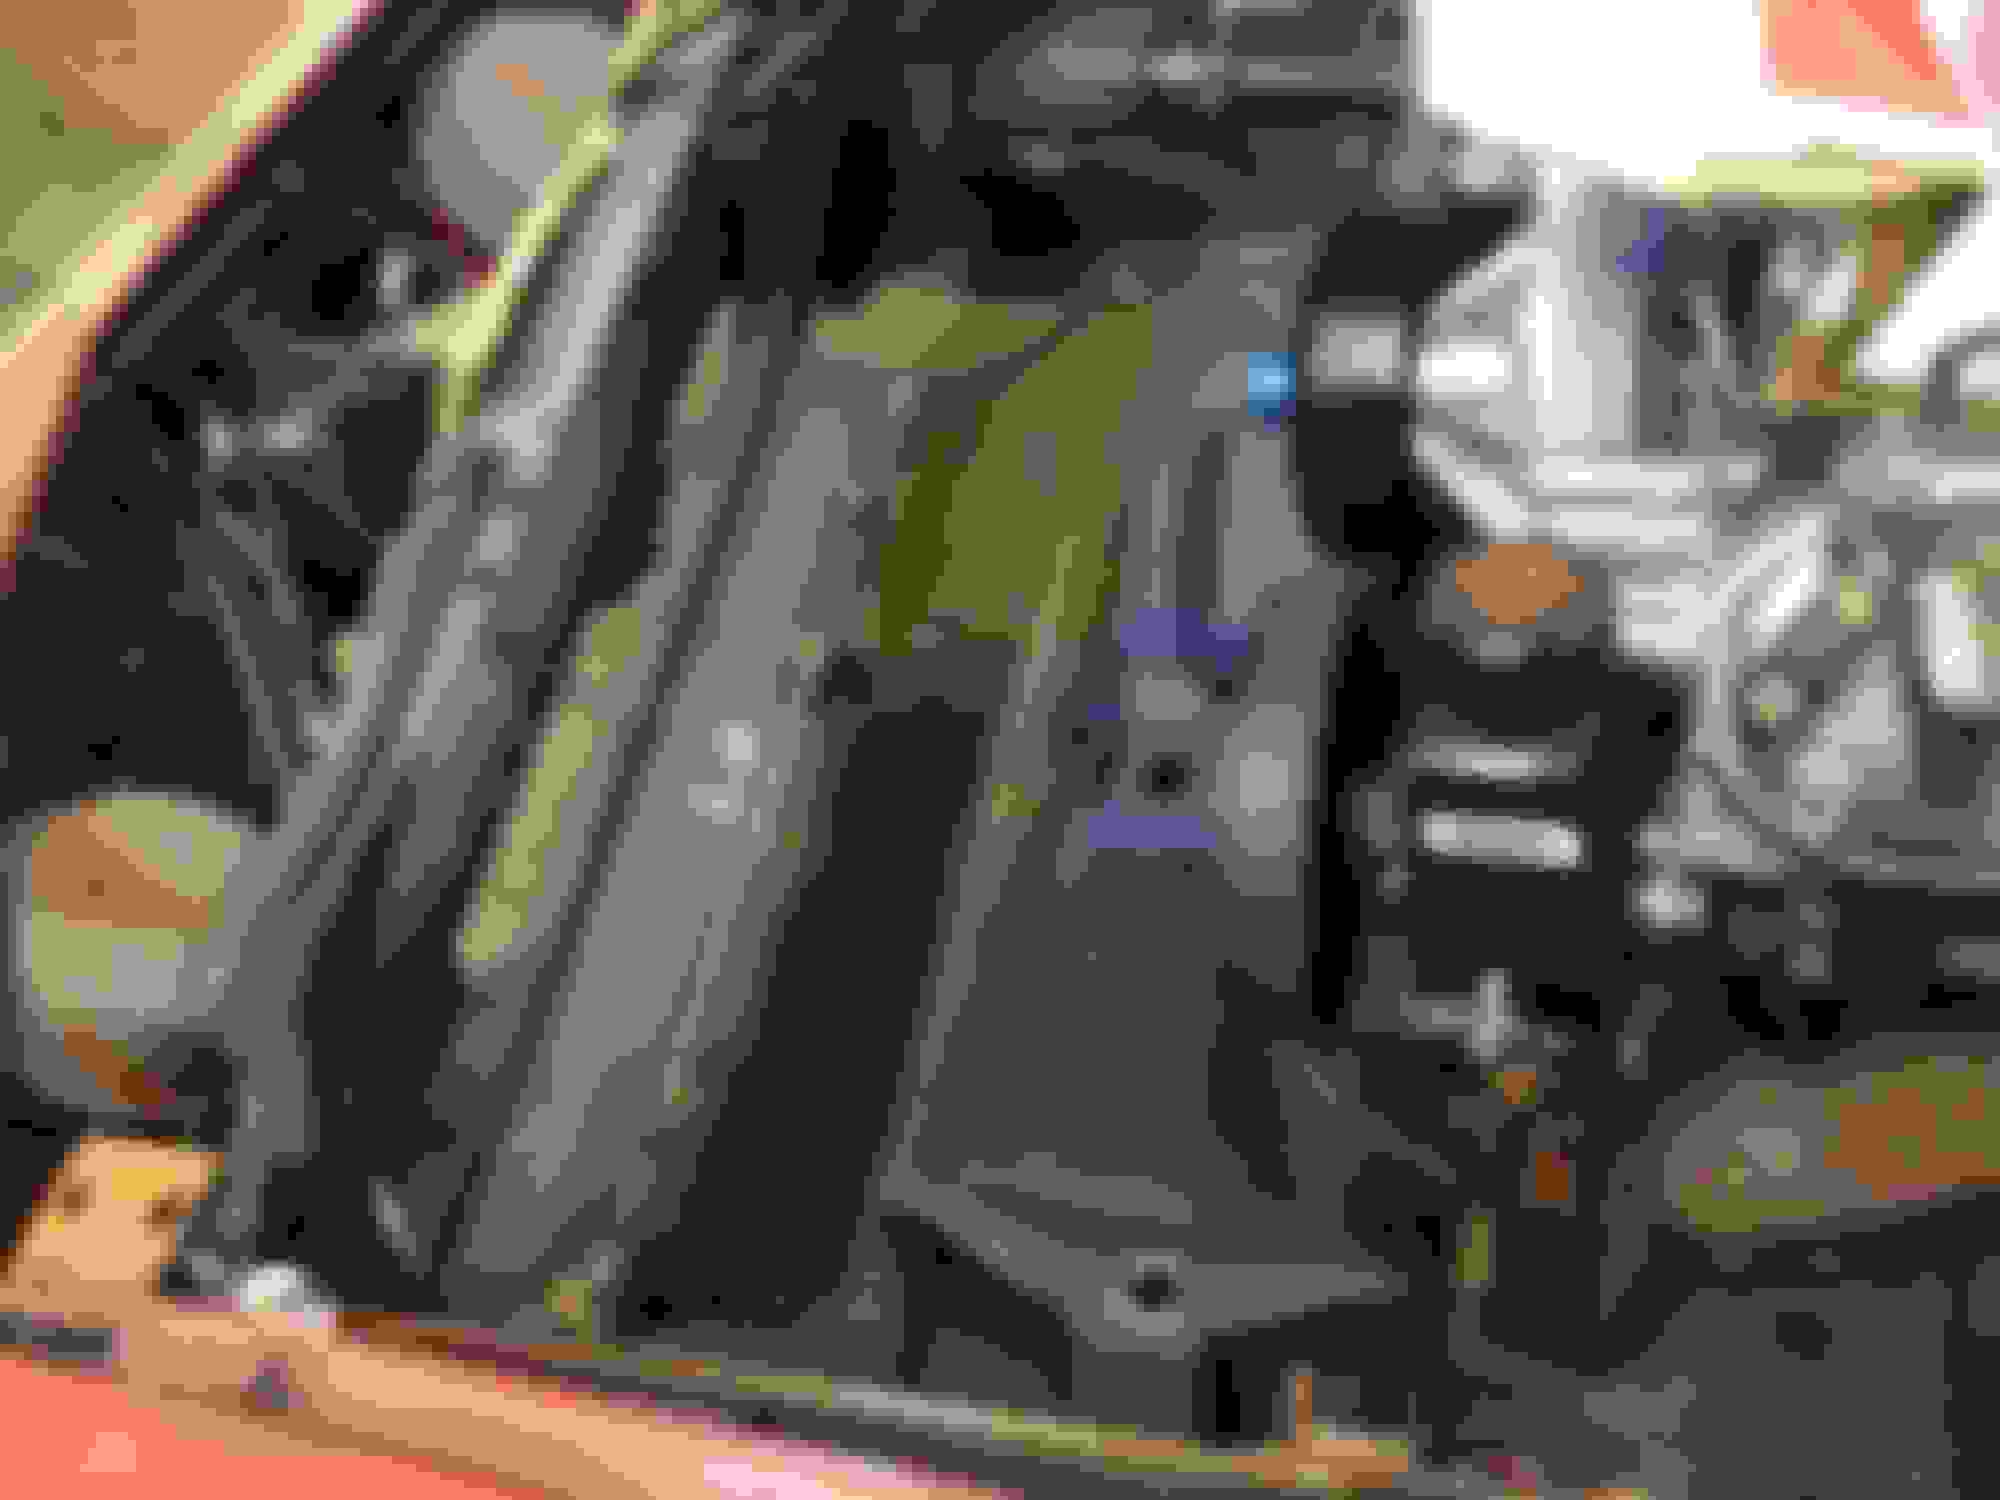
Cleaned up the trans mount.
Took the entire assembly apart and got the chassis powder-coated. My son got me a killer deal on the powder-coat. They blasted the chassis, then a layer of zinc and then a layer of black. came out very thick.
Found an LQ4, 6.0 Liter. Had it freshened up and bored for Forged pistons and Rods.
Cleaned up the valves and seats. installed trunion kit into stock rockers, heavier valve springs, beefier pushrods.
Needless to say, the engine has a higher HP potential than the stock 5.3 did. Injectors are still Siemens 80#.
For the 4l80E, went to a 300M input shaft and billet direct clutch hub, heavier return springs. I had previously already done a dual feed direct, rollerized rear, etc.

 08-05-2016, 08:09 PM