
BMW + 427ci 7.0l + full-on build
 11-26-2017, 09:35 PM
#41
TECH Senior Member


 11-27-2017, 10:08 PM
#43
TECH Senior Member
11-28-2017, 03:25 PM
#44
On The Tree
Thread Starter
iTrader: (1)

Join Date: Apr 2017
Posts: 131
Likes: 0
Received 0 Likes
on
0 Posts
Had to laugh -- first thought was "saying it's higher than other important bits is kind of like saying Barbara Bush is better looking than Janet Reno"....
Not so bad for a track rat I 'spose. I can still remember getting cross-ways up on high alligatored curbs at Texas World Speedway infield track and grinding a flat off of the drain plug on the oil pan of my ITC car a few decades ago. Sounded worse inside the car than it turned out being.
Not so bad for a track rat I 'spose. I can still remember getting cross-ways up on high alligatored curbs at Texas World Speedway infield track and grinding a flat off of the drain plug on the oil pan of my ITC car a few decades ago. Sounded worse inside the car than it turned out being.


 11-28-2017, 04:07 PM
#45
TECH Senior Member
ALWAYS been a firm believer in the KISS principle.....
 12-04-2017, 06:24 PM
#48
On The Tree
Thread Starter
iTrader: (1)
Join Date: Apr 2017
Posts: 131
Likes: 0
Received 0 Likes
on
0 Posts


 12-04-2017, 06:45 PM
#49
My local Advance Auto (Thanks Dee!!!) was happy to let me spend about 45 minutes back in the parts room with the hoses -- bent coat hangers and tape measure in hand. Just a simple cut off of one end allowed a Toyota Corolla hose to work on the upper; the lower was a cut-in-half hose for some 1968 AMC product.
By the way - in almost 50 years of playing with cars and trucks, I've never 1) seen a hose actually fail because the slotted stainless clamp cut into it, and 2) never seen the clamp cut into a hose unless someone over-tightens the hell out of it. The main problem is usually someone trying to force a hose that was too big to start with to seal by continuing to crank on that clamp screw.
Nonetheless, ideal are the 'spring' clamps that maintain their force while allowing things to expand/contract.
01-09-2018, 11:22 AM
#50
On The Tree
Thread Starter
iTrader: (1)
Join Date: Apr 2017
Posts: 131
Likes: 0
Received 0 Likes
on
0 Posts


 01-09-2018, 03:49 PM
#52
TECH Addict
iTrader: (19)
Join Date: Aug 2007
Location: Where the Navy tells me to go
Posts: 2,397
Received 106 Likes
on
88 Posts

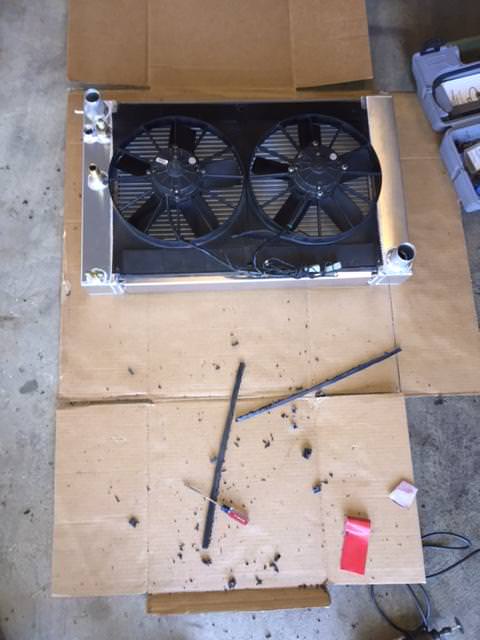
Pretty cool implementation on the fan shroud - can you explain a bit more about what materials you used? Looks like aluminum C-channel to form the outer rim, vertical C-channel ribs for the fan to bolt onto, and then plexiglass across the back? How much distance did you end up with between the fan and the back of the radiator? My understanding is that you need 1" or more of space for the shroud to be worthwhile.
01-09-2018, 05:30 PM
#53
 01-12-2018, 10:51 AM
#54
On The Tree
Thread Starter
iTrader: (1)
Join Date: Apr 2017
Posts: 131
Likes: 0
Received 0 Likes
on
0 Posts
Thank you for your genuine interest - I must caveat my response by stating that my procurement of this vehicle mid-build from a buddy bore out of his necessity to end his effort due to family needs. I had been involved each decision step since we first trailered his �car find� many many years ago. To that end, there were purchases of parts that remained in boxes... 1 of those being this MZ3 radiator- and it�s associated fan and assy from Mishimoto. That�s ~$600 worth of old money spent - and I had to make decision to �make it work� - in lieu of selling all at 50% and buying a street rod or other pre-made Cooling �system�.
After my considerable research (and experience with my other BMW road race car), I decided that any effort beyond pinning a fan to a radiator like most do would be an improvement.
I'm NO Fab guy by trade education or dads help etc... but I�m no dummy so, �how hard can it be� motivation had to drive action.
Yes, U-Channel aluminum material was bought at my walking-distance Lowe�s and I measured twice and cut once - as I learned from a Cracker Jack box in the late �70s!!! The two inner vertical ribs have been sectioned to allow fan to draw air to center section before being dispelled by the moving puller fan.
If pressure differences front/rear fore/aft dictate faster air flow my holes drilled in my �high-temp plexiglass� are there to let straight line air to keep passing the outlet side of the radiator. If I determine I need to slow air down to keep more heat I can make allowances... and if I need air to move more quickly I�ll know that by way of temps logging.
01-12-2018, 12:59 PM
#55
On The Tree
Thread Starter
iTrader: (1)
Join Date: Apr 2017
Posts: 131
Likes: 0
Received 0 Likes
on
0 Posts


 01-12-2018, 01:13 PM
#56
TECH Resident

I'm sure you thought this through based on the rest of your build. If not... some will hang (via rivets) neoprene or other rubber flaps over the holes in the radiator shroud to function as a check valve so air doesn't come in from the engine bay side and out the fan. (path of least resistance)
And some other info:
I built a similar shroud to yours on an $180 2 row Speedway radiator for my '51 truck build. But out of aluminum and welded the shroud in place. I don't have the holes you added on the side, but figured I'd just start with the big hole for the 16" SPAL fan.
I've had sufficient cooling with just that in ambients up to about 100F, including running AC. I think I saw 195F on the freeway @ speed in high ambient temps (100F ish). I'm sure it'd work better with auxiliary holes in that condition.
Obviously, you can add flaps later.
Great work!
Doug
01-12-2018, 01:16 PM
#57
On The Tree
Thread Starter
iTrader: (1)
Join Date: Apr 2017
Posts: 131
Likes: 0
Received 0 Likes
on
0 Posts
New custom made brakes lines spanning from bottom of Tilton Brake Fluid reservoir appear to be leaking... Welp I guess I take everything apart and figure it out - remove new fluid lines etc and test away
Also, my 1 serpentine belt appears to not like staying in groves of ATI damper pulley... it will be awesomely not-awesome if I have to pull that damper and start over :-(
Also, my 1 serpentine belt appears to not like staying in groves of ATI damper pulley... it will be awesomely not-awesome if I have to pull that damper and start over :-(
Last edited by MUL8NO1; 01-12-2018 at 01:17 PM. Reason: Need pics with words eh...
01-12-2018, 01:28 PM
#58
On The Tree
Thread Starter
iTrader: (1)
Join Date: Apr 2017
Posts: 131
Likes: 0
Received 0 Likes
on
0 Posts


I�ve loosened the katech belt tensioner and repositioned the belt on damper - but belt won�t stay aligned in all groves.
Earlier this year I did in fact have a machine shop machine my damper hub down a bit - I think it was .030 not 2-3mm


Last edited by MUL8NO1; 01-12-2018 at 04:27 PM. Reason: Typo
01-12-2018, 02:37 PM
#59
I'm sure you thought this through based on the rest of your build. If not... some will hang (via rivets) neoprene or other rubber flaps over the holes in the radiator shroud to function as a check valve so air doesn't come in from the engine bay side and out the fan. (path of least resistance)
