When you click on links to various merchants on this site and make a purchase, this can result in this site earning a commission. Affiliate programs and affiliations include, but are not limited to, the eBay Partner Network.
So I am starting a build thread for the LQ4 swap I am working on.
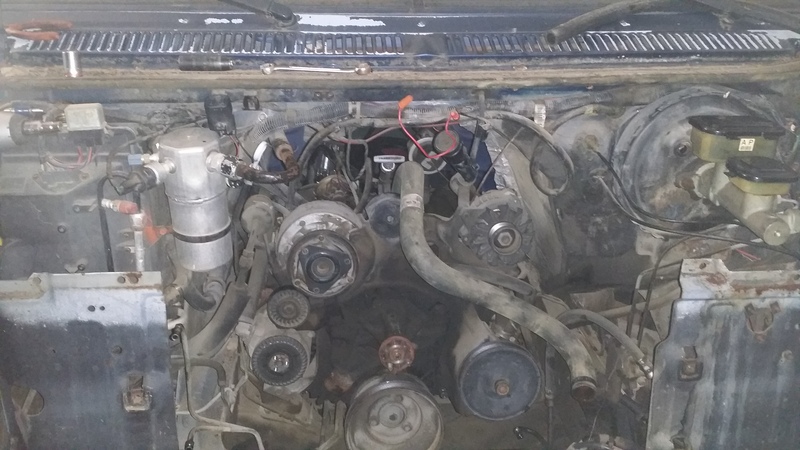
104K mile TBI 305
LQ4 put up a fight but it is in
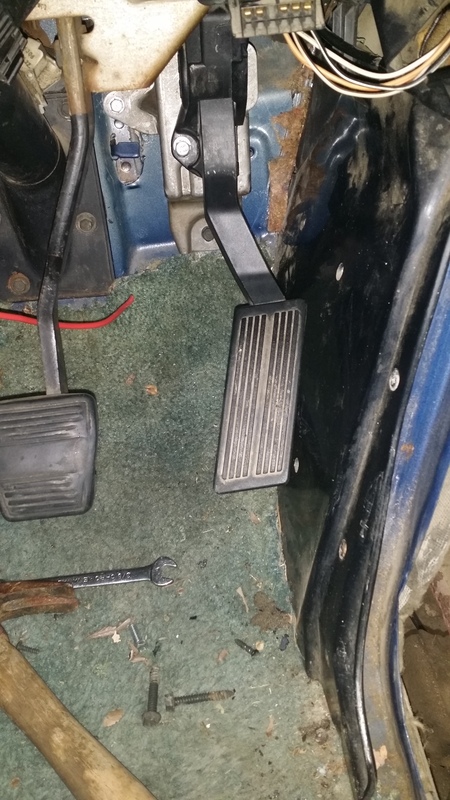
Staying DBW on this one. 2006 Hemi Ram accelerator pedal on a GMT800 firewall bracket and 3 self tapping sheet metal screws later. Looking at the way the Hemi rams APPS voltages are looks like it will work just fine with the GM TAC module after repinning a few wires in the connector.
Now for the fun part. I was going to leave the TH375 in it. However the Transdapt mount adapter plates I had laying around ended up moving the 6.0L bellhousing face forward about 1.5". The TH375 is already sitting as far forward in the crossmember slot as it allows. I measured a 4L80E and bellhousing to mount is 2" longer than the TH375. The overall length is about 1" shorter than the 9" tail TH375. I can swap in the 4L80E I have hanging around with merely a yoke change on the driveshaft and gain OD and lockup as well as electronic control. At this point it makes more sense to swap in the 80E I have sitting in the shop floor instead of buying different engine mounts. It will be interesting to see what kind of highway fuel economy the 6.0L can get in this box on wheels with 3.08 gears and a 0.75 OD. It will turn about 1,800 rpm @ 70 on the 285/60R15s it will have on the back. It will likely get F-Car LT1/LS1 fans and a 4 core stock width radiator. I am deleting the factory engine oil cooler lines. Stock in-radiator cooler should keep the 4L80E plenty cool since it is keeping its stock B82 converter and will not see much towing. I will be adding a momentary push button to add Tow/Haul and the OEM G-Van cruise control switch will be used to activate the cruise. This van already has an electronic speedo in it and the PCM will drive it just fine. Will swap the engine coolant temp sensor with one for a 1998 LS1 Camaro. I also notice the PCM shows to have an output for the oil pressure gauge that is outside the CAN network. I may hookup the OEM gauge to that output and see if it works before adding the stock sender back into place down low. If the PCM will drive the OEM gauge it is one less oil leak source not having a seperate oil pressure sending unit for the gauge.
I did discover the truck manifolds interfere practically everywhere. Hit the frame rail on the passenger side where they kick out at the back and also run directly into the mechanical shift linkage on the driverside. The shift rod is literally right in the middle of the manifold exit. That being said I looked at some CTS-V manifolds a while back and they look like the perfect solution if I can find a set for the right price.
I plan to pickup a set of Lextech accessory brackets for the GMT400 LS swap, move the alternator to the passenger side and high mount the compressor on the driverside and have custom lines made. It is Texas afterall and this thing needs to have functioning A/C.
So far I am
$500 into the van I drove to the shop after a small wiring repair
$350 into the 6.0L with harness and PCM with 90K
$200 in to 4L80E from Pick-A-Part on a clearance weekend. The 6.5 had a rod hanging out of the side of the block at 135K.
Probably $300 into other pieces I had sitting around the shop.
What engine mounts and adapter plates are you using ? Where does the back of the engine flange sit in vs the SBC flange.. can you move the engine up/down and forward any to help clean the exhaust manifolds ?
Keep up the build thread.. I'll be watching this one for sure.
Also.. be careful about using Photobuck for 3rd party hosting of pictures (linking images)... They are now blocking many of there members how and requiring that you now pay membership to allow the 3rd party hosting.
BC
I could play with moving the engine around but I am just going to source manifolds or shorty headers to fit. Not a fan of the truck manifolds anyway. It would have to move further down than I have room to allow. Also the trans crossmember mount is welded into place and cannot move without major surgery. Works out since I had thought of using the 80E.
I have the simple Transdapt mount plates with the OEM 305 mount pads bolted to them.
You cannot go any lower due to the truck pan hitting the crossmember. As it is I have about 1" of clearance minimum.
So the verdict is the set of Speed Engineering shorties they make for a C10 swap WILL fit and work after cutting a couple of tabs off the 4L80E and putting a single good dimple in one of the primaries on the passenger side where it slightly interferes with the unibody frame rail.
One of the guys at work switched direction and is going turbo on his 1971 C10 SWB. Let me take them to see if they would fit.
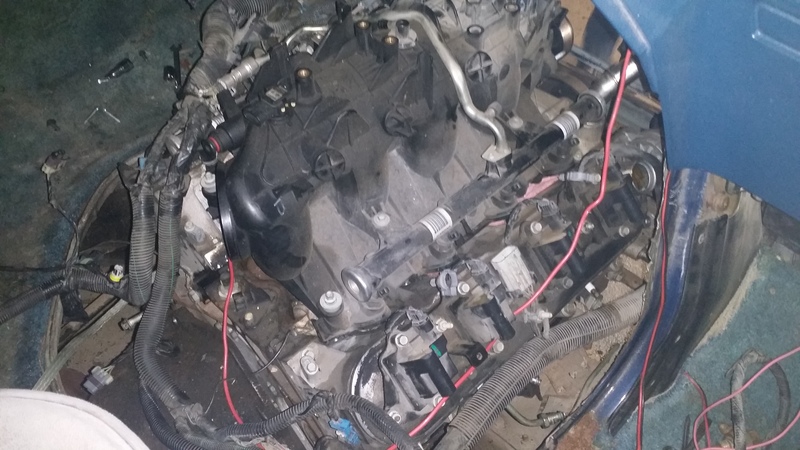
I will pull this engine back out, clean it up, pull the timing cover and replace it, and extract two broken manifold bolts out of the heads before it runs. May also slap the extra Trailblazer SS intake I have laying around on it. Since it is not an all out build will most likely keep the stock 78mm throttle body on it with an adapter plate for now.
I will pull this engine back out, clean it up, pull the timing cover and replace it, and extract two broken manifold bolts out of the heads before it runs. May also slap the extra Trailblazer SS intake I have laying around on it. Since it is not an all out build will most likely keep the stock 78mm throttle body on it with an adapter plate for now.
I have the wiring 90% done. Starting on the fuel and cooling system plumbing next. I have a 02-04 LS6 cam that I am going to run in it. Since I have HP Tuners this will be running a custom SD operating system. I deleted the MAF, rear 02 sensor, canister vent and pressure circuits. The fan relays are wired into the new relay/fuse box underhood along with the compressor cutout relay, the fuel pump relay, and an PCM power relay. I picked up the parts to swap the van over to hydroboost this past weekend as well. Picked a brake pedal, booster and master off a low mileage, clean 1995 G20 TBI 350 van. I will be running a radiator for a 1988 G30 454 that has the same core width and height but is near triple the core depth of the 305 radiator. The 454 radiator has provisions for oil cooler lines so I will be running those as well. A LS1 F-car fan assembly fits it perfectly. Upper hose from the donor truck also fits perfectly. Will also be building a custom air box to seal the air cleaner from radiator and underhood heat. These big old vans have a large gap between the bottem of the hood and the plate that runs across the front. Should be able to draw in plenty of cool air. To simplify the injector wiring will be running a set of stock 8.1 injecotrs I had sitting around too.
Looks interesting. Any other pics? Do you know the aircleaner P/N?
Edit---this ended up a long post and I appologize for restating some of what I said in the last post, but I wanted to elaborate on some details I left out in the previous post.
I do not know the air cleaner part number. It and the 6" to 4" reducer venturi cone are from an Airaid MXP Nissan Titan CAI kit I had no use for after I sold my Titan. I had cut the MAF reducer out of the kit that allowed it to run on the stock tune because I was Uprev tuning the truck. It was worthless to sell to someone without the Uprev tuning package so I had the pieces laying around.
No other pictures yet because I have not stopped with work and projects long enough to take any.
I installed a random GM OBD2 connector I had laying around in place of the OBD1 connector. I had to grind the slot that held it in place slightly larger to fit the OBD1 connector in the dash, but the install looks like it could have come from the factory. Same location as stock so no extra confusion there. I want any Autozone counter kid to be able to pull codes should the need arrive out on the road.
I removed all the rear 02 sensor wiring as well as the MAF wiring, keeping the IAT wiring in the process. I shortened the IAT wiring and added a Vortec 350 IAT connector. I will put a hole directly into the back of the filter to hold it in place. Since I did away with the PCV vent port with the TBSS intake the vent hose will also have a plastic fitting directly into the rubber of the air cleaner.
I dropped the tank, cleaned out the 3 year old gas, and swapped the fuel pump for one meant for a CPI 4.3 Astro van. I changed the fuel filter back by the tank and added the Vette fuel filter/regulator to the end of the metal lines on the frame rail next to the transmission bellhousing. A small pilot hole and a GM self tapping body bolt hold the bracket in place. Will be a single AN line from the filter to the fuel rail.
I have a $22, 90mm 4 bolt intake to 78mm DBW adapter plate so I can skip the $250 X-link for now.
I swapped the TBSS injectors for a set of stock 8.1 injectors I had laying around. The 8.1 injectors fit with no harness changes unlike the TBSS injectors. I also have injector data from a factory returnless 2006 8.1 tune that matches the returnless 2006 6.0Ls data tables.
I am adapting over a random van oil fill tube to connect into an Express van grommet in the Valve cover. I cut the tube and found a Ford van that had a rubber section in the fill tube with the upper section bolted to the firewall and a rubber hose between the two metal portions of the tube. I will be adapting it. The 6.0L truck dipstick is actually long enough that the oil can still be checked without trying to adapt over the Express dipstick tubes that are way too long. The 4L80E will have the simple GM400 6.5 diesel dipstick tube that bolts to the 6.5 intake. With some minor rework the bracket bolts to the 6.0L intake bolt. Will only be able to check the trans fluid with the doghouse off but assuming no leaks, should not be something you often have to mess with.
I am still working out the a/c but it will likely be Lextech brackets, a Vortec 350 compressor and matching a/c manifold with a fitting for the newer a/c pressure transducer with custom hoses into the factory van accumulator side metal fitting and into the factor condenser metal line. I found a nice looking newer style aftermarket parallel flow condenser for $65 that should cool better than the old tube and fin R12 condenser. Will probably charge the system with R152a. I want the a/c in this thing to be as cold as possible since it is a front only system. I love the R152a, works so much better than R134a and is cheaper. My Black on Black leather 2011 M56S 110K untouched R134a system charged with R152a blows 40�F at idle, and 30-36�F even just above idle with the unit on recirculate, high blower on a 100�F day and actually makes your fingers go numb after a while. The temperature variation is caused by the compressor cycling to keep the evaporator from freezing. With R134a almost the instant you started the car the cooling fans would be roaring at the 220 psi turn on for 100% fan duty cycle and the car actually had to be driven to start cooling. With R152a the pressure tops out about 180 psi and the fans run at 65% and it cools noticeably quicker even at idle. For you Dallas people, I get right on 75 after leaving work in rush hour traffic. With R134a it was miserable, with R152a its great.
I picked up a new aluminum radiator with plastic tanks for a 1988 G30 with a 454. It has the same 28x17" core but the core is nearly 3x as thick as the stock 305 radiator and has the driverside engine oil cooler. I have a new GM set of lines for an Express van that I will take to my hose maker 3 doors down from my shop and have them reduced in length using hydraulic hose and crimps in place of the leak prone GM hoses. I mounted the 2002 LS1 F-car fan assembly I picked up for $50 at the boneyard and it fits perfectly. I found a new old stock GM factory auxiliary trans cooler for a 1995 G20 that has the correct mounting points to fit in front of the condensor. Will plumb it inline after the factory radiator cooler to help keep the 4L80E cool. Combined with the factory diesel deep pan and extra fluid it should be plenty of cooling.
I also scored a hydroboost setup and pedal from a low mileage 1995 G20 van in the wrecking yard for $50. Appeared to have actually been recently replaced and was actually dry of fluid externally. Works out since the pump on my 6.0L has the extra return fitting anyway since it was a hydroboost truck. Frees up some valuable firewall space to mount the TAC module and will give me better braking overall than the crappy vacuum booster. Which gives me some future freedom for cam changes when the thing gets a decent converter, deeper gears and LY6/L92 rectangle port heads and intake someday in the future when the power bug bites. I also have a power steering cooler that is in good shape from a GMT400 4x4 that I may try to adapt over knowing I had to add a cooler on my Express after it melted the convulted rubber covering off the pressure line one day after a sustained climb up a mountain with the travel trailer, running 4,000+ rpm for 10-12 miles straight. Coming back down was a little interesting with nearly no power steeing/brake assist and lots of engine braking. RPM coming down was just as high as going up due to the aggressive engine braking of 2nd gear.
As I get further along, after the harmess is finished and loomed, I get the engine back out, clean the engine compartment and engine, swap the heads, cam, timing cover, etc I will get more pictures.
Oh and I have also drawn up and planned the exhaust system on paper. The shorty headers have 2.5" collectors. Because my brother and I may have kids and we have a neice and cousins the van is getting cats. The 6.0L should still be cleaner than the old 305 without them, but the cats we picked up are Thunderbolt 2.5" high flow metallic core race cats. They work well on my Express van. The exhaust will be 2.5" mandrel bends to the cats, at the exit of the cats a pair of Flowmaster reducer cones will be reverse mounted to step the exhaust up to 3" to run to the Magnaflow dual 3" in/single 3.5" out long case muffler we had sitting in the shop from a different project. The tailpipe will be 3.5" on the driverside in the stock location. I figure the exhaust will be hottest amd highest volume after the cats and the extra diameter will not kill low-end performance too much and allow ot to breathe at higher rpms. Should also help kill some of the resonance and drone a smaller pipe helps create. Larger pipes should also help dissapate some extra heat before the muffler to help keep from cooking the muffler under sustained load. GM did the same thing on some of the G-series as well as later Express/Savana vans from the factory. The pipe or pipes coming out of the converter between the converter or converters and muffler are larger than the pipe or pipes going into the converter. For whatever reason GM stepped the pipe diameter up post converter. If it worked for 1000s of stock vans, it will work for me. Just as an example the stock 305 had 2.25" exit manifolds and headpipes, a 2.5" exit at the Y, pellet cat, 3" pipe after the cat to the muffler and dual 2" tail pipes and it was all still factory down to the pellet box cat.
nice swap just got my hands on a 02 LR4 4.8 with trans harness and ecu and was thinking of doing this very swap now that the replacement th350 might be gone after only two weeks any updates or another advice would be nice
Hi,
I'm in the same situation your in with the 4l80e swap in my '88 g30 motorhome. What did you run into? I got the trans in today, but the rear is right up against the body crossmember and the transmission crossmember that bolts to it is hitting the trans oil pan. I get that the crossmember has to be altered but I don't think I really want to cut this "unibody" type mount out maybe just make a trans crossmember out of a 4"x4" square tube and bolt it somehow through the frame. As far as the linkage goes I'm going to try to use the existing just make the rod longer from the front and try to relocate the pivot on the frame. I think I might have to somehow make a different "U" shifter linkage bracket since it doesn't seem to be in the same orientation as the 700r4 that was in there. One item to overcome after another. I hope this is all worth it. Also what are you using for a shift controller? I opted to buy the Compushift Sport.
Have a good one! Look forward to your reply!
-Jon in NH
Figured it out 1988 G30 4l80e retrofit. Lots of fab.
Hi,
I tried to post this awhile ago and for some reason it never got to the board.
Installing this 4l80e turned into quite the project. Little did I know that this would be such an adventure. I found little information on it or pictures of the process. First since the 1988 Chevy G30 van never came with the 4l80e only a TH400 the unibody cross member was in the wrong place. I mean really wrong. The cross member for the tranny bolts to this cross member and since this thing was made into a unibody (Thanks GM) it wasn't just a slide it back and redrill holes kind of thing. It required a spot weld cutter and lots of time. Below is the picture of the cross member removed. Good old Harbor Freight came through on this on for the spot weld cutter. I actually went through about 3 of them to do this. Drill pilot holes first then use some lubricant on the drill bit an go slow and even. I blew the first one up in 3 uses. The next ones lasted much longer. Basically one bit has two saws built in so at $5 it's not too hard on the wallet. 1988 Chevy G30 motorhome unibody crossmember removed and ready to be relocated tor the 4l80e retrofit.
The transmission was installed and frame marked to where the new location would be. The crossmember now was cleaned up and painted with weld through primer. The holes facing forward had the rear seat bolts through them so I had to keep that in mind for this relocation. The seat bolts would still need to be bolted to something other than the floor pan. The resolve was to make some extensions tabs for the bolts that would be welded to the the crossmember.
Then it was back to the RV. The floor pan was cleaned up and all the holes I had made by drilling or using brute force were welded back in and made whole again. The crossmember was then put in to place and transmission was once again bolted to the motor for final test fit before welding the crossmember back into place.
Since everything was looking good the welding back in was done and now the transmission could now be installed and fully supported by the frame of the Chevy G30 van motorhome. That was a huge load off my mind. Now everything else needed to be done. And I mean everything else.
The next step was getting the shift linkage to work. This was way off since the 4L80e's shift point or pivot was back further about 6 inches. I had to cut the original one up to even get an idea of how this would work. I came up with this. Transmission pivot redesign for 4l80e transmission retrofit 1988 Chevy G30 motorhome
This mount bolted into the same mounting holes as the original. That is why it's longer. Plus since the frame had threaded holes it was much more secure. The mount installed is the next pic. I have since painted what I missed here. Shift pivot relocation for 4L80e transmission installed. 1988 Chevy G30 motorhome
It worked out great! I think is shifts better than it has ever done in the past. That was a relief! The shift rod from the column also had to be lengthened. Not a big deal either since it was 3/8" rod. So an extension was made and coupled with a piece of 3/8" black iron pipe. I always knew I kept this "junk" around for a reason.
Oddly GM's original shift shaft bracket seems to be clocked slightly more forward. But it's really a non issue to deal with. You can put a bit of a twist in the arm that goes to the transmission easily. In the end it worked just fine. Extending column shifter linkage in 1988 Chevy G30 motorhome for 4L80e transmission retrofit.
The below pic is the transmission in it's new home. The painted area was were the crossmember was. It had to go backwards about 3". After the transmission was in place I did some measurements and got the drive shaft over to get it shortened. My job was easy there. I just had to do the driving and measurements. It came back and fit perfectly. Thanks Keene Driveline! 1988 Chevy G30 motorhome 4l80e transmission retrofit. Installed with crossmember moved back 3"
Another note here is that I had to get a different tail shaft housing to make my speedo cable work. That was pretty easy it's only 6 bolts, but the instructions say to press the gear onto the output shaft. Well I tried to do it cold and then warm with the oven but I really needed some heat and that made it slide right into place.
Next up is getting the wiring in place. I opted to get a Compushift controller to do the job. The wiring is very straight forward. I located the control module under the seat behind the engine ECU on it's own bracket. The wiring simply passes through the floor just inside of the frame rail. I made up a wiring holder out of a piece of 1 1/4" piece of conduit to keep the wiring in place and out of the way of the shifter.
As I ran the new Nicop trans lines I wanted to put them in a better place yet keep them from getting too hot so a heat shield was fabricated (no I didn't have to bend the curve it was like that already) and installed it in front of the coolant lines to keep the exhaust manifold heat away from them. So far so good. There were some other "L" brackets made too to keep the lines in place and easily accessible in case of failure or replacement. It's a hard pic to take but they are back there.
Below is a pic of one of the new brackets for the trans dipstick. It was the original one from the TH400 that had to be bent a bit to fit. It does work with a bit of encouragement.
The new lines run to the transmission. I really like the AN type fittings and the PTFE lines. Although a bit expensive they look very durable. I think I paid a couple hundred dollars or so for the plumbing fittings and lines. I appear to have a leak in the gasket of the pan though. Looks like that's coming back off soon. Dam! Luckily it has a drain plug. I'll put some gasket sealer on it next time.
This was pretty easy too. The Compushift has an available display. It can also be accessed by Bluetooth. The bluetooth works very well. the display is almost not even needed. It does give lots of information without having to use the cell phone display. Plus, in years to come Bluetooth might become obsolete leaving the display the only way to change settings. Who really knows about how long technology lasts these days.
The Compushift controller fits well under the seat. It has two alignment pins and two screws to hold it in. I wanted it to be very easy to get to in case of problems. This way it can be put into place without having to hold it into position then drive in screws.
Finally the test drive. Most everything seems ok. The transmission shifts like it should at just the right times. You'd never know it wasn't stock. The controller has lots of adjustments to it. I had to input all the usual things like tire size and rear end radio but the shift points can be altered and the lock up converter speed can be adjusted. The only thing I notice is when the torque converter locks in the vehicle seems to be a bit uneven in cruising. I had to replace the pickup coil in the distributor since the motor was somewhat at fault but even by doing that it still is a bit uneven. Much improved though. At least it's drivable.
I'd like to be able to do more with the engine ECU though. I had a guy burn the chip for the larger TBI but it's just not right and I don't think at this point without lots of back and forth in the mail it's going to be. I'm looking at a Holley Sniper set up. At least it would come with an interface that can be altered. I just don't know for sure yet. There is also stuff that can be done to the existing ECU to give it the ability to be flash learned. I don't know much about that or how to edit BIN file or fully even understand all the parameters and how they play off each other yet. Maybe. The Holley is somewhat self learning which would be a place to start I guess. It would be learning experience. Looking at the wiring it looks pretty straight forward. All the GM wring to the ECU could be removed and simplified a bit.
Hope you enjoyed reading this. It was a long project that's almost complete.
Jon,
Just saw your response. Not sure why you had such an issue with your 80E. Bellhousing to mount was less than an inch difference in the 87 TH400 based 3L80 and the 97 6.5 4L80E. I used the stock front location type LS mounts, moving the LS bellhousing 1" forward compared to a SBC. 6.0L and 4L80E bolted right in. Changed the yoke (3L80 used a TH350 sized output shaft) and had the front driveshaft cut down. The 4L80E was about 3" longer from face to tailshaft but the whole trans was moved an inch forward. Going off memory the shaft had to be shortened 2.25". I mocked the shift lever bracket back, drilled small pilot holes and put the OEM self tapping bolts back in. Then adjusted the linkage. I found the plastic bezel on top of the colunn from a GM van with a overdrive trans. P N D 3 2 1 labeled. Then picked up some brass fittings that plumbed the early 4L80E directly to the TH400 cooler lines with some minor bending.
I would have also done what every conversion van manufacturer does with the seat. The take a piece of 1/8" thick plate steel about 2" square, drill a hole threw it and bolt the seat bolts through it. Simple yet effective. Both G20s and my 97 Express were done the same way. Three different companies had such similar brackets I almost think they must come with the aftermarket seats.
I have seen some conversion vans wrecked hard from the front. in the wrecking yards. Seen those plates bend the floor some but never have seen a seat that has come loose.
are you saying there are 4. 2" plates bolt though the same holes as the seat would normalley be bolted to then the the 2" plate is drilled for new seat?
or did you mean to say 2' plate?
also how hard would it be to to swap in a newer electric seat w/ heat in a vehicle that didn't have power seat? thanks
Sorry just saw this response. I mean a 2" square piece of steel. Usually 4 to a seat. The drill the holes straight through the floor, then use the plate as re-enforcement for the floor.

 07-16-2017, 10:41 PM