
Betsy, The '57 210 Belair Wagon LS376/480
 01-08-2018, 11:54 AM
#21
Well, as expected, the pace has slowed now that the holidays are over and only weekends can be used for car stuff. We did get some stuff done, I test fitted a new wheel. The C6 wheels are from an F-body, so the offset was all wrong. Plus, the Brembos were going to require a larger diameter anyway. Basically, that C6 wheel shot was a teaser lol... just using it to roll around on. I bought a wheel to test fit based on my measurements and tried it out on the front and back Saturday. It was just about what I wanted, so I ordered 4 more... gotta have a spare, it's a cruiser! 20X8 with a +40mm offset and 5x4.75 pattern. The hubs will be bored to 70.3mm at the local machine shop where all the blasting is happening.
Speaking of, the bumpers are at the machine shop for blasting. I took a shot at doing some of the smaller chrome pieces in a newly acquired blast cabinet, but I suspect the chrome coming off in flakes may have plugged the blaster... sorry, David! Gonna take more to the shop.
Also, I bolted up the hydroboost master cylinder. It all went together with the bracketry provided, but the freaking reservoir stood a good 3" higher than the fender. I can't find any pics of an installed set-up on a '57, so I tried something: removed the Wilwood bracket and mounted the booster directly to the firewall bracket. The bore of the bracket nearly perfectly matched the OD of the end of the hydro boost housing, so I'm calling it right. After some leveling, it's where I think it should be.
So, progress has slowed a good bit. I'll keep it updated, but likely with more sporadic posts.
 01-09-2018, 06:37 AM
#22
11 Second Club
iTrader: (3)
Join Date: Dec 2004
Location: Coastal Mississippi
Posts: 107
Likes: 0
Received 0 Likes
on
0 Posts

If the blaster is clogged just unscrew the tip and blow out the ceramic nozzle. Might be time to change out the media also. Its pretty contaminated and broken down.
01-15-2018, 07:35 AM
#23
Slow progress. I did a test fit of the front calipers to get some measurements for a bracket to mount them on the 2" lowering spindles. Dimensions were acquired, but I'll be moving them again. Can you see what's wrong with them in the picture? Hint: they're CTS-V front calipers, and that matters (didn't know that going in).


Friday, I dropped off the 5 wheels and 2 rear rotors off for machine work, need the hubs bored to 70.3mm. Also, dropped a bunch of pieces off for blasting to go with the blasted bumpers.
I was supposed to make brake lines and mock all that up on Saturday, but I was delayed with a project on the Hombre that had to happen before this Friday. So with the little time I had left Saturday, we removed the rear suspension (springs and shackles), rear axle and fuel tank to see what we're working with. We knew the spare well was rotted out, since we could drop interior parts out of the car through that part of the floor lol! In question was the upper shock mounts and what was behind the fuel tank.
Turns out it's not awful. That's good news, as it's the difference between $480 and $1250+freight in patch panels. Also, got a feel for what the EFI will look like. I had called Tanks inc and asked why they didn't offer an EFI tank for the wagons, now I know why: plenty of mounting space on the top of the tank, a wedge at the bottom. The guy doing a '57 LSA Nomad did a lowered section where he mounted a pump bucket, but I can't imagine that being on a flat surface on the bottom of the tank. So instead, I'll be doing the external pump with a Holley 12-600. I ordered fittings, a new sender, some hardware and a bunch of odds and ends to go with the new tank.


Meanwhile, the large powder coating oven is coming along. A friend is doing the internal welding, and it doesn't look awful. We have major wiring questions now, as PsychoSid incorrectly said the heating elements were not labeled. They definitely are, and unfortunately, it's 120V. We bought a 240V controller... D'oh! I'll get back to the powdering once the brake lines are fabricated.

Friday, I dropped off the 5 wheels and 2 rear rotors off for machine work, need the hubs bored to 70.3mm. Also, dropped a bunch of pieces off for blasting to go with the blasted bumpers.
I was supposed to make brake lines and mock all that up on Saturday, but I was delayed with a project on the Hombre that had to happen before this Friday. So with the little time I had left Saturday, we removed the rear suspension (springs and shackles), rear axle and fuel tank to see what we're working with. We knew the spare well was rotted out, since we could drop interior parts out of the car through that part of the floor lol! In question was the upper shock mounts and what was behind the fuel tank.
Turns out it's not awful. That's good news, as it's the difference between $480 and $1250+freight in patch panels. Also, got a feel for what the EFI will look like. I had called Tanks inc and asked why they didn't offer an EFI tank for the wagons, now I know why: plenty of mounting space on the top of the tank, a wedge at the bottom. The guy doing a '57 LSA Nomad did a lowered section where he mounted a pump bucket, but I can't imagine that being on a flat surface on the bottom of the tank. So instead, I'll be doing the external pump with a Holley 12-600. I ordered fittings, a new sender, some hardware and a bunch of odds and ends to go with the new tank.
Meanwhile, the large powder coating oven is coming along. A friend is doing the internal welding, and it doesn't look awful. We have major wiring questions now, as PsychoSid incorrectly said the heating elements were not labeled. They definitely are, and unfortunately, it's 120V. We bought a 240V controller... D'oh! I'll get back to the powdering once the brake lines are fabricated.
02-05-2018, 07:34 AM
#24
Time for an update: making progress. In true form, a friend got me going at it hard and fast after a couple weeks of just steady powder coating. So first, lots of powder coating: Bumper pieces (carriage bolts, front bumper guards, bumper brackets), splash guards, internal pieces, a battery tray, internal inspection covers, key hole trim pieces, pretty much any little thing I could separate and bake.


Once we got to touch the car again, big improvements were made. The rear shock towers were removed and replaced, the spare wheel compartment was replaced, and the trans mount supports were cut from the frame.


Yesterday, we started by getting nice and dirty, cleaning out all the surface rust and caked on dirt under the back end. Once that was done, the underside needed a fresh coat of Rustoleum undercoating. After that, install!
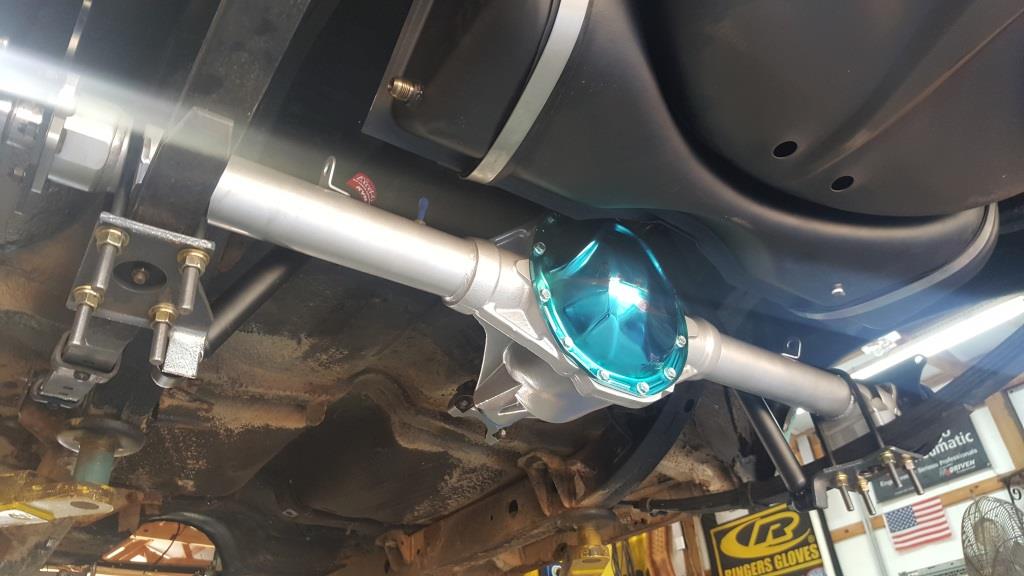
The new tank was modified with a -10AN bung at the bottom to supply the external pump. It also got a -6AN return bung on the other side at the top, and the new level sender was welded closed on the tube after the level sender. New tank straps, new leaf springs, new shackles, new rear end!
Once we got to touch the car again, big improvements were made. The rear shock towers were removed and replaced, the spare wheel compartment was replaced, and the trans mount supports were cut from the frame.
Yesterday, we started by getting nice and dirty, cleaning out all the surface rust and caked on dirt under the back end. Once that was done, the underside needed a fresh coat of Rustoleum undercoating. After that, install!
The new tank was modified with a -10AN bung at the bottom to supply the external pump. It also got a -6AN return bung on the other side at the top, and the new level sender was welded closed on the tube after the level sender. New tank straps, new leaf springs, new shackles, new rear end!
02-05-2018, 07:55 AM
#25
More pictures, including hilarious pictures of the "final stance" with 16" fbody donuts on the back. Looking forward to getting the other wheels back from the machine shop, it barely comes off the lift in this configuration! Also in the background, our new oven. Much closer as far as wiring goes, I believe I remember hearing it's ready for a test fire on a couple elements to make sure it controls.


02-13-2018, 07:16 AM
#27
With the long weekend, some more progress was made. Lots more powder coating, including a couple rear "Vees", the ***** and levers for a new Ididit steering column, rear hatch accent pieces and miscellaneous brackets. The old steering column is out, and while I was in the engine bay, I removed the stock master cylinder bracket to have a look. Sure enough, turns out there are TWO locations where the master cylinder can be located. They're really not close, and the stock booster location doesn't make the other location intuitive. But behind the other hole is one articulating point of the brake pedal. A simple picture included in this pretty expensive piece would have helped avoid a lot of work... oh well.
Otherwise, the progress was all positive. The local machine shop finished modifying the hub bore on the 5 wheels and the rear rotors, and they're working on the blasting of the bumpers so we can powder them. I took some time to delete the front window's vent window and installed the "fuzzy" kit, then installed the new windows. Also, the new wheels and tires are on! Camaro replica wheels in 20x8 with Nitto NT555 G2 in 255/35r20. Since the rotors were here, I was able to install the rear brakes to get a look at the whole package. Glad I went this route, this is just what I was looking for!
Next up is install of the column, install of some sound deadening, removing the dash and some patching holes in the engine bay. And just enough body work to tease my dad into thinking it'll all be done...
P.S. This wheel fitment is brought to you by the letters B, F and H!


 02-26-2018, 07:37 AM
#29
I think last weekend was a little less productive than the one preceding it, but work was done nonetheless. The trunk got a nice cleaning, some rust converter primer, and a bunch of fat mat. The interior will eventually all be fat matted, but it was nice to get a section done and see what the process would be like. Also, I relocated the brake booster, connected it to the pedal, installed the column mount at the firewall, cleaned and primed the engine bay, and installed the rear side windows.
The machine shop finished the blasting, and unfortunately, I couldn't fit it all in our standard oven. Now it's becoming really taxing that my friends won't finish the larger oven, as my bumpers and some interior window framing is currently sitting in bare blasted metal. Great.
I did powder coat what would fit in our currently operational oven. Overall, I'm pleased with the finish. Wish I knew how to clean these blasted (textured) pieces without leaving a bunch of lint on the pieces before coating. If I off-gassed every part, I'd never finish... Thinking of acquiring a small torch to burn off lint after cleaning parts. Either way, more parts are going on.
And the front brakes are becoming a bit of a problem. The two iterations of brake caliper brackets I've test fit provided good information, but it seems almost impossible to put the calipers on the back of the spindle and maintain any decent steering arm angle. I think I may end up putting the calipers on the front of the rotor, progressive Brembo piston size to be ignored.


[img][/img]
The machine shop finished the blasting, and unfortunately, I couldn't fit it all in our standard oven. Now it's becoming really taxing that my friends won't finish the larger oven, as my bumpers and some interior window framing is currently sitting in bare blasted metal. Great.
I did powder coat what would fit in our currently operational oven. Overall, I'm pleased with the finish. Wish I knew how to clean these blasted (textured) pieces without leaving a bunch of lint on the pieces before coating. If I off-gassed every part, I'd never finish... Thinking of acquiring a small torch to burn off lint after cleaning parts. Either way, more parts are going on.
And the front brakes are becoming a bit of a problem. The two iterations of brake caliper brackets I've test fit provided good information, but it seems almost impossible to put the calipers on the back of the spindle and maintain any decent steering arm angle. I think I may end up putting the calipers on the front of the rotor, progressive Brembo piston size to be ignored.
[img][/img]
02-27-2018, 10:53 AM
#31
LOL don't let this guy fool you, he's the only one who does any work on this car. I just tend to hold a flashlight and a cleaning rag while he gets it done.
Hoping to begin routing brake lines and installing the line lock this weekend. The machine shop has the R3 bracket design, and I'll plan to swap the bleeders and crossover tubes to swap the calipers on the front side to side.
Hoping to begin routing brake lines and installing the line lock this weekend. The machine shop has the R3 bracket design, and I'll plan to swap the bleeders and crossover tubes to swap the calipers on the front side to side.
02-27-2018, 02:58 PM
#32
TECH Addict
iTrader: (19)
Join Date: Aug 2007
Location: Where the Navy tells me to go
Posts: 2,397
Received 106 Likes
on
88 Posts
If you swap the bleeders and cross-over tubes, but keep the calipers on the same side of the car they're on originally, then you'll end up with what you want. You'll be able to flip the calipers to the front side of the spindles, have the bleeders up top where they should be, and still have the staggered pistons in the correct orientation relative to rotor rotation.


 03-05-2018, 09:10 AM
#34
What a weekend! Not a lot done on the '57, just really busy. Powder coated 100 cups for a small fund raiser, sold the first '57 wagon, sold the Camaro (and delivered it to Jackson) and a few other miscellaneous things. This was all a long time coming, the yard is much cleaner without the two vehicles back there... and converting metal to cash is a nice trick!
The third iteration of the brake caliper brackets worked well with some minor trimming of two holes on each side. Once they were test fit, I powder coated them and installed the calipers for (hopefully) the last time!
Meanwhile, Sid and I started talking about plans for the trunk. I already knew the battery was going back there, but I hadn't decided where in the trunk. Now, the plan is to put a full floor MDF piece in there with the front 18"-24" used for a pair of 6x9s, a 10" sub, an amp, a cap, the battery tray and a small tool box. So, I gathered some stereo equipment from the attic.
Next is cleaning the remainder of the underside of the car, then coating it and gutting the interior in preparation for some rust repair, fat mat and body wiring.
03-12-2018, 08:01 AM
#35
Seems like now, the work is really just grinding rather than polishing. I ran through a wire wheel Saturday cleaning up the underside of the car. After that, it was pressure washed, then acetone washed and sprayed with rust converting primer and finally undercoating. Also, evicted a previous tenant of the Passenger frame rail. And fully understand why the previous owner had riveted plates in the floorboard in front of the front seats... floor patch panels ordered. Pictures don't make it look very nice, but it's a big difference. Now I feel I can start putting things on the underside, things like brake lines, fuel lines, wiring, etc.


So that took a solid 4 hours. With the rest of the day, I took some small pieces off of the underside and powder coated them. While that was curing, the pump and filters went in. The back frame brace is split in two with a previous owner bolting and then tacking in an angle iron to keep it somewhat steady. I feel like that needs to be replaced... but in the meantime, the pump is mounted on it at the back of the car. This was in an effort to make the -10AN fuel line to the inlet side of the pump. I also pulled out the Magnaflow exhaust kit to see where the fuel lines can go. Basically, not where they are. Well, actually, there's no way to get around it. There's a -10AN bung welded to the bottom of the wagon tank on the Driver's side. That's exactly where the exhaust pipe is supposed to come out when it goes over the axle. So even if I moved the exhaust, any fitting on the fuel tank would be in the way. Sweet, looks like a dumped exhaust for now!


Once that was settled, the master cylinder brake lines received some attention. Three lines flared to get the master cylinder to the line lock, then ran out of time for the day.

Ran out of undercoating this weekend, still need to do the wheel wells and some inside the car. Thanks for restocking, Walmart!

So that took a solid 4 hours. With the rest of the day, I took some small pieces off of the underside and powder coated them. While that was curing, the pump and filters went in. The back frame brace is split in two with a previous owner bolting and then tacking in an angle iron to keep it somewhat steady. I feel like that needs to be replaced... but in the meantime, the pump is mounted on it at the back of the car. This was in an effort to make the -10AN fuel line to the inlet side of the pump. I also pulled out the Magnaflow exhaust kit to see where the fuel lines can go. Basically, not where they are. Well, actually, there's no way to get around it. There's a -10AN bung welded to the bottom of the wagon tank on the Driver's side. That's exactly where the exhaust pipe is supposed to come out when it goes over the axle. So even if I moved the exhaust, any fitting on the fuel tank would be in the way. Sweet, looks like a dumped exhaust for now!
Once that was settled, the master cylinder brake lines received some attention. Three lines flared to get the master cylinder to the line lock, then ran out of time for the day.
Ran out of undercoating this weekend, still need to do the wheel wells and some inside the car. Thanks for restocking, Walmart!
 03-19-2018, 07:41 AM
#37
Thanks!
More progress, hopefully the end of rattle-bombing the underside for now. Floor pan patches came in, and they were powder coated within 24 hours. They don't look that big, but they wouldn't "fit" in the oven for cure. It sure does take a long time for an oven to heat up when the door is open a few inches... Also, all of the front brake lines are formed, and the first line to the back is formed. A wise man once said, "the brake master cylinder is on the body, the brake lines are on the frame." Since I don't care for the spiral brake lines for flex, I present the crazy straw brake line! I ran out of brake line fittings, so a couple lines had to wait until yesterday for flaring. The line lock is located, spots to be welded up are marked, dimensions were taken for a trunk package tray, and the wheel wells were cleaned up, washed, rust-converting primer'd, and undercoated. More stuff ordered.


Public Service Announcement: I suffered a nasty injury doing the wheel wells with the wire wheel. I was prepared with glasses, a bandanna for respiratory protection and ear plugs. Guess I got complacent and didn't use gloves or long sleeves. Well, it kicked and flew, nailed the back of my left hand. You never really appreciate how much that skin stretches in normal use until you have to heal a patch of skin about 1"x2" there. I'll spare y'all a graphic image, but suffice it to say, it's painful. So remember that next time you grab a powered tool... will gloves help if something goes wrong?
More progress, hopefully the end of rattle-bombing the underside for now. Floor pan patches came in, and they were powder coated within 24 hours. They don't look that big, but they wouldn't "fit" in the oven for cure. It sure does take a long time for an oven to heat up when the door is open a few inches... Also, all of the front brake lines are formed, and the first line to the back is formed. A wise man once said, "the brake master cylinder is on the body, the brake lines are on the frame." Since I don't care for the spiral brake lines for flex, I present the crazy straw brake line! I ran out of brake line fittings, so a couple lines had to wait until yesterday for flaring. The line lock is located, spots to be welded up are marked, dimensions were taken for a trunk package tray, and the wheel wells were cleaned up, washed, rust-converting primer'd, and undercoated. More stuff ordered.
Public Service Announcement: I suffered a nasty injury doing the wheel wells with the wire wheel. I was prepared with glasses, a bandanna for respiratory protection and ear plugs. Guess I got complacent and didn't use gloves or long sleeves. Well, it kicked and flew, nailed the back of my left hand. You never really appreciate how much that skin stretches in normal use until you have to heal a patch of skin about 1"x2" there. I'll spare y'all a graphic image, but suffice it to say, it's painful. So remember that next time you grab a powered tool... will gloves help if something goes wrong?
03-26-2018, 08:11 AM
#38
The project seems to be turning a corner, more stuff goes on/in than comes out. This weekend, I bent, flared, clamped and installed the lines for the rear brakes. I had a braided flex line left over from my Hombre that I used for the flex line between the frame and axle, feels great to find parts laying around that work! The brakes would be buttoned up, but I need four (4) 3/16 to 1/4 flare nut adapters for the connection between the hard lines and the rubber lines I bought for all the calipers. Those are on order, hopefully I can bleed the brakes as early as next Monday. Talk about putting the cart before the horse...


Generally, work was a little slow as I did a lot of powder coating for various other purposes... an intake for a local guy, some cups for the kid and the wife, and miscellaneous brackets. Not a bad thing, just time consuming. Meanwhile, Sean got the 8 elements wired on the big oven on a junction and tested the controller to 250... heats up, and controls! Looks like she's ready, and I'll be aiming to do my bumpers soon!


Also, the 6an supply and return lines are installed and secured. Not sure where I'll put the regulator yet, so there's extra length in there. Without the AC in there, I'm reluctant to commit to a spot on the passenger fender. But really, that's where I'm gravitating.

Took more of the dash out, powder coating pieces as they come off. The glove box is a nice example of what that will be, satin black. Looks almost vinyl wrapped.


Generally, work was a little slow as I did a lot of powder coating for various other purposes... an intake for a local guy, some cups for the kid and the wife, and miscellaneous brackets. Not a bad thing, just time consuming. Meanwhile, Sean got the 8 elements wired on the big oven on a junction and tested the controller to 250... heats up, and controls! Looks like she's ready, and I'll be aiming to do my bumpers soon!
Also, the 6an supply and return lines are installed and secured. Not sure where I'll put the regulator yet, so there's extra length in there. Without the AC in there, I'm reluctant to commit to a spot on the passenger fender. But really, that's where I'm gravitating.
Took more of the dash out, powder coating pieces as they come off. The glove box is a nice example of what that will be, satin black. Looks almost vinyl wrapped.
04-03-2018, 07:30 AM
#39
This last weekend was full of pleasant surprises, disappointment and expensive lessons. While at the shop doing some powder coating and interior removal, I decided to "throw" the beauty covers on. They're fabricated pieces I got on eBay, and I did a little custom powdering to make them really pop... should have been 4 bolts to go on. Well, not exactly... spent several hours spacing, trimming and finally installing. Looking pretty good!


Also, the dash is welded in from the factory. Wish I had looked that up first... 30 spot welds, and they're not really accessible with the windshield in. Basically, is it worth the climb to powder coat the dash in satin black? Nope, rattle can does pretty well with that. So, time savings, but a little disappointed.

Then yesterday, I had a plan to tie up more loose ends. However, locospl stopped by as promised, and convinced me to abandon that plan to cut the frame for the AC and mock up the motor/trans. As we tried to throw the engine and trans in, we discovered we had to keep taking things off to get it in... beauty covers, headers, transmission... now I know lol! Also, I had purchased an Alan Grove LS3 low mount bracket that Vintage Air says is what they offer for their 57 Gen IV kit. Bullsh**, no way that fits. No. Way.


Then, more disappointment. The hydroboost that I spent so much on, the one that gains a whole bunch of space? So tight to the driver's side valve cover that I can't even use the stock coil bracket, much less the beauty covers I spent so much time on. Awesome. I've ordered Holley valve covers in the hopes that the coils mounted directly to the valve cover will save me, and will relegate the beauty covers to wall art.

But there were some pleasant rewards to installing the engine and trans... the engine mounts are in the right place, that's pretty nice! Also, after everything was taken off and the trans was reinstalled under the car, we located the trans crossmember and he welded in the brackets. Further, despite what I expected, the header on the driver side fits pretty well around the steering linkage! That's a Hooker header with a Unisteer rack and pinion on BRP hotrod mounts... wow! I may have spoken too soon, still have to put the Ididit column in, but looking promising!


And on the way home, I got pulled over about a mile from home. Ran a stop sign. He asked why, I said I was anxious to get back home to the wife and kid after a long day. He says that's no excuse. Sweet lol!
Also, the dash is welded in from the factory. Wish I had looked that up first... 30 spot welds, and they're not really accessible with the windshield in. Basically, is it worth the climb to powder coat the dash in satin black? Nope, rattle can does pretty well with that. So, time savings, but a little disappointed.
Then yesterday, I had a plan to tie up more loose ends. However, locospl stopped by as promised, and convinced me to abandon that plan to cut the frame for the AC and mock up the motor/trans. As we tried to throw the engine and trans in, we discovered we had to keep taking things off to get it in... beauty covers, headers, transmission... now I know lol! Also, I had purchased an Alan Grove LS3 low mount bracket that Vintage Air says is what they offer for their 57 Gen IV kit. Bullsh**, no way that fits. No. Way.
Then, more disappointment. The hydroboost that I spent so much on, the one that gains a whole bunch of space? So tight to the driver's side valve cover that I can't even use the stock coil bracket, much less the beauty covers I spent so much time on. Awesome. I've ordered Holley valve covers in the hopes that the coils mounted directly to the valve cover will save me, and will relegate the beauty covers to wall art.
But there were some pleasant rewards to installing the engine and trans... the engine mounts are in the right place, that's pretty nice! Also, after everything was taken off and the trans was reinstalled under the car, we located the trans crossmember and he welded in the brackets. Further, despite what I expected, the header on the driver side fits pretty well around the steering linkage! That's a Hooker header with a Unisteer rack and pinion on BRP hotrod mounts... wow! I may have spoken too soon, still have to put the Ididit column in, but looking promising!
And on the way home, I got pulled over about a mile from home. Ran a stop sign. He asked why, I said I was anxious to get back home to the wife and kid after a long day. He says that's no excuse. Sweet lol!
04-09-2018, 08:06 AM
#40
This week, had to take a little break to raise some funds... I had a short block with 20k miles on CL, and a woman called me asking if I'd install it in her '02 Z28. She suspected major damage after she went to pass someone and instantly heard a major clunking. We agreed to throw my short block in place and agreed on some car-part-money/labor with a contingency that if more than the short block needed replacement, we'd be there. Well, yeah, I'd say it's necessary. As far as we can tell, her 70K-mile "baby" has seen maybe 1 or 2 oil changes in the last few years. #6 didn't like that. PSA: change your danged oil on the regular, everyone.


Meanwhile, it's not like I completely ignored the 57. I bought some Holley valve covers in a hail-mary move to clear the freaking hydroboost. I had no experience with those covers, and don't know anyone who has them... but they just looked like they would clear by eliminating the coil bracket. Sure enough, they fit! The last two coils on the driver side can't be installed with the cover, they have to be installed after the cover is on... but it fits! Also bought a high mount AC compressor bracket and powder coated it. Not installed, but ready for install.


And we had to roll it out of the shop for a minute, so Betsy got a little sun for the first time in months. Looking good! Well, not really, but... lol! Father in-law in the background, thanks for tolerating all of this!

Meanwhile, it's not like I completely ignored the 57. I bought some Holley valve covers in a hail-mary move to clear the freaking hydroboost. I had no experience with those covers, and don't know anyone who has them... but they just looked like they would clear by eliminating the coil bracket. Sure enough, they fit! The last two coils on the driver side can't be installed with the cover, they have to be installed after the cover is on... but it fits! Also bought a high mount AC compressor bracket and powder coated it. Not installed, but ready for install.
And we had to roll it out of the shop for a minute, so Betsy got a little sun for the first time in months. Looking good! Well, not really, but... lol! Father in-law in the background, thanks for tolerating all of this!