
My LS1 E36 BMW 357i
 09-24-2007, 01:19 PM
#41
TECH Regular

Join Date: Jul 2004
Posts: 419
Likes: 0
Received 0 Likes
on
0 Posts
awesome swap.
highly doubt you can use the oem bmw clutch master cylinder, but cool if you can.
more pics!
congrats on scoring so many parts off that original LS1 swap car (that wrecked), man that thing was amazing.
big props on making things work the right way and hurry up isnt school back in session!??!? lol...
 09-24-2007, 03:13 PM
#42
You can use the OEM clutch master cylinder it has a 3/4" bore. I used a spacer on the throw out bearing on my LS7 clutch.
http://forums.bimmerforums.com/forum...d.php?t=655818
It works just fine
http://forums.bimmerforums.com/forum...d.php?t=655818
It works just fine
 09-25-2007, 11:10 AM
#44
On The Tree
Thread Starter
iTrader: (2)
Join Date: Dec 2005
Location: Dublin, VA
Posts: 139
Likes: 0
Received 0 Likes
on
0 Posts

Originally Posted by owen v8litew8
hurry up isnt school back in session!??!? lol...
Anything in particular would you like to see pictures of?
 09-25-2007, 02:23 PM
#46
Teching In

Join Date: Nov 2006
Posts: 9
Likes: 0
Received 0 Likes
on
0 Posts
What are you doing spacing the throw out bearing off the bell housing if so how much by. How much of a gap are you aiming for between the bearing and clutch.
Also do you know the thickness of the aluminum plate you used doing the oil pan and did you need to used a certain grade regards ian...
Also do you know the thickness of the aluminum plate you used doing the oil pan and did you need to used a certain grade regards ian...
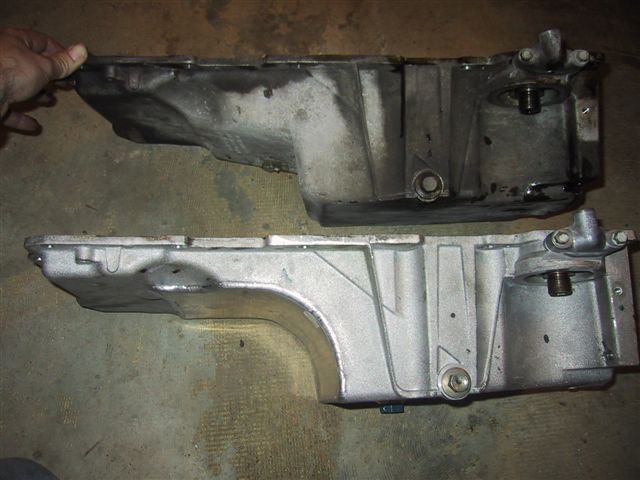
09-25-2007, 03:27 PM
#47
We used 5052 aluminum plate, 5mm thick from www.misumiusa.com to cut and patch our 2004 GTO oil pan. Our welder pre-heated the pan and patch, and used 3/32 5356 TIG rod. Welds were 3/16 to 1/4", outside only. The pan distorted about .07 at each end (ends bent downwards). When we bolted it up to the oil pan rail on the bottom of the block, it flattened out nicely. I would expect that thermal cycling cold-hot-cold from driving will relieve the pan stress after a while. If we did it again, we'd use 1/8" alum, which would be a little thinner than the @ 4mm thick cast A356 pan. The pan patch was the only thing we subbed out.
Garret & Steve almost done with E30-LS1 swap aka 357is
Garret & Steve almost done with E30-LS1 swap aka 357is
09-26-2007, 11:28 AM
#48
Great thread & nice work on the project. I'd like to know how you are adapting the driveshaft to the diff? I read through all posts & didn't see anything about it. I think your car uses a similar diff to the one in the E34 I'm converting. I'm considering adapting in a large case LSD since mine is a medium case open 4.10. I believe the input flanges are the same or similar.
Thanks.
Thanks.
09-26-2007, 04:08 PM
#49
On The Tree
Thread Starter
iTrader: (2)
Join Date: Dec 2005
Location: Dublin, VA
Posts: 139
Likes: 0
Received 0 Likes
on
0 Posts
Originally Posted by blown ls1 bmw
What are you doing spacing the throw out bearing off the bell housing if so how much by. How much of a gap are you aiming for between the bearing and clutch.
Also do you know the thickness of the aluminum plate you used doing the oil pan and did you need to used a certain grade regards ian...
Also do you know the thickness of the aluminum plate you used doing the oil pan and did you need to used a certain grade regards ian...
I didn't do the pan mod so I'm not much help there.
Oh as far as mating to the diff. In the parts I bought were a driveshaft and a macined adapter ring. The adapter ring is about 1" thick and adapts from the BMW to some other bolt pattern. It is made well but personally I don't really like the added rotating mass (so I haven't mentioned). It does fit so I'll use it. For now anyway.
I think Jags that run sells a flange that may fit.
09-27-2007, 01:45 AM
#51
Teching In

Join Date: Dec 2005
Posts: 13
Likes: 0
Received 0 Likes
on
0 Posts
Yep, I'm using the JTR flange adapter on the rear and their front yoke that uses "U-bolts" on the U-joint so that I can drop the front of the drive shaft in order to get the drive shaft in and out. I'm using a Posi Diff out of a 540i
Of course, I'm putting the LS6/T56 into a E30, not an E36. I didn't like the front suspension so it is all C5 Corvette and custom Upper control arms in the front. Once we decided to run the C5 steering rack to minimize bump steer, we ended up building 8" fender flares on each corner. The rears are done, but the front air dam and fender flares are only about half way done.
Of course, I'm putting the LS6/T56 into a E30, not an E36. I didn't like the front suspension so it is all C5 Corvette and custom Upper control arms in the front. Once we decided to run the C5 steering rack to minimize bump steer, we ended up building 8" fender flares on each corner. The rears are done, but the front air dam and fender flares are only about half way done.
09-27-2007, 01:12 PM
#53
Launching!
iTrader: (2)
Join Date: Oct 2002
Location: Indy, IN
Posts: 230
Likes: 0
Received 0 Likes
on
0 Posts
Originally Posted by C5stein
Yep, I'm using the JTR flange adapter on the rear and their front yoke that uses "U-bolts" on the U-joint so that I can drop the front of the drive shaft in order to get the drive shaft in and out. I'm using a Posi Diff out of a 540i
Of course, I'm putting the LS6/T56 into a E30, not an E36. I didn't like the front suspension so it is all C5 Corvette and custom Upper control arms in the front. Once we decided to run the C5 steering rack to minimize bump steer, we ended up building 8" fender flares on each corner. The rears are done, but the front air dam and fender flares are only about half way done.
Of course, I'm putting the LS6/T56 into a E30, not an E36. I didn't like the front suspension so it is all C5 Corvette and custom Upper control arms in the front. Once we decided to run the C5 steering rack to minimize bump steer, we ended up building 8" fender flares on each corner. The rears are done, but the front air dam and fender flares are only about half way done.
 But where are the pics !!! Or Links !!
Thanks..
10-07-2007, 09:34 AM
#56
On The Tree
Thread Starter
iTrader: (2)
Join Date: Dec 2005
Location: Dublin, VA
Posts: 139
Likes: 0
Received 0 Likes
on
0 Posts
Ok I looked into the shimming issue and it looked to me to be more necessary when putting in an aftermarket clutch. I'm using the OEM so I thought I'd give it a shot. I put the motor back in and bled the clutch (my remote bleeder components worked just fine). According to my assistant the clutch was halfway down when it released (I was under the car trurning the drive shaft). So I think I'm ok.
Anyway I have the engine back in the car for hopefully the LAST time. I'm hoping in a week or two to take it for a drive though I'll still have some rear diff work to do.
If you are wondering I did paint the heater lines black.
Oh and did I have post a pic of the plug I used for the skip shift solenoid hole? If so this is a repeat. I didn't find much on the board about removing the skip shift solenoid. I sure didn't want that useless dead weight on there. After much searching for a bolt or plug the right size and finding nothing. I ended up with a drain plug that is almost too short. I can only get about one thread engaged without using a crush washer. It's only a plug and supports no load so I sealed it with silicone gasket maker instead of a crushwasher. The silicone should also help ensure that it won't back out.
Last edited by Thaniel; 10-07-2007 at 09:40 AM. Reason: didn't get pictures attached
10-07-2007, 06:03 PM
#58
Member Schitzo in my build thread linked the Rockford catalog here. For my 750 diff, PN R2-2-3101, which is for a Jeep CV conversion, looks to be as close to a perfect fit as I will find:
Exact matches-
3.914 pilot
6 holes
3.375" bolt circle
Difference-
Bolt holes are .328 (8mm ?), not .393 (10mm)
Last edited by V8 Supra Builder; 10-14-2007 at 08:46 AM. Reason: Removed old info, added relevant info
10-14-2007, 02:06 AM
#59

Is the engine moved more forward (for stock shifter location)?
Is the engine lower than Collins kit (for brake booster clearance)?
10-14-2007, 02:38 PM
#60
On The Tree
Thread Starter
iTrader: (2)
Join Date: Dec 2005
Location: Dublin, VA
Posts: 139
Likes: 0
Received 0 Likes
on
0 Posts
I'm unsure of the for and aft placement in comparrison to what i have. based on what I've seen for shifter cut outs both have to be pretty close to the same. Maybe 1/2" or something different? If anyone with the collins kit wants to measure somewhere I can measure and compare.
Looking at it the same engine placement might be possible with some modification to the cross member instead of the oil pan. I've attached some pics showing the engine to cross member height.
Oh further project update. Did a marathon work on the car saturday. Engine bay is pretty much all done (-A/C, coolant overflow and charcoal canister). Need to add the head lights and bumper to the front. I also need to install a muffler. Nonetheless I took it for a drive today anyway. Sounds really mean with no muffler
 Took the whole family for the ride. You can't see them in the picture but my kids are in the back. Quick and family friendly.
So far the only problems I've found so far is one heat shield rattle, the e-fan makes some noise and the Tach is off. The MPG gauge even reads but I'm sure the reading is wrong (will need a signal converter to correct).
Last edited by Thaniel; 10-14-2007 at 02:43 PM.

