
Mark's LS1 2nd Gen Camaro build
 03-08-2009, 11:12 PM
#61
11 Second Club
Thread Starter
Join Date: Mar 2008
Location: New Westminster, B.C., Canada
Posts: 445
Likes: 0
Received 1 Like
on
1 Post

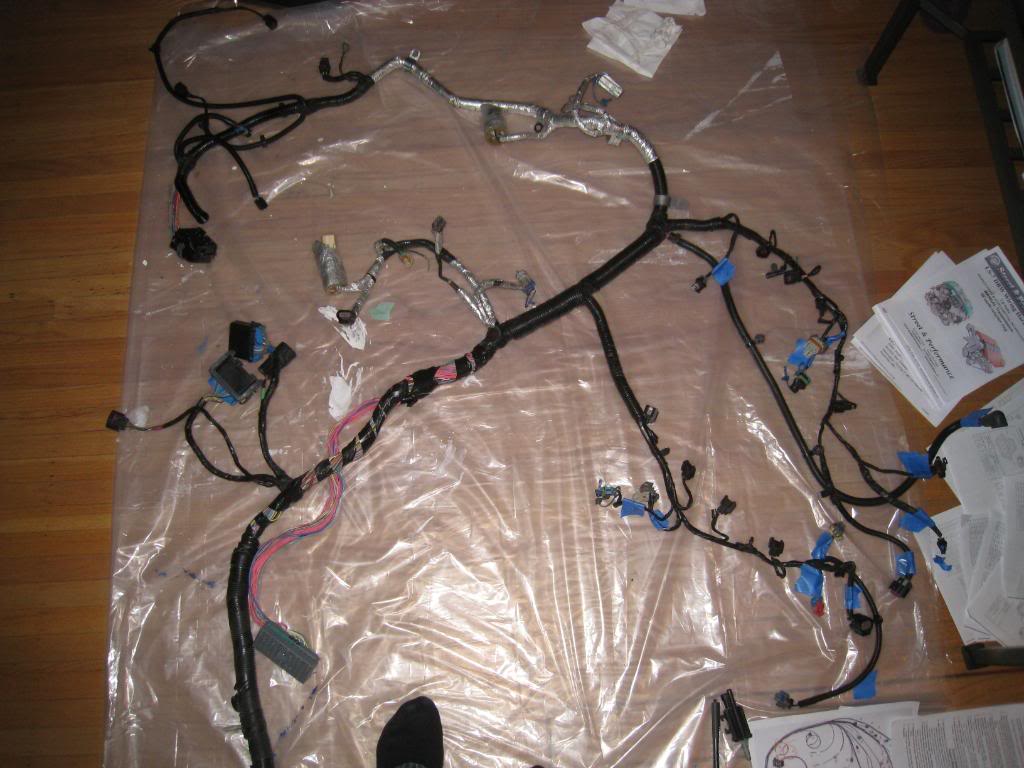
Ok, I've been putting this daunting task off as long as I could. Time to convert my engine harness so that I can get this thing running.
Step 1. Collect as much information as possible. I found a wiring diagram/manual online and downloaded and printed as much of it off as I thought neccessary. Also found a manual for an aftermarket harness so that I could see what is used after all is said and done.
http://www.ls2.com/forums/showthread...hreadid=405808
http://www.hotrodlane.cc/PDFFILES/squireLS7.pdf
Step 2. Lay out the harness on the livingroom floor (sorry Jenn)
Step 3. Label as much of it as possible. I went as far as to use the aftermarket instruction sheet and use their item numbers on the labels, thinking that at the end of this it will make more sense.
Last edited by Marktainium; 09-26-2012 at 07:44 PM.
 03-09-2009, 06:27 PM
#63
Staging Lane

Join Date: Mar 2002
Location: South of the Mason-Dixon
Posts: 91
Likes: 0
Received 0 Likes
on
0 Posts
The connector you asked me about, can you get me a close up so I can see the detail. I'm still looking but A little more information might help. I can give you the wiring for any "Cxxx" connector but gray and a bolt in it is still vague.
Elmer
Elmer
03-09-2009, 06:54 PM
#65
Staging Lane
Join Date: Mar 2002
Location: South of the Mason-Dixon
Posts: 91
Likes: 0
Received 0 Likes
on
0 Posts
That looks like a fuse block # C1, C2, or C3.
Let me see if I can get a picture to post on LS2 for you.
Elmer
Let me see if I can get a picture to post on LS2 for you.
Elmer
Last edited by eboggs_jkvl; 03-09-2009 at 07:00 PM.
03-09-2009, 07:17 PM
#66
Staging Lane
Join Date: Mar 2002
Location: South of the Mason-Dixon
Posts: 91
Likes: 0
Received 0 Likes
on
0 Posts
How's this? It looks very similar to your close up picture.
http://www.ls2.com/forums/showthread...1#post11285111
Elmer
http://www.ls2.com/forums/showthread...1#post11285111
Elmer
03-09-2009, 07:23 PM
#67
11 Second Club
Thread Starter
Join Date: Mar 2008
Location: New Westminster, B.C., Canada
Posts: 445
Likes: 0
Received 1 Like
on
1 Post
I think you are right, now I just need to figure out which one it is, and where the wires go. Pretty sure one of them is a crank wire, found a heavy purple wire on one corner.
Awesome! found it, it was fuse block C2. That connection has alot of my needed 'stand-alone' wires in it. Thanks so much for your help! Here it is.
http://www.ls2.com/boggs/c6/Fuseblockc1c2c3.htm
Awesome! found it, it was fuse block C2. That connection has alot of my needed 'stand-alone' wires in it. Thanks so much for your help! Here it is.
http://www.ls2.com/boggs/c6/Fuseblockc1c2c3.htm
Last edited by Marktainium; 03-09-2009 at 07:44 PM.
03-09-2009, 11:26 PM
#68
Teching In
Nice work man looking good, i just finish my stand alone harness check my build.
http://67-72chevytrucks.com/vboard/s...d.php?t=316140
Thanks
http://67-72chevytrucks.com/vboard/s...d.php?t=316140
Thanks
03-10-2009, 12:12 AM
#69
11 Second Club
Thread Starter
Join Date: Mar 2008
Location: New Westminster, B.C., Canada
Posts: 445
Likes: 0
Received 1 Like
on
1 Post
jml, where did you get those fuse blocks? You did exactly what I am doing with the harness. Glad to see that it wasn't as bad as it looks like when you start!
 03-10-2009, 06:24 PM
#71
Teching In
03-11-2009, 10:26 PM
#72
11 Second Club
Thread Starter
Join Date: Mar 2008
Location: New Westminster, B.C., Canada
Posts: 445
Likes: 0
Received 1 Like
on
1 Post
Again drifitng away from my wiring... At least I got something done!
Here's a cheap way to replace your Vaccuum Brake Booster with a Hydro-Boost booster. Or at least thats what I am hoping.
So I want to use hydro-boost power brakes so I don't need to be concerned with a lack of vaccuum because of my engine being super-charged. Not only that, the Hydro-Boost just seems to me to be a better idea.
I could have bought an aftermarket kit for $$$ but I'm all about building it myself, so here's what I have found.
I found that Astro / Safari vans run a hydro boost system, that looks very similar to the aftermarket systems. I went to the wrecker, did some snooping, and found that pre-95 boosters have a flat mounting flange on them. The newer ones are recessed into the firewall on an angle, which may have worked if the bracket was flipped around, but I felt that the flat bracket would give me more options in case I had to fab something up. Paid $45 for it.
Took the master cylinder and vaccuum booster off of my car and started thinking.
Here's what I did.
Step 1. Remove booster bracket from booster by grinding off rivet heads and prying off.
Step 2. Using a die grinder, elongate the rivet holes towards the center of the bracket by 1/4 inch.
Step 3. Loosely attach the brackets to the new booster and cut the excess stud off.
Step 4. Bolt the assembly back onto the firewall and then tighten the bracket to booster bolts. This will assure that the brackets are positioned properly.
Step 5. Re-attach the master cylinder.
Thats all I had time to do so far, here's some pics...
I'm looking into a different master cylinder, I'm not happy with the hood to cylinder clearance. I'll address the pushrod length and plumbing later.
03-16-2009, 11:57 PM
#73
Awesome idea, but will the super-angled setup look wonky? I always thought the very-angled setups looked strange.
That is the exact same booster that I have. The rectangular mounting plate with the 4 studs is attached to the hydro-boost by being sandwiched by a nut and clip retainer. It is prevented from rotating by having a notch which slides into a keyway on the hydro-boost backside.
My car came manual brake-equipped, so I was planning on unscrewing the nut on the hydro-boost and removing the plate. I'm going to then transfer the outline and bolt-hole locations fof the back of the manual master cyclinder onto 3/16" steel or 1/4", and then cut into it an appropriately-sized hole with a notch for a keyway. Kindof a mounting hybrid...
Any particular reason you want to reuse the angled brackets? Maybe bend a couple quickies up out of 1/8" steel, so that you could make them parallel and not angled?
Also, were you trying to re-use the original master cylinder with the hydro-boost? If you end up needing a different master, let me know what you find that works/is compatible, I need to find myself a MC too...
03-18-2009, 09:35 PM
#74
11 Second Club
Thread Starter
Join Date: Mar 2008
Location: New Westminster, B.C., Canada
Posts: 445
Likes: 0
Received 1 Like
on
1 Post
I agree, it does look a bit wonky. The angle is necessary for the brake rod to pedal geometry. I may mill one out of aluminum instead, but lower profile and get rid of the plate. too bad you can't just buy the aluminum bit!
03-23-2009, 01:41 AM
#75
Took apart the hydro-boost and this is what I found the notches to look like. Within the next couple days when I'm bored with school I'm gonna draw up a template for this mid-plate so it can fit on the hydro-boost and have the proper master cylinder bolt-spacing. From the looks of it, with the max adapter thickness that can be sandwiched between the nut and the hydro-boost is 1/4".

 03-31-2009, 07:33 PM
#78
11 Second Club
Thread Starter
Join Date: Mar 2008
Location: New Westminster, B.C., Canada
Posts: 445
Likes: 0
Received 1 Like
on
1 Post
 I read somewhere that big block chevy headers could be modified to work on the LSx... maybe in NARNIA!!! but not here. I bought a set of hooker super comps made for the 2nd gen camaro, and was willing to cut off the flanges and weld them onto LSx flanges, but the spread was too wide, (not just a case of modifying 1 or 2 pipes) and the height of the headers was no good either. Oh well. At least I can return them no problem.
 04-05-2009, 12:13 AM
#80
TECH Fanatic
iTrader: (9)
Join Date: Aug 2007
Location: Rocky Mtn thin air & snow...
Posts: 1,237
Likes: 0
Received 1 Like
on
1 Post
Originally Posted by JML55
Nice work man looking good, i just finish my stand alone harness check my build.
[url]http://67-72chevytrucks.com/vboard/showthread.php?t=316140[/url
[url]http://67-72chevytrucks.com/vboard/showthread.php?t=316140[/url

And to the OP - your project looks like it's coming along pretty well too!


