Custom Long Tube Header / Exhaust Build ***DYNO Results are In***
 03-03-2013, 02:46 AM
#21
I have broken two Energy Suspension engine mounts on my Thunderbird and the engine is 95% stock. With mine the poly separated from the metal internally and would clank around, but the external welds held. Yours looks like a poor weld with not enough heat on the horizontal plate to get necessary penetration. Next time I'll use a different design engine mount.
Good luck on the headers. I saw Header Lego's a long time ago and they look like they would make that job a breeze. Like 2001CamaroGuy, I wanted a set until I saw the price at which point I deemed them completely out of my range for the type of work I do.
Good luck on the headers. I saw Header Lego's a long time ago and they look like they would make that job a breeze. Like 2001CamaroGuy, I wanted a set until I saw the price at which point I deemed them completely out of my range for the type of work I do.
 03-03-2013, 03:42 PM
#22
11 Second Club
Thread Starter
After looking around at starters some more it seems the only reason that the F-body starter doesn't work with the GTO bellhousing is because of the nose cone that covers the starter gear. Since aftermarket starters typically don't have this nose cone, they "should" all be interchangeable.
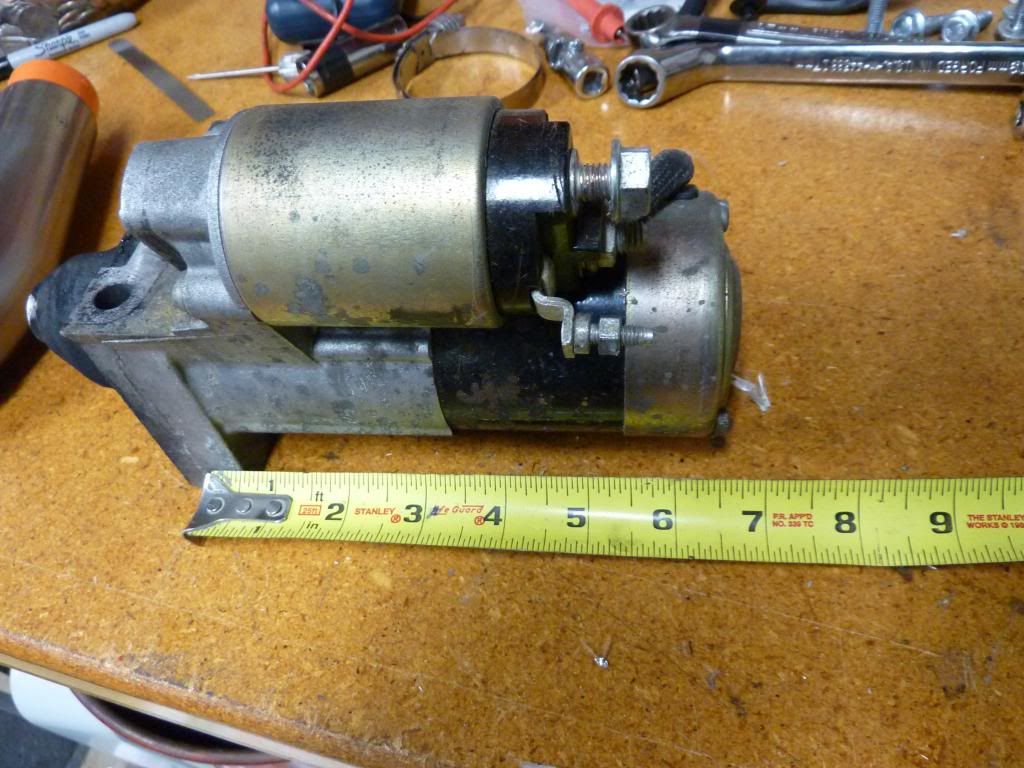
The stock GTO starter measured right about 6.75" from bolt center to end.
I found some more info on the PowerMaster 5905 mini starter. It looks like it would buy me just over 1/2" behind the starter. Should be just enough to slip 2 primaries past allowing me to run primary #2 behind the motor mount like the rest of them. If anyone knows of a shorter starter let me know.
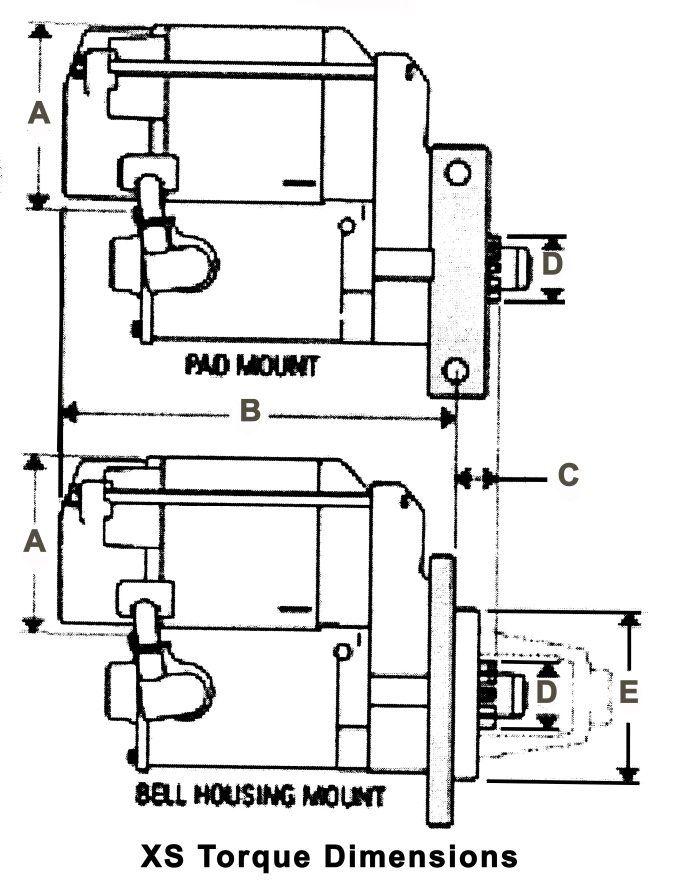
Chevy LS motors
Part Numbers - 9509
Weight - 8.0 lbs
Ft. Lbs. - 200
A - 3.00
B - 6.12
C - 0.79
D - 1.14
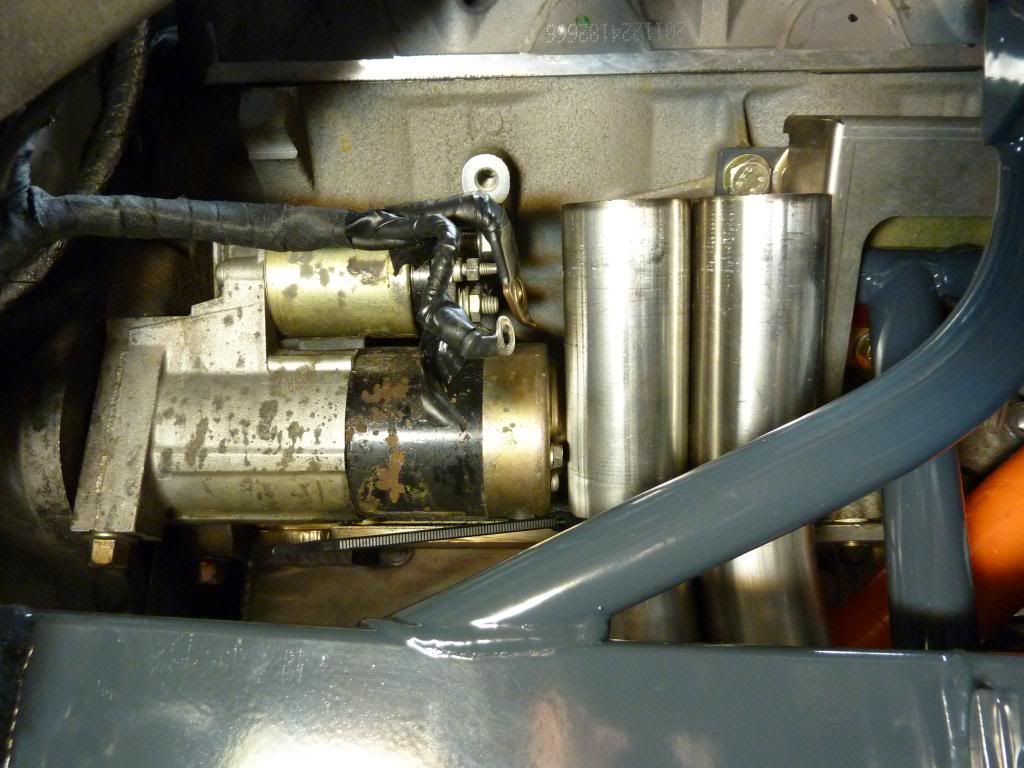
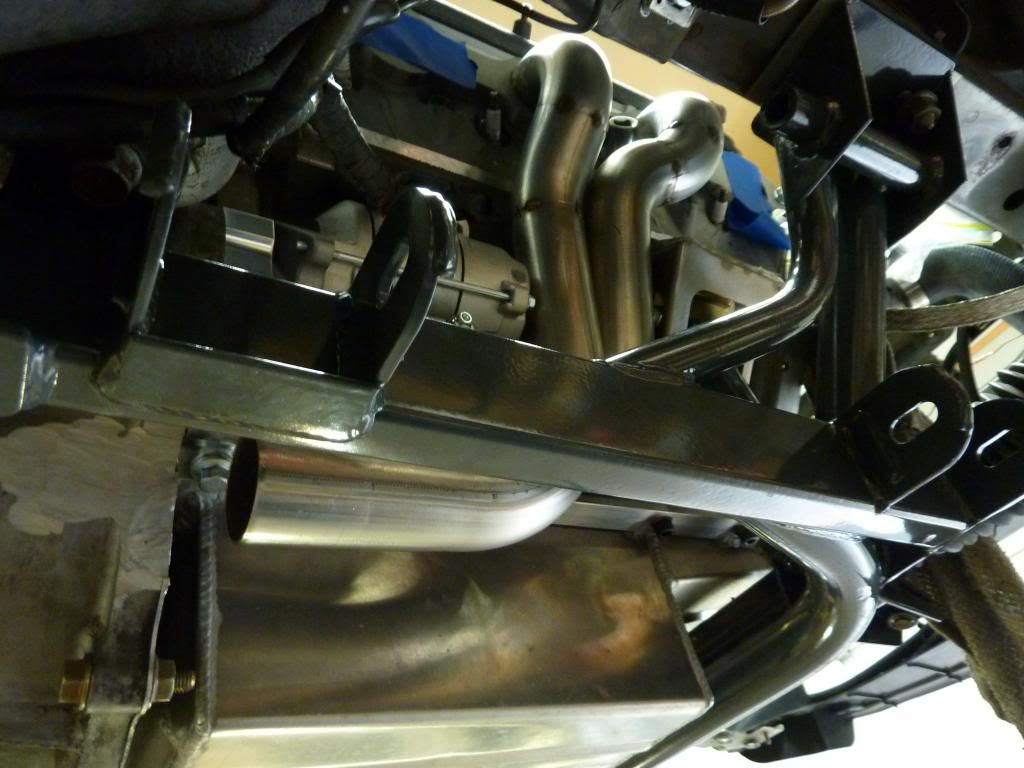
Here's a shot of 2 primaries run between the starter and the motor mount heat shield. It's tight, but with a shorter starter and some creative metal work on the heat shield, there should be plenty of room.
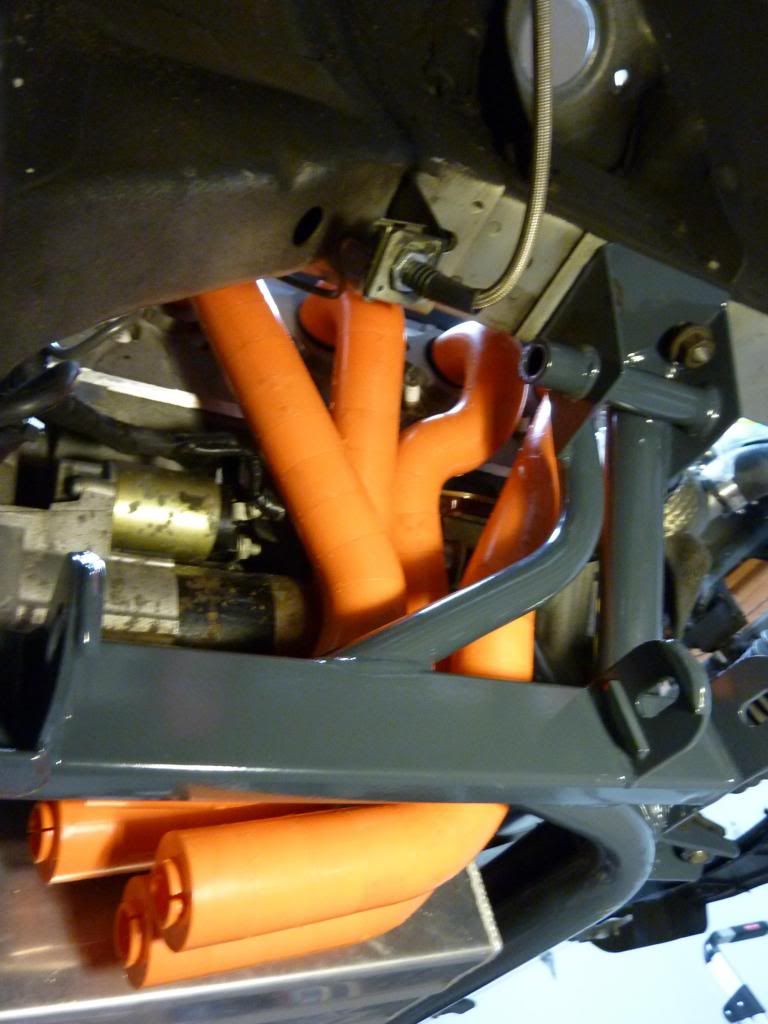
This is what I came up with. This time with the #2 runner behind the subframe motor mount. Again, it's difficult to get the angles of everything perfect with the lego's but this gives me a general idea of how to route things. In the final product I could gain a little more length on #8 by angling it back more.
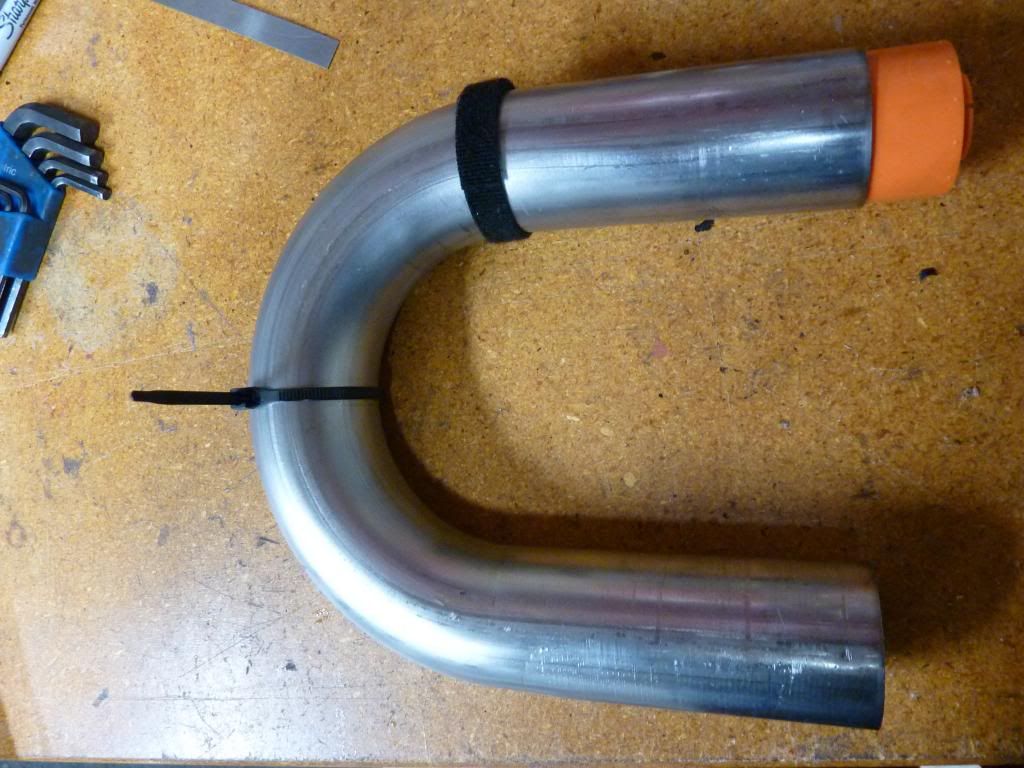
I was trying to figure out how to get straight cuts on a bend. I haven't found much on the subject but it looks like a zip tie would do the trick.
The stock GTO starter measured right about 6.75" from bolt center to end.
I found some more info on the PowerMaster 5905 mini starter. It looks like it would buy me just over 1/2" behind the starter. Should be just enough to slip 2 primaries past allowing me to run primary #2 behind the motor mount like the rest of them. If anyone knows of a shorter starter let me know.
Chevy LS motors
Part Numbers - 9509
Weight - 8.0 lbs
Ft. Lbs. - 200
A - 3.00
B - 6.12
C - 0.79
D - 1.14
Here's a shot of 2 primaries run between the starter and the motor mount heat shield. It's tight, but with a shorter starter and some creative metal work on the heat shield, there should be plenty of room.
This is what I came up with. This time with the #2 runner behind the subframe motor mount. Again, it's difficult to get the angles of everything perfect with the lego's but this gives me a general idea of how to route things. In the final product I could gain a little more length on #8 by angling it back more.
I was trying to figure out how to get straight cuts on a bend. I haven't found much on the subject but it looks like a zip tie would do the trick.


 03-06-2013, 04:23 PM
#27
11 Second Club
Thread Starter
Got the new tight radius bends yesterday. They are 1D bends which means the bend radius is the same as the diameter, 1 7/8. Should definitely be tight enough to clear what I need. Probably even tight enough to leave a short straight section coming out of the flange.
The Powermaster 9509 starter came in also. This thing is sweet, most mini starters have a few holes in them so you can clock the starter to pre-set positions. This one is adjustable to ANY position you want so you can get the perfect angle and clearance.
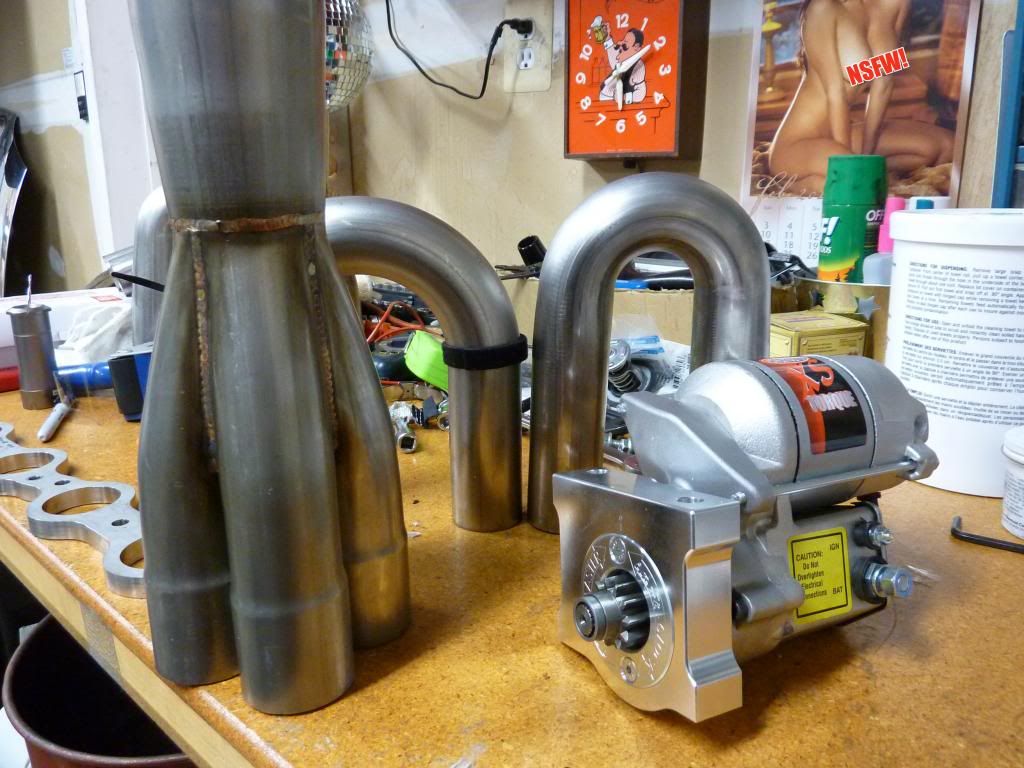
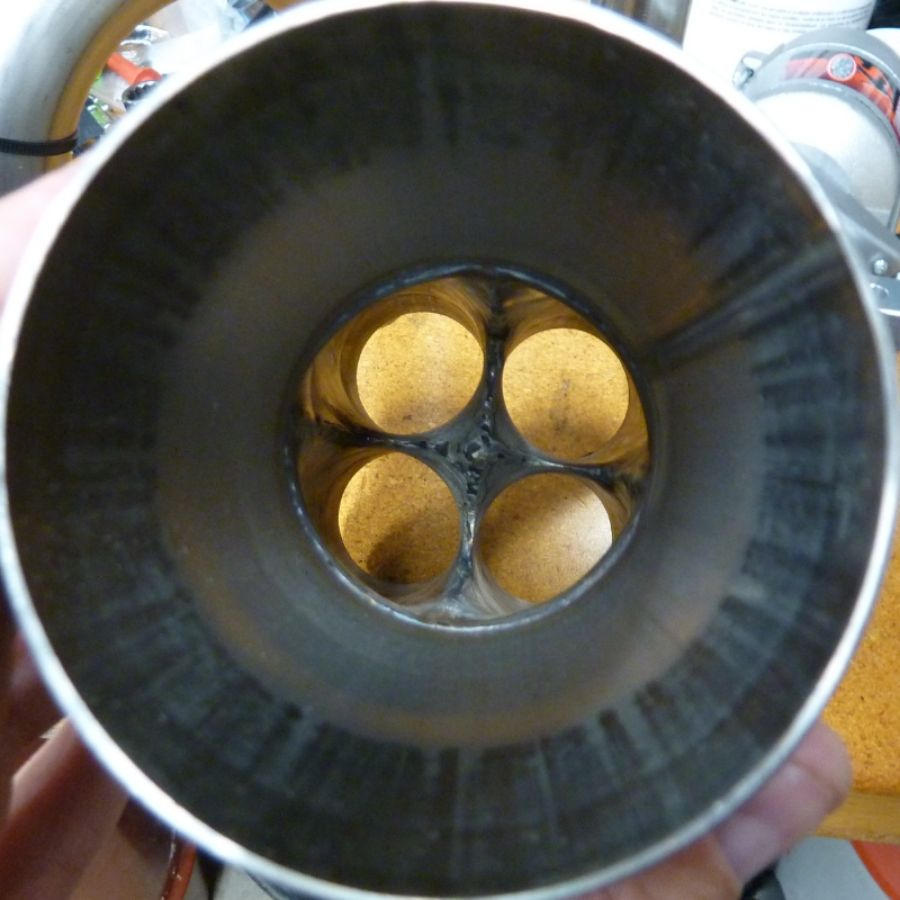
Stainless Works collectors came in too. Perfect welds inside and out.
Here's a shot of yesterday's new toys. You can see the difference in pipe radius. It's like Christmas in March!
The Powermaster 9509 starter came in also. This thing is sweet, most mini starters have a few holes in them so you can clock the starter to pre-set positions. This one is adjustable to ANY position you want so you can get the perfect angle and clearance.
Stainless Works collectors came in too. Perfect welds inside and out.
Here's a shot of yesterday's new toys. You can see the difference in pipe radius. It's like Christmas in March!
 03-11-2013, 07:03 PM
#29
11 Second Club
Thread Starter
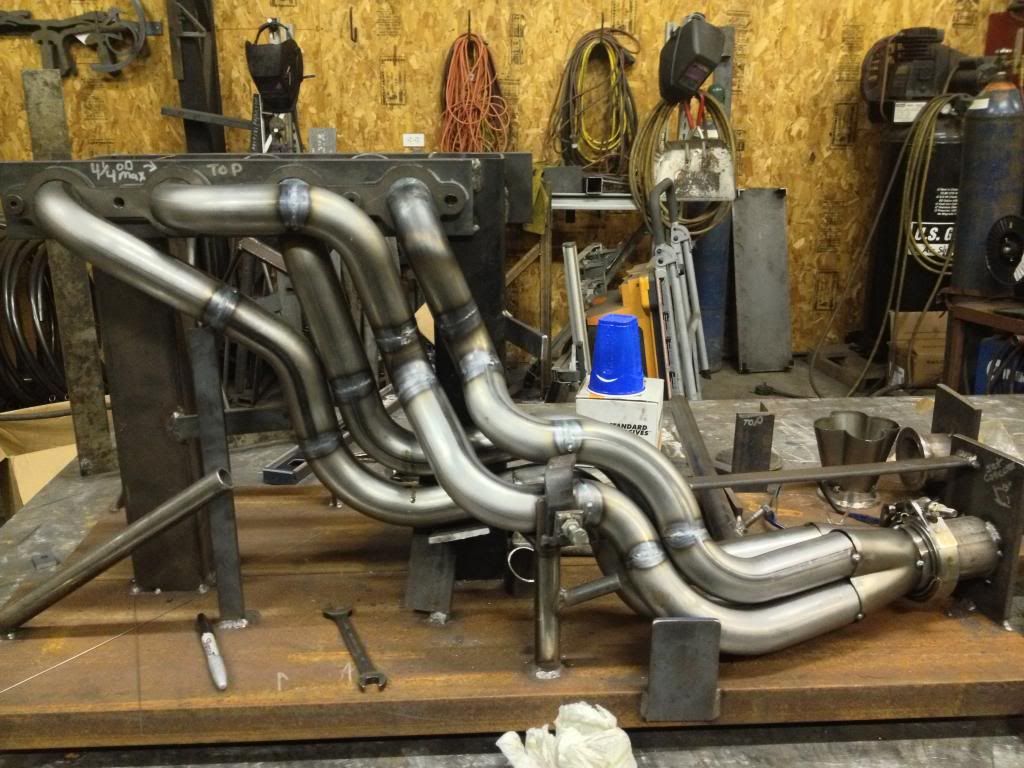
Made some progress over the past couple days. I started with the passenger side which is the more difficult side of the two. The learning curve is very steep so it's taking a bit of time to get everything figured out but it's coming along.
First of all, the Powermaster 9509 starter fits just fine. I pulled the plugs and jumped it out with a battery to make sure it turns the engine over and everything seemed ok.
I used packing tape to mock up the pipes. It works well to hold things in place and isn't prone to stretching and tearing like other tapes do. Once things were taped in place where I wanted them, I put a couple index marks on the pipes to get the angles right.

Here's where I ground the lip off of the bellhousing to make a little extra room for the collector. It's really tight around the collector, the will only be about 1/4 clearance on the passenger side.
Here's where I ended up today. Got #6 mostly done and #4 started. These 2 should be the more difficult ones.
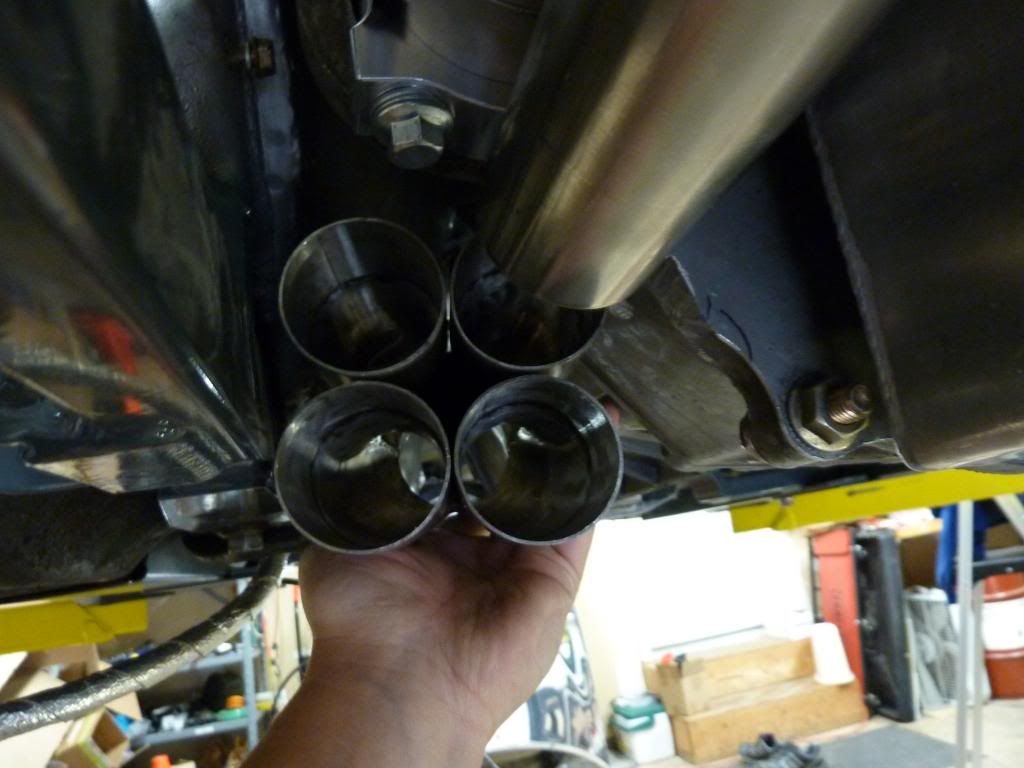
And here's about where the collector should end up. In this position the shortest primary would be about 26-28". Not the perfect 32" but about the same as most aftermarket long tubes.
First of all, the Powermaster 9509 starter fits just fine. I pulled the plugs and jumped it out with a battery to make sure it turns the engine over and everything seemed ok.
I used packing tape to mock up the pipes. It works well to hold things in place and isn't prone to stretching and tearing like other tapes do. Once things were taped in place where I wanted them, I put a couple index marks on the pipes to get the angles right.
Here's where I ground the lip off of the bellhousing to make a little extra room for the collector. It's really tight around the collector, the will only be about 1/4 clearance on the passenger side.
Here's where I ended up today. Got #6 mostly done and #4 started. These 2 should be the more difficult ones.
And here's about where the collector should end up. In this position the shortest primary would be about 26-28". Not the perfect 32" but about the same as most aftermarket long tubes.
 03-11-2013, 11:00 PM
#31
11 Second Club
Thread Starter
A company named Vibrant sells them. I wouldn't suggest using them unless you have to, though. The quality of the bends are far from ideal.
http://www.ebay.com/itm/Vibrant-2623...-/300777201930
The rest of the bends I got are from Mandrel Bends.com and are great...just not tight enough for some spots.
http://www.ebay.com/itm/Vibrant-2623...-/300777201930
The rest of the bends I got are from Mandrel Bends.com and are great...just not tight enough for some spots.
03-12-2013, 01:37 AM
#32
On The Tree
iTrader: (1)

Join Date: Jul 2005
Location: Portland OR
Posts: 129
Likes: 0
Received 0 Likes
on
0 Posts

Doing the same with cut up SS e-bay headers.
Eye balling the fit, 2/3 rds done with he problematic drivers side steering shaft no room side.
Where did you get a band saw blade thats cuts SS!? I've looked around and settled on a steel chop saw.
Also, I'm using a Henrob 2000 oxy fuel welder, does your wire feed work well-I've been considering a jump to my wire feed for easier/tac etc...
03-12-2013, 06:57 AM
#33
thanks, I normally buy 2.5 or 3" rad bends from mandrel bends.com as well. But always on the look out for something even tighter. In the past if I had to go REALLY tight I just did an off radius cut (not ideal, but sometimes you have to make compromises to fit)
Cone engineering sells a gauge to cut on radius...I keep meaning to buy one.
A pic of one (didn't want to embed as the image is huge)
http://image.superchevy.com/f/techni...headers%2b.jpg
Cone engineering sells a gauge to cut on radius...I keep meaning to buy one.
A pic of one (didn't want to embed as the image is huge)
http://image.superchevy.com/f/techni...headers%2b.jpg
03-12-2013, 01:37 PM
#34
11 Second Club
Thread Starter
Doing the same with cut up SS e-bay headers.
Eye balling the fit, 2/3 rds done with he problematic drivers side steering shaft no room side.
Where did you get a band saw blade thats cuts SS!? I've looked around and settled on a steel chop saw.
Also, I'm using a Henrob 2000 oxy fuel welder, does your wire feed work well-I've been considering a jump to my wire feed for easier/tac etc...
Eye balling the fit, 2/3 rds done with he problematic drivers side steering shaft no room side.
Where did you get a band saw blade thats cuts SS!? I've looked around and settled on a steel chop saw.
Also, I'm using a Henrob 2000 oxy fuel welder, does your wire feed work well-I've been considering a jump to my wire feed for easier/tac etc...
Using a 25/75 mix and .024/308 wire, the mig (Millermatic 140) is working just fine. I'm just using the MIG to tack the pieces together, I'm leaving the TIG welding to a professional
 03-12-2013, 01:48 PM
#35
11 Second Club
Thread Starter
thanks, I normally buy 2.5 or 3" rad bends from mandrel bends.com as well. But always on the look out for something even tighter. In the past if I had to go REALLY tight I just did an off radius cut (not ideal, but sometimes you have to make compromises to fit)
Cone engineering sells a gauge to cut on radius...I keep meaning to buy one.
Cone engineering sells a gauge to cut on radius...I keep meaning to buy one.
03-12-2013, 08:38 PM
#36

Our shop buys tight radius elbows from these guys on a regular basis, quality is great & prices are fair.
http://www.woolfaircraft.com/index.html
http://www.woolfaircraft.com/index.html
03-14-2013, 10:24 AM
#37
TECH Enthusiast

Join Date: Feb 2007
Location: Raleigh, NC
Posts: 625
Likes: 0
Received 0 Likes
on
0 Posts
Our shop buys tight radius elbows from these guys on a regular basis, quality is great & prices are fair.
http://www.woolfaircraft.com/index.html
http://www.woolfaircraft.com/index.html
03-14-2013, 09:07 PM
#38
11 Second Club
Thread Starter
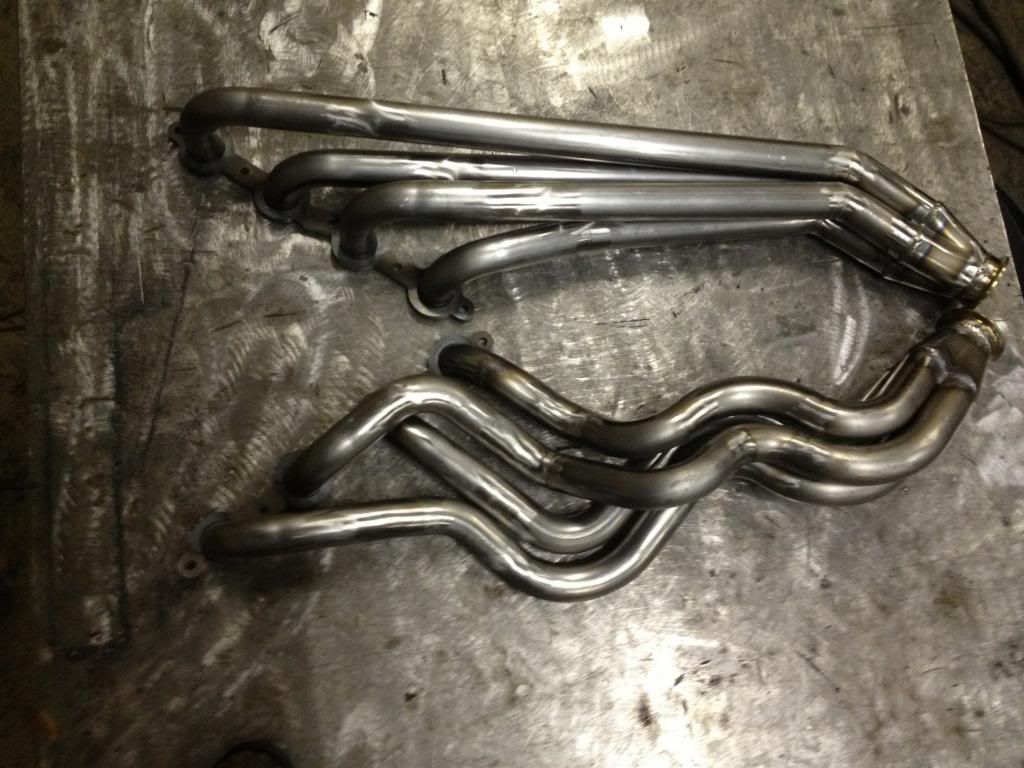
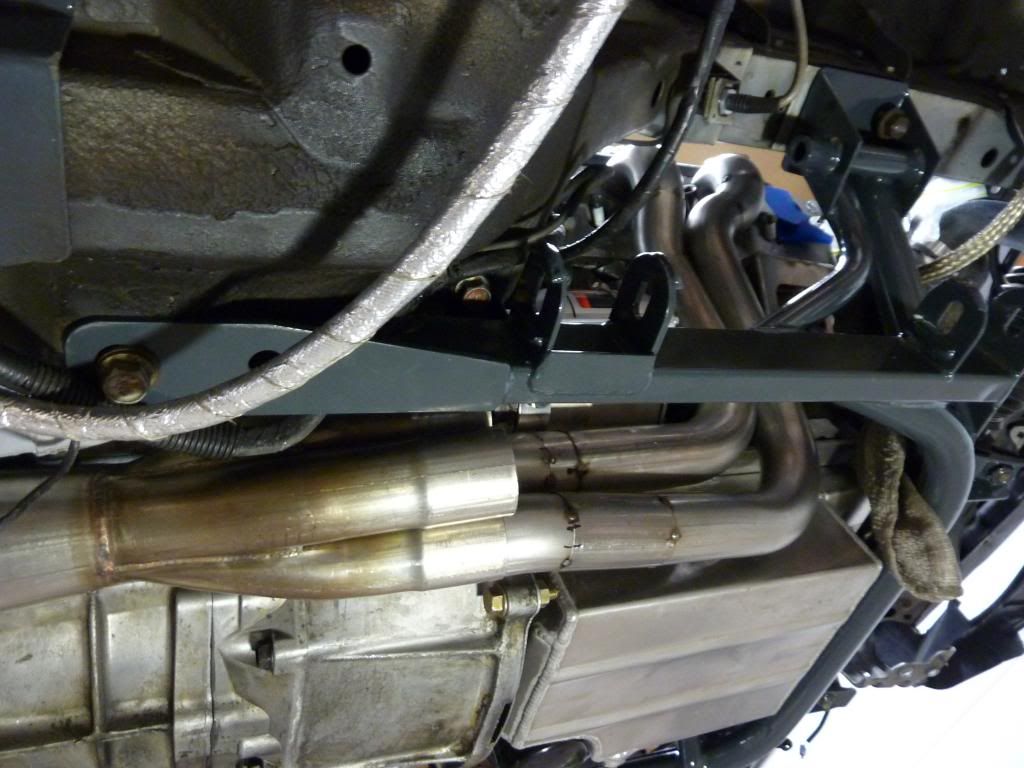
Made some great progress over the last couple days. Yesterday I got #6 all tacked together and positioned the collector. Now that the collector is in place, doing the rest of them should be much easier. I can build the primaries from both ends at the same time and meet in the middle without trying to imagine where the collector will be.
Today I got #4 all finished, it's starting to look like something!
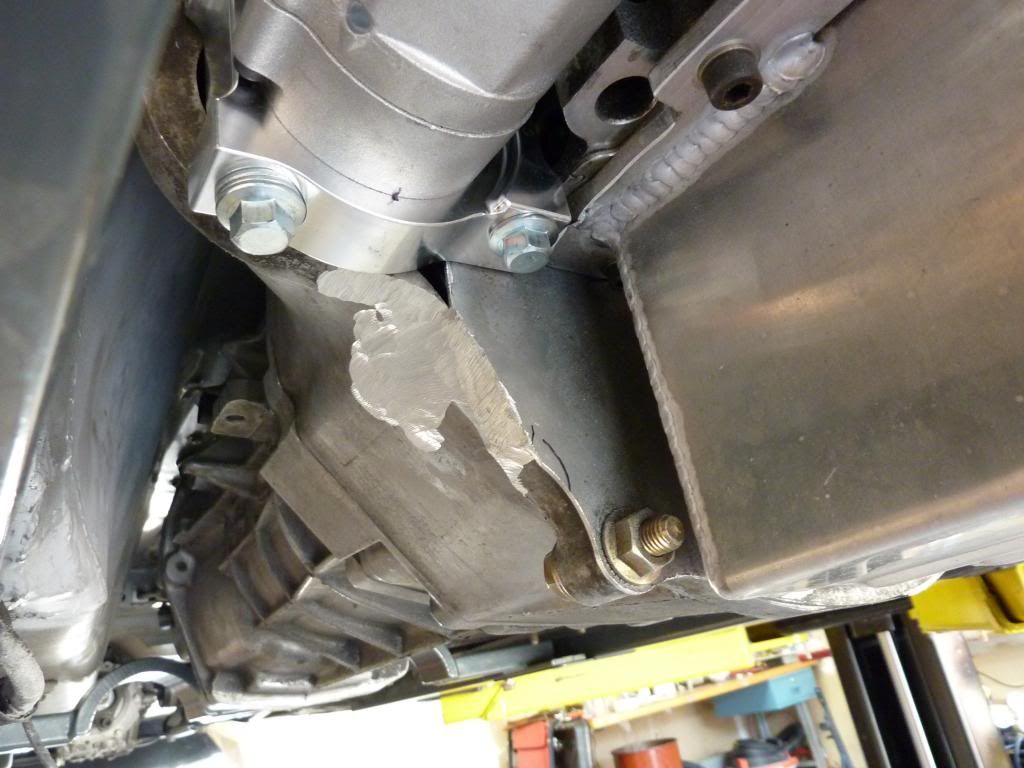
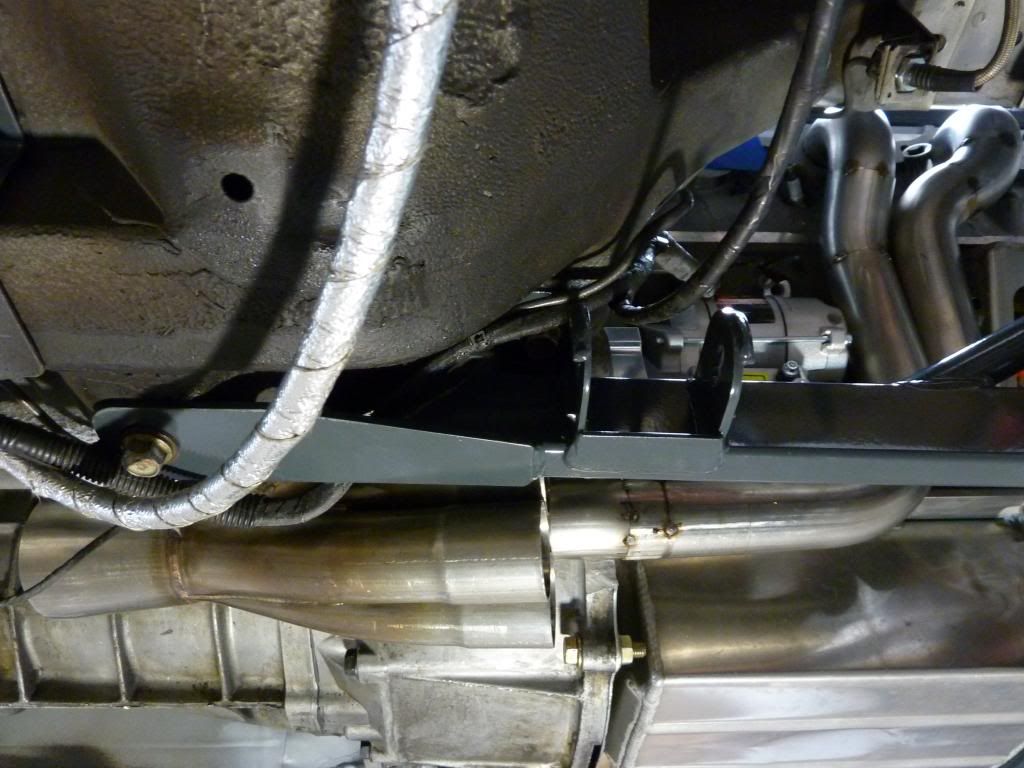
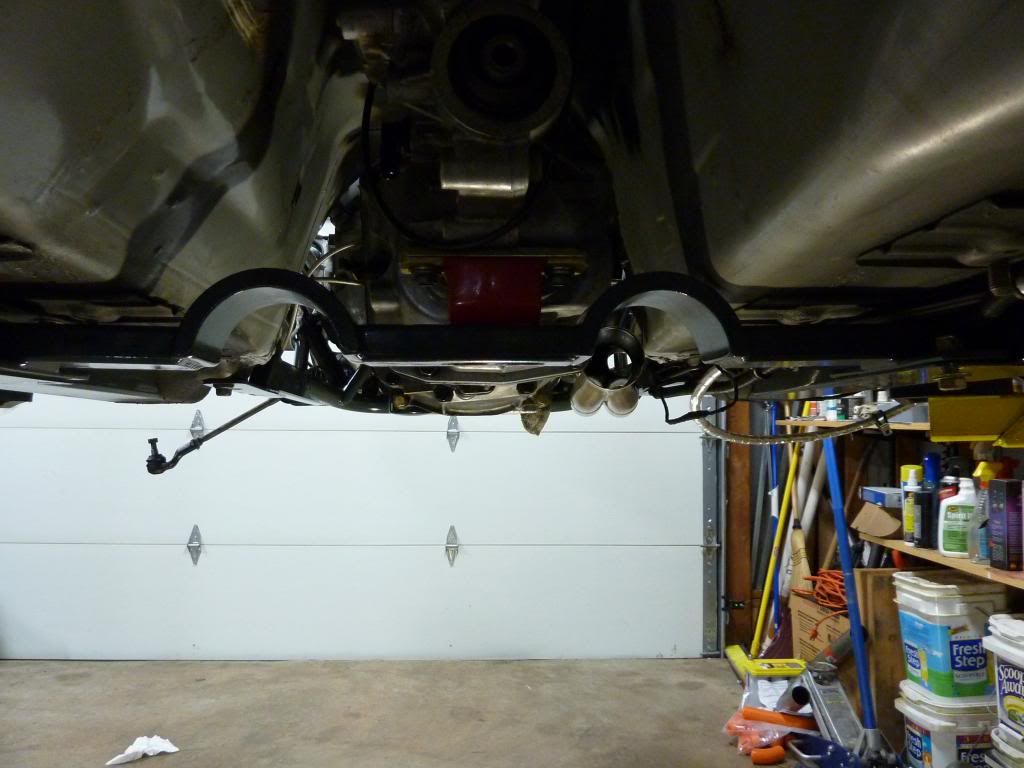
Here's a shot from under the car. You can see that the collector hangs no lower than the front of the bellousing so clearance shouldn't be an issue.
Today I got #4 all finished, it's starting to look like something!
Here's a shot from under the car. You can see that the collector hangs no lower than the front of the bellousing so clearance shouldn't be an issue.