

My S13 240 Build : Ls swap, Corvette transaxle, ITB's, Widebody, Do everything car
 05-07-2016, 08:11 PM
#81
On The Tree
Nice *****'s, love the color. That torque sounds insane. Man, that is a weird stretch. Definitely different. I can see not wanting to spend the money on more new barrels, but I think I would. Car's looking pretty sick though still. Interested to see how the stroller turns out, lol, I need to get working on a sweet wagon for my little one.


 05-17-2016, 03:58 PM
#83
Staging Lane
Thread Starter

Join Date: Oct 2015
Posts: 91
Likes: 0
Received 0 Likes
on
0 Posts
Dont worry everyone i havent forgotten about ole girl. Just been busy lately finishing up that caddy project and then getting things put together from out baby shower and just all around getting ready for the baby, hes only a few weeks out now if everything is going according to plan.
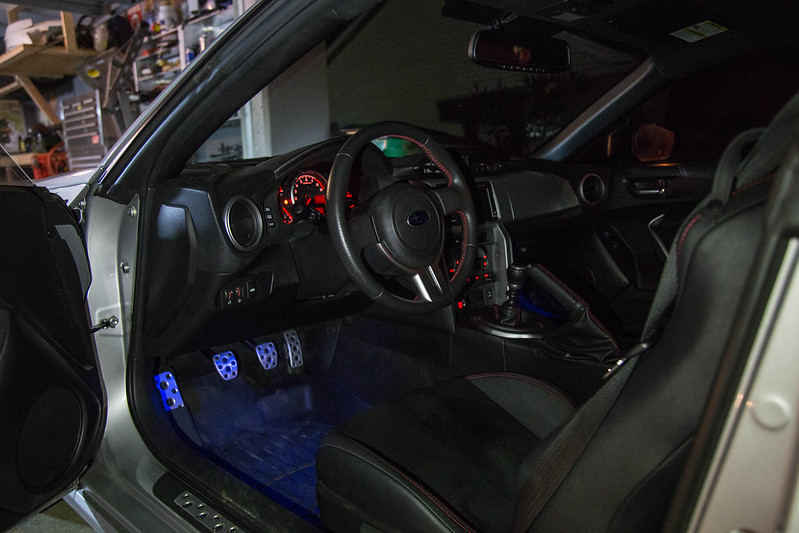
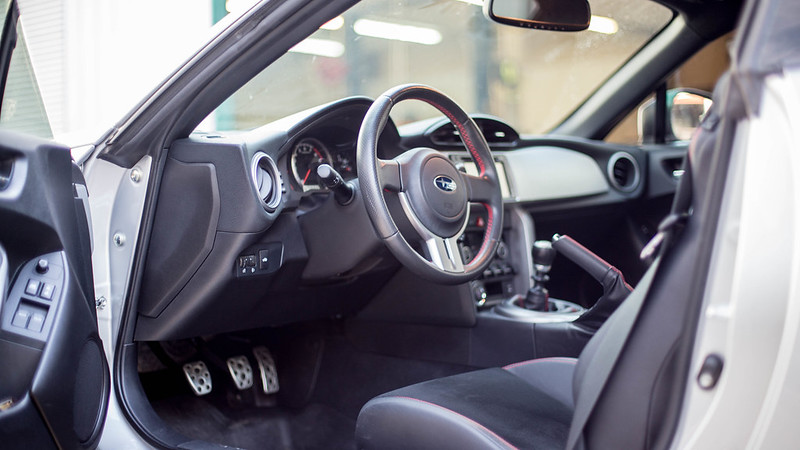
Ive also been spening a little bit of money on modding the brz..... new car problems. ill eventually make a thread for it as well.
 untitled (11 of 18) by lawrx, on Flickr
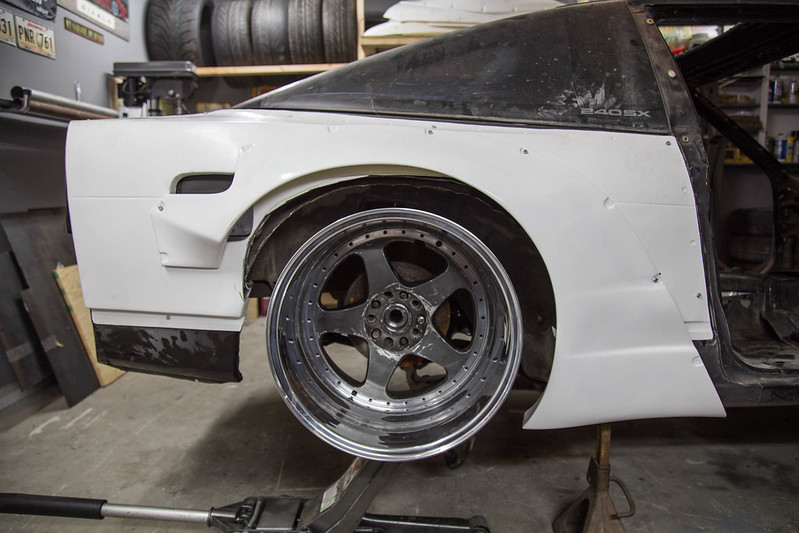 untitled (9 of 25) by lawrx, on Flickr
Those blue footwell lights HAVE TO GOOOOOOOO
 untitled (24 of 25) by lawrx, on Flickr
Ive also been spening a little bit of money on modding the brz..... new car problems. ill eventually make a thread for it as well.
untitled (11 of 18) by lawrx, on Flickruntitled (9 of 25) by lawrx, on FlickrThose blue footwell lights HAVE TO GOOOOOOOO
untitled (24 of 25) by lawrx, on Flickr  05-17-2016, 08:52 PM
#86
Staging Lane
Thread Starter
Join Date: Oct 2015
Posts: 91
Likes: 0
Received 0 Likes
on
0 Posts
yeah its a factry option,similar to whats available on the mustang and few other ford models. Me no likey. Ill prolly just pull the bulbs in the next few days
 05-18-2016, 09:30 PM
#88
Staging Lane
Thread Starter
Join Date: Oct 2015
Posts: 91
Likes: 0
Received 0 Likes
on
0 Posts
Brought home a busted radiator and condenser from work to day in the rough size i think ima run. Threw a front fender on to get an idea of depth. After seeing it up there compared to the fender length, ill probably go the route of a shorter but wider core than what i used for mock up, overall width will be determined by how wide the mouth of the front bumper is, once it arrives.
We had a new m6 in the other day that had ran over a curb, and upon checking out the underside i noticed they had a flat cooler than the air ran threw and exited out the bottom of the car. This gave me the idea of mounting the condenser flat and exiting the air out the bottom right behind the splitter. I need to do some research on hoe much if any this will affect pressures differentials and front splitter effectiveness and downforce.
If the horizontal mounting of the condenser isn't feasible, ill more than likely just mount it directly to the radiator like all oem's do. This was just an idea to get the best possible uninterrupted cooling to the radiator, a side benefit is that it lowers the Center of Gravity, granted its extremely minimal but hey, it all adds up in the end.
 untitled (5 of 5) by lawrx, on Flickr
 untitled (4 of 5) by lawrx, on Flickr
 untitled (3 of 5) by lawrx, on Flickr
 untitled (2 of 5) by lawrx, on Flickr
 untitled (1 of 5) by lawrx, on Flickr
We had a new m6 in the other day that had ran over a curb, and upon checking out the underside i noticed they had a flat cooler than the air ran threw and exited out the bottom of the car. This gave me the idea of mounting the condenser flat and exiting the air out the bottom right behind the splitter. I need to do some research on hoe much if any this will affect pressures differentials and front splitter effectiveness and downforce.
If the horizontal mounting of the condenser isn't feasible, ill more than likely just mount it directly to the radiator like all oem's do. This was just an idea to get the best possible uninterrupted cooling to the radiator, a side benefit is that it lowers the Center of Gravity, granted its extremely minimal but hey, it all adds up in the end.
untitled (5 of 5) by lawrx, on Flickruntitled (4 of 5) by lawrx, on Flickruntitled (3 of 5) by lawrx, on Flickruntitled (2 of 5) by lawrx, on Flickruntitled (1 of 5) by lawrx, on Flickr
05-30-2016, 10:55 PM
#89
Staging Lane
Thread Starter
Join Date: Oct 2015
Posts: 91
Likes: 0
Received 0 Likes
on
0 Posts
Been a bit pre occupied latley. My baby boy is due any day now so over the last week or so we've been doing last minute preparations. We have a scheduled induction date of June 8th but doc seems to think he will pop out before then, so guess we shall see on that front.
On top of baby preparations I've also been slightly distracted by the new daily, 14 brz i picked up a few weeks back. Got a few small parts on order. Probably in a week or so ill start its own thread, but for now here are some pretty pictures of it.
 untitled (17 of 21) by lawrx, on Flickr
 untitled (40 of 62) by lawrx, on Flickr
 untitled (21 of 21) by lawrx, on Flickr
 untitled (60 of 62) by lawrx, on Flickr
Alright enough of the daily. Time to get back to the 240. I was only able to knock out a small amount of work today, as I'm still waiting on my god damn ******* seat to arrive. I hate waiting on parts.....Anyway. I started to remove the hood hinge and upper rail outer reinforcements as well as the main cowl. This servers two purposes. One makes it much easier to route the front down tubes that tie into the main cage, two it eliminates some soon to be needed material (thanks to the cage) The cowl will be welded back on once cage and downtubes are in
 untitled (1 of 9)-4 by lawrx, on Flickr
 untitled (2 of 9)-4 by lawrx, on Flickr
 untitled (3 of 9)-4 by lawrx, on Flickr
 untitled (4 of 9)-4 by lawrx, on Flickr
Now removing these now obsolete reinforcements leaves me with a good area to duct some engine heat out. I had a rough idea about what i wanted to do before i had removed any, but now that I've removed that i see that it can absolutely work. Ill be creating a triangulated vent on the top back end of the fender that will 1. Vent hot air from the engine bay and lower overall temperature and air pressure for better air movement for cooling, and 2. allow me to contour the air smoothly and with minimal drag around the side mirrors. I still need to remove those two small pieces however i want to keeo them in place until i run the down tube off the cage and can reinforce the hood mount holes so they dont get distorted.
 untitled (5 of 9)-4 by lawrx, on Flickr
 untitled (6 of 9)-4 by lawrx, on Flickr
 untitled (7 of 9)-4 by lawrx, on Flickr
Ill be using a similar design as to what was made onto the Varis fenders that i had on my wrx, seen here
 IMG_0553 by lawrx, on Flickr
 DSC_0006 by lawrx, on Flickr
 IMG_1516 by lawrx, on Flickr
On top of baby preparations I've also been slightly distracted by the new daily, 14 brz i picked up a few weeks back. Got a few small parts on order. Probably in a week or so ill start its own thread, but for now here are some pretty pictures of it.
untitled (17 of 21) by lawrx, on Flickruntitled (40 of 62) by lawrx, on Flickruntitled (21 of 21) by lawrx, on Flickruntitled (60 of 62) by lawrx, on FlickrAlright enough of the daily. Time to get back to the 240. I was only able to knock out a small amount of work today, as I'm still waiting on my god damn ******* seat to arrive. I hate waiting on parts.....Anyway. I started to remove the hood hinge and upper rail outer reinforcements as well as the main cowl. This servers two purposes. One makes it much easier to route the front down tubes that tie into the main cage, two it eliminates some soon to be needed material (thanks to the cage) The cowl will be welded back on once cage and downtubes are in
untitled (1 of 9)-4 by lawrx, on Flickruntitled (2 of 9)-4 by lawrx, on Flickruntitled (3 of 9)-4 by lawrx, on Flickruntitled (4 of 9)-4 by lawrx, on FlickrNow removing these now obsolete reinforcements leaves me with a good area to duct some engine heat out. I had a rough idea about what i wanted to do before i had removed any, but now that I've removed that i see that it can absolutely work. Ill be creating a triangulated vent on the top back end of the fender that will 1. Vent hot air from the engine bay and lower overall temperature and air pressure for better air movement for cooling, and 2. allow me to contour the air smoothly and with minimal drag around the side mirrors. I still need to remove those two small pieces however i want to keeo them in place until i run the down tube off the cage and can reinforce the hood mount holes so they dont get distorted.
untitled (5 of 9)-4 by lawrx, on Flickruntitled (6 of 9)-4 by lawrx, on Flickruntitled (7 of 9)-4 by lawrx, on FlickrIll be using a similar design as to what was made onto the Varis fenders that i had on my wrx, seen here
IMG_0553 by lawrx, on FlickrDSC_0006 by lawrx, on FlickrIMG_1516 by lawrx, on Flickr
06-12-2016, 12:29 PM
#90
Staging Lane
Thread Starter
Join Date: Oct 2015
Posts: 91
Likes: 0
Received 0 Likes
on
0 Posts
My baby boy was born on June 7th, and we got home this past Thursday night. Fully expect to see project shenanigans with him posted in this build thread as well. Hehe
 untitled (40 of 90) by lawrx, on Flickr
 untitled (33 of 90) by lawrx, on Flickr
 untitled (20 of 90) by lawrx, on Flickr
The week before i had gotten a bit more done. I had finished removing the cowl from the front, and had removed one side of the rear seat/seatblet bracket that attaches to the inner wheel house and rear strut tower.
 untitled (1 of 6) by lawrx, on Flickr
 untitled (2 of 6) by lawrx, on Flickr
 untitled (3 of 6) by lawrx, on Flickr
After having that bracket removed and giving a good look, i think I'm just going to remove the factory inner wheel house completely and make my own. The mock up pictures with the wheel and tire were as high as they could go, as they were hitting the top of the wheel house. At first i was going to just modify the existing wheel house, but then i decided it would be
A. easier to just replace the entire thing with a nicer looking overall unit
B. allow me to remove the strut towers and make them 2'' taller to gain a bit more shock travel back after the car being lowered so much.
So in short new whole rear wheel houses and raised rear strut top mounts
 untitled (4 of 6) by lawrx, on Flickr
 untitled (5 of 6) by lawrx, on Flickr
 untitled (6 of 6) by lawrx, on Flickr
untitled (40 of 90) by lawrx, on Flickruntitled (33 of 90) by lawrx, on Flickruntitled (20 of 90) by lawrx, on FlickrThe week before i had gotten a bit more done. I had finished removing the cowl from the front, and had removed one side of the rear seat/seatblet bracket that attaches to the inner wheel house and rear strut tower.
untitled (1 of 6) by lawrx, on Flickruntitled (2 of 6) by lawrx, on Flickruntitled (3 of 6) by lawrx, on FlickrAfter having that bracket removed and giving a good look, i think I'm just going to remove the factory inner wheel house completely and make my own. The mock up pictures with the wheel and tire were as high as they could go, as they were hitting the top of the wheel house. At first i was going to just modify the existing wheel house, but then i decided it would be
A. easier to just replace the entire thing with a nicer looking overall unit
B. allow me to remove the strut towers and make them 2'' taller to gain a bit more shock travel back after the car being lowered so much.
So in short new whole rear wheel houses and raised rear strut top mounts
untitled (4 of 6) by lawrx, on Flickruntitled (5 of 6) by lawrx, on Flickruntitled (6 of 6) by lawrx, on Flickr
06-18-2016, 06:11 PM
#92
Staging Lane
Thread Starter
Join Date: Oct 2015
Posts: 91
Likes: 0
Received 0 Likes
on
0 Posts
Nice relaxing saturday so i was able to get some work done. Still slowly preparing the chassis to begin the cage work.
I removed the other side bracket from atop the wheel well. Need to order some properly sized thick tubing to use as the rear strut towers before i cut out the old ones.
 untitled (1 of 12)-2 by lawrx, on Flickr
 untitled (2 of 12)-2 by lawrx, on Flickr
 untitled (3 of 12)-2 by lawrx, on Flickr
 untitled (4 of 12)-2 by lawrx, on Flickr
Also started to remove some sound deadening. i tried to find some dry ice locally but wasn't able to track any down. However the flathead screwdriver and hammer worked pretty well. I guess being 20+ years old didn't really help its case to keep its hold to the metal
 untitled (5 of 12)-2 by lawrx, on Flickr
 untitled (6 of 12)-2 by lawrx, on Flickr
 untitled (7 of 12)-2 by lawrx, on Flickr
 untitled (8 of 12)-2 by lawrx, on Flickr
Lastly. seeing as I'm caging the car, this makes much of the upper roof and pillar braces obsolete. So i used the drill out the spot welds method and removed the two outer/upper braces. This gives me access to remove the central brace up top. Again i dont really need this brace as the roll cage will be doing its job, making it unnecessary weight.
I also cut out a larger portion of the roof so as much easier access to weld all the way around.
 untitled (9 of 12)-2 by lawrx, on Flickr
 untitled (12 of 12)-2 by lawrx, on Flickr
 untitled (10 of 12)-2 by lawrx, on Flickr
 untitled (11 of 12)-2 by lawrx, on Flickr
I removed the other side bracket from atop the wheel well. Need to order some properly sized thick tubing to use as the rear strut towers before i cut out the old ones.
untitled (1 of 12)-2 by lawrx, on Flickruntitled (2 of 12)-2 by lawrx, on Flickruntitled (3 of 12)-2 by lawrx, on Flickruntitled (4 of 12)-2 by lawrx, on FlickrAlso started to remove some sound deadening. i tried to find some dry ice locally but wasn't able to track any down. However the flathead screwdriver and hammer worked pretty well. I guess being 20+ years old didn't really help its case to keep its hold to the metal
untitled (5 of 12)-2 by lawrx, on Flickruntitled (6 of 12)-2 by lawrx, on Flickruntitled (7 of 12)-2 by lawrx, on Flickruntitled (8 of 12)-2 by lawrx, on FlickrLastly. seeing as I'm caging the car, this makes much of the upper roof and pillar braces obsolete. So i used the drill out the spot welds method and removed the two outer/upper braces. This gives me access to remove the central brace up top. Again i dont really need this brace as the roll cage will be doing its job, making it unnecessary weight.
I also cut out a larger portion of the roof so as much easier access to weld all the way around.
untitled (9 of 12)-2 by lawrx, on Flickruntitled (12 of 12)-2 by lawrx, on Flickruntitled (10 of 12)-2 by lawrx, on Flickruntitled (11 of 12)-2 by lawrx, on Flickr
06-26-2016, 02:52 PM
#93
Staging Lane
Thread Starter
Join Date: Oct 2015
Posts: 91
Likes: 0
Received 0 Likes
on
0 Posts
Finally got a bit more time to finish remove those upper braces from where I left off last time
This little ******* were a bitch to remove, being high strength steel it took forever to drill through and a ton of force to bend and wiggle off.
Im glad i did remove them as there was some rust build up underneath the two outside panels. Nothing major, but would have sucked to get it all painted then have that show its face a while after.
After removing the two side pieces i was able to mark and drill out the center reinforcement. Again these will be obsolete once i have the cage in, so they were dead weight i could remove. All the work i did paid off as 1.I made more room to tuck the cage up and out of the way and 2. I removed 11 pounds from above the center of gravity. WIN WIN in my book. Just took a bit of time and sweat.
 untitled (1 of 7) by lawrx, on Flickr
 untitled (2 of 7) by lawrx, on Flickr
 untitled (3 of 7) by lawrx, on Flickr
 untitled (4 of 7) by lawrx, on Flickr
 untitled (5 of 7) by lawrx, on Flickr
 untitled (6 of 7) by lawrx, on Flickr
This little ******* were a bitch to remove, being high strength steel it took forever to drill through and a ton of force to bend and wiggle off.
Im glad i did remove them as there was some rust build up underneath the two outside panels. Nothing major, but would have sucked to get it all painted then have that show its face a while after.
After removing the two side pieces i was able to mark and drill out the center reinforcement. Again these will be obsolete once i have the cage in, so they were dead weight i could remove. All the work i did paid off as 1.I made more room to tuck the cage up and out of the way and 2. I removed 11 pounds from above the center of gravity. WIN WIN in my book. Just took a bit of time and sweat.
untitled (1 of 7) by lawrx, on Flickruntitled (2 of 7) by lawrx, on Flickruntitled (3 of 7) by lawrx, on Flickruntitled (4 of 7) by lawrx, on Flickruntitled (5 of 7) by lawrx, on Flickruntitled (6 of 7) by lawrx, on Flickr
06-28-2016, 08:01 PM
#94
Staging Lane
Thread Starter
Join Date: Oct 2015
Posts: 91
Likes: 0
Received 0 Likes
on
0 Posts
Little time here and there I'm slowly getting stuff done.
Took home some tools from work to remove the quarter glass. Just like the windshield someone terribly installed them after having them removed and the glass wasn't really all that "stuck" to the car. People dont realize the windshield plays a vital structural role to the integrity of the chassis in a wreck. Granted the quarter glass doesn't, but who wants there glass to come flying off on the highway lol
 untitled (6 of 21) by lawrx, on Flickr
 untitled (7 of 21) by lawrx, on Flickr
 untitled (8 of 21) by lawrx, on Flickr
 untitled (9 of 21) by lawrx, on Flickr
Once i had the glass removed i noticed the line where the roof meets the quarter panel. i always wondered where the roof line ended, and now i know. I also realized the "gutter area" that the rear hatch covers is part of the roof panel itself. This is a plus because that means i dont have to fill those holes. And this also means that the roof panel is the only joining panel at the rear since i removed that brace the other day. Again this is ok as the cage will the structural part up there. it also gives me maximum room to get the cage up and out of the way and have as much cabin space as possible.
This also means i have to get creative with the hatch hinge mounting. Will need to make some type of backing brace, and maybe make some small mounts that come off the main roller just as added security. Idk will have to play it by ear once i get the roof panel and hatch mocked up and tested.
 untitled (14 of 21) by lawrx, on Flickr
 untitled (15 of 21) by lawrx, on Flickr
 untitled (16 of 21) by lawrx, on Flickr
 untitled (18 of 21) by lawrx, on Flickr
 untitled (19 of 21) by lawrx, on Flickr
 untitled (20 of 21) by lawrx, on Flickr
I also noticed that there is a large area that could be open to the qtr glass and increase visibility. Once the rollbar is in i can possibly look into cutting out this section and opening up the biggest blind spot on the car. I need to check and see if the lexan qtr glass is full clear or if they come with the blacked out sections from the vendor
 untitled (13 of 21) by lawrx, on Flickr
I also had a buddy of mine drop his car off for me to install his Karlton flares and his new wider Rpf1s. he showed up rocking hoosier slicks from driving an hour away. Like a boss.
 untitled (1 of 21) by lawrx, on Flickr
 untitled (2 of 21) by lawrx, on Flickr
 untitled (3 of 21) by lawrx, on Flickr
 untitled (4 of 21) by lawrx, on Flickr
Took home some tools from work to remove the quarter glass. Just like the windshield someone terribly installed them after having them removed and the glass wasn't really all that "stuck" to the car. People dont realize the windshield plays a vital structural role to the integrity of the chassis in a wreck. Granted the quarter glass doesn't, but who wants there glass to come flying off on the highway lol
untitled (6 of 21) by lawrx, on Flickruntitled (7 of 21) by lawrx, on Flickruntitled (8 of 21) by lawrx, on Flickruntitled (9 of 21) by lawrx, on FlickrOnce i had the glass removed i noticed the line where the roof meets the quarter panel. i always wondered where the roof line ended, and now i know. I also realized the "gutter area" that the rear hatch covers is part of the roof panel itself. This is a plus because that means i dont have to fill those holes. And this also means that the roof panel is the only joining panel at the rear since i removed that brace the other day. Again this is ok as the cage will the structural part up there. it also gives me maximum room to get the cage up and out of the way and have as much cabin space as possible.
This also means i have to get creative with the hatch hinge mounting. Will need to make some type of backing brace, and maybe make some small mounts that come off the main roller just as added security. Idk will have to play it by ear once i get the roof panel and hatch mocked up and tested.
untitled (14 of 21) by lawrx, on Flickruntitled (15 of 21) by lawrx, on Flickruntitled (16 of 21) by lawrx, on Flickruntitled (18 of 21) by lawrx, on Flickruntitled (19 of 21) by lawrx, on Flickruntitled (20 of 21) by lawrx, on FlickrI also noticed that there is a large area that could be open to the qtr glass and increase visibility. Once the rollbar is in i can possibly look into cutting out this section and opening up the biggest blind spot on the car. I need to check and see if the lexan qtr glass is full clear or if they come with the blacked out sections from the vendor
untitled (13 of 21) by lawrx, on FlickrI also had a buddy of mine drop his car off for me to install his Karlton flares and his new wider Rpf1s. he showed up rocking hoosier slicks from driving an hour away. Like a boss.
untitled (1 of 21) by lawrx, on Flickruntitled (2 of 21) by lawrx, on Flickruntitled (3 of 21) by lawrx, on Flickruntitled (4 of 21) by lawrx, on Flickr
07-07-2016, 08:32 PM
#95
Staging Lane
Thread Starter
Join Date: Oct 2015
Posts: 91
Likes: 0
Received 0 Likes
on
0 Posts
Started working on my buddies Sti with the flare install. got cheeky and decided to throw my wheel on and see how ridiculous it looked. Just incase anyone was wondering, this is what an 18x15 -61 on a sti with Karlton flares looks like haha, just a wee bit of poke.
Also made the AT&T bars with some tires. 245s, 295s,and 335s.
 untitled (1 of 8)-2 by lawrx, on Flickr
 untitled (3 of 8)-2 by lawrx, on Flickr
This also gave me a chance to see what the same size brakes i will be using with my wheels. They fill them up quite nicely.
 untitled (2 of 8)-2 by lawrx, on Flickr
No real update on the 240. Got some info regarding my seat, ITS FINALLY EN ROUTE AND ON ITS WAY IN THE STATES. ******* finally.
Also made the AT&T bars with some tires. 245s, 295s,and 335s.
untitled (1 of 8)-2 by lawrx, on Flickruntitled (3 of 8)-2 by lawrx, on FlickrThis also gave me a chance to see what the same size brakes i will be using with my wheels. They fill them up quite nicely.
untitled (2 of 8)-2 by lawrx, on FlickrNo real update on the 240. Got some info regarding my seat, ITS FINALLY EN ROUTE AND ON ITS WAY IN THE STATES. ******* finally.
07-08-2016, 03:18 PM
#97
Staging Lane
Thread Starter
Join Date: Oct 2015
Posts: 91
Likes: 0
Received 0 Likes
on
0 Posts
07-19-2016, 09:41 PM
#98
Staging Lane
Thread Starter
Join Date: Oct 2015
Posts: 91
Likes: 0
Received 0 Likes
on
0 Posts
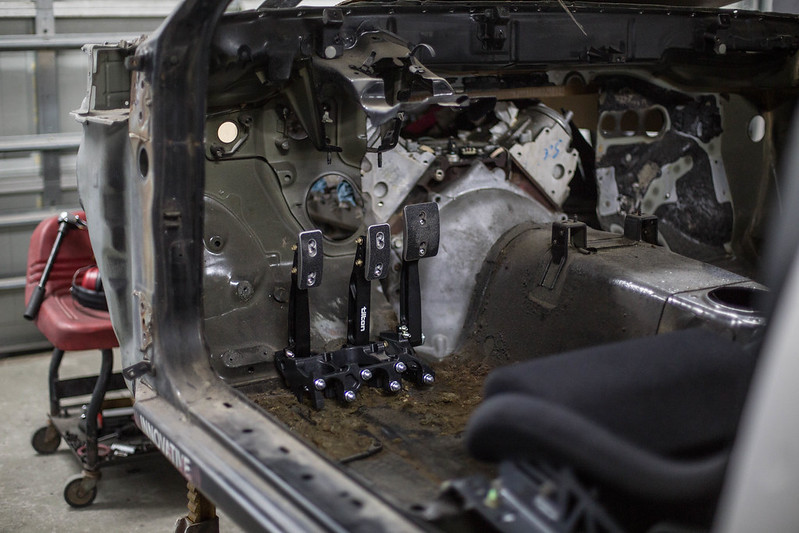
Small update. Seat finally came in.
Initail mock up of it and the pedal box that just arrived today. I got the underfoot 3 pedal from Tilton. Basically the underfoot portion means the master cylinders bolt to the rear of the assembly and are under your feet. requiring the use of a small false floor for your feet to rest on.
This allows maximum forward mounting position for optimal comfort placement, which is good, because i dont think i would have had room of rate typical front mounted master cylinders. I mean could have made it work, but i would have had to serioulsy hack up the seat mounting to get it back several more inches, but then i would have ran out of room to mount the battery, oil canister, air cup tank and compressor, and such that will be right behind the seats.
After initial mock i still can lower the seat about 1'' form blindly feeling the space between the floor and seat. I also need to move the seat back about 1-1.5'' for one to make it more comfortable and two so the seat clears the factory seat mounting brace. The latter isn't that big an issue as i can cut and shut it, which i have outlined if i need to, but i feel moving the seat back that amount will gain the clearance.
With these few changes the seat will be seating as far back and as low as i feel comfortable given my current hardware, and i feel it shall fit the bill perfectly.
The Recaro RS-GE is AWESOME. Initial comfort is great, little tight at a 34" waist but perfectly suited for the insane driving this car will have. Quality is GREAT, as expected with recaro. Supposedly it weighs right at 8 lbs. I totally believe it. Its SUPER light. Sometime this week i will be weighing the bare seat in my small scale and seeing the actual weight.
The Street faction seat brackets are also great. Super low mounting, good quality, everything lines up perfectly. Same can't be said for my previous Planted brackets....
And lastly the Tilton Pedal box. OMG they are awesome. super crazy infinitely adjustable. Superb build quality, and they look ******* awesome.
Anyway, enough of me blabbing. Here are a few pictures.
 untitled (2 of 6)-2 by lawrx, on Flickr
 untitled (3 of 6)-2 by lawrx, on Flickr
 untitled (1 of 6)-2 by lawrx, on Flickr
 untitled (4 of 6)-2 by lawrx, on Flickr
 untitled (5 of 6)-2 by lawrx, on Flickr
 untitled (6 of 6)-2 by lawrx, on Flickr
Initail mock up of it and the pedal box that just arrived today. I got the underfoot 3 pedal from Tilton. Basically the underfoot portion means the master cylinders bolt to the rear of the assembly and are under your feet. requiring the use of a small false floor for your feet to rest on.
This allows maximum forward mounting position for optimal comfort placement, which is good, because i dont think i would have had room of rate typical front mounted master cylinders. I mean could have made it work, but i would have had to serioulsy hack up the seat mounting to get it back several more inches, but then i would have ran out of room to mount the battery, oil canister, air cup tank and compressor, and such that will be right behind the seats.
After initial mock i still can lower the seat about 1'' form blindly feeling the space between the floor and seat. I also need to move the seat back about 1-1.5'' for one to make it more comfortable and two so the seat clears the factory seat mounting brace. The latter isn't that big an issue as i can cut and shut it, which i have outlined if i need to, but i feel moving the seat back that amount will gain the clearance.
With these few changes the seat will be seating as far back and as low as i feel comfortable given my current hardware, and i feel it shall fit the bill perfectly.
The Recaro RS-GE is AWESOME. Initial comfort is great, little tight at a 34" waist but perfectly suited for the insane driving this car will have. Quality is GREAT, as expected with recaro. Supposedly it weighs right at 8 lbs. I totally believe it. Its SUPER light. Sometime this week i will be weighing the bare seat in my small scale and seeing the actual weight.
The Street faction seat brackets are also great. Super low mounting, good quality, everything lines up perfectly. Same can't be said for my previous Planted brackets....
And lastly the Tilton Pedal box. OMG they are awesome. super crazy infinitely adjustable. Superb build quality, and they look ******* awesome.
Anyway, enough of me blabbing. Here are a few pictures.
untitled (2 of 6)-2 by lawrx, on Flickruntitled (3 of 6)-2 by lawrx, on Flickruntitled (1 of 6)-2 by lawrx, on Flickruntitled (4 of 6)-2 by lawrx, on Flickruntitled (5 of 6)-2 by lawrx, on Flickruntitled (6 of 6)-2 by lawrx, on Flickr
07-20-2016, 06:40 AM
#99
TECH Apprentice
Join Date: May 2012
Location: Danbury, Ct
Posts: 372
Likes: 0
Received 0 Likes
on
0 Posts
badass pedals I have contemplated running floor mounted pedal for years but I still have not driven a car with them to see if I would actually like them or not
07-20-2016, 10:28 AM
#100
Staging Lane
Thread Starter
Join Date: Oct 2015
Posts: 91
Likes: 0
Received 0 Likes
on
0 Posts
Ive also always wanted a set so, that helped too haha