
project "Shop Rag" 1965 El Camino drag car build
 07-14-2013, 12:38 PM
#61
Launching!
iTrader: (1)
Join Date: Jul 2009
Location: Missouri
Posts: 209
Likes: 0
Received 0 Likes
on
0 Posts
Wow ,this is a great build. Had a 64 El Camino in 1983. I was a Mac tool dist., and traded out with some of my customers body work, interior, etc. I can use a wrench and take engines apart ,put them back together and back in the vehicle. But any more technical and the top of my head blows off.
Your expertise is great and all your able to accomplish is commendable. Keep up the great build and pictures. I just got my head back together and am ready for more tech stuff.
I do have a 2006 GMC Sierra than runs 10.43 @130mph. with a 6.0 LS . Not to shabby for an Old , Fat and Grumpy guy. Oh Ya it"s CARBED
 07-14-2013, 08:04 PM
#62
10 Second Club

Join Date: Apr 2013
Location: Carlinville, IL
Posts: 317
Likes: 0
Received 0 Likes
on
0 Posts
Maybe we'll see you at Gateway when we're done. We're having a blast doing this. This is the first all out drag car I have built from scratch. I drag raced when my boys were little, but that car was a mildly warmed over car compared to this one. Everything we have done so far has been pretty much dreamed up as we go. I do most of the small parts fab work and Joe does most of the welding. Although my welding will hold up, I had a stroke three years ago and my right hand still isn't steady enough to lay down a pretty bead.
Joe started a late model El Camino a few years back but sold it before he got it finished so he had some chassis experience coming in to this project. We have been going to NHRA National events all over the country for years so we have gotten to see a lot of different car designs so that helps out too.
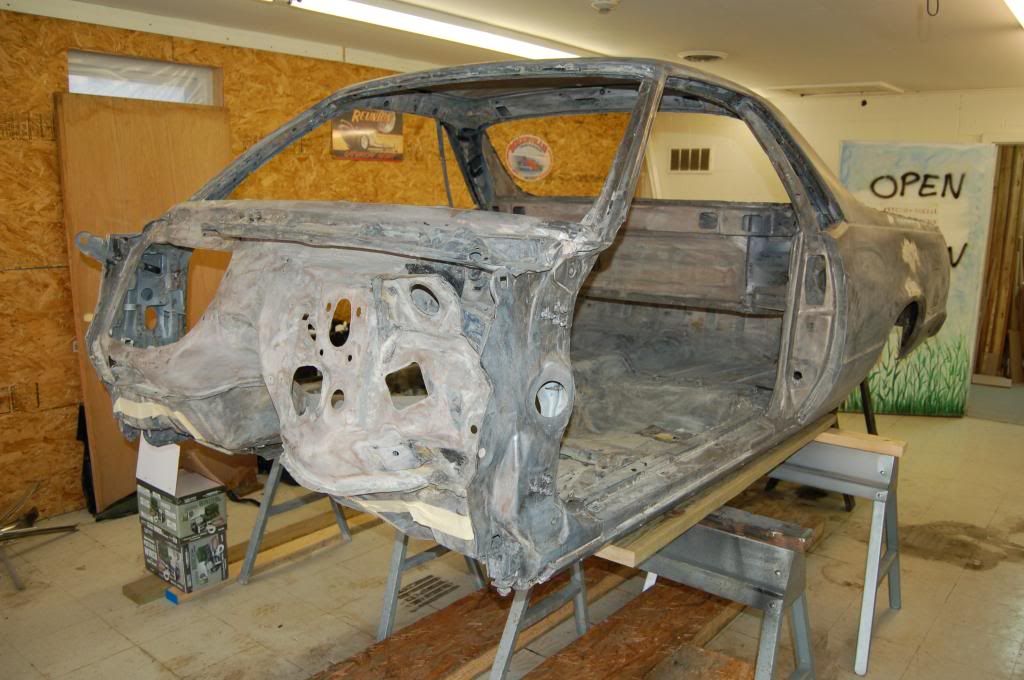
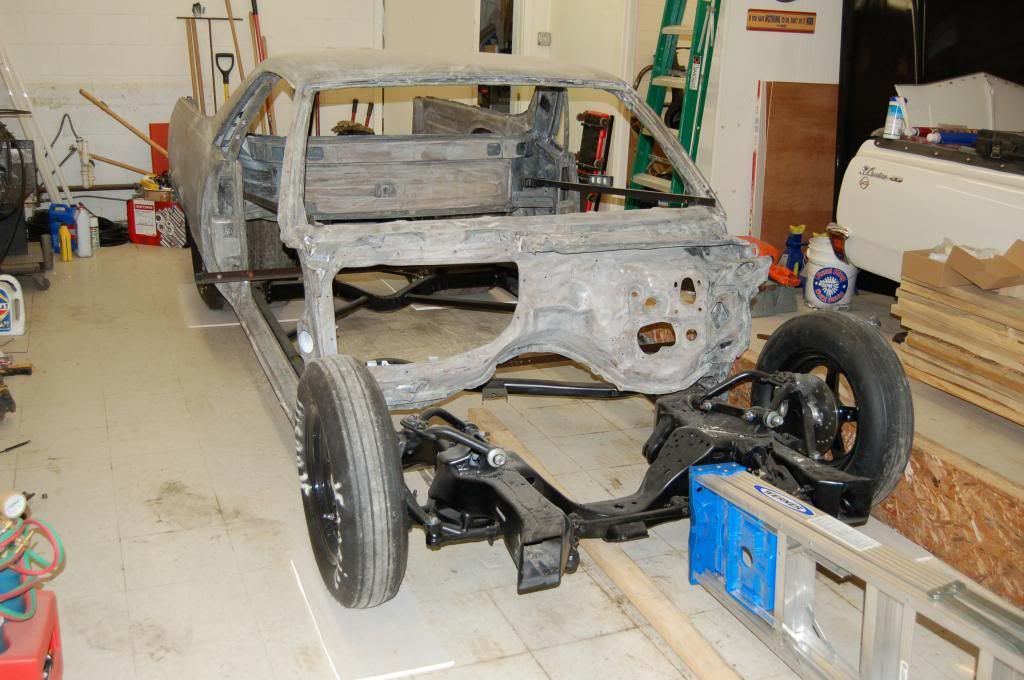
Our shop was still more or less a hobby shop when this photo was taken. You can see the fresh concrete pad outside where our new shop now sits. Joe runs his own place here now. This is what a good acid dip job will do for you. It will eat off everything but seam sealer, undercoat, and body putty. It really lets you see what you have to work with and YOU don't have the mess to clean up from stripping the paint.
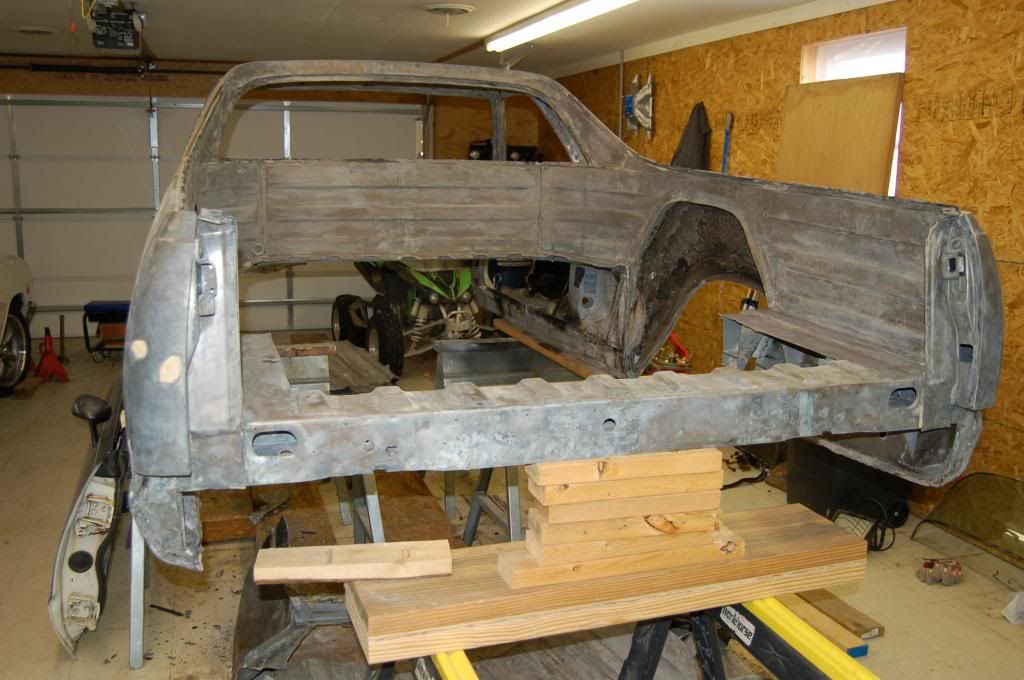
This was while he was still working for another repair shop. This picture was taken at open house day. He kept the original frame and back halved it, and updated the front suspension.
Joe started a late model El Camino a few years back but sold it before he got it finished so he had some chassis experience coming in to this project. We have been going to NHRA National events all over the country for years so we have gotten to see a lot of different car designs so that helps out too.

Our shop was still more or less a hobby shop when this photo was taken. You can see the fresh concrete pad outside where our new shop now sits. Joe runs his own place here now. This is what a good acid dip job will do for you. It will eat off everything but seam sealer, undercoat, and body putty. It really lets you see what you have to work with and YOU don't have the mess to clean up from stripping the paint.


This was while he was still working for another repair shop. This picture was taken at open house day. He kept the original frame and back halved it, and updated the front suspension.

Last edited by 65drag; 11-29-2013 at 07:59 AM.
07-14-2013, 08:14 PM
#63
10 Second Club
Join Date: Apr 2013
Location: Carlinville, IL
Posts: 317
Likes: 0
Received 0 Likes
on
0 Posts
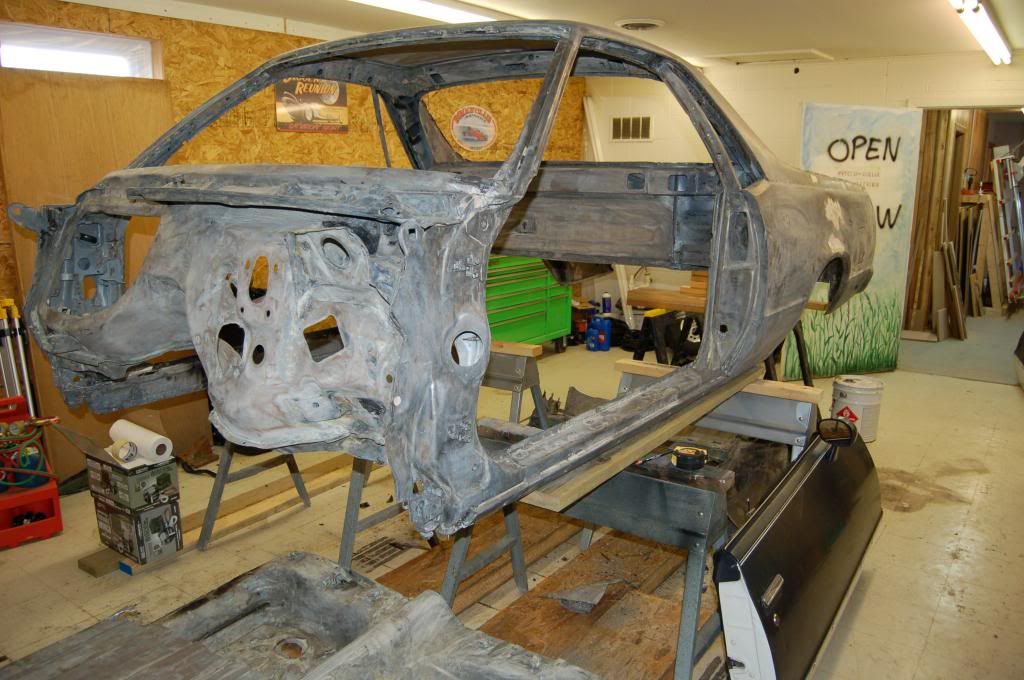
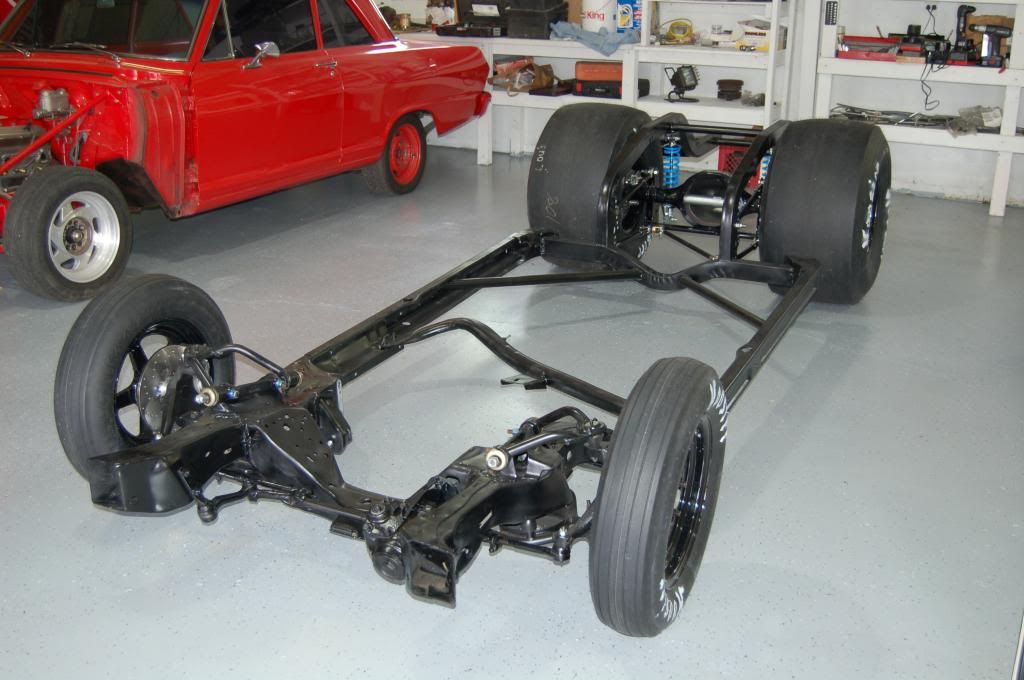
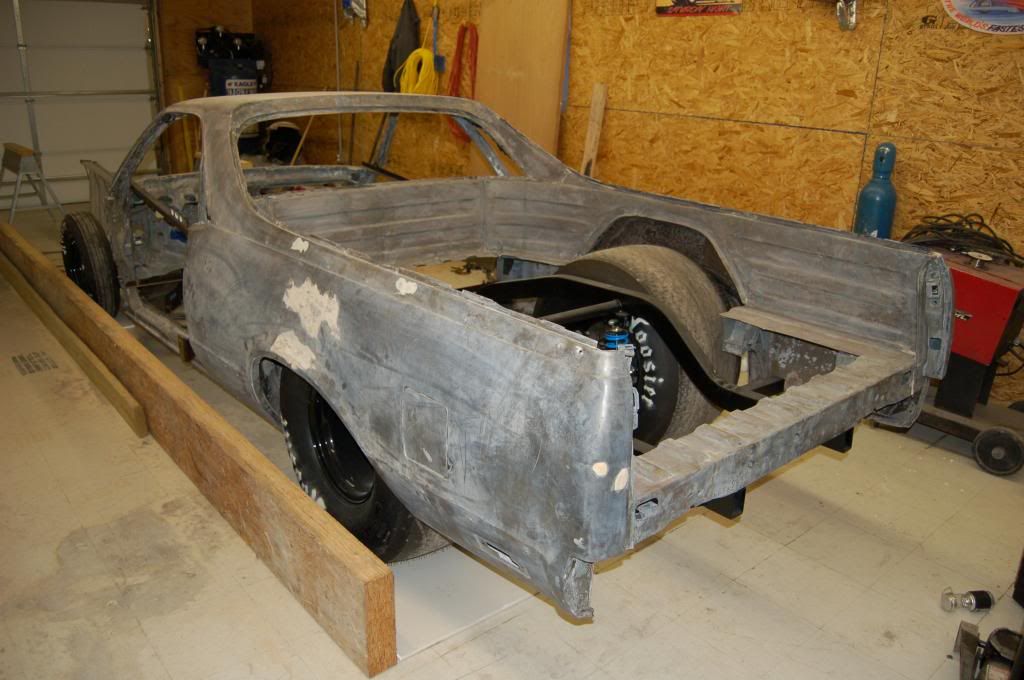
Again at Joes former work place. The other frame behind Joe's was the owners 32 Ford 3 Window frame.
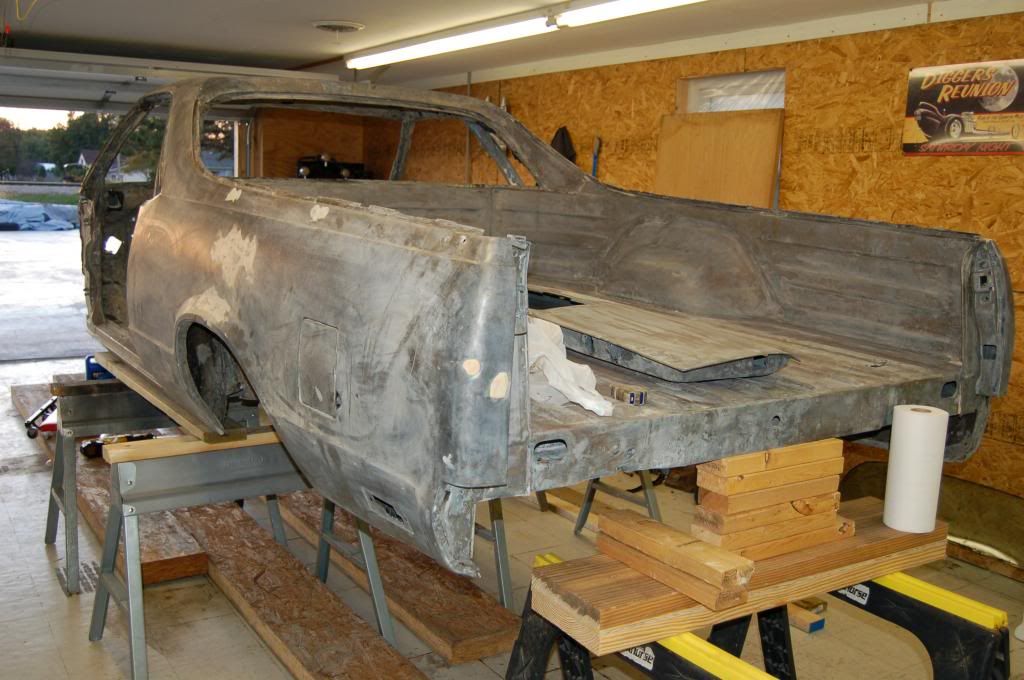
Here we are back at our shop with the body set down on the frame for the first time. This is as far as Joe got before he sold it. This would have been BAD if he had finished it. As you can see, the shop was sharing space with building materials for the new shop which makes it pretty hard to get EITHER done!


Here we are back at our shop with the body set down on the frame for the first time. This is as far as Joe got before he sold it. This would have been BAD if he had finished it. As you can see, the shop was sharing space with building materials for the new shop which makes it pretty hard to get EITHER done!


Last edited by 65drag; 07-14-2013 at 08:32 PM.

 07-16-2013, 09:03 PM
#65
10 Second Club
Join Date: Apr 2013
Location: Carlinville, IL
Posts: 317
Likes: 0
Received 0 Likes
on
0 Posts
08-05-2013, 05:47 PM
#67
10 Second Club
Join Date: Apr 2013
Location: Carlinville, IL
Posts: 317
Likes: 0
Received 0 Likes
on
0 Posts
We've been slacking off lately because of "real world" projects but still chipping away. Finally got around to mounting up the radiator by adding 1/2" tube for top supports attaching to the frame with left over roll cage gussets.
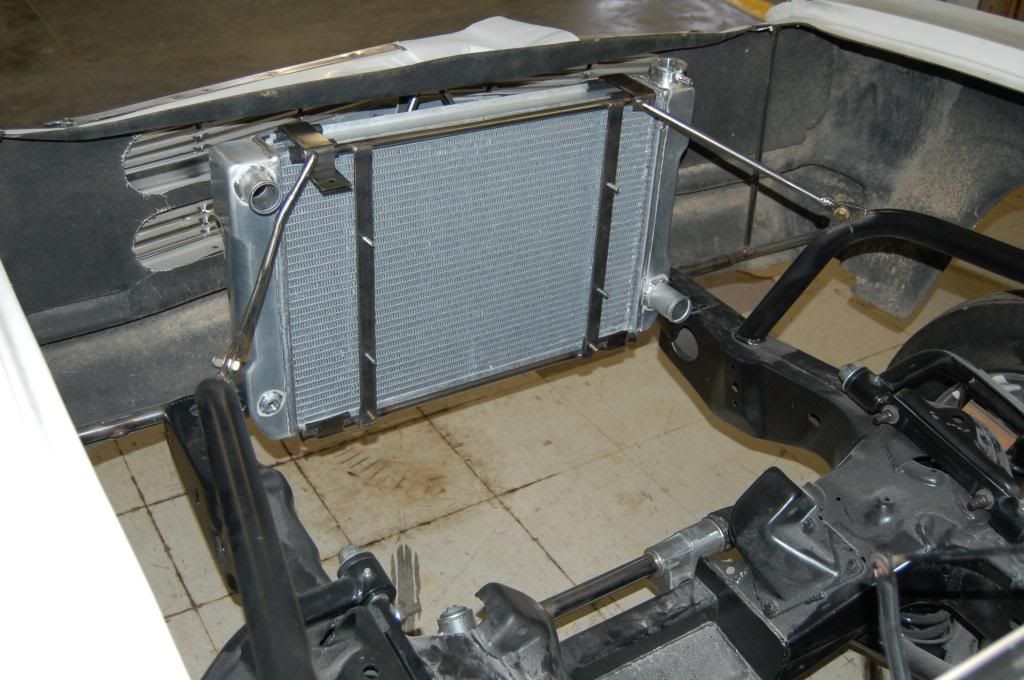
On the driver's side we had to get creative with the support tube to clear the upper radiator hose. This tubing is fairly stiff requiring heat to bend so it should hold this shape pretty well. We still have to weld it in place. This photo shows our mock up so we know exactly how much to cut off for a precise fit.
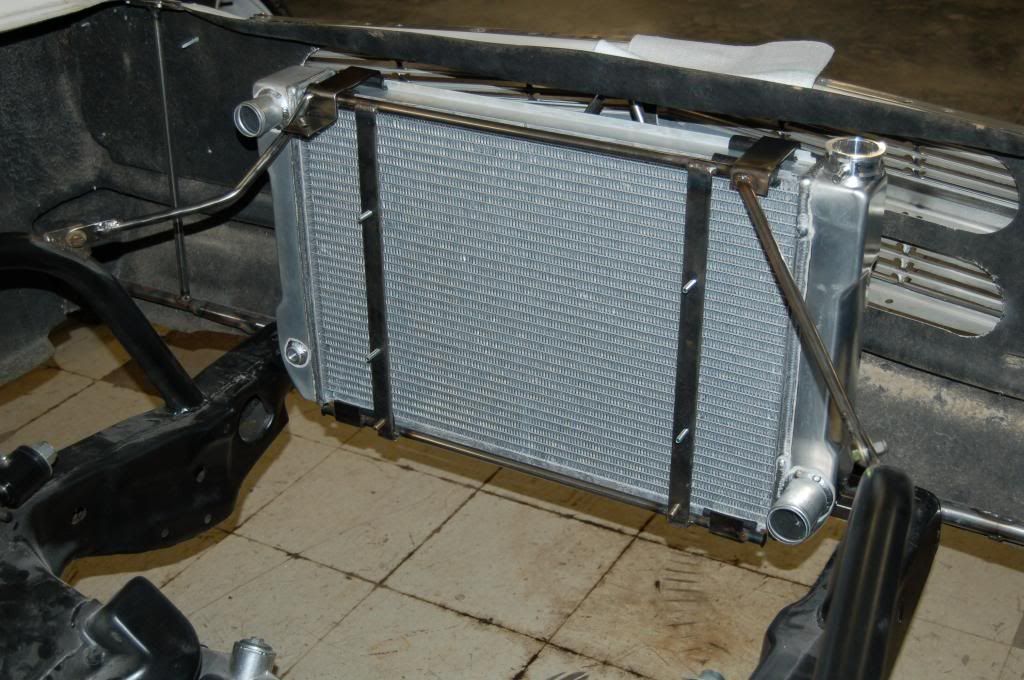

On the driver's side we had to get creative with the support tube to clear the upper radiator hose. This tubing is fairly stiff requiring heat to bend so it should hold this shape pretty well. We still have to weld it in place. This photo shows our mock up so we know exactly how much to cut off for a precise fit.
 08-05-2013, 05:50 PM
#68
10 Second Club
Join Date: Apr 2013
Location: Carlinville, IL
Posts: 317
Likes: 0
Received 0 Likes
on
0 Posts
We also modified the lower bar of the window net. It was originally made for the full width net so when we folded over the rear part the bar was too long and looked goofy.
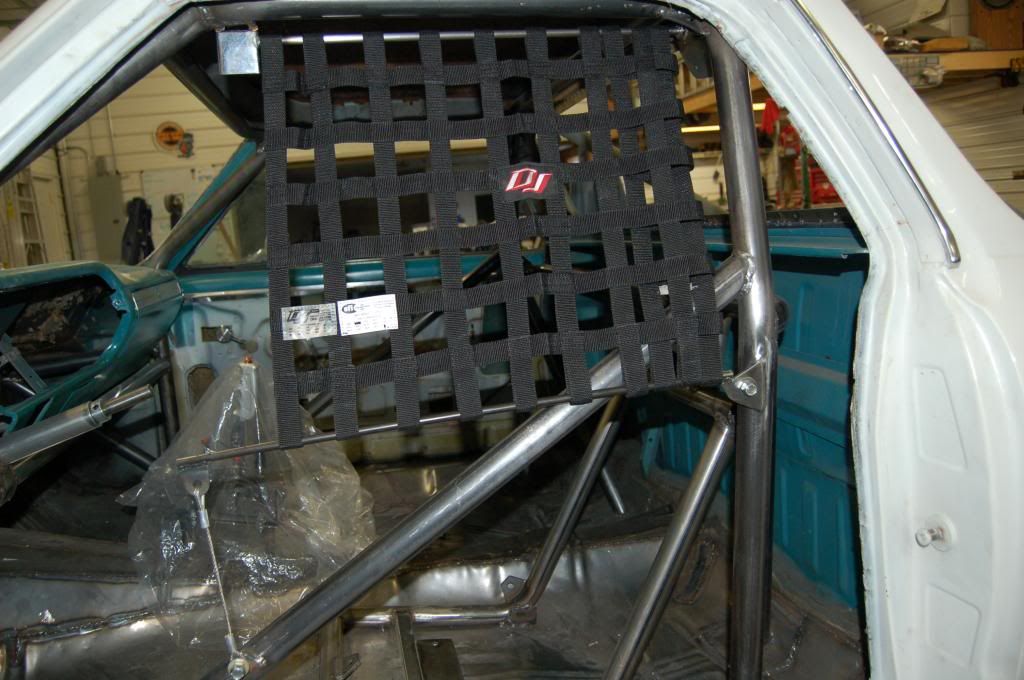
Here it is after shortening the lower bar. Looks much nicer.
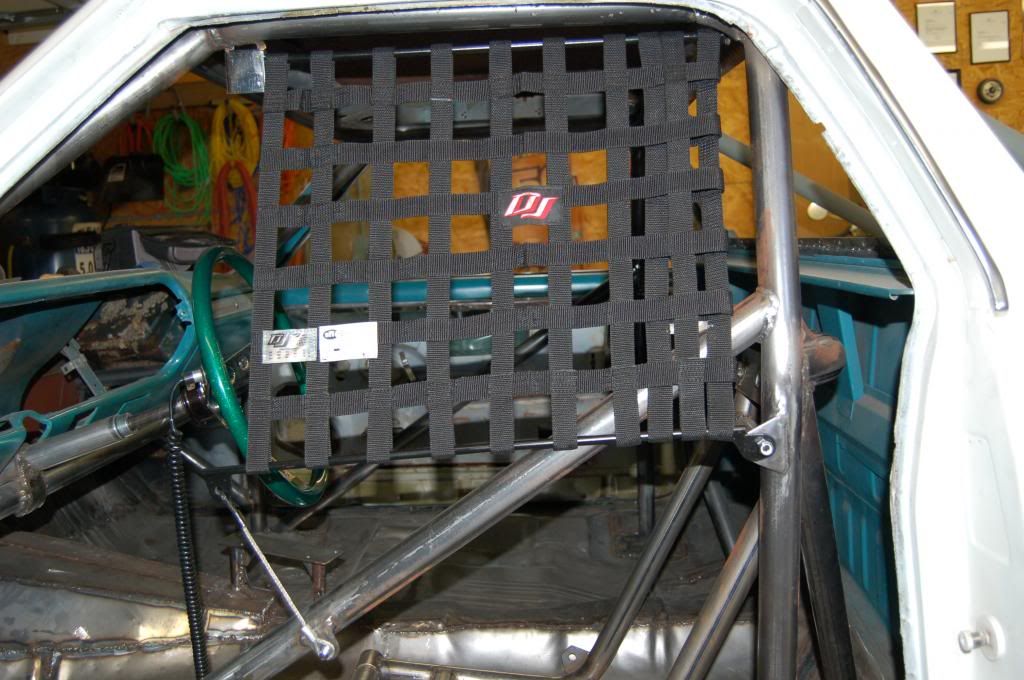

Here it is after shortening the lower bar. Looks much nicer.
 08-08-2013, 07:32 PM
#70
10 Second Club
Join Date: Apr 2013
Location: Carlinville, IL
Posts: 317
Likes: 0
Received 0 Likes
on
0 Posts
Uhhhh, good catch on that 68SS. We'll have to study on that a while. We're building this out of our heads and probably should have caught that earlier. Here is what I found from NHRA....
SECTION 20: GENERAL REGULATIONS, INTERIOR: 6, WINDOW NET (Page 29) (3/5/2012) An SFI 27.1 ribbon-type or mesh-type window net is mandatory on any full-bodied car required by the rules to have a roll cage. An SFI 27.1 ribbon-type or mesh-type window net is mandatory on any full-bodied car running 7.49 (*4.49) or quicker. For full-bodied cars running 7.50 (*4.50) to 9.99 (*6.39) or if vehicle runs 135 mph or faster a ribbon-type or SFI 27.1 mesh-type window net is mandatory unless otherwise specified by class requirements. SFI 27.1 window net, when required, must be updated at two-year intervals from the date of manufacture. Window net must be securely mounted on the inside of the roll cage, with the permanent attachment at the bottom. All attachment points must be designed in an attempt to protect the driver and avoid contact with track surface or guardwall. Eyelet clips, dogleash hardware, hose clamps, etc. prohibited. Penetration of webbing, except as performed by manufacturer, prohibited. Any modification to net must be performed by manufacturer.
SECTION 20: GENERAL REGULATIONS, INTERIOR: 6, WINDOW NET (Page 29) (3/5/2012) An SFI 27.1 ribbon-type or mesh-type window net is mandatory on any full-bodied car required by the rules to have a roll cage. An SFI 27.1 ribbon-type or mesh-type window net is mandatory on any full-bodied car running 7.49 (*4.49) or quicker. For full-bodied cars running 7.50 (*4.50) to 9.99 (*6.39) or if vehicle runs 135 mph or faster a ribbon-type or SFI 27.1 mesh-type window net is mandatory unless otherwise specified by class requirements. SFI 27.1 window net, when required, must be updated at two-year intervals from the date of manufacture. Window net must be securely mounted on the inside of the roll cage, with the permanent attachment at the bottom. All attachment points must be designed in an attempt to protect the driver and avoid contact with track surface or guardwall. Eyelet clips, dogleash hardware, hose clamps, etc. prohibited. Penetration of webbing, except as performed by manufacturer, prohibited. Any modification to net must be performed by manufacturer.
08-08-2013, 11:35 PM
#71
Glad I moved this thread from the hybrids forum. Those street car whiners would have never caught that. They couldn't believe we weren't going to drive this car on the street anymore. No a/c, spool, slicks, 4.33s, ONE SEAT, and open headers and they still have to ask "you still gunna drive it on the street"?
08-17-2013, 04:15 PM
#73
10 Second Club
Join Date: Apr 2013
Location: Carlinville, IL
Posts: 317
Likes: 0
Received 0 Likes
on
0 Posts
OK, we spent last Monday night backtracking a little bit. We cut off the brackets we made to mount the window net to the outside of the cage, and made new ones for the inside of the cage.
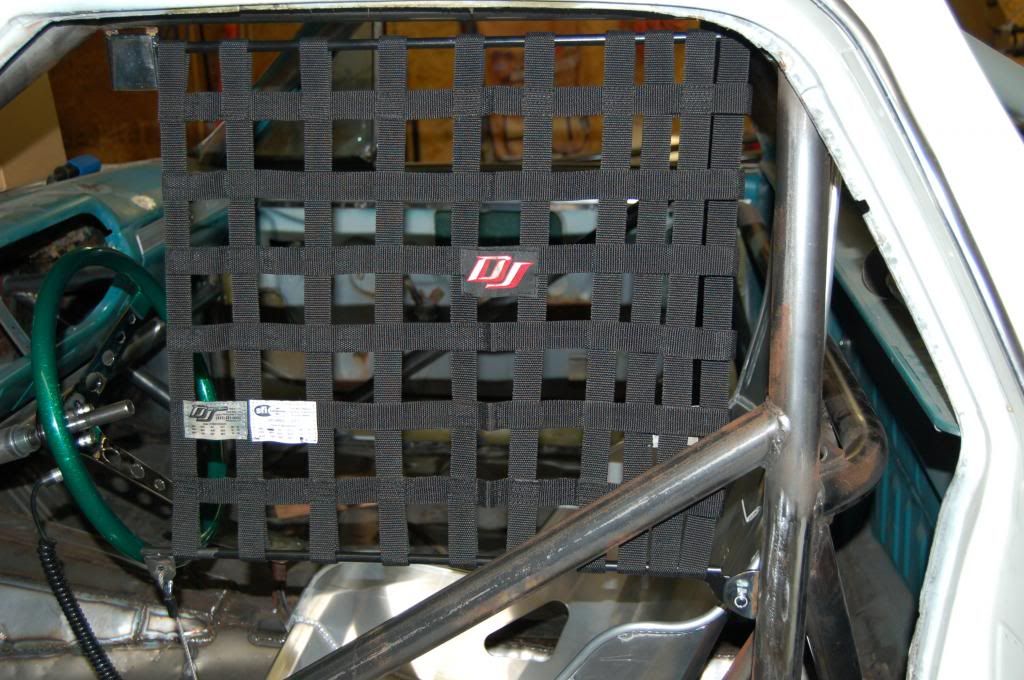
While we were at it, we shortened the lower bar to just long enough for the net. There will be less strain on the bar that way when it is in place. The excess steering rod coming thru the wheel is due to our having to rethink the steering u-joints. It will get cut to length when we have final fit of the seat to wheel to shifter.
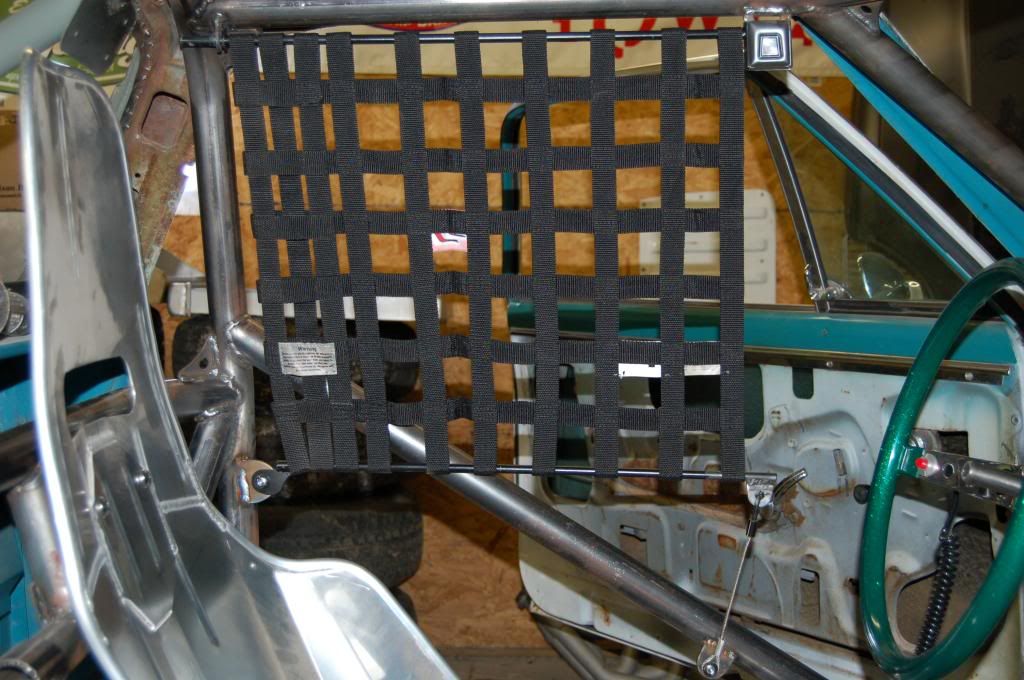

While we were at it, we shortened the lower bar to just long enough for the net. There will be less strain on the bar that way when it is in place. The excess steering rod coming thru the wheel is due to our having to rethink the steering u-joints. It will get cut to length when we have final fit of the seat to wheel to shifter.

 08-18-2013, 08:18 AM
#75
Thank you for the kind words! It is so nice to have encouragement from people who appreciate what it takes to build something like this. We are long past our completion goal, but we are still plunking away at it. Hopefully we will have some reinforcements soon to help with the body and paint work. Once this thing is painted, we can have it ready to test in a week or two.
08-18-2013, 04:04 PM
#76
10 Second Club
Join Date: Apr 2013
Location: Carlinville, IL
Posts: 317
Likes: 0
Received 0 Likes
on
0 Posts
Got a little done today in prep for shop night tomorrow. We are fitting up a nice aluminum bodied master cylinder to update the brakes and save weight.
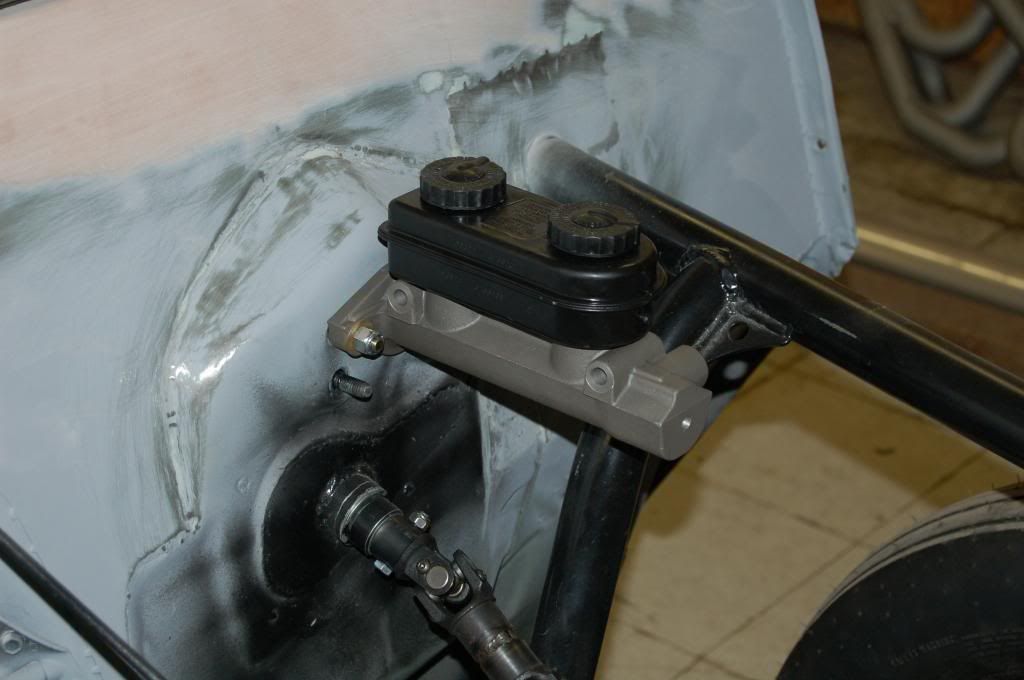
The holes in the master cylinder body didn't line up with the holes in the firewall so we open up the mounting holes in the master cylinder to 3/8 and slotted the firewall holes to match.
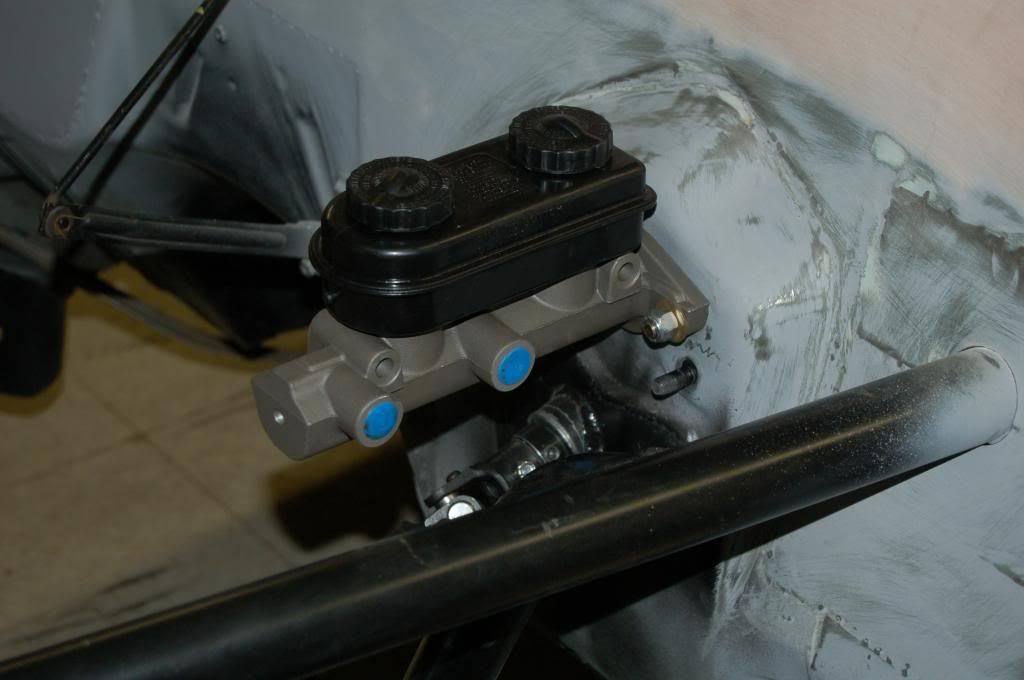

The holes in the master cylinder body didn't line up with the holes in the firewall so we open up the mounting holes in the master cylinder to 3/8 and slotted the firewall holes to match.
 08-18-2013, 04:09 PM
#77
10 Second Club
Join Date: Apr 2013
Location: Carlinville, IL
Posts: 317
Likes: 0
Received 0 Likes
on
0 Posts
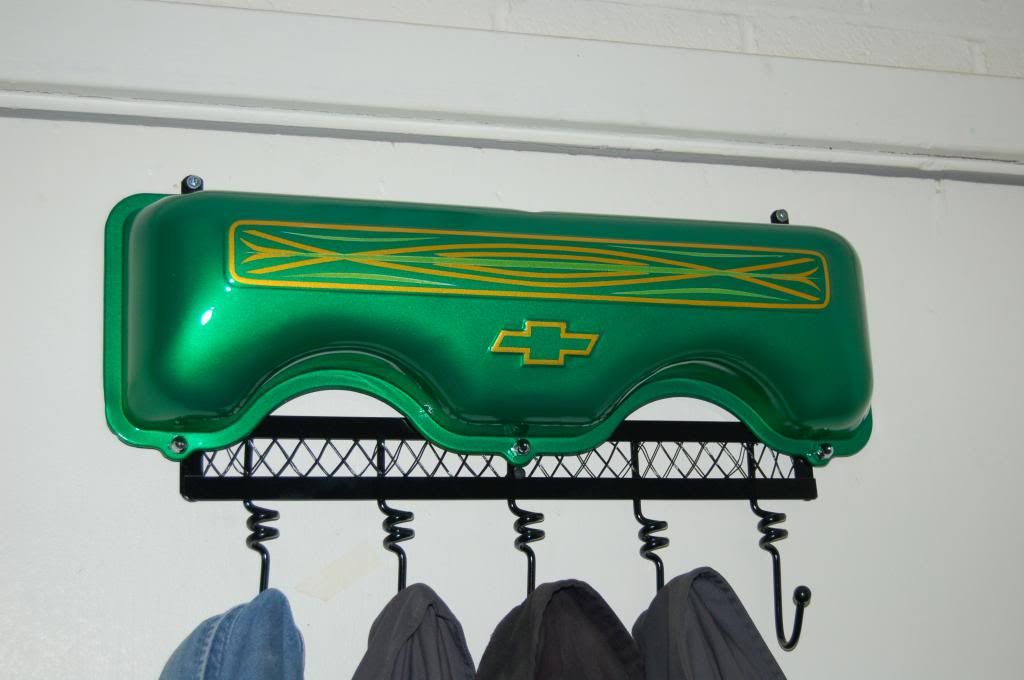
While I was at the shop today, I got this coat hanger hung up. I've been working on this since last winter.
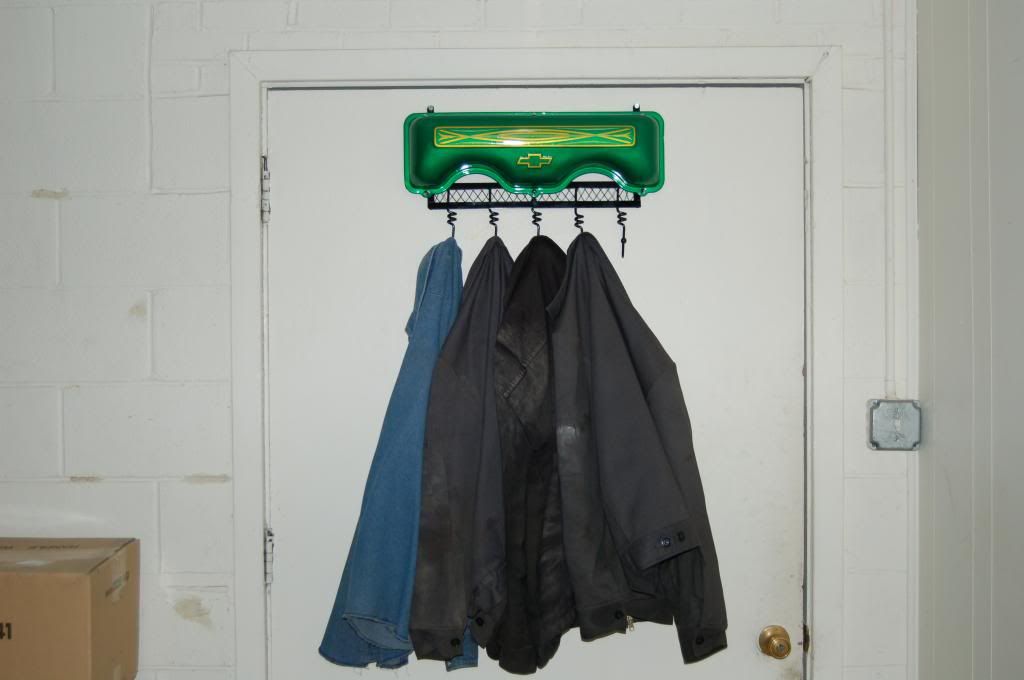
Before you go ballistic about using this 409 valve cover for a project like this, it started out as a mess with several rust holes that I had to patch which made it virtually unusable for the real purpose.

Before you go ballistic about using this 409 valve cover for a project like this, it started out as a mess with several rust holes that I had to patch which made it virtually unusable for the real purpose.
 08-20-2013, 05:02 PM
#78
10 Second Club
Join Date: Apr 2013
Location: Carlinville, IL
Posts: 317
Likes: 0
Received 0 Likes
on
0 Posts
Didn't get much done last night. Joe has a major project coming in next week that will take up most of the shop space, and a couple of weeks to complete so we devoted much of shop night to cleaning up the place.
I was able to sneak in enough time for the brake pedal. We were going to use the small brake pedal that came with the car when it had a clutch pedal along side, but when we put our homemade steering column in, the pedal arm rubbed the column because the factory column actually is in crooked and our column is straight.
The small clutch/brake pedal and the large automatic pedal hang differently and the pedal rod is shaped differently so they both end up in about the same foot position. I modified the large automatic brake pedal to give us more room between the brake and throttle and still clear the column.
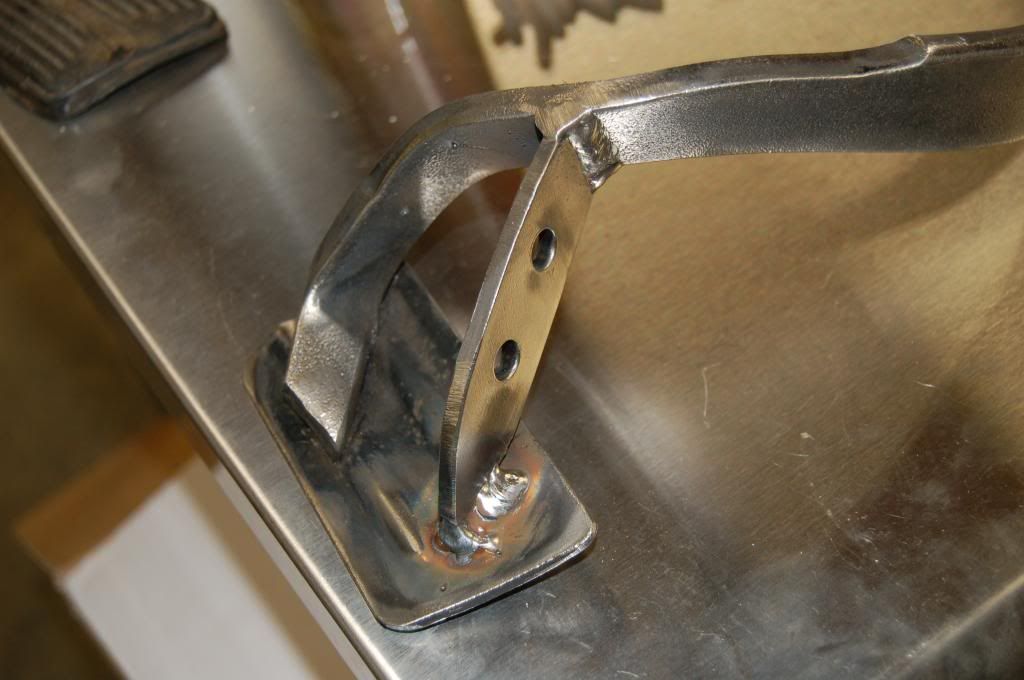
I was able to sneak in enough time for the brake pedal. We were going to use the small brake pedal that came with the car when it had a clutch pedal along side, but when we put our homemade steering column in, the pedal arm rubbed the column because the factory column actually is in crooked and our column is straight.

The small clutch/brake pedal and the large automatic pedal hang differently and the pedal rod is shaped differently so they both end up in about the same foot position. I modified the large automatic brake pedal to give us more room between the brake and throttle and still clear the column.

Last edited by 65drag; 08-20-2013 at 05:08 PM.
 08-20-2013, 08:46 PM
#80
10 Second Club
Join Date: Apr 2013
Location: Carlinville, IL
Posts: 317
Likes: 0
Received 0 Likes
on
0 Posts
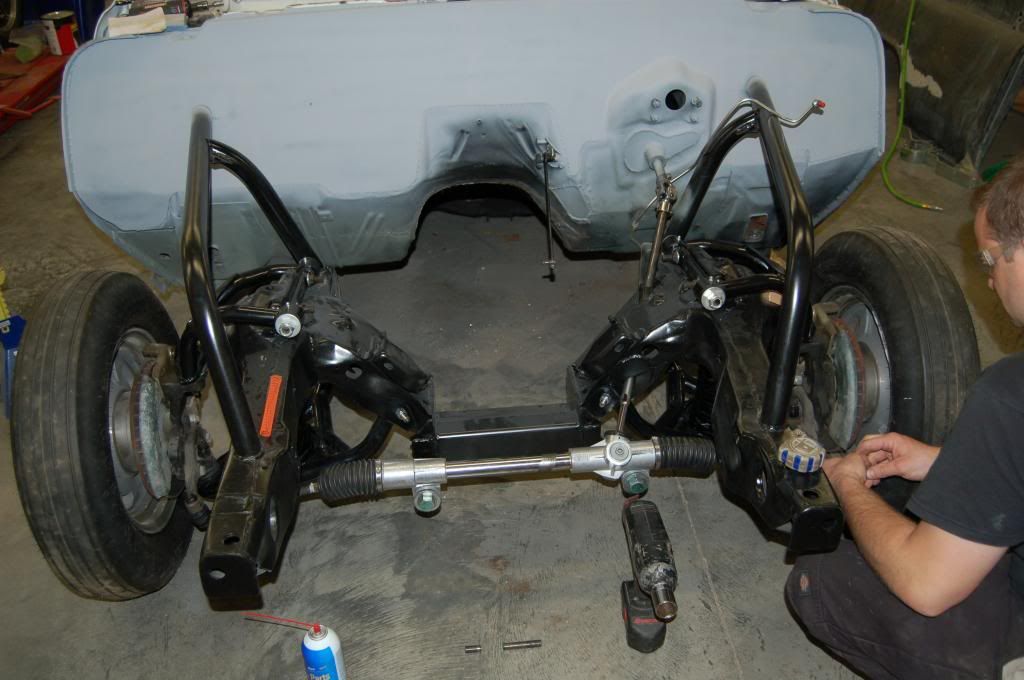
No Speedtigger, your not seeing things. It is off center to the drivers side for a reason. If we had centered the rack symmetrically, the steering rod would have come up thru the headers or we would have had to do a real snake thing with multiple u-joints to get it around the cross member and up to the firewall.
Your Buick is SWEET by the way.
Your Buick is SWEET by the way.
Last edited by 65drag; 08-20-2013 at 08:55 PM.