
Dash,Passenger Air Bag,Door Bar,Wiper/Wiper Motor,Inner Fender Removal with Pictures
 03-24-2007, 09:05 PM
#1
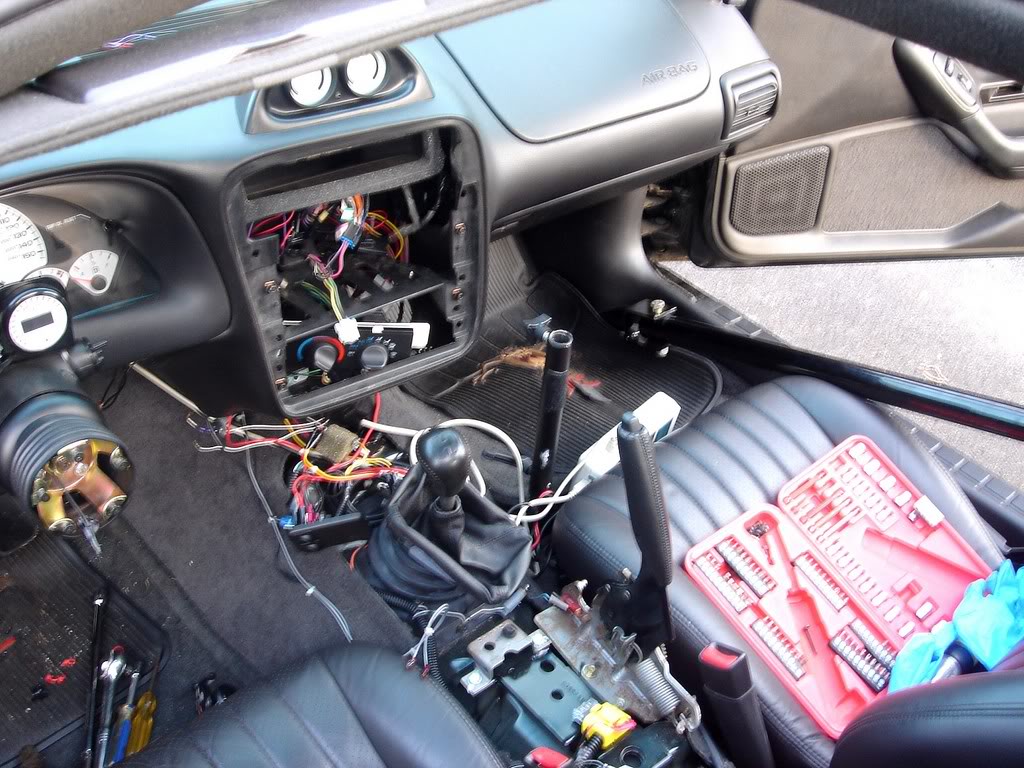
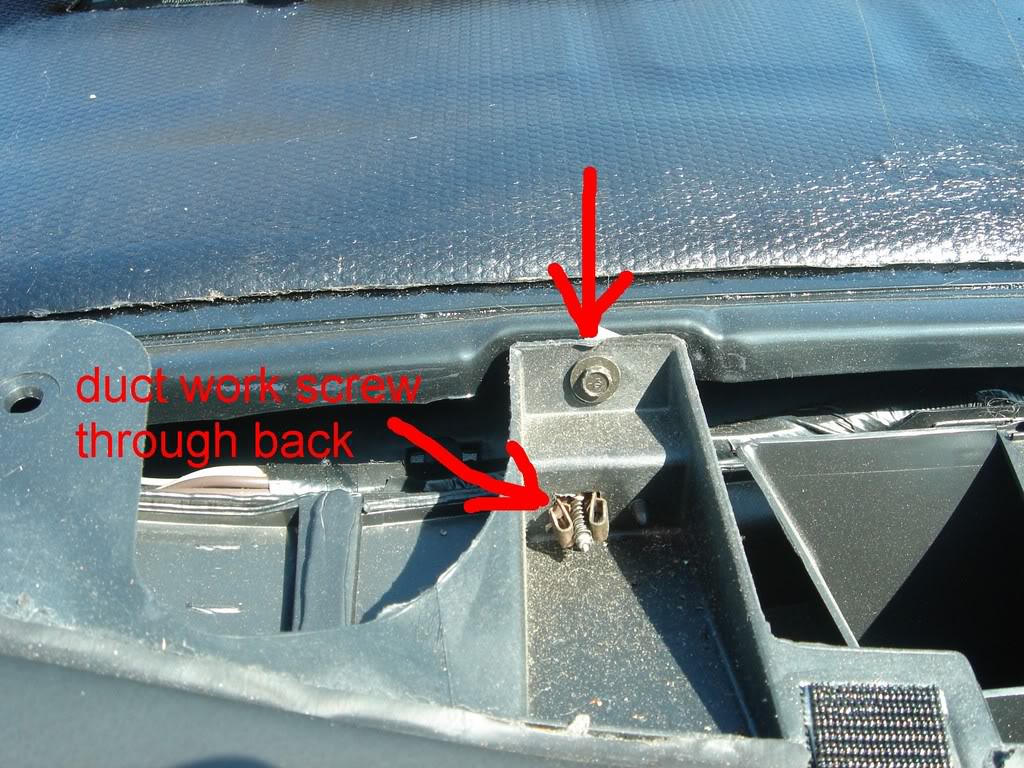
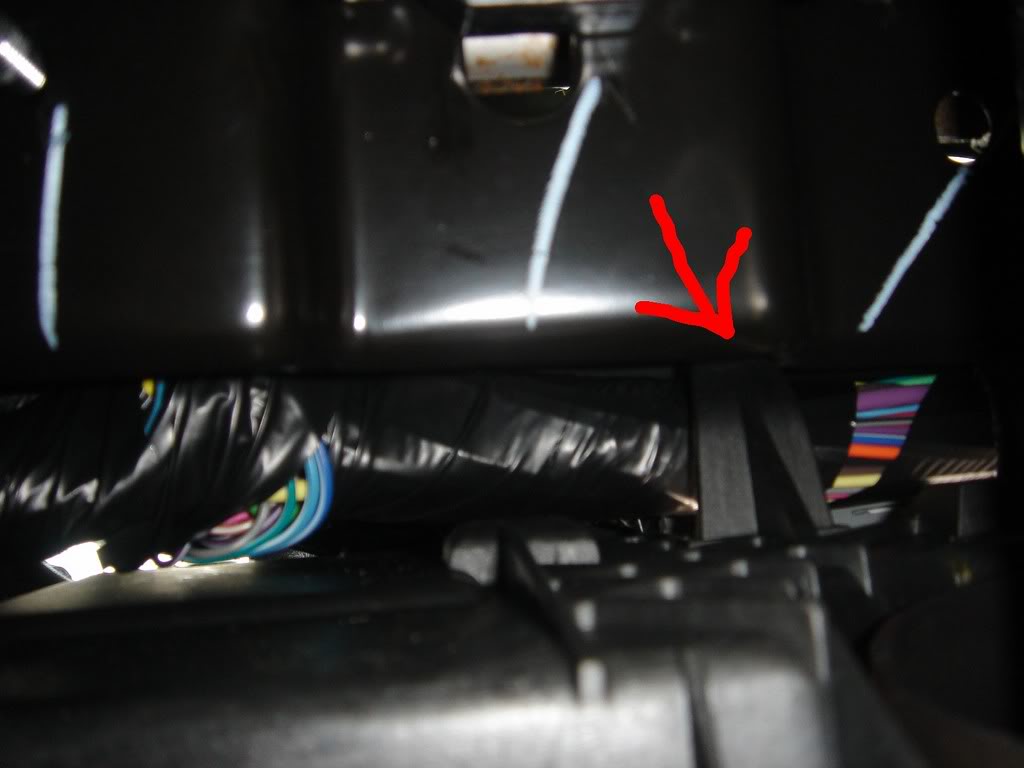
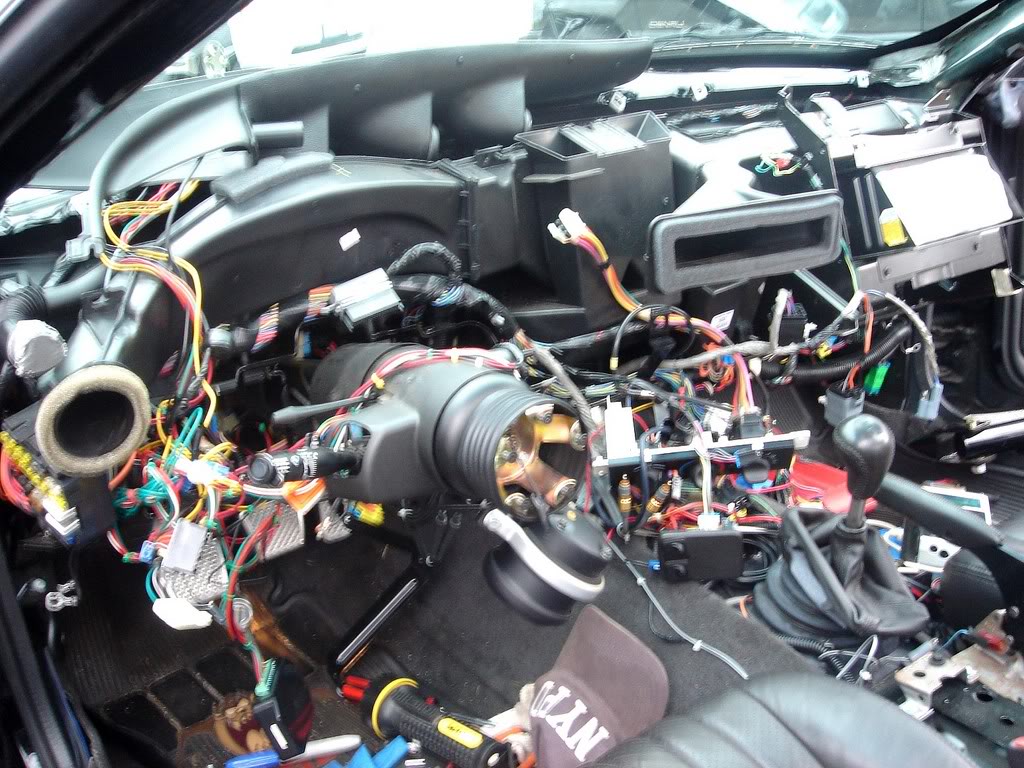
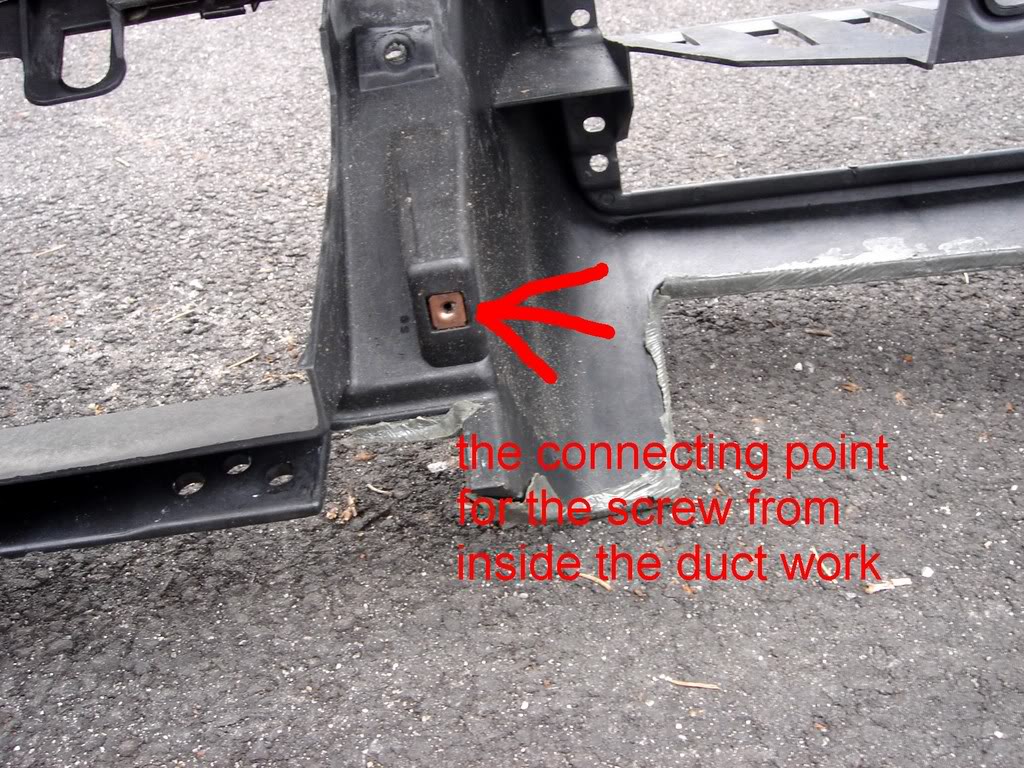
Took a little figuring out but I managed. I think the worst part was figuring out the 1 screw that came from inside the duct work to the dash  .
.
Door bars and bolts = 14.5lbs
Cruise control = 5lbs
Steering wheel with airbag = 5.5lbs
Airbag control module = 1.5lbs
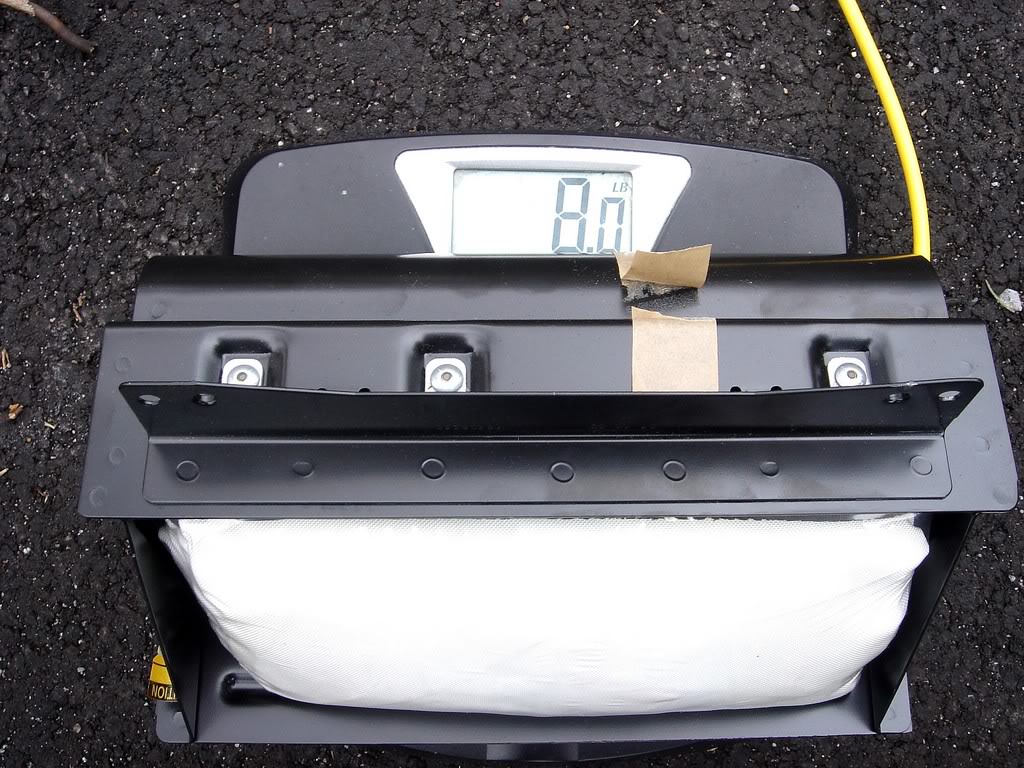
Pass airbag = 14-14.5lbs
Current total = -40.5lbs
7mm
10mm
13mm
phillips screwdriver
!!Patience!!
Pull center console
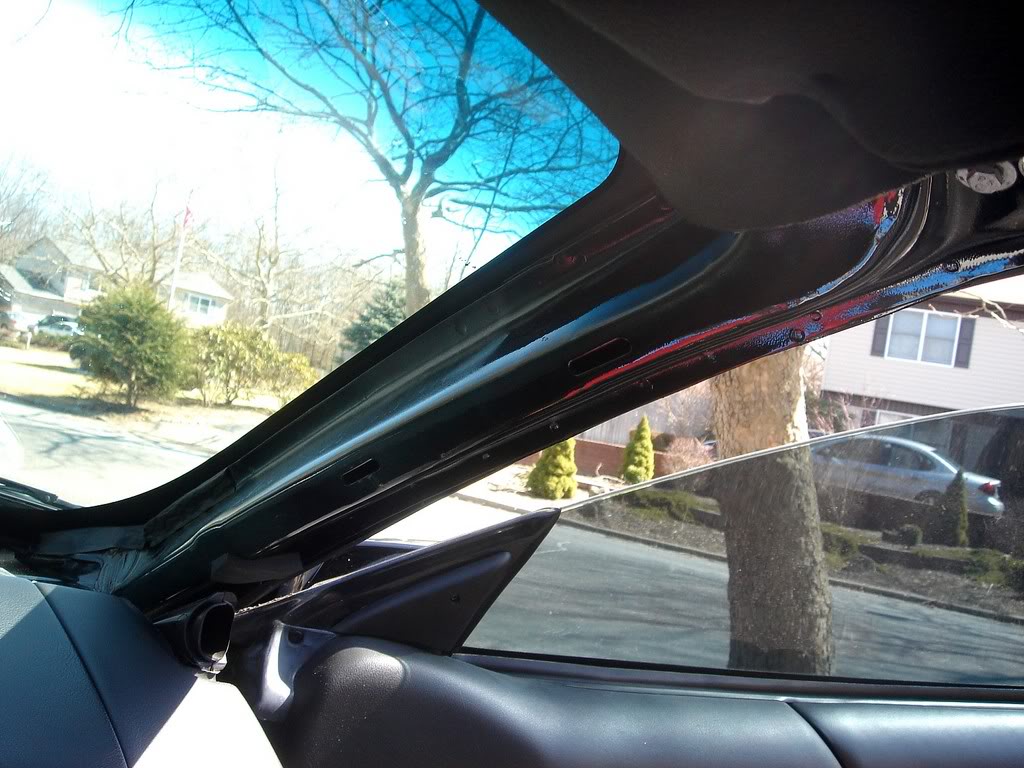
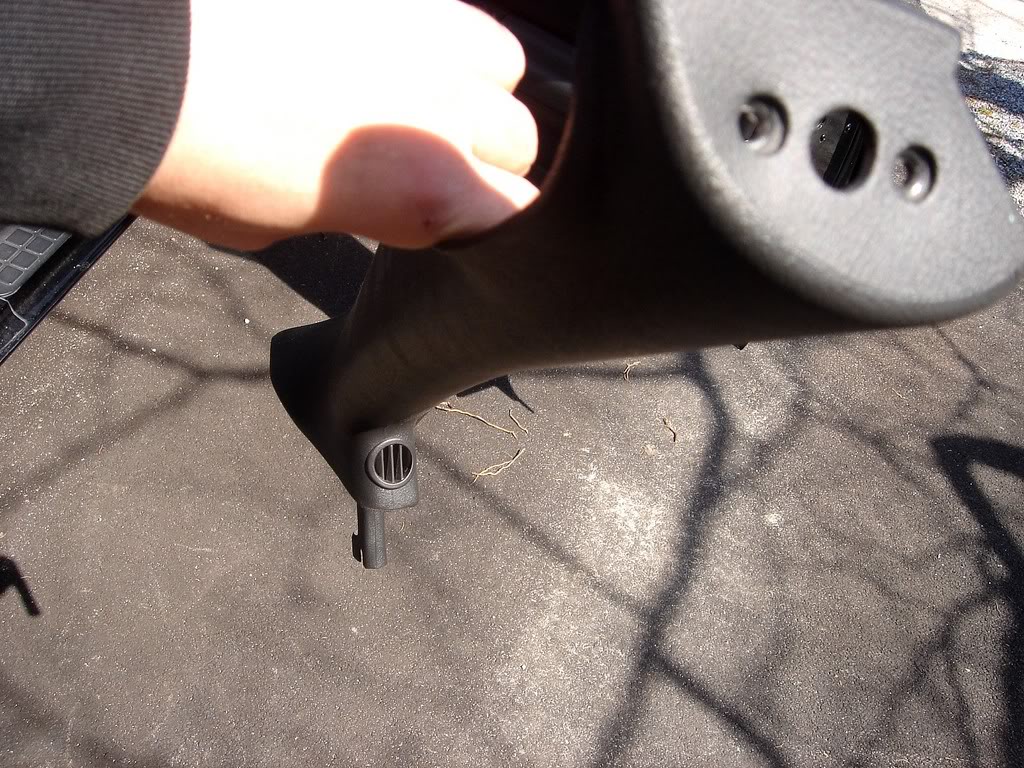
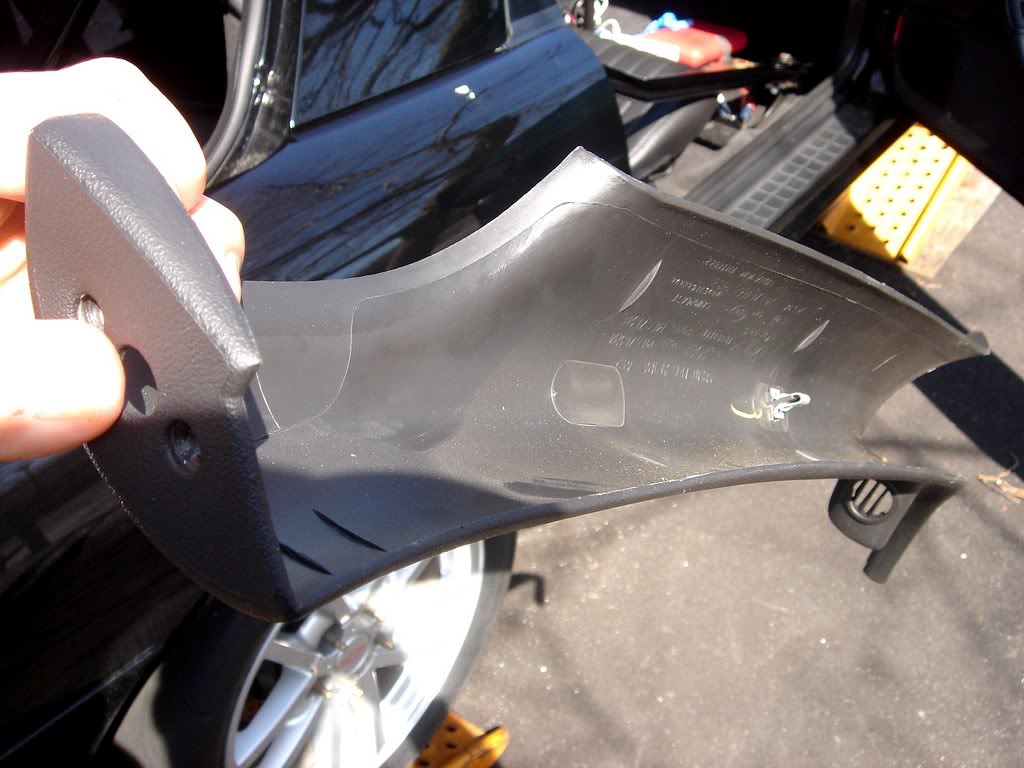
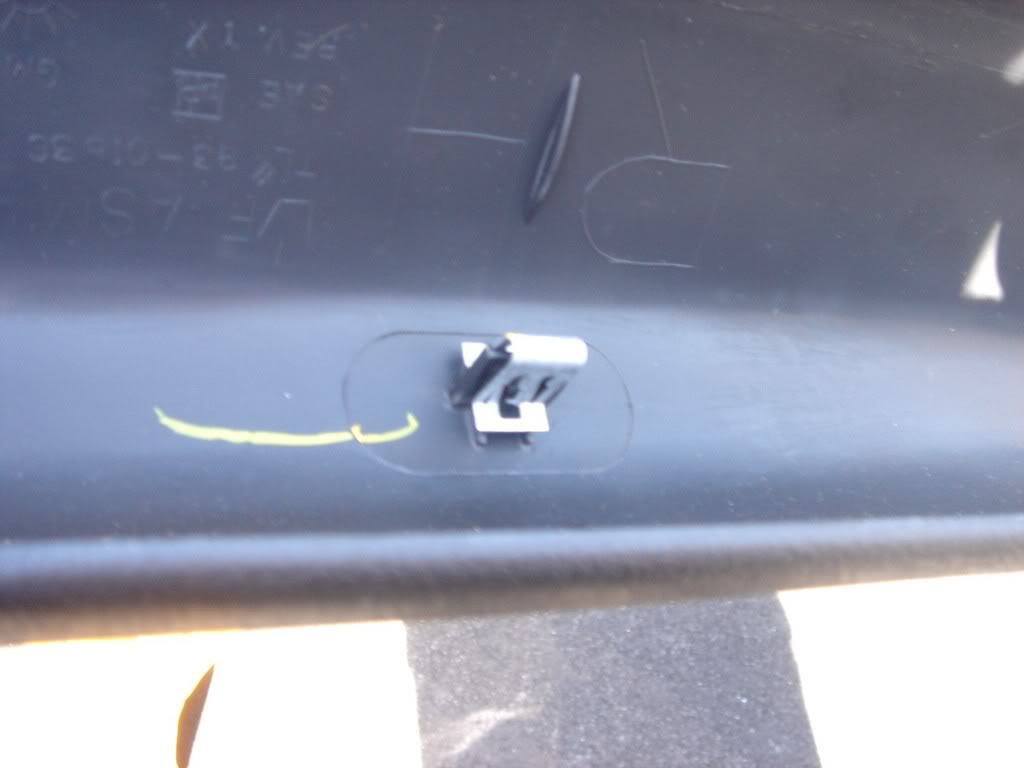
Pull a-pillar trim
Pull trim along door sill (kick panel)
Pull all panels off bottom of dash
Pull screw holding fuse panel to dash.
Pull light switch.
Pull radio and HVAC
Pull steering wheel
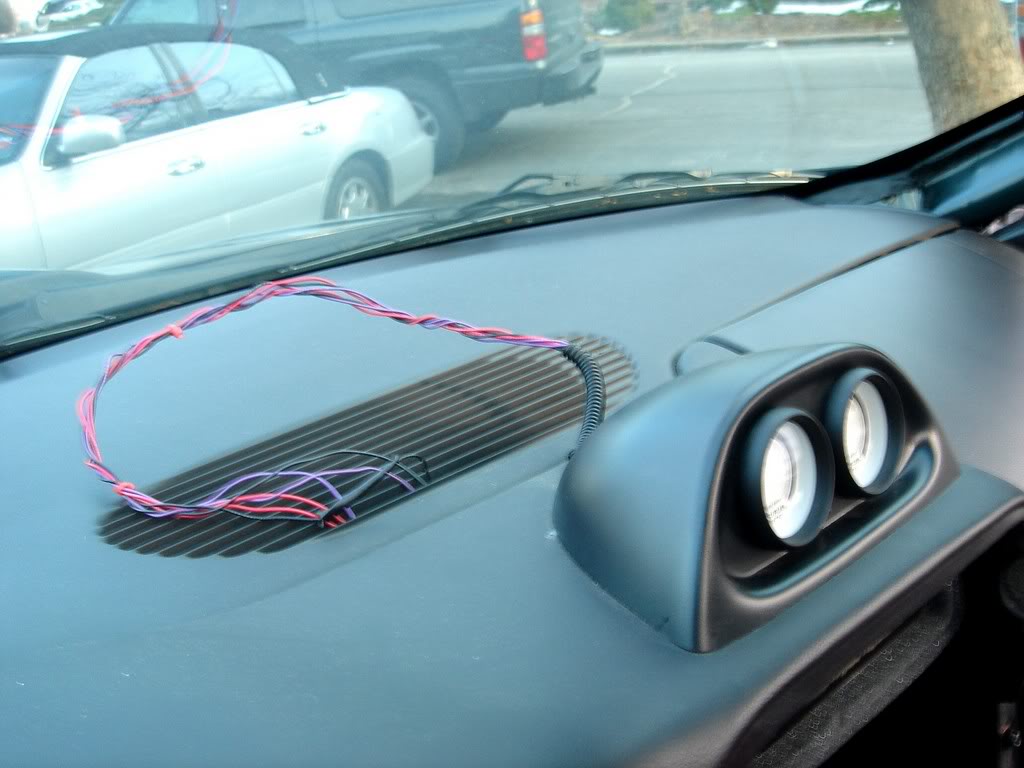
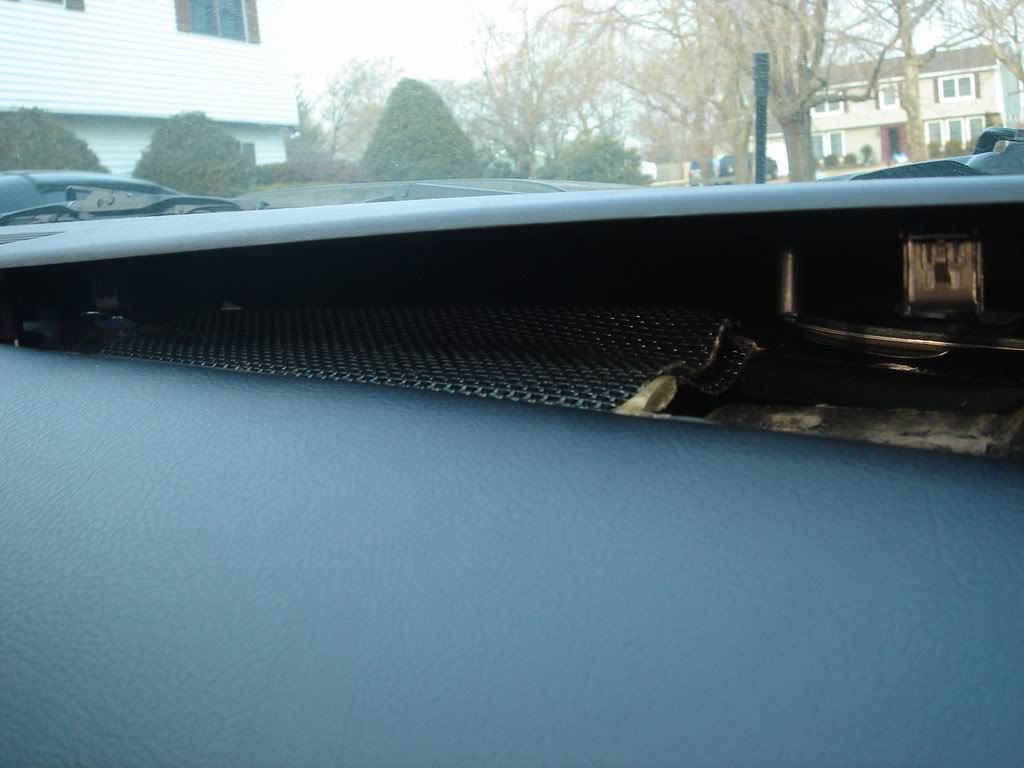
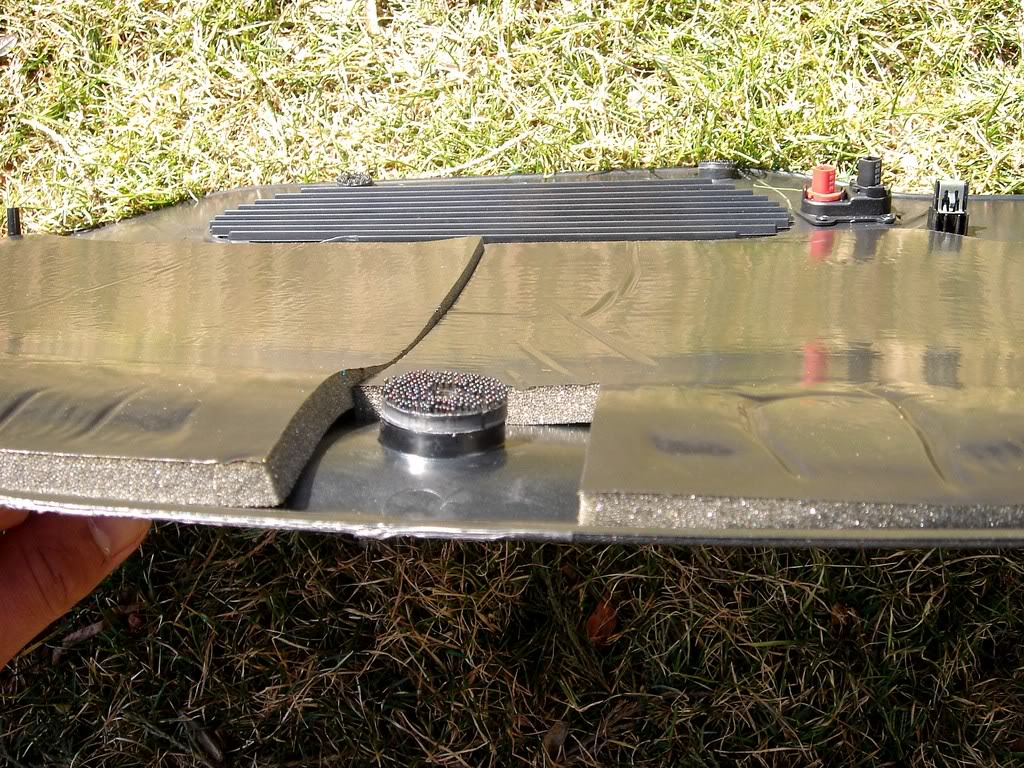
Pull dash piece closest to windshield. Start in corner carefully pop the clips/velcro.
Remove alarm and photocell wiring before complete removal.
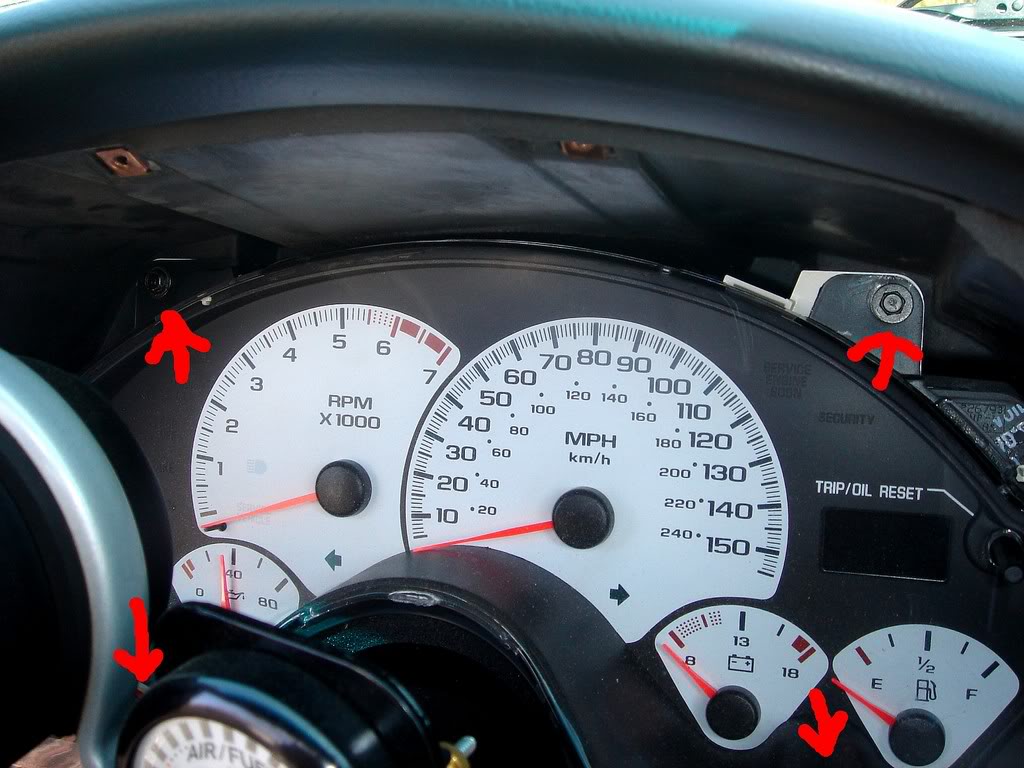
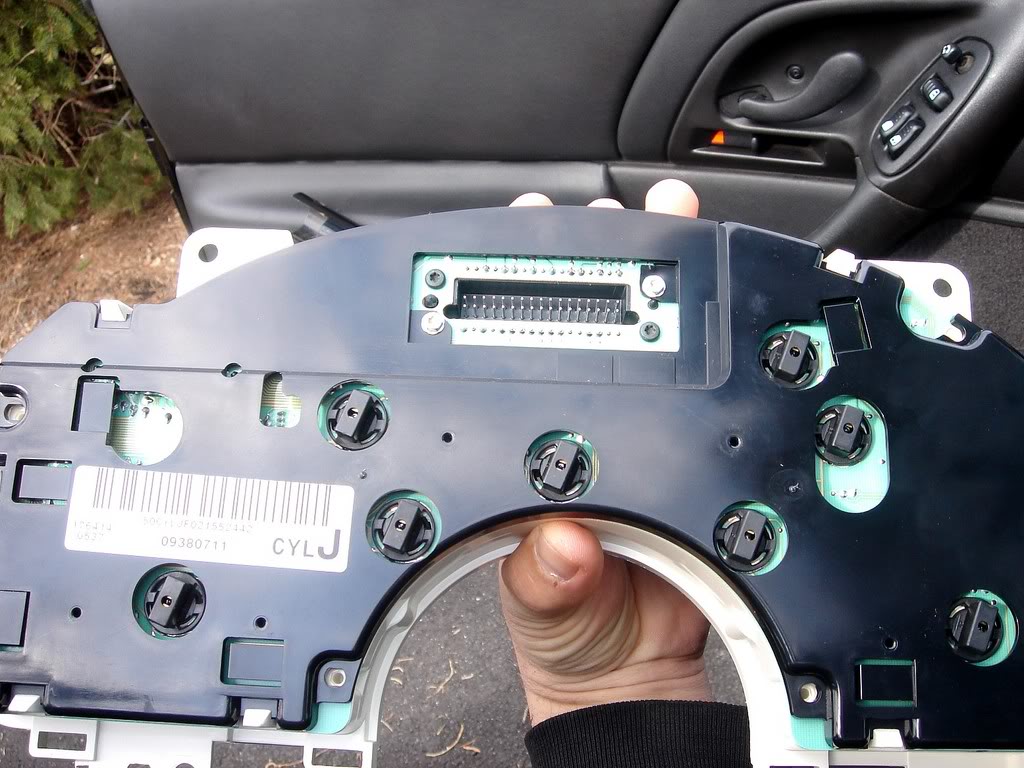
Pull guage cluster. Remove all screws. Grip both sides firmly and carefully pull towards you as you gently wiggle it back and forth.
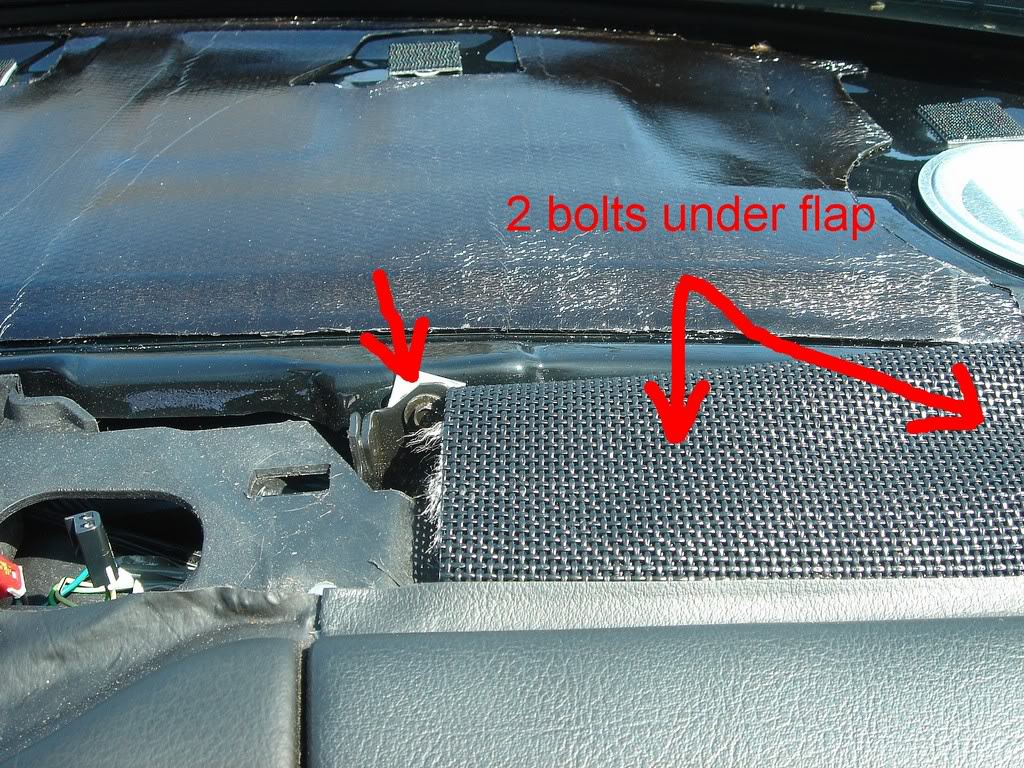
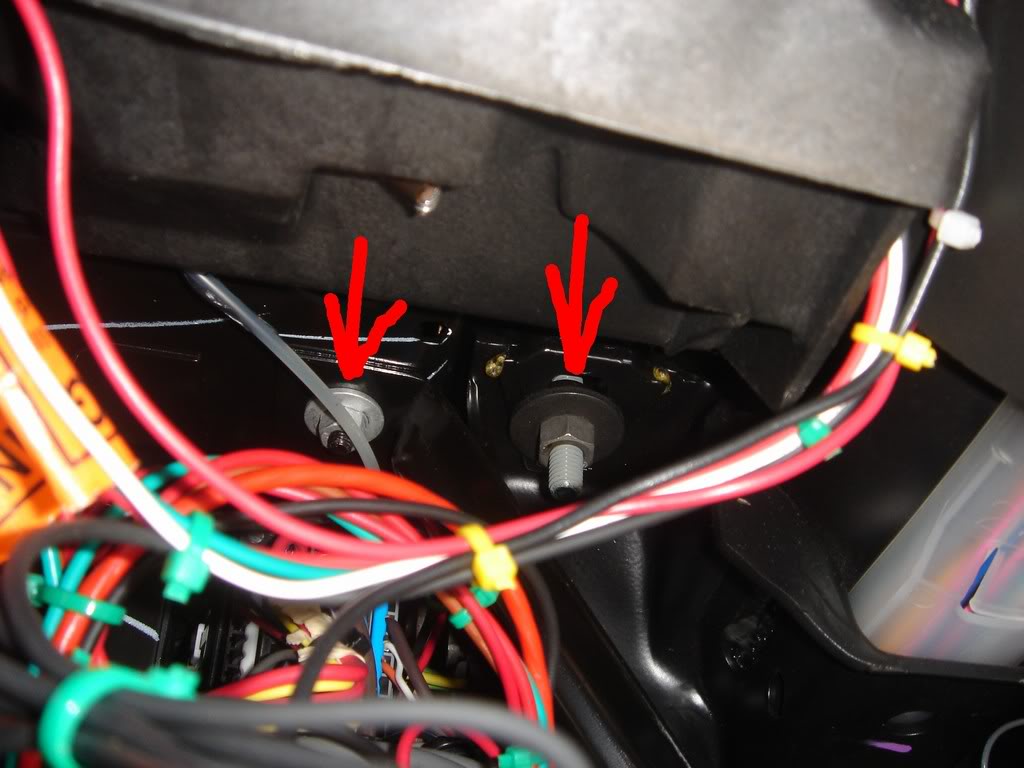
Pull all screws along top and bottom as well as 2 nuts that were covered by each kickpanel.
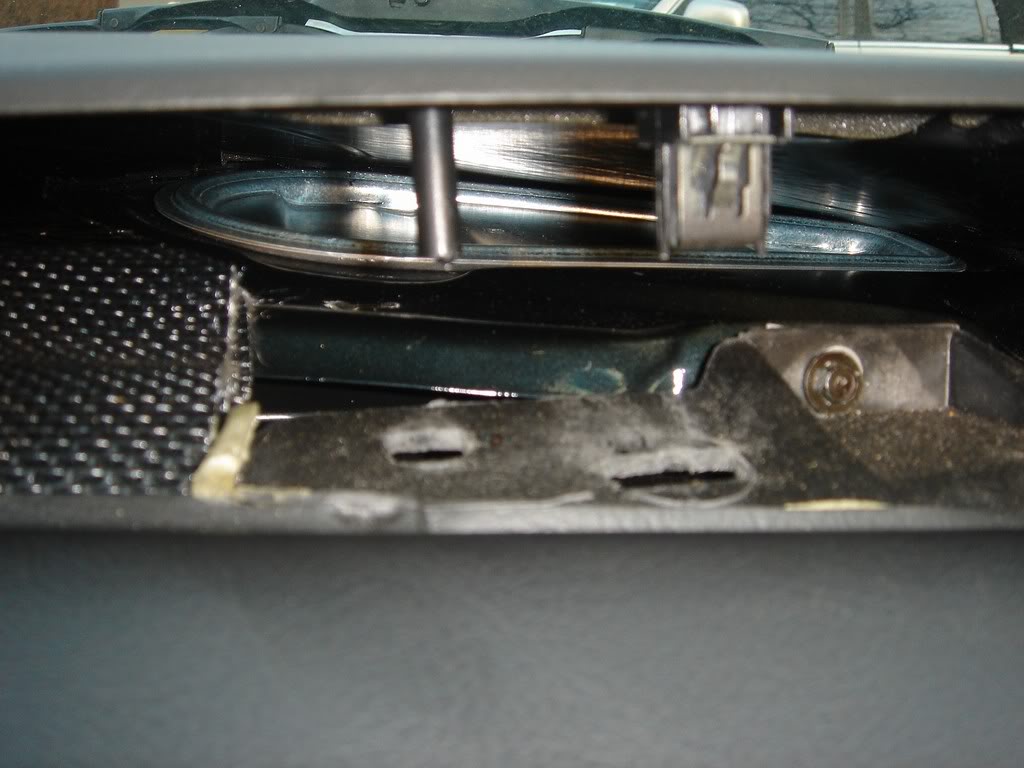
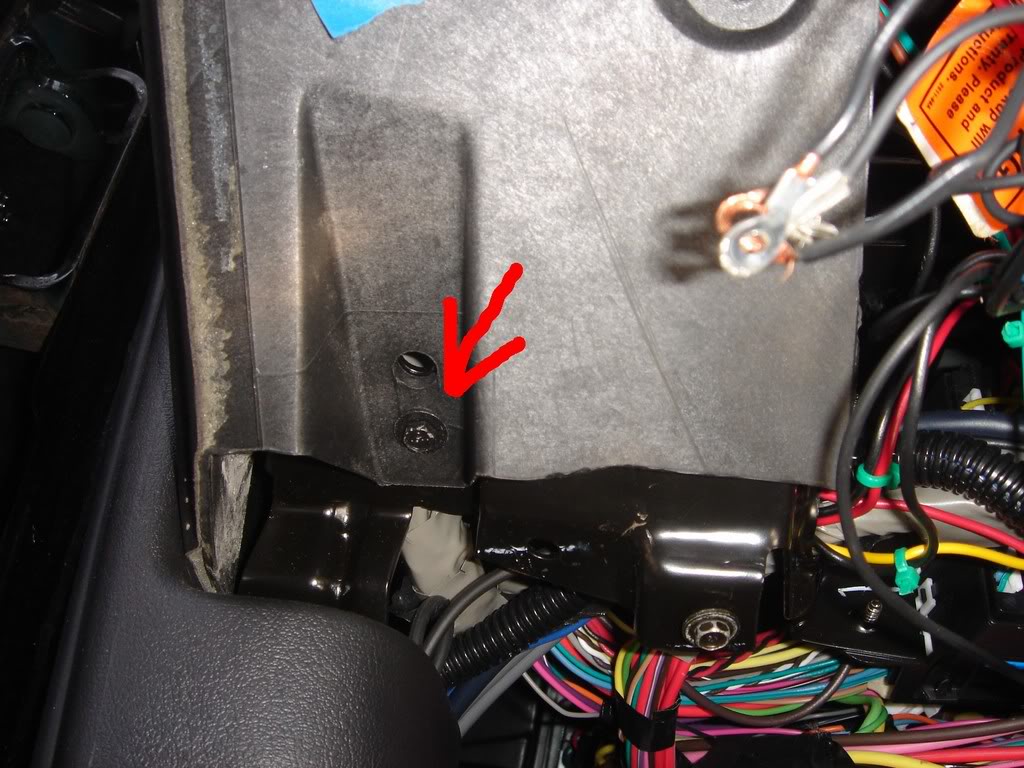
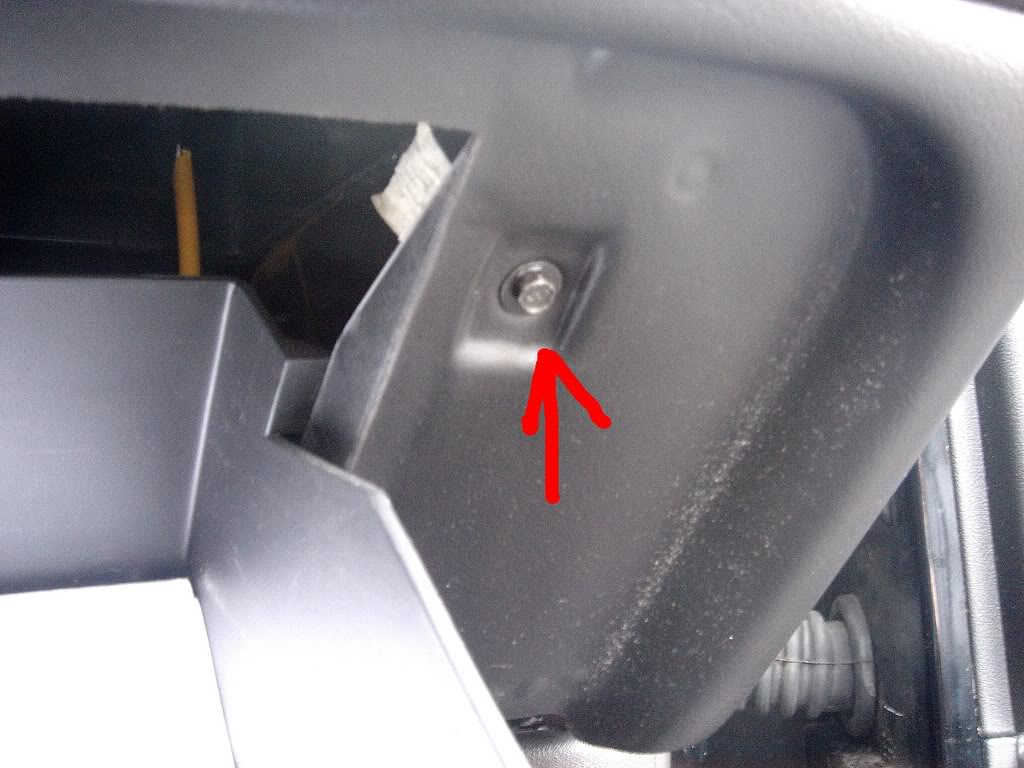
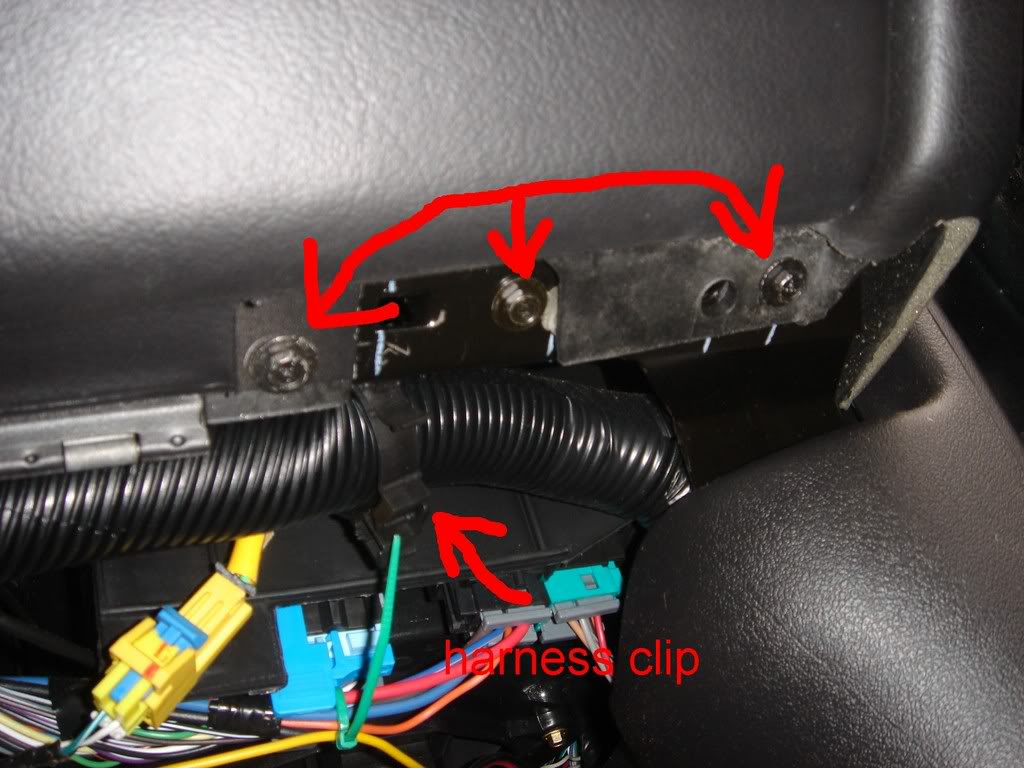
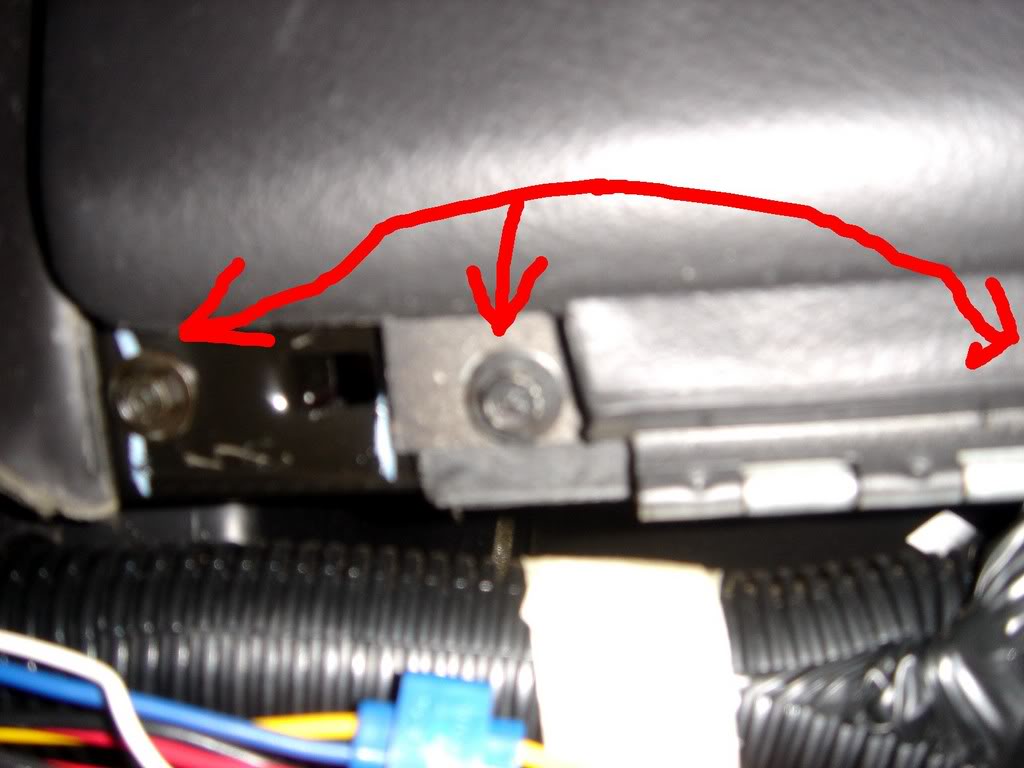
Pull glove box and 2 screws in dash under door.
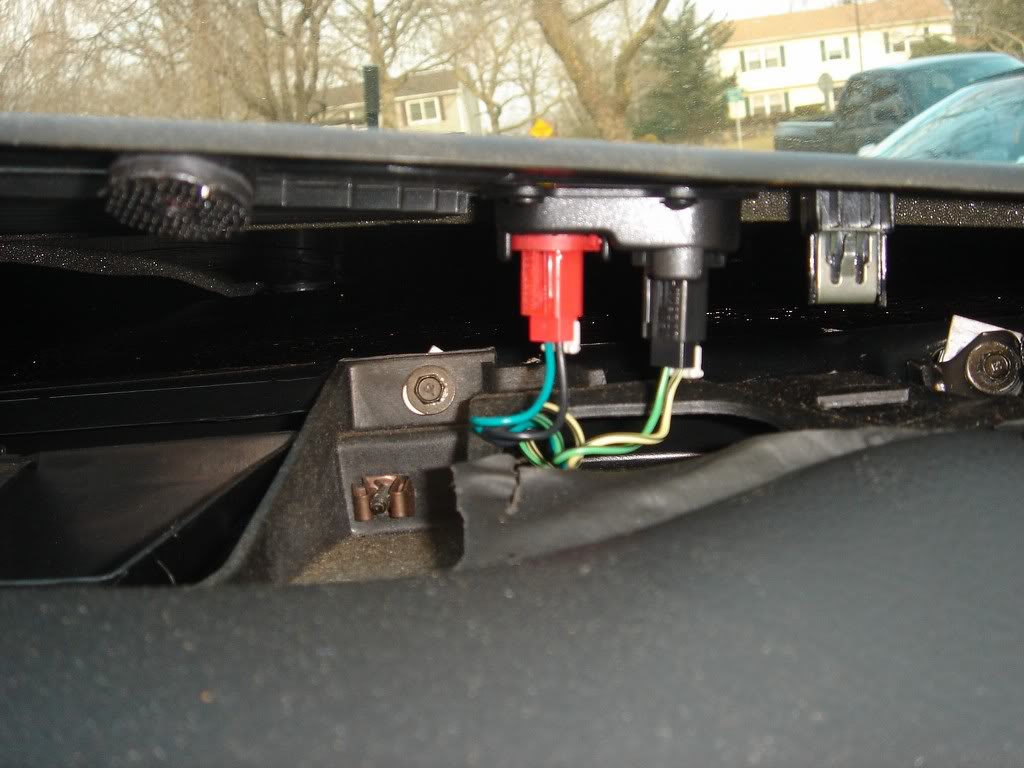
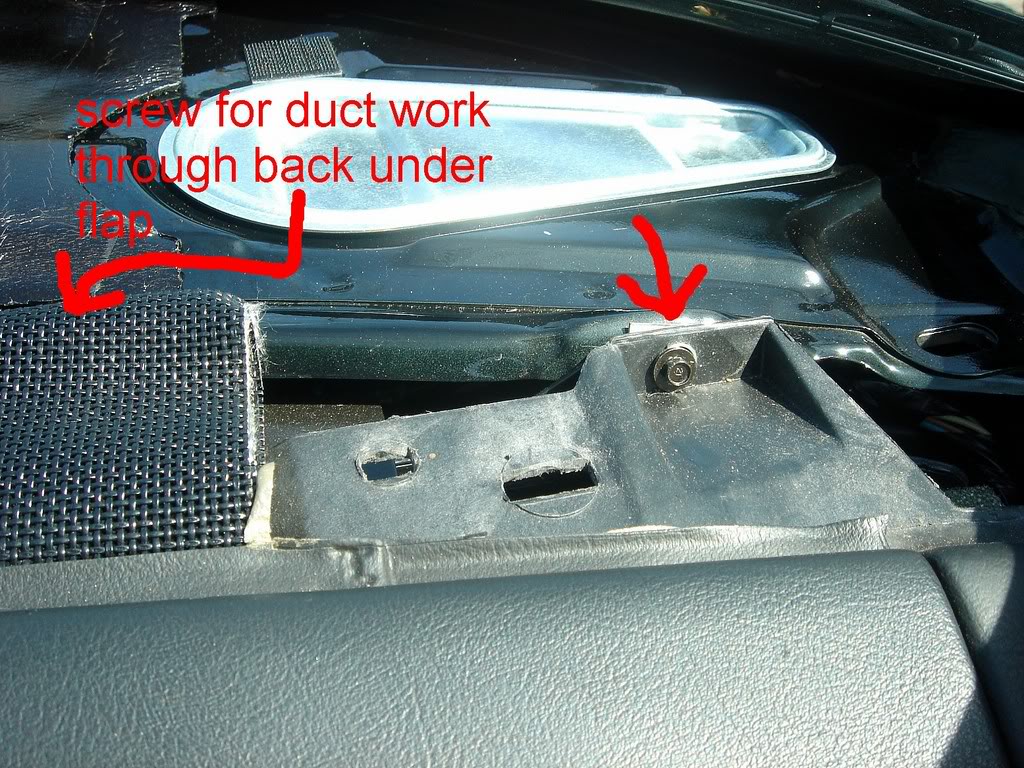
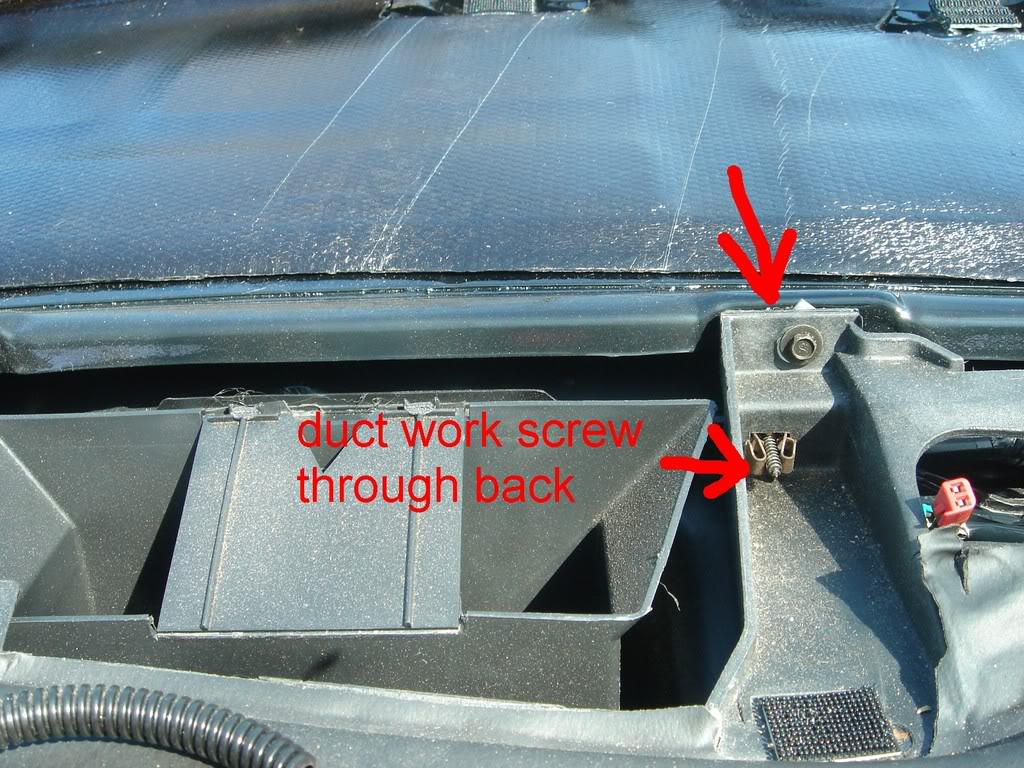
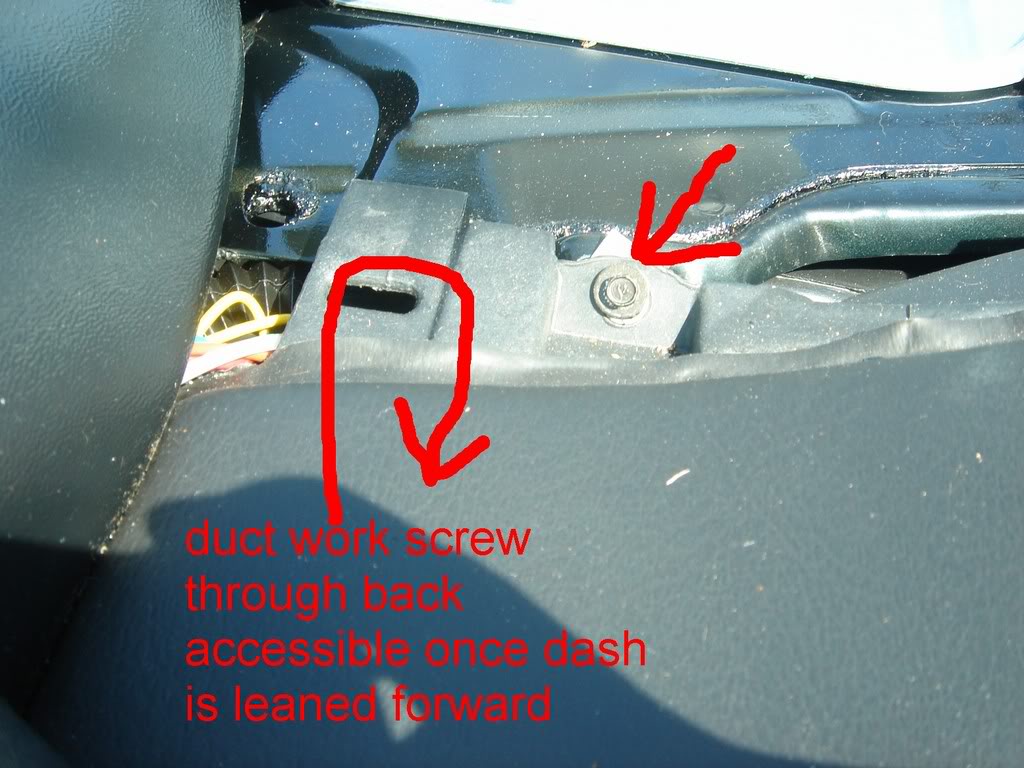
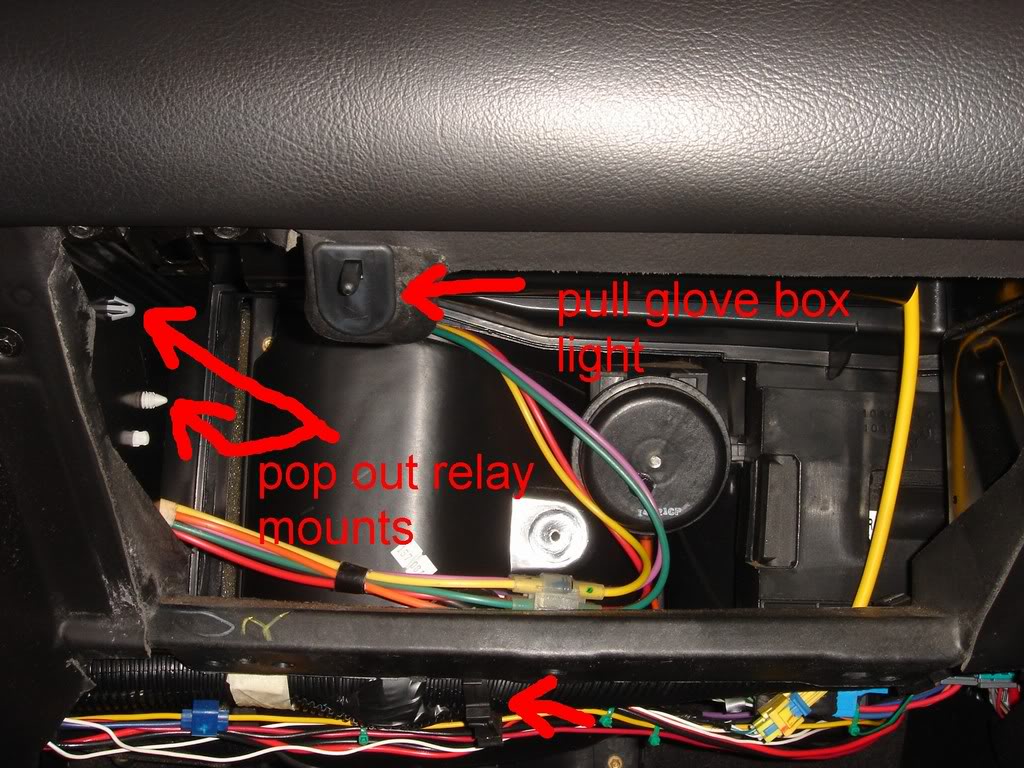
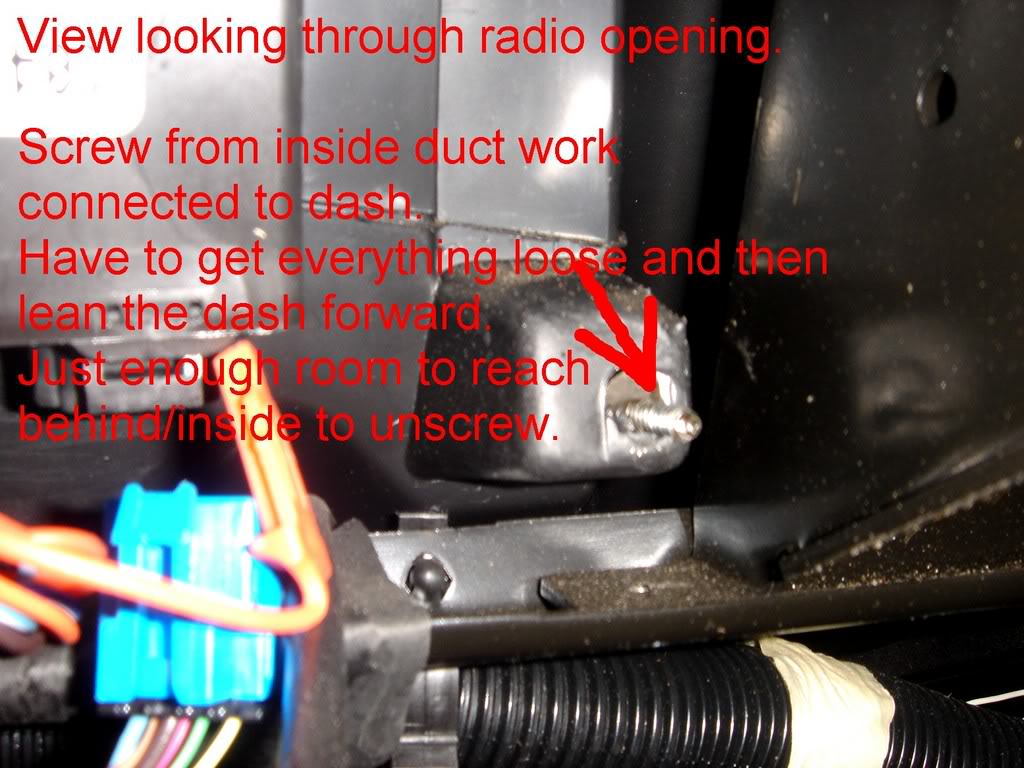
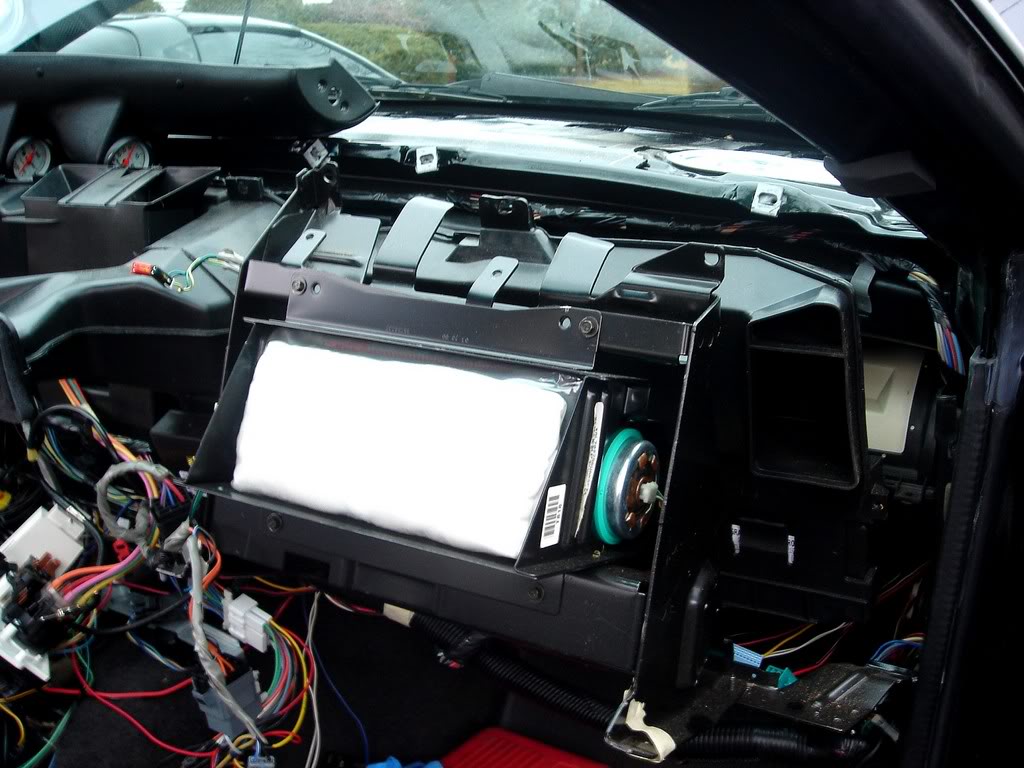
Unscrew duct work from back side of dash.
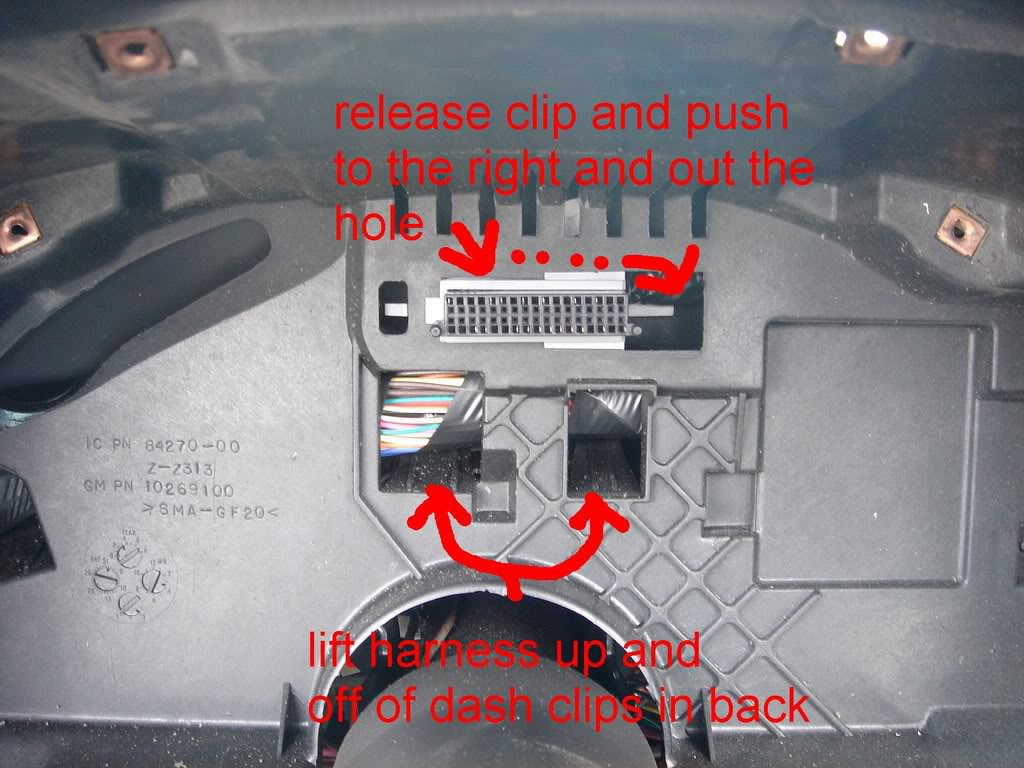
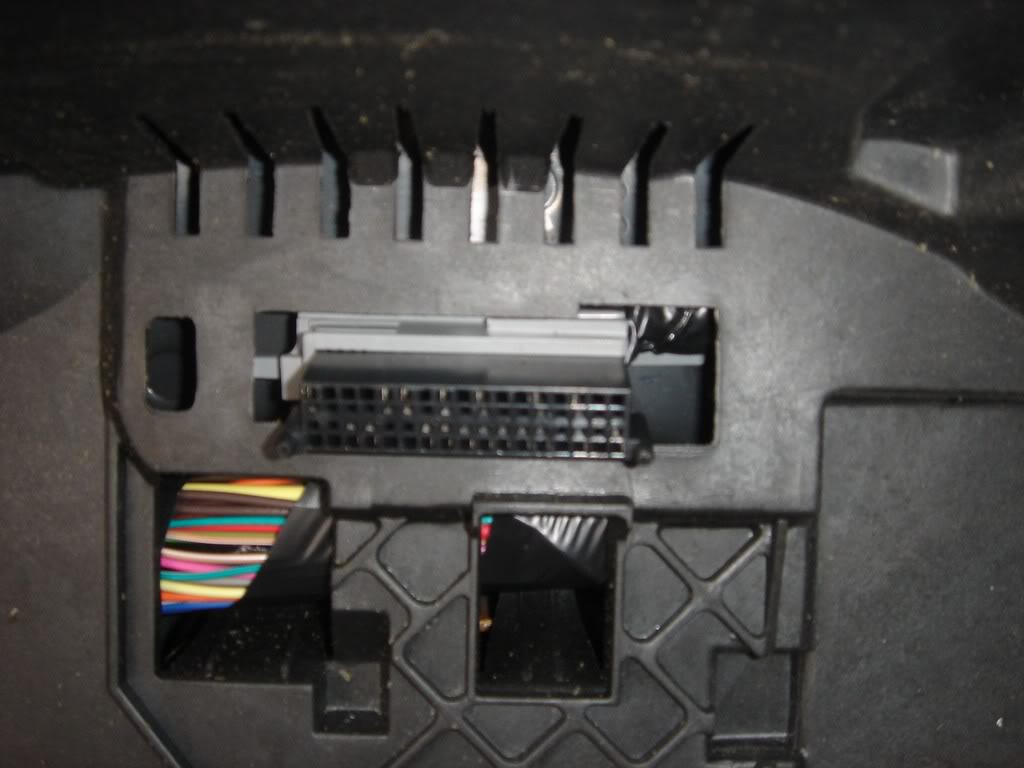
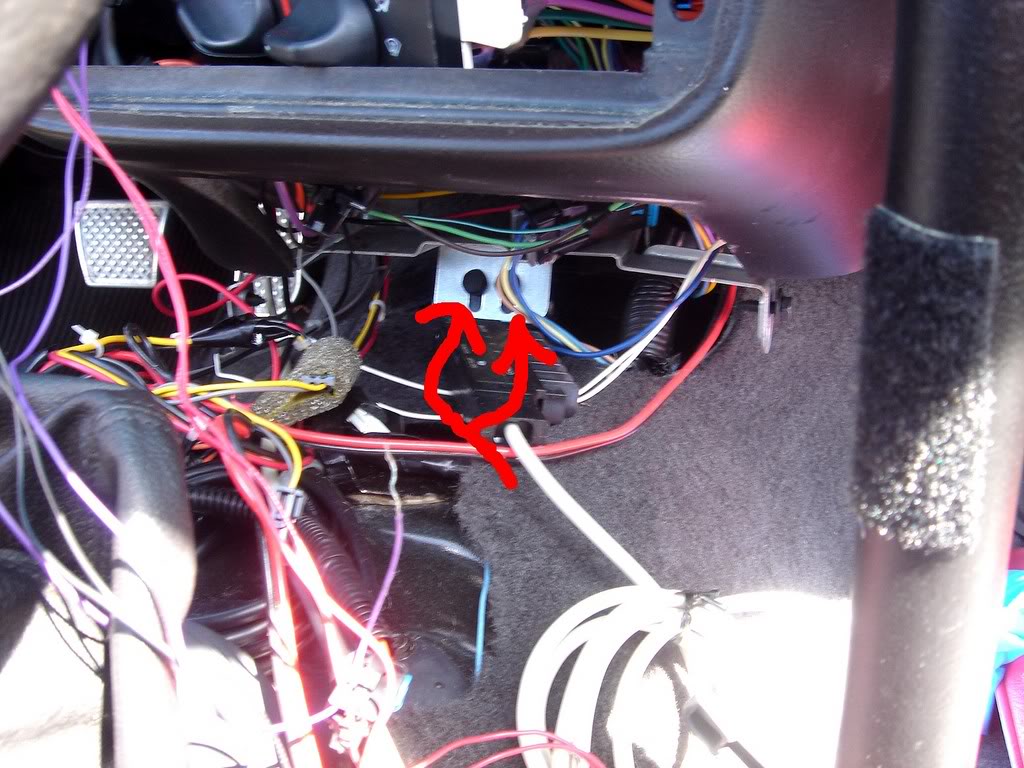
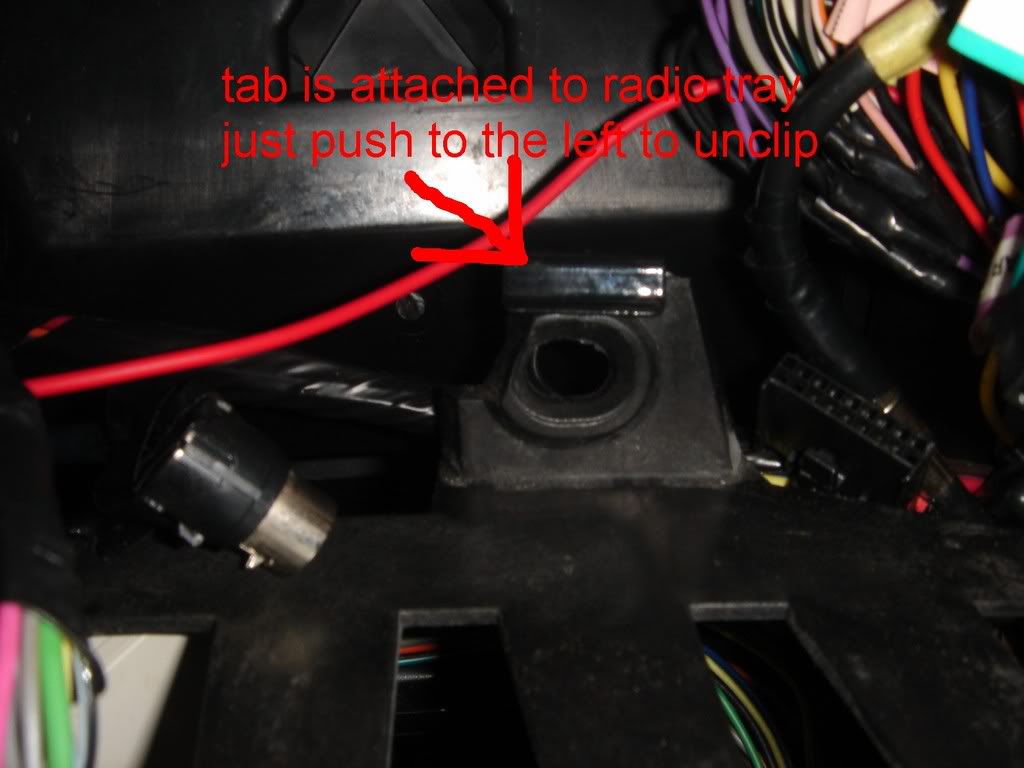
Disconnect/unhook all wiring and harness that's attached.
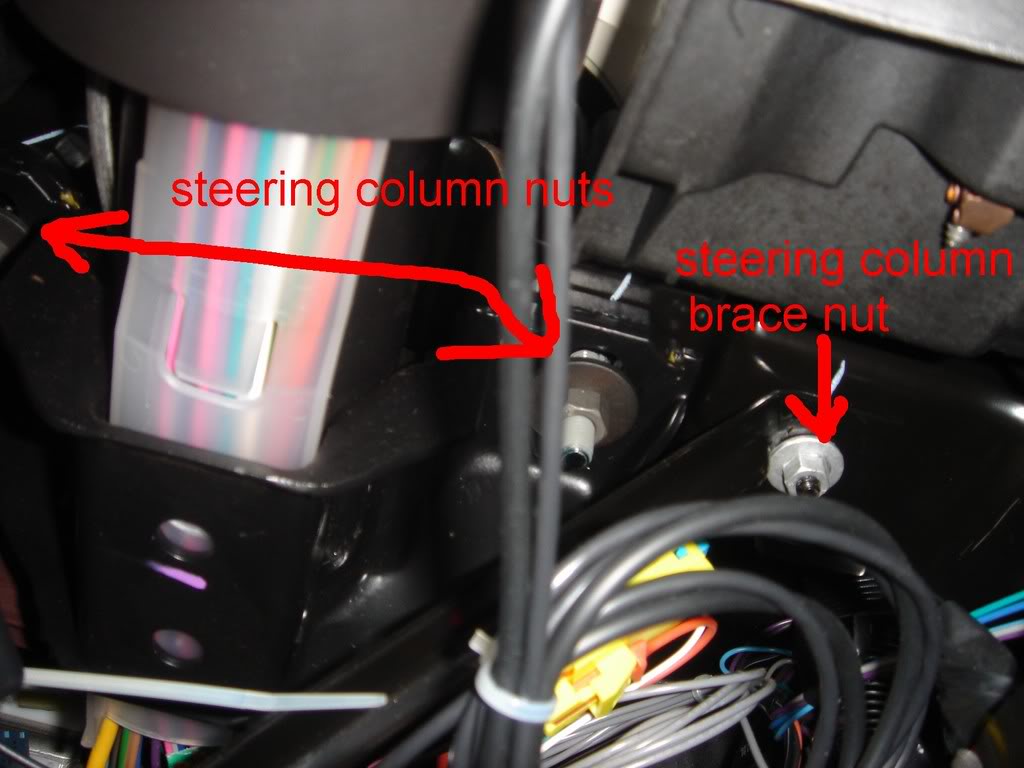
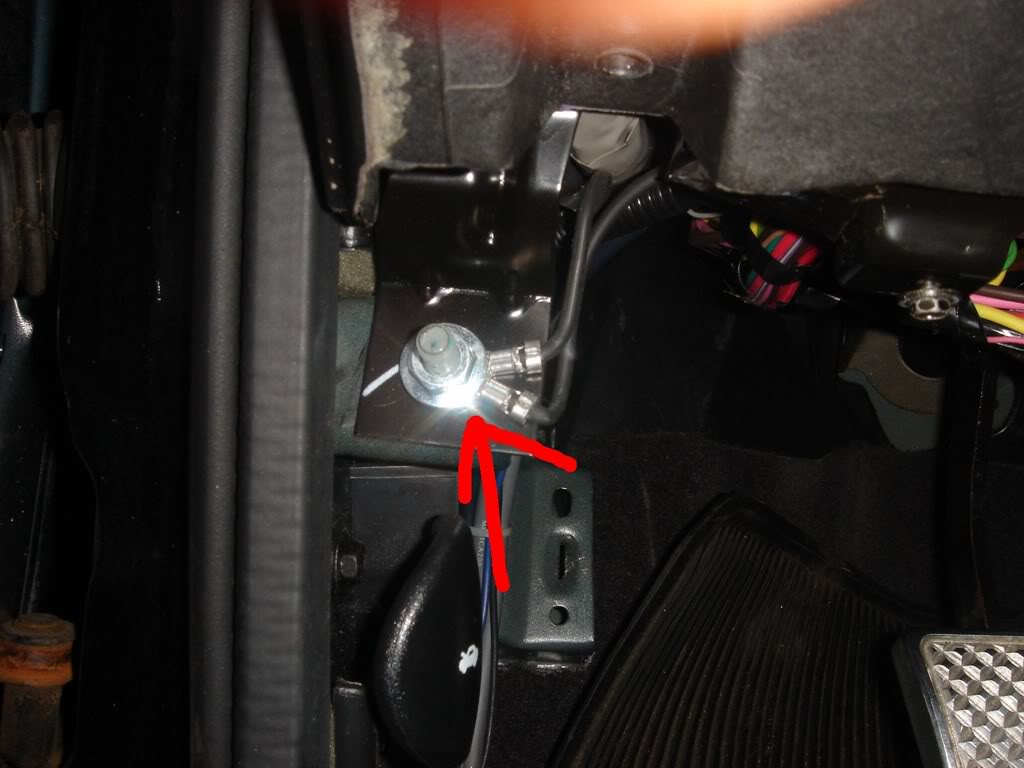
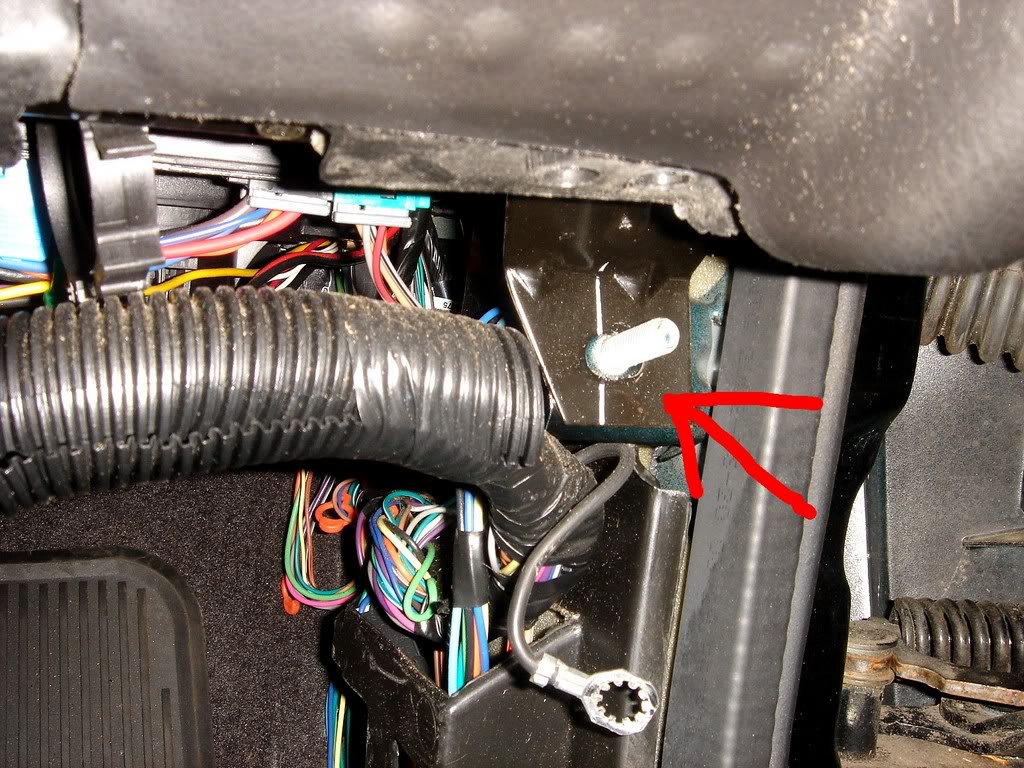
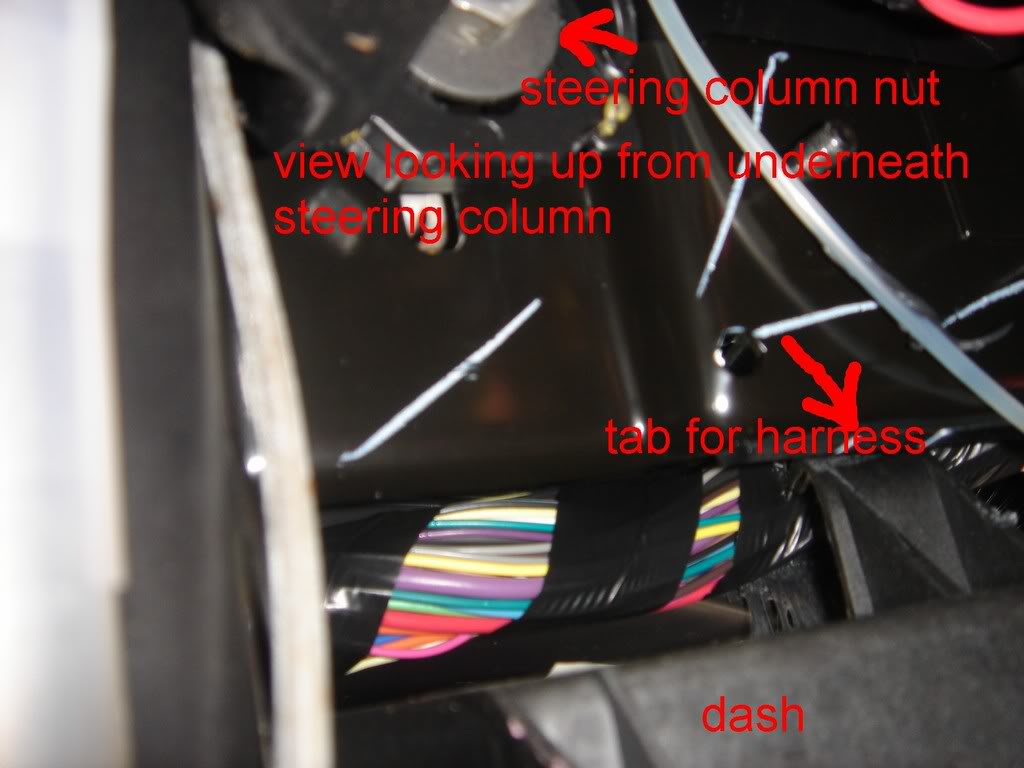
Lower steering column.
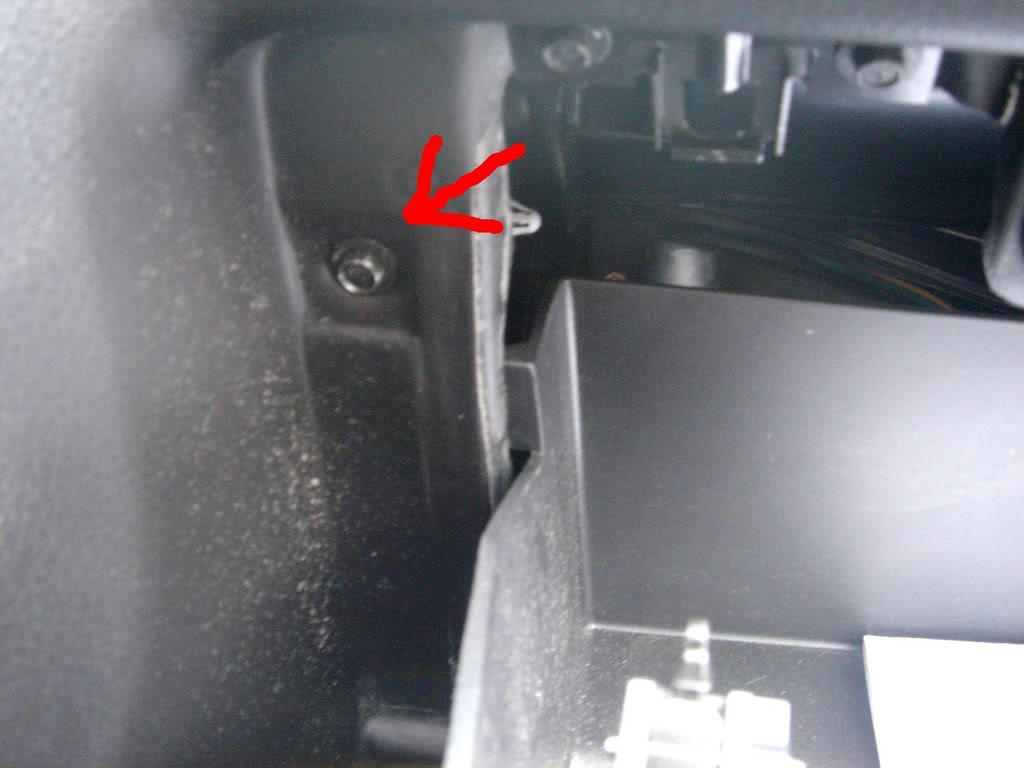
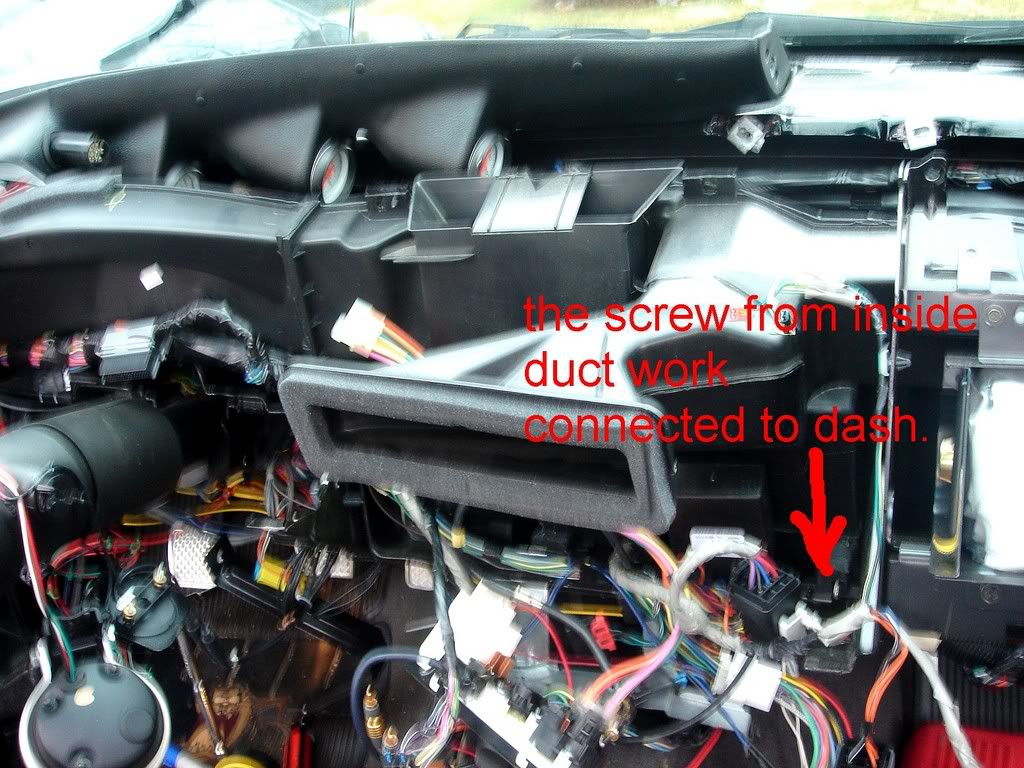
Lean dash forward enough that you are able to reach down from the top and into the inside of the duct work. There is one more screw there.
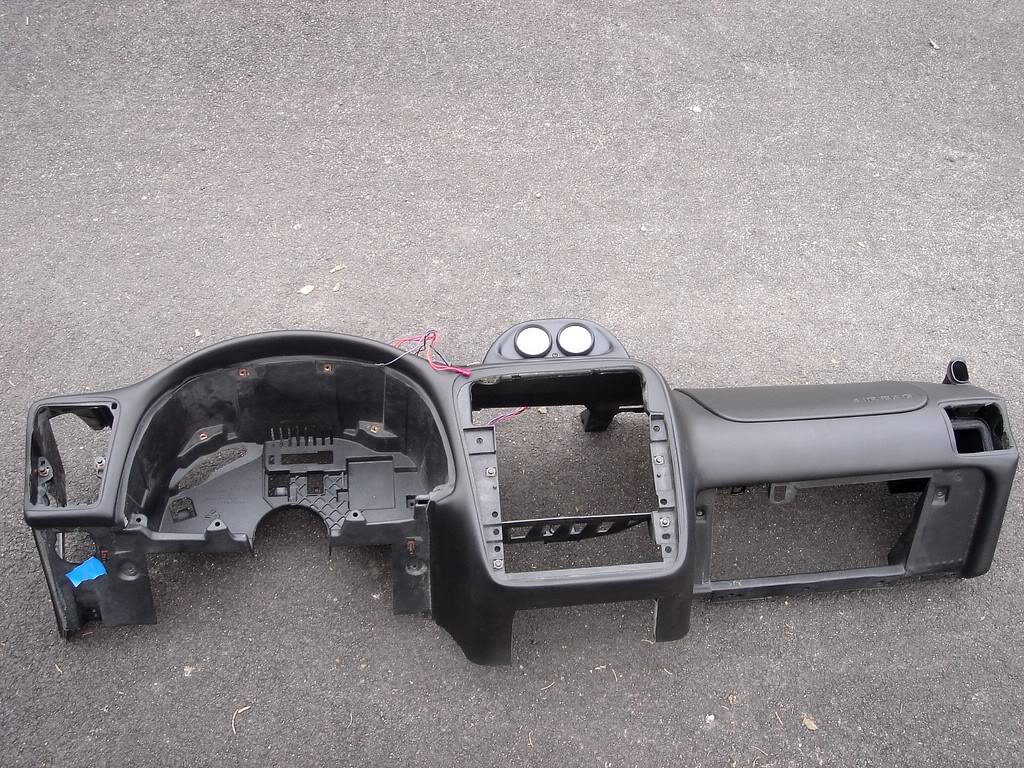
As long as you didn't miss anything the dash should come off. An extra hand is helpful since it's so bulky. Dash weighs 13-14lbs if your interested in that.
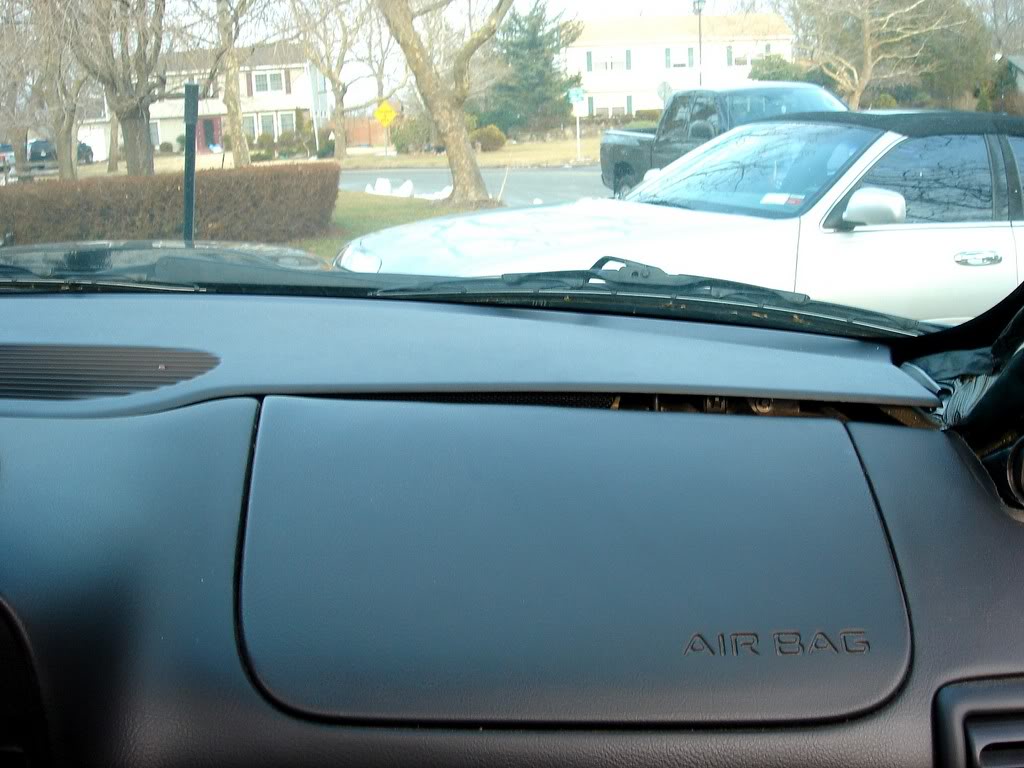
Pull airbag and bracket .
.
I think I covered it for the most part. Don't shoot me if I forgot a screw or two .
.


.Door bars and bolts = 14.5lbs
Cruise control = 5lbs
Steering wheel with airbag = 5.5lbs
Airbag control module = 1.5lbs
Pass airbag = 14-14.5lbs
Current total = -40.5lbs
7mm
10mm
13mm
phillips screwdriver
!!Patience!!
Pull center console
Pull a-pillar trim
Pull trim along door sill (kick panel)
Pull all panels off bottom of dash
Pull screw holding fuse panel to dash.
Pull light switch.
Pull radio and HVAC
Pull steering wheel
Pull dash piece closest to windshield. Start in corner carefully pop the clips/velcro.
Remove alarm and photocell wiring before complete removal.
Pull guage cluster. Remove all screws. Grip both sides firmly and carefully pull towards you as you gently wiggle it back and forth.
Pull all screws along top and bottom as well as 2 nuts that were covered by each kickpanel.
Pull glove box and 2 screws in dash under door.
Unscrew duct work from back side of dash.
Disconnect/unhook all wiring and harness that's attached.
Lower steering column.
Lean dash forward enough that you are able to reach down from the top and into the inside of the duct work. There is one more screw there.
As long as you didn't miss anything the dash should come off. An extra hand is helpful since it's so bulky. Dash weighs 13-14lbs if your interested in that.
Pull airbag and bracket
.I think I covered it for the most part. Don't shoot me if I forgot a screw or two
. Last edited by SSmokin 01; 03-24-2007 at 09:43 PM.

The following users liked this post:
TedsB4Csled2 (05-23-2021)

 12-30-2008, 09:14 PM
#4
10 Second Club
iTrader: (21)

Join Date: Mar 2004
Location: Ft Lauderdale, FL
Posts: 808
Likes: 0
Received 0 Likes
on
0 Posts

Thought some people would benefit from a pretty good instruction post for removing the door bars through the front of the door so you dont need to cut any holes in the door. Weight savings is around 20lbs.
Tools I used: phillips screw driver, 1/4 ratchet with 10mm socket, 10mm ratchet wrench, 3/8 breaker bar, 15mm socket. used a breaker bars since it had more range of motion. The 2 bolts, nut and plate is what your removing

1) Remove the door panel by removing the phillips head screws, there are 5 in total, 4 that are visible and 1 behind the plate where the handle is. Just pull up on the door panel and it will come off. (Not really much detail since most everyone can do this, kinda self explanitory)
2) I pulled all the wire out of the door so I could completely remove the grommet/boot towards the front of the door.

3) Begin removing the 2 10mm bolts towards the front of the door. I used the ratchet and socket to get it pretty far out then used the wrench since you cant get the ratchet and bolt out together because it is a pretty tight fit.

4) Now you can remove the 15mm nut towards the back of the door. Once it is broken loose you should be able to take it of by hand. After this is removed slide the bar off the stud where the nut was and twist, there is some sticky stuff that holds the front of the bar to the plate it is mounted to. It should just break free.
5) Now you can menouver (spellcheck?) the bar towards the bottom and to the hole where the grommet/boot was where all the wires ran. Once you get it to where the end of the bar is resting on the hole where the grommet/boot was close the door. Make sure nothing is in the way

6) Remove the plastic inner wheelwell up front. Im not sure of what all holds this in I know there are some clips, phillips screws and I think some 7mm bolt. Mine was already off when I did this so I dont remember, again this is pretty self explanitory.


7) Now that the plastic wheelwell is out you can have someone get inside and guide the bar through the hole and you will be able to guide it from inside the wheel well. Its pretty long so just be gentle and guide it slowly.


8) Just reverse everything and put everything back then do the other side. When your done this is what you should have removed!!

I hope this helps I know I have seen some people ask about doing this and never really saw anyone post an instructional post with some pics. This is also a much better way then using a hole saw and cutting up your door, take your time do it right and it will end up looking like nothing was ever done
Tools I used: phillips screw driver, 1/4 ratchet with 10mm socket, 10mm ratchet wrench, 3/8 breaker bar, 15mm socket. used a breaker bars since it had more range of motion. The 2 bolts, nut and plate is what your removing
1) Remove the door panel by removing the phillips head screws, there are 5 in total, 4 that are visible and 1 behind the plate where the handle is. Just pull up on the door panel and it will come off. (Not really much detail since most everyone can do this, kinda self explanitory)
2) I pulled all the wire out of the door so I could completely remove the grommet/boot towards the front of the door.
3) Begin removing the 2 10mm bolts towards the front of the door. I used the ratchet and socket to get it pretty far out then used the wrench since you cant get the ratchet and bolt out together because it is a pretty tight fit.
4) Now you can remove the 15mm nut towards the back of the door. Once it is broken loose you should be able to take it of by hand. After this is removed slide the bar off the stud where the nut was and twist, there is some sticky stuff that holds the front of the bar to the plate it is mounted to. It should just break free.
5) Now you can menouver (spellcheck?) the bar towards the bottom and to the hole where the grommet/boot was where all the wires ran. Once you get it to where the end of the bar is resting on the hole where the grommet/boot was close the door. Make sure nothing is in the way
6) Remove the plastic inner wheelwell up front. Im not sure of what all holds this in I know there are some clips, phillips screws and I think some 7mm bolt. Mine was already off when I did this so I dont remember, again this is pretty self explanitory.
7) Now that the plastic wheelwell is out you can have someone get inside and guide the bar through the hole and you will be able to guide it from inside the wheel well. Its pretty long so just be gentle and guide it slowly.
8) Just reverse everything and put everything back then do the other side. When your done this is what you should have removed!!
I hope this helps I know I have seen some people ask about doing this and never really saw anyone post an instructional post with some pics. This is also a much better way then using a hole saw and cutting up your door, take your time do it right and it will end up looking like nothing was ever done
12-31-2008, 06:06 PM
#5
10 Second Club
iTrader: (21)
Join Date: Mar 2004
Location: Ft Lauderdale, FL
Posts: 808
Likes: 0
Received 0 Likes
on
0 Posts
Good luck! If you never drive in the rain this will help too
https://ls1tech.com/forums/drag-raci...oval-pics.html
https://ls1tech.com/forums/drag-raci...oval-pics.html
12-31-2008, 06:44 PM
#6

We just did mine a couple weeks ago.
Use an angle grinder to cut the "nuts" off the backside (the side closest to the inside of the car).
Remove bars. I am not crazy enough to think my car will ever be worth **** or that anyone will care, so I drilled holes in mine to remove the bars.
Thats it, no tools (aside from the grinder), no BS socket making, no trying to fit your hand in there. We tried the OP's way the first time, took a good 4 or 5 hours and still ended up cutting it out. Second door took maybe 45 minutes.
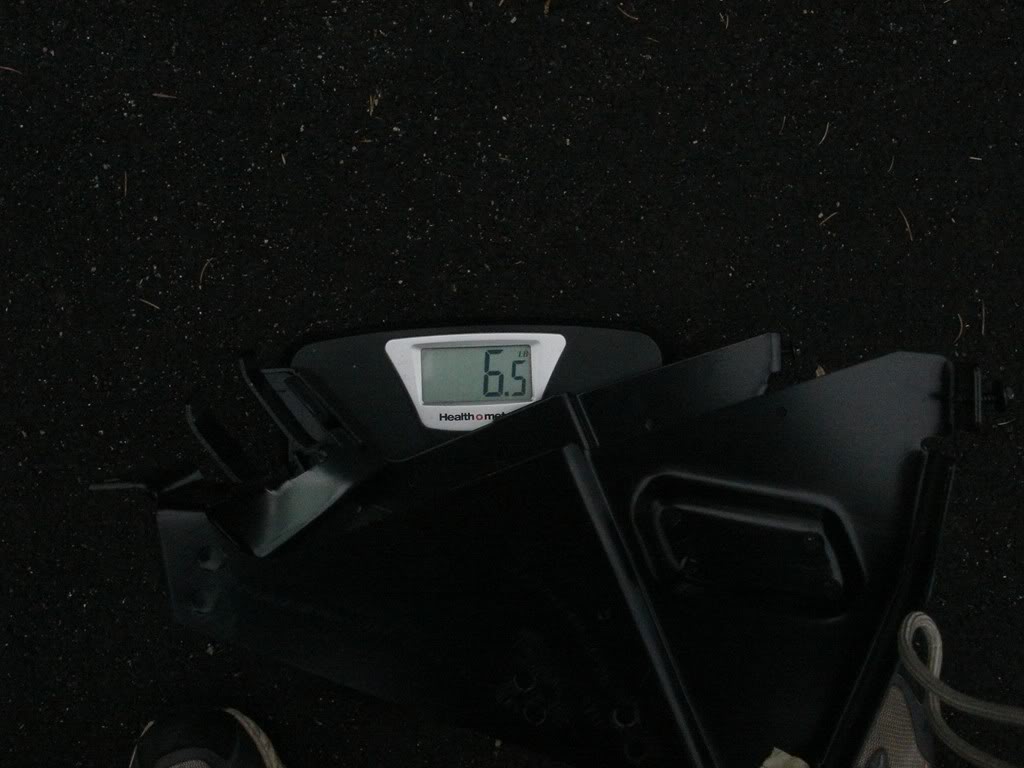
Oh, and just FYI: both door bars weighed 14 lbs total. Thats on a very accurate scale.
Use an angle grinder to cut the "nuts" off the backside (the side closest to the inside of the car).
Remove bars. I am not crazy enough to think my car will ever be worth **** or that anyone will care, so I drilled holes in mine to remove the bars.
Thats it, no tools (aside from the grinder), no BS socket making, no trying to fit your hand in there. We tried the OP's way the first time, took a good 4 or 5 hours and still ended up cutting it out. Second door took maybe 45 minutes.
Oh, and just FYI: both door bars weighed 14 lbs total. Thats on a very accurate scale.
Last edited by Navy David SS; 01-01-2009 at 09:59 AM.
12-31-2008, 06:51 PM
#7
10 Second Club
iTrader: (21)
Join Date: Mar 2004
Location: Ft Lauderdale, FL
Posts: 808
Likes: 0
Received 0 Likes
on
0 Posts
We just did mine a couple weeks ago.
Use an angle grinder to cut the "nuts" off the backside (the side closest to the inside of the car).
Remove bars. I am not crazy enough to think my car will ever be worth **** or that anyone will care, so I drilled holes in mine to remove the bars.
Thats it, no tools (aside from the grinder), no BS socket making, no trying to fit your hand in there. We tried the OP's way the first time, took a good 4 or 5 hours and still ended up cutting it out. Second door took maybe 45 minutes.
Oh, and just FYI: both door bars weighed 14 lbs total. Thats on a very accurate scale.
Last edited by Navy David SS; 01-01-2009 at 10:00 AM.
Trending Topics
01-01-2009, 10:23 AM
#11
THIS WAS POSTED BY 1999TRANSAMWS6 - all credit goes to him
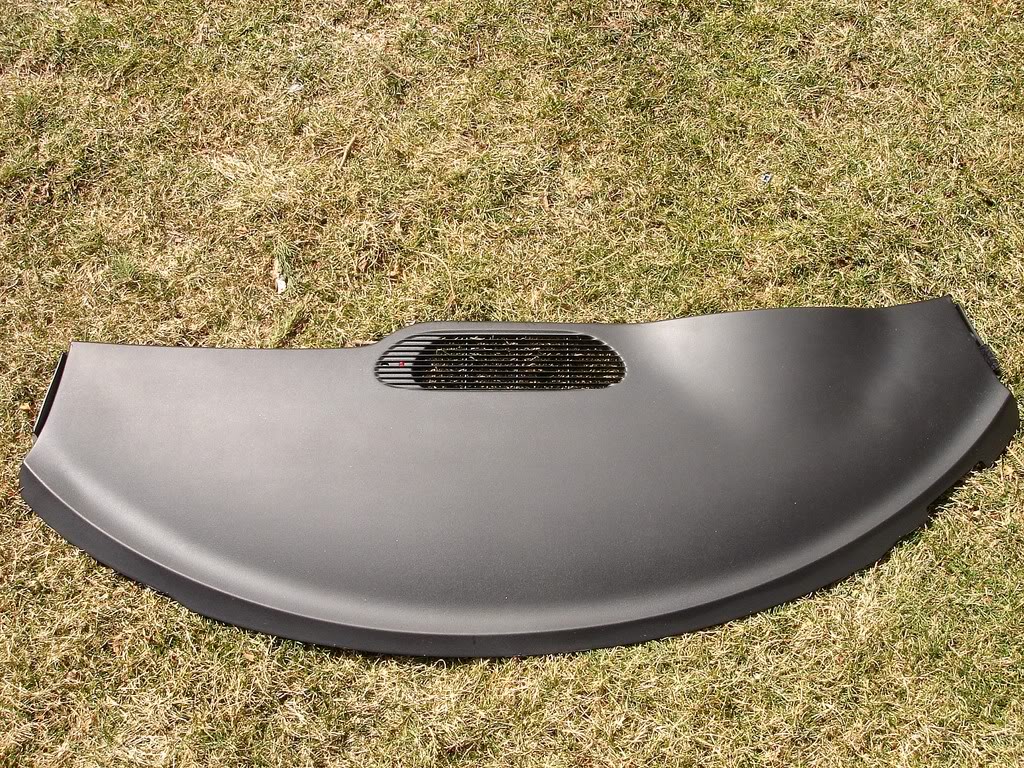
I thought this may help some people to remove their wipers and wiper motor assembly. Its worth about 10-15lbs I would say.
Tools used: needle nose pliers, 10mm wrench, 10mm socket and ratchet and 13mm wrench.
1) Remove the rubber "gasket" that runs along the plastic pieces towards the back of your engine bay. It all just pulls up.

2) Remove the wipers, there is a piece that hinges back at the base of the wipers and under it is a 13mm nut, remove the nut and pull the wiper up and off. Mine was on there pretty good so I sprayed it with some lubricant first.


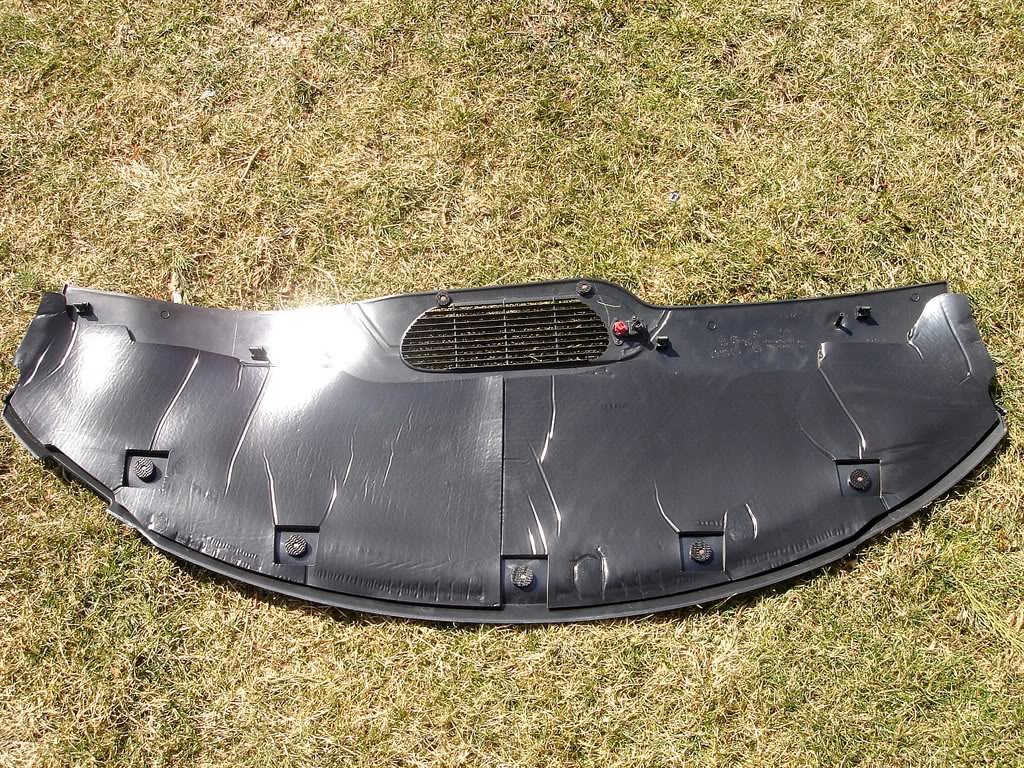
3) remove all the plastic clips holding the plastic "cowl" down and remove both pieces starting with the driver side. There is the tubing for the wiper fluid attached to them so pull it off as you remove the cowl. Also there is a little "hook" towards the side mirrors you have to work around, no big deal just dont pull and break anything it should come off easy.


4) Now thats thats done you can start seeing what your after, there are 5 10mm bolts and 1 10mm nut in total. Remove the 2 bolts on the driver side and the nut, the nut is inside the opening you cant see you need a 10mm wrench for this. Then there is 3 10mm bolts in the middle just remove these as well.


5) one its all unbolted its just a matter of pulling the motor forward a bit and start removing all the bars that attach everything. The bars are held on by little joints they just pop off each other. Once everything is loose pull the bars out toward the center and the motor out on the drivers side. After everything is out you should be done. Just put all the plastic parts back on and your ready to go!


Battle wounds LOL See what I do for you people???

I thought this may help some people to remove their wipers and wiper motor assembly. Its worth about 10-15lbs I would say.
Tools used: needle nose pliers, 10mm wrench, 10mm socket and ratchet and 13mm wrench.
1) Remove the rubber "gasket" that runs along the plastic pieces towards the back of your engine bay. It all just pulls up.
2) Remove the wipers, there is a piece that hinges back at the base of the wipers and under it is a 13mm nut, remove the nut and pull the wiper up and off. Mine was on there pretty good so I sprayed it with some lubricant first.
3) remove all the plastic clips holding the plastic "cowl" down and remove both pieces starting with the driver side. There is the tubing for the wiper fluid attached to them so pull it off as you remove the cowl. Also there is a little "hook" towards the side mirrors you have to work around, no big deal just dont pull and break anything it should come off easy.
4) Now thats thats done you can start seeing what your after, there are 5 10mm bolts and 1 10mm nut in total. Remove the 2 bolts on the driver side and the nut, the nut is inside the opening you cant see you need a 10mm wrench for this. Then there is 3 10mm bolts in the middle just remove these as well.
5) one its all unbolted its just a matter of pulling the motor forward a bit and start removing all the bars that attach everything. The bars are held on by little joints they just pop off each other. Once everything is loose pull the bars out toward the center and the motor out on the drivers side. After everything is out you should be done. Just put all the plastic parts back on and your ready to go!
Battle wounds
LOL See what I do for you people???
01-04-2009, 05:28 PM
#14
THANKS AGAIN TO 1999TransamWs6 for this write-up
I removed all the metal inside the front fenders and figured I would post it up here. Total weight, im not sure but the "Weight reduction list" say 5lbs so Ill go with that.
Tools needed was a 10mm wrench and 10mm socket and ratchet. You will also need something to cut the metal out with. I used a torch but I know not everyone has one so anything that you can cut it out with will work.
1) Remove the front bumper, inner fenderwell plastics, plastic cowel ( where wipers are) and Side Skirts. I dont have any steps or pics to do this since my car already had all this off before I decided to do a "how to" on this. If you need help feel free to PM me. You can see how to remove the cowel in this post here, https://ls1tech.com/forums/drag-raci...-pictures.html
2) Remove all 4 of the 10mm bolts on the inside of the engine bay holding on the fender, then the bolt towards the windshield. Once these are removed there are 2 10mm bolts under the car where the side skirt was and 1 10mm bolt inside the wheel well behinf the fenderwell plastic. Last there is 1 10mm nut and bolt towards the front holding a bracket to the car that is also attached to the fender. Once all bolts are removed lift out on the bottom and up and it should come off with no problems.


3) I used a marker to mark a straight line where I wanted to cut. I took as much off as I could. Once it is all cut off just put it all back the way it was. I would try to use the marks where you can see where the bolts where before to assure it all is aligned when you are done. It is a pretty easy thing to do especially if you are pulling the bumper, which is the most time consuming thing along with the cutting unless you have a torch or plasma cutter. Well hope this helps.


I removed all the metal inside the front fenders and figured I would post it up here. Total weight, im not sure but the "Weight reduction list" say 5lbs so Ill go with that.
Tools needed was a 10mm wrench and 10mm socket and ratchet. You will also need something to cut the metal out with. I used a torch but I know not everyone has one so anything that you can cut it out with will work.
1) Remove the front bumper, inner fenderwell plastics, plastic cowel ( where wipers are) and Side Skirts. I dont have any steps or pics to do this since my car already had all this off before I decided to do a "how to" on this. If you need help feel free to PM me. You can see how to remove the cowel in this post here, https://ls1tech.com/forums/drag-raci...-pictures.html
2) Remove all 4 of the 10mm bolts on the inside of the engine bay holding on the fender, then the bolt towards the windshield. Once these are removed there are 2 10mm bolts under the car where the side skirt was and 1 10mm bolt inside the wheel well behinf the fenderwell plastic. Last there is 1 10mm nut and bolt towards the front holding a bracket to the car that is also attached to the fender. Once all bolts are removed lift out on the bottom and up and it should come off with no problems.
3) I used a marker to mark a straight line where I wanted to cut. I took as much off as I could. Once it is all cut off just put it all back the way it was. I would try to use the marks where you can see where the bolts where before to assure it all is aligned when you are done. It is a pretty easy thing to do especially if you are pulling the bumper, which is the most time consuming thing along with the cutting unless you have a torch or plasma cutter. Well hope this helps.
02-13-2009, 02:27 PM
#15
Man-Crush Warning

I've come to the conclusion that the door bar removal write-up only applies to firebird/ trans ams. I'm trying to take them out of my Camaro right now and there is no way to get to those bolts behind the bars. I'm gonna start cutting the bars off I guess.
Edit: while waiting for a cutting utensil, I decided to do the windshield wiper removal, took about 20 minutes because I couldn't get the damn wipers off. Great write up. Once I finish cutting the door bars out, I'm going to be pulling the dash using your write-up and installing my HVAC delete plate, grant steering wheel and removing the pass. airbag. Its gonna be a long night.
Edit: while waiting for a cutting utensil, I decided to do the windshield wiper removal, took about 20 minutes because I couldn't get the damn wipers off. Great write up. Once I finish cutting the door bars out, I'm going to be pulling the dash using your write-up and installing my HVAC delete plate, grant steering wheel and removing the pass. airbag. Its gonna be a long night.
Last edited by 01sscam; 02-13-2009 at 04:28 PM.
02-14-2009, 12:58 PM
#16
TECH Fanatic
iTrader: (12)
Join Date: Aug 2007
Location: Cornfields near Pontiac, IL
Posts: 1,818
Likes: 0
Received 1 Like
on
1 Post
I've come to the conclusion that the door bar removal write-up only applies to firebird/ trans ams. I'm trying to take them out of my Camaro right now and there is no way to get to those bolts behind the bars. I'm gonna start cutting the bars off I guess.
Edit: while waiting for a cutting utensil, I decided to do the windshield wiper removal, took about 20 minutes because I couldn't get the damn wipers off. Great write up. Once I finish cutting the door bars out, I'm going to be pulling the dash using your write-up and installing my HVAC delete plate, grant steering wheel and removing the pass. airbag. Its gonna be a long night.
Edit: while waiting for a cutting utensil, I decided to do the windshield wiper removal, took about 20 minutes because I couldn't get the damn wipers off. Great write up. Once I finish cutting the door bars out, I'm going to be pulling the dash using your write-up and installing my HVAC delete plate, grant steering wheel and removing the pass. airbag. Its gonna be a long night.
Ill second that on the Camaros being a major PITA! Have 3/4 out, one is being a bitch. I really dont want to get a cut off wheel anywhere near a fiberglass door though.
02-14-2009, 01:09 PM
#17
TECH Enthusiast
iTrader: (52)
Join Date: Jun 2007
Location: Summersville, WV
Posts: 523
Likes: 0
Received 0 Likes
on
0 Posts
i made my own tool and after only getting about a 1/16 of a turn on one nut, i said **** on it and took a cutoff wheel to them...just take your time and watch..