LS2 GTO front mount single low budget turbo, keeping A/C

 09-15-2012, 08:50 AM
#23
Launching!
Thread Starter
Join Date: Jan 2012
Location: Davisburg, MI
Posts: 205
Likes: 0
Received 0 Likes
on
0 Posts

The cross over fit with the factory mounts. I made a pair of polyurethane mounts from Prothane 7803 shackle bushings. Better power transfer, 0.2" taller and much narrower for more exhaust clearance. Truth be told, it was the only way I could get a fitting on the pan oil return. Worst possible spot for it.
09-22-2012, 11:26 AM
#24
Launching!
Thread Starter
Join Date: Jan 2012
Location: Davisburg, MI
Posts: 205
Likes: 0
Received 0 Likes
on
0 Posts
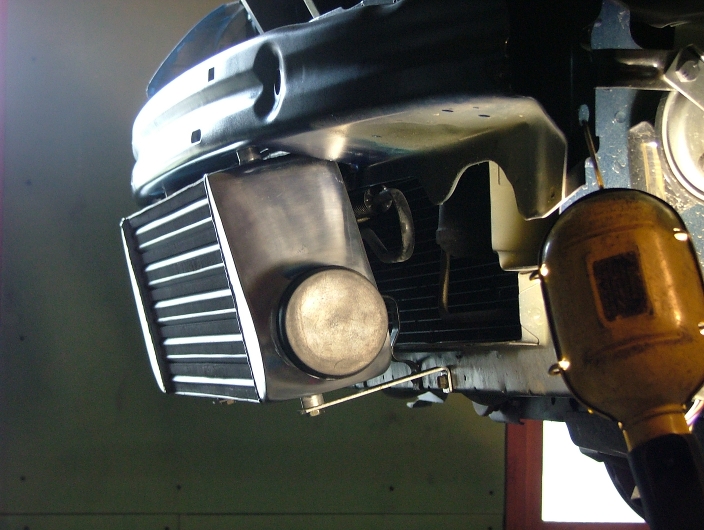
Went smaller than most with the intercooler. I'm using it in a low boost application, optimum air flow position and it has a thick 4" core. It does package well. The bumper bar was notched and boxed so the IC can be bolted straight to it through tool access holes in the top. I even kept the EA foam by just notching it two places around the mounting bosses.
09-22-2012, 11:48 AM
#25
Launching!
Thread Starter
Join Date: Jan 2012
Location: Davisburg, MI
Posts: 205
Likes: 0
Received 0 Likes
on
0 Posts
The GT45 has a lot of material in the compressor housing. I was forced to cut a window in the wheel well to get it in position. The giant knuckle 3.25" OD outlet proved too much with the addition of the silicone elbow for tire clearance. I gained over an inch of additional clearance by cutting it back and welding a 3" elbow directly to it.
 09-28-2012, 08:33 AM
#27
Launching!
Thread Starter
Join Date: Jan 2012
Location: Davisburg, MI
Posts: 205
Likes: 0
Received 0 Likes
on
0 Posts
Thanks, I put a lot of time and effort into it. I like it when people ask "what did I change?"
Not wanting to be nickle and dimed like I was on the exhaust ordering tubing a piece at a time. Sketched up what I planned to do and ordered a box-'o-tubing off of ebay. A $120 and I have lots left over.
At this point it was time to learn TIG welding for the 3 inch aluminum tubing. Borrowed welder from neighbor, filled up the bottle, couple youtube videos and Geronimo. First day I didn't think I was ever going to get it. I week later I sat down and welded some real tubing together for use. They hold water, so I'm satisfied. Lot more welding needed than I thought there was going to be. Every tube cut needs some sort of bead on it to retain the silicone coupler. Highly recommend you give TIG a try if you haven't.
From the turbo I hole sawed the coolant bottle bulkhead, cut the flange off the bumper right below the mounting studs and notched the end of the frame rail. I welded the pinch flange on the bumper back together and boxed where I cut into the frame rail. Even wearing safety glasses I managed getting a metal sliver in my eye during this. Be careful.
The tubing required some slight ovaling for front facia clearance. It is joined to my extended turbo outlet with a 3" silicone hump connector to allow for some engine movement. I went satin black on it as it wasn't symmetrical and I wanted it to disappear.
Last edited by ACCLR8N; 09-28-2012 at 09:40 PM.
09-28-2012, 09:12 AM
#28
Launching!
Thread Starter
Join Date: Jan 2012
Location: Davisburg, MI
Posts: 205
Likes: 0
Received 0 Likes
on
0 Posts
I have this goal of the car not taking too big a hit on cruising fuel economy. I'd like to be able to take a road trip with it when completed. Towards that end I decided to go large on the intake tubing even with my low boost and power goals. Most people are running 2.5" tubing with success.
My tape measure said I could do 3 inch without relocating the battery. The biggest challenge turned out to be the radiator vent fittings. This one joint had to be mitered slightly to get it to work. The bumper bar flange above the frame rail opening was notched, a 3.5" hole saw in the top of the frame rail right behind the head light and notching of the radiator support were required. The battery tray and the battery hold down also had to be clearanced around the vertical pipe.
The tubing transitions though the frame rail with a 90 degree silicone coupler. It was necessary to figure out the orientation and clamp the coupler on the first pipe, slip it up through the hole, put the bumper bar back on, reinstall the intercooler and check alignment. Tedious. Took a couple tries. The clamp for the vertical tube basically sits on top of the frame rail and is accessed with the battery and battery tray removed. Not designed for ease of service.
The 50mm BOV is mounted on the vertical tubing. It is bordered by the battery, radiator hose, fan shroud and silicone elbow above it. Just fit.
At this point a 3" by 4" 45 degree hump connector gets me to the MAF sensor. The exit of the MAF required a special order 3.75" to 4" connector to connect to a short piece of 4" tubing. This last piece of tubing has a 3/8" hose barb for boost referencing by the wastegate before the throttle body. Then another hump connector for engine movement. This one 4" by 4" 90 degree into the throttle body. Hood clearance is tight. I was able to pull the MAF connector out of the loom and re-route around the front of the intake manifold without cutting or splicing.
Last edited by ACCLR8N; 09-28-2012 at 09:48 PM.
09-28-2012, 10:06 AM
#29
Launching!
Thread Starter
Join Date: Jan 2012
Location: Davisburg, MI
Posts: 205
Likes: 0
Received 0 Likes
on
0 Posts
I took heed of others and packaged my turbo with room for an off the shelf air filter. That went out the window when I was convinced by a friend that my first turbo was too small. Not only was it too small on paper, but its actual dimensions were greatly exaggerated. This second turbo was physically half again the size.
I made lots of cardboard filter mock ups and after brainstorming with others a round filter offset and at an angle could work. Went to Autozone with a tape measure and on the second attempt came home with an 8.4" x 3.25" round filter. My neighbor spent a lot of time developing a mold to produce a carbon fiber housing. Fiberglass would have flexed better for clamping onto the turbo, but the CF looks cooler.
I have options down the road of turning my lid into an inner second cone filter or my neighbor is keen on a much more elaborate over the radiator style air box. Had to calm him down, I wanted to get the car on the road and he has to get his sons cart ready for a race. For now this will flow plenty to get me going.

 09-28-2012, 10:17 PM
#32
Launching!
Thread Starter
Join Date: Jan 2012
Location: Davisburg, MI
Posts: 205
Likes: 0
Received 0 Likes
on
0 Posts
Thanks for the compliments.
The original coolant bottle was removed to make room for the air filter and intercooler piping. I had a half gallon milk jug tucked inbetween the bumper and AC condenser. As stylish as that was I made a more permanent replacement out of left over 4" tubing. I did manage to reuse the filler neck and vent tube from the original. Good thing it isn't visible, that is some fugly welding.
Today the car was fitted with the new injectors, 2 bar MAP and tune uploaded. Car is running great. So well I even poked it into boost (2.8psi Max). I can't see that whistle and phissssh getting old any time soon.
Last edited by ACCLR8N; 09-28-2012 at 10:22 PM.
09-30-2012, 12:00 PM
#34
Launching!
Thread Starter
Join Date: Jan 2012
Location: Davisburg, MI
Posts: 205
Likes: 0
Received 0 Likes
on
0 Posts
Thank you. My son took a through the windshield video today but you can't hear the whistle once it was saved.
Got the skid plate notched and put on yesterday. Still working on my radiator cover. Base tune from a friends car has proved to be very close. Driveability has been excellent, AFR's perfect at idle and cruise, 11-13 at low boost and no knock retard. Fine tuning will go on for a couple weeks, but the car is roadworthy in my opinion.
Got the skid plate notched and put on yesterday. Still working on my radiator cover. Base tune from a friends car has proved to be very close. Driveability has been excellent, AFR's perfect at idle and cruise, 11-13 at low boost and no knock retard. Fine tuning will go on for a couple weeks, but the car is roadworthy in my opinion.
10-03-2012, 02:05 PM
#38
Teching In
Join Date: Nov 2010
Location: DFW
Posts: 11
Likes: 0
Received 0 Likes
on
0 Posts
I want this turbo, I wish you'd make a kit for at least the manifolds. I considered buying your first revision but it seems a shop would be needed to handle all of the little things that come up.
10-03-2012, 09:10 PM
#39
Launching!
Thread Starter
Join Date: Jan 2012
Location: Davisburg, MI
Posts: 205
Likes: 0
Received 0 Likes
on
0 Posts
Sorry, no manifold kits. Wife is pretty fed up with this whole project. There are a lot of details to be sure. My wastegate reference hose is on the long side so I wanted to run 3/8". I was frustrated how hard it was to source 3/8" to 1/4" hose barb adapter to connect to the 'gate. I shortened the feed elbow to the power steering pump to gain heat clearance. Took 5 tries to get that low pressure fitting to quit leaking.
10-29-2012, 05:41 AM
#40
10 Second Club
iTrader: (1)
Join Date: Feb 2006
Location: OHIO
Posts: 161
Likes: 0
Received 0 Likes
on
0 Posts
nice write up and build,you will be fine i ran 15 psi on the street for 3 years with stock ls2 timing was around 10 deg ,put race fuel in it and picked up a bunch,i run alky in mine now and still 93 octain with the twins 20+ psi no problems on the built 408.I built a front mount once was way too close to everything and had alot of heat issues,so i went back to the rear mounts,way easier to work on.get yourself an alky injection system,what injectors are you running? pump gas is expensive enough!lol