Advice for those thinking of doing their own gears
 05-25-2012, 08:59 PM
#1

Firstly, sensitive readers should avert their eyes. . .they's some profanity in here. Just thought I'd summarized my experiece/thoughts as a rearend noob for those considering doing it. I did it mostly for the learning experience and to buy one season's worth of time on bigger gears. . .I failed. . hard.
1) You need some specialty tools that you probably dont already have: rear axle bearing puller and slide hammer (they can be rented/borrowed) (or 6' section of pipe and a BFH, but the carrier must be out of the housing to use that method), bearing splitter, a shop press is huge. . .the bearing splitter is nearly worthless without a shop press because the bolts just bend, tapered and flat seal drivers, I think most tapered are reversible. I also needed a dremel and a few fiber wheels as I had to cut all of my bearings off as I did not have a shop press. You also must have a dial indicator, preferably with a magnetic base. Air tools are really, really, really handy as you will be removing the pinion nut quite a bit.
2) When you buy the master install kit, make sure you're getting quality. I got a National kit from Summit and this is what fucked, absolutely fucked me, well that and ignorance. Make sure you get real gear paint, if buying a kit spend the extra $4 to get some paint seperately just to be sure. Your kit may say it comes with paint like mine did, but mine came with grease and at least in my case, grease did not show the true pattern in detail, nor did paint mixed with gear oil, brake quitener actually wasn't too bad though. Here is the thread with patterns:
https://ls1tech.com/forums/gears-axl...-my-paint.html
3) If you are doing this on the ground, consider removing the rear. I really recommend it, I put mine on saw horses. Otherwise you're going to take short cuts and potentially drive it before it's really ready. . .and it's 1.5 bitches to drive the pinion race in on the ground. . .I destroyed an aluminum seal driver (the hammered side mushroomed badly) pounding that race in with the BFH. (And yes, I had it square and I was standing over the top of it (sawhorses, remember?) swinging as hard with a 4lb sledge as my 170lbs would allow). . .again I emphasize, I was standing above it and swinging as hard as a could for about 20 minutes and was able to look directly at it to make sure it was square. I think this was mostly due to the aluminum tool, but that was all I had for a tapered driver.
4) Take your time, I took a couple of months here and there and dealing with bad parts, thinking I had a good pattern, and screwing up. . .but I'm also screwing up a lot of other things motor and trannywise at the same time too, so it wasn't all gears. . .but far, far too much of it was.
5) Purchase a set of extra pinion bearings and hog the ID out so they slip on and use these for setup. . .if you dont and you dont have bad *** bearing removal tools you are probably going to be throwing bearings away anyway, or running a poorly set up rear.
5.5) When you remove your old pinion and carrier bearings I found it really helpful to keep the old races, one from each, 3 total. This was easy for me as I had to destroy the bearings then cut the inner race to remove them. FWIW I gradually cut into them, say 95% through and then used a cold chisel to snap them open. . .some just popped open when I got close enough with the dremel. The left over races are really useful for driving the new bearings, but you should cut the old races a bit so they come back off and dont get pressed on with the new bearings.
OH YEAH, THIS IS IMPORTANT IF YOU ARE CUTTING THE CARRIER RACES OFF: you need to make the cuts with the dremel where there are the two notches where you insert the 2-jaw puller. If you dont cut there, you will need to cut into the diff a fair bit in order to be able to cut the race all the way. . .even at the notches you may need to cut into the diff just a hair, no biggee. I nicked the notches just a bit even when using a worn down cutting wheel.
6) AND HERE IS THE MOST IMPORTANT PART IN MY CASE: Do not use new axle (wheel) bearings that look like either of the pictures below, which came in my shitty National kit. You will know these bearings by the fact that they have one or more seals incorporated with the bearing race. Folks say that you wont be able to get your c-clips in, that was not my experience with the Auto Extra RP5707. . .but that bitch is never, ever coming out of that housing again. Couldn't even drive it out with a 1" steel pipe, BFH, and a torch. It is fused in there, I'm throwing the housing in the scrap heap tomorrow. The SKF R1563 would not go in hardly at all, even after I deburred and comfortized both the bearing and the housing with a die grinder many times. it stuck out of the axle tube, so it was a good 1/2" from being installed as I still needed to drive the outer seal on after it was seated.
If anyone out there can give me positive proof of a live and conscious castration of the ****** that designed either of those bearings I will pay them $5k cash money.
7) Another thing, I am not sure if it was because I used red loctite on the ring gear bolts, or if they were just more shitty items in my master kit, but even after heating them up good with a torch I broke 9 of the 10 bolts. . .in my brand new 3.73s. . .that I had planned to resell.
8) This is going to seem obvious, but trust me it happens to a lot of guys: Especially when using used gears you should check to make sure that the pinion nut will thread onto the pinion BEFORE you press the bearing on. The threads seem to be fairly easily galled. The other side of this is if you plan to reuse a gear or are just setting them up DO NOT STRIKE THE THREADED END OF THE PINION with a hammer. Use a drift and avoid striking near the edges of the threads. . .otherwise you'd better have a threadfile and a lot of patience. Seriously, even just a bit of tapping softly with a hammer can screw those threads up, so always use a drift.
OK, so that was my learning experience and it was definitely educational. . .with the tools it cost me about the same money as a semester in college back in '95 and that is not counting the replacement MWC 9". . .but I went to a state school.
Postlogue: I finally did remove the RP5707 from the housing just to get a tiny bit of my pride back. It would appear that most if not all of the jamming was the result of the rubber seals. . .but I did find a ~2" long metal burr in there too and I am 100% certain it was not in there when I installed the bearing.


Last edited by therabidweasel; 03-21-2013 at 06:31 AM. Reason: added 5.5) & postlogue
 05-28-2012, 07:57 PM
#2
Launching!
iTrader: (2)
Join Date: Dec 2011
Location: Cincinnati, Ohio
Posts: 241
Likes: 0
Received 0 Likes
on
0 Posts

On step 7, you did turn the bolts clockwise right? They are left hand thread, so if you tried to do the old lefty loosey then that is why you broke them off. Just checking since this is one of those things a lot of guys miss. Sorry about the headaches. I know the feeling.
05-28-2012, 09:19 PM
#4
TECH Senior Member
iTrader: (96)
Join Date: Aug 2007
Location: Turnin' Wrenches Infractions: 005
Posts: 24,241
Likes: 0
Received 79 Likes
on
70 Posts
Bad luck and lack of knowledge.......next time (with a press and a good quality rebuild kit) I think you would have much better luck. And a tip...get a 4 pound mini sledge.
05-28-2012, 09:44 PM
#5

Firstly, sensitive readers should avert their eyes. . .they's some profanity in here. Just thought I'd summarized my experiece/thoughts as a rearend noob for those considering doing it. I did it mostly for the learning experience and to buy one season's worth of time on bigger gears. . .I failed. . hard.
1) You need some specialty tools that you probably dont already have: rear axle bearing puller and slide hammer (they can be rented/borrowed) (or 6' section of pipe and a BFH, but the carrier must be out of the housing to use that method), bearing splitter, a shop press is huge. . .the bearing splitter is nearly worthless without a shop press because the bolts just bend, tapered and flat seal drivers, I think most tapered are reversible. I also needed a dremel and a few fiber wheels as I had to cut all of my bearings off as I did not have a shop press. You also must have a dial indicator, preferably with a magnetic base. Air tools are really, really, really handy as you will be removing the pinion nut quite a bit.
1) You need some specialty tools that you probably dont already have: rear axle bearing puller and slide hammer (they can be rented/borrowed) (or 6' section of pipe and a BFH, but the carrier must be out of the housing to use that method), bearing splitter, a shop press is huge. . .the bearing splitter is nearly worthless without a shop press because the bolts just bend, tapered and flat seal drivers, I think most tapered are reversible. I also needed a dremel and a few fiber wheels as I had to cut all of my bearings off as I did not have a shop press. You also must have a dial indicator, preferably with a magnetic base. Air tools are really, really, really handy as you will be removing the pinion nut quite a bit.
2) When you buy the master install kit, make sure you're getting quality. I got a National kit from Summit and this is what fucked, absolutely fucked me, well that and ignorance. Make sure you get real gear paint, if buying a kit spend the extra $4 to get some paint seperately just to be sure. Your kit may say it comes with paint like mine did, but mine came with grease and at least in my case, grease did not show the true pattern in detail, nor did paint mixed with gear oil, brake quitener actually wasn't too bad though. Here is the thread with patterns:
https://ls1tech.com/forums/gears-axl...-my-paint.html
3) If you are doing this on the ground, consider removing the rear. I really recommend it, I put mine on saw horses. Otherwise you're going to take short cuts and potentially drive it before it's really ready. . .and it's 1.5 bitches to drive the pinion race in on the ground. . .I destroyed an aluminum seal driver (the hammered side mushroomed badly) pounding that race in with the BFH. (And yes, I had it square and I was standing over the top of it (sawhorses, remember?) swinging as hard with a 2lb sledge as my 170lbs would allow). . .again I emphasize, I was standing above it and swinging as hard as a could for about 20 minutes and was able to look directly at it to make sure it was square. I think this was mostly due to the aluminum tool, but that was all I had for a tapered driver.
4) Take your time, I took a couple of months here and there and dealing with bad parts, thinking I had a good pattern, and screwing up. . .but I'm also screwing up a lot of other things motor and trannywise at the same time too, so it wasn't all gears. . .but far, far too much of it was.
5) Purchase a set of extra pinion bearings and hog the ID out so they slip on and use these for setup. . .if you dont and you dont have bad *** bearing removal tools you are probably going to be throwing bearings away anyway, or running a poorly set up rear.
5.5) When you remove your old pinion and carrier bearings I found it really helpful to keep the old races, one from each, 3 total. This was easy for me as I had to destroy the bearings then cut the inner race to remove them. FWIW I gradually cut into them, say 95% through and then used a cold chisel to snap them open. . .some just popped open when I got close enough with the dremel. The left over races are really useful for driving the new bearings, but you should cut the old races a bit so they come back off and dont get pressed on with the new bearings.
OH YEAH, THIS IS IMPORTANT IF YOU ARE CUTTING THE CARRIER RACES OFF: you need to make the cuts with the dremel where there are the two notches where you insert the 2-jaw puller. If you dont cut there, you will need to cut into the diff a fair bit in order to be able to cut the race all the way. . .even at the notches you may need to cut into the diff just a hair, no biggee. I nicked the notches just a bit even when using a worn down cutting wheel.
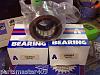
6) AND HERE IS THE MOST IMPORTANT PART IN MY CASE: Do not use new axle (wheel) bearings that look like either of the pictures below, which came in my shitty National kit. You will know these bearings by the fact that they have one or more seals incorporated with the bearing race. Folks say that you wont be able to get your c-clips in, that was not my experience with the Auto Extra RP5707. . .but that bitch is never, ever coming out of that housing again. Couldn't even drive it out with a 1" steel pipe, BFH, and a torch. It is fused in there, I'm throwing the housing in the scrap heap tomorrow. The SKF R1563 would not go in hardly at all, even after I deburred and comfortized both the bearing and the housing with a die grinder many times. it stuck out of the axle tube, so it was a good 1/2" from being installed as I still needed to drive the outer seal on after it was seated.
If anyone out there can give me positive proof of a live and conscious castration of the ****** that designed either of those bearings I will pay them $5k cash money.
https://ls1tech.com/forums/gears-axl...-my-paint.html
3) If you are doing this on the ground, consider removing the rear. I really recommend it, I put mine on saw horses. Otherwise you're going to take short cuts and potentially drive it before it's really ready. . .and it's 1.5 bitches to drive the pinion race in on the ground. . .I destroyed an aluminum seal driver (the hammered side mushroomed badly) pounding that race in with the BFH. (And yes, I had it square and I was standing over the top of it (sawhorses, remember?) swinging as hard with a 2lb sledge as my 170lbs would allow). . .again I emphasize, I was standing above it and swinging as hard as a could for about 20 minutes and was able to look directly at it to make sure it was square. I think this was mostly due to the aluminum tool, but that was all I had for a tapered driver.
4) Take your time, I took a couple of months here and there and dealing with bad parts, thinking I had a good pattern, and screwing up. . .but I'm also screwing up a lot of other things motor and trannywise at the same time too, so it wasn't all gears. . .but far, far too much of it was.
5) Purchase a set of extra pinion bearings and hog the ID out so they slip on and use these for setup. . .if you dont and you dont have bad *** bearing removal tools you are probably going to be throwing bearings away anyway, or running a poorly set up rear.
5.5) When you remove your old pinion and carrier bearings I found it really helpful to keep the old races, one from each, 3 total. This was easy for me as I had to destroy the bearings then cut the inner race to remove them. FWIW I gradually cut into them, say 95% through and then used a cold chisel to snap them open. . .some just popped open when I got close enough with the dremel. The left over races are really useful for driving the new bearings, but you should cut the old races a bit so they come back off and dont get pressed on with the new bearings.
OH YEAH, THIS IS IMPORTANT IF YOU ARE CUTTING THE CARRIER RACES OFF: you need to make the cuts with the dremel where there are the two notches where you insert the 2-jaw puller. If you dont cut there, you will need to cut into the diff a fair bit in order to be able to cut the race all the way. . .even at the notches you may need to cut into the diff just a hair, no biggee. I nicked the notches just a bit even when using a worn down cutting wheel.
6) AND HERE IS THE MOST IMPORTANT PART IN MY CASE: Do not use new axle (wheel) bearings that look like either of the pictures below, which came in my shitty National kit. You will know these bearings by the fact that they have one or more seals incorporated with the bearing race. Folks say that you wont be able to get your c-clips in, that was not my experience with the Auto Extra RP5707. . .but that bitch is never, ever coming out of that housing again. Couldn't even drive it out with a 1" steel pipe, BFH, and a torch. It is fused in there, I'm throwing the housing in the scrap heap tomorrow. The SKF R1563 would not go in hardly at all, even after I deburred and comfortized both the bearing and the housing with a die grinder many times. it stuck out of the axle tube, so it was a good 1/2" from being installed as I still needed to drive the outer seal on after it was seated.
If anyone out there can give me positive proof of a live and conscious castration of the ****** that designed either of those bearings I will pay them $5k cash money.

I would & have used the ones they sell at the dealer, no issues there. I have used the aftermarket bearing kits as well & never got those goofy looking things.
7) Another thing, I am not sure if it was because I used red loctite on the ring gear bolts, or if they were just more shitty items in my master kit, but even after heating them up good with a torch I broke 9 of the 10 bolts. . .in my brand new 3.73s. . .that I had planned to resell.
OK, so that was my learning experience and it was definitely educational. . .with the tools it cost me about the same money as a semester in college back in '95 and that is not counting the replacement MWC 9". . .but I went to a state school.
Postlogue: I finally did remove the RP5707 from the housing just to get a tiny bit of my pride back. It would appear that most if not all of the jamming was the result of the rubber seals. . .but I did find a ~2" long metal burr in there too and I am 100% certain it was not in there when I installed the bearing.
Attachment 355802Attachment 355803
05-29-2012, 05:29 PM
#6
RedA4 thanks for the vote of confidence, I think I could do it now much easier now too. . .but the wrong direction on ALL 10! ring bolts was just stupid on my part. . .I put that together like 6 weeks ago and just forgot. Still after the first few you would think I would've caught on. . .OK, maybe y'all dont expect that much out of me. Seriously though, without your help and that of guppymech no way would I have made it this far, help like that is what makes this site great. . .oh yeah, I weighed my "2lb sledge" and found it to be 3.96lbs. . .so I changed my reference above.
So the bearing splitter does not split the bearing as in destroy, ideally it doesn't harm it at all. I linked to a pic of one below. You can get them in kits that have some standoffs and a big screw to push the bearing off of whatever its on. . .but additions to what is shown below are useless. . .you need a press. If you feel comfortable using a die grinder OR air chisel on your gears or posi unit you have bigger ***** than me. The dremel was way faster than I needed, and you really need to get to a very small cutting wheel size near the edge of the inner pinion and carrier bearings or you will cut into things you care about. You also need the steady control/speed of a dremel IMO as at the end you are just shaving very lightly waiting for the race to pop. . .it has to be real thin to pop it open with a chisel too.

I did not finish, in fact I stripped the housing and threw it in the woods on the side of my house like a good redneck. I am buying the Fab 9" now. I was planning on saving the 10 bolt for a future demod, but given that I spent a good deal of time on it with a die grinder and hours deburring every little thing with needle files I no longer trust it. . .and why would anyone want to demod back to a 10 bolt anyway. . .it had no business on the car even when stock. . .and the wife is already on board
What did you need the bearing splitter for? Isnt that what the dremel does? A die grinder with a cutoff wheel & air chisel does the job faster.
I did not finish, in fact I stripped the housing and threw it in the woods on the side of my house like a good redneck. I am buying the Fab 9" now. I was planning on saving the 10 bolt for a future demod, but given that I spent a good deal of time on it with a die grinder and hours deburring every little thing with needle files I no longer trust it. . .and why would anyone want to demod back to a 10 bolt anyway. . .it had no business on the car even when stock. . .and the wife is already on board
05-29-2012, 09:39 PM
#7
RedA4 thanks for the vote of confidence, I think I could do it now much easier now too. . .but the wrong direction on ALL 10! ring bolts was just stupid on my part. . .I put that together like 6 weeks ago and just forgot. Still after the first few you would think I would've caught on. . .OK, maybe y'all dont expect that much out of me.
those bolts so nice & easy.
Seriously though, without your help and that of guppymech no way would I have made it this far, help like that is what makes this site great. . .oh yeah, I weighed my "2lb sledge" and found it to be 3.96lbs. . .so I changed my reference above.
So the bearing splitter does not split the bearing as in destroy, ideally it doesn't harm it at all. I linked to a pic of one below. You can get them in kits that have some standoffs and a big screw to push the bearing off of whatever its on. . .but additions to what is shown below are useless. . .you need a press.
So the bearing splitter does not split the bearing as in destroy, ideally it doesn't harm it at all. I linked to a pic of one below. You can get them in kits that have some standoffs and a big screw to push the bearing off of whatever its on. . .but additions to what is shown below are useless. . .you need a press.
If you feel comfortable using a die grinder OR air chisel on your gears or posi unit you have bigger ***** than me.
The dremel was way faster than I needed, and you really need to get to a very small cutting wheel size near the edge of the inner pinion and carrier bearings or you will cut into things you care about. You also need the steady control/speed of a dremel IMO as at the end you are just shaving very lightly waiting for the race to pop. . .it has to be real thin to pop it open with a chisel too.
I did not finish, in fact I stripped the housing and threw it in the woods on the side of my house like a good redneck. I am buying the Fab 9" now. I was planning on saving the 10 bolt for a future demod, but given that I spent a good deal of time on it with a die grinder and hours deburring every little thing with needle files I no longer trust it. . .and why would anyone want to demod back to a 10 bolt anyway. . .it had no business on the car even when stock. . .and the wife is already on board
I did not finish, in fact I stripped the housing and threw it in the woods on the side of my house like a good redneck. I am buying the Fab 9" now. I was planning on saving the 10 bolt for a future demod, but given that I spent a good deal of time on it with a die grinder and hours deburring every little thing with needle files I no longer trust it. . .and why would anyone want to demod back to a 10 bolt anyway. . .it had no business on the car even when stock. . .and the wife is already on board
Trending Topics
05-30-2012, 06:06 AM
#8
TECH Regular

Join Date: Mar 2011
Posts: 496
Likes: 0
Received 0 Likes
on
0 Posts
my wife is onboard with getting a new one too. i did similar **** on harley's and still do stuff like that and i'm 54 years old . chaulk it up to experience. it tests you to see how bad you want it. i get into this stuff and walk away for a while and come back to it. as they say "cooler heads will prevail." good luck! the oldman.........
 05-30-2012, 08:14 AM
#10
Teching In
iTrader: (4)

Join Date: Mar 2012
Location: Poconos PA
Posts: 49
Likes: 0
Received 0 Likes
on
0 Posts
You learned a lot the hard way for sure.
I build about a dozen rears per year....mostly race stuff. I REFUSE to work under a car. That's the best advice you can have!
I make the person pull the rear out and bring the rear only...otherwise I just don't do it.
It's a hobby for me, I have a full time job
I build about a dozen rears per year....mostly race stuff. I REFUSE to work under a car. That's the best advice you can have!
I make the person pull the rear out and bring the rear only...otherwise I just don't do it.
It's a hobby for me, I have a full time job