

Ls1 180 T stat, what should my temp be?
 07-22-2012, 01:37 AM
#1
Staging Lane
Thread Starter
Join Date: Sep 2009
Location: weigh west
Posts: 94
Likes: 0
Received 0 Likes
on
0 Posts
I just replaced the stock 195 LS thermostat with a Hypertech 180 degree thermostat. Iam running at close to 200 degrees still. I vacuum purged the system today and I am still idling at 200-205. The ls is in my Jeep, fans come on at 190. I cruise at about 195 ish
Last edited by Jeep09; 07-22-2012 at 01:58 AM.
 07-22-2012, 05:49 AM
#2
TECH Senior Member

180 stats just open at 180 and motor will run at normal temp. Yours is running correctly.
You could also adjust your fans to come on a bit earlier, but yours seems normal for what you describe.
You could also adjust your fans to come on a bit earlier, but yours seems normal for what you describe.
07-22-2012, 08:17 AM
#3

My C5 runs at 180 but I also have a DeWitts radiator which is fairly large and dual core.
Did you test the thermostat before installation? I have read many who have and found that they don't open where they should. Also, if this is like the standard LS1 thermostat, they are easily modified to open at any temp you want.
Did you test the thermostat before installation? I have read many who have and found that they don't open where they should. Also, if this is like the standard LS1 thermostat, they are easily modified to open at any temp you want.
07-22-2012, 11:34 AM
#5
Staging Lane
Thread Starter
Join Date: Sep 2009
Location: weigh west
Posts: 94
Likes: 0
Received 0 Likes
on
0 Posts
No, pulled it out of the Hypertech box and installed. I am just about the same as stock. I have a Thomas Brice dual pass radiator, 3300 cfm flexalite 100% shrouded fan.
I am not happy with it and would like to look at modifying the stock ls thermostat. Any info/links to show how?
I am running a Autometer 2 5/8 mechanical gauge
I am not happy with it and would like to look at modifying the stock ls thermostat. Any info/links to show how?
I am running a Autometer 2 5/8 mechanical gauge
Trending Topics
07-22-2012, 03:02 PM
#8
Staging Lane
Thread Starter
Join Date: Sep 2009
Location: weigh west
Posts: 94
Likes: 0
Received 0 Likes
on
0 Posts
 07-23-2012, 07:23 PM
#11
No, pulled it out of the Hypertech box and installed. I am just about the same as stock. I have a Thomas Brice dual pass radiator, 3300 cfm flexalite 100% shrouded fan.
I am not happy with it and would like to look at modifying the stock ls thermostat. Any info/links to show how?
I am running a Autometer 2 5/8 mechanical gauge
I am not happy with it and would like to look at modifying the stock ls thermostat. Any info/links to show how?
I am running a Autometer 2 5/8 mechanical gauge
-----------------------------------------------------------------------------
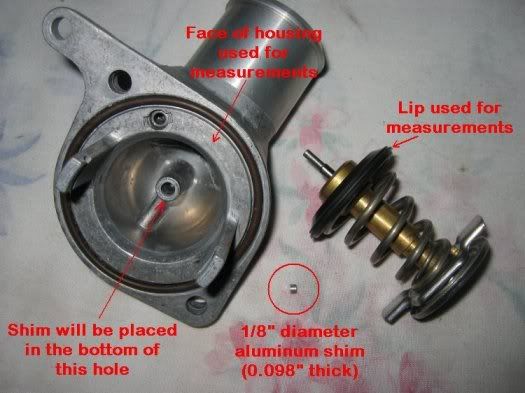
In the first photo the thermostat has been disassembled. You can see one of the shims that I made and the hole into which it is installed. The thickness of the shim will alter the opening point by lowering it, or as is the case if you get to approximately 0.100� thick shim, the thermostat will barely close.

One of the problems I ran into was how to measure data so it wasn�t subjective and I could repeat the test fairly well between the different shims and get a good comparison. After some messing around with the test, I decided to take the temperature at three points in the opening sequence. First, by hanging the thermostat such that the neck was downward, it was easy to trap air behind the rubber door that opens in the thermostat. The first data point would then be when the thermostat opened enough to release the trapped air. This doesn�t take much movement at all and you can barely see the rubber door move at all when this occurs since the movement is so slight. The second point of measurement would be when the rubber lip on the seal was even with the flat mounting surface of the thermostat (see the photo). Finally, I took a third measurement when the rubber lip was 0.2� from the same flat mounting surface. While this seems to be a precise number, it is actually the width of my flat screwdriver that I could hold in the water and use for a measuring tool. With one edge of the screwdriver against the flat mounting surface of the thermostat, when the lip was even with the other edge of the screwdriver blade that is when I wrote down the temperature.
Below is a photo of the shim installed prior to re-assembly of the thermostat.

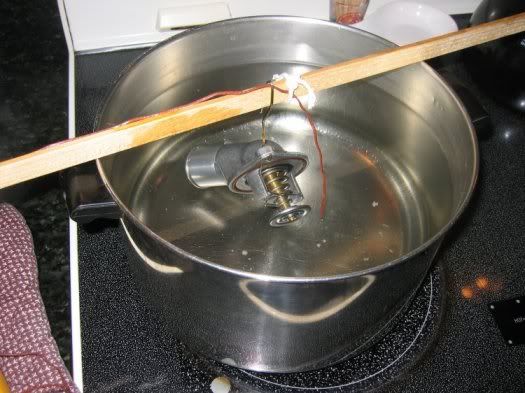
Next was the method of heating up the thermostat so it was immersed in water. In the next photo you can see I bent up a coat hanger and hung it from a small stick across a large pot of water (my wife thinks I should be committed at this point
 . The wire next to the thermostat is the thermocouple that was tied into a Fluke Meter for measuring the temperature.
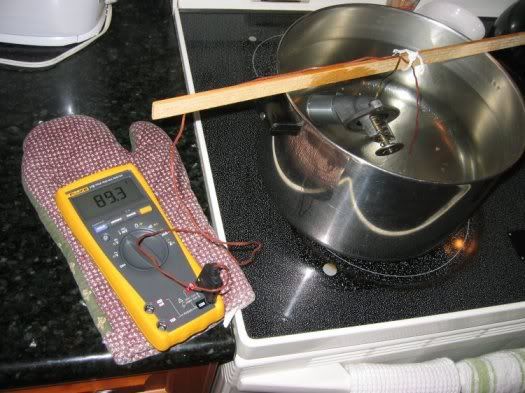
Below is the Fluke Meter that was used to monitor the temperature, which is accurate to 1/10th of a degree.

Here is the data that I obtained, noting each shim was tested several times to obtain these average values:

It appears that with the 0.098� shim, the thermostat is barely closed. The 0.075� shim didn�t quite get me to where I wanted to be. The performance of the 0.058� shim, which seems to seal the thermostat better when it closes down again, will hopefully provide me the temperatures I am trying to achieve in the motor. However, if it is too cool the data will be used to make adjustments as necessary to get to my final goals.
This modified thermostat is now running in a C5 with a DeWitts radiator. On a hot day cruising the motor temp stays right at 180, cooler temps and the engine temp goes to 178 and no lower. At this point, the motor is a little too cool and I plan to modify the thermostat this fall to hopefully bring the running temp up to 185 in cool temps, which is my target running temperature.
04-15-2015, 04:05 PM
#14
Teching In

Join Date: Feb 2012
Posts: 15
Likes: 0
Received 0 Likes
on
0 Posts
I posted the following a couple of years ago but the thread has since been closed and the host server for the photos went away. So I uploaded the photos to Photobucket to duplicate the old thread.
-----------------------------------------------------------------------------
In the first photo the thermostat has been disassembled. You can see one of the shims that I made and the hole into which it is installed. The thickness of the shim will alter the opening point by lowering it, or as is the case if you get to approximately 0.100� thick shim, the thermostat will barely close.
One of the problems I ran into was how to measure data so it wasn�t subjective and I could repeat the test fairly well between the different shims and get a good comparison. After some messing around with the test, I decided to take the temperature at three points in the opening sequence. First, by hanging the thermostat such that the neck was downward, it was easy to trap air behind the rubber door that opens in the thermostat. The first data point would then be when the thermostat opened enough to release the trapped air. This doesn�t take much movement at all and you can barely see the rubber door move at all when this occurs since the movement is so slight. The second point of measurement would be when the rubber lip on the seal was even with the flat mounting surface of the thermostat (see the photo). Finally, I took a third measurement when the rubber lip was 0.2� from the same flat mounting surface. While this seems to be a precise number, it is actually the width of my flat screwdriver that I could hold in the water and use for a measuring tool. With one edge of the screwdriver against the flat mounting surface of the thermostat, when the lip was even with the other edge of the screwdriver blade that is when I wrote down the temperature.
Below is a photo of the shim installed prior to re-assembly of the thermostat.

Next was the method of heating up the thermostat so it was immersed in water. In the next photo you can see I bent up a coat hanger and hung it from a small stick across a large pot of water (my wife thinks I should be committed at this point. The wire next to the thermostat is the thermocouple that was tied into a Fluke Meter for measuring the temperature.
Below is the Fluke Meter that was used to monitor the temperature, which is accurate to 1/10th of a degree.
Here is the data that I obtained, noting each shim was tested several times to obtain these average values:

It appears that with the 0.098� shim, the thermostat is barely closed. The 0.075� shim didn�t quite get me to where I wanted to be. The performance of the 0.058� shim, which seems to seal the thermostat better when it closes down again, will hopefully provide me the temperatures I am trying to achieve in the motor. However, if it is too cool the data will be used to make adjustments as necessary to get to my final goals.
This modified thermostat is now running in a C5 with a DeWitts radiator. On a hot day cruising the motor temp stays right at 180, cooler temps and the engine temp goes to 178 and no lower. At this point, the motor is a little too cool and I plan to modify the thermostat this fall to hopefully bring the running temp up to 185 in cool temps, which is my target running temperature.
-----------------------------------------------------------------------------
In the first photo the thermostat has been disassembled. You can see one of the shims that I made and the hole into which it is installed. The thickness of the shim will alter the opening point by lowering it, or as is the case if you get to approximately 0.100� thick shim, the thermostat will barely close.
One of the problems I ran into was how to measure data so it wasn�t subjective and I could repeat the test fairly well between the different shims and get a good comparison. After some messing around with the test, I decided to take the temperature at three points in the opening sequence. First, by hanging the thermostat such that the neck was downward, it was easy to trap air behind the rubber door that opens in the thermostat. The first data point would then be when the thermostat opened enough to release the trapped air. This doesn�t take much movement at all and you can barely see the rubber door move at all when this occurs since the movement is so slight. The second point of measurement would be when the rubber lip on the seal was even with the flat mounting surface of the thermostat (see the photo). Finally, I took a third measurement when the rubber lip was 0.2� from the same flat mounting surface. While this seems to be a precise number, it is actually the width of my flat screwdriver that I could hold in the water and use for a measuring tool. With one edge of the screwdriver against the flat mounting surface of the thermostat, when the lip was even with the other edge of the screwdriver blade that is when I wrote down the temperature.
Below is a photo of the shim installed prior to re-assembly of the thermostat.
Next was the method of heating up the thermostat so it was immersed in water. In the next photo you can see I bent up a coat hanger and hung it from a small stick across a large pot of water (my wife thinks I should be committed at this point
. The wire next to the thermostat is the thermocouple that was tied into a Fluke Meter for measuring the temperature.Below is the Fluke Meter that was used to monitor the temperature, which is accurate to 1/10th of a degree.
Here is the data that I obtained, noting each shim was tested several times to obtain these average values:
It appears that with the 0.098� shim, the thermostat is barely closed. The 0.075� shim didn�t quite get me to where I wanted to be. The performance of the 0.058� shim, which seems to seal the thermostat better when it closes down again, will hopefully provide me the temperatures I am trying to achieve in the motor. However, if it is too cool the data will be used to make adjustments as necessary to get to my final goals.
This modified thermostat is now running in a C5 with a DeWitts radiator. On a hot day cruising the motor temp stays right at 180, cooler temps and the engine temp goes to 178 and no lower. At this point, the motor is a little too cool and I plan to modify the thermostat this fall to hopefully bring the running temp up to 185 in cool temps, which is my target running temperature.