

My Engine Committed Suicide Yesterday

 06-03-2010, 06:34 PM
#262
--------------------------------------------------------------------------
Today, in being June 3rd officially marks the three year anniversary of my engine destroying itself in my driveway when I tried to start it. Three years later it is still not running and driving me absolutely insane.
Today has been pretty much a complete waste of time. More so than that in the fact that it has actually been a step backwards. Nothing came in the mail today. I checked my paypal account to wonder if someone had sent me money for a part. I didn't find money from that person, but for some odd reason I had roughly an extra $150 in my account. As I look through my transactions I notice a refund for a large sum of money. I click on it and find that it is the money that I spent on my gauges. I click on the transaction and find the reason for my refund:
"Parts not in stock. 4 day lead time from autometer. Sent 2 emails, no response from customer. Sorry for the inconvenience."
I didn't receive any sort of contact; either an email, letter, anything. Now, I have part of the money that was spent through paypal in my account, but am currently missing or waiting on the other $500.15 to magically reappear. When I checked it this morning it said that the refund had been issued by the seller for the total amount. I checked my bank account and was missing the $500. I just checked paypal again and it says that a credit card refund has been issued, so I check my bank account again, and no money.

The part that really makes me upset about this is that they could have simply sent them anyways. I ordered them on the 27th and if you count 4 business days excluding Saturday and Monday as a holiday that would be uh... TODAY. Not to mention shipping for 3 gauges and 3 single gauge cups through UPS ground was going to cost $29. Granted they are in California and I am in Florida, but if they shipped in a $12.95 or $14.50 flat rate priority mail box I would have paid half as much and gotten the items in half the time.
Needless to say I won't be doing business with them again. I plan on finding a sponsor that carries Autometer cobalt digital gauges, offers price matching, and ordering the gauges through them. Anyone know of sponsors carry these?
--------------------------------------------------------------------------
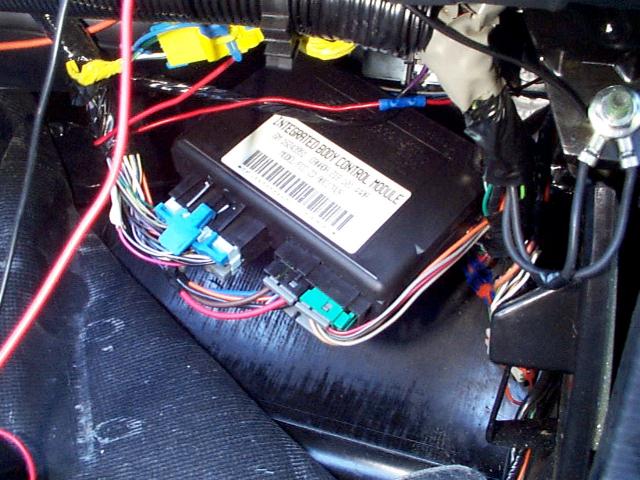
The other thing that has been driving me insane has been dealing with the wiring issues of my car. I originally was going to repin the harness until I realized that with the 99 engine harness and PCM that is not an option. I sent Doc at EFI alchemy a PM a couple days ago. He replied by sending me a couple emails and gave me a phone call yesterday. He told me that instead I need to repin the interconnects at the BCM and that it should be less work. He told me where to find the diagrams for the interconnects and the pinouts for the different years. Today, I went to the site and found all of the information.
I went to look at my car to find the connectors and see if they match up with the diagrams. Well, I can't find the ******* plugs. For some odd reason the 3 interconnects that match the BCM are either hiding from me, not in the car, or I have three C1, C2, and C3 shaped blindspots on my eyes.
Here is a picture of the BCM connectors. One is a 32 pin and the other two are 6 pin connectors:

Here is all of the wiring in that area of my car:

I noticed two things right away. One was a cut ground:

The other was these three plugs being the only ones unconnected:

I then noticed the missing grommet in my firewall and thought maybe that the plugs were on the PCM side of the engine harness:


Yes, I know my engine bay is dirty. It's been sitting for three years.
I then checked the engine harness, found the grommet, but only two plugs. I think this is what Doc was telling me about needing to go from my 98 three plugs to 99+ of only have two.

Yet, I couldn't find the BCM plugs. Here is what they are supposed to look like.
(This image is from a 96-98 vehicle)
According to the diagrams there is one C3 blue 32 way, C2 black 6 way, and C1 green 6 way for a total of three connectors at the BCM.
I just can't seem to find these three plugs. I don't know where they are hiding or if they had been removed from my car with the BCM (without my consent). I am also wondering about what that ground goes to. Anyone know?
If anyone could take a picture of their BCM area, post it, or PM it to me I would greatly appreciate it. I am looking for where these three plugs come from. As in the where the wires that end at the plug come from. Are they on the interior harness or the engine harness?
Any help would be greatly appreciated.
06-04-2010, 08:30 AM
#263
I just got off of work a couple hours ago. While I was there I managed to print around 50 pages of pinouts and wiring diagrams that should help me out. I went through all of them and decided that when I got home I was going to look through the car again while waiting for the post office to open.
Well, look what I found:

MY BCM!
Here are those magical connectors I was looking for:

I figured that if I wasn't missing my BCM I was missing some other sort of electrical module / box. I decided to pull the passenger side kick panel off of my 95 and here it is:

Yeah, I have no clue.
Here are the two connectors that plug into it:

I didn't see those two plugs in my Formula, but perhaps it is a year to year difference?
I started to slide it out and noticed a number stamped on the side:

I then managed to pry it all they way out of its holster and took a picture of the label:

Anyone have any idea what this thing is? I could really use some help with this as I now need another electric module. Hopefully, I can trade John the BCM for what ever this new piece is.
EDIT: Googled it and it is the keyless entry module. Could someone take a picture of theirs in their car for me? Specifically, a 98+ model so I can see what plugs run into it.
Well, look what I found:
MY BCM!
Here are those magical connectors I was looking for:
I figured that if I wasn't missing my BCM I was missing some other sort of electrical module / box. I decided to pull the passenger side kick panel off of my 95 and here it is:
Yeah, I have no clue.
Here are the two connectors that plug into it:
I didn't see those two plugs in my Formula, but perhaps it is a year to year difference?
I started to slide it out and noticed a number stamped on the side:
I then managed to pry it all they way out of its holster and took a picture of the label:
Anyone have any idea what this thing is? I could really use some help with this as I now need another electric module. Hopefully, I can trade John the BCM for what ever this new piece is.
EDIT: Googled it and it is the keyless entry module. Could someone take a picture of theirs in their car for me? Specifically, a 98+ model so I can see what plugs run into it.
06-04-2010, 07:58 PM
#264
Upon waking up I found a couple packages at the house....
The first was my wideband O2 sensor that I bought. It is an innovative DB gauge with an LC1. I have to say it is a really cool setup. They include absolutely everything you could possibly need to install it, data logging software, and instructions.

The other thing was something I've been waiting on a long time to receive. I went through a debacle involving a sponsor on here basically stealing a laptop from the seller after receiving a refund, which I had paid for, was supposed to be mine, refusing to ship it back to the seller, or me, and lowballing him on the price. The seller was awesome to deal with and shipped me another one after eating the loss of being lowballed and threw in two extra batteries for free.

-------------------------------------------------------------------------------------
In regards to my wiring debacle.
1. Could someone with a 98+ take a picture of their keyless entry module, the plugs that go into it, and post it or PM it to me?
2. Anyone know how much those things cost?
3. If my 95 has one then I should theoretically have keyless entry? I have an extra key fob. Would I just have to go through the programming process?
The first was my wideband O2 sensor that I bought. It is an innovative DB gauge with an LC1. I have to say it is a really cool setup. They include absolutely everything you could possibly need to install it, data logging software, and instructions.
The other thing was something I've been waiting on a long time to receive. I went through a debacle involving a sponsor on here basically stealing a laptop from the seller after receiving a refund, which I had paid for, was supposed to be mine, refusing to ship it back to the seller, or me, and lowballing him on the price. The seller was awesome to deal with and shipped me another one after eating the loss of being lowballed and threw in two extra batteries for free.
-------------------------------------------------------------------------------------
In regards to my wiring debacle.
1. Could someone with a 98+ take a picture of their keyless entry module, the plugs that go into it, and post it or PM it to me?
2. Anyone know how much those things cost?
3. If my 95 has one then I should theoretically have keyless entry? I have an extra key fob. Would I just have to go through the programming process?
06-09-2010, 06:04 PM
#265
I got a couple parts in today and managed to get some work done. I received my aluminum flywheel from SDPC, Pro 5.0 and short stick from Speed Inc, and 5 inch dial bore extension from Jegs. With the dial bore extension I can finally measure my valve drop and get measurements to Patrick G. With the shifter I can get Maciek at Redline Goods the measurements he needs to make my shift boot.

Pro 5.0 from Speed Inc. with short stick.
I actually wanted the short straight stick, but ended up with the angled one. There wasn't a spot to say what you wanted so I just gave them a call. I've also been waiting on some parts from my original order from the 13th of May. The guy there checked on my order and told me that they had been waiting on the Lingenfelter box to ship everything, that it was there, and it would be shipped out today or tomorrow. I asked him about the short stick and he said he would make a note on my invoice. That I should just send in the angled one and they'd send me the straight one in exchange.
Ram Aluminum Flywheel from SDPC:

John comes through again. I am going to need to give him a call tomorrow for some other things. I am going to try and do some work tonight on getting engine measurements together and figuring out what random parts I need.
5 Inch dial bore extension:

After putting those items away I gave RacePartsUSA another call. My tubing showed up finally and it should be shipping today. For some odd reason my panhard rod tube didn't come in anodized like the LCA tubing. I figure I'll either polish it or paint it with the rear end.
I was also searching around for the interior panels I want in ebony when I stumbled across a deal in the sponsors sale section. Specialized Stainless is running 50% off their ebony and tan leather wrapping kits.
https://ls1tech.com/forums/sponsor-s...l#post13446476
I bough a kit and a shifter plaque from them for way less than I would have spent on new interior panels. I plan on wrapping pretty much everything in the interior once it arrives. I am still going to need a new dash and have one lined up, but am waiting to hear from the member how much shipping will be.
Pro 5.0 from Speed Inc. with short stick.
I actually wanted the short straight stick, but ended up with the angled one. There wasn't a spot to say what you wanted so I just gave them a call. I've also been waiting on some parts from my original order from the 13th of May. The guy there checked on my order and told me that they had been waiting on the Lingenfelter box to ship everything, that it was there, and it would be shipped out today or tomorrow. I asked him about the short stick and he said he would make a note on my invoice. That I should just send in the angled one and they'd send me the straight one in exchange.
Ram Aluminum Flywheel from SDPC:
John comes through again. I am going to need to give him a call tomorrow for some other things. I am going to try and do some work tonight on getting engine measurements together and figuring out what random parts I need.
5 Inch dial bore extension:
After putting those items away I gave RacePartsUSA another call. My tubing showed up finally and it should be shipping today. For some odd reason my panhard rod tube didn't come in anodized like the LCA tubing. I figure I'll either polish it or paint it with the rear end.
I was also searching around for the interior panels I want in ebony when I stumbled across a deal in the sponsors sale section. Specialized Stainless is running 50% off their ebony and tan leather wrapping kits.
https://ls1tech.com/forums/sponsor-s...l#post13446476
I bough a kit and a shifter plaque from them for way less than I would have spent on new interior panels. I plan on wrapping pretty much everything in the interior once it arrives. I am still going to need a new dash and have one lined up, but am waiting to hear from the member how much shipping will be.
 06-10-2010, 06:53 PM
#267
--------------------------------------------------------------------------
Nothing came in the mail today as I only have a couple pending items still headed this way and I paid for two of them yesterday. Within the next week or so I should have my new a pillars, ebony interior kit, shifter plaque, new straight short stick, PHR / LCA tubing, items from my original speed inc. order, and once I can get some measurements my shift boot from Redline Goods.
Update wise though I actually managed to work on something that matters last night. Last night was the first official night of making positive progress. With finally getting that dial bore extension I could get some work done on measuring the valve drop on my heads.
The first thing I did was unwrap my engine and dig out some parts I'd had in storage for a while. I bought a complete set of Fbody front accessories from a member on here a while ago and opened some and left others in the packaging. I finally opened the water pump last night to test fit it with the L92 front cover. When I opened the pump I noticed the tensioner was basically frozen in place and the pulley was broken.
great! I think I bought a spare one a long time ago, but I'll need to check. Either way much like I believed the front cover doesn't allow the Fbody water pump to clear. It isn't even close:
After I found that wouldn't work I picked the closest piston and correlating chamber in the heads and started working. I've pulled a couple sets of springs off of heads before so I wasn't expecting to have issues. For what ever reason of which I am still unsure the locks would not come out of the retainers. I used an assortment of different sockets and hammers ranging from a ball peen, claw, and 3 lb mini sledge (The wall destroyer. You can see it in the background of this picture). Eventually, I ended up tightening the compressor on them slightly, putting the socket on top of the compressor, and smashing it with my mini sledge. After a few bashes they finally came out.

[Borat Voice] Success, very nice!!! [/Borat Voice] It honestly took me at least 45 minutes to get this one off.
Once I got that one off I proceeded to install the checker spring in it's place and do the same with the exhaust valve spring setup. This one came off quicker but was actually more of a pain in the *** to knock loose. When I finally got both checker springs installed I carried the head upstairs with my dial bore indicator. I've never used a dial bore indicator before and had no clue what so ever how to set it up or what it threaded into. I went through a ton of different ideas before I just decided to start trying to thread the base into every hole in the head I could find. Eventually, I figured that it threads into the middle of the 3 holes on the rocker pad.
 = me
= meIntake valve drop measurements:

Exhaust valve zeroed out:

Exhaust valve measured:

Once I got all of the measurements from the head on a flate surface I was going to continue in installing the head on the block and seeing if any of the valve reliefs in the piston correlate. The first thing I was trying to do was get the piston towards the top. In doing so I managed to acrue my first battle wound by getting my fingers jammed between the flywheel and block:

It was a couple stupid tiny cuts, but super deep, and cut through my fingernail.
After I finally stopped bleeding I decided that turning the engine over using a socket on the flywheel bolts was a much safer idea. I then had the problem of trying to figure out how I was going to mount the dial bore indicator. Everything I was trying wasn't even coming close to being steady and was giving me innacurate measurements. I had an idea to take my angle grinder and grind the head of an oem head bolt round so that the indicator base could be tightened over the head. I ditched that idea as I knew it would be too loud for 2am. I finally came up with this setup after thinking for a while and it worked out pretty well.

I jammed one of my extra PtV checker springs under the ring for the indicator base and then tightened the head bolt down. I used the 5'' extension to get it where I wanted it centered in the piston. The issue I was having was that in turning the engine by the flywheel with a ratchet was that even in barely trying to turn it would end up moving the piston around .150. I figured that if I added my giant breaker bar onto the ratchet that I could move the ratchet extremely slowly and determine top dead center. I worked out pretty well. I am going to mark it on the block and flywheel for reference basically like a degree wheel.
By this point in time it was about 230am and I had to be at work at 7am this morning so I decided to pack everything up. I am planning on getting the valve drop installed measurements tonight and try to do a couple other things if I can.
--------------------------------------------------------------------------
Questions
In regards to my wiring debacle.
1. Could someone with a 98+ take a picture of their keyless entry module, the plugs that go into it, and post it or PM it to me?
2. Anyone know how much those things cost?
3. If my 95 has one then I should theoretically have keyless entry? I have an extra key fob. Would I just have to go through the programming process?
Valve Drop Questons.
1. I've never measured this before what so ever so let me know if my numbers sound about right.
2.055 Intake valve = 1.000 - .847 = .153 with .002 showing on the gauge instead of zero when I released the compressor from the spring completely.
1.600 Exhaust valve = 1.000 - .805 = .195 with .0015 showing on the gauge instead of zero when I released the compressor from the spring completely.
06-15-2010, 06:16 PM
#269
I've been really busy lately and haven't been able to post an update. Here's one giant one.
--------------------------------------------------------------------------
On Thursday, the 10th I finished up measuring my valve drop with the head on the short block. I already had the rear piston at TDC by my previous breaker bar and dial bore indicator method so I figured it would be pretty easy. I only had four head bolts so I tightened them down slightly snug on the head. I noticed when installing the head that all four of the head dowels in the block are missing so I’m adding that onto my ever growing list of parts I need.
The whole goal of doing this on the head was to see if any of the OEM valve reliefs in the L92 pistons correspond to the Dart heads I have. I started with the exhaust valve side. I set up my dial bore indicator on the head, put the compressor on, and zeroed it out. I then measured it out and came up with .297 inches of clearance before the valve contacted the piston at TDC. I measured it out again just to be thorough and came up with the exact same measurement. Obviously this is an increase over my counter measured .195 so I picked up roughly .100 inches of clearance.
I then moved onto the intake valve and transferred everything over.

Here is what I came up with on the intake side:

Clearance ended up measuring out to .154 and .147 when I measured again. Unfortunately, for me that means that the valve relief in the piston doesn’t correspond at all on the intake valve side.
Measurements:
On the Counter:
Intake Valve = .153 with .002 release change
Exhaust Valve = .195 with .0015 release change
On the Block:
Intake Valve = .154 and .147 with zero release change
Exhaust Valve = .297 with zero release change
I really don’t know what that gives me piston to valve clearance wise when designing a cam, but I’m going to leave that to Patrick G. Looking back I should have been able to figure out that the exhaust side would clear and the intake side wouldn’t. Here is my OEM L92 piston:

The right relief is for the exhaust valve and the left for the intake valve. For some odd reason the intake valve relief is on the bottom of the piston instead of on the top like this Diamond -1.8cc piston I used to own:

This piston has corresponding valve reliefs. The intake valve is on the top left and the exhaust on the top right. Looking at it now it seems so basic, but like I said I am an assembly .
I’m also doing all of this in a tiny space between my closet full of parts and my drier.

To the left is that black hood I picked up a long time ago in my 95.
--------------------------------------------------------------------------
Friday, the 11th I didn’t get too much done as I’m kind of stuck waiting on parts or searching for information. I did get my aluminum hex tubing in the mail from RacePartsUSA. I was very surprised how quickly everything arrived as I talked to him on Wednesday the 9th right around 4:30pm and the parts got here on the morning of the 11th.
Much like I thought my LCA tubing ended up anodized, but the PHR one didn’t for some odd reason. I’m still unsure whether I am going to paint it black with the rear or polish it. With the tubing in hand I decided to go ahead and thread all of the Spohn del spheres onto the tubing. I have to admit that the right and left handed threads messed me up at first. I was thinking that for some odd reason I messed up my order. I started with the PHR tubing and everything went in really easy. It looks pretty pimp even in it’s current state:

After that I started threading the del spheres on the LCA tubing. Upon getting everything installed I noticed that they seemed pretty long and had a lot of unthreaded length. I have an extra set of OEM LCAs and my Wolfe offset LCAs in the garage. I decided to set the Wolfe’s and my new aluminum ones next to each other. Sure enough as I sat them next to each other the new ones were noticeably longer.

I decided to measure them length wise from bolt hole to bolt hole. The Wolfes measured out at 19.5 inches (same as my OEM ones) and my new ones measured 21 inches. I knew that the extra length would cause issues so I measured both tubes again. Both the Wolfes and my new LCA tubes measured out to 16 inches in length so that wasn’t the issue. I immediately knew that the extra threaded bolt length of the del spheres was what was causing the issue.
I threaded the del sphere all the way back into the rod and tightened down the jam nut as a measuring point. I then pulled it off and measured. The LCA tube is threaded 1.75 inches deep and the del sphere has 2.5 inches of thread. That extra .75 inches of length of unthreaded material was what was causing them to be too long.

I then decided for kicks to pull off one of the Wolfe rod ends and I noticed it was much shorter right away.

I guess the guys at RacePartsUSA deal with rod ends which have a much shorter overall thread length. I would say if you guys are ordering tubing and planning on using del spheres ask for it to be threaded around 2.75 inches deep per side to make sure that they will thread in completely. I would also suggest if you desire to swap your current rod ended LCAs or PHR for del spheres to go to the hardware store, buy a 3 inch �-16 bolt, and use it to test the threaded depth of your tubing before spending $51 per del sphere / spacer combo. This will let you know if you will be set to go before spending a decent amount of money. For me now that I already have everything I am planning on Monday to go to Sears to buy some tools including a roughly 3 inch �-16 tap to put an extra .75-1 inch of threads in my LCA tubing.
--------------------------------------------------------------------------
All I really on Saturday, the 12th was work. I worked from 11pm Friday night until 7am Saturday morning, left for less than 8 hours, and then worked from 3pm to 11pm the same day. I was woken up by my postman who happens to be my neighbor knocking on my door around 1pm. I staggered out there and found part of my ebony interior leather wrapping kit from Specialized Stainless. I just set it aside and went back to sleep. When I got home around 11:45pm I decided to open it up. Inside was the all of the tools minus the roller and leather material, instructions and my shifter plaque. I was a little unsure of the firebird logo on the shifter plaque at first, but upon seeing it I really like it.
Wrapping kit tools:

Shifter Plaque:

--------------------------------------------------------------------------
--------------------------------------------------------------------------
On Thursday, the 10th I finished up measuring my valve drop with the head on the short block. I already had the rear piston at TDC by my previous breaker bar and dial bore indicator method so I figured it would be pretty easy. I only had four head bolts so I tightened them down slightly snug on the head. I noticed when installing the head that all four of the head dowels in the block are missing so I’m adding that onto my ever growing list of parts I need.
The whole goal of doing this on the head was to see if any of the OEM valve reliefs in the L92 pistons correspond to the Dart heads I have. I started with the exhaust valve side. I set up my dial bore indicator on the head, put the compressor on, and zeroed it out. I then measured it out and came up with .297 inches of clearance before the valve contacted the piston at TDC. I measured it out again just to be thorough and came up with the exact same measurement. Obviously this is an increase over my counter measured .195 so I picked up roughly .100 inches of clearance.
I then moved onto the intake valve and transferred everything over.
Here is what I came up with on the intake side:
Clearance ended up measuring out to .154 and .147 when I measured again. Unfortunately, for me that means that the valve relief in the piston doesn’t correspond at all on the intake valve side.
Measurements:
On the Counter:
Intake Valve = .153 with .002 release change
Exhaust Valve = .195 with .0015 release change
On the Block:
Intake Valve = .154 and .147 with zero release change
Exhaust Valve = .297 with zero release change
I really don’t know what that gives me piston to valve clearance wise when designing a cam, but I’m going to leave that to Patrick G. Looking back I should have been able to figure out that the exhaust side would clear and the intake side wouldn’t. Here is my OEM L92 piston:
The right relief is for the exhaust valve and the left for the intake valve. For some odd reason the intake valve relief is on the bottom of the piston instead of on the top like this Diamond -1.8cc piston I used to own:
This piston has corresponding valve reliefs. The intake valve is on the top left and the exhaust on the top right. Looking at it now it seems so basic, but like I said I am an assembly
. I’m also doing all of this in a tiny space between my closet full of parts and my drier.
To the left is that black hood I picked up a long time ago in my 95.
--------------------------------------------------------------------------
Friday, the 11th I didn’t get too much done as I’m kind of stuck waiting on parts or searching for information. I did get my aluminum hex tubing in the mail from RacePartsUSA. I was very surprised how quickly everything arrived as I talked to him on Wednesday the 9th right around 4:30pm and the parts got here on the morning of the 11th.
Much like I thought my LCA tubing ended up anodized, but the PHR one didn’t for some odd reason. I’m still unsure whether I am going to paint it black with the rear or polish it. With the tubing in hand I decided to go ahead and thread all of the Spohn del spheres onto the tubing. I have to admit that the right and left handed threads messed me up at first. I was thinking that for some odd reason I messed up my order. I started with the PHR tubing and everything went in really easy. It looks pretty pimp even in it’s current state:
After that I started threading the del spheres on the LCA tubing. Upon getting everything installed I noticed that they seemed pretty long and had a lot of unthreaded length. I have an extra set of OEM LCAs and my Wolfe offset LCAs in the garage. I decided to set the Wolfe’s and my new aluminum ones next to each other. Sure enough as I sat them next to each other the new ones were noticeably longer.
I decided to measure them length wise from bolt hole to bolt hole. The Wolfes measured out at 19.5 inches (same as my OEM ones) and my new ones measured 21 inches. I knew that the extra length would cause issues so I measured both tubes again. Both the Wolfes and my new LCA tubes measured out to 16 inches in length so that wasn’t the issue. I immediately knew that the extra threaded bolt length of the del spheres was what was causing the issue.
I threaded the del sphere all the way back into the rod and tightened down the jam nut as a measuring point. I then pulled it off and measured. The LCA tube is threaded 1.75 inches deep and the del sphere has 2.5 inches of thread. That extra .75 inches of length of unthreaded material was what was causing them to be too long.
I then decided for kicks to pull off one of the Wolfe rod ends and I noticed it was much shorter right away.
I guess the guys at RacePartsUSA deal with rod ends which have a much shorter overall thread length. I would say if you guys are ordering tubing and planning on using del spheres ask for it to be threaded around 2.75 inches deep per side to make sure that they will thread in completely. I would also suggest if you desire to swap your current rod ended LCAs or PHR for del spheres to go to the hardware store, buy a 3 inch �-16 bolt, and use it to test the threaded depth of your tubing before spending $51 per del sphere / spacer combo. This will let you know if you will be set to go before spending a decent amount of money. For me now that I already have everything I am planning on Monday to go to Sears to buy some tools including a roughly 3 inch �-16 tap to put an extra .75-1 inch of threads in my LCA tubing.
--------------------------------------------------------------------------
All I really on Saturday, the 12th was work. I worked from 11pm Friday night until 7am Saturday morning, left for less than 8 hours, and then worked from 3pm to 11pm the same day. I was woken up by my postman who happens to be my neighbor knocking on my door around 1pm. I staggered out there and found part of my ebony interior leather wrapping kit from Specialized Stainless. I just set it aside and went back to sleep. When I got home around 11:45pm I decided to open it up. Inside was the all of the tools minus the roller and leather material, instructions and my shifter plaque. I was a little unsure of the firebird logo on the shifter plaque at first, but upon seeing it I really like it.
Wrapping kit tools:
Shifter Plaque:
--------------------------------------------------------------------------
06-15-2010, 06:17 PM
#270
I didn’t get anything done yesterday the 13th, but today the 14th I did. I pretty much committed today to shopping locally for all of the tools and random things that I am going to need to work on the car. I made a trip to Sears, Wal-Mart aka super hickville, and Home Depot.
Before I left home I found a couple boxes outside. One was the material roller from Specialized Stainless and the other was my box of missing parts from Speed Inc. that I ordered on the 13th of May. I opened up the box from Speed Inc. first and it contained my poly sway bar end links, 1 motor mount, and Lingenfelter conversion box. I flipped through the 15 page converter box instruction manual real quick and it seems like it is going to be more complicated than I originally thought. The thing that kind of annoyed me is that for some odd reason they only sent me one poly motor mount…. I have no clue what I am going to do with one motor mount, but continue to wait. After a month of waiting it is kind of annoying and I am going to have to call them tomorrow and ask why I only got one motor mount. Here are the parts from Speed Inc.

After I went through the boxes of parts I went down to the garage and grabbed my aluminum hex tubing and hopped in my car. The closest Sears is about 20-25 minutes away so I don’t ever really go there unless I have to. I decided that today was going to be a pre emptive trip, I was really looking for a �-16 tap, but for some odd reason they didn’t have it either. I am going to have to order one and wait for it to get here. Anyways, I ended up spending a small fortune at Sears on tools. I decided it was time to step up over my 50 something travel size tool kit and brought home quite the hall.


Next on my list of places to go was Wal-Mart aka super hickville, a place that I absolutely hate going to. I made my journey through that giant hell as quickly as I could. I ended up picking up a spray bottle, large brush, black fabric dye, some gloss black Rustoleum paint, and a brush for it. I was looking for POR15 that I’ve read so much on here about, but ended up going with the Rustoleum as that was all I could find there. I think it’ll work just find.
I was going to go to a small local hobby store as I like supporting small businesses more than giant chains like super hickville, but they had closed right before I got there. I ended up going to the Home Depot by my house to pick up the rest of things as I won’t have time to do much of anything tomorrow. At Home Depot I bought some methyl ethyl keton MEK, a heat gun, an xacto knife, and some extra blades for it.
The spray bottle, large brush, and black fabric dye will be for dying my grey carpet and hopefully headliner black. I bought the Rustoleum paint for painting my rear end, PHR, and sway bars. The MEK, heat gun, and xacto knife are for wrapping all of my interior panels in leather. The haul:

--------------------------------------------------------------------------
To reiterate some of the questions I’ve accrued so far:
In regards to my wiring debacle.
1. Could someone with a 98+ take a picture of their keyless entry module, the plugs that go into it, and post it or PM it to me?
2. Anyone know how much those things cost?
3. If my 95 has one then I should theoretically have keyless entry? I have an extra key fob. Would I just have to go through the programming process?
Valve Drop Questons.
1. I've never measured this before what so ever so let me know if my numbers sound about right.
2.055 Intake valve = 1.000 - .847 = .153 with .002 showing on the gauge instead of zero when I released the compressor from the spring completely.
1.600 Exhaust valve = 1.000 - .805 = .195 with .0015 showing on the gauge instead of zero when I released the compressor from the spring completely.
Before I left home I found a couple boxes outside. One was the material roller from Specialized Stainless and the other was my box of missing parts from Speed Inc. that I ordered on the 13th of May. I opened up the box from Speed Inc. first and it contained my poly sway bar end links, 1 motor mount, and Lingenfelter conversion box. I flipped through the 15 page converter box instruction manual real quick and it seems like it is going to be more complicated than I originally thought. The thing that kind of annoyed me is that for some odd reason they only sent me one poly motor mount….
I have no clue what I am going to do with one motor mount, but continue to wait. After a month of waiting it is kind of annoying and I am going to have to call them tomorrow and ask why I only got one motor mount. Here are the parts from Speed Inc.After I went through the boxes of parts I went down to the garage and grabbed my aluminum hex tubing and hopped in my car. The closest Sears is about 20-25 minutes away so I don’t ever really go there unless I have to. I decided that today was going to be a pre emptive trip, I was really looking for a �-16 tap, but for some odd reason they didn’t have it either. I am going to have to order one and wait for it to get here. Anyways, I ended up spending a small fortune at Sears on tools. I decided it was time to step up over my 50 something travel size tool kit and brought home quite the hall.
Next on my list of places to go was Wal-Mart aka super hickville, a place that I absolutely hate going to. I made my journey through that giant hell as quickly as I could. I ended up picking up a spray bottle, large brush, black fabric dye, some gloss black Rustoleum paint, and a brush for it. I was looking for POR15 that I’ve read so much on here about, but ended up going with the Rustoleum as that was all I could find there. I think it’ll work just find.
I was going to go to a small local hobby store as I like supporting small businesses more than giant chains like super hickville, but they had closed right before I got there. I ended up going to the Home Depot by my house to pick up the rest of things as I won’t have time to do much of anything tomorrow. At Home Depot I bought some methyl ethyl keton MEK, a heat gun, an xacto knife, and some extra blades for it.
The spray bottle, large brush, and black fabric dye will be for dying my grey carpet and hopefully headliner black. I bought the Rustoleum paint for painting my rear end, PHR, and sway bars. The MEK, heat gun, and xacto knife are for wrapping all of my interior panels in leather. The haul:
--------------------------------------------------------------------------
To reiterate some of the questions I’ve accrued so far:
In regards to my wiring debacle.
1. Could someone with a 98+ take a picture of their keyless entry module, the plugs that go into it, and post it or PM it to me?
2. Anyone know how much those things cost?
3. If my 95 has one then I should theoretically have keyless entry? I have an extra key fob. Would I just have to go through the programming process?
Valve Drop Questons.
1. I've never measured this before what so ever so let me know if my numbers sound about right.
2.055 Intake valve = 1.000 - .847 = .153 with .002 showing on the gauge instead of zero when I released the compressor from the spring completely.
1.600 Exhaust valve = 1.000 - .805 = .195 with .0015 showing on the gauge instead of zero when I released the compressor from the spring completely.
06-15-2010, 06:34 PM
#271
TECH Resident
iTrader: (60)
Join Date: Dec 2006
Location: Jacksonville, Florida
Posts: 849
Likes: 0
Received 0 Likes
on
0 Posts

good luck on getting those ratchets to last. I bought that same set from sears last year and all ratchets are broke and its a bitch to get replacements.
06-18-2010, 07:26 PM
#273
The only thing that's a pain about exchanging anything is that I live at the beach by JTB and have to drive to Regency to trade them out.


--------------------------------------------------------------------------
On the 16th I got a couple things in the mail. The first was my door panel inserts that I bought on here recently. They are a black carbon fiber vinyl. They have a rather subtle look to them from a far, but when you look at them closer they have a nice weave to them.
Insert:

Zoom:

I also received a really large roll of ebony leather from Specialized Stainless. I was a little unsure of if I wanted to go through all of the work of wrapping everything, but after seeing the material I think it'll be way worth it.

Later that night I went through the pain in the *** process of installing this engine stand. The directions on it sucked ***, but it was pretty straight forward. The rear wheels don't fit very well either, but hopefully I won't have to move it too much.

--------------------------------------------------------------------------
Yesterday, the 17th was an adventure. I got a call from the freight company on the 16th while I was at work that my dash had arrived. I didn't have time that day to go pick it up so I went yesterday. I really had no clue where the place was so I gave them a call and got their address. I put the address into google maps on my phone to get directions. For some odd reason every time I put in the address it changed it to Rail Trail Road. I figured that must be correct and it was kind of close to where he told me they were located.
It came up as a 36 mile trip which seemed a little far. I then proceeded to drive out there and as I was closing in on the final destination the less and less plausible it seemed that I was going the correct way. I was driving by trailer parks in the middle of no where with old rusted cars and chickens in the yards. The last three turns I made were all dirt roads and Rail Trail Road ended up being someone's one lane dirt driveway with no tresspassing signs all over it. I decided to promptly get out of there and back to the last gas station I saw. Once I got there I called them again and got directions. I ended up being about 12-15 miles away from the freight depot.
When I finally got there they pulled around a giant pallet with my new dashboard, pad, and bolts in it. I wish I had taken a picture of the pallet and boxes the guy who shipped it made because it was rather impressive. I pulled it all out and loaded into the back of my Mom's car and headed towards home. On my way back I stopped by Sears again to trade something out and buy some other things. Here's what I picked up:

Here's the dash related parts in the back of my Mom's car:

I left rather early around 2pm and by the time I got home around 6pm a package had arrived. Inside was my new ebony a pillars and t top latch holders:

Later that night I unpacked everything, stashed it away, and started working on getting an accurate piston out of the hole measurement. Last time I did it I measured four times and got three different results. The first time I ended up with .008, .011, .012, and .011 again. I used a different mounting spot this time and ended up with getting .011 again and .007. I am thinking that I am going to just take an average of all of them and play the head gasket safe around an extra .005ish to not bring things too close.
--------------------------------------------------------------------------
Today, I finally got a chance to give Speed Inc. a call and get my motor mount issue squared away. For some odd reason when I originally called and placed my order I was only charged for one motor mount and that's what they shipped. I don't know what I am supposed to do with one motor mount, but the other will get shipped out Monday as it isn't in stock
and get here around Thursday or Friday of next week.I've also been continuing my back and forth messaging with Patrick G about cam design. The choice has been made to flycut the intake valve side and remill the heads. That'll put me with the proper clearance I need on the intake side and allow me to reach my compression goals. I'm going to try and get a bunch of things squared away this weekend work wise and order the remaining parts to assemble the engine on Monday.
06-24-2010, 08:07 PM
#274
I've finally managed to make some major steps in finding the information I've been searching for. On Tuesday John at SDPC helped me out with another order. This should be everything I need to start getting my engine assembled.
- LS2 Front Cover
- Oil Pressure Sending Unit � Short 1 wire sensor
- Timing chain damper � 12588670 LS2/LS3 Black Timing Chain Tensioner
- Head dowels and dumbbell plugs
- Complete gasket set with LS9 Head gaskets
- Extra L92 piston
I had been thinking that there was an electronic module I was missing for a long time, but we couldn't figure out what was missing. We decided that post my journey yesterday we could figure it out.
Yesterday aka Wednesday, Doc @ EFI Alchemy was nice enough to help me out with finding all of the wiring information for me in regards to repinning my harness and getting everything to work. He let me look at his car (98 repinned to 99+) and sure enough the first thing I noticed is that there was no module in that open slot. Apparently there just isn't anything that goes there on the 98+ cars. That works out for me as I don't have to order anything now.
Today, my 3/4ths-16 RH and LH taps came in the mail.

I can now get my LCA tubing tapped enough to fit the del spheres in there.
I'm working on getting all of my flycutting tools ordered. I am planning on using a Rev 2.096 valve with adhesive 40 grit sanding disks. I'm planning on using a die sit to thread the valve stem. Then, using a large nut with a flat washer attached to the bottom of it to set my cut depth. Monday should be the day I can get a lot of things done. My current work schedule is making things extremely difficult.
- LS2 Front Cover
- Oil Pressure Sending Unit � Short 1 wire sensor
- Timing chain damper � 12588670 LS2/LS3 Black Timing Chain Tensioner
- Head dowels and dumbbell plugs
- Complete gasket set with LS9 Head gaskets
- Extra L92 piston
I had been thinking that there was an electronic module I was missing for a long time, but we couldn't figure out what was missing. We decided that post my journey yesterday we could figure it out.
Yesterday aka Wednesday, Doc @ EFI Alchemy was nice enough to help me out with finding all of the wiring information for me in regards to repinning my harness and getting everything to work. He let me look at his car (98 repinned to 99+) and sure enough the first thing I noticed is that there was no module in that open slot. Apparently there just isn't anything that goes there on the 98+ cars. That works out for me as I don't have to order anything now.
Today, my 3/4ths-16 RH and LH taps came in the mail.
I can now get my LCA tubing tapped enough to fit the del spheres in there.
I'm working on getting all of my flycutting tools ordered. I am planning on using a Rev 2.096 valve with adhesive 40 grit sanding disks. I'm planning on using a die sit to thread the valve stem. Then, using a large nut with a flat washer attached to the bottom of it to set my cut depth. Monday should be the day I can get a lot of things done. My current work schedule is making things extremely difficult.
06-30-2010, 05:56 PM
#275
YEAH, PROGRESS!!!
The night of the 27th I took those 3/4-16 LH and RH taps to my aluminum LCA tubing and finished those off. I have to say that tapping them was a lot more work than I anticipated. I used my dad's table vise to hold them in place, a ratchet with a piece of PVC to give me some extra leverage, and a lot of sweat to get them tapped. After I got them tapped I made the mistake of trying to blow all of the remaining aluminum shavings out of the tube and ended up with a mouth full of aluminum dust. DON'T DO THINK THAT IS A GOOD IDEA, IT IS RETARDED. Even with them now tapped I was having a hell of a time getting one of the left handed rod ends to thread in. I lubricated the threads and end with WD40 and that seemed to help. Eventually, I got all of the ends back into the tubing:

The night of the 28th I started working on repinning the harness armed with the information Doc at EFI Alchemy supplied me with. I got all of the wires labeled and started pulling them out of the connectors. I got the all of them out, but the small ones in less than two minutes. I just used a tiny screwdriver and pushed them right out. When I got to the other connector they just wouldn't come out. I decided to take things one step further and just say, "Screw this." I broke out a razor blade and...

About an hour later:

I then ran into this issue:

Another email off to Doc, information was passed along, and things were resolved. I ended the night with a giant jumble of wiring every where and sore thumbs from trying to hold onto that connector as I massacred it with a razor.
Last night, the 29th I got almost everything finished up. It was extremely frustrating though because I went to start working around 9:40pm and didn't get started until midnight. I first noticed that I needed some dykes to cut the pins so I walked across the street to my parent's garage and made a raid. This was then proceeded by me walking back and forth four more times searching for a soldering iron, solder, and some other things. I found the soldering tools and then realized I needed an extension cord, then heat shrink tubing, or crimp connectors, etc... Each time I needed to stop what I was doing and then walk across the street.
Next, as I was soldering the iron my dad had from circa 1970 stopped working. I then had to drive 20 minutes to Walmart aka super hickville in the middle of the night to find a soldering iron. While I was there I went ahead and bought some more solder, crimp connectors, and a 500 watt light. The light was only $10 and I have to say awesome! I'm going to make something to hang it from later.
Once I finally got home I started hacking up some wiring and got everything moved to where it was supposed to be, taped off, and double checked:

The next step is simply getting power to the car. I have the harness repinned, but I don't have the engine harness side of things done. I went through the engine harness and counted six grounds. I know some of them go to the back of one of the heads, one or two go on the starter, but I really don't remember.
QUESTIONS
Where are the OEM grounds for the engine harness located? I also need to figure out if any of the sensors in the engine harness need to be connected to have power. Remember, I am not trying to start the car and can't with a blown up engine. All I want to achieve is to have electricity when I turn the key. Can I simply ground all of the engine harness grounds to the chassis or engine and plug in the PCM or is it more complicated than that?
The night of the 27th I took those 3/4-16 LH and RH taps to my aluminum LCA tubing and finished those off. I have to say that tapping them was a lot more work than I anticipated. I used my dad's table vise to hold them in place, a ratchet with a piece of PVC to give me some extra leverage, and a lot of sweat to get them tapped. After I got them tapped I made the mistake of trying to blow all of the remaining aluminum shavings out of the tube and ended up with a mouth full of aluminum dust. DON'T DO THINK THAT IS A GOOD IDEA, IT IS RETARDED. Even with them now tapped I was having a hell of a time getting one of the left handed rod ends to thread in. I lubricated the threads and end with WD40 and that seemed to help. Eventually, I got all of the ends back into the tubing:
The night of the 28th I started working on repinning the harness armed with the information Doc at EFI Alchemy supplied me with. I got all of the wires labeled and started pulling them out of the connectors. I got the all of them out, but the small ones in less than two minutes. I just used a tiny screwdriver and pushed them right out. When I got to the other connector they just wouldn't come out. I decided to take things one step further and just say, "Screw this." I broke out a razor blade and...
About an hour later:
I then ran into this issue:
Another email off to Doc, information was passed along, and things were resolved. I ended the night with a giant jumble of wiring every where and sore thumbs from trying to hold onto that connector as I massacred it with a razor.
Last night, the 29th I got almost everything finished up. It was extremely frustrating though because I went to start working around 9:40pm and didn't get started until midnight. I first noticed that I needed some dykes to cut the pins so I walked across the street to my parent's garage and made a raid. This was then proceeded by me walking back and forth four more times searching for a soldering iron, solder, and some other things. I found the soldering tools and then realized I needed an extension cord, then heat shrink tubing, or crimp connectors, etc... Each time I needed to stop what I was doing and then walk across the street.
Next, as I was soldering the iron my dad had from circa 1970 stopped working. I then had to drive 20 minutes to Walmart aka super hickville in the middle of the night to find a soldering iron. While I was there I went ahead and bought some more solder, crimp connectors, and a 500 watt light. The light was only $10 and I have to say awesome! I'm going to make something to hang it from later.
Once I finally got home I started hacking up some wiring and got everything moved to where it was supposed to be, taped off, and double checked:
The next step is simply getting power to the car. I have the harness repinned, but I don't have the engine harness side of things done. I went through the engine harness and counted six grounds. I know some of them go to the back of one of the heads, one or two go on the starter, but I really don't remember.
QUESTIONS
Where are the OEM grounds for the engine harness located? I also need to figure out if any of the sensors in the engine harness need to be connected to have power. Remember, I am not trying to start the car and can't with a blown up engine. All I want to achieve is to have electricity when I turn the key. Can I simply ground all of the engine harness grounds to the chassis or engine and plug in the PCM or is it more complicated than that?
07-01-2010, 02:51 AM
#276
POWER! - Finally, after about a year and a half. I got this done right before I had to be at work around 10:15pm. It is definetly kind of rigged up now in regards to the engine harness not being plugged into anything, but I don't need it to be. I have the four connectors on the passenger fender, interconnects, the PCM plugged in, and the grounds rigged. I have three grounds on a bolt for the water pump to ground the engine and one ground for the chassis in front of the battery, but... IT WORKS!

My battery is dead so I have it jumped off of my 95. You can see the jumper cables in this picture and my car in the next.

I also think this is the only picture I have with all three of my cars in it:

To say I am excited is an understatement. I tested out all of my power accessories, lights, blinkers, radio, cd player, gauges, etc... and it all works. Enter Sandman was the song on the radio when I pushed the button. . I can now start working on wiring up my BLS kit, autotrix passenger window fix, move the battery to the trunk, install and wire the two fuel pumps, etc... PROGRESS!
My battery is dead so I have it jumped off of my 95. You can see the jumper cables in this picture and my car in the next.
I also think this is the only picture I have with all three of my cars in it:
To say I am excited is an understatement. I tested out all of my power accessories, lights, blinkers, radio, cd player, gauges, etc... and it all works. Enter Sandman was the song on the radio when I pushed the button.
. I can now start working on wiring up my BLS kit, autotrix passenger window fix, move the battery to the trunk, install and wire the two fuel pumps, etc... PROGRESS!
07-16-2010, 11:22 PM
#277
I haven't worked too much on the car recently, but have continually been seeing my money disappearing. I've completely underestimated the amount of money it was going to cost me to get this thing running once again and every time I turn around there are more expenses.
Most of the money I was talking about I spent on the night of the 12th at work. I reordered all of the cobalt digital gauges I need along with some 2-1/16th angle rings. I am planning on making my own pod out of acrylic to mount them above the center AC vents. I kind of have it laid out, but have yet to do anything with it yet. That same night I also ordered some digital calipers, a burette with holder (already received), 2x 2.100 intake valves, a 200 amp inline fuse, and fuse holder for my battery relocation.
My basic plan is to use the 2.100 intake valves as my own fly cutting tool like LS1Formulation did a while ago with a little different methology. I am going to thread the valve stem from 8mm to 1/4-20, use feeler gauges to measure my .050 cut from the top of the valve stem, and then use a lock nut as my stopper. I went and bought all of the supplies the other day, but need the valves to come into get everything rolling:

Once the valves and extra piston get here I am going to measure the OEM L92 piston reliefs, cut my .050, and measure that to get a total -cc dish for the piston. From there I can figure out how much I will need to mill the heads to achieve my compression goals.
The largest piece of progress happened on Thursday the 15th. Every once in a while there are those kinds of deals that pop up that you cannot in the right state of mind pass up on regardless of the circumstances. I managed to bump into those once again and it happens to be a very nice set of heads, rockers, and pushrods. I know you guys are thinking... HE CHANGED HIS MIND AGAIN!!! I knew he would even though he said he wouldn't. If you guys had this kind of deal lined up you wouldn't pass on them either.
Here they are and the last picture is the reason I got them for the amount I did:


Intake runners - Clean:

Exhaust runners also very clean:

8 1.7 and 1.8 Crane polymatrix rockers, stands, and pushrods:

Seven extra 1.7 rockers, rocker shafts, and bolts:

Here is why they were priced the way they were:

I've had two people say that they would be fine to run as is, one say they'd want to look at them, and another locally that I am going to have check them out.
Thursday night I started checking them out and took those pictures. I did my best to check them over and they look good. The damage between the valves doesn't seem to have touched the seats at all. I was going to swap two of the springs over to a checker set, but my compressor wouldn't work. The rocker bolt holes on these have been opened up to accept a larger 3/8-16 bolt instead of the oem size which is the same size as the stud I have for my compressor. I went to Home Depot today and bought a couple 3.5 inch long 3/8-16 bolts with some washers and nuts along with a couple other things to make a stand for my burette. I haven't messed with it yet, but am going to here shortly. I'll swap a couple of the springs over and do some flat valve drop measurements to see what sort of added clearance I have over my Dart heads.
I'm thinking I'm going to step up to a solid grind now with the adjustable rockers. I have a set of unused jesel solid lifters in the garage that I bought a long time ago so I can use those. The only cost will be buying a slightly beefier set of springs, but I found a nice drop in set of 1.290 springs that are rated as:
160 lbs @ 1.750
400 lbs @ 1.150
will handle .750 lift with ample coil clearance
I figure I can sell the springs on these heads and the new set of .660 lift springs I have and simply buy the new ones, swap them out, drop in my jesel lifters, and proceed as normal.
Most of the money I was talking about I spent on the night of the 12th at work. I reordered all of the cobalt digital gauges I need along with some 2-1/16th angle rings. I am planning on making my own pod out of acrylic to mount them above the center AC vents. I kind of have it laid out, but have yet to do anything with it yet. That same night I also ordered some digital calipers, a burette with holder (already received), 2x 2.100 intake valves, a 200 amp inline fuse, and fuse holder for my battery relocation.
My basic plan is to use the 2.100 intake valves as my own fly cutting tool like LS1Formulation did a while ago with a little different methology. I am going to thread the valve stem from 8mm to 1/4-20, use feeler gauges to measure my .050 cut from the top of the valve stem, and then use a lock nut as my stopper. I went and bought all of the supplies the other day, but need the valves to come into get everything rolling:
Once the valves and extra piston get here I am going to measure the OEM L92 piston reliefs, cut my .050, and measure that to get a total -cc dish for the piston. From there I can figure out how much I will need to mill the heads to achieve my compression goals.
The largest piece of progress happened on Thursday the 15th. Every once in a while there are those kinds of deals that pop up that you cannot in the right state of mind pass up on regardless of the circumstances. I managed to bump into those once again and it happens to be a very nice set of heads, rockers, and pushrods. I know you guys are thinking... HE CHANGED HIS MIND AGAIN!!! I knew he would even though he said he wouldn't. If you guys had this kind of deal lined up you wouldn't pass on them either.
Here they are and the last picture is the reason I got them for the amount I did:
Intake runners - Clean:
Exhaust runners also very clean:
8 1.7 and 1.8 Crane polymatrix rockers, stands, and pushrods:
Seven extra 1.7 rockers, rocker shafts, and bolts:
Here is why they were priced the way they were:
I've had two people say that they would be fine to run as is, one say they'd want to look at them, and another locally that I am going to have check them out.
Thursday night I started checking them out and took those pictures. I did my best to check them over and they look good. The damage between the valves doesn't seem to have touched the seats at all. I was going to swap two of the springs over to a checker set, but my compressor wouldn't work. The rocker bolt holes on these have been opened up to accept a larger 3/8-16 bolt instead of the oem size which is the same size as the stud I have for my compressor. I went to Home Depot today and bought a couple 3.5 inch long 3/8-16 bolts with some washers and nuts along with a couple other things to make a stand for my burette. I haven't messed with it yet, but am going to here shortly. I'll swap a couple of the springs over and do some flat valve drop measurements to see what sort of added clearance I have over my Dart heads.
I'm thinking I'm going to step up to a solid grind now with the adjustable rockers. I have a set of unused jesel solid lifters in the garage that I bought a long time ago so I can use those. The only cost will be buying a slightly beefier set of springs, but I found a nice drop in set of 1.290 springs that are rated as:
160 lbs @ 1.750
400 lbs @ 1.150
will handle .750 lift with ample coil clearance
I figure I can sell the springs on these heads and the new set of .660 lift springs I have and simply buy the new ones, swap them out, drop in my jesel lifters, and proceed as normal.
07-19-2010, 01:06 AM
#278
I had all day off of work yesterday (Saturday) so I decided as soon as I got up I would start working on the car and get as much done as I could. I happened to get up at 1:30pm, but worked until around 3am and was pretty productive. My original plan was to pull a couple of the springs off of my new heads, swap them out for the checker springs, and remeasure my valve drop. I have to admit on a level that this set of springs was giving me hell. I was having issues, but it all came down to how I was trying to do.
I was simply snugging the compressor against the springs and then trying to tap the retainers out. When tapping didn't work that eventually transformed into bashing with a mini sledge which still didn't work. I eventually started to compress the spring down about half way and then lightly tapping the retainers loose. Once I got that down they came out right away.
Upon pulling the first valve spring I noticed that the seat had some damage to it on the very edge. I pretty much thought, "Damn, now I'm going to have to pull all of these bitches." This was also before I got the methology down. After pulling all of them I found four intake seats damaged from extremely slight to obvious. Here is the worst one:

Upon pulling the exhaust spring I noticed for some odd reason the one spring I had just pulled off of the intake valve is different than the other 15:

??? I have no idea on this one. The inside spring looks taller, but it still has a normal gold / extreme gold retainer on it.
Followed by the least obvious.

Two of the seats looked like this. The first one I found damaged was in between this level and the worst.
I sent Mike at TEA an email with pictures of the damage around 4am last night. We'll see what he has to say, but I believe the seats will need to be swapped out and a new valve job done. I'd prefer not to spend the money, but I want to have complete confidence in the items I am running. I don't want anything small to cost me an engine. If they get shipped out to them I'll have them do a lot of the measuring I was planning on having to do and milling the heads.
After I got the heads taken apart and inspected I simply built a stand for my burette. I bought the materials for less than $5 and put it together in 10 minutes including finding all of the tools. It works just the same as the $45 + shipping the supply company was going to charge.
With that out of the way also I decided to start on the first thing on my wiring process which was rerouting my fuse boxes out of the way to clean things up. This was a mother ****** of a task as there isn't much slack in the oem harness. I also had my garage door shut to keep the mosquitos out so it was boiling hot in there.
I started off by moving the fuse boxes out of the way and pulling the oem bracket. I then jacked the front of the car up and pulled the driver's side front wheel. I then pulled the OEM air pump bracket out of the way.. It leaves you with this:

I started by simply trying to jam the fuse boxes down the hole, but quickly realized that wasn't working too well. I figured I'd make the hole larger so I then took my sawzall, a metal cutting blade, and removed the material between the two areas to enlarge the hole.

After I had some more space I jammed the boxes all through the hole, but was now trying to figure out a way to mount them. I decided to pull the four OEM clip looking things that hold the bolts for the air pump bracket. My plan was to take four long bolts and drop them down through there to hold a square of aluminum flat bar. Well, at 9:15pm all of the hardware stores were closed so that kind of killed that idea. I started measuring things and my next idea was to mount the bracket where the cruise control module normally mounts. I would have worked pretty well, but I didn't have the right parts to pull it off so I just decided to jam them through, let them hang there, and zip tie everything.
I knew that the new cut I had just made would eventually work through the OEM wiring even though I had filed it decently smooth, but all of the shops were closed by now. I pulled all of the boxes back out, went outside to the parts car I have in my driveway, and started hunting for some sort of suitable weather stripping or grommet. I ended up pulling the metal trim piece off of the passenger side that goes along the door seal / roof and pealing a giant section of the windshields weather stripping off. I used my heat gun to contour it to the shape of the new hole and zip tied it up.
Around this time I was fighting with the wiring and trying to get more of the harness towards the hole that had just been made smaller by the weather stripping. Well, the ABS block was in the way and I plan on deleting it anyways so I pulled that off and added it to my pile of crap. I then put the plug for the ABS block down the hole I cut also and used the front cruise control mount as the new ground for it. I didn't know if it needed to be grounded any longer, but figured I had the space and I might as well.

I then figured I could mount the headlight module the same way, but to the rear mount:

With those out of the way I just started adding a couple extra zip ties to keep things in place and from moving around too much. Here's the whole thing pre extra zip ties from the bottom:

Here is the top view with everything moved:

Here's a little more of a zoomed out view without the ABS block in there:

I also started looking around at the OEM grounds and looking towards where I could relocate them. I noticed the two above the headlights, the one just inside of the driver's frame rail towards the radiator, and one for the battery. I decided to move the two above the headlights beneath the lid base:

I added an extra washer to it just in case.
By this time I was getting tired and decided to call it a night. Here's all of the crap I managed to pull off of the car:

I still have to move the other two grounds. I'm not too sure where those are going to go just yet. I'm going to work on it tomorrow as much as I can. My plans involve moving those other two grounds, drilling out the OEM fuse box mount, rerouting the hood latch cable, and making a cover out of acrylic for the hole that all of the fuse box wiring runs through. I should have another update late tomorrow.
level that this set of springs was giving me hell. I was having issues, but it all came down to how I was trying to do. I was simply snugging the compressor against the springs and then trying to tap the retainers out. When tapping didn't work that eventually transformed into bashing with a mini sledge which still didn't work. I eventually started to compress the spring down about half way and then lightly tapping the retainers loose. Once I got that down they came out right away.
Upon pulling the first valve spring I noticed that the seat had some damage to it on the very edge. I pretty much thought, "Damn, now I'm going to have to pull all of these bitches." This was also before I got the methology down. After pulling all of them I found four intake seats damaged from extremely slight to obvious. Here is the worst one:
Upon pulling the exhaust spring I noticed for some odd reason the one spring I had just pulled off of the intake valve is different than the other 15:
??? I have no idea on this one. The inside spring looks taller, but it still has a normal gold / extreme gold retainer on it.
Followed by the least obvious.
Two of the seats looked like this. The first one I found damaged was in between this level and the worst.
I sent Mike at TEA an email with pictures of the damage around 4am last night. We'll see what he has to say, but I believe the seats will need to be swapped out and a new valve job done. I'd prefer not to spend the money, but I want to have complete confidence in the items I am running. I don't want anything small to cost me an engine. If they get shipped out to them I'll have them do a lot of the measuring I was planning on having to do and milling the heads.
After I got the heads taken apart and inspected I simply built a stand for my burette. I bought the materials for less than $5 and put it together in 10 minutes including finding all of the tools. It works just the same as the $45 + shipping the supply company was going to charge.
With that out of the way also I decided to start on the first thing on my wiring process which was rerouting my fuse boxes out of the way to clean things up. This was a mother ****** of a task as there isn't much slack in the oem harness. I also had my garage door shut to keep the mosquitos out so it was boiling hot in there.
I started off by moving the fuse boxes out of the way and pulling the oem bracket. I then jacked the front of the car up and pulled the driver's side front wheel. I then pulled the OEM air pump bracket out of the way.. It leaves you with this:
I started by simply trying to jam the fuse boxes down the hole, but quickly realized that wasn't working too well. I figured I'd make the hole larger so I then took my sawzall, a metal cutting blade, and removed the material between the two areas to enlarge the hole.
After I had some more space I jammed the boxes all through the hole, but was now trying to figure out a way to mount them. I decided to pull the four OEM clip looking things that hold the bolts for the air pump bracket. My plan was to take four long bolts and drop them down through there to hold a square of aluminum flat bar. Well, at 9:15pm all of the hardware stores were closed so that kind of killed that idea. I started measuring things and my next idea was to mount the bracket where the cruise control module normally mounts. I would have worked pretty well, but I didn't have the right parts to pull it off so I just decided to jam them through, let them hang there, and zip tie everything.
I knew that the new cut I had just made would eventually work through the OEM wiring even though I had filed it decently smooth, but all of the shops were closed by now. I pulled all of the boxes back out, went outside to the parts car I have in my driveway, and started hunting for some sort of suitable weather stripping or grommet. I ended up pulling the metal trim piece off of the passenger side that goes along the door seal / roof and pealing a giant section of the windshields weather stripping off. I used my heat gun to contour it to the shape of the new hole and zip tied it up.
Around this time I was fighting with the wiring and trying to get more of the harness towards the hole that had just been made smaller by the weather stripping. Well, the ABS block was in the way and I plan on deleting it anyways so I pulled that off and added it to my pile of crap. I then put the plug for the ABS block down the hole I cut also and used the front cruise control mount as the new ground for it. I didn't know if it needed to be grounded any longer, but figured I had the space and I might as well.
I then figured I could mount the headlight module the same way, but to the rear mount:
With those out of the way I just started adding a couple extra zip ties to keep things in place and from moving around too much. Here's the whole thing pre extra zip ties from the bottom:
Here is the top view with everything moved:
Here's a little more of a zoomed out view without the ABS block in there:
I also started looking around at the OEM grounds and looking towards where I could relocate them. I noticed the two above the headlights, the one just inside of the driver's frame rail towards the radiator, and one for the battery. I decided to move the two above the headlights beneath the lid base:
I added an extra washer to it just in case.
By this time I was getting tired and decided to call it a night. Here's all of the crap I managed to pull off of the car:
I still have to move the other two grounds. I'm not too sure where those are going to go just yet. I'm going to work on it tomorrow as much as I can. My plans involve moving those other two grounds, drilling out the OEM fuse box mount, rerouting the hood latch cable, and making a cover out of acrylic for the hole that all of the fuse box wiring runs through. I should have another update late tomorrow.
Last edited by Beaflag VonRathburg; 07-20-2010 at 02:17 AM.
07-20-2010, 02:31 AM
#280
Slowly would be the key word. I don't understand how some people can mow through things so quickly. Perhaps they have more space, are more experienced, or just aren't as attentive to details? At this rate it is going to take me forever to get this thing running.
--------------------------------------------------------------------------
I continued working on my fuse panel cover today and didn't get very far. I made a rough template out of cardboard and paper. I decided to keep the OEM fuse box bracket to help mount my new acrylic covers as it would be more work to figure out how to add mounts cleanly. Once I had the cardboard piece on the car it looked pretty good.

I had to make another trip to Home Depot for some supplies and ended up with $88.89 missing from my checking account. I bought a 1.75 hole saw, sawzall blades, the cheapest jig saw they had, some blades for that, velcro, and some universal weather stripping, and another sheet of acrylic. Besides the jig saw and blades the rest is for tucking the passenger side wires and the hood latch cable. I got home, popped out the jigsaw, put a new blade in it and started cutting. This is the first time I've ever used one so it took some getting used to. I found that if I went too slow or quickly the acrylic would crack. I was having a hell of a time cutting this from a large sheet and had one corner break a couple times. Thankfully, it is the corner that goes beneath the rubber stopper for the hood so you can't see it very much. It still needs a ton of trimming to make it fit right, but here's where I'm at now:

I'm going to try and get this whole side finished tomorrow. I'm pretty sure it is going to take me a ton of time trimming the thing to get it to fit correctly and then getting it mounted up. If I can get it finished it will be onto the other side which might take me even longer as there's a few more odd bends.
--------------------------------------------------------------------------
I continued working on my fuse panel cover today and didn't get very far. I made a rough template out of cardboard and paper. I decided to keep the OEM fuse box bracket to help mount my new acrylic covers as it would be more work to figure out how to add mounts cleanly. Once I had the cardboard piece on the car it looked pretty good.
I had to make another trip to Home Depot for some supplies and ended up with $88.89 missing from my checking account. I bought a 1.75 hole saw, sawzall blades, the cheapest jig saw they had, some blades for that, velcro, and some universal weather stripping, and another sheet of acrylic. Besides the jig saw and blades the rest is for tucking the passenger side wires and the hood latch cable. I got home, popped out the jigsaw, put a new blade in it and started cutting. This is the first time I've ever used one so it took some getting used to. I found that if I went too slow or quickly the acrylic would crack. I was having a hell of a time cutting this from a large sheet and had one corner break a couple times. Thankfully, it is the corner that goes beneath the rubber stopper for the hood so you can't see it very much. It still needs a ton of trimming to make it fit right, but here's where I'm at now:
I'm going to try and get this whole side finished tomorrow. I'm pretty sure it is going to take me a ton of time trimming the thing to get it to fit correctly and then getting it mounted up. If I can get it finished it will be onto the other side which might take me even longer as there's a few more odd bends.