

My Engine Committed Suicide Yesterday

 10-11-2010, 10:29 AM
#302

You should both assume that the engine consumed the water the natural way.....through the intake like most of them do. Expecting them to get through a very tight connection like a fuel injector o ring to the intake manifold is somewhat of a stretch. Also bad head gaskets seem like a stretch as well. An engine, given the chance, will consume water through the intake tract.
10-11-2010, 03:35 PM
#303
TECH Fanatic
iTrader: (2)

Join Date: Sep 2004
Location: South Shore, MA
Posts: 1,713
Likes: 0
Received 0 Likes
on
0 Posts

You should both assume that the engine consumed the water the natural way.....through the intake like most of them do. Expecting them to get through a very tight connection like a fuel injector o ring to the intake manifold is somewhat of a stretch. Also bad head gaskets seem like a stretch as well. An engine, given the chance, will consume water through the intake tract.
10-12-2010, 05:18 PM
#305
this may be way off topic but i just now saw your thread and the same thing happen to my 02 z28 i had saved up for a year and a half both my 02 camaro z28 cash. did a full tune up you name it i did it the last thing on my to do list was the oil/oil filter change i finally did it to royal purple and knn oil filter. well not even a month past after the oil change wen one day i was driving home in a bad storm going berry careful not to go thro any puddles after i got home i park the car and it sat for a whole day wild the storm past it rain so hard. after it clear up i went to start it but my z28 did not come to life it would not start turns out my engine got lock because water some how found a way to get inside couse off some bad head gaskets it had..i had no way off knowing but now i know how to check for bad head gaskets all you have to do is lift up your oil cap and if you see crap like egg on the cap you better go fix the gasket and fast other wise your fbody will go bye bye..but since then i both a nother ls1 drop it in and she runs like a chap now!! my z28 sat 3month with out and engine so dont lose faith bro she will come back to life 
Yep.. this happened to mine too I'm assuming the rain water got in through by passing by the injector(s). Only had the car for 600mi, ran perfect the night before, the next morning I went to start it after a down poor, and boom. I went to work, came home, opened the hood and I saw a trickle of water coming off the plastic "shelf" that sits over the intake manifold. it ran down the side of the intake and flooded the space around each injector. When I pulled it apart afterwards I found water in the intake as well. And like the first post it was my #8
http://i95.photobucket.com/albums/l1...d/IMAG0079.jpg
http://i95.photobucket.com/albums/l1...d/IMAG0079.jpg
You should both assume that the engine consumed the water the natural way.....through the intake like most of them do. Expecting them to get through a very tight connection like a fuel injector o ring to the intake manifold is somewhat of a stretch. Also bad head gaskets seem like a stretch as well. An engine, given the chance, will consume water through the intake tract.
I'm going to tend to agree with John. If you had a head gasket issue it would have to be leaking an absolute ton of coolant to hydrolock an engine. My friend had a leaky head gasket due to installation error and it only leaked a tiny amount of coolant, but it was enough to crack the sleeve of his block. He put new head gaskets in the right way the second time around and still had overheating issues. He tore it down to find a crack at the top of the cylinder.
I could potentially see the injector O rings being an issue, but they are so tight in there that I would tend to think of another issue. I didn't drive my car for five days, but had a storm come through. I took it apart dry, it rained for quite a few days, and after the storm had completely passed I went to start it.... KABOOM! Mine ended up being from a torn hose that runs off of the brake booster into the intake manifold. You can see it in this link.
https://ls1tech.com/forums/9714232-post109.html
You can also see that despite the water sitting on the intake manifold by the injector bung the O ring on the injector is bone dry. I pulled the O rings out of my 93 that were OEM archaic and they actually didn't want to come out. I could only seeing as the years go by them getting even harder to remove and not letting water through them.
Either way having your engine hydrolock and destroy your engine sucks the big one. I've been hearing of a lot more of them recently and I think it has to do with as these cars age they're having rotted hoses, possible bellow leaks, trimmed filter trays, etc...
--------------------------------------------------------------------------
I have another quick little update.
It seems the guy I bought my transmission from finally shipped it today after near three weeks of delays. It should be at it's destination tomorrow to get fiddled with. I'm pretty excited as I've been stressing about that a lot recently.
On the 8th I also received my shift boot and metal shift boot ring from Redline Goods. I haven't had time to install it yet as I had to stay late three nights in a row a work, but I'm going to try and get it in tonight or in one of the next upcoming days. Here's a couple quick pictures of it:

I'm going to wrap as many of the interior panels as I can with the ebony leather and then have the shift boot and the door panels in CF material. Here's the door panel inserts compared to the shift boot. The boot is a little bit darker, but I think it'll look awesome!
 12-31-2010, 04:24 PM
#306
New items for sale thread: https://ls1tech.com/forums/parts-cla...l#post14301250
Support the build and get some parts at a great price.
Support the build and get some parts at a great price.
01-25-2011, 06:26 PM
#307
My new battery box showed up today from jegs. I ended up ordering the Taylor battery box in satin. I measured about 8 times to make sure it fits. I didn't take someone's word on it this time and end up with $100 hunk of plastic I can't use like last time. I have the next few days off of work so I'm looking to get some wiring work done.
01-28-2011, 03:54 PM
#309
--------------------------------------------------------------------------
I got working on the car again Tuesday night. I hadn't realized that the last time I did anything to the car was three months ago. Obviously, I've been slacking.
I mentioned earlier about buying the Taylor battery box and saying it would fit. Well,.... it doesn't. It is the smallest NHRA approved battery box I could find and the damn thing still doesn't fit. It is really close, but just a touch too long. Here's a picture of my battery in the box:

For some odd reason they make them absolutely massive. If I could find a box around the same size + 2" / side of the battery it would fit.
Here's the battery in the spare tire well.

I ended up just perching it on a cardboard box so I could get everything wired up.
I used the Moroso battery cables that I got with my original order from Speed Inc. It includes all of the 2ga wire, terminal ends, and heat shrink tubing. I ran the wire through the car, behind the sail panel, under the kick panel, through the oem grommet in the firewall, and into the engine bay:


After I got all the wiring run through the car I started on adding the terminal ends where I had to cut the cable. I don't know what you guys use to cut this size wire, but I had a hell of a time getting through it. Tools:

I mostly used the dykes to flatten the cable and then the scissors to cut through it. Pain in the *** and took forever.
Working from the front of the car backwards was the logical way everything progressed and it went pretty smoothly until I got to the new 200amp fuse. The fuse holder has relatively short posts on the end of it. With some of the washers removed and the nuts on there isn't much thread engagement holding everything together:

Up until now it hasn't been a problem and seems to be on there decently snug. I think I may try to find some longer studs though for it.
I just kind of kept snipping away and here's everything hooked up in the trunk:

I'm going to mount the fuse to the wheel tub once I get the Wolfe ones in there.

The grounding position I have is currently working fine, but I'm thinking about moving it over to the hole to the left of where it is currently mounted.
This is how I rigged up the main positive wire as a temp fix:

Power! It works and nothing caught on fire or blew out.


More...
01-28-2011, 04:09 PM
#310
Wednesday, I started off by going to the local hardware store to find some random fasteners. I had a really good idea for mounting my passenger side cover using pre existing holes and threaded body mounts. I took the OEM coolant overflow fasteners to the store and figured out they are M8x1.25. Before that I measured that I would need a 4'' long bolt to make everything the right height (3" off of the frame) that I wanted. I managed to track down some bolts in the right length, some washers, and nuts that ended up working out perfectly with some revisions.

I also picked up a new M10 battery bolt and some fasteners to mount the driver's side cover.
Bolts compared to the stockers:

The oem coolant overflow is 1'' thick so:

Is perfect for what I wanted.
Here's the first effort at mounting everything that had some issues:


Mounted:

It mounted up well, but the problems I had were all in tightening down the bottom nut to hold down the overflow tank and the nut that helped sandwich the acrylic between the fasteners.
Instead I decided to flip the bolts upside down and turn them into a stud:

The problem was the other one mounts right above where the frame is boxed in. I ended up having to mount that one the opposite way and it worked, but was a PITA.

I'm going to end up cutting the head off of the other bolt to turn it into a stud and then threading it into the frame. That way both bolts will be the same and make everything easy to mount and work on.
I got the new M10 battery bolt holding everything in. It is the same thread as the factory bolt so I don't really need the lock nut, but I added it for some extra security:

This was my last idea for relocating the negative OEM ground off of the shock tower and out of sight.

More...
I also picked up a new M10 battery bolt and some fasteners to mount the driver's side cover.
Bolts compared to the stockers:
The oem coolant overflow is 1'' thick so:
Is perfect for what I wanted.
Here's the first effort at mounting everything that had some issues:
Mounted:
It mounted up well, but the problems I had were all in tightening down the bottom nut to hold down the overflow tank and the nut that helped sandwich the acrylic between the fasteners.
Instead I decided to flip the bolts upside down and turn them into a stud:
The problem was the other one mounts right above where the frame is boxed in. I ended up having to mount that one the opposite way and it worked, but was a PITA.
I'm going to end up cutting the head off of the other bolt to turn it into a stud and then threading it into the frame. That way both bolts will be the same and make everything easy to mount and work on.
I got the new M10 battery bolt holding everything in. It is the same thread as the factory bolt so I don't really need the lock nut, but I added it for some extra security:
This was my last idea for relocating the negative OEM ground off of the shock tower and out of sight.
More...
01-28-2011, 04:58 PM
#311
Yesterday / Thursday I finally got the car out of the garage for its first complete bath in since 7-29-08. Needless to say after sitting outside for a couple years and then being stashed in my garage the car was incredibly dirty. I know this sounds a little odd, but the major problem is that my AC / heat doesn't work correctly in my apartment. The AC unit is in a closet that is directly above my car. It took us a long time to figure it out, but the AC leaks a massive amount of water when it runs and was flooding our carpet. I didn't think about it until I was rewiring the car early last year and was getting dripped on with the T top off. Naturally, the water drips down into the garage and my car happens to be below it:
Ceiling:

Car:


Finally completely clean and super sexy. This is why I love this car:


I had washed the back half of the car before as our hose only reaches so far through the garage, but never the front.
I was determined to get all of the leaves and other gunk out of the cowling from sitting at my friend's old shop for so long. If anyone's attempted to get the cowling and windshield wipers off you know how much of a pain in the *** it is to do. I got all of the push pins out without breaking my windshield (like I did on my 93), but couldn't get the wipers off.
I went to my class and came back later to work on it. I was kind of running out of ideas until I saw my cheapo pulley puller from Advanced Discount Auto. Rigged as an attempt:

Blamo, like a ******* champ:

The thing came right off. If you ever have to do this spend the $10 to make your life easier.
Once I got the wipers off my last problem was the wiper fluid line. I couldn't get the sprayer fittings off of the line to save my life and ended up breaking both of them. Thankfully, I was able to pillage them off of my 93 which no longer has this amenity.


With the cowling finally off here's what I found:

Gross...

I'm going to get it vaccuumed out sometime soon on my next bit of free time.
I then moved onto getting that last factory ground moved out of the way. I went back to the hardware store and found an M6 stud, a couple nuts, and a fender washer to righ it all up. Versus OEM:

OEM:

Installed:

It is going to be completely out of sight once I can finish my cover.
I was going to finish it, but my dad didn't bring home his dremel tool like I asked him to. Instead I decided to move onto trying to make the bracket for the driver's side. I had purchased a 1/16th piece of aluminum angle that I was going to trim and cut into a large C esque shape to hold the acrylic up. Here's kind of what I imagined:

With the tools I had available to me it didn't work out so great:

I have my next few tasks layed out before me for my next available free time.
1. Vaccuum cowling out
2. Cut the head off of the passenger side bolt = stud
3. Make driver's side standoff
4. Passenger window rewire kit
Ceiling:
Car:
Finally completely clean and super sexy. This is why I love this car:
I had washed the back half of the car before as our hose only reaches so far through the garage, but never the front.
I was determined to get all of the leaves and other gunk out of the cowling from sitting at my friend's old shop for so long. If anyone's attempted to get the cowling and windshield wipers off you know how much of a pain in the *** it is to do. I got all of the push pins out without breaking my windshield (like I did on my 93), but couldn't get the wipers off.
I went to my class and came back later to work on it. I was kind of running out of ideas until I saw my cheapo pulley puller from Advanced Discount Auto. Rigged as an attempt:
Blamo, like a ******* champ:
The thing came right off. If you ever have to do this spend the $10 to make your life easier.
Once I got the wipers off my last problem was the wiper fluid line. I couldn't get the sprayer fittings off of the line to save my life and ended up breaking both of them. Thankfully, I was able to pillage them off of my 93 which no longer has this amenity.
With the cowling finally off here's what I found:
Gross...
I'm going to get it vaccuumed out sometime soon on my next bit of free time.
I then moved onto getting that last factory ground moved out of the way. I went back to the hardware store and found an M6 stud, a couple nuts, and a fender washer to righ it all up. Versus OEM:
OEM:
Installed:
It is going to be completely out of sight once I can finish my cover.
I was going to finish it, but my dad didn't bring home his dremel tool like I asked him to. Instead I decided to move onto trying to make the bracket for the driver's side. I had purchased a 1/16th piece of aluminum angle that I was going to trim and cut into a large C esque shape to hold the acrylic up. Here's kind of what I imagined:
With the tools I had available to me it didn't work out so great:
I have my next few tasks layed out before me for my next available free time.
1. Vaccuum cowling out
2. Cut the head off of the passenger side bolt = stud
3. Make driver's side standoff
4. Passenger window rewire kit
01-28-2011, 05:28 PM
#313
The acrylic is nice although a difficult material to work with. Cutting it without it cracking is hard. The dremel worked magic, but made a mess, and left some rough edges. If I was to do it again I might use a thin gauge of aluminum that could be cut with sheeres.
01-28-2011, 05:39 PM
#314
Done... I'm not even able to comprehend the thought of that word yet. I have an ungodly amount of work left to do. Most of it is wiring which for me being color blind takes about 10x longer than the normal person. There's also the money factor and simply buying the rest of the parts. Not any time remotely soon, but I'm trying to avoid be discouraged and keep working.
The acrylic is nice although a difficult material to work with. Cutting it without it cracking is hard. The dremel worked magic, but made a mess, and left some rough edges. If I was to do it again I might use a thin gauge of aluminum that could be cut with sheeres.
The acrylic is nice although a difficult material to work with. Cutting it without it cracking is hard. The dremel worked magic, but made a mess, and left some rough edges. If I was to do it again I might use a thin gauge of aluminum that could be cut with sheeres.
 01-29-2011, 09:36 PM
#316
Teching In

Join Date: Jul 2008
Location: Harlan, IA
Posts: 25
Likes: 0
Received 0 Likes
on
0 Posts
Wow, I can't believe I just spent 2 hours reading through this. 3 and 1/2 years later and all I have seen in this thread is I am buying this and selling this and changing my mind. I have yet to see anything assembled on one of the 3-4-5 shorts blocks that were purchased in this thread. I wish you luck in getting this car running again though.
01-30-2011, 09:42 PM
#317
Wow, I can't believe I just spent 2 hours reading through this. 3 and 1/2 years later and all I have seen in this thread is I am buying this and selling this and changing my mind. I have yet to see anything assembled on one of the 3-4-5 shorts blocks that were purchased in this thread. I wish you luck in getting this car running again though.
01-31-2011, 12:28 AM
#318
TECH Fanatic
iTrader: (14)
Join Date: Mar 2007
Location: Phoenix/Tempe, AZ
Posts: 1,968
Likes: 0
Received 0 Likes
on
0 Posts
I was like perfeect that looks like my car in my garage, except mines not as dirty (just dusty as ****)
but then you washed yours...
mines been down since july/april, and its always gonna be running next weekend. i know how it is.
but then you washed yours...
mines been down since july/april, and its always gonna be running next weekend. i know how it is.
01-31-2011, 12:58 AM
#319
On The Tree
Join Date: Jan 2011
Location: Indiana
Posts: 176
Likes: 0
Received 0 Likes
on
0 Posts
You have to give him some credit though, he seems to be paying for everything out of pocket instead of racking up tens of thousands in credit card bills....
Keep on working man it is your dream.
Keep on working man it is your dream.
01-31-2011, 01:14 AM
#320
Teching In

Good to see you're getting the car back together.
New Years day, I went for a nice drive on Palomar Mountain. I rounded a corner and found a rockslide all over the road.
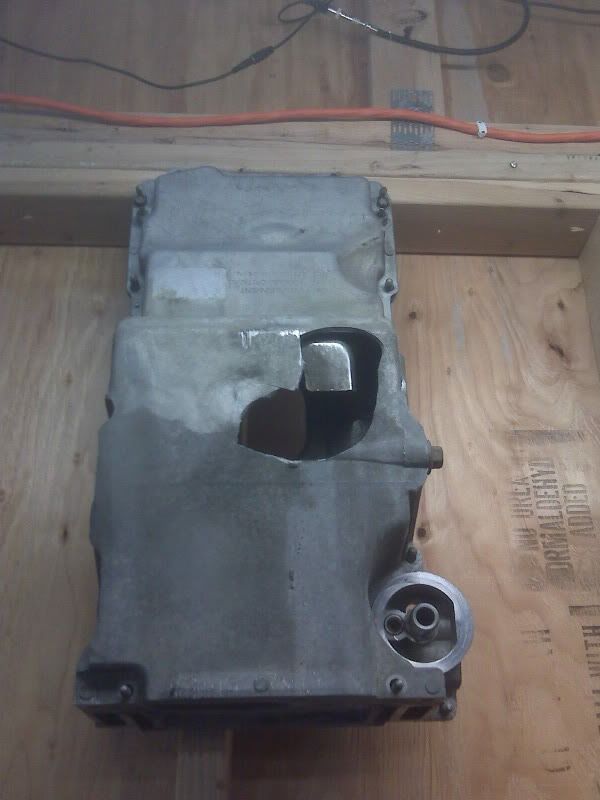
The hole in the oilpan

My bent K-member
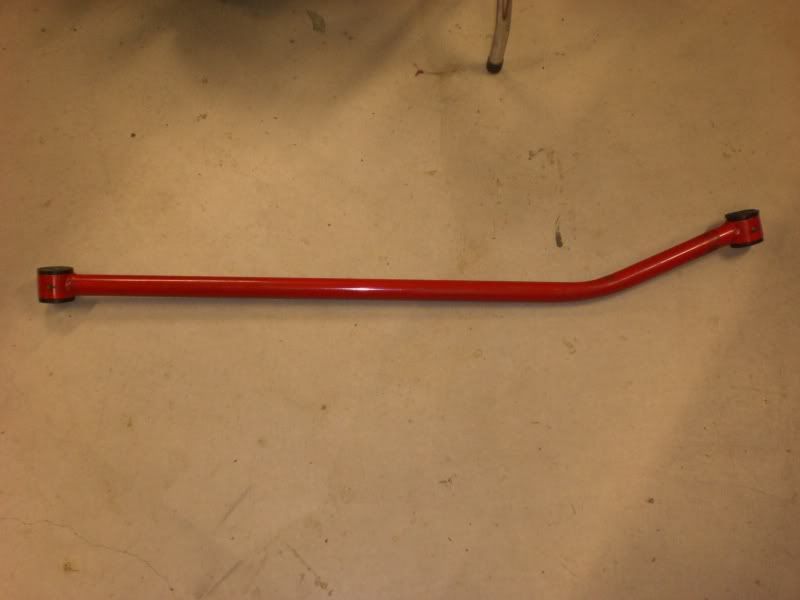
Panhard
I have a 69 K10, if I park it on a steep grade, the carb leaks fuel into motor and hydro locks it. Thankfully when it gets locked I've been able to pull the plugs and crank the starter. It never blew up on me.
But just keep at it, you'll get there.
New Years day, I went for a nice drive on Palomar Mountain. I rounded a corner and found a rockslide all over the road.
The hole in the oilpan
My bent K-member
Panhard
I have a 69 K10, if I park it on a steep grade, the carb leaks fuel into motor and hydro locks it. Thankfully when it gets locked I've been able to pull the plugs and crank the starter. It never blew up on me.
But just keep at it, you'll get there.