Clutch swap/trans removal sticky!!!


 11-07-2008, 09:54 PM
#43

Anyone have any ideas what the hell is going on?? I've pulled it out and put it back in about 5 times, it just won't go that last 1/2 into to touch the bellhousing!!
11-20-2008, 07:50 AM
#45
Teching In

Join Date: Oct 2008
Posts: 11
Likes: 0
Received 0 Likes
on
0 Posts
i finally got my tranny in the whole thing that was stopping me was my clutch wasnt lined up perfect so i took it all back apart and linded it up perfectly and it slid right in.. lol now im have another problem the clutch still doesnt really have much pressure so far ive out a new clutch and pressure plate, clutch master cylinder and hydraulic clutch line.. so i dunno do i have to bleed it all again after reinstalling the clutch????
 01-07-2009, 07:11 PM
#47
Teching In

Join Date: Jan 2009
Posts: 8
Likes: 0
Received 0 Likes
on
0 Posts
My slave cylinder just went out 74k on the car
I am in the process of replacing the slave cylinder, everything is going pretty smooth besides getting to one of the 8 bolts going from the trans to the bell housing, its the top 15mm bolt on the passenger side, there seems to be a small metal tube running right over it and i cant seem to get a socket on it. has anyone run into this problem? any ideas?
I am in the process of replacing the slave cylinder, everything is going pretty smooth besides getting to one of the 8 bolts going from the trans to the bell housing, its the top 15mm bolt on the passenger side, there seems to be a small metal tube running right over it and i cant seem to get a socket on it. has anyone run into this problem? any ideas?
01-20-2009, 07:42 PM
#48
Teching In

Join Date: Dec 2008
Posts: 10
Likes: 0
Received 0 Likes
on
0 Posts
 01-20-2009, 07:49 PM
#49
TECH Resident
iTrader: (1)

Join Date: Jul 2004
Location: Henderson, NC
Posts: 854
Likes: 0
Received 0 Likes
on
0 Posts
yea I just got done having the same issues... what we did was this... jack it up jack it down.. wiggle it side to side alot... get the bolts started... tighten em down some.. to where it wont wiggle.. and that the guide bolts are lined up or just started.. then we loosen the bolts...
Then its a long process of sideways wiggling near the input shaft and adapter plate, while someone pushes and lifts the tranny up and down from behind/underneath.
its a mega *itch. Just stick to it... try not to get angry and destroy your yellow work lights
You will then feel it sorta click or pop into that last 1/2 inch. Then just tighten up your bolts and itll seat that bit.
01-20-2009, 07:51 PM
#50
TECH Resident
iTrader: (1)
Join Date: Jul 2004
Location: Henderson, NC
Posts: 854
Likes: 0
Received 0 Likes
on
0 Posts
I did buy some bolts that were longer than the stock bolts, to help me visualize lining up the guide bolts. helps to make sure you loosed up the belt on the tranny jack some so you can twist the case. also helps if you have the adjustable banana bolts on the front, to hve them up a bit so the front will be higher than the rear... then you can loosen them and allows you to have a bit more play witht he front to help line it up.
If you get stuck with 2-3 inches, back it out a tad and turn the iput shaft a little to help line up the splines.
If you get stuck with 2-3 inches, back it out a tad and turn the iput shaft a little to help line up the splines.
01-25-2009, 05:05 AM
#51
TECH Addict


Tightening the pressure plate bolts in three passes as decribed in the GM manual is extremely important. I would guess that a good number of the vibration and chatter problems after a clutch swap are due to improper tightening of the bolts.
I made a holder for the transmission from a simple 2x6 about a foot long and some triangular wedges on both sides. The wedges fit in the indentations on the case on the sides and hold the transmission vertical. The 2 x 6 then sits on the floor jack with the trans on top. A simple hold down strap from home depot goes around the trans and and the head of the floor jack. It took about 20 minutes to make the holder and made doing the clutch on floor jacks by myself much easier!
Getting the transmission in and bolts started went easy for me once I got the transmission up high enough. The top of the transmision should be almost against the floor, inch it forward, then raise it a bit more and that did the trick.
02-27-2009, 12:42 AM
#52
Teching In
Join Date: Jun 2005
Location: Attleboro, MA
Posts: 39
Likes: 0
Received 0 Likes
on
0 Posts
For the true redneck genius, when re-installing the tranny on a lift or secure ramps/stands.
1. Have buddy sit in passenger seat BEFORE you crawl underneath. Ensure E-brake is set and tight. No need in killing yourself.
2. Get nuts ready, and position tranny in good spot to lift from.
3. Loop a rope around the front part of the tailshaft, and send ends up to buddy.
4. Lift and guide the front end, and have buddy pulling with your guidance to get it right. Little wiggling and it pops right in.. thread 3 or 4 bolts in finger tight, and whoola. Support tail shaft, install tranny member, finish bolts. yada yada
5. I have done it like this 3 times, and it beats the hell out of every other method except tranny jack and lift. One of those times my mom actually was the rope puller. (Blew clutch when I was on leave after OIF, USN vet....) Thanks mommy!
06-13-2009, 09:33 PM
#53
I'm sorry if I missed it but I didn't see...does this thread say how tight to put the bolts holdin the trans to the block? I'm guessing flippin tight but I don't like over torquing things
06-16-2009, 10:22 PM
#54
TECH Apprentice
iTrader: (2)

Join Date: Jan 2006
Location: St. Louis, MO
Posts: 304
Likes: 0
Received 0 Likes
on
0 Posts
On a different note, I haven't had any problems with my slave and I didn't need to bleed it at all after the first install, and I'm hoping once I get my tranny back and installed I won't need to this time either!
07-12-2009, 01:49 AM
#56
TECH Regular
iTrader: (8)

Join Date: Apr 2007
Location: Chicagoland
Posts: 428
Likes: 0
Received 0 Likes
on
0 Posts
I just removed my trans and figured I would share my write up here. This is just the removal. I took the original and added my spin to it. I realize everyone is going to do a few things different on their swap.
This is at your own risk!
Tools need:
-rachets
-sockets
-many extensions for rachet of varying lengths.
-rachet swivels
-screwdrivers
-big hammer maybe
-Impact wrench is a plus.
-Allen wrenches.
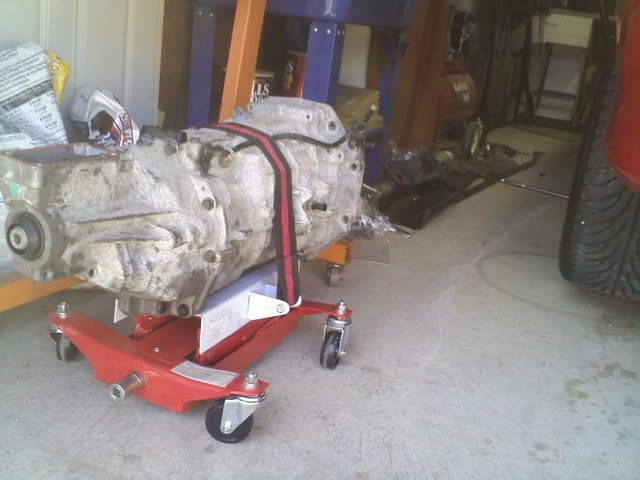
A trans jack is also very very helpful. Got mine from Harbor freight that holds up to 450lbs. Only cost 90 bucks. You can see it in the picture. Actually here's the link and item number... #39178-3VGA. LINK
Parts and Part numbers that I'm using for replacement.
*Scoggin Dickey*
LS7 Clutch [SDLS7CK]
Master/Slave Cylinders [12570277, 15046288]
Pilot Bearing [14061685]
Flywheel and Pressure Plate bolts.[ARP330-2802, ARP134-2201]
Rear Main Seal [89060436] Clutch Alignment Tool [RAM5313]
Torque Specs for LS1 T-56
CLICK HERE FOR LS1 TORQUE SPECS
Torque Specs for LT1 T-56
CLICK HERE FOR LT1 TORQUE SPECS
Removal
1. Unhook your negative on the battery 8mm
2. From inside car remove shift boot by removing the counsel. There is a trick. You do not have to take the entire counsel out if you do this right. Loosen the counsel entirely, pull up on the ebrake as far back as you can (common sense). I believe the bolts are a 7mm for the small bolts and a 10 mm for the larger ones.
Now remove the shifter noise isolator/rubber boot. After this is remove you can now remove your shifter. Either a 13-15mm
3. Lift car up. Get the car high as you can, this will really benefit when it's time to drop the tranny. The higher the better basically. However, use your common sense. Make sure you don't over extend your jackstands.
4. Remove exhaust if it is going to in the way. My Y pipe setup with the LM was ok. I just loosened up the Y pipe and was able to "lightly" flex it around the trans, while I was dropping it. But check this BEFORE you drop the trans.
5. Remove the two back bolts of the torque arm. They are stubborn and will require muscle, even with a breaker bar. Remember you will need to hold a wrench from above while loosening. I wedged a wrench up above so that I could ratchet from underneath.
6. Now with the two torque bolts free the back of the torque are can pivot. You can choose to remove the 2 or 3 bolts that hold the torque arm up front or pivot the torque arm and start working on the driveshaft. I chose to remove the 4 bolts on the rear of driveshaft 10mm that holds the shaft to the pinion yoke.
7. Smack the back of the driveshaft out of the pinion yoke, then pull the DS down and back out of the trans and set aside. Now I removed front torque arm mount bolt and pulled the front of arm out from trans.
8. Move all wiring away from the trans and unplug all sensor connectors that you can from the trans.
9. Start to loosen the trans bolts. Just break them loose at this point. You will now need to tackle the top bolts. Now your ready to remove the 4 tranmission crossmember bolts, the rear of the trans is now free. 15mm I believe is used for the bolts.
Now with the trans sagging a little bit you should be able to reach up and unbolt the top bolts.
-15mm for the trans bolts. There are 8 bolts total. The two most difficult ones are up top. And honestly the only one that's a real headache is the top passenger side. Grab as many extensions as you can and just go to town on it. It takes time, but you'll get it.
-Remove all the top and lower bolts HOWEVER, leave one bolt in on each side (2 bolts total) that are easy access. You can even "break them loose" just make sure they are snug in there, but not real tight. It's just a safety.
10. Remove the hydraulics (master cylinder braided line). This was a bitch for me. I will try to explain this the best I can. There is a white plastic C clip on the line. Once you are under the car you will see what I mean. You need to push this clip in, followed by then pushing the line in, inwards and then pull out. I used a very small flat head screwdriver to push that little clip in. An easier way of understanding it, it is similar to disconnecting fuel lines, however GM has provided the tool for you "that white C clip."
11. . Until you are ready to remove the trans I would use a jack and jack up the back end of the trans to support the weight. Especially if you walk away for a break. Again your saving your motor mounts.
12. Ok we are ready to get that trans out. Position your trans jack under the trans. Jack it up and get the trans leveled. Remove those 2 bolts that are easy to access. Again you should have 8 bolts out of the trans casing now. To remove the trans you will need to push with a lot of might. I began walking it back and forth a bit until I got a little crack between the bellhousing and trans case.
13. Then what I did was knock the case a few times with a rubber mallet. Got out the pry bar. CAUTION!!!!!! If you use any type of pry bar or crow bar be very very gentle, you are dealing with aluminum. But using a little leverage with crowbar I was able to pry the trans apart very easily. Once you see the 2 doll pins on both sides she's pretty clear. But look at your input shaft. Make sure it comes back freely.
15. This is the beauty of a trans jack now. The trans is free of the bellhousing, began to lower her gently making sure it clears everything.
16. Remove the bolts that hold the bellhousing to the motor. These are also a PITA and require time. Use a 3/8 drive socket and extensions to get the upper ones.
17. Remove bellhousing from block. It will probably take a few hits to break it loose (Rubber mallet).
18. Remove the bolts that hold the pressure plate to the flywheel. Watch out that once loose the disk doesnt fall out on your foot or something.
19. If you are wise, go ahead and remove the flywheel bolts and pull the flywheel and have that bitch sent out for a resurface or to install a new ones. I recommend ARP. Might as well install a new rear main seal while youre back there too.
20. Remove the pilot bearing if you want to, it is pressed in the crank. PITA to get out.
21. If you plan on installing a new slave go ahead and unbolt it and remove it from the trans.
The trans is now out, job well done, pat yourself on the back.
BTW. The only difference on this removal on a LS1 T-56 Tremec vs a LT1 T-56 Borg Warner are the hydraulics that I can remember. You don't have to worry about the "white c clip" with a LT1. Instead you have a clutch fork. BE SURE TO remove your slave and then pull out the clutch fork once you are ready to remove the trans. Pull it out, by pulling left. This will disengage the clutch. Not pulling the clutch fork out you will not be able to remove the trans.
This is at your own risk!
Tools need:
-rachets
-sockets
-many extensions for rachet of varying lengths.
-rachet swivels
-screwdrivers
-big hammer maybe
-Impact wrench is a plus.
-Allen wrenches.
A trans jack is also very very helpful. Got mine from Harbor freight that holds up to 450lbs. Only cost 90 bucks. You can see it in the picture. Actually here's the link and item number... #39178-3VGA. LINK
Parts and Part numbers that I'm using for replacement.
*Scoggin Dickey*
LS7 Clutch [SDLS7CK]
Master/Slave Cylinders [12570277, 15046288]
Pilot Bearing [14061685]
Flywheel and Pressure Plate bolts.[ARP330-2802, ARP134-2201]
Rear Main Seal [89060436] Clutch Alignment Tool [RAM5313]
Torque Specs for LS1 T-56
CLICK HERE FOR LS1 TORQUE SPECS
Torque Specs for LT1 T-56
CLICK HERE FOR LT1 TORQUE SPECS
Removal
1. Unhook your negative on the battery 8mm
2. From inside car remove shift boot by removing the counsel. There is a trick. You do not have to take the entire counsel out if you do this right. Loosen the counsel entirely, pull up on the ebrake as far back as you can (common sense). I believe the bolts are a 7mm for the small bolts and a 10 mm for the larger ones.
Now remove the shifter noise isolator/rubber boot. After this is remove you can now remove your shifter. Either a 13-15mm
3. Lift car up. Get the car high as you can, this will really benefit when it's time to drop the tranny. The higher the better basically. However, use your common sense. Make sure you don't over extend your jackstands.
4. Remove exhaust if it is going to in the way. My Y pipe setup with the LM was ok. I just loosened up the Y pipe and was able to "lightly" flex it around the trans, while I was dropping it. But check this BEFORE you drop the trans.
5. Remove the two back bolts of the torque arm. They are stubborn and will require muscle, even with a breaker bar. Remember you will need to hold a wrench from above while loosening. I wedged a wrench up above so that I could ratchet from underneath.
6. Now with the two torque bolts free the back of the torque are can pivot. You can choose to remove the 2 or 3 bolts that hold the torque arm up front or pivot the torque arm and start working on the driveshaft. I chose to remove the 4 bolts on the rear of driveshaft 10mm that holds the shaft to the pinion yoke.
7. Smack the back of the driveshaft out of the pinion yoke, then pull the DS down and back out of the trans and set aside. Now I removed front torque arm mount bolt and pulled the front of arm out from trans.
8. Move all wiring away from the trans and unplug all sensor connectors that you can from the trans.
9. Start to loosen the trans bolts. Just break them loose at this point. You will now need to tackle the top bolts. Now your ready to remove the 4 tranmission crossmember bolts, the rear of the trans is now free. 15mm I believe is used for the bolts.
Now with the trans sagging a little bit you should be able to reach up and unbolt the top bolts.
-15mm for the trans bolts. There are 8 bolts total. The two most difficult ones are up top. And honestly the only one that's a real headache is the top passenger side. Grab as many extensions as you can and just go to town on it. It takes time, but you'll get it.
-Remove all the top and lower bolts HOWEVER, leave one bolt in on each side (2 bolts total) that are easy access. You can even "break them loose" just make sure they are snug in there, but not real tight. It's just a safety.
10. Remove the hydraulics (master cylinder braided line). This was a bitch for me. I will try to explain this the best I can. There is a white plastic C clip on the line. Once you are under the car you will see what I mean. You need to push this clip in, followed by then pushing the line in, inwards and then pull out. I used a very small flat head screwdriver to push that little clip in. An easier way of understanding it, it is similar to disconnecting fuel lines, however GM has provided the tool for you "that white C clip."
11. . Until you are ready to remove the trans I would use a jack and jack up the back end of the trans to support the weight. Especially if you walk away for a break. Again your saving your motor mounts.
12. Ok we are ready to get that trans out. Position your trans jack under the trans. Jack it up and get the trans leveled. Remove those 2 bolts that are easy to access. Again you should have 8 bolts out of the trans casing now. To remove the trans you will need to push with a lot of might. I began walking it back and forth a bit until I got a little crack between the bellhousing and trans case.
13. Then what I did was knock the case a few times with a rubber mallet. Got out the pry bar. CAUTION!!!!!! If you use any type of pry bar or crow bar be very very gentle, you are dealing with aluminum. But using a little leverage with crowbar I was able to pry the trans apart very easily. Once you see the 2 doll pins on both sides she's pretty clear. But look at your input shaft. Make sure it comes back freely.
15. This is the beauty of a trans jack now. The trans is free of the bellhousing, began to lower her gently making sure it clears everything.
16. Remove the bolts that hold the bellhousing to the motor. These are also a PITA and require time. Use a 3/8 drive socket and extensions to get the upper ones.
17. Remove bellhousing from block. It will probably take a few hits to break it loose (Rubber mallet).
18. Remove the bolts that hold the pressure plate to the flywheel. Watch out that once loose the disk doesnt fall out on your foot or something.
19. If you are wise, go ahead and remove the flywheel bolts and pull the flywheel and have that bitch sent out for a resurface or to install a new ones. I recommend ARP. Might as well install a new rear main seal while youre back there too.
20. Remove the pilot bearing if you want to, it is pressed in the crank. PITA to get out.
21. If you plan on installing a new slave go ahead and unbolt it and remove it from the trans.
The trans is now out, job well done, pat yourself on the back.
BTW. The only difference on this removal on a LS1 T-56 Tremec vs a LT1 T-56 Borg Warner are the hydraulics that I can remember. You don't have to worry about the "white c clip" with a LT1. Instead you have a clutch fork. BE SURE TO remove your slave and then pull out the clutch fork once you are ready to remove the trans. Pull it out, by pulling left. This will disengage the clutch. Not pulling the clutch fork out you will not be able to remove the trans.
Last edited by Bones Z28; 07-12-2009 at 02:13 AM.
 01-03-2011, 06:48 PM
#59

just a couple little tips i think might me helpful to some :
1. get or rent a tranny jack. the bottom on a t56 isnt flat like an auto. so installing with a jack and a piece of wood is a PITA
2. when you are torquing your 6 pressure plate bolts down, make sure your alignment tool slips in and out EASILY. When your are torquing the PP, it tightens on the clutch disk. this sometimes can BIND the alignment tool bc the DISK moves around a little as you are tightening your PP bolts. So just make sure that as you are tightening, keep making sure that you are "completely" aligned. Just keep making sure that the alignment tool slips in an out FREELY as you tighten.
Even tho i used the alighment tool, i played hell getting my input shaft into the TObearing. i eventually had to pull the bellhousing and PP to realign my clutch disk. PITA
01-03-2011, 08:24 PM
#60
TECH Fanatic
iTrader: (26)

Join Date: Mar 2010
Location: Milledgeville, GA
Posts: 1,909
Likes: 0
Received 0 Likes
on
0 Posts
2. when you are torquing your 6 pressure plate bolts down, make sure your alignment tool slips in and out EASILY. When your are torquing the PP, it tightens on the clutch disk. this sometimes can BIND the alignment tool bc the DISK moves around a little as you are tightening your PP bolts. So just make sure that as you are tightening, keep making sure that you are "completely" aligned. Just keep making sure that the alignment tool slips in an out FREELY as you tighten.
Even tho i used the alighment tool, i played hell getting my input shaft into the TObearing. i eventually had to pull the bellhousing and PP to realign my clutch disk. PITA
Even tho i used the alighment tool, i played hell getting my input shaft into the TObearing. i eventually had to pull the bellhousing and PP to realign my clutch disk. PITA