CETA Bumper: A How To
 06-02-2006, 05:23 PM
#1
TECH Resident
Thread Starter
iTrader: (2)

Join Date: Sep 2005
Location: OC, CA
Posts: 777
Likes: 0
Received 0 Likes
on
0 Posts
As with many other members on here have noticed, there are actaully no write ups on how to CETA. So I dove in today.
What you'll need:
Tools:
Short Phillips Screwdriver
10mm wratchet
needle nose pliers
Materials:
Primer
Color Coat
Masking Tape
Plastic Tarp
300-400 grit sandpaper
1000 grit sandpaper
Step 1: Unbolting the the bumer (optional)
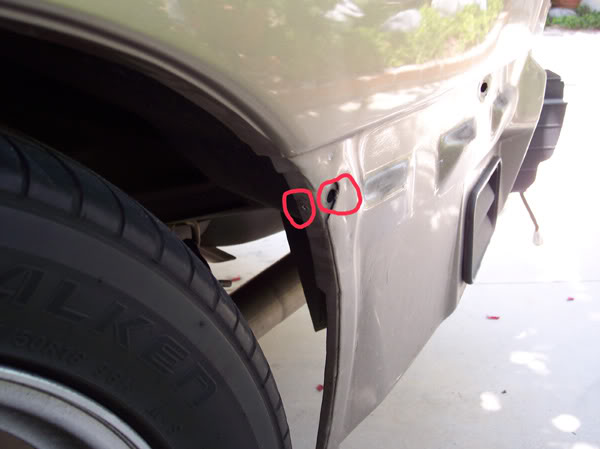
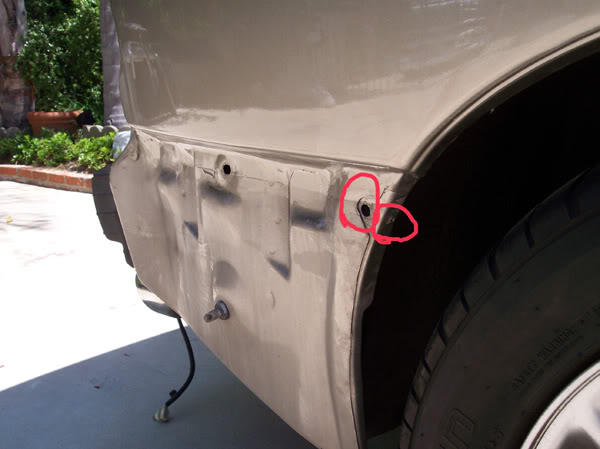
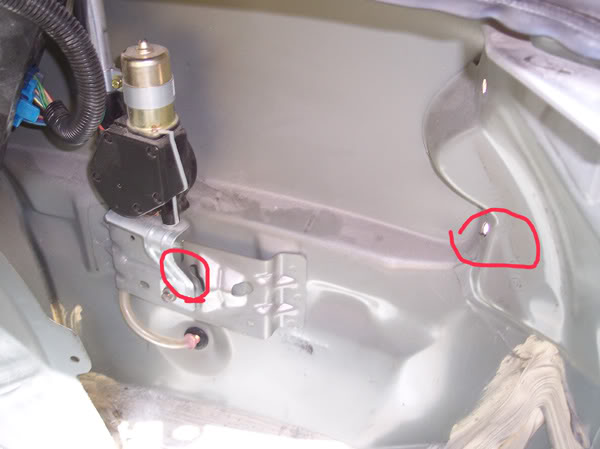
There are 6 bolts and two screws that hold the bumer on along with 4 plastic pull clips on the top and 3 barbed plastic clips underneath the car and 2 more pull clips underneath on either side. You'll have to take out the tail lights and spare tire to access the bolts as well as pull back the carpeting. Some of the bolts are circled in red.

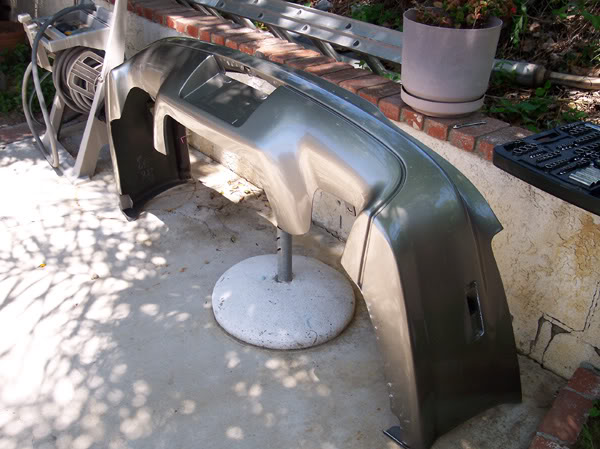
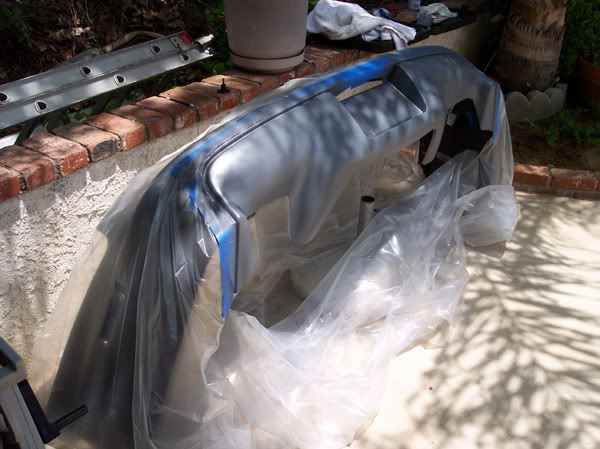
Step 2: Preping the bumper
You need to sand rough the area to be painted with your coarser sandpaper. Not all the way down to the plastic, but just enough to get the surface rough. The idea is to give the primer a surface to stick to.
Now wash the entire bumper with soap and water then dry with a lint free towel. Don't use a chamois because they may leave oils on the bumper which will cause the paint to fisheye.
Then tape off the areas you don't want painted. Give the tape a twice over press down to make sure the tape all sticks. You don't want any paint seeping under the tape at all. Drape the plastic tarp over the bumper to cover the areas you dont want painted from overspray and tape it to the tape you previously laid.
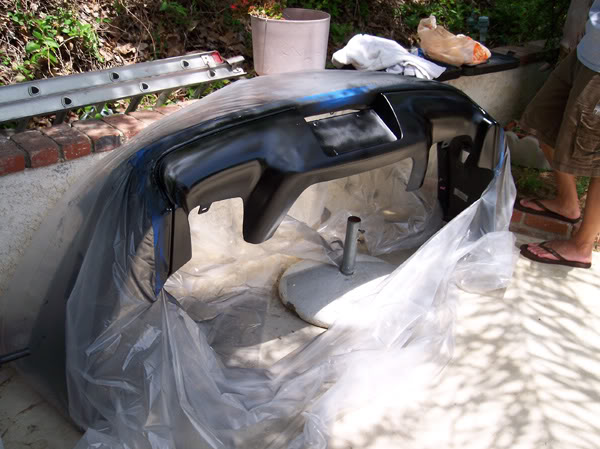
Step 3: Painting the Bumper
Shake the primer well and often. Whether you use a rattle can or HVLP, the techniques are the same. Apply at ~8" away from bumper in even strokes from side to side. Don't ever start or stop a pass directly over the bumper.
Spray -> pass over bumper -> end spray
After the primer has dried fully, you can use the 1000 grit sandpaper to make it smooth. Use a little water with this to prevent the sand paper from clogging.
Apply the color coat the same way as the primer. Except this time the first coat should be barely enough paint to see on the surface. Let this dry so that its tacky enough for the following layers to adhere to.
Since I used a semi-gloss paint, I did not want to use clear. But for those who do, you should apply while the color coat is still tacky. Allow ~15-30 minutes between the layers to keep it from running. If you wnat to color sand, make sure the clear is thick enough to plentifully sand without sanding through.
When you take the tape off, be sure to pull the tape away from the new paint and not straight off the surface. Otherwise the paint may peel.

Color Sanding: (Optional)
To elliminate orange peel, color sanding works wonders but this also takes a little practice and if done wrong you'll need to shoot more layers of clear. You may want to start out with 800 grit wet/dry sandpaper with a sponge behind the sandpaper. If you use your bare hand to hold the paper the sanding tends to come out uneven from the pressure from the tips of your fingers. Have a hose or a bucket of water to keep the work wet at all times. Keep in mind you do not want to sand through the clear coat to the color coat.
When you sand, the clear will become dull and low spots will stay clear. You should sand just enough so that the low spots are sanded away. Repeat this with grit incriments that get higher and higher until you reach about 2000 grit. Then it's time to bring out the buffer.
You'll want to use two compounds to buff out the haze from color sanding. A cutting compound and a polish compound. Keep in mind that the cutting compound cuts away at the paint so use this in moderation. One could do this by hand but it will cut days of work by using a random orbital buffer or analagous. Also keep in mind that any buffer you use may burn through the paint if kept in a spot for too long. Buff the painted area with cutting compound until most of the haze is out equally throughout. Then use a polish compound until the shine in the clear comes through. Just remember that through all this, you should not sand all the way through the clear, or youll have to respray the entire clear all over again.
Step 4: Reinstall. Replace bumper with all clips and screws. Replace tail lights with filler panel and replace interior.
Step 5: Enjoy!
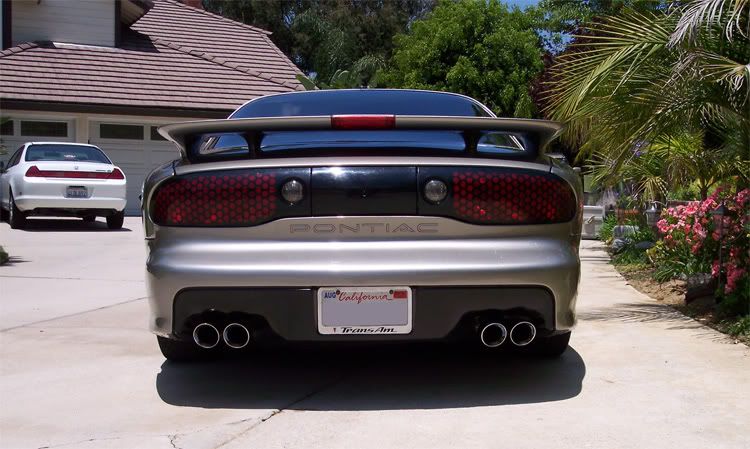
Before:

After:
Semi-gloss:
Gloss:

c/o: GotV-8
Matte Black:

c/o: 5550racing
What you'll need:
Tools:
Short Phillips Screwdriver
10mm wratchet
needle nose pliers
Materials:
Primer
Color Coat
Masking Tape
Plastic Tarp
300-400 grit sandpaper
1000 grit sandpaper
Step 1: Unbolting the the bumer (optional)
There are 6 bolts and two screws that hold the bumer on along with 4 plastic pull clips on the top and 3 barbed plastic clips underneath the car and 2 more pull clips underneath on either side. You'll have to take out the tail lights and spare tire to access the bolts as well as pull back the carpeting. Some of the bolts are circled in red.
Step 2: Preping the bumper
You need to sand rough the area to be painted with your coarser sandpaper. Not all the way down to the plastic, but just enough to get the surface rough. The idea is to give the primer a surface to stick to.
Now wash the entire bumper with soap and water then dry with a lint free towel. Don't use a chamois because they may leave oils on the bumper which will cause the paint to fisheye.
Then tape off the areas you don't want painted. Give the tape a twice over press down to make sure the tape all sticks. You don't want any paint seeping under the tape at all. Drape the plastic tarp over the bumper to cover the areas you dont want painted from overspray and tape it to the tape you previously laid.
Step 3: Painting the Bumper
Shake the primer well and often. Whether you use a rattle can or HVLP, the techniques are the same. Apply at ~8" away from bumper in even strokes from side to side. Don't ever start or stop a pass directly over the bumper.
Spray -> pass over bumper -> end spray
After the primer has dried fully, you can use the 1000 grit sandpaper to make it smooth. Use a little water with this to prevent the sand paper from clogging.
Apply the color coat the same way as the primer. Except this time the first coat should be barely enough paint to see on the surface. Let this dry so that its tacky enough for the following layers to adhere to.
Since I used a semi-gloss paint, I did not want to use clear. But for those who do, you should apply while the color coat is still tacky. Allow ~15-30 minutes between the layers to keep it from running. If you wnat to color sand, make sure the clear is thick enough to plentifully sand without sanding through.
When you take the tape off, be sure to pull the tape away from the new paint and not straight off the surface. Otherwise the paint may peel.
Color Sanding: (Optional)
To elliminate orange peel, color sanding works wonders but this also takes a little practice and if done wrong you'll need to shoot more layers of clear. You may want to start out with 800 grit wet/dry sandpaper with a sponge behind the sandpaper. If you use your bare hand to hold the paper the sanding tends to come out uneven from the pressure from the tips of your fingers. Have a hose or a bucket of water to keep the work wet at all times. Keep in mind you do not want to sand through the clear coat to the color coat.
When you sand, the clear will become dull and low spots will stay clear. You should sand just enough so that the low spots are sanded away. Repeat this with grit incriments that get higher and higher until you reach about 2000 grit. Then it's time to bring out the buffer.
You'll want to use two compounds to buff out the haze from color sanding. A cutting compound and a polish compound. Keep in mind that the cutting compound cuts away at the paint so use this in moderation. One could do this by hand but it will cut days of work by using a random orbital buffer or analagous. Also keep in mind that any buffer you use may burn through the paint if kept in a spot for too long. Buff the painted area with cutting compound until most of the haze is out equally throughout. Then use a polish compound until the shine in the clear comes through. Just remember that through all this, you should not sand all the way through the clear, or youll have to respray the entire clear all over again.
Step 4: Reinstall. Replace bumper with all clips and screws. Replace tail lights with filler panel and replace interior.
Step 5: Enjoy!
Before:
After:
Semi-gloss:
Gloss:
c/o: GotV-8
Matte Black:
c/o: 5550racing
Last edited by kraaazymike; 09-27-2006 at 08:06 PM.
 06-02-2006, 05:28 PM
#2
12 Second Club
iTrader: (19)
Join Date: Nov 2005
Location: Dallas, TX/Orlando, FL
Posts: 786
Likes: 0
Received 0 Likes
on
0 Posts

Thanks for the write-up! Ive looked for one but never found it. Now Im just paying someone to repaint my entire bumper and do the CETA. What color are you suppose to use for the black though? Flat, semi or gloss? Im thinking semi would look best.

 06-02-2006, 05:46 PM
#5
TECH Resident
Thread Starter
iTrader: (2)
Join Date: Sep 2005
Location: OC, CA
Posts: 777
Likes: 0
Received 0 Likes
on
0 Posts
Originally Posted by crazymofo1986
i went flat black. and to save alot of time you really dont need to take off the bumper
Originally Posted by kraaazymike
Step 1: Unbolting the the bumer (optional)
06-02-2006, 05:47 PM
#6
11 Second Club
iTrader: (13)
Join Date: Jun 2005
Location: Lisle, IL
Posts: 1,332
Likes: 0
Received 0 Likes
on
0 Posts
nice write up with pics. i went with gloss, i was going to remove the bumper but i just put up on jackstands and that was high enough to get to the underneath portion.
Trending Topics

 06-03-2006, 08:46 AM
#12
TECH Resident
Thread Starter
iTrader: (2)
Join Date: Sep 2005
Location: OC, CA
Posts: 777
Likes: 0
Received 0 Likes
on
0 Posts
Originally Posted by Sgt. Spuds
When I posted that I hadn't read the thread, I just read it today and seen you said optional.
 06-03-2006, 09:03 AM
#15
TECH Regular
iTrader: (2)

Join Date: Apr 2004
Location: Columbus, OH
Posts: 482
Likes: 0
Received 0 Likes
on
0 Posts
Nice write up and awesome result. I am kicking around doing it myself. It is not whether I will do it or not - it's going to happen! I am just not sure whether to do it myself. I have done everything else to my car but I had drawn the line at body or paint. Hmmm.....
06-03-2006, 09:29 AM
#16
Staging Lane
iTrader: (1)
Join Date: Jan 2006
Location: Harrodsburg, KY
Posts: 86
Likes: 0
Received 0 Likes
on
0 Posts
Originally Posted by casey02ws6
Nice write up and awesome result. I am kicking around doing it myself. It is not whether I will do it or not - it's going to happen! I am just not sure whether to do it myself. I have done everything else to my car but I had drawn the line at body or paint. Hmmm.....
06-03-2006, 09:59 AM
#17
TECH Addict
iTrader: (5)

Join Date: Jan 2004
Location: Missouri
Posts: 2,408
Likes: 0
Received 0 Likes
on
0 Posts
I think this needs to be a sticky. 
And I can honestly say that if I had a TA and was going to do this (which I most definitely would!), I'd take the bumper off as well. Every precaution helps.
Great job on it. Looks amazing! I'm a fan of black on pewter too.
Oh, by the way, your driveway and surrounding floral area/trees look great as well!
06-03-2006, 10:17 AM
#18
Shirley Temple Drinker
iTrader: (1)

Join Date: Oct 2005
Location: IL
Posts: 3,333
Likes: 0
Received 0 Likes
on
0 Posts
Originally Posted by casey02ws6
Nice write up and awesome result. I am kicking around doing it myself. It is not whether I will do it or not - it's going to happen! I am just not sure whether to do it myself. I have done everything else to my car but I had drawn the line at body or paint. Hmmm.....
06-03-2006, 10:35 AM
#19

I did my buddies TA in my driveway. I paint aircraft for a living and I'm with Sgt. Spuds.....PREP is everything. It took a total of about one hour to do the whole thing and it turned out great. We used flat black and it dried very quickly. We didn't wash it or anything for a week or so, but a year later it still looks great. Very simple mod and I would tell anybody to do it themselves. Just take your time.