
1st ever 4l60e Teardown 4WD to 2WD conversion 4l65e
 05-20-2018, 11:42 AM
#1
Launching!
Thread Starter

Join Date: Sep 2016
Posts: 254
Likes: 0
Received 0 Likes
on
0 Posts
Bought a 4WD hummer lq4/4l65e with goals of selling and buying a new rebuilt 4l80e. Didn't get any good offers and everything in combo was so low mile/clean decided to
do the swap with help from people on here and videos on youtube. First time in a trans. Will be stock to stock+cam build.
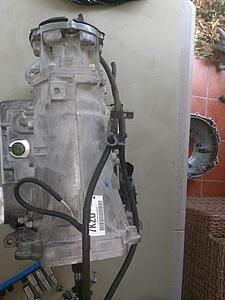
TEARDOWN - not going to take as many pics and rebuild will be a video. Its well documented - but here are the steps and some pics.
Assumes mostly transmission is upside down with input to your left and tail housing to you right.
STEPS
====
Remove external like vent tubes and shaft selector electronics on side.
Level trans tailshaft end with 4x4 or similar so pan is near level.
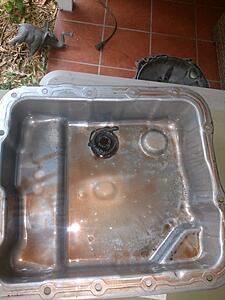
Remove pan and gasket - 13mm from memory around 12 bolts.
Remove 2-4 servo on sde. Get a soft hammer and tap and remove snap ring. Place locking pliers on lip of cover an pull out - get a pick and pull up on oring until it thens out enough whislt pulling pliers till assembly removes. Remove entire assembly (3-4 pieces and apply pin etc and bag).
Disconnect all wiring harness tabs you can see carefully with screwdriver.
Remove retaining clip on the Pulse Width Modulator which sits on top of the TCC solenoid on bottom left corner near dickstip hole. Its kinda tricky I used a pick and then a screwdriver. Remove PWM and retaining clip and bag.
Remove 2x10mm bolts on TCC holddown and bag. Twist and pullup TCC and move it over to the side of case (flip and hang).
Remove Detent spring by shift lever on top - 13mm.
NOW VB
======
17 bolts total. 3x8mm on lower right by rear shaft. Rest are 10mm. 3 on top of the manifold pressure switch are longer. The bottom 2 on same switch remain.
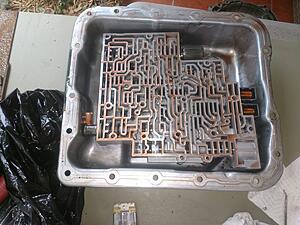
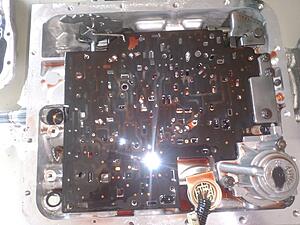
Lift VB carefully and slowly and turnover and place in pan.Remove manual link or if it falls bag it.
Remove 7 checkballs with a magnet and bag.
Remove 3x10mm bolts on 3/4 accumalator housing in bottom right. Hold main gasket near edge and tilt/pry off and remove and bag.
Remove stiffener plate - 3x 10mm bolts and bag.
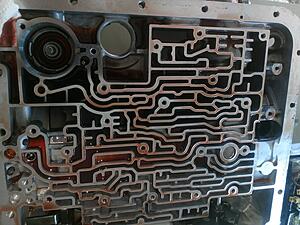
Remove seperator plate and the 2 gaskets (1 each side) and place in pan.
Remove the #8 checkball near the 3/4 accumulator with magnet and place with others.
Remove the 3/4 accumulator piston spring, then gently rotate and pry on the piston using the pin by rotating and rocking. Had to remove pin to let air vacuum out but then came ok. Bag.
Remove wiring harness by pusing the connector through the transmission whilst gently pulling on wiring harness. Or use a large socket. Dont brake teh retaining clips. Bag.
PUMP and Iput/Reverse Assembly Removal
======================================
Remove the Pump by gently prying on inside of the case - you will seea few points - keep it even and gently pry out whilst supporting and pulling with other hand.
Mine had the case outer seal - removed that with a screwdriver.
Relaxed the band by prying against it with a screwdriver - band is now seperated from anchor.
Pulled the input/reversinput drum ut by hand whilst supporting.
Remove the Band.
Remove the band anchor.
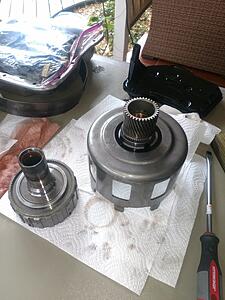
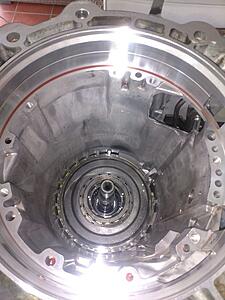
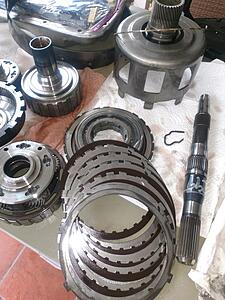
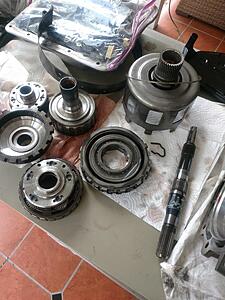
Some pics.

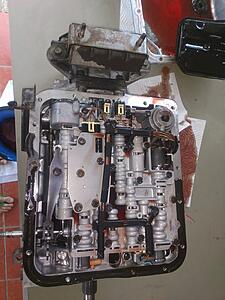
Upside down in reference to thread ..... 3/4 accumulator is in bottom right not top left - the large thing in top left in this pic (housing is removed - piston is still in)
next to hole where trans harness plug was.
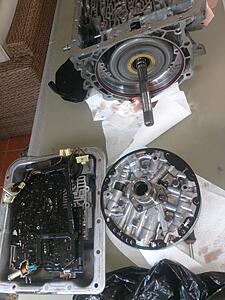
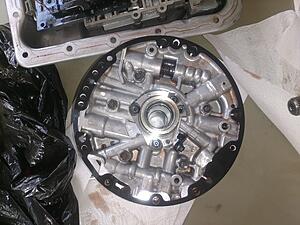
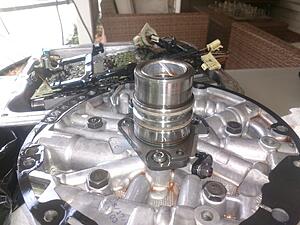
PUMP OUT

Input/Reverse Input drum out and band out.
Stopping here ....... have a question ...... does the shift selector assembly need to be removed ? Not sure.
do the swap with help from people on here and videos on youtube. First time in a trans. Will be stock to stock+cam build.
TEARDOWN - not going to take as many pics and rebuild will be a video. Its well documented - but here are the steps and some pics.
Assumes mostly transmission is upside down with input to your left and tail housing to you right.
STEPS
====
Remove external like vent tubes and shaft selector electronics on side.
Level trans tailshaft end with 4x4 or similar so pan is near level.
Remove pan and gasket - 13mm from memory around 12 bolts.
Remove 2-4 servo on sde. Get a soft hammer and tap and remove snap ring. Place locking pliers on lip of cover an pull out - get a pick and pull up on oring until it thens out enough whislt pulling pliers till assembly removes. Remove entire assembly (3-4 pieces and apply pin etc and bag).
Disconnect all wiring harness tabs you can see carefully with screwdriver.
Remove retaining clip on the Pulse Width Modulator which sits on top of the TCC solenoid on bottom left corner near dickstip hole. Its kinda tricky I used a pick and then a screwdriver. Remove PWM and retaining clip and bag.
Remove 2x10mm bolts on TCC holddown and bag. Twist and pullup TCC and move it over to the side of case (flip and hang).
Remove Detent spring by shift lever on top - 13mm.
NOW VB
======
17 bolts total. 3x8mm on lower right by rear shaft. Rest are 10mm. 3 on top of the manifold pressure switch are longer. The bottom 2 on same switch remain.
Lift VB carefully and slowly and turnover and place in pan.Remove manual link or if it falls bag it.
Remove 7 checkballs with a magnet and bag.
Remove 3x10mm bolts on 3/4 accumalator housing in bottom right. Hold main gasket near edge and tilt/pry off and remove and bag.
Remove stiffener plate - 3x 10mm bolts and bag.
Remove seperator plate and the 2 gaskets (1 each side) and place in pan.
Remove the #8 checkball near the 3/4 accumulator with magnet and place with others.
Remove the 3/4 accumulator piston spring, then gently rotate and pry on the piston using the pin by rotating and rocking. Had to remove pin to let air vacuum out but then came ok. Bag.
Remove wiring harness by pusing the connector through the transmission whilst gently pulling on wiring harness. Or use a large socket. Dont brake teh retaining clips. Bag.
PUMP and Iput/Reverse Assembly Removal
======================================
Remove the Pump by gently prying on inside of the case - you will seea few points - keep it even and gently pry out whilst supporting and pulling with other hand.
Mine had the case outer seal - removed that with a screwdriver.
Relaxed the band by prying against it with a screwdriver - band is now seperated from anchor.
Pulled the input/reversinput drum ut by hand whilst supporting.
Remove the Band.
Remove the band anchor.
Some pics.


Upside down in reference to thread ..... 3/4 accumulator is in bottom right not top left - the large thing in top left in this pic (housing is removed - piston is still in)
next to hole where trans harness plug was.


PUMP OUT


Input/Reverse Input drum out and band out.
Stopping here ....... have a question ...... does the shift selector assembly need to be removed ? Not sure.
 05-20-2018, 04:46 PM
#3
Launching!
Thread Starter
Join Date: Sep 2016
Posts: 254
Likes: 0
Received 0 Likes
on
0 Posts
Remove Planetary/Roller Gear Train and Shaft
==============================================
Remove Output shaft lock ring using special lock ring pliers. Tight and hard.
Remove 5 pinion (4l65e) planetary forward gear set.
Remove Ring gear hub and reassable on top of 5 pinion forward planetary on bench with bearings.
Remove Sunshell.
Remove large Centre Support/Roller clutch housing snap ring. Remove Rear 5 pinion planetary sun gear.
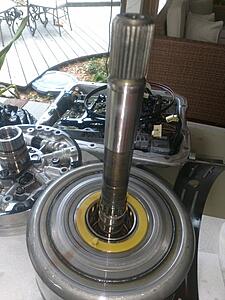
Remove Shaft
============
Small tap of shaft from behind witll push low/reverse clutch housing/center support forward and case silencer will fall to bottom.
You can now remove shaft from back. I found I had to pull from front and then bang it again to seperate from roller clutch housing.
Remove rear planet carrier and thrust bearing.
Remove reverse clutch pack - think it was 5 clutches and 5 steels and 1 wavy ring.
Remove output ring gear and thrust bearing and case silencer ring.
Lay all out in order on table.
This is it - ready for reassembly (unless you are replacing the low reverse piston which requires a compression tool).
pics
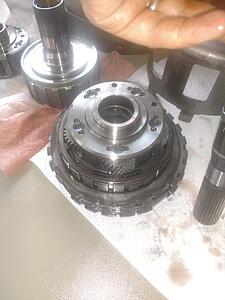

Shaft I pulled forward with the roller clutch housing hgub and banged again to seperate. typically could take out direct from back.
==============================================
Remove Output shaft lock ring using special lock ring pliers. Tight and hard.
Remove 5 pinion (4l65e) planetary forward gear set.
Remove Ring gear hub and reassable on top of 5 pinion forward planetary on bench with bearings.
Remove Sunshell.
Remove large Centre Support/Roller clutch housing snap ring. Remove Rear 5 pinion planetary sun gear.
Remove Shaft
============
Small tap of shaft from behind witll push low/reverse clutch housing/center support forward and case silencer will fall to bottom.
You can now remove shaft from back. I found I had to pull from front and then bang it again to seperate from roller clutch housing.
Remove rear planet carrier and thrust bearing.
Remove reverse clutch pack - think it was 5 clutches and 5 steels and 1 wavy ring.
Remove output ring gear and thrust bearing and case silencer ring.
Lay all out in order on table.
This is it - ready for reassembly (unless you are replacing the low reverse piston which requires a compression tool).
pics


Shaft I pulled forward with the roller clutch housing hgub and banged again to seperate. typically could take out direct from back.


 05-20-2018, 06:22 PM
#4
Launching!
Thread Starter
Join Date: Sep 2016
Posts: 254
Likes: 0
Received 0 Likes
on
0 Posts
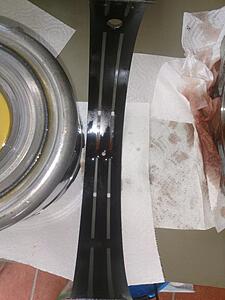
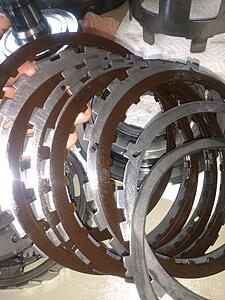
So ...... from dissasembly looks pretty much as expected - clean transmission with no damage for 69k miles.
Only small question is amount of clutch material if normal or not.
So some questions.
I think I could get by with just a gasket/seal kit --- but I might go with more of a overhaul ...... stock HP (270 RWHP or maybe a cam 325RWHP).
q1) Since I cant see any heat on steels - reuse ?
q2) Thoughts on clutch material ?
q3) Either of these kits ? Or other ?
https://www.ebay.com/itm/Trutech-Alt...19.m1438.l2649
https://www.ebay.com/itm/4L60E-4L65E...19.m1438.l2649
Not planning on replacing bushig baced on inspection. Pistons - not sure.
q4) Its a 4l65e with supposefly hardended sunsheel. Shall I jsut replace with sonnax smartshell anyway https://www.ebay.com/i/323070772591?chn=ps
q5) When I switch shaft and housing. What VSS do I use. Can I use the same 4WD one ...... or need a differnt one for 2WD.
q6) Stock, corvette or sonnax 2-4 servo.
Anything else for mild refresh/build ?
thanks !
05-20-2018, 06:40 PM
#5
Moderator

First, sorry I didn't reply to your PM last week.
Glad that everything is looking good.
Although 69K isn't many miles, since you have the input drum out, I would just replace the 3/4 clutch frictions and steels. With so few miles, you can probably get away with not disassembling the input drum any further than that.
I know that TruTech generally includes the best Raybestos GPZ frictions; the generic rebuild kits tend to include something cheaper. You might get away with just a "reseal" kit and a nice 7-friction 3/4 clutch kit from e.g. TruTech; that should be cheaper than a complete rebuild kit.
In your PM, you mentioned a complete Corvette servo kit with new servo pin, 2nd and 4th servo pistons, cover, springs etc. While certainly a good choice, you really only need the Corvette 2nd gear piston kit which should cost less than $25.
If you go with the Corvette servo, you might as well get a quality band. Again TruTech can supply that - instead of picking a kit from their website, just call them and get a custom kit of only what you need.
I would just reuse the sunshell - the 2004+ ones are all hardened and rarely break like the early ones.
Someone else will have to answer your VSS question.
The Corvette servo should be plenty for your application.
Hope that helps - these suggestions include my personal preferences and other suggestions are likely to be just as good.
 05-20-2018, 07:05 PM
#6

I'd put it back together with a shift kit, get rid of those stator bushings for some bronze ones, maybe a high rev pump ring kit, gaskets and seals.
Wouldn't bother changing the sealing rings either. You either spend a few hundred for the right tools or make your own and have the new ones worse off than the old ones if left alone.
I'd make sure the 3-4 clutches were right.
Wouldn't bother changing the sealing rings either. You either spend a few hundred for the right tools or make your own and have the new ones worse off than the old ones if left alone.
I'd make sure the 3-4 clutches were right.
05-20-2018, 07:36 PM
#7
Launching!
Thread Starter
Join Date: Sep 2016
Posts: 254
Likes: 0
Received 0 Likes
on
0 Posts
First, sorry I didn't reply to your PM last week.
Glad that everything is looking good.
Although 69K isn't many miles, since you have the input drum out, I would just replace the 3/4 clutch frictions and steels. With so few miles, you can probably get away with not disassembling the input drum any further than that.
.
Glad that everything is looking good.
Although 69K isn't many miles, since you have the input drum out, I would just replace the 3/4 clutch frictions and steels. With so few miles, you can probably get away with not disassembling the input drum any further than that.
.
I'd put it back together with a shift kit, get rid of those stator bushings for some bronze ones, maybe a high rev pump ring kit, gaskets and seals.
Wouldn't bother changing the sealing rings either. You either spend a few hundred for the right tools or make your own and have the new ones worse off than the old ones if left alone.
I'd make sure the 3-4 clutches were right.
Wouldn't bother changing the sealing rings either. You either spend a few hundred for the right tools or make your own and have the new ones worse off than the old ones if left alone.
I'd make sure the 3-4 clutches were right.
I know the shift kit will help with shift/line pressure and also the bushing you mention are better - but was kinda thinking to do all that if I go bigger than ~325 hp etc ..... doubt it though.
Whats a high rev pump ring kit - again - doubt Ill have her over 5000rpm often.
No idea if these any good if I had to. I do know about the trick with the clamps/tape etc.
https://www.ebay.com/itm/4L60E-700R4-T-1574-M-GM-Turbine-Shaft-Teflon-Seal-Installer-Resizer-Set/302178630685?_trkparms=aid%3D555018%26algo%3DPL.SI M%26ao%3D2%26asc%3D44040%26meid%3Dbea5ac52b4f14dcf 99c5d8c21ebf1fce%26pid%3D100005%26rk%3D3%26rkt%3D1 2%26sd%3D282273528807%26itm%3D302178630685&_trksid =p2047675.c100005.m1851
For msot part want to to do just a stock/oem gasket/overhal with clutches - but fix any issues seen on teardown and/or known wekapoints at ~300HP.
Thanks all - I'll put a video up of the actual install.
Any ideas on the VSS for 2WD ?
Last edited by fakky; 05-20-2018 at 08:01 PM.
Trending Topics
05-20-2018, 08:25 PM
#8
what i see is another....another rebuild thread. What you're converting it to two wheel drive? Get an output shaft with the reluctor wheel on it - done.
Theres one vss for two wheel drives from '98 and on. But what are you working on.............
All i see is an obvious repetitive tear down write up -- unimportant.
Really, replace only what got damaged on teardown and be done. Sonnax smartshell? But don't do any other durability upgrades like get rid of the **** babbit stator bushing thats $1.69?
Let mr rogers mislead you. You've read too much and been told the wrong **** and you're headed straight in the direction of money spent on crap you don't need.
Now watch someone call me out on something, i upset someone. You're talking about a 270 to 325 hp build and going the wrong direction based on what someone already told you. I only said do the basics and that was too much, you need a smartshell, gee i wonder who told you that.
05-20-2018, 08:44 PM
#9
TECH Junkie
Honestly, I did, what's wrong with that?
I'm a big fan of your blunt, opened ended posts but give credit to people.
You helped me much on my rebuild but sometimes people do not know that green can be made from blue and yellow.
I'm a big fan of your blunt, opened ended posts but give credit to people.
You helped me much on my rebuild but sometimes people do not know that green can be made from blue and yellow.
05-20-2018, 09:46 PM
#10
It's fine, I'll sit back and watch this one. I haven't figured out why I care about what people waste their money on.
05-21-2018, 06:56 AM
#11
Launching!
Thread Starter
Join Date: Sep 2016
Posts: 254
Likes: 0
Received 0 Likes
on
0 Posts
what i see is another....another rebuild thread. What you're converting it to two wheel drive? Get an output shaft with the reluctor wheel on it - done.
Theres one vss for two wheel drives from '98 and on. But what are you working on.............
All i see is an obvious repetitive tear down write up -- unimportant.
Really, replace only what got damaged on teardown and be done. Sonnax smartshell? But don't do any other durability upgrades like get rid of the **** babbit stator bushing thats $1.69?
Let mr rogers mislead you. You've read too much and been told the wrong **** and you're headed straight in the direction of money spent on crap you don't need.
Now watch someone call me out on something, i upset someone. You're talking about a 270 to 325 hp build and going the wrong direction based on what someone already told you. I only said do the basics and that was too much, you need a smartshell, gee i wonder who told you that.
1) Yes its essentially another rebuild thread - but I I heard from a 50 people people on this forum and others that you can just swap the tailhousing - its a 30 min job - lots of "misinformation" out there.
2) I couldnt find a thread that specifically tagged 4WD=>2WD. Yes if you know for sure its covered in a rebuild thread.
3) Not important to you - hugely important to me. Im sure there was a 1st time for you also ..... its just been so long you've forgotten.
4) I APPRECIATE you and others being here so I can balance the ideas and move forward.
Cayenne was 1 of 2 people on the forums that gave me the confidence to jump in and try this. So far glad I did.
1) Why do we recommend the bushings get replaced. Whats the failure/issue on a 4l65e with this type.
2) Cheap bushing driver kit and process ? Never done it before. All bushings ? Or just the stator ?
3) You mentioned a shift kit - which one ? Just for line pressure ?
4) Anything special on the 3/4 kit - like which one ?
5) Resuse the steels since I cant see too much heat anywhere ?
As mentioned - all - thanks for everyones input.
05-21-2018, 07:30 AM
#12
Moderator
Lets remember this is an enthusiast forum, not a professional forum. Therefore, yet another, another, another rebuild thread, especially with great pictures, is always welcome.
Yes, I and many others end up answering the same questions over and over and over again, but that is what I am volunteering for.
I do get tired of it myself at times and then step back for a few weeks.
Since I'm really just a hobbyist, and not a pro builder, I have little experience looking at parts, much less pics of parts, and suggesting whether they should be replaced or not.
However, if a pro like Jay, (grumpy as he is sometimes) suggests replacing a cheap bushing, its because he knows that it wears quickly and I would take his advice to replace it.
Pros are always critical of replacing unnecessary parts, but for those of us in it for satisfaction and education, replacing a few other modestly priced parts gives us more confidence.
So lets all support fakky. Will a good rebuild experience, I'll bet he will soon want to rebuild a stronger trans and will then start answering questions here too, helping those who start yet another rebuild thread.
05-21-2018, 07:40 AM
#13
TECH Junkie
mrvedit and chyeanne are both right. The newer stock sunshells are hardened and have a better fillet radius around the splines and will be fine for your setup. The sonnax smart shell is a good upgrade too.
On older units, people would strip/break splines in stock applications. There's a reason its such a popular mod so I'm not sure why jays is so against it??
Yes jays, bushings are cheap. And on rebuilds you or I do for a customer should get new bushings no doubt, I agree with you. But for the DIYer in their garage, the stock bushings will be fine with just a good inspection. If they don't look scored or worn, go ahead and leave them. You won't be high rpm and it's a low mile unit. The failure rate for those bushings is pretty slim in a stock app. If you have the means, or if you have a buddy that is confident in changing them, then please upgrade the bushings...but don't think that if you don't your whole build is now ****.
Here's the quick list of what is probably best for your rebuild:
2wd shaft with reluctor
tailhousing with speed sensor
paper/rubber kit
redo the 3/4 clutch. It's super easy and one of the most worn areas of the 4l60e. set clearance tight. 0.025-0.035
New band
corvette 2nd gear servo. Set clearance tight. .060 is good to target.
Sonnax o-ring boost valve kit. There's really no reason not to put in a boost valve. Even in a stock app it's a good idea
Drill the separator plate. I know you don't really want a whole shift kit, but drilling the separator plate is very easy and costs nothing. Lots of guys on here will help you with drill sizes if you don't already have a thread bookmarked telling you what to use.
With any rebuild, i recommend new electronics. You can find them online for like $145 for EVERYTHING inside the trans. Shift solenoids, 3-2, tcc, pressure control, harness. It's worth it every time in my opinion. Cheyanne can share the link he used to find his.
I'd also spend the $20 and get the sonnax o-ring end plugs for the valve body. They're incredibly easy to fix and every valve body i've vacuum checked has had pretty good sized circuit leaks in this area. Easy insurance.
This is a short list of stuff that should hold 325 all day, every day, no issue. If you call who mrvedit has recommended with this list, he should be able to set you up with it all, easy peasy.
Good luck with rebuild, enjoy your ride
05-21-2018, 09:35 AM
#14
I'm not a pro transmission builder. Lets go back to 1995 when I built my first transmission, a 1985 700R4, never even looked at the sunshell (why would I there was no internet (for me anyway). It had a rebuild kit I bought out of a JC Whitney catalog, can you believe that? Had alto reds and a TransGo 2&3 kit. Thats a hell of a kit for a first timer build.
I ran that in a '75 nova with a 400 small block and 12" slicks. Street car, part time daily driver. I was 23 (not that it matters) and still had that "lets see how long of a burnout we can do" kid left in me.
The sunshell never broke. I beat the crap out of that transmission, then went back with a manual. Sold the 700 via the newspaper classifieds.
What I do see thats relevant to this post is a lot of cores, mostly 4x4 cores, that have spline wear, not high power spline failure. This is exactly what GM set out to prevent with the sunshell this guy has. So why change it.....
Also the bushing in the stator tube, I did say change that bushing, not all of them. I'm not sure if those are pure babbit with a steel back, or aluminum, or what. Pretty sure it's babbit because it distorts and flakes away. OR NOT, he's only claiming to make 325 hp max, but does it matter? I've seen that bushing fail in stock applications.
I suggest putting it back together as it is. Why? Next thing you know he changed the servo, drilled some holes, etc, etc, etc, now has a flare during 2-3. I have two v6 s10's with 4L60E's and transgo SK kits. They shift perfect, one with 106k and one with 178k. Original clutches, original sunshell, never been out of the trucks.
You'd be surprised at how well an old band works over a new one when used on the same drum. As long as theres good material left on it, which there usually is. Just thought I'd randomly throw that in here.
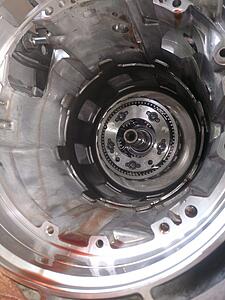
I also have a Gen IV 5.3 swapped s10 with a 4L60E build out of leftover, and spare parts. That is the 3-4 clutches I don't like that come in a kit and I replace them with the ones I like to run. All other clutches are used out of a recent rebuild. Stock sunshell. I just threw this together and when the s10 project came up I just threw it in there. It has an HD2 kit that was missing a few parts that I ended up making. It shifts perfect, best shifting 4L60E I ever built. My point? This is a trans I bought off some guy on here, it sat in my shed forever, apart, back together, etc. It wasn't a good trans with a 4x4 tail shaft that looks perfect inside, it's actually a lower quality build than what this guy has already. And why I got a good deal on the trans I bought off the guy here, see the picture, probably done during the hd2 install and it did have burned 3-4 clutches.
Whatever the case, I'm not a teacher and everyone can see why. I know what works but I have no idea how to convince people to do what works. Or more like make it work very well with adequate durability but without extra expense. Some people love to do this, make people spend a ton of money on crap they don't need. And I get **** for caring about people wasting money? Thanks guys.
I'm in no way saying I'm anyone special, I'm not. But I've gone against the grain on just about everything I've ever done and it's always worked very well, been very predictable.
PS: if anyone wants some inspiration find the basement buildup, or whatever it's titled. I could see that coming a mile away, I knew that transmission was never going to work. He even had every sponsor builder helping him. Probably why I hate these kinds of threads.
Heres the picture of the one I bought off this site and why it didn't work.

Last edited by Jays_SSZ28; 05-21-2018 at 09:46 AM.
05-21-2018, 10:00 AM
#15
Here ya go. A six page build thread with every sponsor at the time giving advice, even jakeshoe who hardly ever helps with 4L60E stuff. End result, well take a look.
Wow, thread zombie...
It's been a long time since I thought about the old 4L60E. The car's gone (put a stocker back in and sold it), but the star of this thread still sits in the corner of my garage. Anybody need a core?
It was a fun experience, but ........never again
Nick
It's been a long time since I thought about the old 4L60E. The car's gone (put a stocker back in and sold it), but the star of this thread still sits in the corner of my garage. Anybody need a core?
It was a fun experience, but ........never again
Nick
05-21-2018, 10:09 AM
#16
Launching!
Thread Starter
Join Date: Sep 2016
Posts: 254
Likes: 0
Received 0 Likes
on
0 Posts
Pros are always critical of replacing unnecessary parts, but for those of us in it for satisfaction and education, replacing a few other modestly priced parts gives us more confidence.
So lets all support fakky. Will a good rebuild experience, I'll bet he will soon want to rebuild a stronger trans and will then start answering questions here too, helping those who start yet another rebuild thread.
So lets all support fakky. Will a good rebuild experience, I'll bet he will soon want to rebuild a stronger trans and will then start answering questions here too, helping those who start yet another rebuild thread.
mrvedit and chyeanne are both right. The newer stock sunshells are hardened and have a better fillet radius around the splines and will be fine for your setup. The sonnax smart shell is a good upgrade too.
On older units, people would strip/break splines in stock applications. There's a reason its such a popular mod so I'm not sure why jays is so against it??
Yes jays, bushings are cheap. And on rebuilds you or I do for a customer should get new bushings no doubt, I agree with you. But for the DIYer in their garage, the stock bushings will be fine with just a good inspection. If they don't look scored or worn, go ahead and leave them. You won't be high rpm and it's a low mile unit. The failure rate for those bushings is pretty slim in a stock app. If you have the means, or if you have a buddy that is confident in changing them, then please upgrade the bushings...but don't think that if you don't your whole build is now ****.
Here's the quick list of what is probably best for your rebuild:
2wd shaft with reluctor
tailhousing with speed sensor
paper/rubber kit
redo the 3/4 clutch. It's super easy and one of the most worn areas of the 4l60e. set clearance tight. 0.025-0.035
New band
corvette 2nd gear servo. Set clearance tight. .060 is good to target.
Sonnax o-ring boost valve kit. There's really no reason not to put in a boost valve. Even in a stock app it's a good idea
Drill the separator plate. I know you don't really want a whole shift kit, but drilling the separator plate is very easy and costs nothing. Lots of guys on here will help you with drill sizes if you don't already have a thread bookmarked telling you what to use.
With any rebuild, i recommend new electronics. You can find them online for like $145 for EVERYTHING inside the trans. Shift solenoids, 3-2, tcc, pressure control, harness. It's worth it every time in my opinion. Cheyanne can share the link he used to find his.
I'd also spend the $20 and get the sonnax o-ring end plugs for the valve body. They're incredibly easy to fix and every valve body i've vacuum checked has had pretty good sized circuit leaks in this area. Easy insurance.
This is a short list of stuff that should hold 325 all day, every day, no issue. If you call who mrvedit has recommended with this list, he should be able to set you up with it all, easy peasy.
Good luck with rebuild, enjoy your ride
On older units, people would strip/break splines in stock applications. There's a reason its such a popular mod so I'm not sure why jays is so against it??
Yes jays, bushings are cheap. And on rebuilds you or I do for a customer should get new bushings no doubt, I agree with you. But for the DIYer in their garage, the stock bushings will be fine with just a good inspection. If they don't look scored or worn, go ahead and leave them. You won't be high rpm and it's a low mile unit. The failure rate for those bushings is pretty slim in a stock app. If you have the means, or if you have a buddy that is confident in changing them, then please upgrade the bushings...but don't think that if you don't your whole build is now ****.
Here's the quick list of what is probably best for your rebuild:
2wd shaft with reluctor
tailhousing with speed sensor
paper/rubber kit
redo the 3/4 clutch. It's super easy and one of the most worn areas of the 4l60e. set clearance tight. 0.025-0.035
New band
corvette 2nd gear servo. Set clearance tight. .060 is good to target.
Sonnax o-ring boost valve kit. There's really no reason not to put in a boost valve. Even in a stock app it's a good idea
Drill the separator plate. I know you don't really want a whole shift kit, but drilling the separator plate is very easy and costs nothing. Lots of guys on here will help you with drill sizes if you don't already have a thread bookmarked telling you what to use.
With any rebuild, i recommend new electronics. You can find them online for like $145 for EVERYTHING inside the trans. Shift solenoids, 3-2, tcc, pressure control, harness. It's worth it every time in my opinion. Cheyanne can share the link he used to find his.
I'd also spend the $20 and get the sonnax o-ring end plugs for the valve body. They're incredibly easy to fix and every valve body i've vacuum checked has had pretty good sized circuit leaks in this area. Easy insurance.
This is a short list of stuff that should hold 325 all day, every day, no issue. If you call who mrvedit has recommended with this list, he should be able to set you up with it all, easy peasy.
Good luck with rebuild, enjoy your ride
1) Cost
2) Less things to diagnose should I hit an issue.
The vacuum test - is that something that needs special tools - actually a part I havent looked into much is post assembly air/vacuum testing of the assembly. I know its exists - but havent checked whats involved tool wise.
Just to answer your question. I just recently bought my first GM hardened sunshell based only on the claims that probuilt has a 800hp or something car running some quick numbers with it or whatever. I understand the added benefits of the smartshell, but this guy already has the GM hardened sunshell.
..
What I do see thats relevant to this post is a lot of cores, mostly 4x4 cores, that have spline wear, not high power spline failure. This is exactly what GM set out to prevent with the sunshell this guy has. So why change it.....
Also the bushing in the stator tube, I did say change that bushing, not all of them. I'm not sure if those are pure babbit with a steel back, or aluminum, or what. Pretty sure it's babbit because it distorts and flakes away. OR NOT, he's only claiming to make 325 hp max, but does it matter? I've seen that bushing fail in stock applications.
I suggest putting it back together as it is. Why? Next thing you know he changed the servo, drilled some holes, etc, etc, etc, now has a flare during 2-3. I have two v6 s10's with 4L60E's and transgo SK kits. They shift perfect, one with 106k and one with 178k. Original clutches, original sunshell, never been out of the trucks.
You'd be surprised at how well an old band works over a new one when used on the same drum. As long as theres good material left on it, which there usually is. Just thought I'd randomly throw that in here.
Whatever the case, I'm not a teacher and everyone can see why. I know what works but I have no idea how to convince people to do what works. Or more like make it work very well with adequate durability but without extra expense. Some people love to do this, make people spend a ton of money on crap they don't need. And I get **** for caring about people wasting money? Thanks guys.
I'm in no way saying I'm anyone special, I'm not. But I've gone against the grain on just about everything I've ever done and it's always worked very well, been very predictable.
I'm in no way saying I'm anyone special, I'm not. But I've gone against the grain on just about everything I've ever done and it's always worked very well, been very predictable.
Like I said - main reason for not changing stuff is reducing cost (yes its a $2 bushing but it might be a $40 bushing kit to buy - all for it - just saved $80 on a sunshell). and risk of diagnosing 50 things I touched versus 10 ......
But ...1) Can you provide me the reason as to why it damages/flakes .... and when it does ... whats the significance - pressure loss to 3/4 clutches .... something else ?
2) Got a link on process for this 1 bushing without a press - and what size socket can/cant be used etc ?
05-21-2018, 10:12 AM
#17
Launching!
Thread Starter
Join Date: Sep 2016
Posts: 254
Likes: 0
Received 0 Likes
on
0 Posts
Cleaning of hardparts ......... assume all hard parts (rings/planets/case/shaft/roller clutch/pistons) basically it can all be cleaned with mineral sprits/paint thinner ..... just if its has a gasket needs to be removed and replaced new.
Still torn on shift kit. In the diesel world everyone was big on it for increasing line pressure for holding clutches. So understanding drilling out certain holes and springs.
What makes me real nervous is I HAVE NO IDEA if this valve body is already modded. So hate the idea of maybe mixing two things that don't play well together.
Again -thx for input - taking it all in and digesting it ......... I know there are 100 build threads out there but when its your truck and your 1st time - hand holding is inevitable to feeling better/confident.
so again
Appreciating all comments
Last edited by fakky; 05-21-2018 at 10:19 AM.
05-21-2018, 10:17 AM
#18
TECH Junkie
I'm not saying he needs the smartshell. I said the one he has is fine for his setup. But Cheyanne was making one of those "good insurance" recommendations. No reason to knock a guy for that.
The bushings in the stator can wear, and that's why they need a close inspection. Make sure they aren't worn, grooved, flaking, peeling, yadda yadda yadda and they'll be fine for another 70k
I've built quite a few too, add a corvette servo, 7 clutch 3/4, with just a drilled separator plate has worked well in multiple cases. The thing with anything automotive, is lots of setups will work.
I don't think he's trying to upgrade **** he doesn't need. mrvedit told him to reuse stuff, I told him to reuse stuff and spend maybe $100-150 on some quality upgrades that are super simple and will extend the longevity of the trans.
Heck, I think the only "upgrades" even mentioned in this whole thread are the sunshell, boost valve, and corvette servo. You're actually the one that mentioned the shift kit and the hardened pump rings. Any of the other parts are just standard replacement stuff. The blunt answers are good, and the help is always a good benefit the the forums, but let's not tear this guy a new one.
To the O.P. do a stock rebuild with the short list I gave you and you'll be fine. If you don't want to drill the separator plate, you don't need to. If you want to keep a tight budget and don't want to replace the electronics, you don't need to.
And as for the rest of the thread, with steps and teardown...keep it coming. Just because someone else has already posted the info elsewhere, or you can find it on youtube, doesn't mean you can't post it here. If nothing else, it can help you look back at exactly what you did if you have issues. And if it helps one or two guys later on down the road, then great.
 05-21-2018, 11:15 AM
#20
Launching!
Thread Starter
Join Date: Sep 2016
Posts: 254
Likes: 0
Received 0 Likes
on
0 Posts
I'm not saying he needs the smartshell. I said the one he has is fine for his setup. But Cheyanne was making one of those "good insurance" recommendations. No reason to knock a guy for that.
The bushings in the stator can wear, and that's why they need a close inspection. Make sure they aren't worn, grooved, flaking, peeling, yadda yadda yadda and they'll be fine for another 70k
I've built quite a few too, add a corvette servo, 7 clutch 3/4, with just a drilled separator plate has worked well in multiple cases. The thing with anything automotive, is lots of setups will work.
I don't think he's trying to upgrade **** he doesn't need. mrvedit told him to reuse stuff, I told him to reuse stuff and spend maybe $100-150 on some quality upgrades that are super simple and will extend the longevity of the trans.
Heck, I think the only "upgrades" even mentioned in this whole thread are the sunshell, boost valve, and corvette servo. You're actually the one that mentioned the shift kit and the hardened pump rings. Any of the other parts are just standard replacement stuff. The blunt answers are good, and the help is always a good benefit the the forums, but let's not tear this guy a new one.
To the O.P. do a stock rebuild with the short list I gave you and you'll be fine. If you don't want to drill the separator plate, you don't need to. If you want to keep a tight budget and don't want to replace the electronics, you don't need to.
And as for the rest of the thread, with steps and teardown...keep it coming. Just because someone else has already posted the info elsewhere, or you can find it on youtube, doesn't mean you can't post it here. If nothing else, it can help you look back at exactly what you did if you have issues. And if it helps one or two guys later on down the road, then great.
The bushings in the stator can wear, and that's why they need a close inspection. Make sure they aren't worn, grooved, flaking, peeling, yadda yadda yadda and they'll be fine for another 70k
I've built quite a few too, add a corvette servo, 7 clutch 3/4, with just a drilled separator plate has worked well in multiple cases. The thing with anything automotive, is lots of setups will work.
I don't think he's trying to upgrade **** he doesn't need. mrvedit told him to reuse stuff, I told him to reuse stuff and spend maybe $100-150 on some quality upgrades that are super simple and will extend the longevity of the trans.
Heck, I think the only "upgrades" even mentioned in this whole thread are the sunshell, boost valve, and corvette servo. You're actually the one that mentioned the shift kit and the hardened pump rings. Any of the other parts are just standard replacement stuff. The blunt answers are good, and the help is always a good benefit the the forums, but let's not tear this guy a new one.
To the O.P. do a stock rebuild with the short list I gave you and you'll be fine. If you don't want to drill the separator plate, you don't need to. If you want to keep a tight budget and don't want to replace the electronics, you don't need to.
And as for the rest of the thread, with steps and teardown...keep it coming. Just because someone else has already posted the info elsewhere, or you can find it on youtube, doesn't mean you can't post it here. If nothing else, it can help you look back at exactly what you did if you have issues. And if it helps one or two guys later on down the road, then great.
Same with everyone else THANKS for being here. I will check the current hole size on separator plate and post also when I pull the 3/4 tonight and look.
I DO plan to try and make a video of my reinstall. Want to clean it all up .... and bring inside house to prevent dirt etc [yes wife super excited].
Video the assembly - and post it in sections ...... then you guys can be like ' No dude - the shaft goes the other way -
Well maybe not that bad but clucthes/bearings who knows Yes self DOCO.