Wheel alignment for 4th gen IRS swap
 02-27-2013, 09:39 PM
#81

Ohhh yeah... Nearly forgot to mention the brakes finally arrived for the 3rd gen. 15 inches wide with 6-piston CTS-V brembo calipers 


I wear a size 17 boot. This just give you an odea of how massive these brakes really are.

Also, Im re-doing the IRS install. Ive taken a radical deviation away from the original plan that will involve some "back-halfing". These are the initial suspension design sketches that I came up with for the new arrangement. You can put together the details with your imagination.

I wear a size 17 boot. This just give you an odea of how massive these brakes really are.
Also, Im re-doing the IRS install. Ive taken a radical deviation away from the original plan that will involve some "back-halfing". These are the initial suspension design sketches that I came up with for the new arrangement. You can put together the details with your imagination.
 02-28-2013, 09:23 AM
#82
On The Tree
iTrader: (20)
Join Date: Mar 2007
Location: TX
Posts: 126
Likes: 0
Received 0 Likes
on
0 Posts

That's been the same plan I have had for mine once I swap in the C5/6 setup. I've already got most of the required equipment but I'd prefer to do it once!
Great work though! Its slowly coming together and will be a blast in the end!
Great work though! Its slowly coming together and will be a blast in the end!
02-28-2013, 05:58 PM
#83
I paid $800 "used" for the Miller welder from an old man living on a property in the boondocks. The drive was about an hour away from Houston.

After bringing it home, I opened it up to inspect it and it was chalked FULL of metallic dust from grinding and old cemented mud-wasp nest. I cleaned out the dust and chiselled away the mud-nest and bought new leads. Other than an inoperative cooling fan, it worked like a charm!

(You have to weld it together when you buy it)


The possibilities just opened up even more for what I can accomplish in my shop. At this point I would have problem fabricating a full rear cradle assembly for the IRS.
My next purchase will be a 2-post car lift sometime later this year.
03-02-2013, 01:41 PM
#84
I didn't do a whole lot today.
Its been a bit chilly with a lot of obnoxiously windy, "anti-welding" weather conditions, but it hasn't kept me away from the shop. I fabricated a new radiator/condenser support that doubles as the support for the hood latch. I designed it to enable easier engine removal.


Its been a bit chilly with a lot of obnoxiously windy, "anti-welding" weather conditions, but it hasn't kept me away from the shop. I fabricated a new radiator/condenser support that doubles as the support for the hood latch. I designed it to enable easier engine removal.
03-30-2013, 07:35 AM
#85
I had an engineering issue at hand. I wanted to have 3500 CFM or more airflow coming through the shroud to insure that I could adaquately cool the IC heat exchanger, the AC condensor, and the radiator.
The biggest fan that could be fit on the radiator was a 16 inch unit. I had two other small 7-inch 600 cfm fans that could have been arranged in a pusher configuration, but then space would become an issue.
This was the solution that I came up with...


It sticks out quite a bit, but it clears the IC well enough and leaves room for the radiator and evaporator plumbing. (I may have to tweak the air-charge tubing a bit)


The biggest fan that could be fit on the radiator was a 16 inch unit. I had two other small 7-inch 600 cfm fans that could have been arranged in a pusher configuration, but then space would become an issue.
This was the solution that I came up with...
It sticks out quite a bit, but it clears the IC well enough and leaves room for the radiator and evaporator plumbing. (I may have to tweak the air-charge tubing a bit)
 04-02-2013, 05:18 PM
#87
It just seems like the more equipment I snag, the more imaginative and un-shackled my ideas get. I'm honestly not sure whether or not Ill be happy or just bored after I get through putting this car together.
I may just buy another F-body and see if I can convert it to AWD or something.
I may just buy another F-body and see if I can convert it to AWD or something.
04-03-2013, 12:46 PM
#88
TECH Enthusiast
iTrader: (1)

Join Date: Dec 2002
Location: Long Island NY
Posts: 530
Likes: 0
Received 0 Likes
on
0 Posts
You'll find that's often the case. The more you can do, the more you want to do. Building it all is easily half the fun.
It's been fun checking in on your build, thanks for keeping us updated.
It's been fun checking in on your build, thanks for keeping us updated.
05-23-2013, 04:39 PM
#91
I was hoping to wrap up this project by the end of June, however, do to some family matters I will be leaving to go back to Alaska to work some more to make up the lost revenue. In the meantime, in lack of any genuine updates in construction, I will inform the viewers out there about some changes in the build.
For starters, Im re-doing the IRS swap since I found some outstanding issues with chassis rigidity. I will use a pre-fabbed IRS cradle to contain the suspension and completely "back-half" the car for some weight savings. I bought it for about $374 bones, so it was not too pricey an investment.

Next, I went ahead and bought a set of boxed front lower A-arms with Roto-joints. At some $550+ shipped, it was not a cheap investment, but after hearing some of the issues with some lesser tubular A-arms, I decided that it was wiser to take the advice from some of the experienced guys that Id spoken to.
Although they are heavier than the set that I modified, they still weigh about 5lbs less than stockers, and any weight savings on anything unsprung is an upgrade. (Mine are black BTW)

I also went ahead and paid for a set of 2-piece ZO6 rotors that will probably show up after Ive left the states. Ive got the DBA 5000 series with slots and NO cross-drilling. (With the "Gold" hats, of course ) The fronts were around $700 and the rears were only $400 extra. Not a bad price considering that they are usually around $850 for the front pair and $600 for the rears. Saved a bit of cash, which is always good.
Ill pair these up with CTS-V 6-piston calipers up front and 4-piston rears.

I also bought this for $600 yesterday. A C5 ECBM to convert the 3-channel ABS into full 4-channel ABS! It works like a stand-alone requiring only ground, power and inputs from all four wheel sensors. Just so happens that the 95 F-body and the 92 C4 use the same exciter ring and tooth count. Its a plug-n-play operation! The only snag is that there is no way to read DTC's from the ECBM since it requires a body control module and CAN network for OBDII reading.
In any case, it will make the car THAT much safer to run fast.

Theres some other small items that I bought, but Ill wait until I get back and start fabricating again in August (possibly late June if they send me home early) so you all will just have to wait until then for some more build pics! Ill have some running vids by the end of August, ASSUMING that I don't get anymore curve ***** thrown my way.
For starters, Im re-doing the IRS swap since I found some outstanding issues with chassis rigidity. I will use a pre-fabbed IRS cradle to contain the suspension and completely "back-half" the car for some weight savings. I bought it for about $374 bones, so it was not too pricey an investment.
Next, I went ahead and bought a set of boxed front lower A-arms with Roto-joints. At some $550+ shipped, it was not a cheap investment, but after hearing some of the issues with some lesser tubular A-arms, I decided that it was wiser to take the advice from some of the experienced guys that Id spoken to.
Although they are heavier than the set that I modified, they still weigh about 5lbs less than stockers, and any weight savings on anything unsprung is an upgrade. (Mine are black BTW)
I also went ahead and paid for a set of 2-piece ZO6 rotors that will probably show up after Ive left the states. Ive got the DBA 5000 series with slots and NO cross-drilling. (With the "Gold" hats, of course
) The fronts were around $700 and the rears were only $400 extra. Not a bad price considering that they are usually around $850 for the front pair and $600 for the rears. Saved a bit of cash, which is always good.Ill pair these up with CTS-V 6-piston calipers up front and 4-piston rears.
I also bought this for $600 yesterday. A C5 ECBM to convert the 3-channel ABS into full 4-channel ABS! It works like a stand-alone requiring only ground, power and inputs from all four wheel sensors. Just so happens that the 95 F-body and the 92 C4 use the same exciter ring and tooth count. Its a plug-n-play operation! The only snag is that there is no way to read DTC's from the ECBM since it requires a body control module and CAN network for OBDII reading.
In any case, it will make the car THAT much safer to run fast.
Theres some other small items that I bought, but Ill wait until I get back and start fabricating again in August (possibly late June if they send me home early) so you all will just have to wait until then for some more build pics! Ill have some running vids by the end of August, ASSUMING that I don't get anymore curve ***** thrown my way.
 07-21-2013, 04:38 AM
#93
08-21-2013, 12:47 AM
#94
Hello again...
Well folks, I was only home for two weeks (Going back to Alaska tomorrow) and it took the better part of a week to re-acclimate myself to the Texas heat. (it was no warmer than 70 degrees the whole time I was in Alaska) I had intend to have the car setting on it own wheels by the time i left for work, but it is what it is.
I bought some yummy goodies including a 14' brake upgrade and some suspension goodies (which are still on back-order)
Heres the Brake combo I'm running. CTS-V, 6-pot, Brembo calipers and 2011 Camaro SS two-piece rotors. Not exactly a "thrifty" purchase, but you only live once.

Im having a new set of Timken hubs modified for the combo. I also bought a full Banski performance rear suspension package for the C4 rear end.

I also pre-ordered a set of Koni D/A front dampers (Again, not cheap) and a set of Afco D/A rear shocks; both of which are on back-order
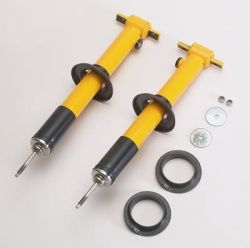
these remote reservoir, types will be used to set-up the rear...

Now for progress pics.
The original IRS mounting was done by welding together a bat-wing mount and placing it directly onto the frame of the car. After seeing the car on the ground, I soon realized that car's body was not nearly rigid enough, so I built a jig to capture the mounting position and then cut out all of that pretty mounting work out along with the Firewall (bye bye floor-pan)

heres the mounting Jig along with the new, bigger, badder IRS cradle.

After cutting out the rear floor-pan, I used a set of cheap carpenters "straight-edge" lasers to perfectly squared up the final cut. Hard to believe that this was cut with little more than a cut-off wheel and a sawzall. The new cradle is also aligned and jigged into final position as well.


Id highly recommend these little guys. They only cost 14 bucks apiece! Greatest alignment/straight edge tools ever made.

Well folks, I was only home for two weeks (Going back to Alaska tomorrow) and it took the better part of a week to re-acclimate myself to the Texas heat. (it was no warmer than 70 degrees the whole time I was in Alaska) I had intend to have the car setting on it own wheels by the time i left for work, but it is what it is.
I bought some yummy goodies including a 14' brake upgrade and some suspension goodies (which are still on back-order)
Heres the Brake combo I'm running. CTS-V, 6-pot, Brembo calipers and 2011 Camaro SS two-piece rotors. Not exactly a "thrifty" purchase, but you only live once.
Im having a new set of Timken hubs modified for the combo. I also bought a full Banski performance rear suspension package for the C4 rear end.
I also pre-ordered a set of Koni D/A front dampers (Again, not cheap) and a set of Afco D/A rear shocks; both of which are on back-order
these remote reservoir, types will be used to set-up the rear...
Now for progress pics.
The original IRS mounting was done by welding together a bat-wing mount and placing it directly onto the frame of the car. After seeing the car on the ground, I soon realized that car's body was not nearly rigid enough, so I built a jig to capture the mounting position and then cut out all of that pretty mounting work out along with the Firewall (bye bye floor-pan)
heres the mounting Jig along with the new, bigger, badder IRS cradle.
After cutting out the rear floor-pan, I used a set of cheap carpenters "straight-edge" lasers to perfectly squared up the final cut. Hard to believe that this was cut with little more than a cut-off wheel and a sawzall. The new cradle is also aligned and jigged into final position as well.
Id highly recommend these little guys. They only cost 14 bucks apiece! Greatest alignment/straight edge tools ever made.
08-21-2013, 12:49 AM
#95
I managed to squarely cut the ends off the subframe connectors that were installed in the car prior. They have been capped off to prevent water from rotting them out from the inside.

selfie!

I cut out and welded on some plates to serve as mounting pads to create welding pads for the cross-member and subframe connectors. This will allow me to effectively join the rear suspension to the new vehicle chassis and roll-cage, taking away all stress from the quarter panels and outer body of the car.


And unfortunately... that is where I stop. I was hoping to have this car sitting on it own wheels before I left again for Alaska, but I guess thats not to be.
Well, folks... The next update will be at the end of November after I get back home from work. So look forward to it!
selfie!
I cut out and welded on some plates to serve as mounting pads to create welding pads for the cross-member and subframe connectors. This will allow me to effectively join the rear suspension to the new vehicle chassis and roll-cage, taking away all stress from the quarter panels and outer body of the car.
And unfortunately... that is where I stop. I was hoping to have this car sitting on it own wheels before I left again for Alaska, but I guess thats not to be.
Well, folks... The next update will be at the end of November after I get back home from work. So look forward to it!
09-24-2013, 11:01 PM
#96
Update time!
For starters, I had an opportunity to get a Motec M800 for $2600, but that deal disintegrated. So, it looks like Im sticking to the MS3-pro as planned. I picked it up for $1200 + s/h. I also bought a 3-bar MAP sensor to go with it for barometric correction. (My modded, unused MS-2 will be up for sale soon)
It came with CD, harness and the sealed ECU.


I also got a PLX wideband O2 sensor w/ touchscreen gauge. Its got some snazzy features, including on-the-fly data-logging and changeable value display.

Im got this AEM "peak-n-hold" driver unit for Low-z injectors. The MS3-pro cant safely use low impedence injectors without wiring in resistors. And even then, idle value might get compromised. The box simplifies things quite a bit. Its also a bit less messy than the DIY driver cards I assembled. (Which I will use for another project)
200 bucks, used.

I got 6' 85lb injectors for the intended E85 use. Should flow enough "corn-whiskey" to support 550 hp

Im still lacking an E85 sensor and a few tidbits, but otherwise, the engine management purchases are done.
For starters, I had an opportunity to get a Motec M800 for $2600, but that deal disintegrated. So, it looks like Im sticking to the MS3-pro as planned. I picked it up for $1200 + s/h. I also bought a 3-bar MAP sensor to go with it for barometric correction. (My modded, unused MS-2 will be up for sale soon)
It came with CD, harness and the sealed ECU.
I also got a PLX wideband O2 sensor w/ touchscreen gauge. Its got some snazzy features, including on-the-fly data-logging and changeable value display.
Im got this AEM "peak-n-hold" driver unit for Low-z injectors. The MS3-pro cant safely use low impedence injectors without wiring in resistors. And even then, idle value might get compromised. The box simplifies things quite a bit. Its also a bit less messy than the DIY driver cards I assembled. (Which I will use for another project)
200 bucks, used.
I got 6' 85lb injectors for the intended E85 use. Should flow enough "corn-whiskey" to support 550 hp
Im still lacking an E85 sensor and a few tidbits, but otherwise, the engine management purchases are done.
09-24-2013, 11:02 PM
#97
Back to fabbing stuff... My 2010 Camaro rotors returned from machining. I went ahead and mounted the front brakes today for trial fitment. I used a spare "1-inch" wheel spacer (final fit will use a thinner spacer).
So far, theres no caliper clearance problems with the Corvette 18 x 9.5 wheels. The only issue seems to be a bit of tire contact with the front sway bar. Perhaps a bit of engineering is in order, me-thinks.


I went ahead and jigged the main cross-support tacked in, and I also got the rear control-arm brackets welded into their correct place. It took some time to get them both correct, but I've got the load angle "dead on" correct. (to within 1/5 +/- a degree) The hubs are good and centered also.
The cross-support and rear chassis are made of 11 gauge, steel, 4x2, square channel. It should provide some rugged strength and unmatched structural rigidity. Ill have the remaining lengths cut and welded by tomorrow evening. (Gotta love a plasma cutter. )

Pardon the shitty pic quality...


Thats it for today/ night... Im going to sleep.
So far, theres no caliper clearance problems with the Corvette 18 x 9.5 wheels. The only issue seems to be a bit of tire contact with the front sway bar. Perhaps a bit of engineering is in order, me-thinks.
I went ahead and jigged the main cross-support tacked in, and I also got the rear control-arm brackets welded into their correct place. It took some time to get them both correct, but I've got the load angle "dead on" correct. (to within 1/5 +/- a degree) The hubs are good and centered also.
The cross-support and rear chassis are made of 11 gauge, steel, 4x2, square channel. It should provide some rugged strength and unmatched structural rigidity. Ill have the remaining lengths cut and welded by tomorrow evening. (Gotta love a plasma cutter.
)Pardon the shitty pic quality...
Thats it for today/ night... Im going to sleep.

