
Modifying Your Front Upper Shock Mount
 11-18-2009, 10:39 PM
#161
I used a dremel and several cut-off wheels on the first one, and a hacksaw on the second one. I wish I would have used a hacksaw on the first one, it took forever using the dremel!
If you use a hacksaw start with a new blade in a good hacksaw, and clamp the mount in a vise for the best results.
A air or electric die grinder (not a dremel)with a reinforced cut-off would still be a better choice.
If you use a hacksaw start with a new blade in a good hacksaw, and clamp the mount in a vise for the best results.
A air or electric die grinder (not a dremel)with a reinforced cut-off would still be a better choice.
 11-19-2009, 10:26 PM
#162
Sold The Fun Stuff :(
iTrader: (1)
Join Date: Nov 2001
Location: Nashville, TN
Posts: 2,371
Likes: 0
Received 0 Likes
on
0 Posts

I have an electric die grinder, but I see it superheating the rubber and making a big mess (while also being hard to get a straight, even cut).
I'm also considering selling these Bilsteins I have and getting the front Edelbrock IAS coilover setup. I'm seeing them for $252ish from Jegs. That's per side correct? So $500ish to get the front on Edelbrocks? I'm thinking this route or going bags. Since I'm not going super low (2" max drop) and gaining back a significant amount of suspension travel back I'm not really sure which direction to go with.
I browsed through the thread and I know the IASs mount upside down. Is your bumpstop on the lower side too, and how does the upper side mount to the upper shock mount? You had a big washer in at first and switched to only a small washer, or no washer at all?
Last edited by josh99ta; 11-19-2009 at 10:33 PM.
03-09-2010, 06:10 PM
#163
Teching In
iTrader: (6)
Join Date: Mar 2006
Location: Springfield, MO
Posts: 44
Likes: 0
Received 0 Likes
on
0 Posts
I've read this post a couple times and it seems like a great plan. I read somewhere that JasonWW was going to elaborate on doing this mod with Ground Control coilovers. I haven't seen that yet. Maybe it's on a different post? I did see one from John_D. on frrax, but I'd like to have more input.
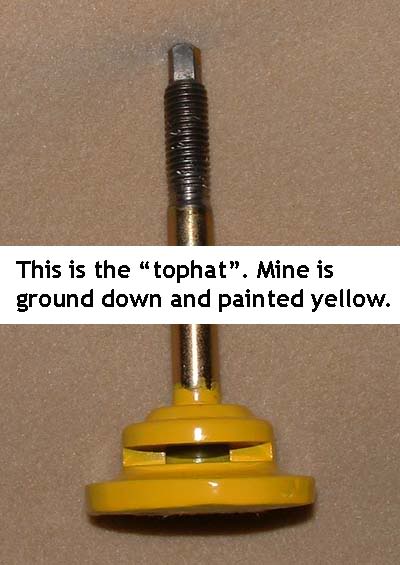
By the way, does anyone have any extra Koni top hats?
By the way, does anyone have any extra Koni top hats?
03-09-2010, 07:27 PM
#164
There really isn't much difference with the koni/ground control combo. I already did mine (I've since swapped to air springs). The one neat thing you can do is enlarge the hole on the GC aluminum upper spring perch and mount it under the tophat, but above the nut. It pushes the spring down an inch or more which is no big deal to compensate for since the red threaded sleeves are so long. The advantage is super easy access to the rebound adjustor on the tophat. Then the tophat just slides into the shortened upper mount.
The koni tophat is kinda tapered already so you don't have to add any washers for the shock to pivot back and forth as the suspension moves.
I happen to have a koni out right now. I'll try and take some pics.
The koni tophat is kinda tapered already so you don't have to add any washers for the shock to pivot back and forth as the suspension moves.
I happen to have a koni out right now. I'll try and take some pics.
Last edited by JasonWW; 03-09-2010 at 07:39 PM.
03-09-2010, 11:05 PM
#165
Teching In
iTrader: (6)
Join Date: Mar 2006
Location: Springfield, MO
Posts: 44
Likes: 0
Received 0 Likes
on
0 Posts
Wow! You're on "top" of these things, aren't you. That's an interesting idea. I like how I wouldn't have to worry about using a washer or spacer on top of the GC top perch after cutting the stock upper spring perch.
Will that aluminum GC top perch hold up when using it differently than it's intended design?
I am really curious if Ground Control or Koni ever see these forums or comment on these ideas.
After thinking some more about it, wouldn't putting the aluminum GC top perch below the Koni tophat reduce the shock travel and be back where I started?
03-10-2010, 12:50 PM
#166
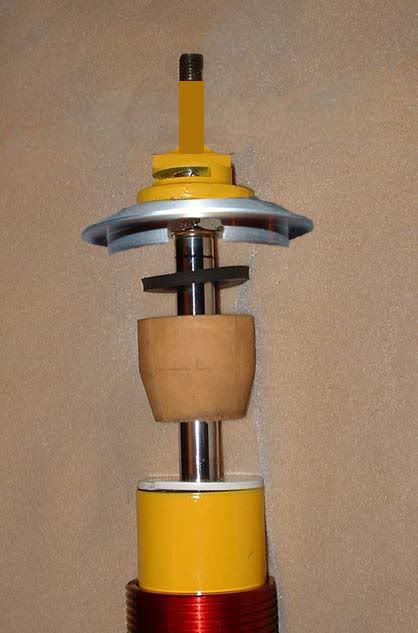
This is how it would look:
In fact, Koni makes a shock with a similar setup:
I never cut a larger hole in mine to do this because I knew I planned to sell them once I went to air suspension.
Not really. The thickness of the aluminum is about 1/8". So that reduces the shock travel 1/8", but you can compensate by leaving out the 1/8 spacer (white piece). So your back to the same exact shock travel.
Last edited by JasonWW; 03-10-2010 at 01:06 PM.
03-10-2010, 01:23 PM
#167
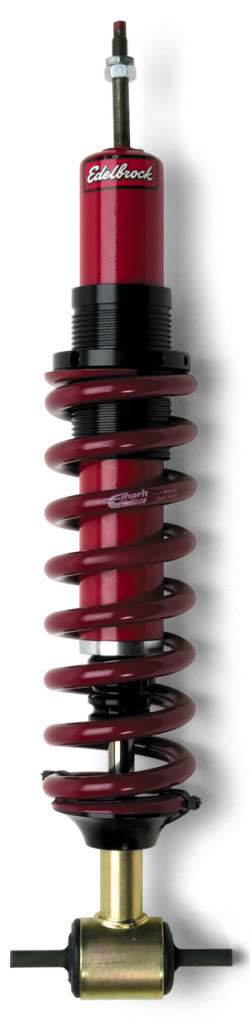
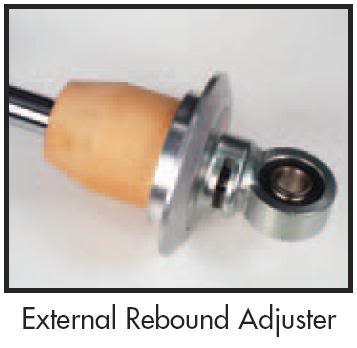
If you look at the top of the Koni tophat as well as the Edelbrock shock, you'll notice they have a little "bump" built in. This acts just like a small diameter washer and allows these shocks to tilt. That's the only reason you don't need to add a little washer to these 2 shocks.
I'd love to match the Edelbrock shock to the Aero Sport Airbag, but there's just no reasonable way to do it. If you don't need on the fly height adjustment, I'd go with the edelbrock or "Ground Control plus good shock" setup. Air suspension is way more complicated and expensive.
Last edited by JasonWW; 03-10-2010 at 01:34 PM.
03-10-2010, 01:30 PM
#168
Teching In
iTrader: (6)
Join Date: Mar 2006
Location: Springfield, MO
Posts: 44
Likes: 0
Received 0 Likes
on
0 Posts
JasonWW, Yeah, I know I've got to shorten the threaded rod on top. Now I see that you also cut down the bottom of the tophat so that the GC aluminum pc doesn't reduce the travel too much.
I think I'll go the small washer route with the standard tophat configuration.
I think I'll go the small washer route with the standard tophat configuration.
03-10-2010, 05:08 PM
#169
 05-14-2010, 11:57 AM
#172
TECH Enthusiast
iTrader: (3)
Join Date: Dec 2004
Location: Centreville, VA
Posts: 535
Likes: 0
Received 0 Likes
on
0 Posts
Is there another name for those do you know? Secondly.. wouldn't this mod allow my car to bottom out easier? As is it already scrapes, especially with the longtubes.
05-14-2010, 07:47 PM
#173
By design, these cars can't touch the ground. The suspension just won't allow that much travel. The K member gets within 2" I think. If you mod the upper shock mount and gain 1" more travel, your still not gonna touch the ground.
Now if your headers are hanging down 2" below K-member level, then yes, they might scrape on a dip that bottoms out the suspension.
You might be better off leaving the upper shock mount stock.
07-04-2010, 10:25 PM
#174

Does it make sense in wanting to cut a little hole in the engine compartment to allow the op of th shock to protrude so I don't have to cut it at the threads? I will be doing this hopefully this weekend. Ground control coilovers on SLP bilsteins. My car won't be slammed like the ops but just about 1/4 inch gap from tire to fnder front and rear is what I desire.
07-05-2010, 02:44 AM
#177
I always use an impact gun to tighten and loosen that top shock nut. It makes it a lot easier. Locktite is not needed, in fact, I'd make sure to grease the threads and then pack grease completely around the nut and threads so that it won't rust over time.
I've never had a shock rod spin more than a little while tightening with an impact gun. If it refuses to tighten and just spins constantly, then I'm not sure what you would do. If you have the GC coilovers, you would slip the sleeve over the shock first and you can then drop the spring way down out of the way while you tighten the upper nut. If I remember correctly the Bilstein/GC combo won't let you run a dust boot up front, so with the spring way down, just grab the shock rod with your hand or put it in a vice with wood blocks to protect the shaft. I'm sure it can be done easily.
Last edited by JasonWW; 07-05-2010 at 02:51 AM.
07-05-2010, 10:05 AM
#178
I'd rather cut the "nib" than drill holes in the shock towers. I guess if you are having problems with the shaft spinning when tightening. you could carefully cut a slot at the top of the rod and use a screwdriver to keep it from turning or you grind a square back on it again. If not done properly, you could destroy the threads though.
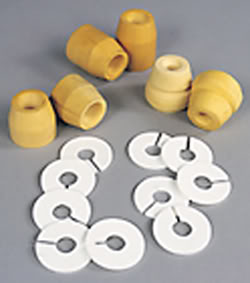
Jason, I've read most of your threads over the years and thought a few of your ideas were crazy and way out there (even said so publicly), but no one can doubt you think out the box and are willing to try things most of us can't imagine, much less do. Thanks for sharing your ideas with us and I'll be trying this idea very soon. BTW, those packers are hard to find online. I found one site that sells them in a pack of 10, but not online.
Jason, I've read most of your threads over the years and thought a few of your ideas were crazy and way out there (even said so publicly), but no one can doubt you think out the box and are willing to try things most of us can't imagine, much less do. Thanks for sharing your ideas with us and I'll be trying this idea very soon. BTW, those packers are hard to find online. I found one site that sells them in a pack of 10, but not online.
07-05-2010, 10:36 AM
#179
Thanks dude.
I had no idea packers were such a hard thing to find until recently. One idea I had was to find some cheap lightweight flat plastic that has some flex in it and just cut out some discs. Or squares, or whatever and then drill out the center and then add a half slice. Or cut them out with a hole saw if you want them to look perfect. As long as it flexes enough to slip over the shock rod and not fall off, your good to go!
Maybe there's some plastic trays or a plastic cutting board at the local dollar store that would work? Or give Koni a call.
