Interested in Powder Coating?
#1
I want to introduce myself, I write for a a DIY powder coating site. I have been powder coating for several years now and I just made the site to make it easier for other new powder coaters to get started.
I started powder coating parts for my cars restoration and the results have been amazing. My car looks 10x better because everything is powder coated.
Anyways, if anyone else here is interested in powder coating or already is into powder coating, you might want to check the site out. http://www.powdercoatguide.com/
I just finished an article on How to build your own powder coating oven.
Also, feel free to ask me any powder coating questions, I would be happy to answer them.
#7
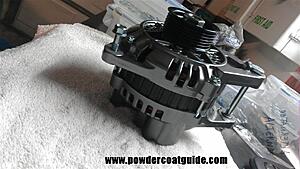
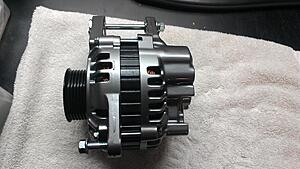
Its pretty straight forward, I had to use an impact to take off the pulley nut. Once the pulley is off, there are 4 bolts around the case that hold the 2 halves together. After you take the cases off, the middle part just rests in there and can be removed. I cleaned everything up with electronics part cleaner while I was in there.
Trending Topics
#9
TECH Senior Member
iTrader: (34)
Can you answer a couple of things for me if you have any experience with it.
What is the process or best practice for adding a powder clear coat?
I have tried using some wrinkle black powder twice. Once on a scrap piece of aluminum square tubing and another on a ls1 valve cover. The tubing had a nice wrinkle effect but the valve cover nothing really happened. Does it have something to do with the cast aluminum possibly being porous?
#11
best way to add a clear coat is to only half bake the color coat then add the clear and finish the clear.Be careful not to put a bunch of clear as it will stick very well because the part is hot as far as wrinkle coat it should work great on aluminum valve covers. I always scuff the valve covers to get more bite. The most important thing is being in the right temperature. get a temp gun. if you are not getting a wrinkle your at the wrong temp of "the part" not the oven.
good luck
bpatrol
good luck
bpatrol
#12
TECH Enthusiast
Join Date: Aug 2012
Location: Vancouver, BC
Posts: 536
Likes: 0
Received 0 Likes
on
0 Posts
im gunna try the prismatic series - sterling black with casper clear (makes a sick looking satin black) and illusion cherry with casper clear (no samples of this yet, maybe I'll be the first!)
#13
Can you answer a couple of things for me if you have any experience with it.
What is the process or best practice for adding a powder clear coat?
I have tried using some wrinkle black powder twice. Once on a scrap piece of aluminum square tubing and another on a ls1 valve cover. The tubing had a nice wrinkle effect but the valve cover nothing really happened. Does it have something to do with the cast aluminum possibly being porous?
What is the process or best practice for adding a powder clear coat?
I have tried using some wrinkle black powder twice. Once on a scrap piece of aluminum square tubing and another on a ls1 valve cover. The tubing had a nice wrinkle effect but the valve cover nothing really happened. Does it have something to do with the cast aluminum possibly being porous?
Normal colors:
- Spray first coat of color just like you would normally
- Put part and oven, wait till part reaches the correct temperature(use an IR thermometer to know when the part is at the correct temp), start your timer but only cure it partially. If your cure time is 10 minutes, take it out of the oven at 6 or 7 minutes.
- Let the part cool to room temperature.
- Keep the part completely clean until the 2nd coat(clear coat) is done curing. Only handle the part with clean gloves, ect.
- Re-do your ground if needed. You will need a direct to metal ground for both coats. I like to ground my parts in areas that get masked off or ground from a bolt threaded into bolt hole if applicable. This way, the ground remains even though the first coat is applied. If you are coating with the part hanging from a hook, just use a small file where the hook is hanging to remove a little powder so your hook gets to bare metal. Wipe any dust off the part with completely clean towel, don't go crazy here, just a nice smooth controlled wipe. You don't want to leave any lint from the towel on the part.
- Reduce the KV on your gun(if adjustable) to around 30kv, this will help you get into the tight areas better.
- Spray your clear, have an led flashlight on hand while doing this. while spraying, check your coverage with the led light, if you can still see through to your original coat, the powder is too thin. Once you can no longer see the original coat, you are done, don't keep piling on the clear. The tighter areas will be harder to spray on 2nd coats, this is called a faraday cage area. This happens because the grounded part is insulated by the 1st coat. You will want the strongest ground you can achieve. I have found a grounding rod is the best way to do this. It allows the cheapest guns to spray 2 coats. Check out the grounding rod info here: http://www.powdercoatguide.com/2012/12/7-grounding.html
- Now you are ready to cure the part fully. You will follow the curing instructions for the clear coat at this point for the full cure. Follow the clear curing times exactly, if you over bake it, the clear can turn yellow. My favorite full-gloss clear is XL clear from allpowderpaints.com, it looks like glass when done.
- What you have just done with the 1st partial cure and the 2nd full cure is interlocked the coats. The coats are adhered to each other. This prevents de-lamination of the clear coat from the 1st coat.
For chrome powder coats you will follow the same steps as above except you must fully cure the chrome before spraying the clear. I also like to give the chrome a couple of extra minutes in the oven to make absolutely sure it is fully cured. Make sure you let it cure completely, then shoot your clear. If you don't fully cure the chrome coat, the chrome will have a textured look underneath the clear. You are sacrificing inter-coat adhesion but it is the only way to do it.
Let me know if you have any more questions about the process. I will type up a full article with more in-depth details and pics for the site eventually and I will do some videos.
As for the wrinkles not coming out right, you need to spray wrinkles heavier than usual to achieve the wrinkled finish. To some tests on some scrap metal to get a good feel for how heavy you need to spray.
best way to add a clear coat is to only half bake the color coat then add the clear and finish the clear.Be careful not to put a bunch of clear as it will stick very well because the part is hot as far as wrinkle coat it should work great on aluminum valve covers. I always scuff the valve covers to get more bite. The most important thing is being in the right temperature. get a temp gun. if you are not getting a wrinkle your at the wrong temp of "the part" not the oven.
good luck
bpatrol
good luck
bpatrol
The only thing I disagree with you here is spraying the clear hot, that is a sure way to spray it way too heavy. I know that spraying a part hot makes it easier to get into the tight areas, but I combat this using a dedicated grounding rod like I mentioned above. If I absolutely cannot get powder into a certain spot, I will use a heat gun in just that area to spray the powder, then let it cool back down and spray the rest of the part. Getting the correct mil thickness is essential for durability. If it too thick, it will chip easily. Always spray the tight areas first, this also helps.
Yeah, the casper clear definitely makes for some awesome custom colors. I really like black chrome+casper clear. I am a bit disappointed in Prismatic lately though, their shipping times have gone from a couple of days to a week or 2.
#15
Powder365.com has a location in Canada. They don't have the selection of prismatic, but they have all of the popular powders and their customer service is great. It might save you some money on shipping. They do have a flat clear that is said to be better than casper clear.
http://www.powder365.ca/
http://www.powder365.ca/
#17
TECH Enthusiast
iTrader: (9)
Join Date: Mar 2008
Location: IL
Posts: 698
Likes: 0
Received 0 Likes
on
0 Posts

I powdercoated a couple small parts in high school and liked how it turned out. Had I had any patience then they would of came out great. I have an electric oven that I no longer use so I put it in my garage. I would like to powdercoat small parts on my car.
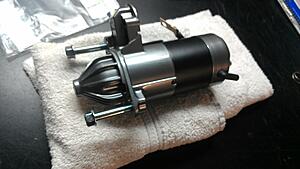
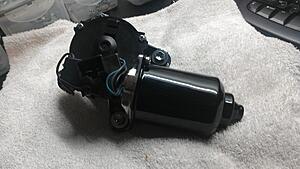
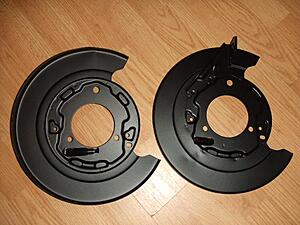
My question is, exactly what parts can and can't you powdercoat without damaging them? I see the backing plates that is an obvious one, but the wiper motor and starter, did you do any disassembly of them or tape them off spray them and put them in the oven to bake?
I would like to do my hydroboost and the engine accessories
#20
I powdercoated a couple small parts in high school and liked how it turned out. Had I had any patience then they would of came out great. I have an electric oven that I no longer use so I put it in my garage. I would like to powdercoat small parts on my car.
My question is, exactly what parts can and can't you powdercoat without damaging them? I see the backing plates that is an obvious one, but the wiper motor and starter, did you do any disassembly of them or tape them off spray them and put them in the oven to bake?
I would like to do my hydroboost and the engine accessories
My question is, exactly what parts can and can't you powdercoat without damaging them? I see the backing plates that is an obvious one, but the wiper motor and starter, did you do any disassembly of them or tape them off spray them and put them in the oven to bake?
I would like to do my hydroboost and the engine accessories
I tore the starter, alternator, and wiper motor down completely, sandblasted all of the metal cases, then coated them. I also used this time to clean up the insides of the assemblies using electrical parts cleaner, and then added new grease during the rebuild. It is amazing how dirty the inside of these parts get and I would imagine that I have extended their lives quite a bit by rebuilding them.
There are some things that I do not powder coat because rebuilding them would be too difficult, or if I do not have access to the correct tools or replacement parts needed to rebuild it. The hydroboost assembly may fall into this category. I have coated my brake and clutch master cylinders and those were easy enough to take apart, but I am not familiar with rebuilding the hydroboost assembly, if there is a good guide to rebuilding it on this forum, then you are good to go. If not, then sometimes you have to decide to take a leap of faith and just start taking it apart. Just keep in mind that you may be buying another one if you damage it during the process. Thats what I do mostly.
Thanks


