Project Budget 10 Second Camaro Thread


 08-10-2010, 04:02 PM
#402
TECH Fanatic
Thread Starter
iTrader: (12)
Join Date: Aug 2007
Location: Cornfields near Pontiac, IL
Posts: 1,818
Likes: 0
Received 1 Like
on
1 Post
Yes and no, yes being its going to be more of a nicer looking car when its done. Want to do the LS1 front end conversion with a SS hood and rear spoiler (want to trade? lol) I still plan of modifying the car for performance, instead of straight line it will now be all around performance. I dont think 10s are in reach still, but you never know. I will definatly get ahold of you and you do the same if you need a hand pulling that engine. 
08-10-2010, 04:33 PM
#403
TECH Resident
iTrader: (34)
Join Date: Nov 2008
Location: Satellite Beach, FL
Posts: 853
Likes: 0
Received 0 Likes
on
0 Posts
I have all the HVAC duct work that goes under the dash minus the vents, keeping those to keep the factor look.. Not sure what it's worth but you can have it for cheap. I'll never use it again. It's all out of my 94 Z28 Camaro, let me know, i'm located in Missouri...It's all light weight with of course that one big peice, shipping shouldn't be that bad just provide an address, drop me a pm or something.
08-11-2010, 05:43 PM
#404
TECH Fanatic
Thread Starter
iTrader: (12)
Join Date: Aug 2007
Location: Cornfields near Pontiac, IL
Posts: 1,818
Likes: 0
Received 1 Like
on
1 Post
Once again, I want to thank you guys for your help. Ive recieved alot of generous offers. I really appreciate it right now while the money is tight! I owe ya all if I run into you
Anyways, found a picture of what I plan on having my car look like (believe this is mtbsully's camaro)

Looking at doing the LS1 front end, a SS hood, SS spoiler, and lowering the front. Too bad I just finished painting the car, looks like the front clip will have to be repainted along with both rear 1/4 panels since the spoiler holes will have to be welded up. Also looking to sell or trade my smooth filler panel for a stock one. Im undecided right now if I want to sand off the paint on the taillights or not...Guess Ill think on that one.
More updates soon as I sort all the trades out. Also my PM's have been exploding lately so if I havent responded to you, shoot me another one. Trying to keep them all in order. I have alot of pending trades right now. Sorry if I missed anyone and thanks again for your help!
Anyways, found a picture of what I plan on having my car look like (believe this is mtbsully's camaro)
Looking at doing the LS1 front end, a SS hood, SS spoiler, and lowering the front. Too bad I just finished painting the car, looks like the front clip will have to be repainted along with both rear 1/4 panels since the spoiler holes will have to be welded up. Also looking to sell or trade my smooth filler panel for a stock one. Im undecided right now if I want to sand off the paint on the taillights or not...Guess Ill think on that one.
More updates soon as I sort all the trades out. Also my PM's have been exploding lately so if I havent responded to you, shoot me another one. Trying to keep them all in order.
I have alot of pending trades right now. Sorry if I missed anyone and thanks again for your help!
08-16-2010, 11:08 PM
#405
TECH Fanatic
Thread Starter
iTrader: (12)
Join Date: Aug 2007
Location: Cornfields near Pontiac, IL
Posts: 1,818
Likes: 0
Received 1 Like
on
1 Post
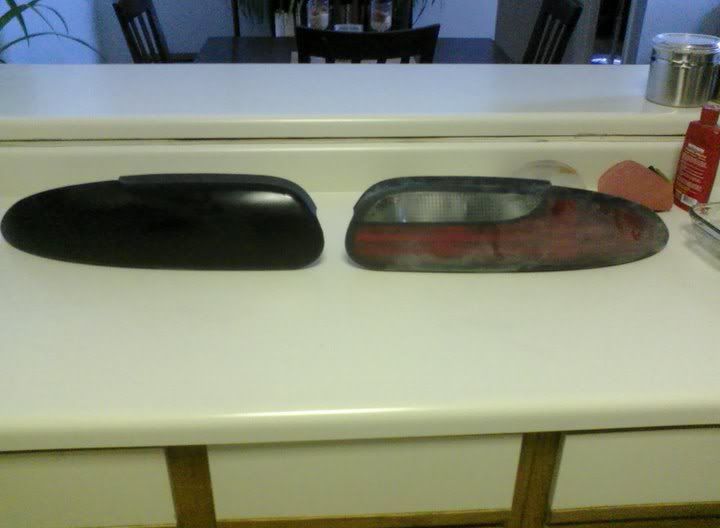
Taillight Tint WriteUp!
Wrote this for you guys who have either screwed up painting your lights or you guys who figured the smoked out look is played out and want to go back to stock...
I am doing this since the car will be a daily driver and want my wife to be seen when braking at night. Dont worry guys, my nice lights were put to use. Am_muscl (Jason) has his car over at my place getting worked on and I offered to swap my lights with his that he messed up trying to tint. They look awesome on his car and glad my hard work didnt go to waste.
What you will need...
180 Grit Sandpaper
320 " "
400 " "
800 " " (I skipped this step)
1500 " " (I skipped this step)
2000 " "
Mother's Plastic Polish
Microfiber towels
I first started off with 180 grit to take off aprox 75% of the paint. You want to gently dry sand the lights since this is a rough grit and dont want to dig into the lights otherwise you will be sanding forever later. I got it to where you could start to see the lens under the paint. I also sanded the date codes off on the bottom for a cleaner look. Just knock them down with 180 until you cant see them anymore.
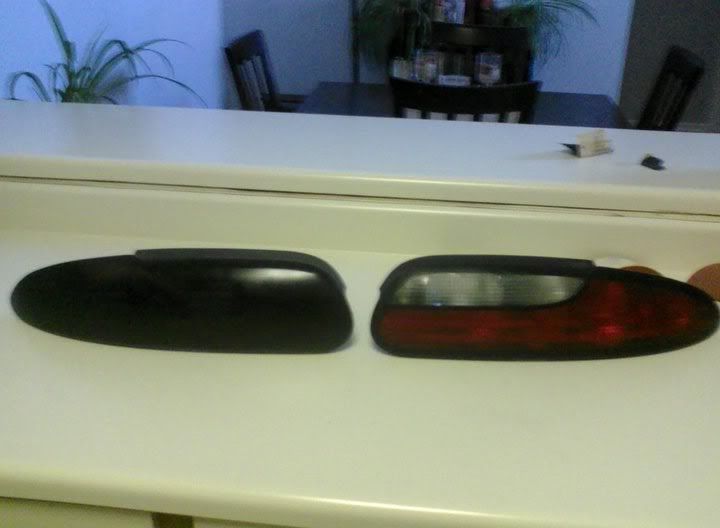
Next step is going over the lights with 320 dry. You want to remove the remainder of the paint in this step and take out all of the 180 scratches. Making sure you do this will save tons of time later.
Sanded with 320...
I went to 400 dry to smooth out alot of the 320 scratches, you dont need to spend too much time on this step, but since I didnt have 800 or 1500 grit laying around when I did this I wanted to smooth this out as much as possible before moving on. I also then wetsanded the lights with 400 to act as a smoother grit of sandpaper. This worked really well and after I hit it with 2000, you couldnt tell I skipped the 800 and 1500 grit, but its optional if you guys want to do it. At this point, the lights should be shiny when wet...
Next, I dry sanded the lights with 2000 to get all the 400 lines out. Idk if it made a difference or not doing this dry before I wetsanded with 2000, but the end result looked like brand new lights, no imperfections, so just letting you guys know how I did it...I then cleaned the light off, looked to make sure I couldnt see anymore deep scratches and all the lines were from the 2000 grit paper. Then I wetsanded the lights to make them as smooth as possible before hitting them with Mother's Plastic Polish.
After wetsanding with 2000 grit...
Now its time to polish. I used Mother's Plastic Polish which Ive used in the past. I LOVE THIS STUFF! Used it on gauge cluster lens, turn signals, etc. I applied several small dabs of polish on a microfiber towl and used some elbow grease to buff the lights (a buffer can be used to, but Im not a wimp though!) About 10-15 minutes later, the lights looked brand new! Could not tell they have been painted before!
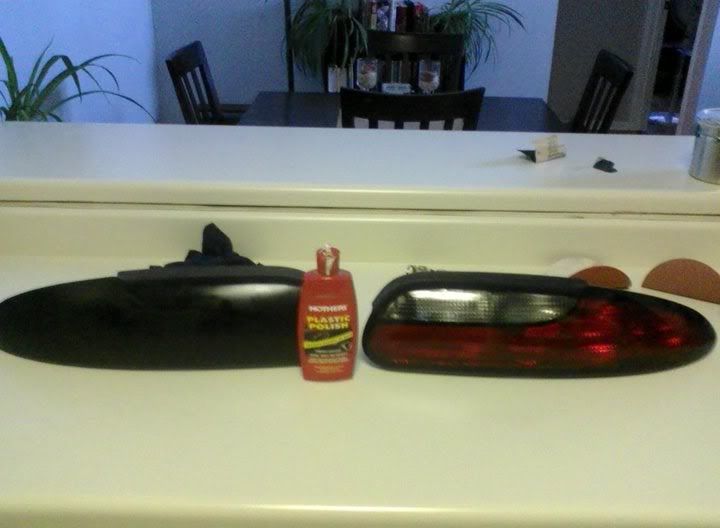
Now check the rest of your lenses and polish if needed! Too bad this is the 2nd time Ive taken the tint off the taillights. lol
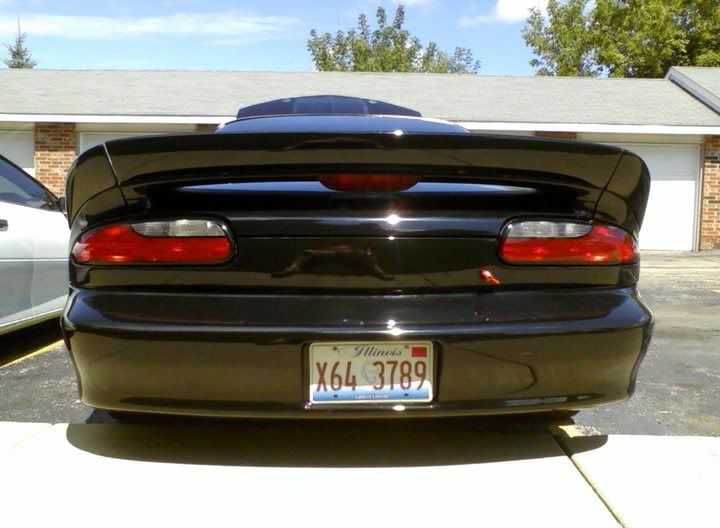
Taillights installed back on the car...I really do like the factory lights, I know I said that before and redid them, but this time they stay!
Wrote this for you guys who have either screwed up painting your lights or you guys who figured the smoked out look is played out and want to go back to stock...
I am doing this since the car will be a daily driver and want my wife to be seen when braking at night. Dont worry guys, my nice lights were put to use. Am_muscl (Jason) has his car over at my place getting worked on and I offered to swap my lights with his that he messed up trying to tint. They look awesome on his car and glad my hard work didnt go to waste.
What you will need...
180 Grit Sandpaper
320 " "
400 " "
800 " " (I skipped this step)
1500 " " (I skipped this step)
2000 " "
Mother's Plastic Polish
Microfiber towels
I first started off with 180 grit to take off aprox 75% of the paint. You want to gently dry sand the lights since this is a rough grit and dont want to dig into the lights otherwise you will be sanding forever later. I got it to where you could start to see the lens under the paint. I also sanded the date codes off on the bottom for a cleaner look. Just knock them down with 180 until you cant see them anymore.
Next step is going over the lights with 320 dry. You want to remove the remainder of the paint in this step and take out all of the 180 scratches. Making sure you do this will save tons of time later.
Sanded with 320...
I went to 400 dry to smooth out alot of the 320 scratches, you dont need to spend too much time on this step, but since I didnt have 800 or 1500 grit laying around when I did this I wanted to smooth this out as much as possible before moving on. I also then wetsanded the lights with 400 to act as a smoother grit of sandpaper. This worked really well and after I hit it with 2000, you couldnt tell I skipped the 800 and 1500 grit, but its optional if you guys want to do it. At this point, the lights should be shiny when wet...
Next, I dry sanded the lights with 2000 to get all the 400 lines out. Idk if it made a difference or not doing this dry before I wetsanded with 2000, but the end result looked like brand new lights, no imperfections, so just letting you guys know how I did it...I then cleaned the light off, looked to make sure I couldnt see anymore deep scratches and all the lines were from the 2000 grit paper. Then I wetsanded the lights to make them as smooth as possible before hitting them with Mother's Plastic Polish.
After wetsanding with 2000 grit...
Now its time to polish. I used Mother's Plastic Polish which Ive used in the past. I LOVE THIS STUFF! Used it on gauge cluster lens, turn signals, etc. I applied several small dabs of polish on a microfiber towl and used some elbow grease to buff the lights (a buffer can be used to, but Im not a wimp though!) About 10-15 minutes later, the lights looked brand new! Could not tell they have been painted before!
Now check the rest of your lenses and polish if needed! Too bad this is the 2nd time Ive taken the tint off the taillights. lol
Taillights installed back on the car...I really do like the factory lights, I know I said that before and redid them, but this time they stay!
Last edited by Black94Z28; 08-18-2010 at 06:55 PM.
08-16-2010, 11:39 PM
#406
08-17-2010, 10:13 PM
#407
TECH Fanatic
Thread Starter
iTrader: (12)
Join Date: Aug 2007
Location: Cornfields near Pontiac, IL
Posts: 1,818
Likes: 0
Received 1 Like
on
1 Post
How to Paint Interior Plastics
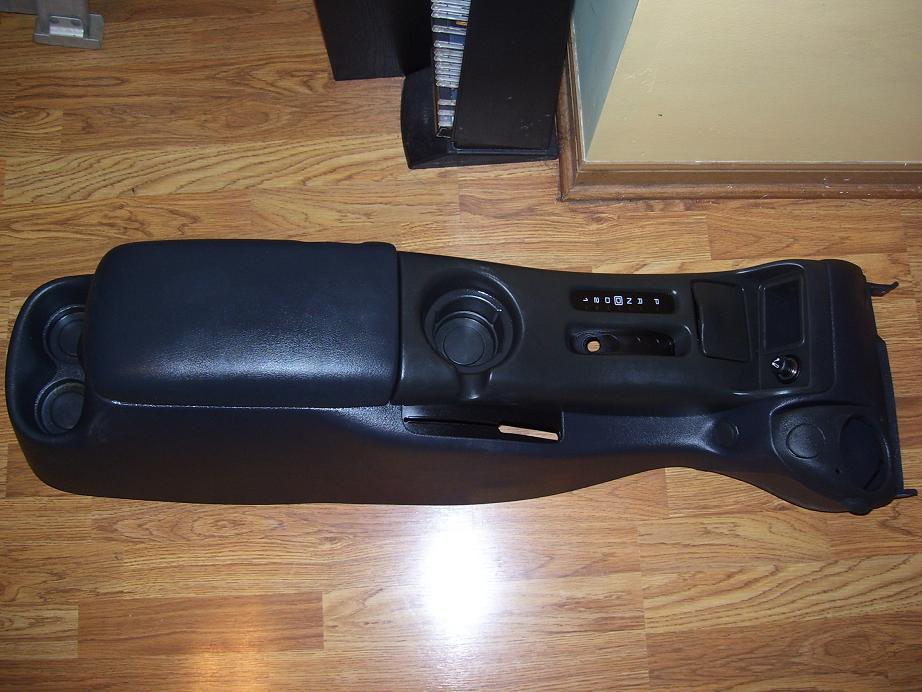
Since I am piecing together stuff I have sold awhile ago, I have gotten several interior pieces that are great shape, but the wrong color. Maybe you replaced a damaged panel and the color is off or faded and looking to make it new again. For this write up here, I used a center console that I bought when I was doing the LS1 dash swap...
Here is a picture of the console when I bought it...Note it is a dark grey instead of black. I want the console to match my dash which is black...
First thing you will want to do is to clean the panel really good. I used Purple Thunder (Can find in most automotive stores) and cut it 50/50 with water, this is pretty strong, so it will get rid of alot of stains, armor all, and leave the surface clean and ready to paint.
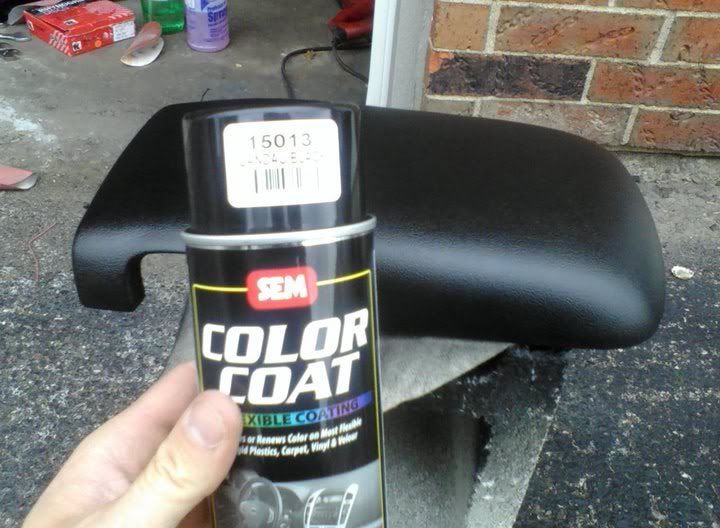
I went to CarQuest and picked up SEM Flexable Interior Paint. This is good stuff, I used it on some of my GTO interior panels years ago and no flaking and looks as good as the day I painted them. The color I used was Landau Black (P/N 15013) This color is the closest in semi gloss of the factory black...
The key to success is to use as little paint as possible, the thicker the paint, the more likely it is to flake off. I kept the can back about a foot and lightly dusted on the first coat and let it dry for 20 minutes. The first coat will be very light and do not try and cover the entire panel. You will repeat this step about 3-4 times going very light and giving plenty of drying time between coats. You do not want the paint to look "wet" in any spots. Just take your time and lightly coat until you have full coverage and then STOP! Enjoy your newly painted panel and give it a full day before installing it!
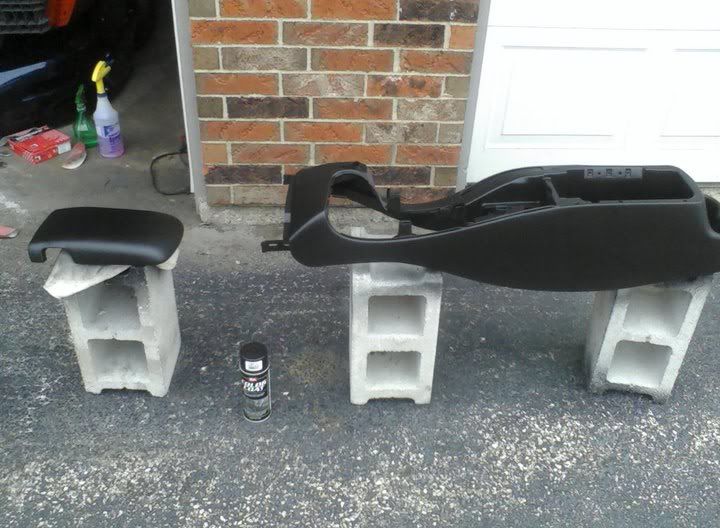
Center console and lid painted black...
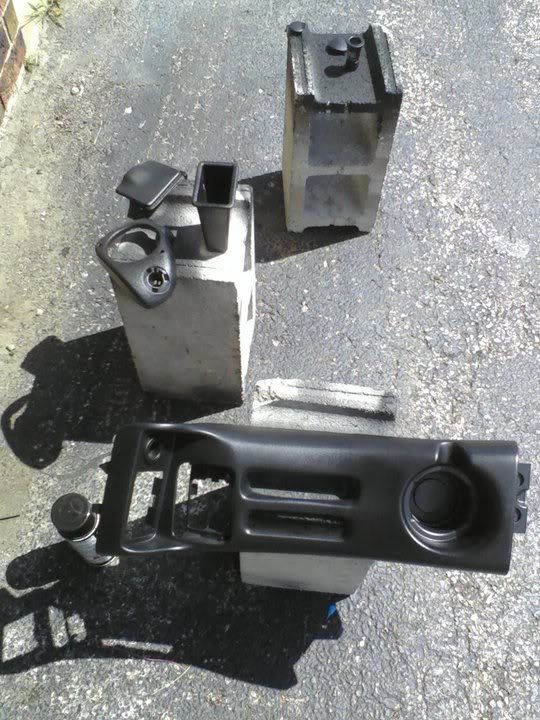
Now to finish up with the top plate and misc pieces that I wanted painted seperate...
And time to put the console back together and install in the car. Note the factory steering wheel is also back in. Thanks Jason (am_muscl)
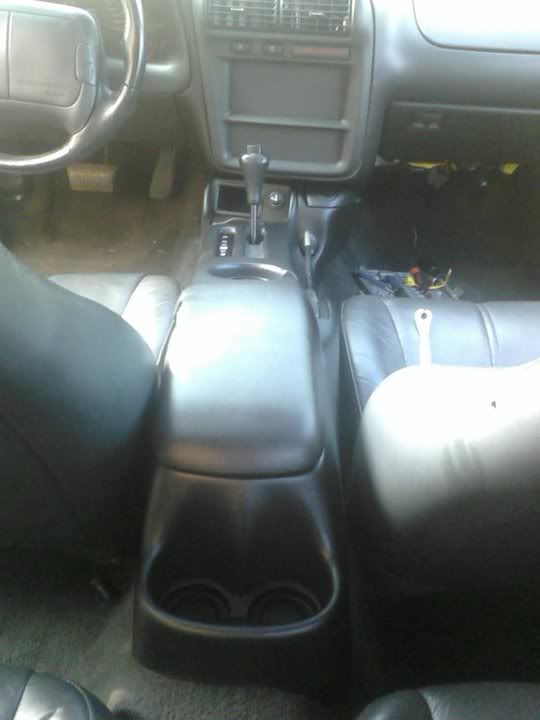
Still need to put the radio and once I locate a complete HVAC setup, I can install the heat, a/c, and vents...
Since I am piecing together stuff I have sold awhile ago, I have gotten several interior pieces that are great shape, but the wrong color. Maybe you replaced a damaged panel and the color is off or faded and looking to make it new again. For this write up here, I used a center console that I bought when I was doing the LS1 dash swap...
Here is a picture of the console when I bought it...Note it is a dark grey instead of black. I want the console to match my dash which is black...
First thing you will want to do is to clean the panel really good. I used Purple Thunder (Can find in most automotive stores) and cut it 50/50 with water, this is pretty strong, so it will get rid of alot of stains, armor all, and leave the surface clean and ready to paint.
I went to CarQuest and picked up SEM Flexable Interior Paint. This is good stuff, I used it on some of my GTO interior panels years ago and no flaking and looks as good as the day I painted them. The color I used was Landau Black (P/N 15013) This color is the closest in semi gloss of the factory black...
The key to success is to use as little paint as possible, the thicker the paint, the more likely it is to flake off. I kept the can back about a foot and lightly dusted on the first coat and let it dry for 20 minutes. The first coat will be very light and do not try and cover the entire panel. You will repeat this step about 3-4 times going very light and giving plenty of drying time between coats. You do not want the paint to look "wet" in any spots. Just take your time and lightly coat until you have full coverage and then STOP! Enjoy your newly painted panel and give it a full day before installing it!
Center console and lid painted black...
Now to finish up with the top plate and misc pieces that I wanted painted seperate...
And time to put the console back together and install in the car. Note the factory steering wheel is also back in. Thanks Jason (am_muscl)
Still need to put the radio and once I locate a complete HVAC setup, I can install the heat, a/c, and vents...
Last edited by Black94Z28; 08-18-2010 at 06:59 PM.
08-17-2010, 10:49 PM
#410
11 Second Club
Black94Z28 if you are doing an LS1 front clip and SS wing, you should also do LS1 tail lights.
08-17-2010, 11:09 PM
#411
TECH Fanatic
Thread Starter
iTrader: (12)
Join Date: Aug 2007
Location: Cornfields near Pontiac, IL
Posts: 1,818
Likes: 0
Received 1 Like
on
1 Post
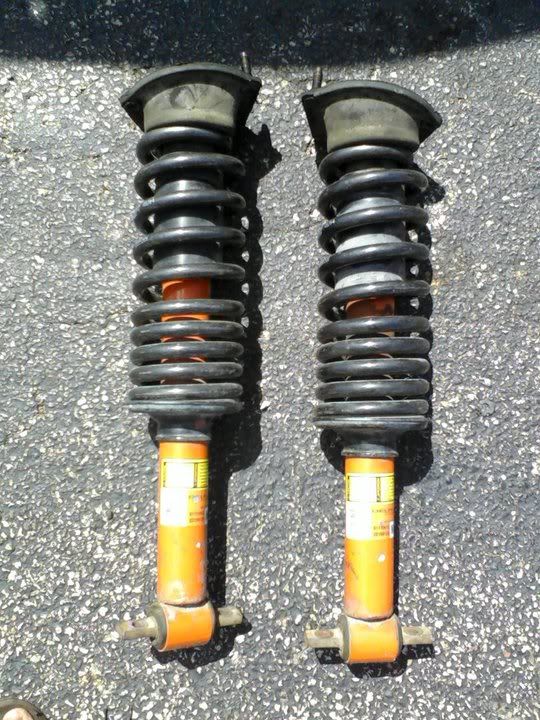
Front Lowering Springs (One of the mods I am actually doing over stock stuff)
These strut/spring assembly is from a donor Camaro with good struts. My factory ones I removed awhile back only to find the top nut so rusted, you couldnt even get a socket on it. So I reinstalled the assembly and looked for another set.
Tools all laid out...
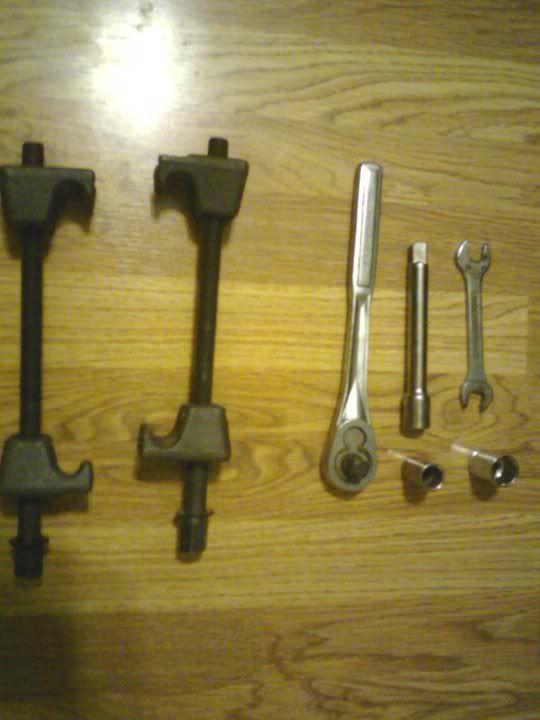
15 mm (strut nut)
19 mm (compressor nut)
15 mm wrench (just grabbed if needed)
1/2 Drive Rachet and extension
Spring Compressor
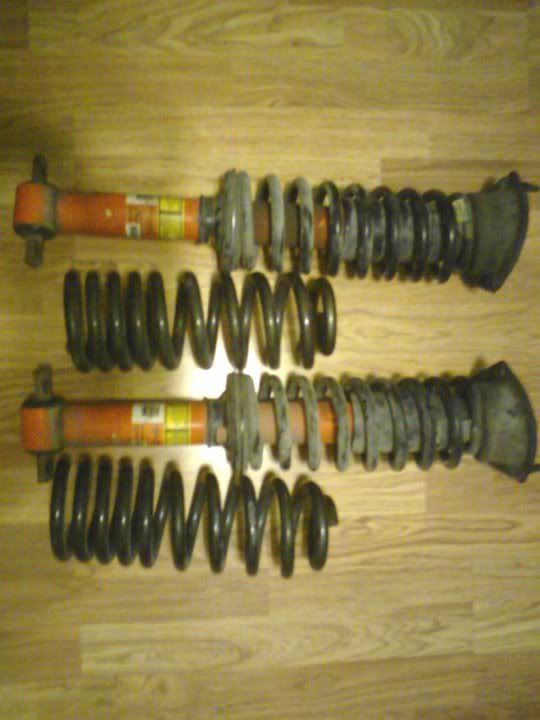
Strut/Spring Assembly with Eiback Pro's waiting to be installed...
I tried tackling this last night with hand tools with so success, so I called it quits and today headed over to my buddys garage to use his air tools. Made this alot easier!
Pic of the swapping the springs out...
Eibach Pros on factory LS1 struts...
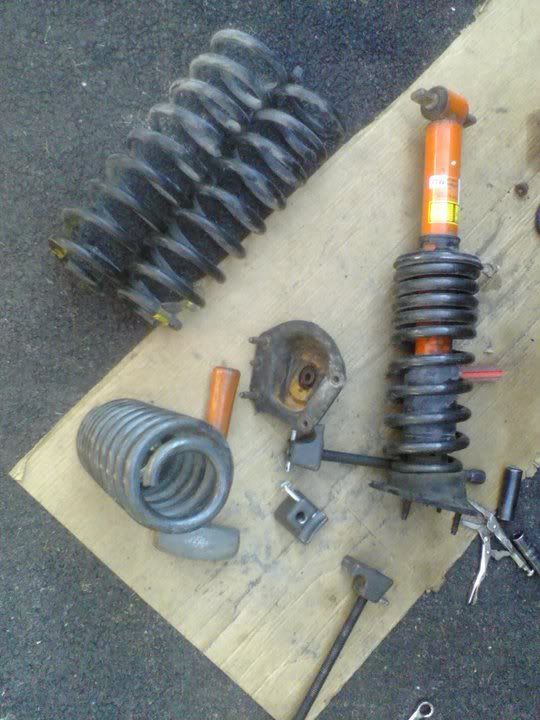
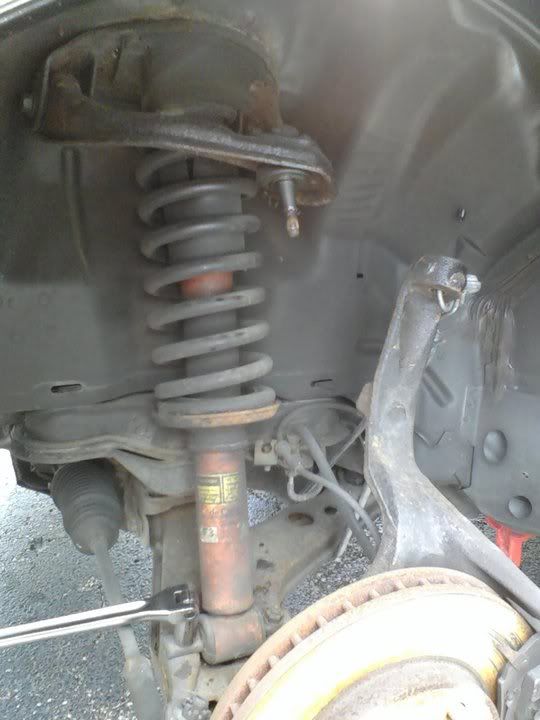
Now that I have a complete assembly, I can remove the factory strut/spring assembly from the car. The strut nuts were so badly corroded you could not see any threads at all. Here is the spindle unbolted from the top control arm...
All finished up, still a little more gap then what I want, but once the A/C and front bumper support go in, hopefully it drops a half inch and Ill be happy.
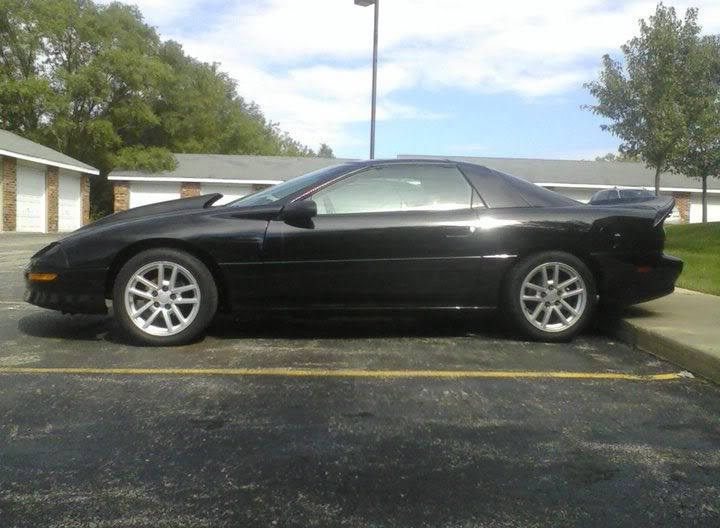
And hopefully the springs will settle a little after driving and drop a little too. But overall, Im happy with the results, I was worried it was going to be too extreme but now it just looks like factory ride height. Before, the car looked like the engine was out! BTW...am_muscl's white 94 is behind my car...
These strut/spring assembly is from a donor Camaro with good struts. My factory ones I removed awhile back only to find the top nut so rusted, you couldnt even get a socket on it. So I reinstalled the assembly and looked for another set.
Tools all laid out...
15 mm (strut nut)
19 mm (compressor nut)
15 mm wrench (just grabbed if needed)
1/2 Drive Rachet and extension
Spring Compressor
Strut/Spring Assembly with Eiback Pro's waiting to be installed...
I tried tackling this last night with hand tools with so success, so I called it quits and today headed over to my buddys garage to use his air tools. Made this alot easier!
Pic of the swapping the springs out...
Eibach Pros on factory LS1 struts...
Now that I have a complete assembly, I can remove the factory strut/spring assembly from the car. The strut nuts were so badly corroded you could not see any threads at all. Here is the spindle unbolted from the top control arm...
All finished up, still a little more gap then what I want, but once the A/C and front bumper support go in, hopefully it drops a half inch and Ill be happy.
And hopefully the springs will settle a little after driving and drop a little too. But overall, Im happy with the results, I was worried it was going to be too extreme but now it just looks like factory ride height. Before, the car looked like the engine was out! BTW...am_muscl's white 94 is behind my car...
Last edited by Black94Z28; 08-18-2010 at 06:53 PM.
08-17-2010, 11:12 PM
#412
TECH Fanatic
Thread Starter
iTrader: (12)
Join Date: Aug 2007
Location: Cornfields near Pontiac, IL
Posts: 1,818
Likes: 0
Received 1 Like
on
1 Post
Nah, I dont like the LS1 taillights, the orange looks terrible on them. Although that brings me to a thought thats in my head. I put the stock orange turn signals in the front and Im wondering if I should go with clear corners and side markers when I do the LS1 swap...I have the rear clear marker lights I took in on trade.
08-17-2010, 11:20 PM
#413
11 Second Club
Nah, I dont like the LS1 taillights, the orange looks terrible on them. Although that brings me to a thought thats in my head. I put the stock orange turn signals in the front and Im wondering if I should go with clear corners and side markers when I do the LS1 swap...I have the rear clear marker lights I took in on trade.
 08-18-2010, 06:08 PM
#414
TECH Fanatic
Thread Starter
iTrader: (12)
Join Date: Aug 2007
Location: Cornfields near Pontiac, IL
Posts: 1,818
Likes: 0
Received 1 Like
on
1 Post
Well looks like the y-pipe setup I traded Jason for my duals doesnt line up, so tomorrow I am trading my 8 pt roll cage for a hooker header back setup. Hopefully this will be an easy install and have a nice sound to it. Also picking up some aluminum valve covers as well. Still need to convert back to the factory acc setup and reinstall the front sway bar, need to find a washer fluid tank and the lines, buy or see if I can find p/s lines, and I think that will be most of the major stuff for now...I hope...
Last edited by Black94Z28; 08-18-2010 at 07:03 PM.
 08-18-2010, 06:39 PM
#416
TECH Fanatic
Thread Starter
iTrader: (12)
Join Date: Aug 2007
Location: Cornfields near Pontiac, IL
Posts: 1,818
Likes: 0
Received 1 Like
on
1 Post
I will do, I have to get Nate to wire in my CD player, I am bad with electrical stuff. Still need to find some heater control ***** as well come to think of it...
08-19-2010, 12:29 PM
#418
TECH Fanatic
Thread Starter
iTrader: (12)
Join Date: Aug 2007
Location: Cornfields near Pontiac, IL
Posts: 1,818
Likes: 0
Received 1 Like
on
1 Post
Its basically the same as if you shut you car off while still driving and try and steer it. On mine, I just looped the lines together and you are manually steering your car.
08-19-2010, 02:53 PM
#419
TECH Fanatic
Thread Starter
iTrader: (12)
Join Date: Aug 2007
Location: Cornfields near Pontiac, IL
Posts: 1,818
Likes: 0
Received 1 Like
on
1 Post
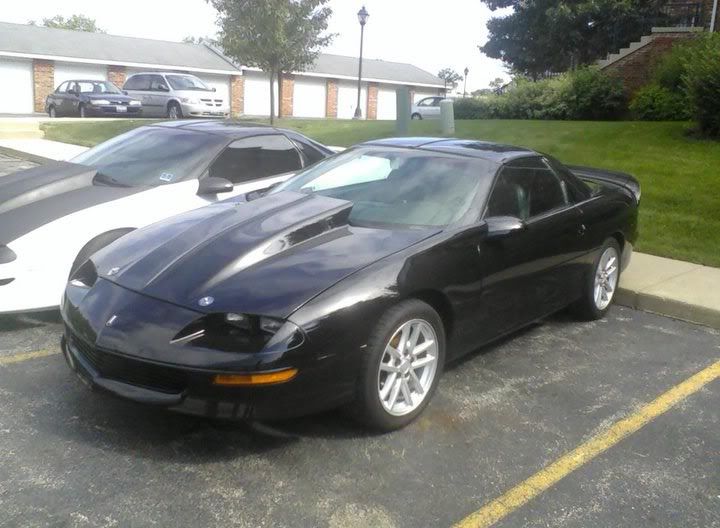
Picked up a LS1 front clip the other day from Aaron (Funkster) on here. Thanks again bro! The lights have the whistler mod done to them already. The lights are what I love about the LS1 front ends. Didnt care for the 2 square headlights. Just need a good polish and should look sharp! I'm gonna run the factory flat hood until I can save up/trade for a SS hood or cowl hood.
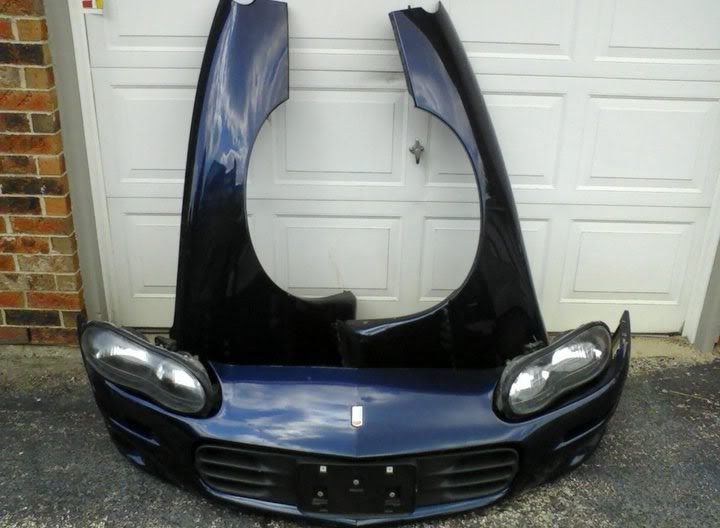
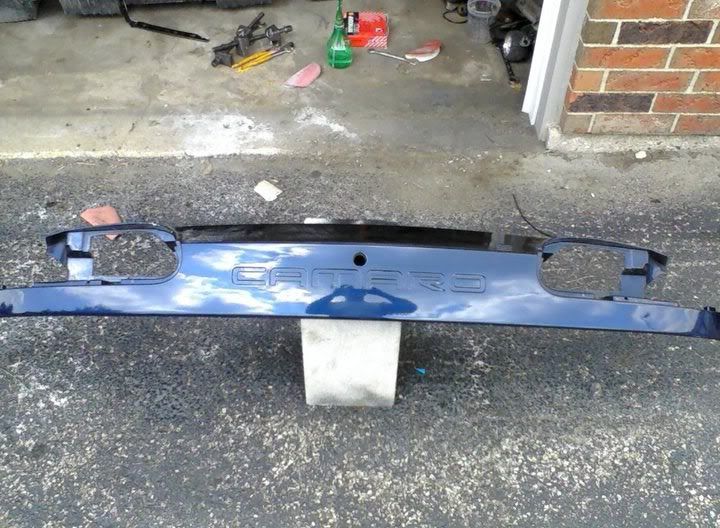
Picked up from Aaron as well a factory rear filler panel. Since I have the battery kill switch on the smoothed back panel, Im gonna sell that so I can get the factory rear panel painted along with the stainless "CAMARO" inserts. Should look nice on a black car!
Now back out to the garage to trade someone for more parts! I swear I should be a drug dealer with all this swapping parts and cash around! lol
The lights have the whistler mod done to them already. The lights are what I love about the LS1 front ends. Didnt care for the 2 square headlights. Just need a good polish and should look sharp! I'm gonna run the factory flat hood until I can save up/trade for a SS hood or cowl hood. Picked up from Aaron as well a factory rear filler panel. Since I have the battery kill switch on the smoothed back panel, Im gonna sell that so I can get the factory rear panel painted along with the stainless "CAMARO" inserts. Should look nice on a black car!
Now back out to the garage to trade someone for more parts! I swear I should be a drug dealer with all this swapping parts and cash around! lol
08-19-2010, 08:25 PM
#420
TECH Fanatic
Thread Starter
iTrader: (12)
Join Date: Aug 2007
Location: Cornfields near Pontiac, IL
Posts: 1,818
Likes: 0
Received 1 Like
on
1 Post
Look at what I just took in on trade...
A set of unused Canton valve covers and they are notched for the alternator which is nice since Im returning to the stock accessory setup...
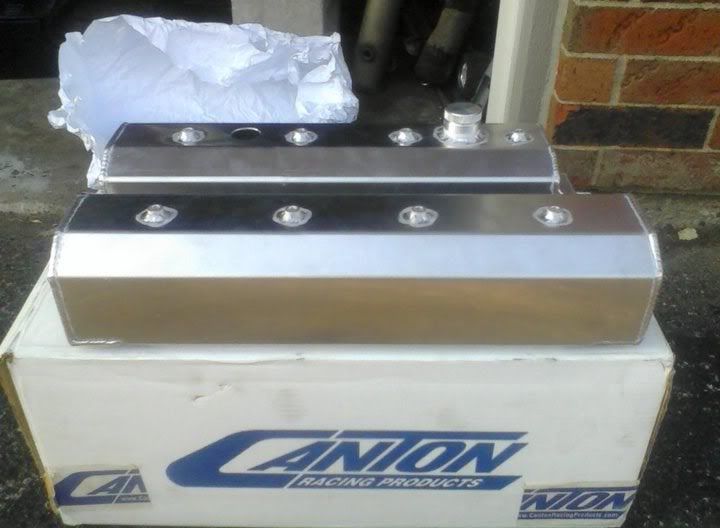
Anyone know what type of breather to get to fill the oil fill hole?
A set of unused Canton valve covers and they are notched for the alternator which is nice since Im returning to the stock accessory setup...
Anyone know what type of breather to get to fill the oil fill hole?