
First 4L60E Build...
 10-23-2015, 02:38 AM
#1

Yep,as usual,didn't listen and went through trying to rebuild a 4L60E that I picked up sitting on the ground at a PnP yard(I just used basic rebuild soft parts,nothin fancy here,teardown revealed no major issues/failures)mostly to learn and experience a new challenge.As can be expected(and predicted by most experts here) I didn't luck out and end up with a perfectly shifting unit,of course it flares for the 2-3 shift in drive,but seems to be better if shifted manually at part throttle.I realize that I will likely need to pull it out and start over again,but would appreciate any areas to have a closer look at.BTW,this is in my LS Toyota Supra swap,I'm pretty sure the wiring, tune and shifter are correct,but there always is the chance I'm overlooking something there as well.
 10-23-2015, 09:46 AM
#2
Moderator
See my post #2 for a "Level 2" type rebuild:
https://ls1tech.com/forums/automatic...arts-list.html
The flare is likely due to leakage in the 3rd apply circuit combined with too small a hole in the separator plate.
In earlier threads I often mentioned replacing the 3rd accumulator checkball in the servo area. Couple pro builders said it wasn't that common a problem, but leakage between the input shaft and input drum was more common and often overlooked.
At a minimum I recommend using a 4L65E rebuild kit for every 4L60E rebuild. The only difference is that the 4L65E kit has the better 7 friction 3/4 clutch; the kit only costs $10 more. Of course, even better is to spring for the best BW HiEnergy frictions which won't come in a basic kit.
However, the vast majority of 3/4 clutch problems after a rebuild are due to shortcuts taken causing leakage in the 3rd apply circuit, and not the choice of frictions. IMHO, some people spent too much time selecting the "perfect" parts and not enough time/money for a careful assembly.
10-23-2015, 12:54 PM
#3
TECH Junkie
Its good to hear that you're doing your own trans. Too many people are more than ready to tear down an engine, do a cam swap, etc but avoid transmissions like they are the plague. There's not as much black magic involved as people seem to think.
To solve your 2-3 flare, do as mrvedit said and find/fix leakages in the 3rd apply circuit.
To help with the leak, I use molded rubber pistons rather than o-ring type. I also prefer the one-piece teflon seals on the input shaft. They are more time consuming to install but worth it to me. I usually let them sit in hot water (i use an old dingy coffee maker in the shop), install them on the shaft, then use a round clamp to hold them tight while they cool back down on the shaft. I've seen too many failures/leaks from the split type teflons. just something to consider for next time
10-23-2015, 09:42 PM
#4
TECH Fanatic

I agree with the 3-4 clutch circuit leaks!,
Though the 3rd accumulator Capsule needs to be checked! And the check ball reseated with a drift if leaking, Retest....If still leaking, Replace the capsule.
Air test the Input Drum while still assembled, The Feed hole between the 2 sealing rings closest to the input drum is the 3-4 clutch....A picture to help you out, I use Solvent out of my parts washer to perform this test, ATF may be easiest for you.
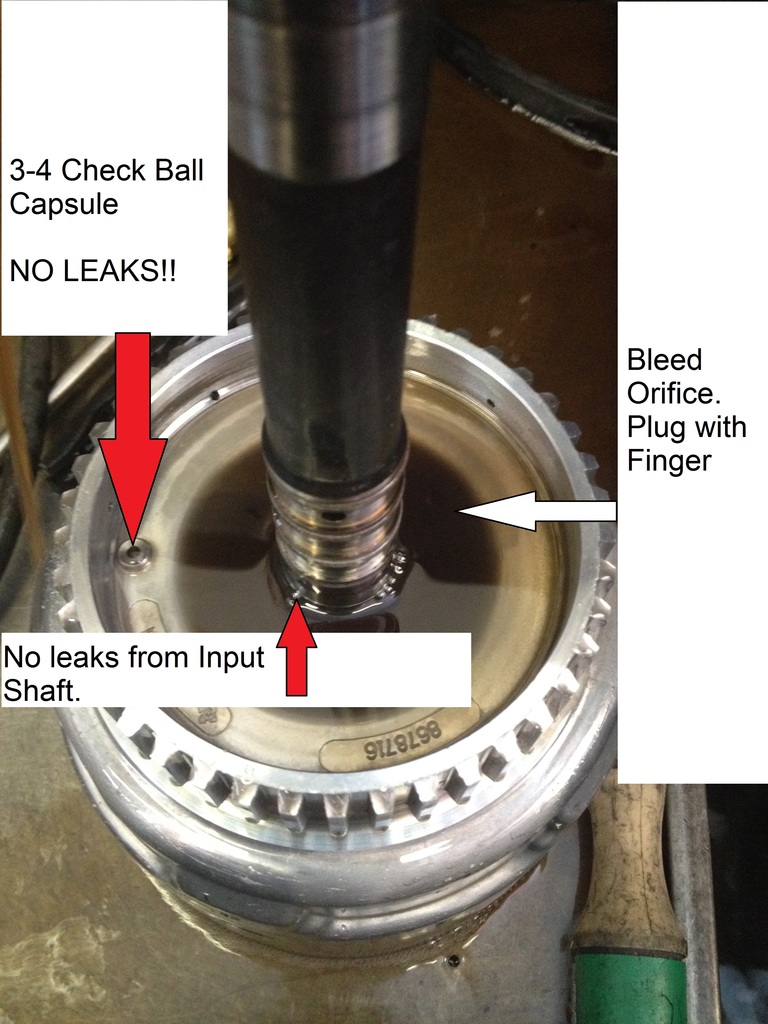
I don't bother much with testing this anymore, I'm naturally proactive about it now, Put the bare Input Drum in your Dishwasher, Pull it out while still HOT, Press the Input shaft out, Half the time, I pull them out of my trans washing machine & pull the Input shaft out by hand (Wearing Gloves)
Apply a liberal amount of Loctite 638 Retainer Compound on the splines & the machined area where the 3 cross drilled holes are.
Press the Input shaft back in the Input drum. A Sonnax reinforcement sleeve kit is highly recommended installed right after the Input shaft gets pressed in.
Let the Loctite cure for 24 hours.
Bonded 3-4 piston & Solid Teflon seals are good items that I use 100%....But I could build a 4L60E with a Aluminum 3-4 piston & Scarf cut sealing rings & it will live & not have a 2-3 cut-loose.
The Band release vs 3-4 apply timing is off, It may be a 3rd circuit leak, It may also be the Band getting knocked off too fast.....Did you install a Shift kit? 2nd piston size? Separator plate hole sizes?
10-24-2015, 08:57 AM
#5
Moderator
clinebarger: Thank you for the great picture and detailed description.
The fact that you can often pull the input shaft out by hand will hopefully convince more builders of the need to seal and reinforce this area.
As you imply, an air test doesn't fully test this area as full hydraulic pressure will be much higher at around 225 psi.
The fact that you can often pull the input shaft out by hand will hopefully convince more builders of the need to seal and reinforce this area.
As you imply, an air test doesn't fully test this area as full hydraulic pressure will be much higher at around 225 psi.
10-24-2015, 01:44 PM
#6
Thanks all for taking the time,extra thanks to clinebarger for the detailed test and pics for the input shaft,this is one issue I was unaware of and did not check/test.I did use bonded pistons and the Transgo HD2 kit and followed their directions,also used the videos on transmissionbench.com for instruction and the leak/air tests shown there,however that was about six months ago and some of the details are a bit fuzzy now.
10-24-2015, 10:48 PM
#7
TECH Fanatic
clinebarger: Thank you for the great picture and detailed description.
The fact that you can often pull the input shaft out by hand will hopefully convince more builders of the need to seal and reinforce this area.
As you imply, an air test doesn't fully test this area as full hydraulic pressure will be much higher at around 225 psi.
The fact that you can often pull the input shaft out by hand will hopefully convince more builders of the need to seal and reinforce this area.
As you imply, an air test doesn't fully test this area as full hydraulic pressure will be much higher at around 225 psi.
Thanks all for taking the time,extra thanks to clinebarger for the detailed test and pics for the input shaft,this is one issue I was unaware of and did not check/test.I did use bonded pistons and the Transgo HD2 kit and followed their directions,also used the videos on transmissionbench.com for instruction and the leak/air tests shown there,however that was about six months ago and some of the details are a bit fuzzy now.