Lightweight battery (Odyssey PC680) install
 07-24-2016, 12:27 AM
#1
TECH Addict
Thread Starter
iTrader: (19)
Join Date: Aug 2007
Location: Where the Navy tells me to go
Posts: 2,398
Received 106 Likes
on
88 Posts

I actually started this project a number of months ago, but never started a thread here.
I have an Odyssey PC680 battery in my Subaru. I bought the battery used while the car was dead (commencing an engine swap), and that car hasn't run in ~2-1/2 years, so I've never actually used the battery. It seems to hold a charge just fine, but it would be nice to try it out in a car. It would also be nice to drop 20# or so off the front end of the Cadillac, so I figured I would see about putting it in the V. My intention was to do so with as little butchering of the car as possible, so I could go back to a conventional battery if the PC680 doesn't work out, and to do this relatively affordably. If the PC680 does work out, I may move on to trying one of the newer generation lithium batteries that only weigh 4 or 5# (compared to ~15# for the PC680).
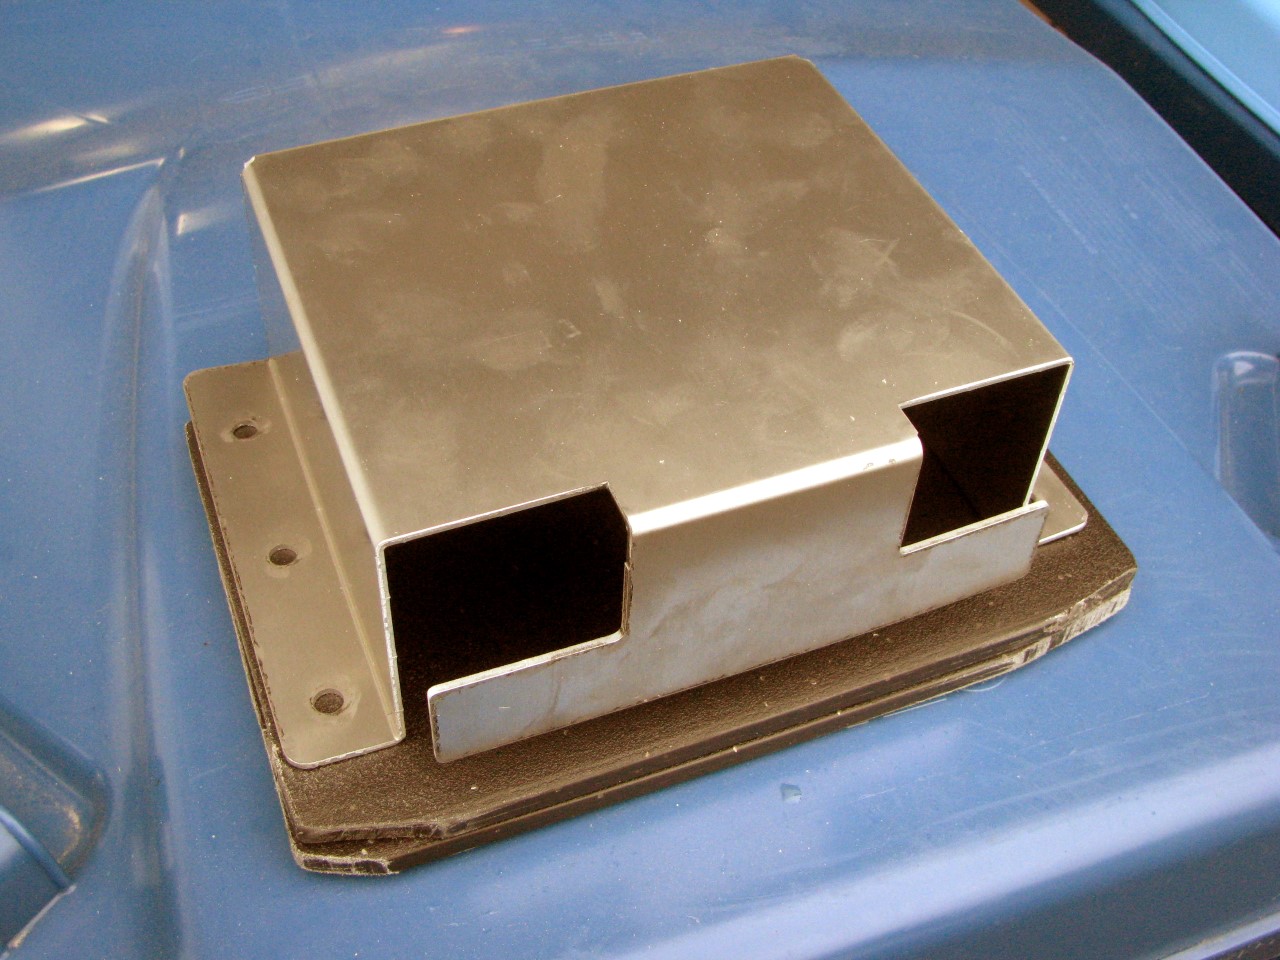
When I was figuring out how to mount the battery in my Subaru I had done some shopping around for brackets, so I knew what sorts of things were available. I suppose if was really intent on doing this affordably, I could've just made my own hold-down bracket, but instead I bought the aluminum bracket seen in the pics below. That bracket was pretty much what I had in mind all along, as it would allow the PC680 to lay down on the stock battery tray, putting the terminals in roughly the same positions as the stock battery.
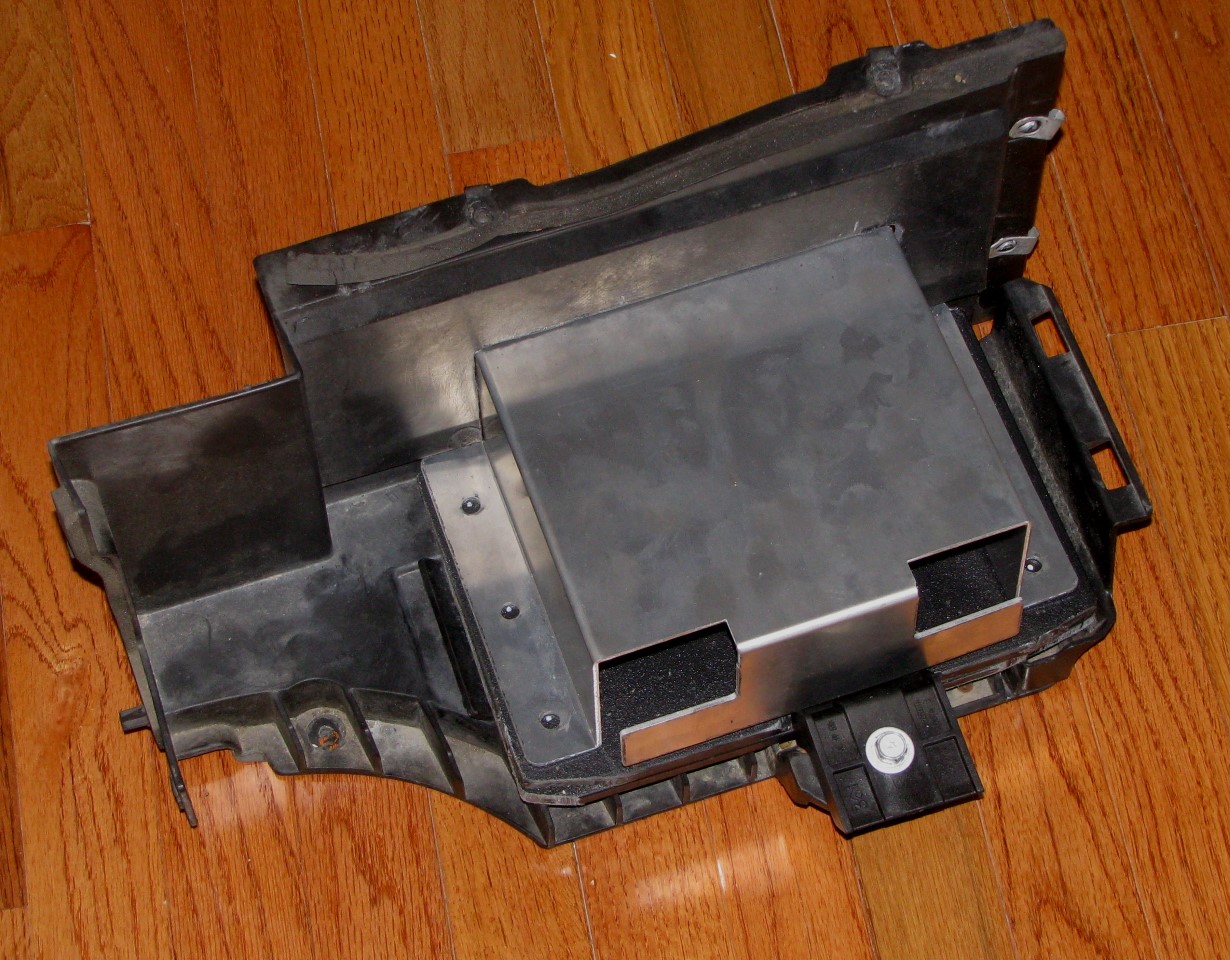
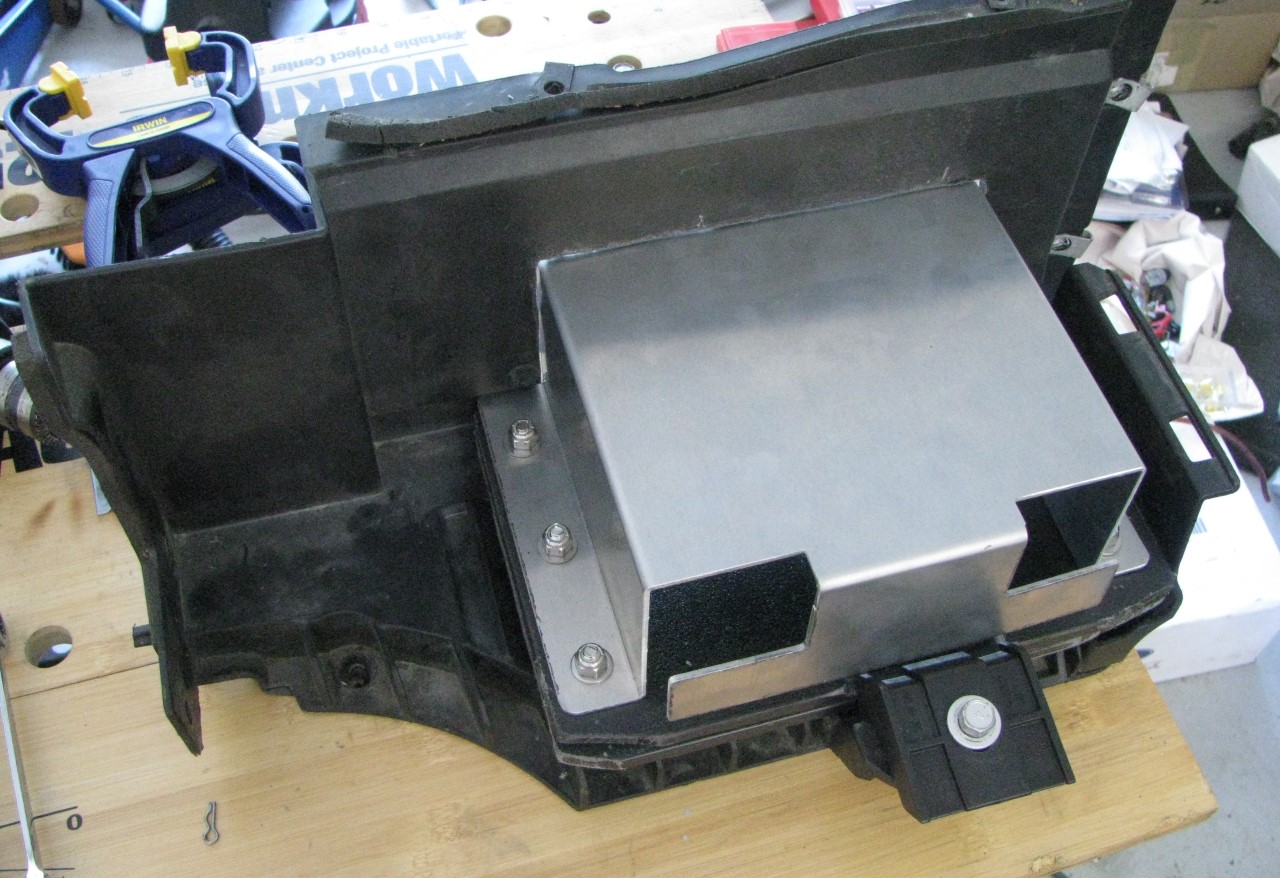
I got the bracket and put it in place on the stock battery tray:

As you can see, if fits into place quite nicely. However, I didn't want to mount the bracket directly to the battery tray (which wouldn't have really worked, anyway), I wanted to mount the bracket to some sort of base that would engage the battery tray and be held in place just like a normal battery. I had seen a couple mentions of using Odyssey batteries, and PM'd heavymetals about it; he suggested using plastic cutting board material. Ah, clever idea! Unfortunately, the only black cutting board I could find has a speckled pattern on it, but in the end it'll be almost completely covered, so it shouldn't matter.
I picked up the cutting board and put my normal battery on it to trace out the bottom profile:
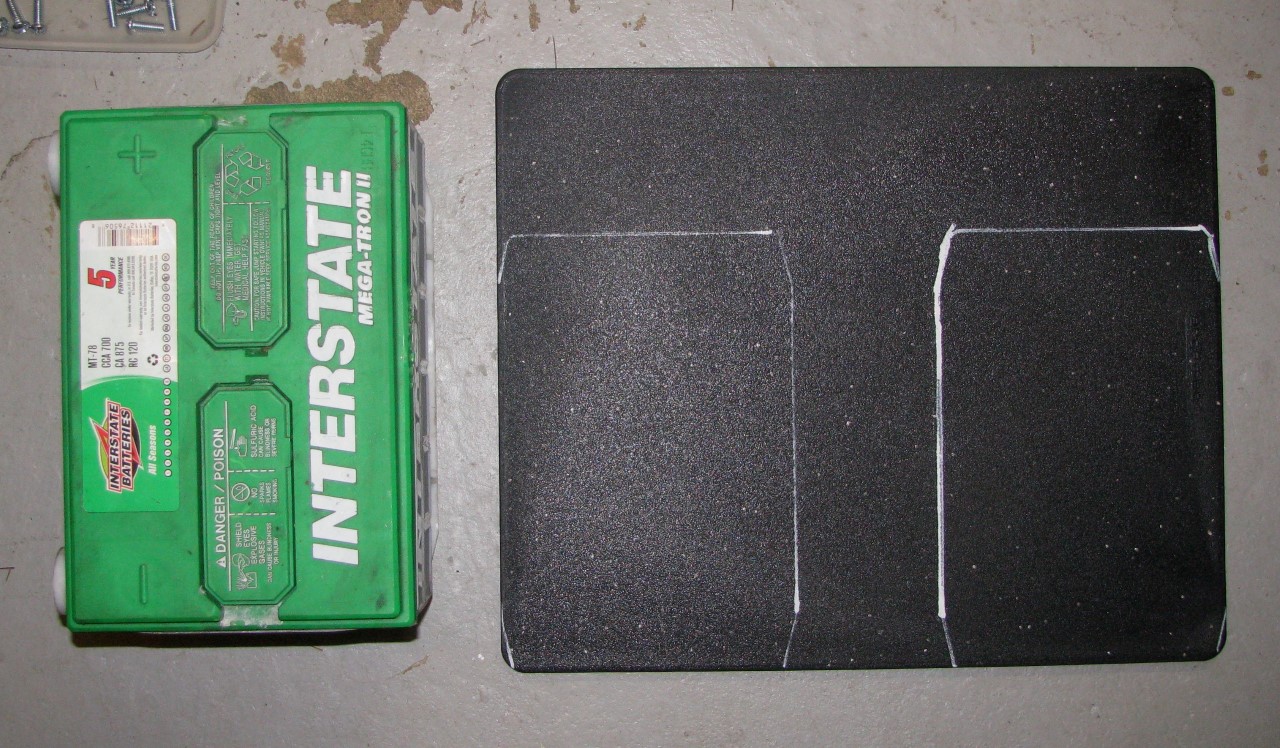
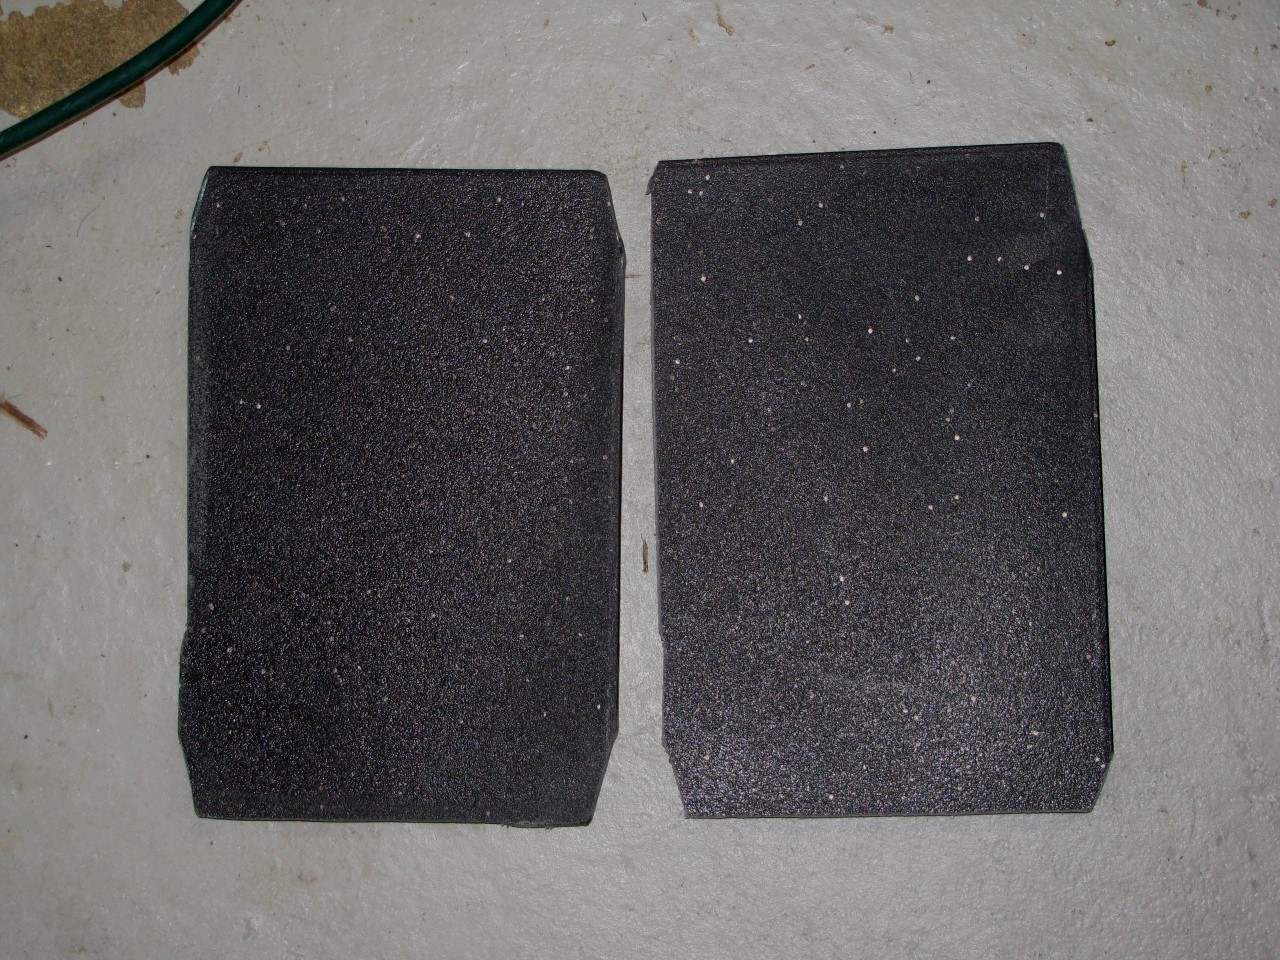
I originally was only planning on using a single piece as the base, I marked out the two just so I could have a back-up. I then decided to use them both, as you'll see in subsequent pics. Cutting the stuff was quite the pain in the *** - I ended up using a combination of Dremel, hacksaw, and good ol' wood handsaw. The hacksaw worked well, but didn't have much directional control, so my cuts kept trying to go off at an angle; the wood handsaw cut straighter, so the long cuts were done with that, and then I trimmed things with the Dremel and hacksaw. As you can see in the above pic, the two parts didn't come out real pretty , but I cleaned them up a bit after that pic, and they'll do the trick just fine.
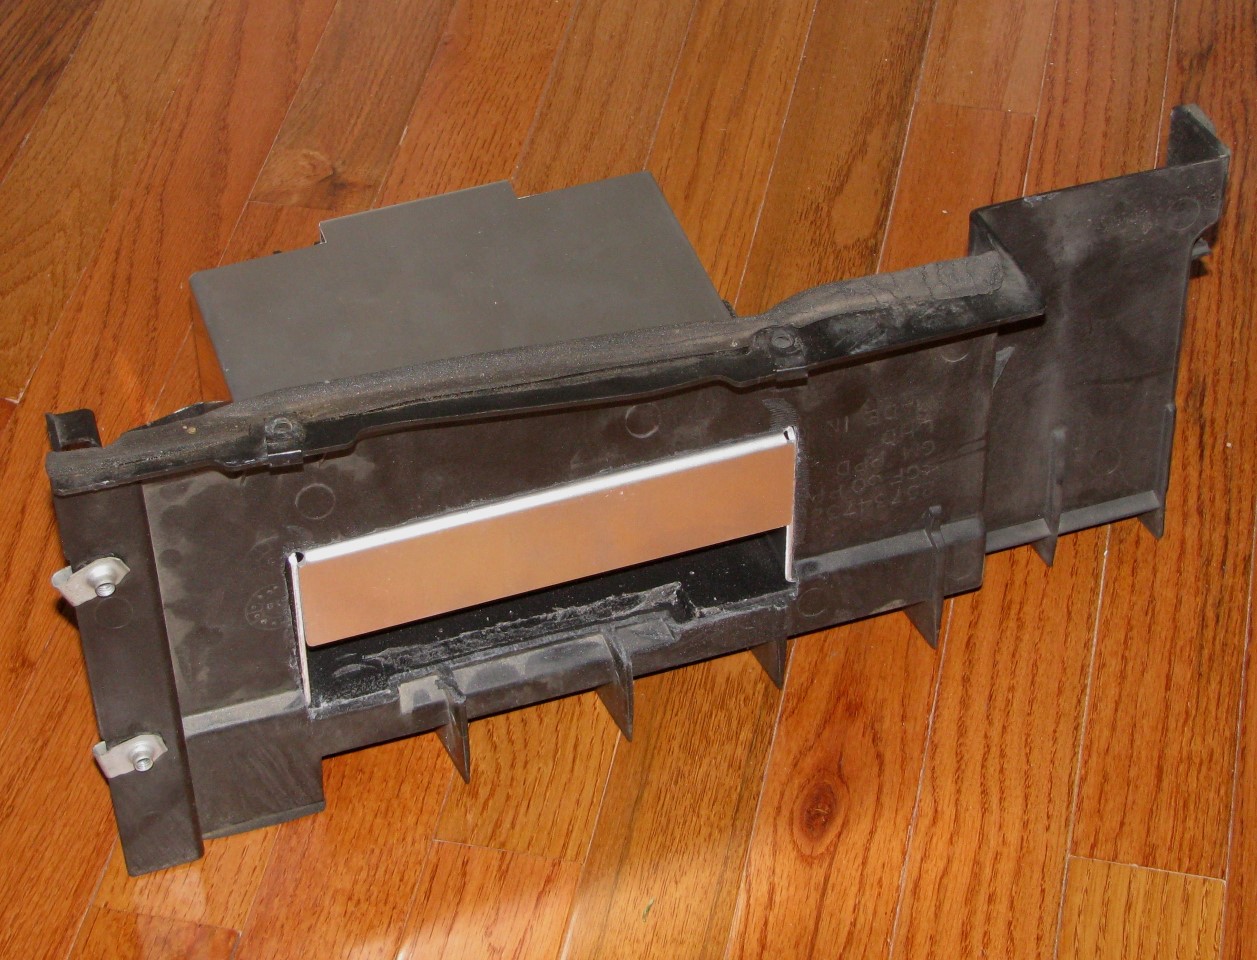
In the first pic up above you can see that the aluminum battery bracket protruded just a bit too far forward, which meant that the stock battery hold-down bracket wouldn't work - it had nowhere to go. To get the hold-down in there, I had to move the battery to the rear a bit. To do that I chopped a hole in the back of the stock battery tray. That's contrary to my "as little butchering as possible", but I picked up a spare battery tray for cheap, so that's not a big deal.
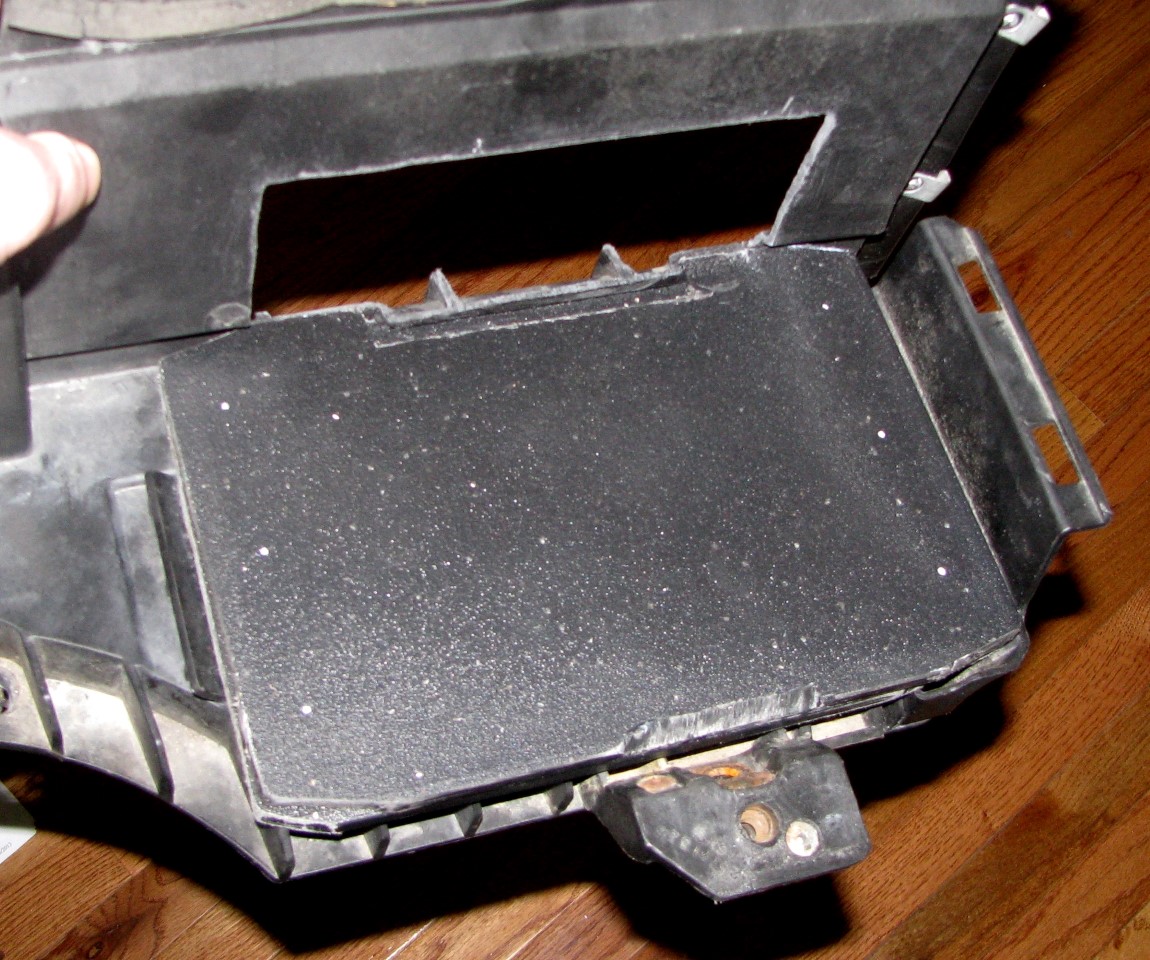
That hole actually serves 2 purposes - not only does it allow the battery to slide back a little, but it also constrains any upward movement of the battery. (There's a hump that protrudes from the back of the battery tray that, combined with the hold-down bracket, is what keeps the stock battery from being able to move up. The cutting board fits under that hump, but it's not a tight fit, so there was some vertical movement. With the "window" cut into the tray to fit tightly around the battery bracket, now there's no vertical movement.)
You can see in the above pic that I beveled the edge of the upper cutting board piece - that's where the hold-down bracket comes to rest. You can also see back at the rear of the tray that I cut a strip out of the upper cutting board piece to allow it to sit flush at the back of the track (around the hump).
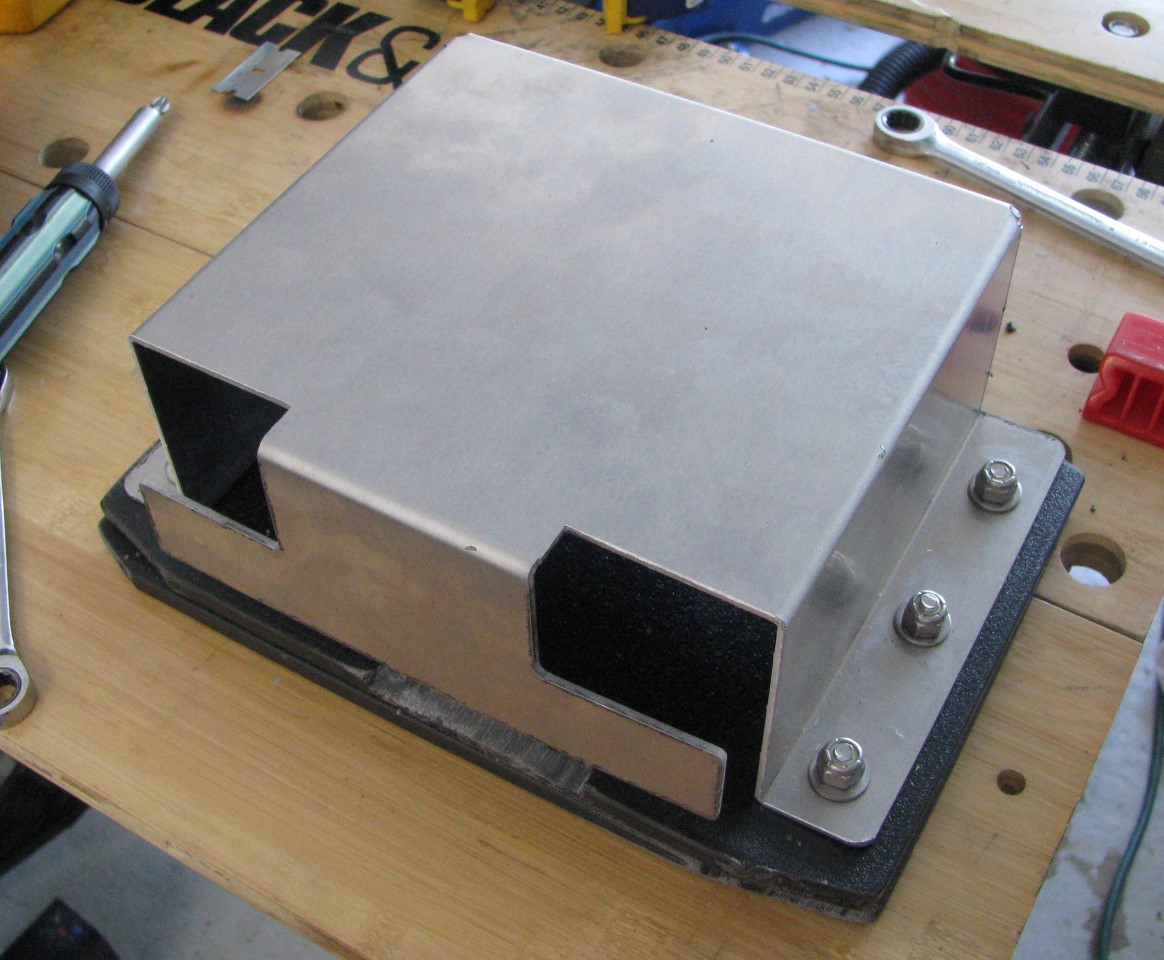
Here's how it mocks up so far:
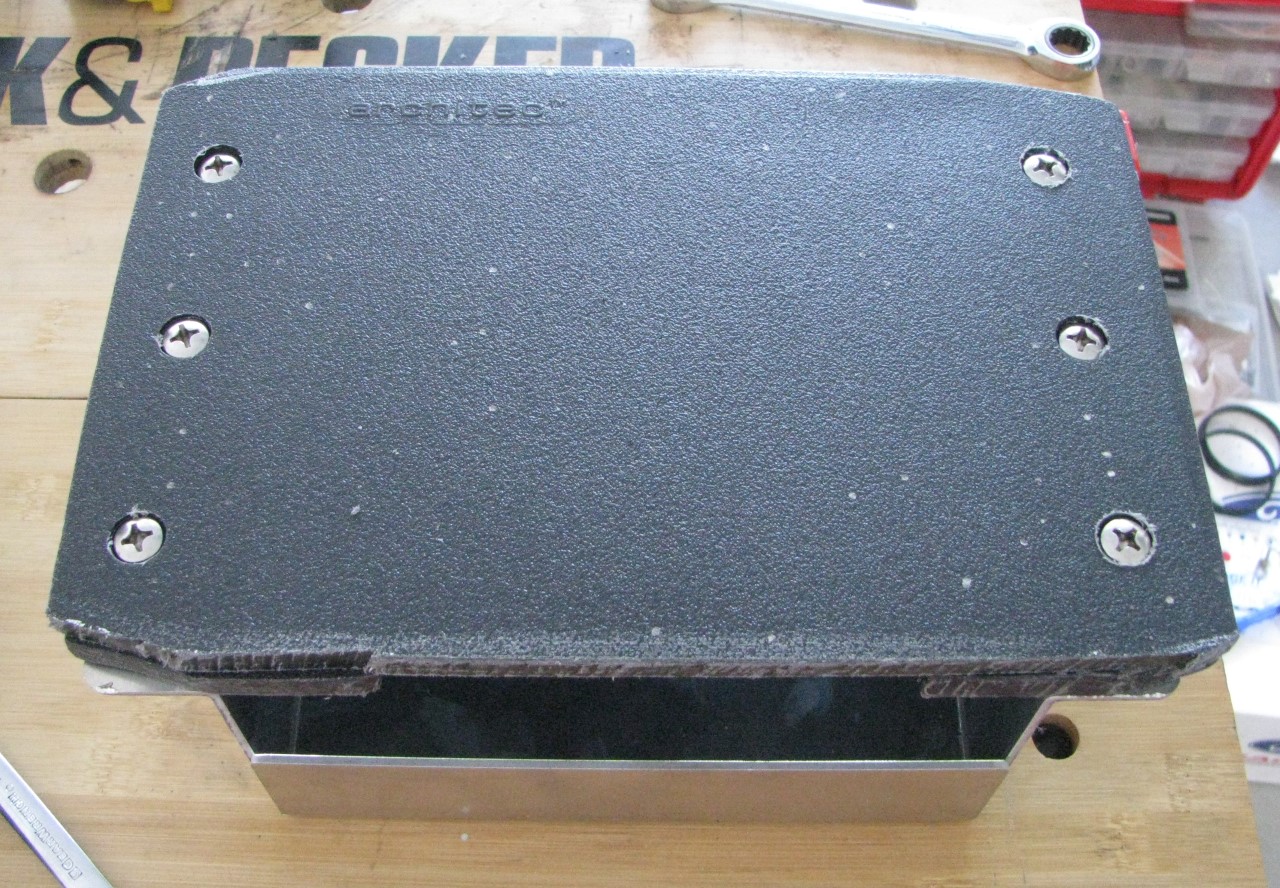
I need to drill the mounting holes through the cutting boards and then I can bolt the battery bracket in place. The bolts will come up from the bottom - I'll be counter-sinking the bolt holes in the lower cutting board and using oval head machine screws.
Once I have the car back, I can see about what needs to be done to connect the stock battery cables to the PC680 and then give this a go. I'm not supposed to get the car back until the 24th, and probably won't fiddle with this until that following weekend, so it'll be a couple weeks before I can finish this.
I have an Odyssey PC680 battery in my Subaru. I bought the battery used while the car was dead (commencing an engine swap), and that car hasn't run in ~2-1/2 years, so I've never actually used the battery. It seems to hold a charge just fine, but it would be nice to try it out in a car. It would also be nice to drop 20# or so off the front end of the Cadillac, so I figured I would see about putting it in the V. My intention was to do so with as little butchering of the car as possible, so I could go back to a conventional battery if the PC680 doesn't work out, and to do this relatively affordably. If the PC680 does work out, I may move on to trying one of the newer generation lithium batteries that only weigh 4 or 5# (compared to ~15# for the PC680).
When I was figuring out how to mount the battery in my Subaru I had done some shopping around for brackets, so I knew what sorts of things were available. I suppose if was really intent on doing this affordably, I could've just made my own hold-down bracket, but instead I bought the aluminum bracket seen in the pics below. That bracket was pretty much what I had in mind all along, as it would allow the PC680 to lay down on the stock battery tray, putting the terminals in roughly the same positions as the stock battery.
I got the bracket and put it in place on the stock battery tray:
As you can see, if fits into place quite nicely. However, I didn't want to mount the bracket directly to the battery tray (which wouldn't have really worked, anyway), I wanted to mount the bracket to some sort of base that would engage the battery tray and be held in place just like a normal battery. I had seen a couple mentions of using Odyssey batteries, and PM'd heavymetals about it; he suggested using plastic cutting board material. Ah, clever idea! Unfortunately, the only black cutting board I could find has a speckled pattern on it, but in the end it'll be almost completely covered, so it shouldn't matter.
I picked up the cutting board and put my normal battery on it to trace out the bottom profile:
I originally was only planning on using a single piece as the base, I marked out the two just so I could have a back-up. I then decided to use them both, as you'll see in subsequent pics. Cutting the stuff was quite the pain in the *** - I ended up using a combination of Dremel, hacksaw, and good ol' wood handsaw. The hacksaw worked well, but didn't have much directional control, so my cuts kept trying to go off at an angle; the wood handsaw cut straighter, so the long cuts were done with that, and then I trimmed things with the Dremel and hacksaw. As you can see in the above pic, the two parts didn't come out real pretty
, but I cleaned them up a bit after that pic, and they'll do the trick just fine.In the first pic up above you can see that the aluminum battery bracket protruded just a bit too far forward, which meant that the stock battery hold-down bracket wouldn't work - it had nowhere to go. To get the hold-down in there, I had to move the battery to the rear a bit. To do that I chopped a hole in the back of the stock battery tray. That's contrary to my "as little butchering as possible", but I picked up a spare battery tray for cheap, so that's not a big deal.
That hole actually serves 2 purposes - not only does it allow the battery to slide back a little, but it also constrains any upward movement of the battery. (There's a hump that protrudes from the back of the battery tray that, combined with the hold-down bracket, is what keeps the stock battery from being able to move up. The cutting board fits under that hump, but it's not a tight fit, so there was some vertical movement. With the "window" cut into the tray to fit tightly around the battery bracket, now there's no vertical movement.)
You can see in the above pic that I beveled the edge of the upper cutting board piece - that's where the hold-down bracket comes to rest. You can also see back at the rear of the tray that I cut a strip out of the upper cutting board piece to allow it to sit flush at the back of the track (around the hump).
Here's how it mocks up so far:
I need to drill the mounting holes through the cutting boards and then I can bolt the battery bracket in place. The bolts will come up from the bottom - I'll be counter-sinking the bolt holes in the lower cutting board and using oval head machine screws.
Once I have the car back, I can see about what needs to be done to connect the stock battery cables to the PC680 and then give this a go. I'm not supposed to get the car back until the 24th, and probably won't fiddle with this until that following weekend, so it'll be a couple weeks before I can finish this.
 07-24-2016, 12:30 AM
#2
TECH Addict
Thread Starter
iTrader: (19)
Join Date: Aug 2007
Location: Where the Navy tells me to go
Posts: 2,398
Received 106 Likes
on
88 Posts
^^^ That was all typed up about 2 months ago, in mid-May when my car was in the body shop after a fender-bender. Here's this weekend's update...
So, "a couple weeks" stretches to a couple months, and here we are.
I drilled the holes in the cutting board a few weeks back and bolted everything together outside the car to verify it all fit. Good to go there.
I also pulled the full-size battery out and verified the stock battery cables would attach to the SAE terminals on the Odyssey battery. In addition to being designed for use with typical clamp-on battery cables, the SAE terminals have internal threads, but I wasn't sure they were the right threads. Sure enough they are. I hooked the battery up and it started the car just fine. Hooray! However, I didn't have time to install the modified battery tray at that point, so I put the ol' Interstate Group 78 battery back in there for the time being. One thing I did make note of was that the positive battery terminal was going to be pretty close to the back of the strut tower. That was with the Odyssey battery just sitting in place directly on the stock battery tray, without the two cutting board spacers beneath. I figured that would help clearance, but I wouldn't know whether it would actually fit until I got the modified tray in the car so I could properly mount the battery.
Today I went ahead and swapped out the battery tray and finalized the install.
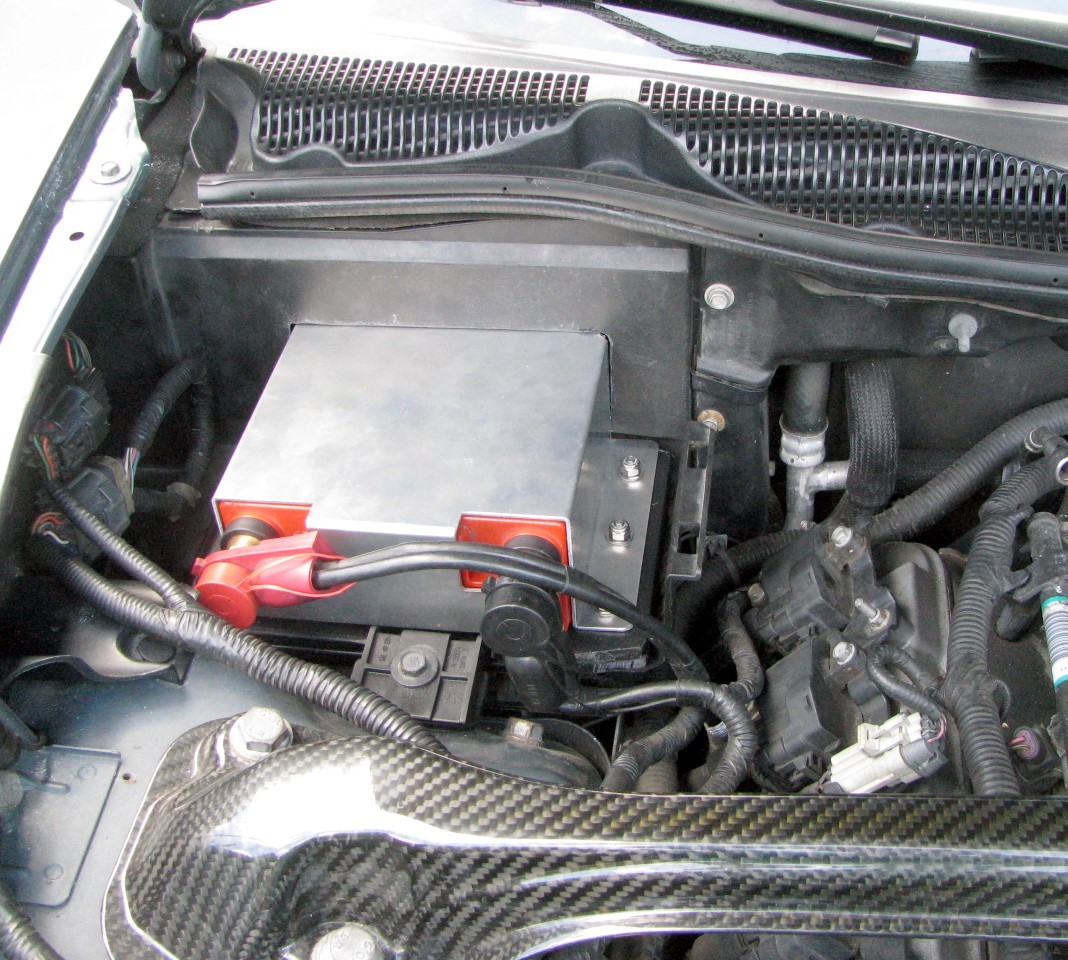
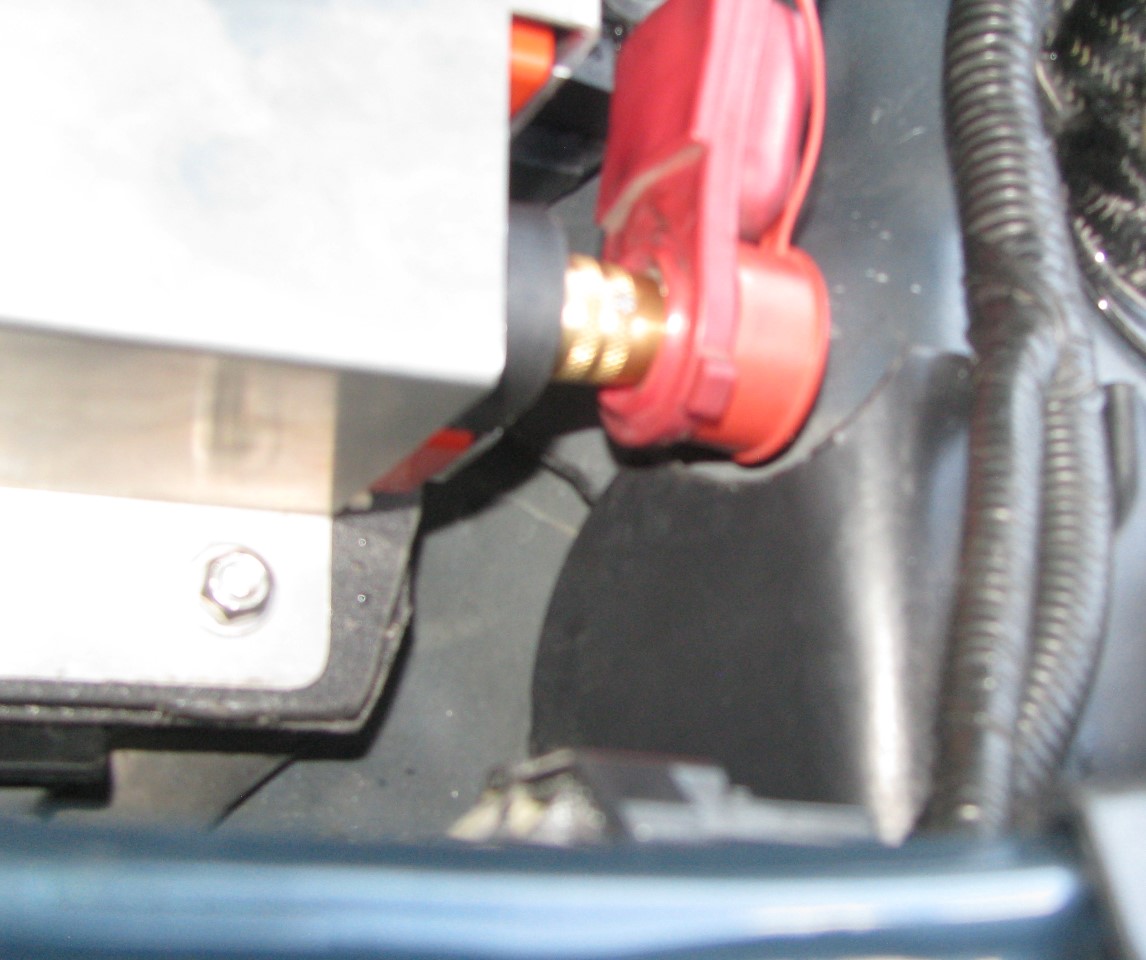
The positive battery cable does fit, but it is pretty tight. To get the red plastic cap to snap onto the terminal I had to trim a little bit off the black plastic piece that insulates/protects the back of the strut tower (sorry about the blurry pic):
I've started the car a few times and the Odyssey PC680 has no issue at all - the engine fires right up. I didn't expect there to be any issues, as there are plenty of folks using these little batteries on various race cars with high CR race motors, but it's nice to get it in my car and confirm that it works in my application. A nice 21# weight savings. I'm sure that'll be good for 10sec a lap at VIR!
So, "a couple weeks" stretches to a couple months, and here we are.
I drilled the holes in the cutting board a few weeks back and bolted everything together outside the car to verify it all fit. Good to go there.
I also pulled the full-size battery out and verified the stock battery cables would attach to the SAE terminals on the Odyssey battery. In addition to being designed for use with typical clamp-on battery cables, the SAE terminals have internal threads, but I wasn't sure they were the right threads. Sure enough they are. I hooked the battery up and it started the car just fine. Hooray! However, I didn't have time to install the modified battery tray at that point, so I put the ol' Interstate Group 78 battery back in there for the time being. One thing I did make note of was that the positive battery terminal was going to be pretty close to the back of the strut tower. That was with the Odyssey battery just sitting in place directly on the stock battery tray, without the two cutting board spacers beneath. I figured that would help clearance, but I wouldn't know whether it would actually fit until I got the modified tray in the car so I could properly mount the battery.
Today I went ahead and swapped out the battery tray and finalized the install.
The positive battery cable does fit, but it is pretty tight. To get the red plastic cap to snap onto the terminal I had to trim a little bit off the black plastic piece that insulates/protects the back of the strut tower (sorry about the blurry pic):
I've started the car a few times and the Odyssey PC680 has no issue at all - the engine fires right up. I didn't expect there to be any issues, as there are plenty of folks using these little batteries on various race cars with high CR race motors, but it's nice to get it in my car and confirm that it works in my application. A nice 21# weight savings.
I'm sure that'll be good for 10sec a lap at VIR!  07-25-2016, 12:19 PM
#6
TECH Addict
Thread Starter
iTrader: (19)
Join Date: Aug 2007
Location: Where the Navy tells me to go
Posts: 2,398
Received 106 Likes
on
88 Posts
This battery was a few years old when I bought it, so it'll be interesting to see how long it lasts. I got it cheap, so no worries if I have to buy another.
07-26-2016, 10:44 AM
#7
Teching In
Join Date: Mar 2016
Location: Orlando, FL
Posts: 24
Likes: 0
Received 0 Likes
on
0 Posts
Nice write up! Looks very clean. We've used Li batteries on our FSAE cars for a couple years now and they have been great. Help up well even with repeated chargings/dischargings.
Trending Topics
08-25-2017, 02:32 PM
#10
Teching In

Join Date: Jul 2011
Location: Atlanta, GA
Posts: 40
Likes: 0
Received 0 Likes
on
0 Posts
Awesome job on the write up as always. I've been contemplating using one of these 680 batteries myself. Hows the battery holding up so far? Also what is the model of the aluminum bracket?
08-25-2017, 05:32 PM
#11
TECH Addict
Thread Starter
iTrader: (19)
Join Date: Aug 2007
Location: Where the Navy tells me to go
Posts: 2,398
Received 106 Likes
on
88 Posts
I was having issues with a draw earlier this year that would kill the battery in short order (even the full-size battery was dying overnight). Got the draw fixed a while back, but haven't reinstalled the PC680.
I'm not particularly happy with how the cables attach. In particular, the ground cable kinda feels like I'm forcing it into position - you can see in the picture of the battery installed in the car that the negative cable has to bend pretty much 90deg coming right out of the terminal. If you try to twist it to a better position (to reduce that 90deg bend), you run out of slack / room with the legs of the cable that run off to bolt up elsewhere. I haven't really done anything to try to come up with a "fix" for that.
The bracket came from Ebay, I think. I don't see the same one when I search now, but there are similar versions there. (I found more results by searching just for 680 rather than PC680.)
08-28-2017, 01:26 PM
#13
Teching In
Join Date: Jul 2011
Location: Atlanta, GA
Posts: 40
Likes: 0
Received 0 Likes
on
0 Posts
I threw my miata PC680mjt in the V this weekend, it almost wants to fit laying down. I may try to put something below the battery to raise it up so the terminals don't hit the obstructions or cut out the rear of the battery box. If anything i have in mind works i will be sure to post some pictures.