
2000 Isuzu Hombre LS1/T56


 11-05-2015, 07:04 AM
#43

Anyway, I'm waiting on fittings coming from China, I mean California, so I can relocate the rear coolant sensor... it sucks not being able to see what I'm working on, especially when I have to remove the freaking wheel just to feel it!
In the mean time, I played a little with HPT and got the wideband to read. I did a little logging and some AFR adjustment. Watching the PCM reading of ECT I'm rock steady at 198 with the massive radiator, so I counted it as good data. It pulls strong, can't wait to get serious about tuning!
11-09-2015, 09:37 AM
#44
Well, I think I've narrowed down the coolant leak... and it's not good. I applied silicone under both steam port plugs and under the passenger rear plug by the header flange. After a test drive, it was practically pouring out through the back passenger side. I can't see it, but I suspect a freeze plug on the head is toast.
When the motor was in my '00 B4C, I overheated it once. It was back in April of this year, the fan relays gave out and I got caught in traffic. No symptoms of overheating at the time, in fact I drove it 2 hours to Houston after replacing the relays with no ill symptoms. But after sitting in the shop for months with no coolant at the plug and after solving the other leaks, I suspect it popped the plug out.
So removal of the passenger head is my next move. I'm not putting 799s back on without some work done... and I don't want to have to wait for shipping both ways for porting. What's a cheap, decent flowing cathedral port head I could look at for replacement?
11-09-2015, 02:47 PM
#45
TECH Addict
You can buy a set of cnc'ed factory castings, totally assembled for ~$1500 without cores. Unless you find them used for a price that allows you to buy new springs and still save money, you probably aren't going to find anything of a better value.
If you save some pennies, or rob a couple old women, you can find some trick flow heads for about $2k, and that's pretty hard to argue with as far as results per dollar spent.
If you save some pennies, or rob a couple old women, you can find some trick flow heads for about $2k, and that's pretty hard to argue with as far as results per dollar spent.
11-09-2015, 03:44 PM
#46
You can buy a set of cnc'ed factory castings, totally assembled for ~$1500 without cores. Unless you find them used for a price that allows you to buy new springs and still save money, you probably aren't going to find anything of a better value.
If you save some pennies, or rob a couple old women, you can find some trick flow heads for about $2k, and that's pretty hard to argue with as far as results per dollar spent.
If you save some pennies, or rob a couple old women, you can find some trick flow heads for about $2k, and that's pretty hard to argue with as far as results per dollar spent.
It just sucks, I want to drive this thing so bad!
 12-20-2015, 12:12 PM
#47
Oh joy of joys! It's fixed, turns out it wasn't a head gasket or freeze plug. Due to my mailbox of an intake, I had to modify the heater core lines coming out of the firewall. To get a good seal, I originally flared the 5/8" line and put a ferrule on the 3/4" line with two hose clamps on each line, one in the cab and one in the engine bay. I mean, what a pain! They were just awful to get on.
Well, over time, the lip on the flare cut a hole in the 5/8" line. I found it when trying to move a mirror around the back of the head to verify the head gasket or freeze plug. The end of the mirror touched the underside of the hose and quickly got covered in residual coolant. Upon further inspection, it had nearly filled my HVAC box in the cab. Woof.
So I bought a new heater core and had a radiator shop cut a section of the lines out, then solder the lines back on to be nearly flush with the firewall and retaining the stock flares. I threw it in the truck yesterday, bought some new lines, bolted up the dash and threw the intake back on.
It surged wildly in the beginning, which I originally attributed to air in the fuel lines. But it kept going, and eventually I realized how low it had drawn the coolant level... I think it was surging because the water pump kept seeing air pockets! I let it cool and filled up the coolant, warmed it up and drove it home. No leaks, all is right in the world for now! Now its time to put some miles on it and work out the tune.
 nice find! have you put many miles on it yet?
12-31-2015, 02:38 PM
nice find! have you put many miles on it yet?
12-31-2015, 02:38 PM
#49
My daily commute is 7mi one way, and I've started daily driving... probably around 300 miles so far. A few quick pulls to 4-4.5K RPM so far, but still mapping the VE... I know it's really rich up top.
My immediate plans/goals are an e-brake (been parking in 1st gear since I did the Camaro brake swap), build a center console, continue on the VE table and work on rolling idle. Basically, it seems to surge badly past the target idle on both low and high ends until I reach a full stop. Worse, the surge is not consistent in magnitude and sometimes the truck will die. I'm starting into a "how to tune" book, so hopefully I find my solution somewhere in there. I need to post up some more recent pictures! Interior, engine bay, exterior... Oh yeah, and I plan to plastidip the truck soon! I've got green with a chameleon pearl in mind, all the materials are in my garage awaiting application.
My immediate plans/goals are an e-brake (been parking in 1st gear since I did the Camaro brake swap), build a center console, continue on the VE table and work on rolling idle. Basically, it seems to surge badly past the target idle on both low and high ends until I reach a full stop. Worse, the surge is not consistent in magnitude and sometimes the truck will die. I'm starting into a "how to tune" book, so hopefully I find my solution somewhere in there. I need to post up some more recent pictures! Interior, engine bay, exterior... Oh yeah, and I plan to plastidip the truck soon! I've got green with a chameleon pearl in mind, all the materials are in my garage awaiting application.
01-04-2016, 09:48 AM
#50
On The Tree

Join Date: May 2014
Posts: 123
Likes: 0
Received 0 Likes
on
0 Posts
Awesome man. I hear that dialing idle in, cold starts, hot starts...etc is the most time consuming & tedious part of tuning. Would bravada center console work for you? Seems like there would be enough room to make a cut out for a stick and still have material to fasten a shift boot to and finish the edge... would be clean. The plasti dip colors come out better than i expected, did the wheels on my lawn tractor lol. I haven't seen the chameleon in person but that would be pretty crazy on your truck. It should look cool as hell.
04-25-2016, 11:53 AM
#51
Man, I hate that my work blocks photobucket...
I made a center console for it and I've been loving having an arm rest and cup holders... as Tallahassee said, enjoy the little things!
I've made a lot of progress on the truck. VE tables are about right, though I still haven't gotten to the surging idle yet. I've got the Greg Banish DVDs now, just have to get a little time to get into them and apply the principles to the truck.
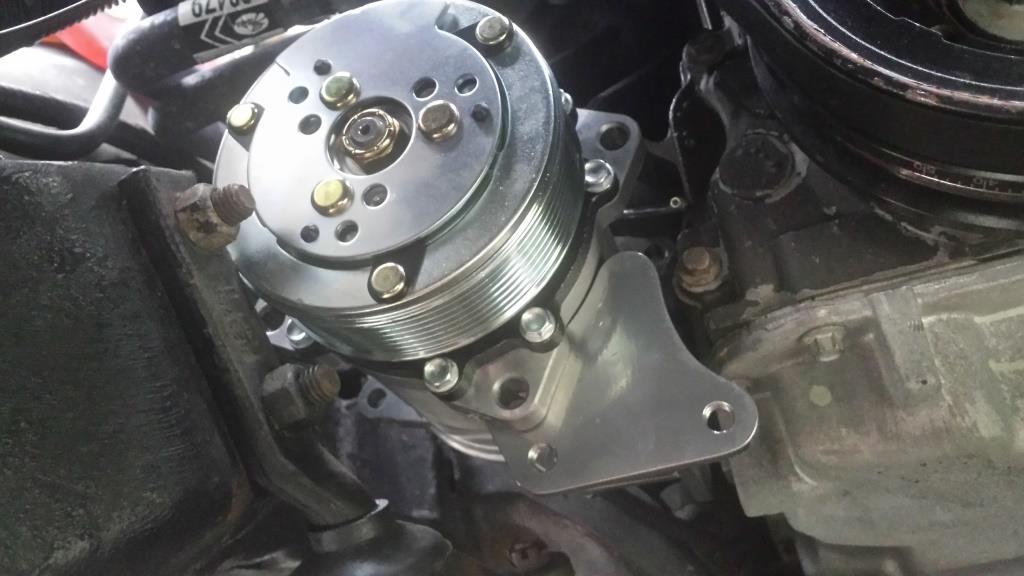
I've got about 2500 miles on the swap so far and I'm driving it near daily. I picked up an Alan Grove AC Compressor bracket that I test fit, it puts the compressor where the stocker goes but uses a 508 compressor, thus tucking it in closer to the motor. It nearly fit, I just have a little more notching to do and it'll bolt in.
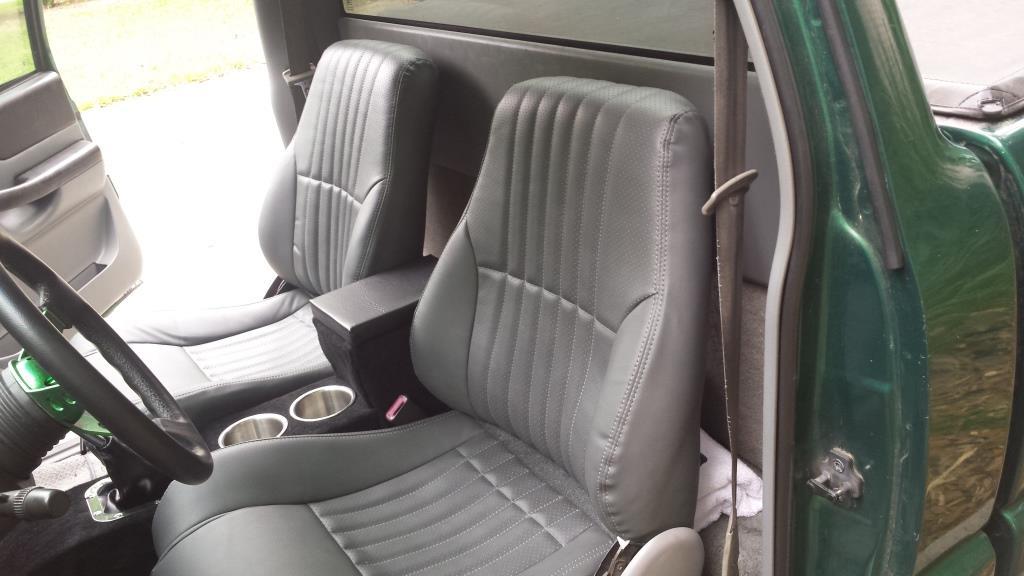
Also, the seats are out and I'm driving it around on a spare Camaro seat. Soon, I should see an upholstery kit show up for the firebird seats and they'll get thrown back in.
Other little stuff includes getting a painted hood on it, mounting a fire extinguisher in the bed, replacing the Comp Cams upgraded trunnions with Straub upgraded trunnions and a little work on the intake routing to work towards a MAF.
I made a center console for it and I've been loving having an arm rest and cup holders... as Tallahassee said, enjoy the little things!
I've made a lot of progress on the truck. VE tables are about right, though I still haven't gotten to the surging idle yet. I've got the Greg Banish DVDs now, just have to get a little time to get into them and apply the principles to the truck.
I've got about 2500 miles on the swap so far and I'm driving it near daily. I picked up an Alan Grove AC Compressor bracket that I test fit, it puts the compressor where the stocker goes but uses a 508 compressor, thus tucking it in closer to the motor. It nearly fit, I just have a little more notching to do and it'll bolt in.
Also, the seats are out and I'm driving it around on a spare Camaro seat. Soon, I should see an upholstery kit show up for the firebird seats and they'll get thrown back in.
Other little stuff includes getting a painted hood on it, mounting a fire extinguisher in the bed, replacing the Comp Cams upgraded trunnions with Straub upgraded trunnions and a little work on the intake routing to work towards a MAF.
05-26-2016, 12:13 PM
#52
I really need to get pics to work at work!
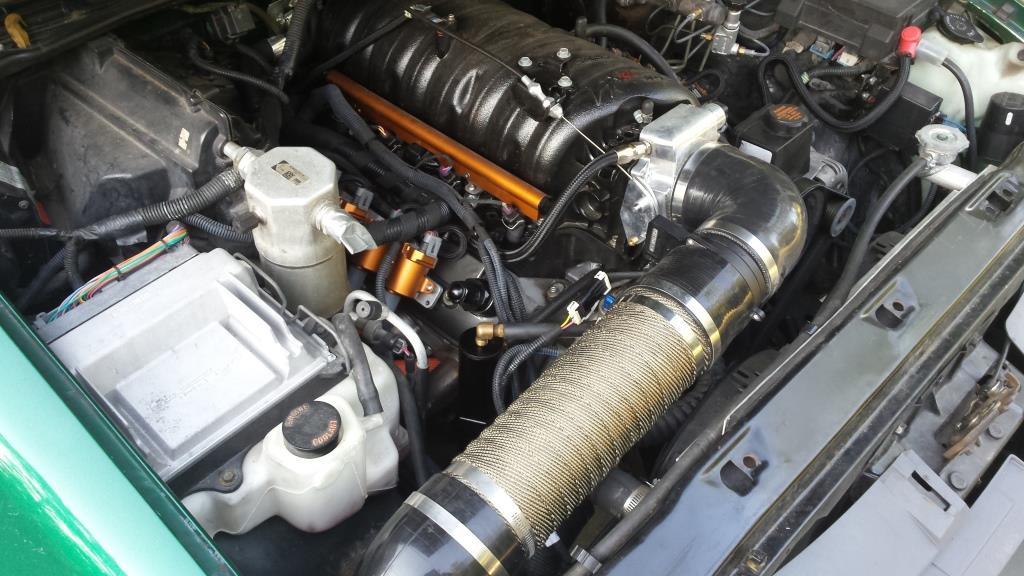
Last night, we installed the last of the AC components that I can do, the condenser. The AC setup is a Sanden 508 in the stock location with an Alan Grove bracket and a condenser for an '87 Jeep Comanche. The radiator I bought on eBay promised stock AC compressor and lines can be used... not true. So after weighing AC options for several months, I stumbled upon the Alan Grove compressor and found a relatively short, wide condenser.
The hood latch bracket required pretty heavy modification, but it's all bolted in! Now I have 2 weeks to get AC lines made for the system to get it on the Hot Rod Power Tour!
Other notables are that I now have a functioning SES light, a horn (horray!), my bed lights work, I remade the intake ducting with heat shielding, the tune is getting better and I replaced the windshield... Oh, and I recovered my 95 firebird seats with a HawksThirdGen kit without headrests, pretty nice feel.
Worthless without pics... I know. Someday I may come back and figure out how to get Photobucket to work at work.
06-04-2016, 12:58 PM
#53
Some miscellaneous pics for catch up...


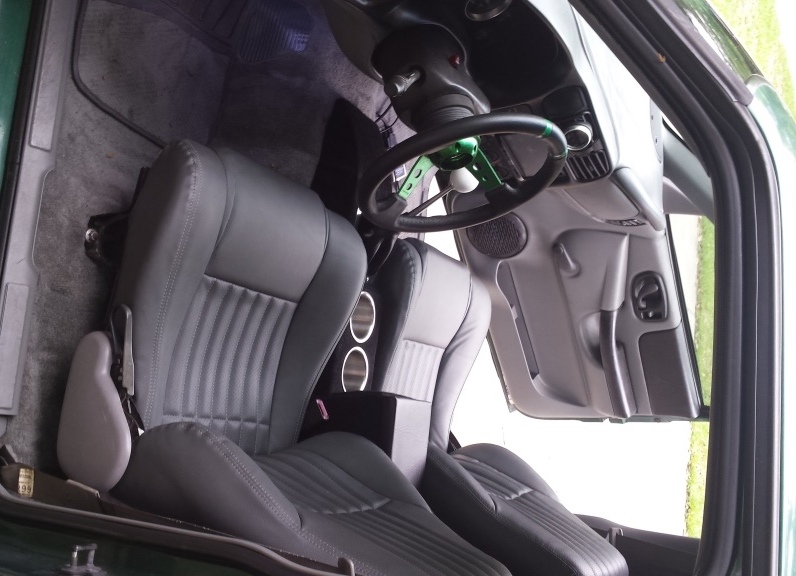

Don't worry, those caps have since been replaced... but the lack of an upper portion to the steering wheel allows me to see all my gauges, the shift light and the SES. Compromise, it's a $120 steering wheel!


Don't worry, those caps have since been replaced... but the lack of an upper portion to the steering wheel allows me to see all my gauges, the shift light and the SES. Compromise, it's a $120 steering wheel!
06-05-2016, 07:31 PM
#55
On The Tree
Join Date: Nov 2014
Location: NW Florida
Posts: 102
Likes: 0
Received 0 Likes
on
0 Posts
Nice job on the truck, motivation for my build for sure. I've got the later model Firebird seats in my truck, did you cut them down at all? They look shorter than mine in your truck and do the earlier models not have the plastic backing to the seat?
Rock
Rock
06-06-2016, 11:54 AM
#56
I don't care for the plastic cap on the back of later TA seats, so I was pleased to find these. They're stock V6 Firebird seats with a HawksThirdGen upholstery kit. I didn't cut them down, they may look shorter because I left the headrest off. I will say, they do sit lower than my 93-97 Camaro seat, and way lower than the Hombre stock seats.
09-11-2016, 09:35 PM
#57
Registered User

Join Date: Sep 2016
Posts: 1
Likes: 0
Received 0 Likes
on
0 Posts
Ok I know this is an old thread and im the newb here,but, I used to own the Hombre in this thread. Im glad to see its still on the road and not scrapped! The scratch on the right front quarter panel was from a guy keying it in high school. The totally killer spraypaint dash board and gutter mesh behind the grill was all me. (I was 16 lol) It had a Jasper rebuilt motor when I traded it in. That engine only had 30k on it when I sold it. Sounds like the new owner beat the hell out of the poor thing. Anyways, glad to see it taken care of. Any chance you would be interested in selling it?
09-12-2016, 07:36 AM
#58
Ok I know this is an old thread and im the newb here,but, I used to own the Hombre in this thread. Im glad to see its still on the road and not scrapped! The scratch on the right front quarter panel was from a guy keying it in high school. The totally killer spraypaint dash board and gutter mesh behind the grill was all me. (I was 16 lol) It had a Jasper rebuilt motor when I traded it in. That engine only had 30k on it when I sold it. Sounds like the new owner beat the hell out of the poor thing. Anyways, glad to see it taken care of. Any chance you would be interested in selling it?
Everything has a price. I wouldn't be unreasonable on the price, but it is my daily. It now has about 6.4K miles on the motor and trans swap, putting the motor somewhere in the neighborhood of 18K miles (I'd have to check the documentation). The tune is close, but I'd want to finish it before saying it's ready for another person's daily drive.
Like I said, everything has a price. In the meantime, I'll continue to enjoy surprising people on the highway
 09-12-2016, 07:41 AM
#59
Also, totally forgot to update, but the truck made it through the Hot Rod Power Tour 2016! We long hauled it, made it all 1300 miles and the return leg. It was a great trip, the truck was very comfortable with the lowering springs and Viking coilovers. Smooth, reliable, and made great gas mileage! At times, I was up to 26MPG on the highway... better than I can say for my counterparts in their '48 Chevy with a 350 small block. I swear, the only time my gas gauge went lower than 3/4 tank was when the gas station didn't have premium and I had to wait 'til the next gas stop lol!
Future plans are to get the AC wrapped up (~1 day at the AC shop, only around 1hr of work), polish the tune and keep driving! Also, repaint the top this fall, as it's suffering the sun even with regular waxes.
Future plans are to get the AC wrapped up (~1 day at the AC shop, only around 1hr of work), polish the tune and keep driving! Also, repaint the top this fall, as it's suffering the sun even with regular waxes.
10-24-2016, 08:49 AM
#60


I have a little bit of an update, I plasti dipped the truck this last weekend. This is my first time doing a whole vehicle, and I didn't have the shop space or a tent available for the job. But this weekend was perfect from a weather stand point, other than the consistent 10-20MPH wind gusts lol! It's got more texture than I wanted and there's absolutely no color shift as advertised (I added 3 packets of pearl shifts) but it'll do to preserve the roof and miscellaneous body scratches.