

1959 Biscayne 2 door wagon
 The overseas / no name brand stuff is complete junk.
 11-30-2016, 10:33 PM
#82
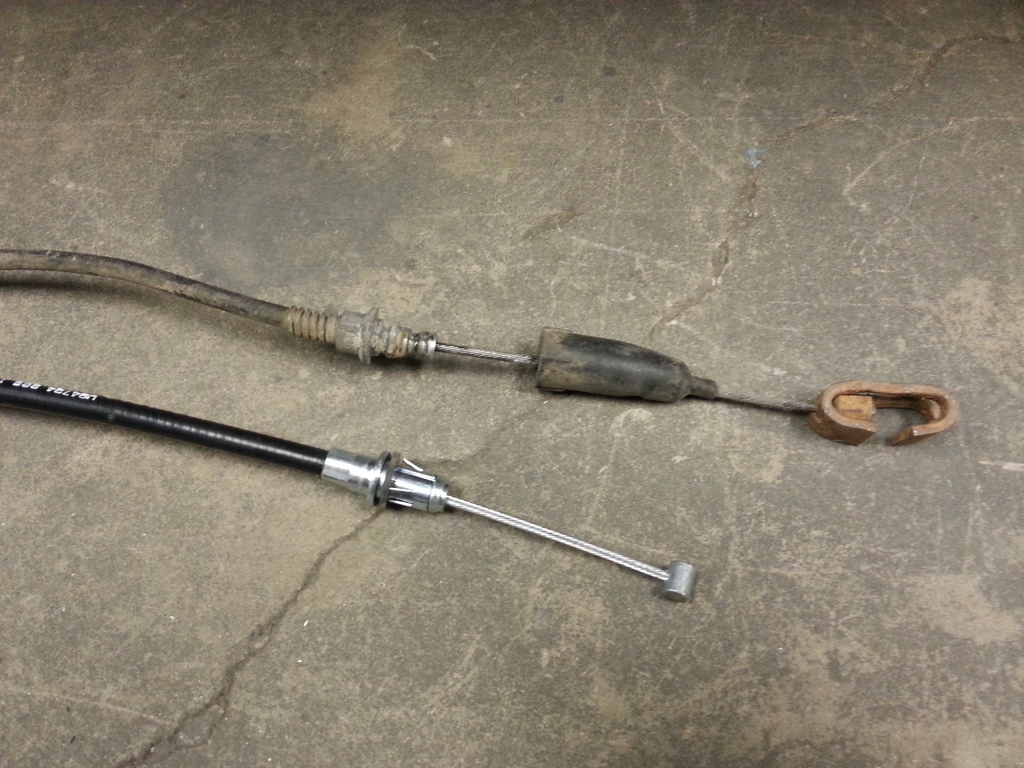
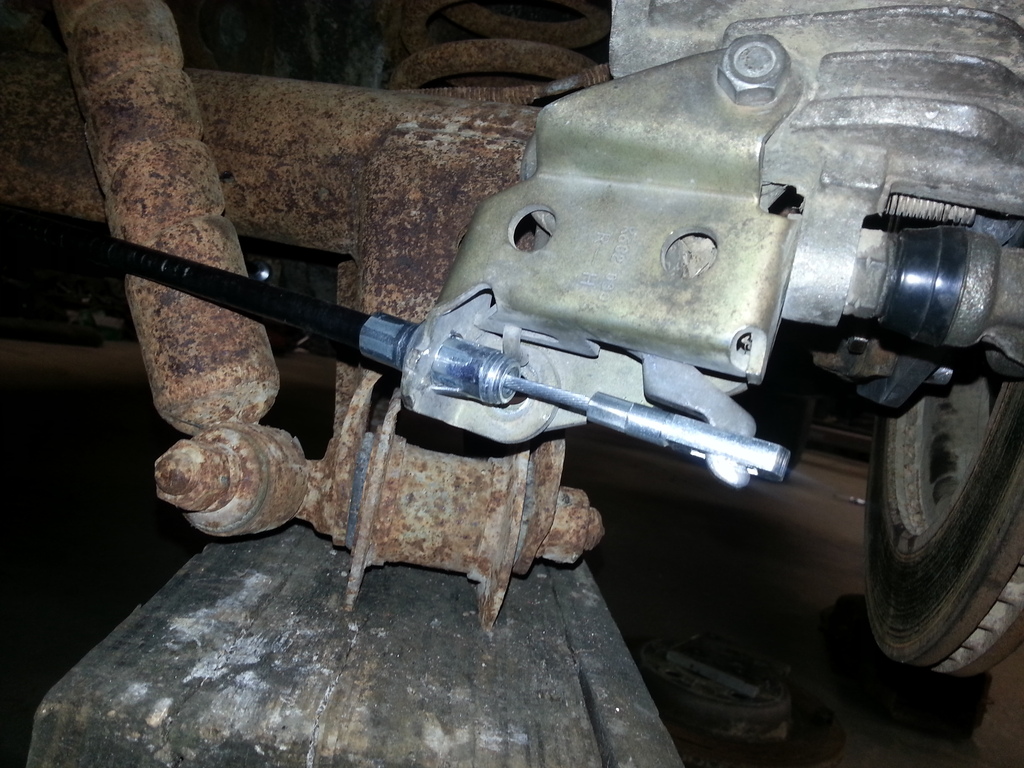
I don't know why I'm so picky about having working park brakes on my cars, I never really use them, but I seem to spend way too much time making sure they work.  I needed to make the '97 cable in the bottom of this pic, match the length of the '59 one at the top.
Anyway, the first step is to take your brand new park brake cable, and cut the end off of it...... Then slide the cable out of it. Then with a couple pairs of Vicegrips, twist one end until it comes off, it's not really that hard to do.
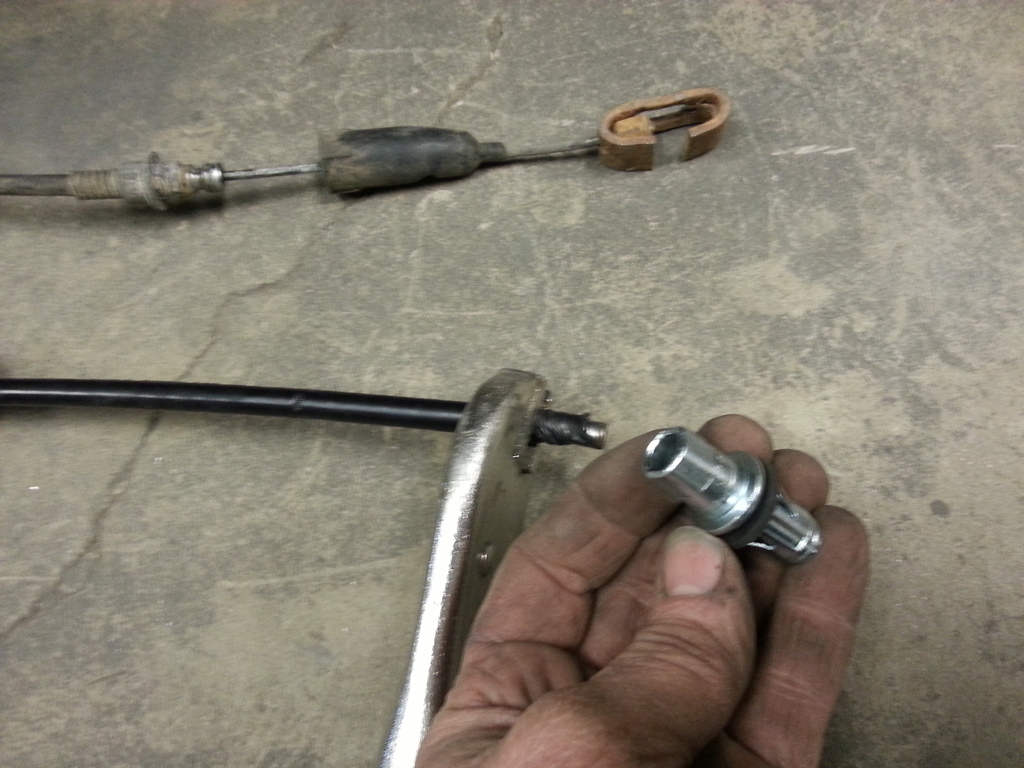
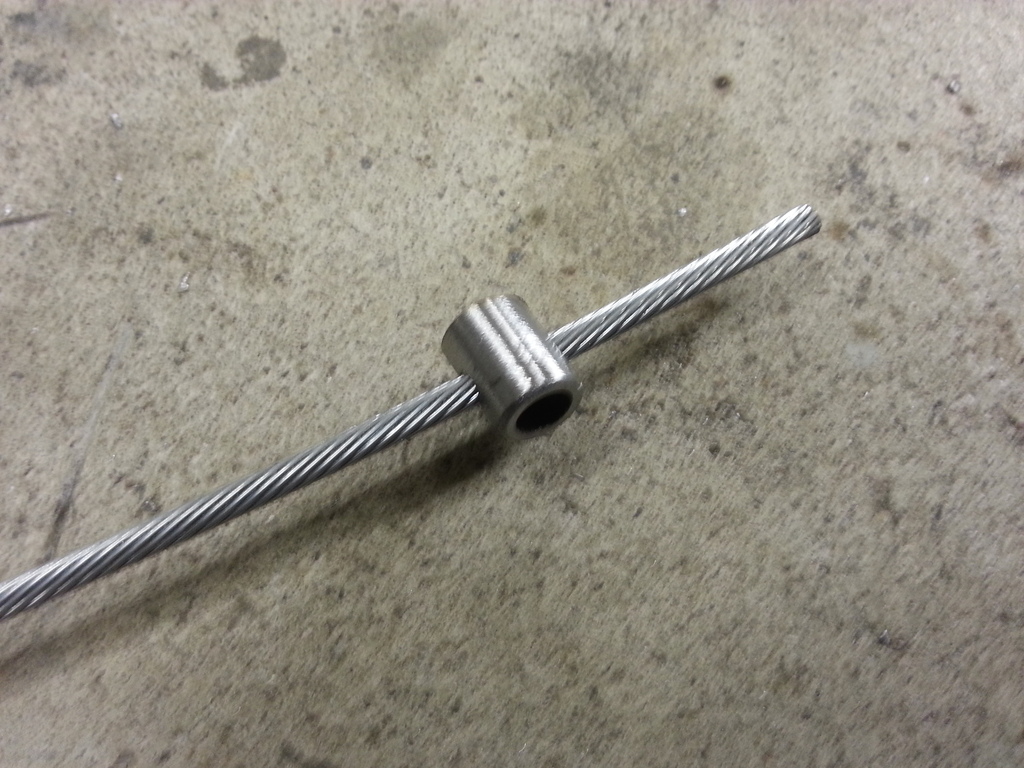
Then cut the outer cable down to the correct length, slide the inner cable back in and cut it to the correct length. After the cables are the right length, you just have to make a new end for the cable. I tried drilling out the original end that I cut off, but it just wasn't happening, that cable is tough to drill through! So I made some new ones out of some tubing I had lying around. (Probably should wash my hands if I'm going to be posting crappy close up pics of them on the internet..... )
)
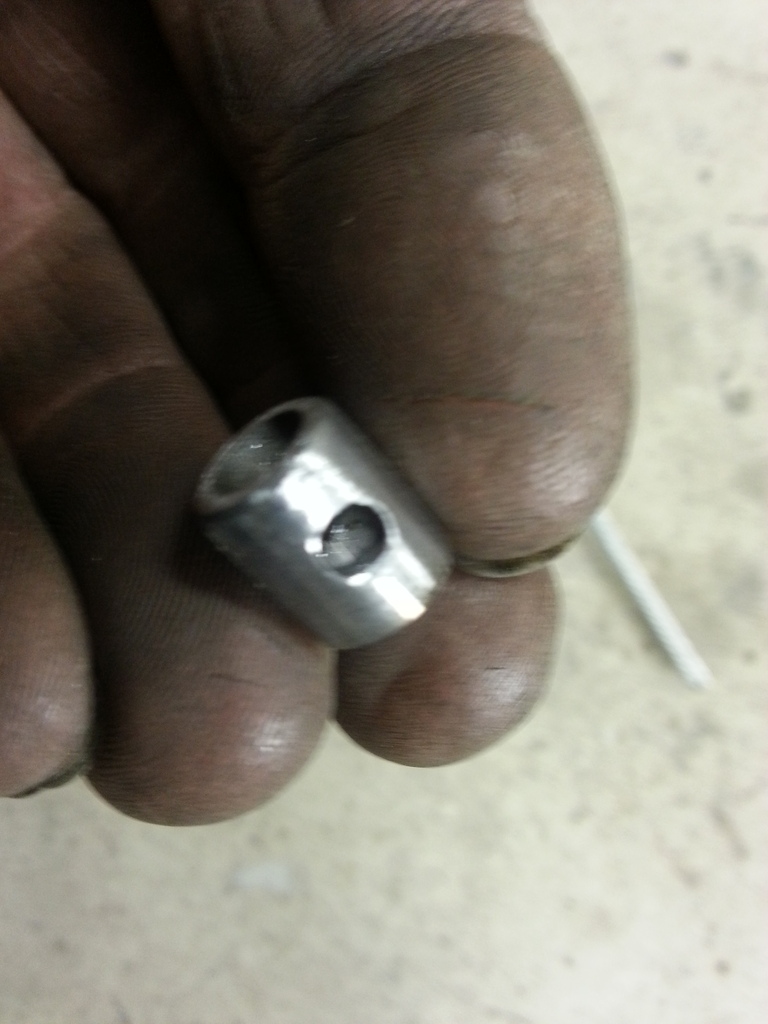
It just slides over the cable, and then I MIG'd the end of it. I tried silver solder which is supposed to work, but I felt a MIG on the end worked a little better. I did silver solder the inside of it just for good measure afterward though, it was laying there, and the part was already hot from welding so I thought why not?
One cable done next to the other one that needs to be cut down.

Brake released.

Park brake set. Works like a champ!
I needed to make the '97 cable in the bottom of this pic, match the length of the '59 one at the top.
Anyway, the first step is to take your brand new park brake cable, and cut the end off of it......
Then slide the cable out of it. Then with a couple pairs of Vicegrips, twist one end until it comes off, it's not really that hard to do.
Then cut the outer cable down to the correct length, slide the inner cable back in and cut it to the correct length. After the cables are the right length, you just have to make a new end for the cable. I tried drilling out the original end that I cut off, but it just wasn't happening, that cable is tough to drill through! So I made some new ones out of some tubing I had lying around. (Probably should wash my hands if I'm going to be posting crappy close up pics of them on the internet.....
)
It just slides over the cable, and then I MIG'd the end of it. I tried silver solder which is supposed to work, but I felt a MIG on the end worked a little better. I did silver solder the inside of it just for good measure afterward though, it was laying there, and the part was already hot from welding so I thought why not?

One cable done next to the other one that needs to be cut down.

Brake released.

Park brake set. Works like a champ!
 12-01-2016, 10:03 PM
#86
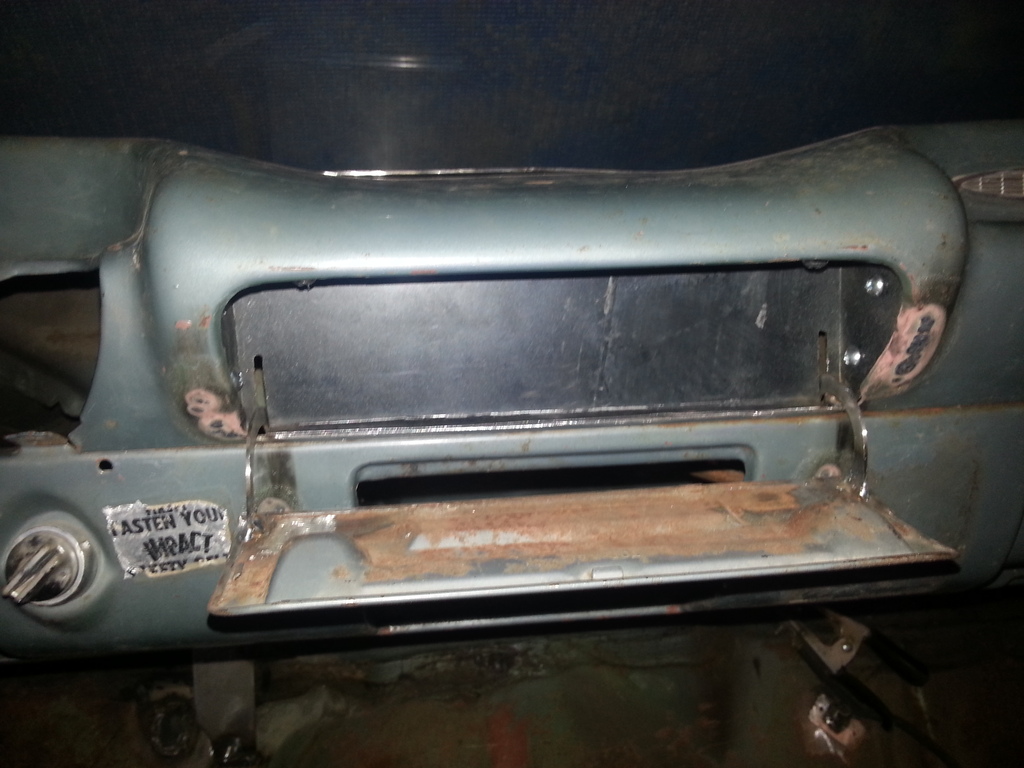
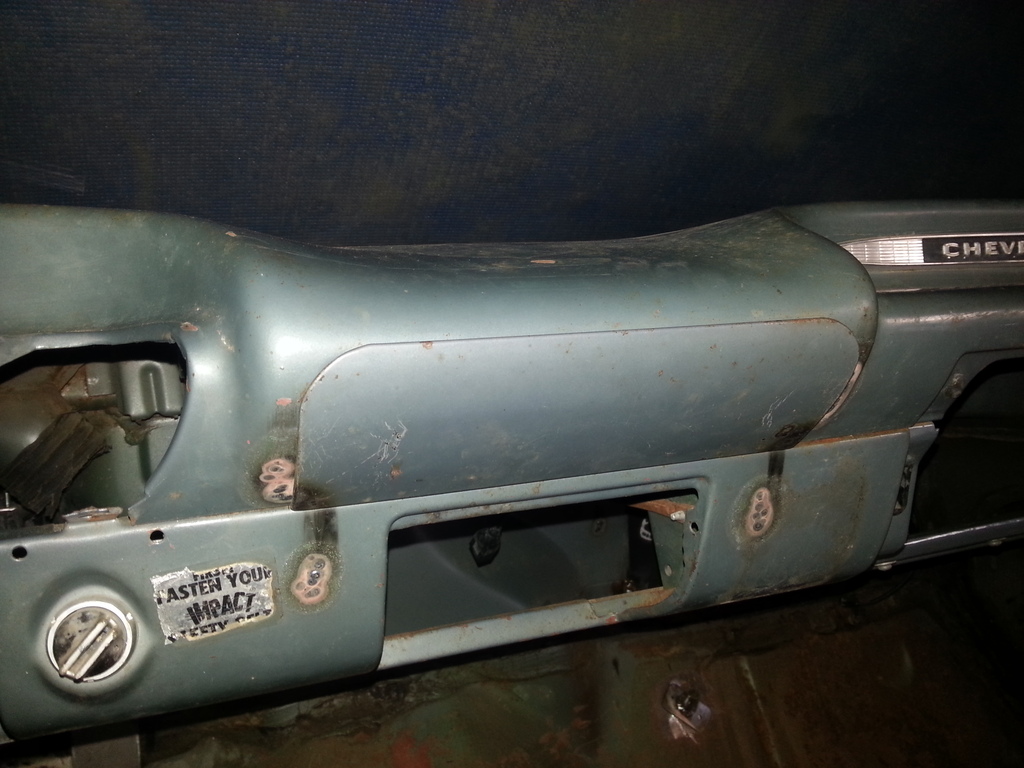
Getting back to the spending time to make it appear I did nothing at all.....
This car never had a radio in it, just a factory block off plate. That being said, I have to have a radio, and since I went to the trouble of keeping the gauges stock so the dash looks stock, just putting a new radio in the dash wasn't going to cut it. I know I could have found a factory radio and had it converted, that's what I did on my Blazer, and it works pretty good, but just not as well as a nice new Alpine. So I set out to hide the radio behind the block off plate, hinged so that it would open and close. Way easier said than done!!!! I have several days in it, the first of which all ideas I tried I had to throw in the trash. I waited a couple weeks and went back to it with a clear head and came up with a doable solution.
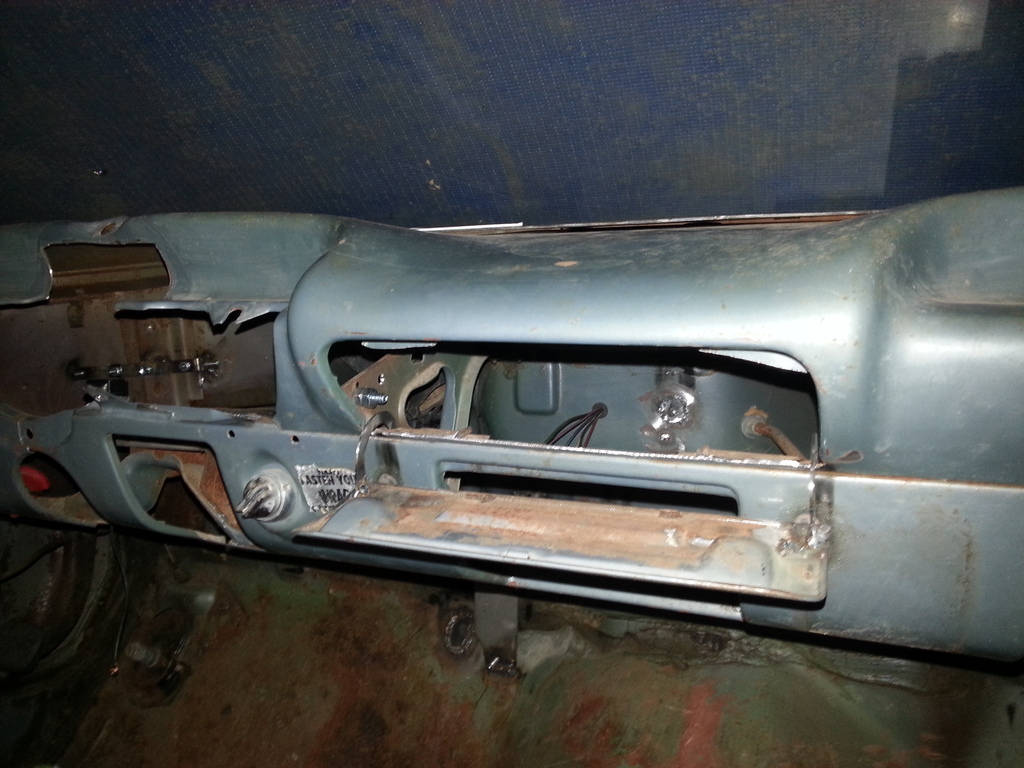
In the closed position.
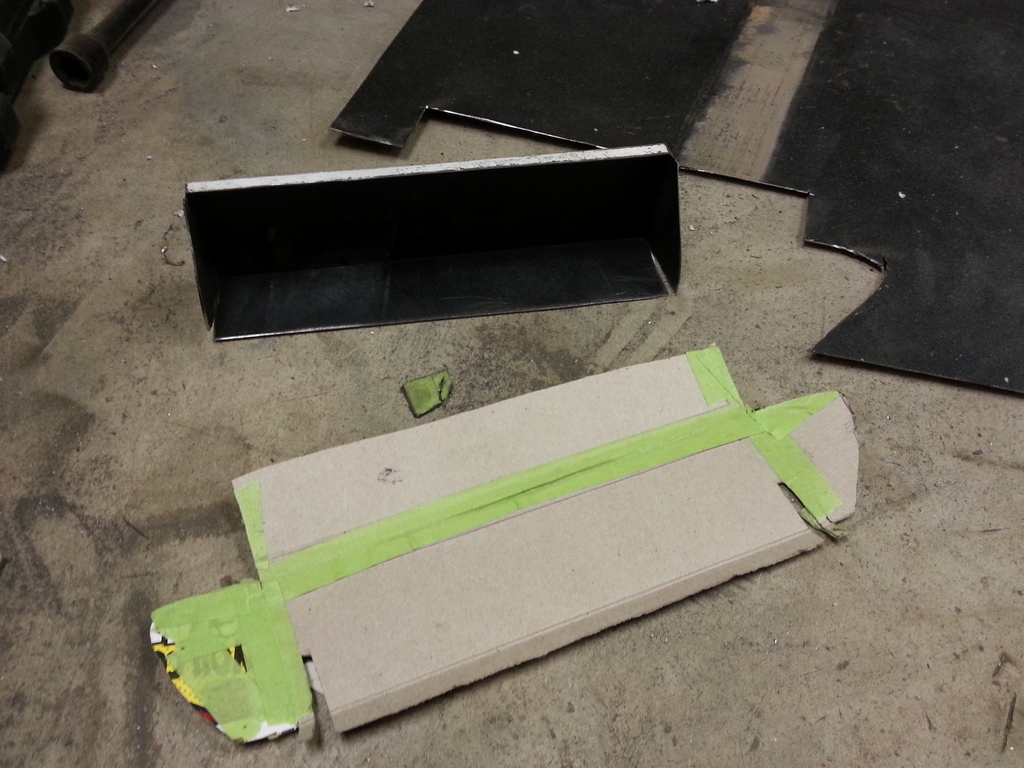
Then I took some cardboard and made a template for the filler piece the radio will mount in, cut it out of some sheet metal and bent it up.
Made it fit the opening...
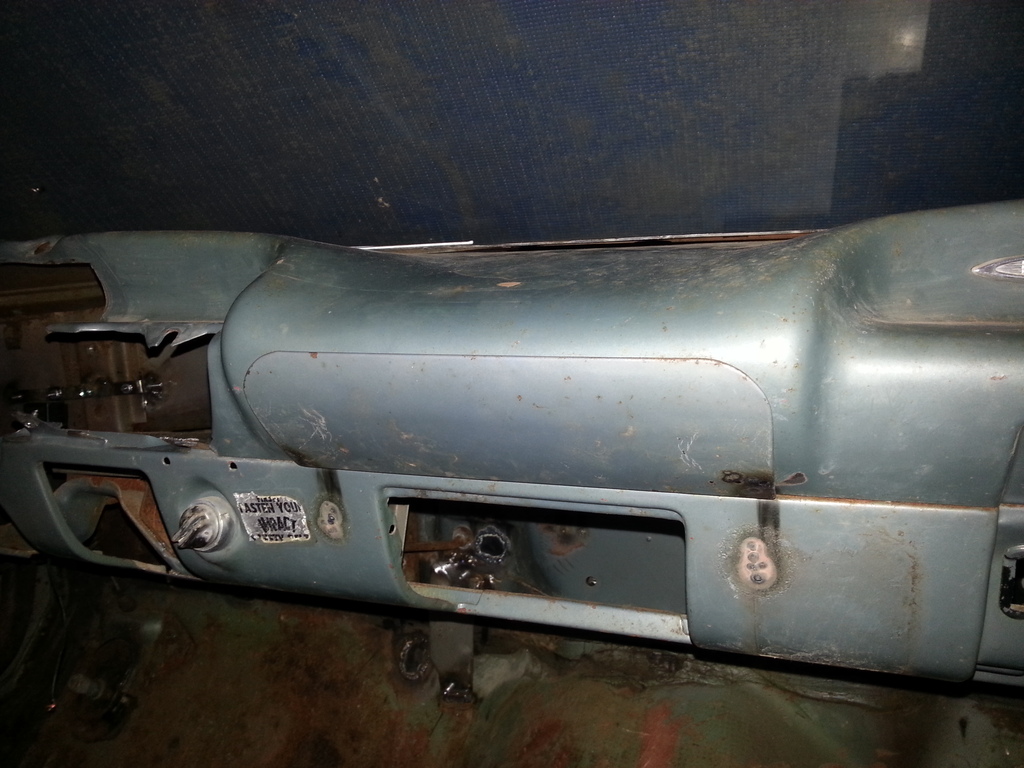
Then cut it open to mount the radio in. This is just an old radio I had lying around, I'll replace it with a newer one when I'm done. I'm going to mount two speakers in the dash, two in the old kick panel vents, and two in the back, behind the wheel wells. Might put some amps and subs where the rear seat should be too, then I'll be up to date on the sound system.
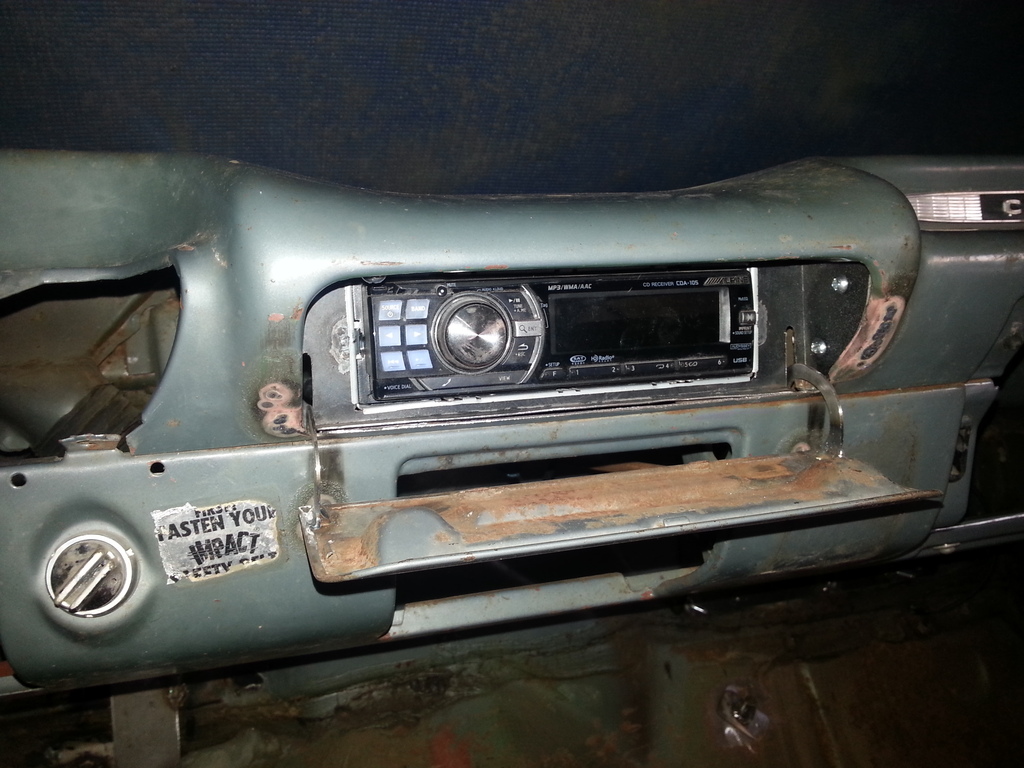
Close it up and it's 1959 all over again....
This car never had a radio in it, just a factory block off plate. That being said, I have to have a radio, and since I went to the trouble of keeping the gauges stock so the dash looks stock, just putting a new radio in the dash wasn't going to cut it. I know I could have found a factory radio and had it converted, that's what I did on my Blazer, and it works pretty good, but just not as well as a nice new Alpine. So I set out to hide the radio behind the block off plate, hinged so that it would open and close. Way easier said than done!!!! I have several days in it, the first of which all ideas I tried I had to throw in the trash. I waited a couple weeks and went back to it with a clear head and came up with a doable solution.

In the closed position.

Then I took some cardboard and made a template for the filler piece the radio will mount in, cut it out of some sheet metal and bent it up.

Made it fit the opening...

Then cut it open to mount the radio in. This is just an old radio I had lying around, I'll replace it with a newer one when I'm done. I'm going to mount two speakers in the dash, two in the old kick panel vents, and two in the back, behind the wheel wells. Might put some amps and subs where the rear seat should be too, then I'll be up to date on the sound system.

Close it up and it's 1959 all over again....
 12-01-2016, 11:44 PM
#87
Nice solution. I hate cutting a factory dash for a modern radio on a classic.
Ok, there are two problems here....
I did tell you I owned a plasma cutter, you were giving me $#it about rich for buying one!
Second. You worded your phrase incorrectly. It isn't your (as in ls1nova71's) plasma cutter, it is MY (as in gofastwclass') plasma cutter - as in lives at my house and was purchased with my money. I will gladly SELL it to you for the proper fee.
Your old age is showing because your memory is obviously failing! Hahaha!!!
12-02-2016, 06:38 AM
#88

nice solution. I hate cutting a factory dash for a modern radio on a classic.
Ok, there are two problems here....
I did tell you i owned a plasma cutter, you were giving me $#it about rich for buying one!
Second. You worded your phrase incorrectly. It isn't your (as in ls1nova71's) plasma cutter, it is my (as in gofastwclass') plasma cutter - as in lives at my house and was purchased with my money. I will gladly sell it to you for the proper fee.
your old age is showing because your memory is obviously failing! Hahaha!!!
lol !!!!!!!!!
12-02-2016, 08:00 AM
#89
Nice solution. I hate cutting a factory dash for a modern radio on a classic.
Ok, there are two problems here....
I did tell you I owned a plasma cutter, you were giving me $#it about rich for buying one!
Second. You worded your phrase incorrectly. It isn't your (as in ls1nova71's) plasma cutter, it is MY (as in gofastwclass') plasma cutter - as in lives at my house and was purchased with my money. I will gladly SELL it to you for the proper fee.
Your old age is showing because your memory is obviously failing! Hahaha!!!
12-02-2016, 01:00 PM
#90


 12-07-2016, 10:30 PM
#94
Well, getting back to the project at hand, it was time to start modifying the fuel tank. I feel like I have to apologize in advance for some of the pictures. Some of them are so bad they're hard to look at, but you will get the idea anyway.
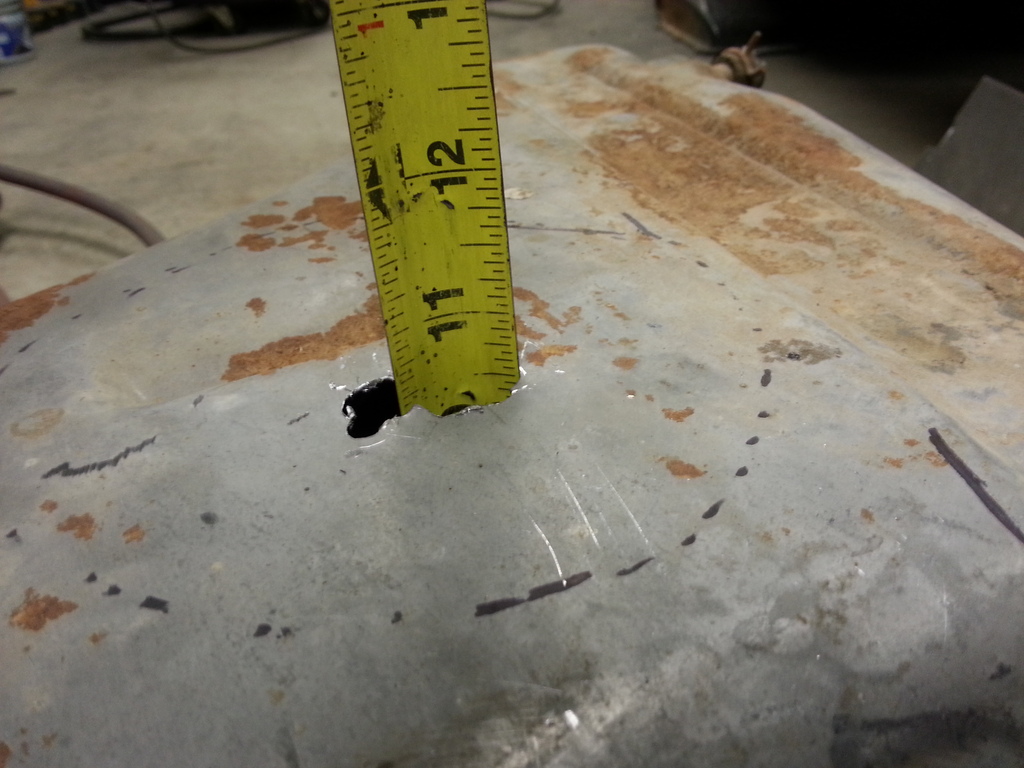
I started off by figuring out where I wanted the pump to be mounted, then drilled a few small holes to be able to get an accurate measurement of the depth of the tank. It was right at 10 1/2" deep.
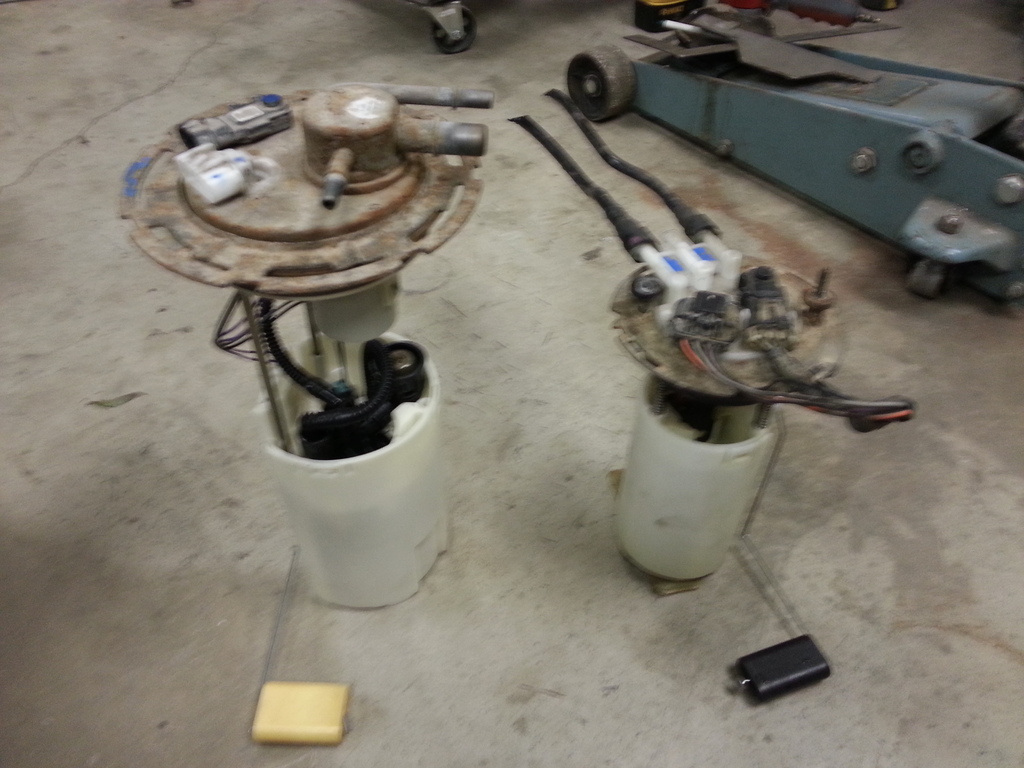
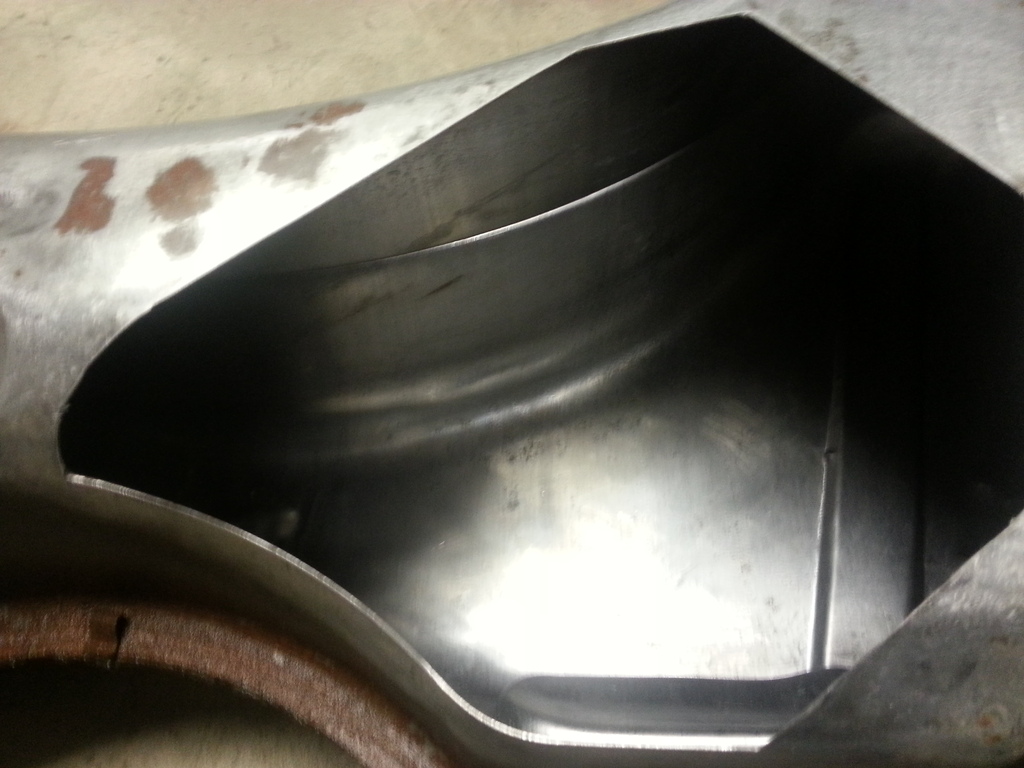
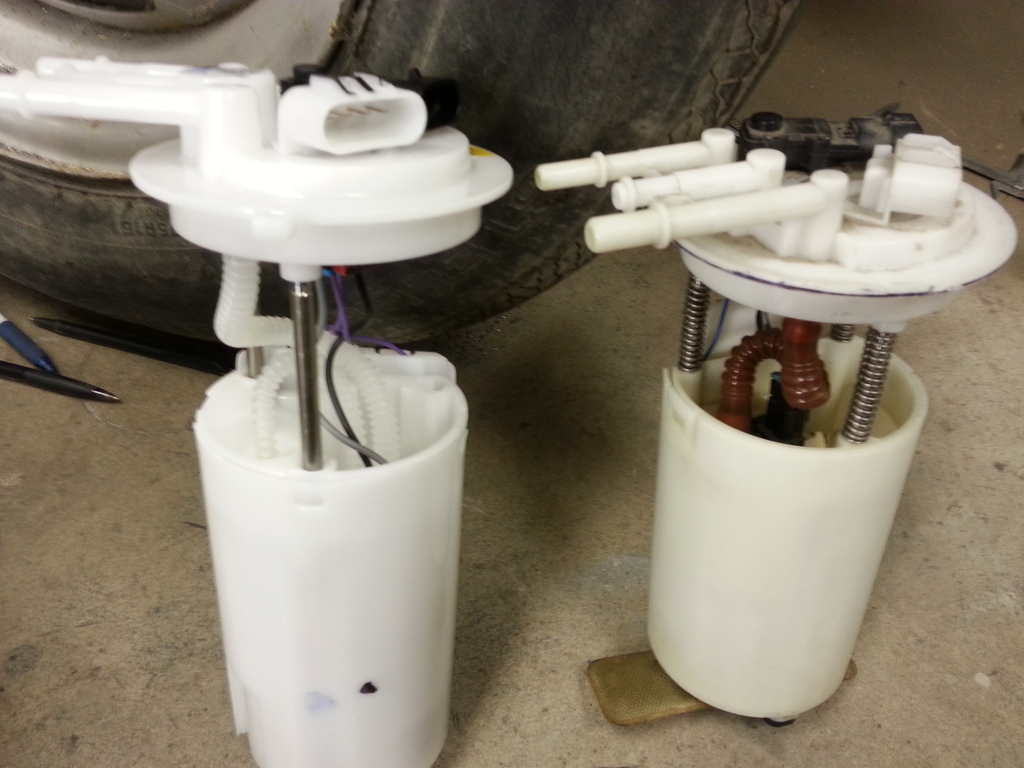
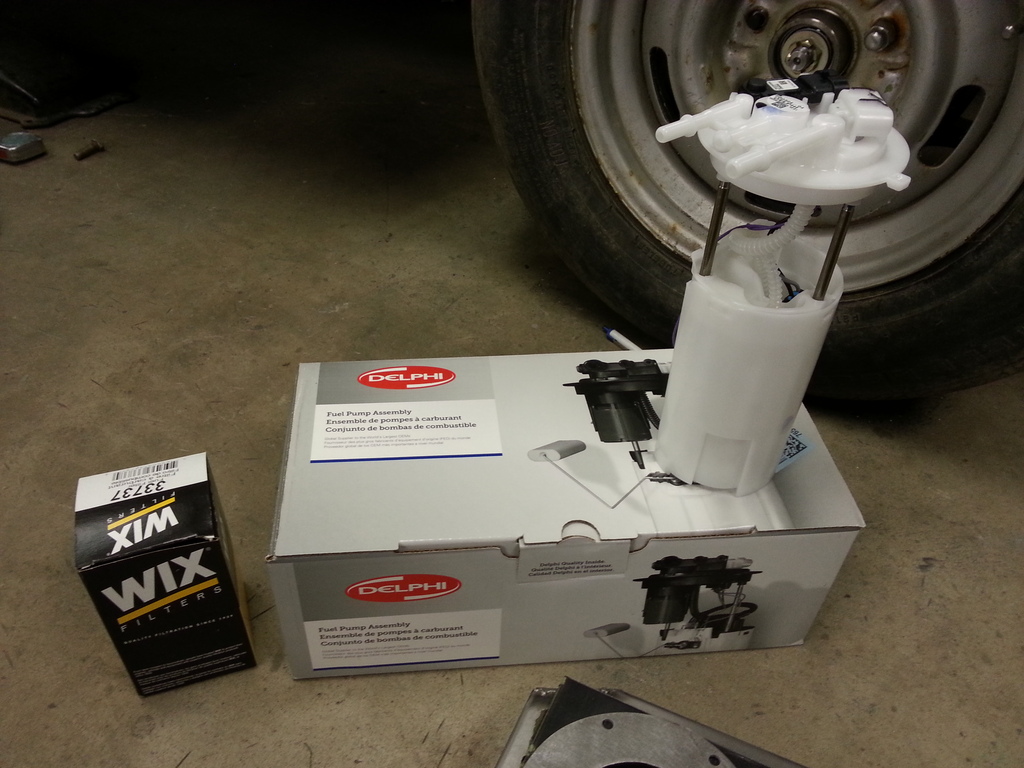
This is one of those bad pics...... But, it shows the fuel bucket/pump I wanted to use, along with the one I ended up using. The one on the left is from a 2005 truck, and has the pressure regulator built into it requiring only a feed line to be run to the engine. I was going to use the shorter Tahoe one, but it was just going to be way too big on top to fit my tank, so I ended up using the 2002 Tahoe pump on the right, and will run the corvette filter/regulator.
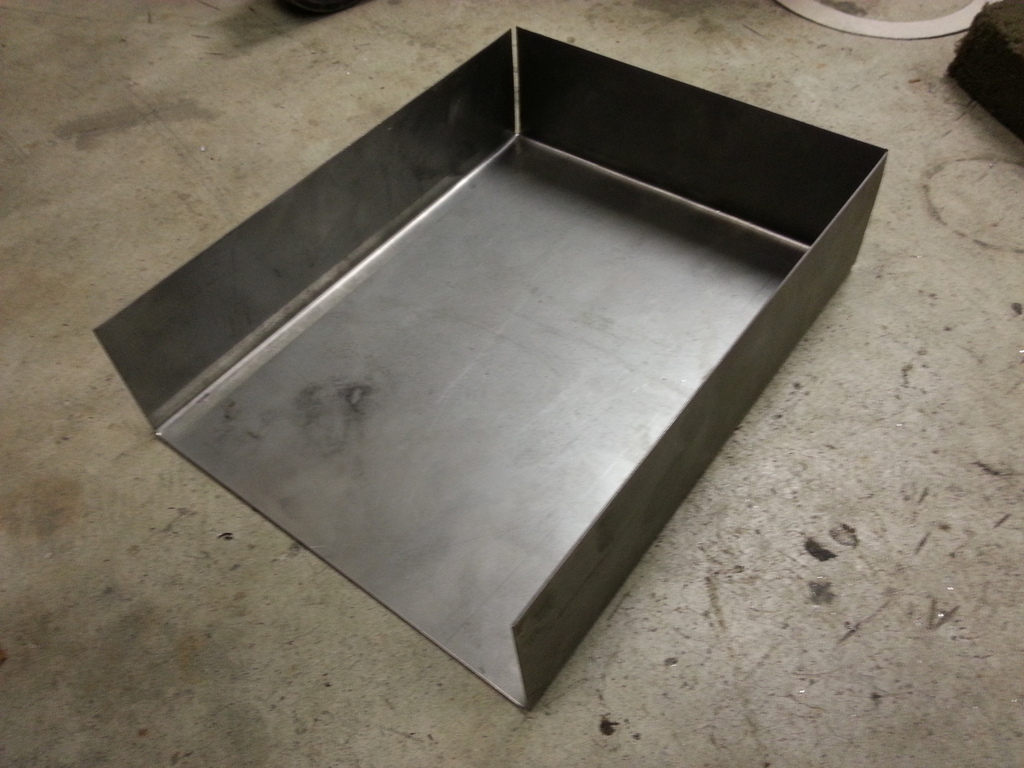
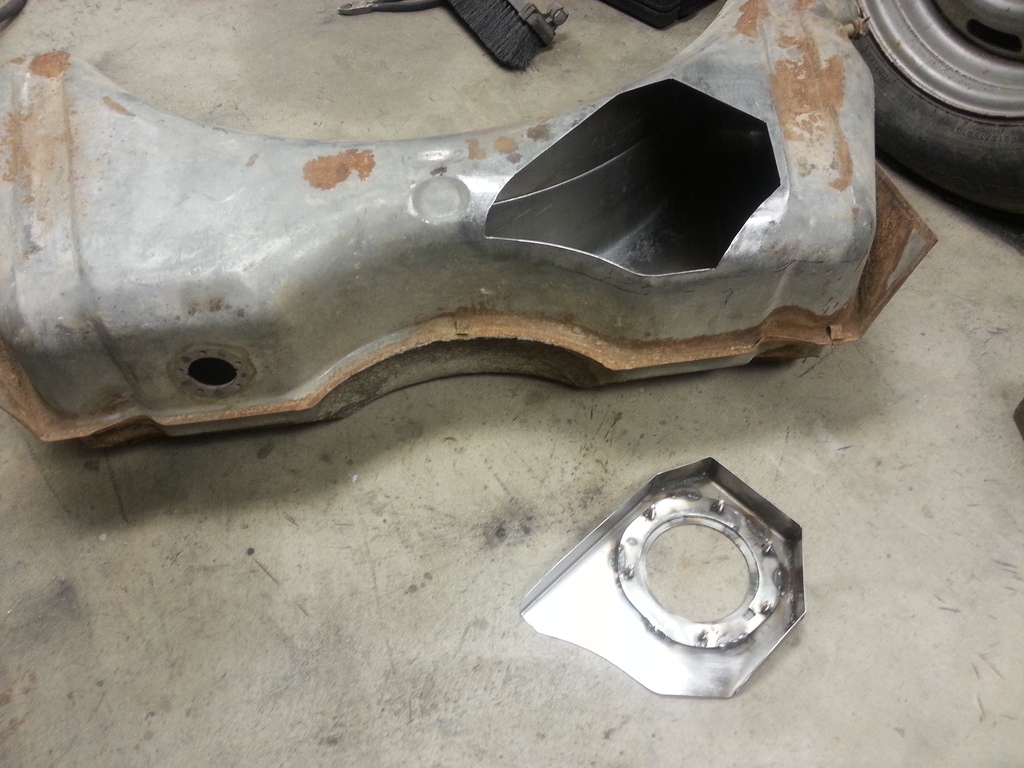
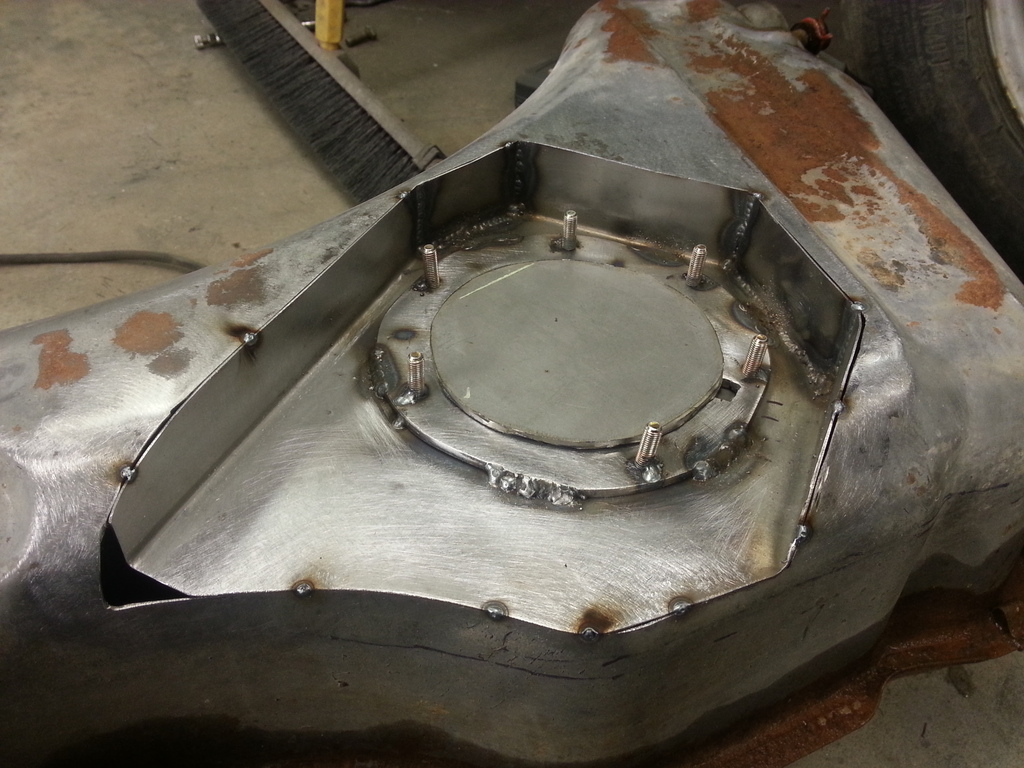
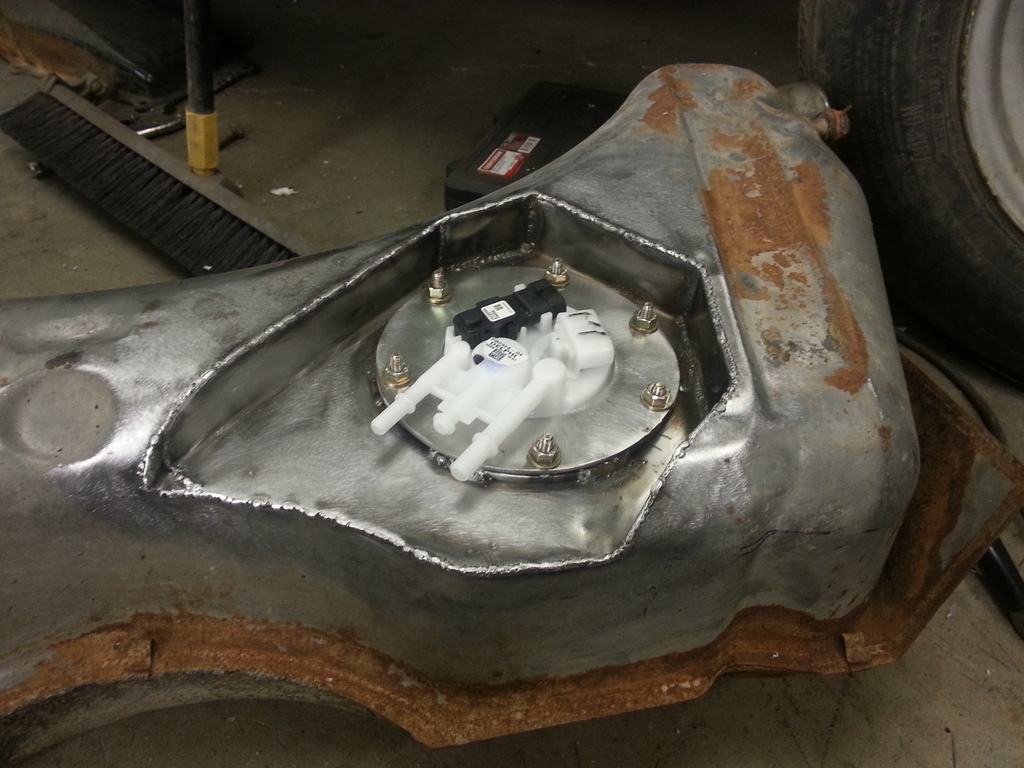
I needed the pump to be flush with the top of the tank to avoid having to cut the floor of the car out, so I bent this up on the sheet metal brake. It will be trimmed to be an inch and a half tall. The pump is 9 1/4" tall, so when it's put in, it will compress a quarter of an inch and be at the bottom of the tank.
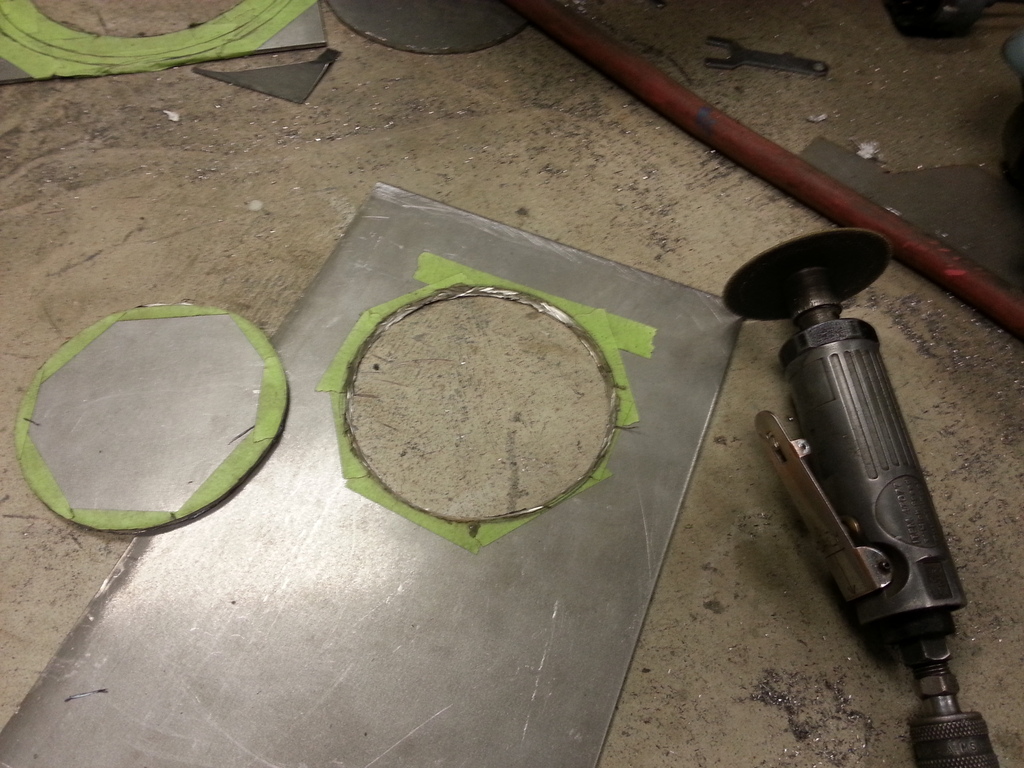
Then I started cutting out the fuel pump mounting brackets. The first pic is actually one I made for the '05 pump that turned out to be too big....
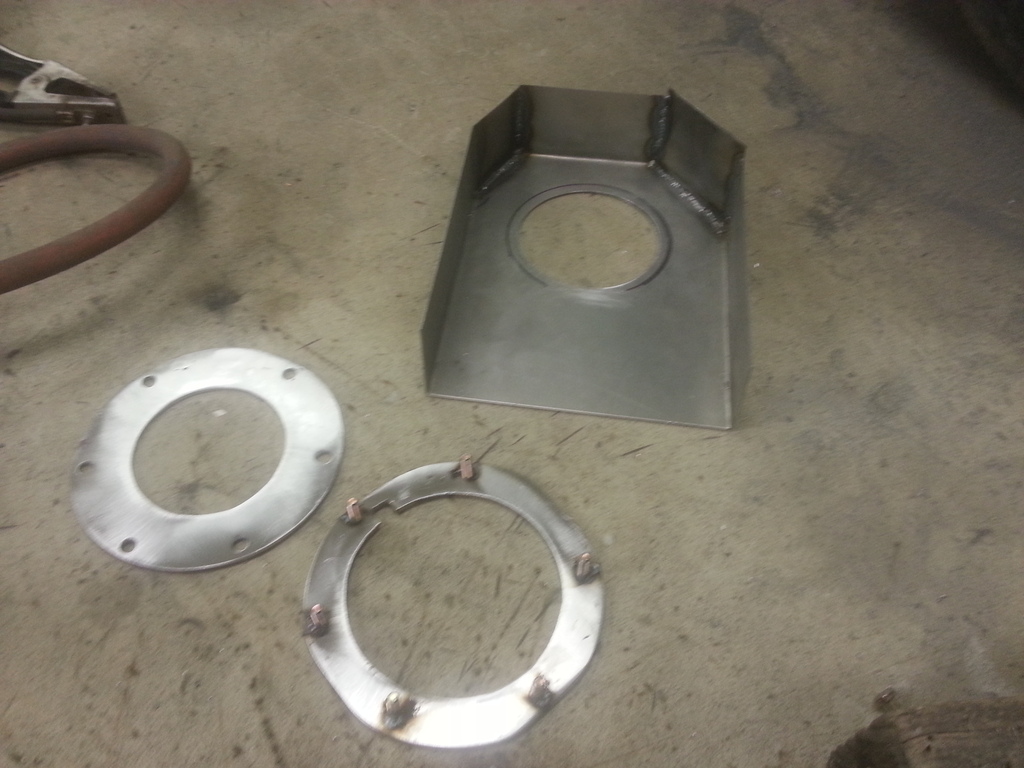
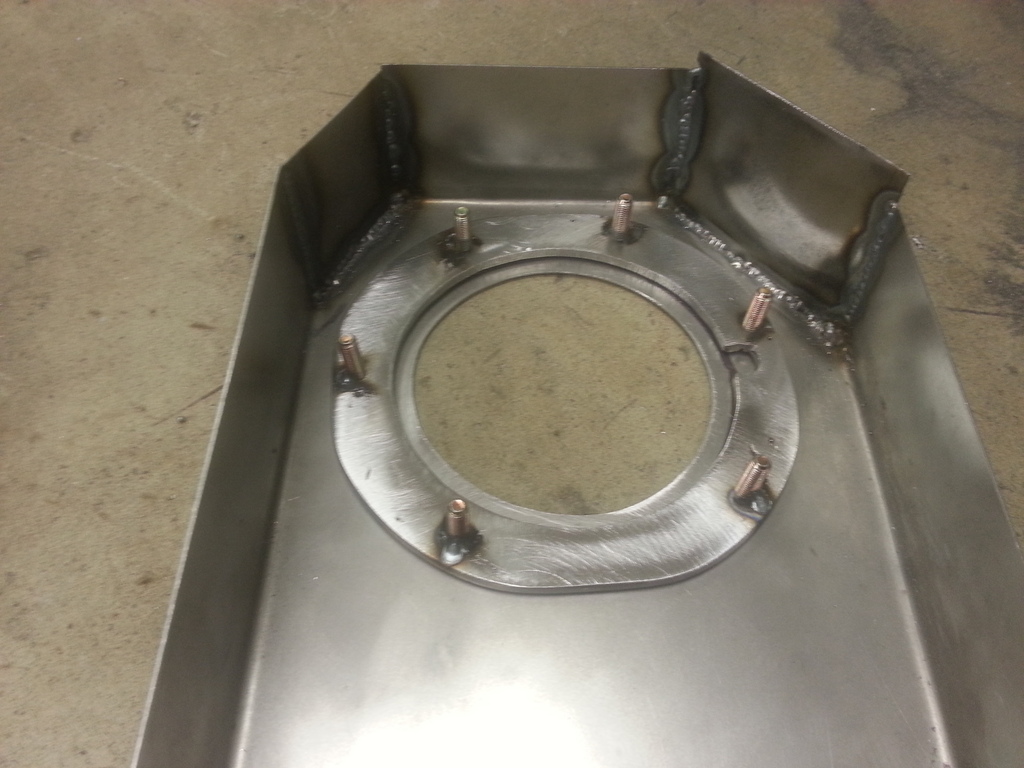
Then I drilled the holes and tapped them for the bolts. I cut the heads off the bolts and plug welded them from the bottom, then put a small tack on the outside of each one.
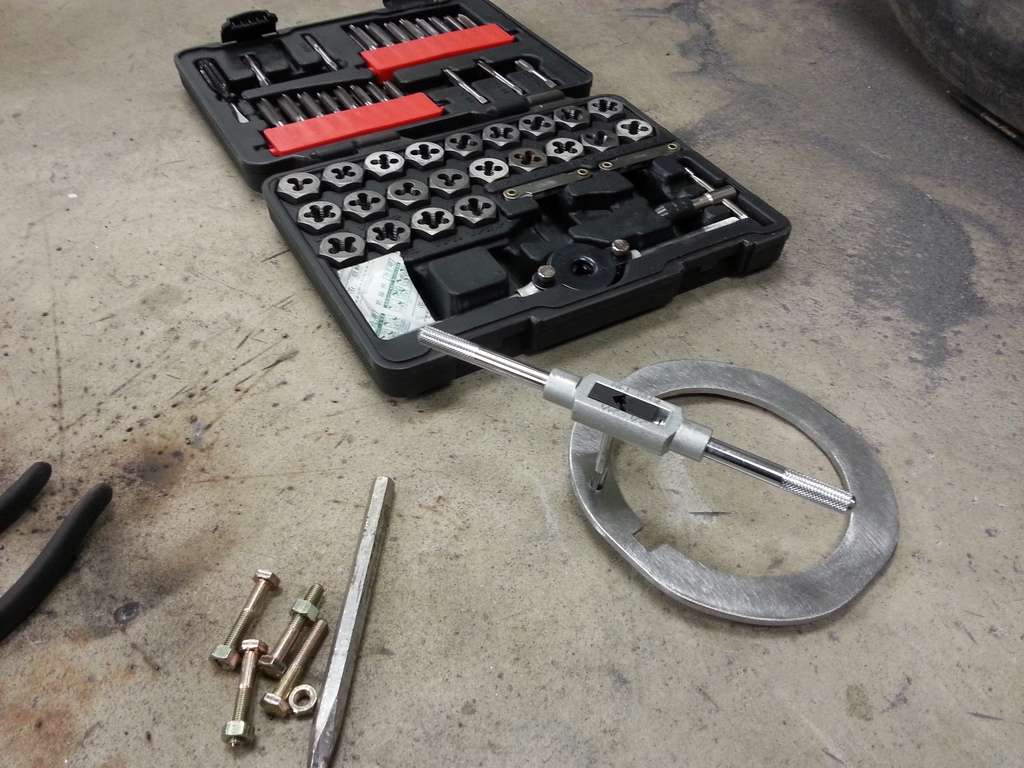
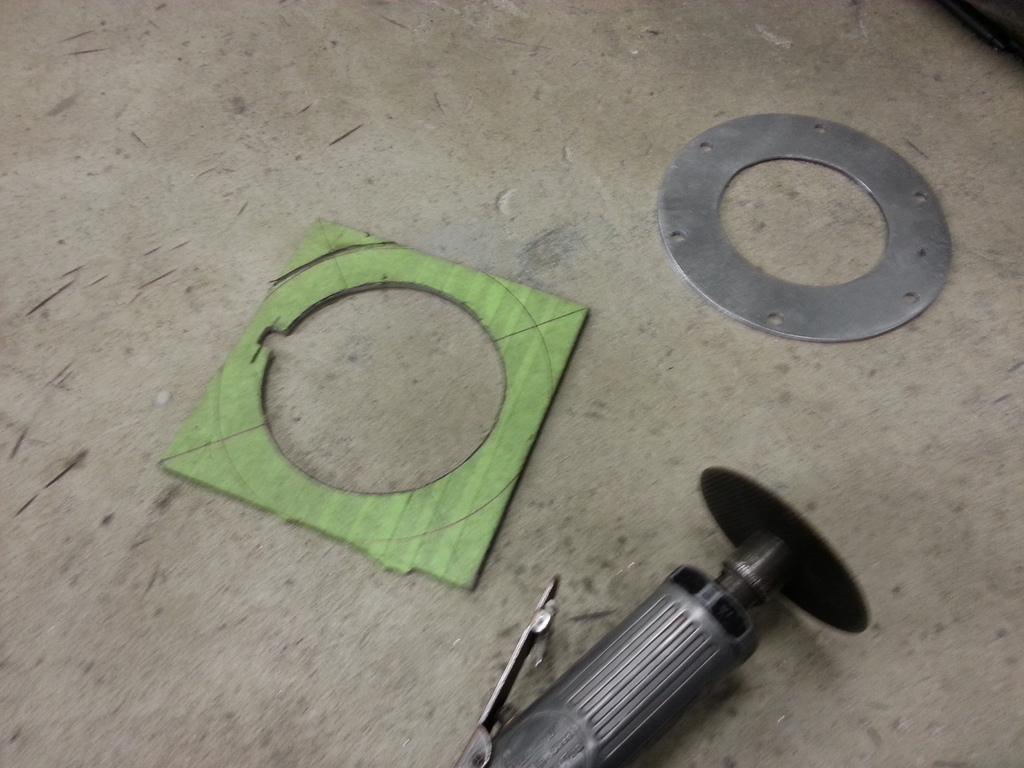
In this pic you can see both rings and that the box I bent up has had the corners cut off and welded up so it fits the location better.
It needed to be angled, so I marked where it needed to be cut.
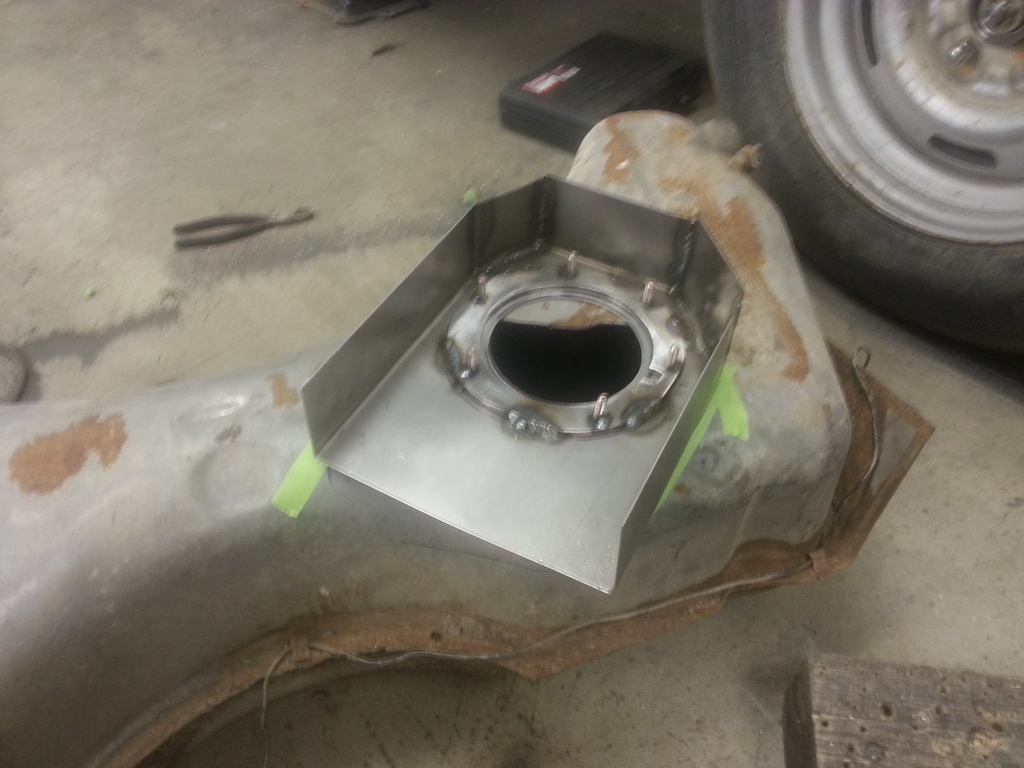
And trimmed the tank for it.
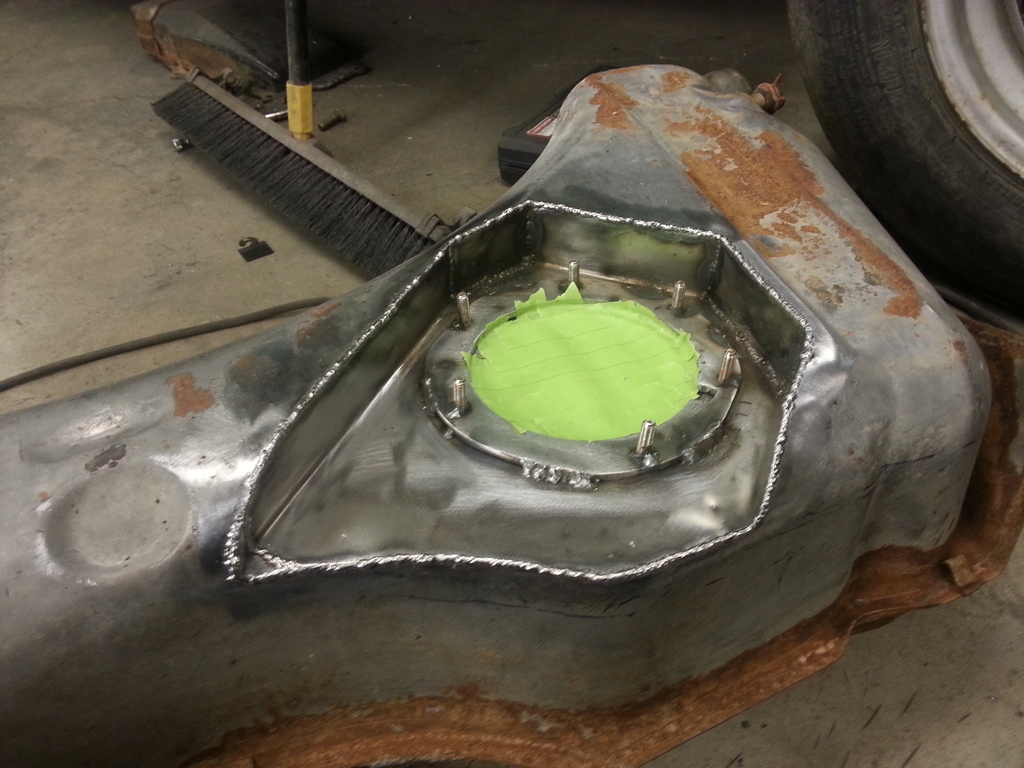
After all the cutting was done and before any welding, I needed to clean the inside of the tank. Dawn cleans things up really well.
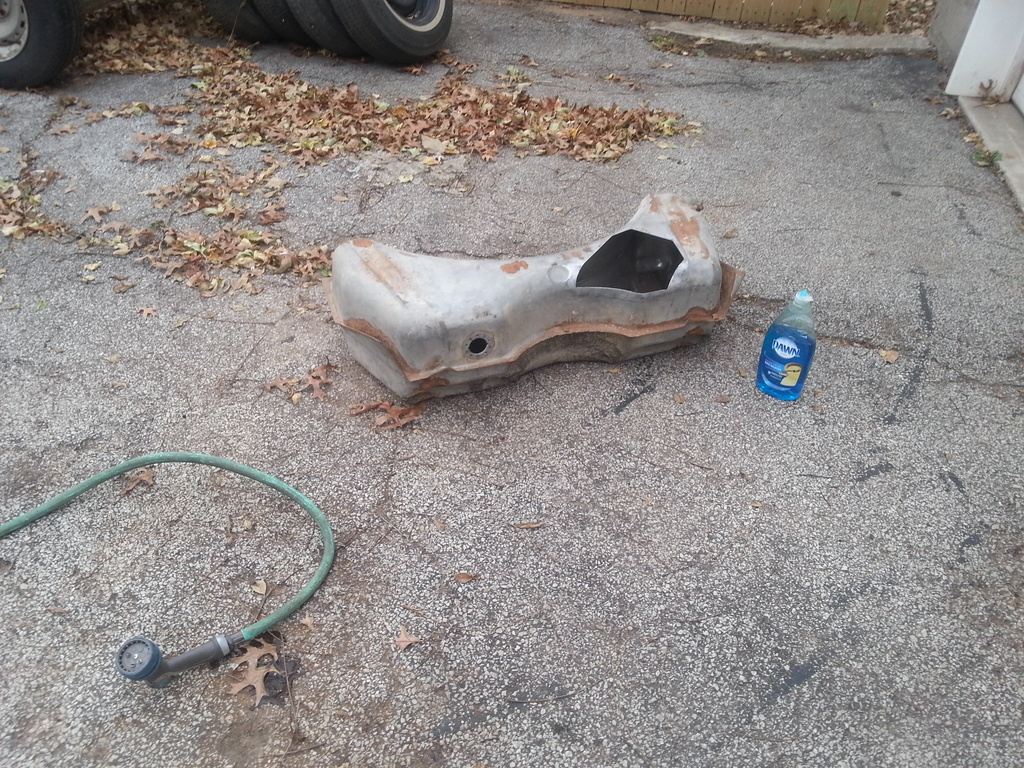
I wiped the whole inside out with an old rag to make sure the inside was spotless....
Then rinsed it out several times and blew it dry with the air hose. Looking pretty clean!
Then I trimmed up the tray and started tack welding it in.
By turning the tray at an angle, it was slightly too short, so I made a filler piece for it.
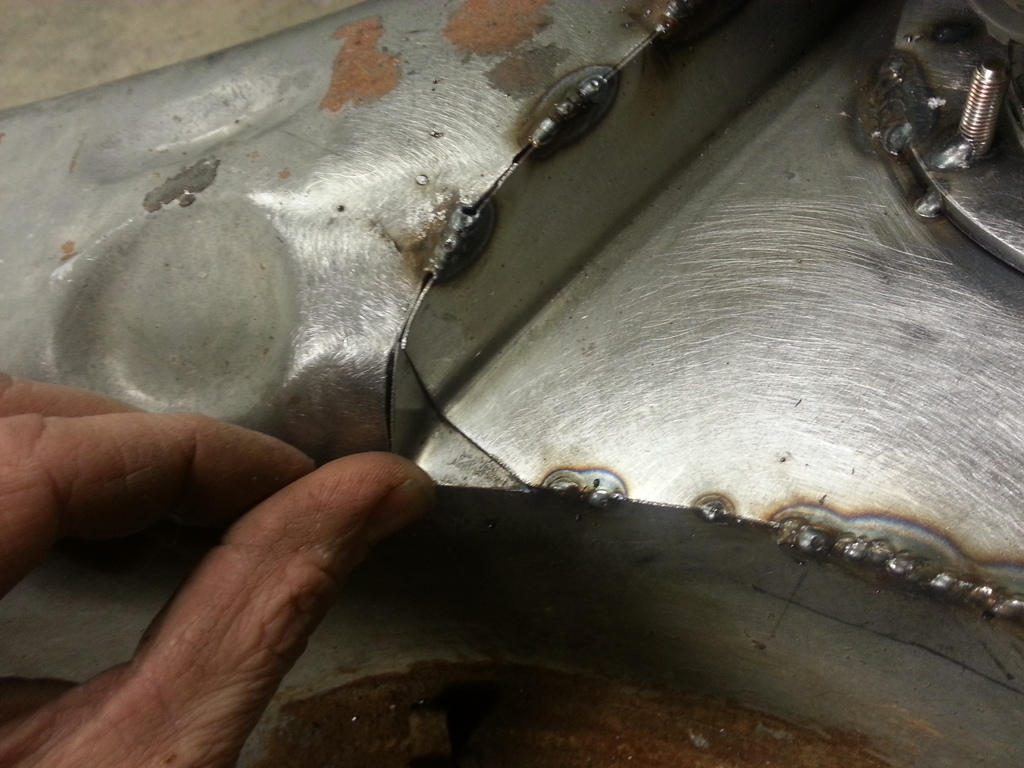
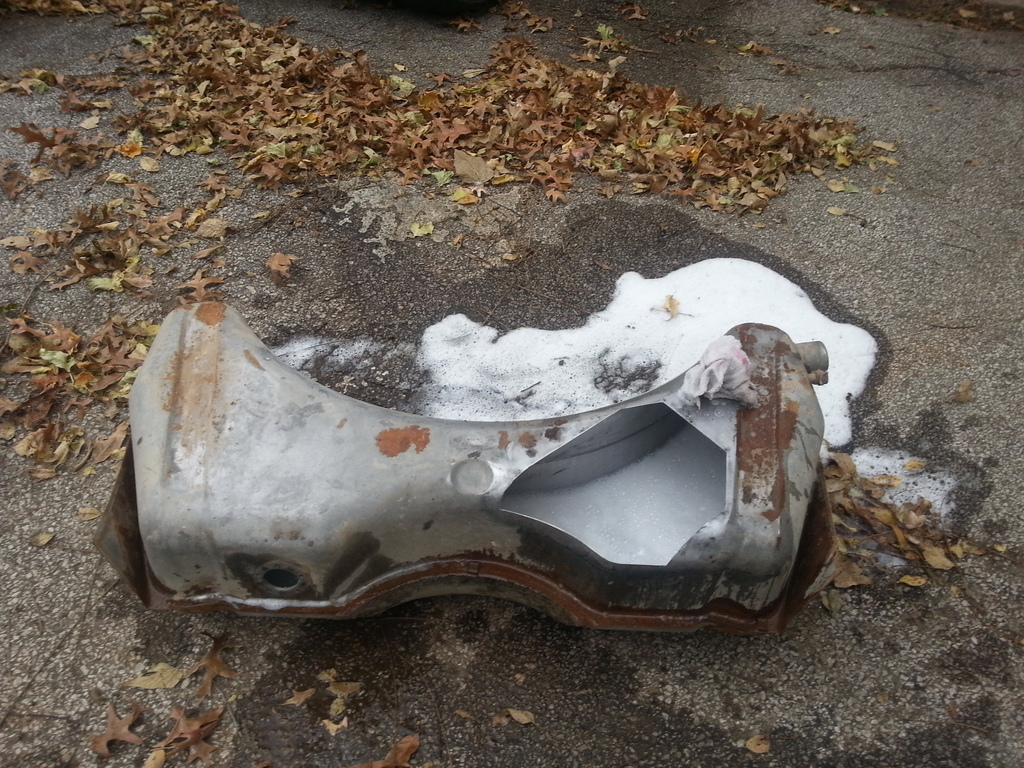
Then welded it all in solid.

Then cleaned it all up, and checked for any pinholes I may have missed by the hi-tech method of turning out all the lights in the shop and shining a flashlight on the inside of the weld. Found two and rewelded them real quick.
This is a pic of the Airtex piece of junk pump I got at the Pick-n-Pull to use for mock up next to the new Delphi pump. the Delphi pump has the jet pump built into it to keep the bucket full at all times unlike the cheap Airtex one. Ironically, the Delphi pump was cheaper on Amazon than the cheap chinese crap ones the auto parts stores sell........
New pump and Vette filter.
New pump installed to make sure everything is going to work.
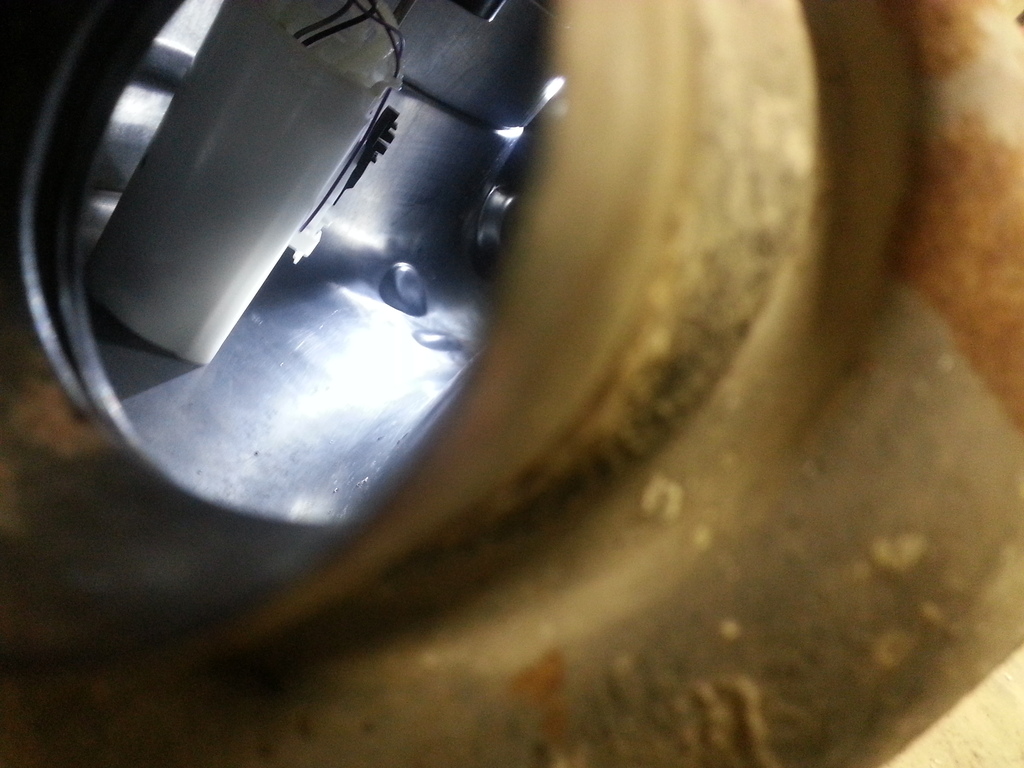
A shot through the fuel filler showing the pump module sitting flat on the bottom of the tank.
I started off by figuring out where I wanted the pump to be mounted, then drilled a few small holes to be able to get an accurate measurement of the depth of the tank. It was right at 10 1/2" deep.

This is one of those bad pics...... But, it shows the fuel bucket/pump I wanted to use, along with the one I ended up using. The one on the left is from a 2005 truck, and has the pressure regulator built into it requiring only a feed line to be run to the engine. I was going to use the shorter Tahoe one, but it was just going to be way too big on top to fit my tank, so I ended up using the 2002 Tahoe pump on the right, and will run the corvette filter/regulator.

I needed the pump to be flush with the top of the tank to avoid having to cut the floor of the car out, so I bent this up on the sheet metal brake. It will be trimmed to be an inch and a half tall. The pump is 9 1/4" tall, so when it's put in, it will compress a quarter of an inch and be at the bottom of the tank.

Then I started cutting out the fuel pump mounting brackets. The first pic is actually one I made for the '05 pump that turned out to be too big....


Then I drilled the holes and tapped them for the bolts. I cut the heads off the bolts and plug welded them from the bottom, then put a small tack on the outside of each one.

In this pic you can see both rings and that the box I bent up has had the corners cut off and welded up so it fits the location better.


It needed to be angled, so I marked where it needed to be cut.

And trimmed the tank for it.

After all the cutting was done and before any welding, I needed to clean the inside of the tank. Dawn cleans things up really well.

I wiped the whole inside out with an old rag to make sure the inside was spotless....

Then rinsed it out several times and blew it dry with the air hose. Looking pretty clean!

Then I trimmed up the tray and started tack welding it in.

By turning the tray at an angle, it was slightly too short, so I made a filler piece for it.

Then welded it all in solid.

Then cleaned it all up, and checked for any pinholes I may have missed by the hi-tech method of turning out all the lights in the shop and shining a flashlight on the inside of the weld. Found two and rewelded them real quick.

This is a pic of the Airtex piece of junk pump I got at the Pick-n-Pull to use for mock up next to the new Delphi pump. the Delphi pump has the jet pump built into it to keep the bucket full at all times unlike the cheap Airtex one. Ironically, the Delphi pump was cheaper on Amazon than the cheap chinese crap ones the auto parts stores sell........

New pump and Vette filter.

New pump installed to make sure everything is going to work.

A shot through the fuel filler showing the pump module sitting flat on the bottom of the tank.

Last edited by ls1nova71; 12-07-2016 at 10:38 PM.
12-08-2016, 04:37 PM
#97
Thanks! I've used these GM fuel buckets before and they work great in a tank that isn't baffled.
The tank sits right behind the rear axle, and the spare tire well is right behind it, that's why it's shaped the way it is. I'm working on hooking up fuel lines now and will post some pics when done and you'll see how it's mounted.
The tank sits right behind the rear axle, and the spare tire well is right behind it, that's why it's shaped the way it is. I'm working on hooking up fuel lines now and will post some pics when done and you'll see how it's mounted.
12-08-2016, 09:32 PM
#98
TECH Enthusiast
iTrader: (9)
Join Date: Mar 2008
Location: IL
Posts: 698
Likes: 0
Received 0 Likes
on
0 Posts

Gotcha, on mine it sits inside the quarter panel tucked above the rear wheel, saw the shape and was confused why you mounted the sending unit like that. But makes sense now
12-08-2016, 10:27 PM
#100
Went ahead and pulled the rear end out since I needed to be able to access the area I need to cut to clear the fuel lines and also to change the control arm bushings.
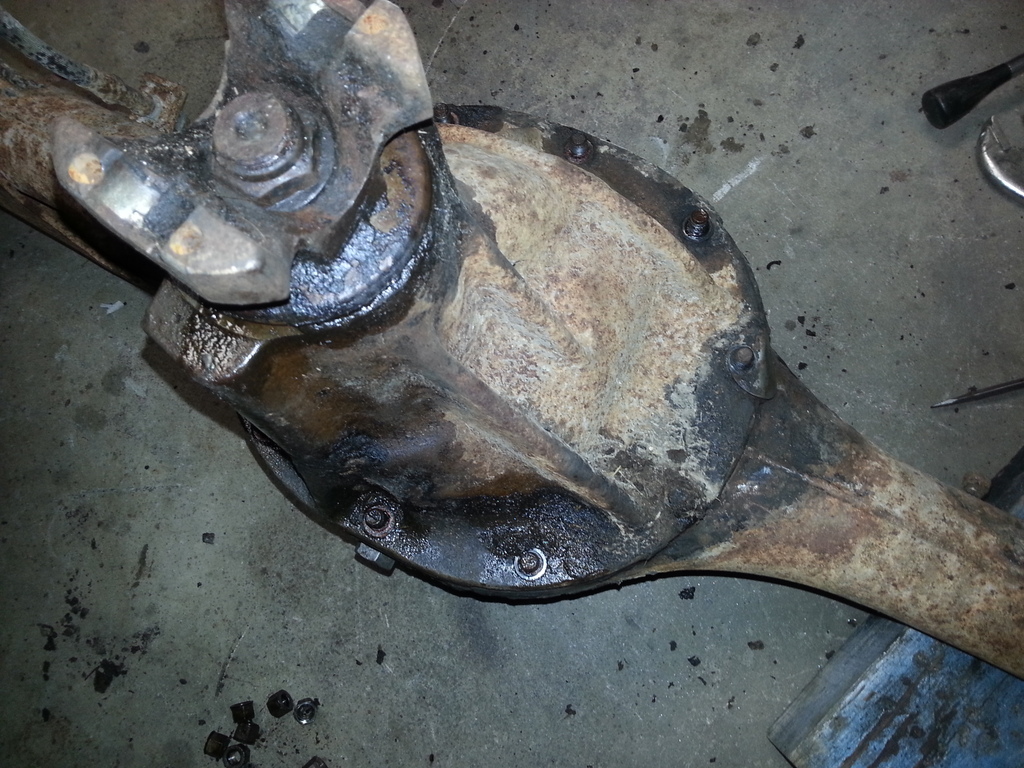
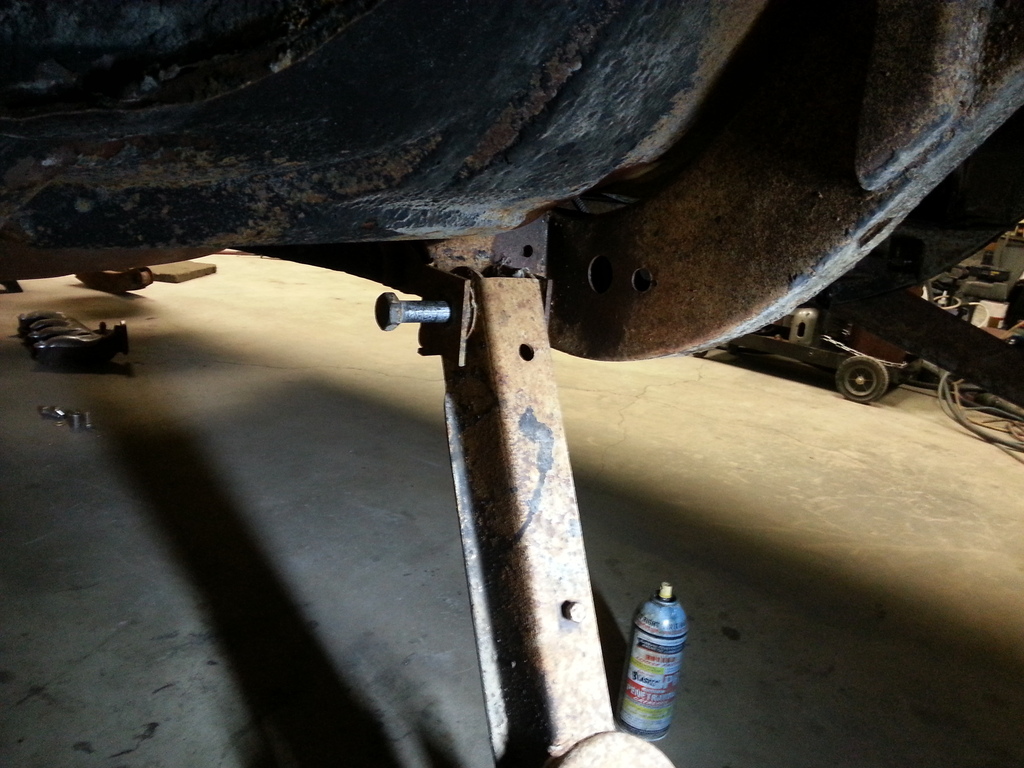
It was surprisingly easy to get the bolts out! I don't think this car has ever seen a salted road. You would think that this bolt would fight you all the way.......
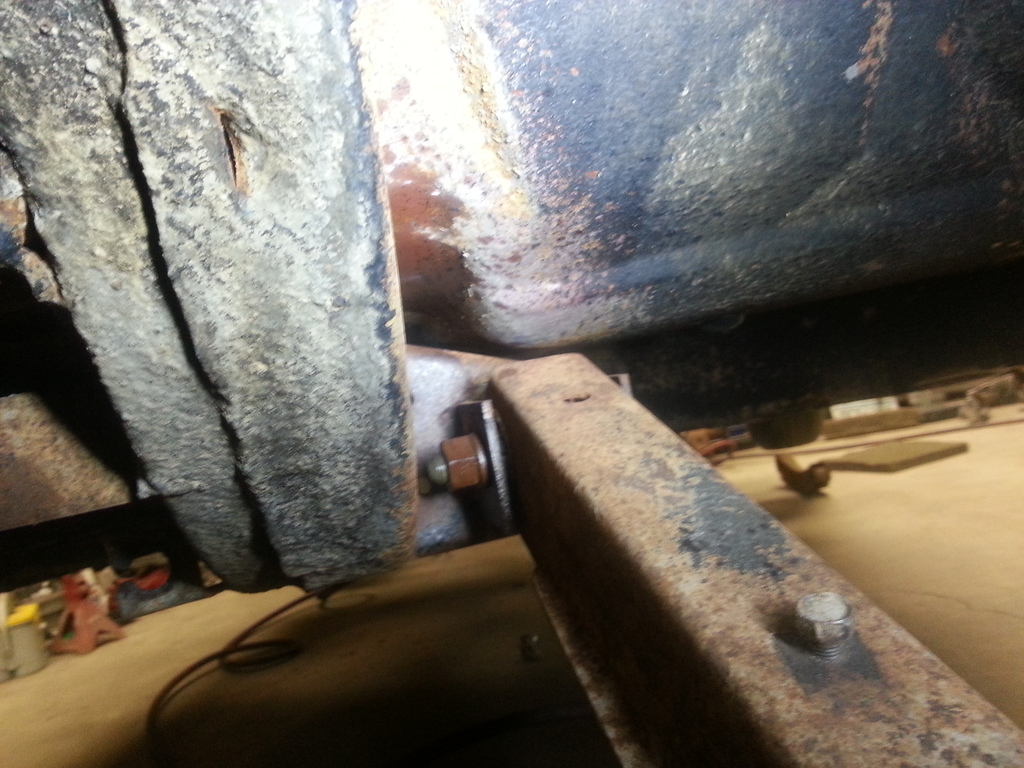
But, nope! Came right out as easily as if they were put in yesterday. Didn't need any heat or long break over bars. Just a little PB Blaster on the threads and they came right out.
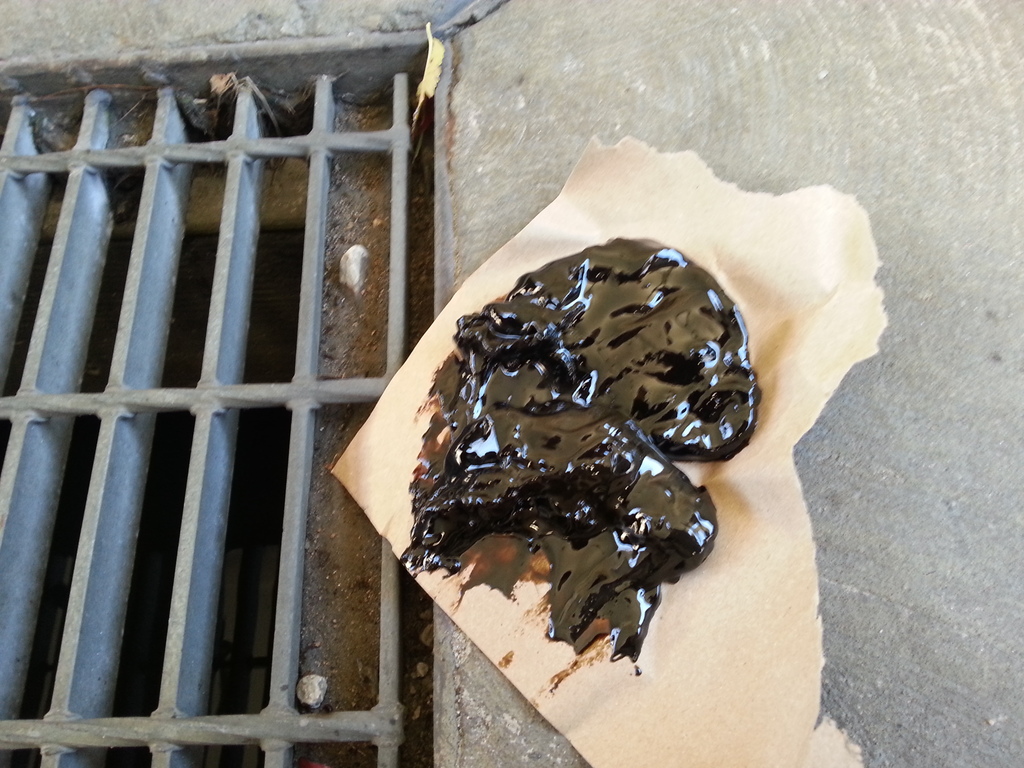
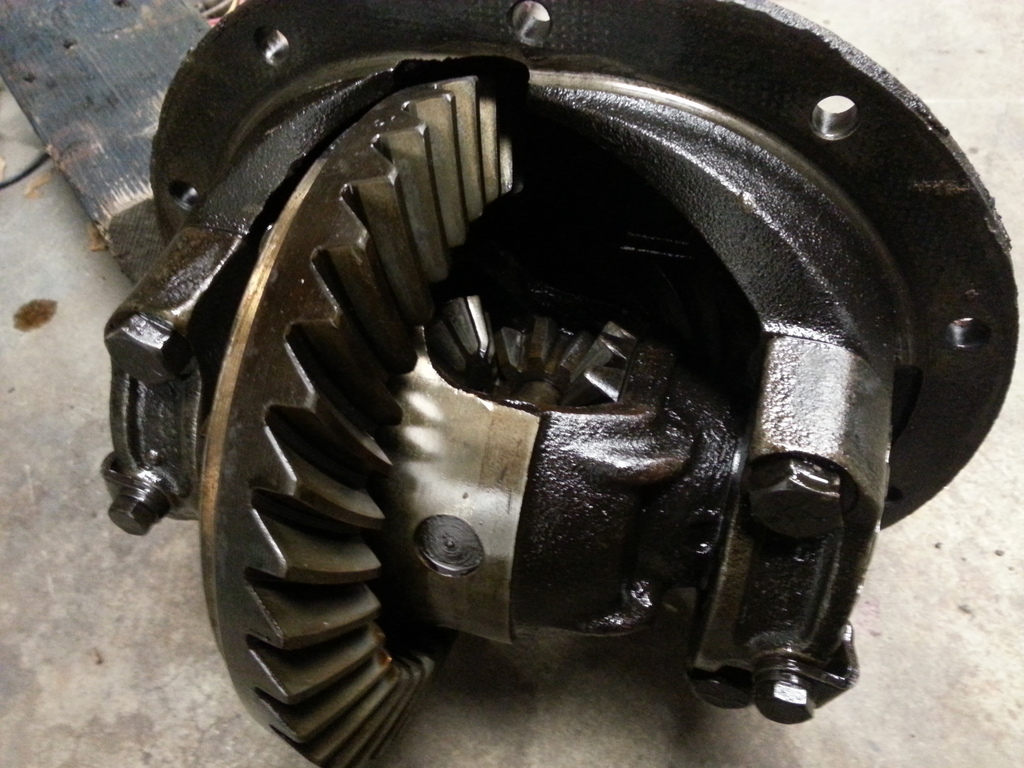
I pulled the third member and drained the foul smelling black gear lube that I'm pretty sure was the factory issue 1959 stuff, then took the housing and third member to the local carwash for a bath. When I got there I realized there was about an inch and a half of sludge in the bottom of the housing, so I had to scoop it out by hand......
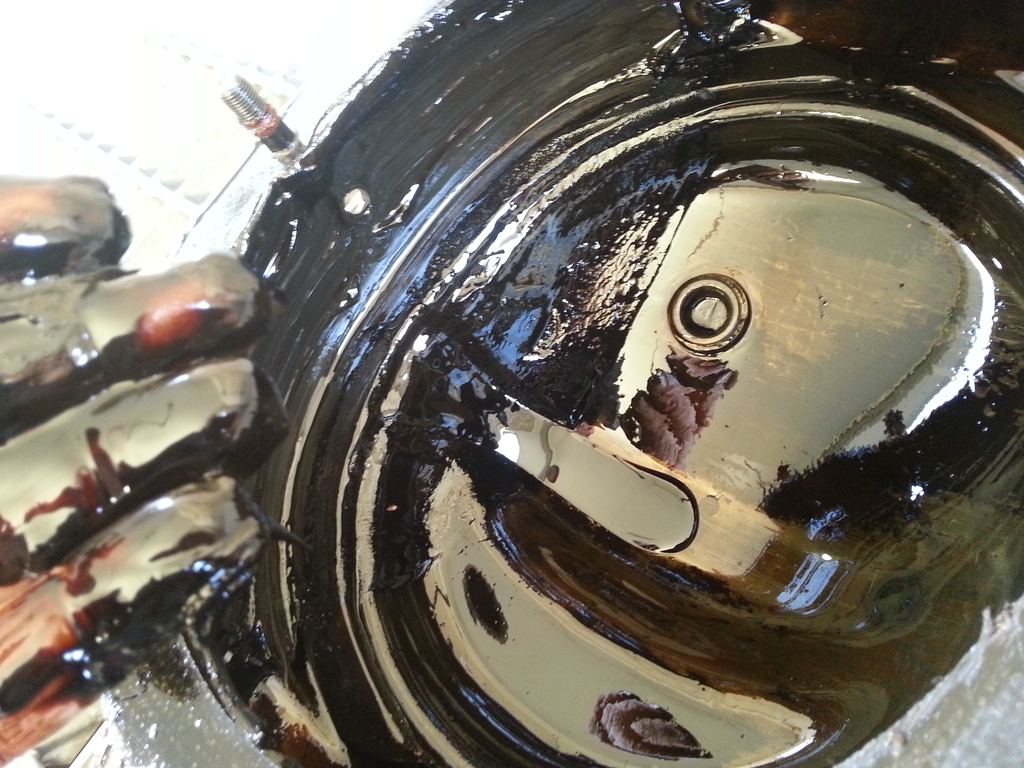
Pretty sure this is supposed to be liquid rather than a solid.
But the third member looked good after a little cleaning.

It was surprisingly easy to get the bolts out! I don't think this car has ever seen a salted road. You would think that this bolt would fight you all the way.......

But, nope! Came right out as easily as if they were put in yesterday. Didn't need any heat or long break over bars. Just a little PB Blaster on the threads and they came right out.

I pulled the third member and drained the foul smelling black gear lube that I'm pretty sure was the factory issue 1959 stuff, then took the housing and third member to the local carwash for a bath. When I got there I realized there was about an inch and a half of sludge in the bottom of the housing, so I had to scoop it out by hand......

Pretty sure this is supposed to be liquid rather than a solid.

But the third member looked good after a little cleaning.
