Passenger Footwell - Firewall Panel Removal
 10-01-2016, 11:08 AM
#1

Trying to remove the black plastic panel with foam backing that is under the carpet against the bottom of the firewall, and wraps around to the right. I seem to have a small leak when it rains somewhere near the door hinge area but the panel is in my way. Specifically the part on the right side near the door.
I can't tell how this is secured to the car, and I didn't want to just yank on it and break it. Will it come out without taking out the dash? Might be missing something obvious here.
Thanks.
I can't tell how this is secured to the car, and I didn't want to just yank on it and break it. Will it come out without taking out the dash? Might be missing something obvious here.
Thanks.
 10-01-2016, 04:22 PM
#3
^I already have that panel out.
I am talking about the black plastic piece that is under the carpet, I think it is one piece that wraps from the bottom of the firewall to the right side, in front of the door.
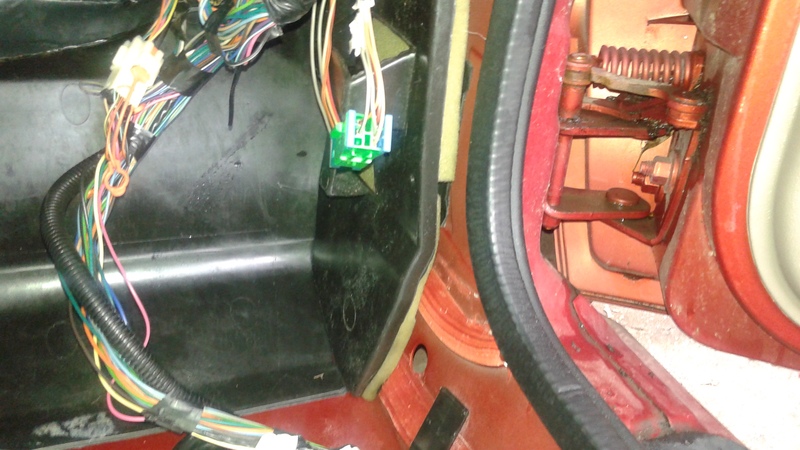
It looks like the right side of it has a push pin or something pretty high up. Water is coming in somewhere in front of the door when it rains heavily or when I run water over the bottom corner of the windshield / front edge of the door. Hard to tell exactly where with this piece in the way though.
I am talking about the black plastic piece that is under the carpet, I think it is one piece that wraps from the bottom of the firewall to the right side, in front of the door.
It looks like the right side of it has a push pin or something pretty high up. Water is coming in somewhere in front of the door when it rains heavily or when I run water over the bottom corner of the windshield / front edge of the door. Hard to tell exactly where with this piece in the way though.
10-01-2016, 05:39 PM
#4
I don't know that this can be pulled without a lot of effort, I got the rear push pin out but I can't reach or tell where the front is connected.
I think the best explanation might just be that the wire boot (for the window motor and lock wires) is not sealing at the body and that is how water is getting in there, I can't think of anything else.
I can see the firewall wire grommet and it looked dry (and I doubt water drains to there from where I was testing today anyway).
10-01-2016, 08:39 PM
#5
Was thinking about putting a lot of black silicone around the boot where it meets the car, but now I am not so certain the water came in through there.
How is water supposed to drain off of the windshield and cowl area? I sort of understand how the roof / t-tops drain since that seems to be through channels in the weather stripping, but are there supposed to be drains for body panels?
How is water supposed to drain off of the windshield and cowl area? I sort of understand how the roof / t-tops drain since that seems to be through channels in the weather stripping, but are there supposed to be drains for body panels?
10-02-2016, 10:56 AM
#6
I don't see that mentioned in the factory service manuals. I assume it's just glued-on sound deadening.
Are you sure the water is coming from behind it? That would be a really odd place unless you have a rust hole. Usually water gets in from the window glass areas and then runs down behind the trim.
Are you sure the water is coming from behind it? That would be a really odd place unless you have a rust hole. Usually water gets in from the window glass areas and then runs down behind the trim.
10-02-2016, 03:50 PM
#7
No I am not sure... those are where wet though, and when I used the hose with that piece propped out, a bit of water was coming along the edge of the foam and dripping on to the floor.
I tried to do more localized testing today using a 60cc syringe, but haven't found it. Maybe I need to revisit the t-top drains or try the hose again starting from the bottom.
I tried to do more localized testing today using a 60cc syringe, but haven't found it. Maybe I need to revisit the t-top drains or try the hose again starting from the bottom.
Trending Topics
10-02-2016, 07:54 PM
#9
Right but I don't think it could be there as the water isn't really leaking between the window and the weatherstripping, or getting in between the weatherstripping and the car.
I retested the drains in the channel behind the windshield for the t-top and it seems to drain properly. It could use a little RTV to improve the edge where the old sealant was, but putting water there didn't seem to cause any leak.
I did eventually get the leak to appear from running the hose again at the right edge of the windshield near where the side mirror and leading edge of the door comes together. Could see a little stream of water trickling down inside but couldn't figure out the source.
I had pushed the black piece on the right in the pic above up / aside to see the metal as much as I could in front of the door. Could only really lean it out to about the level of where the wires that run into the door come in. It is hard for me to describe, and I didn't get a pic of it, but the metal is sort of boxed there, and the trickle was further forward of that boxed area where the door wires come through, and seemed to be originating from higher than that. I couldn't see much higher than that, or feel anything useful with my hand.
I am thinking it may be the bottom right edge of the windshield isn't sealed quite right, as it doesn't look the same as the driver side under where the plastic cowl connects. I don't know if the adhesive / sealant they use disintegrated over time or what. I did have the windshield replaced 8 yrs ago or so. I might put some sealant in it and see if that makes a difference.
I may still pull the fender liner to see if I can see anything else going on with the seems.
10-03-2016, 11:14 AM
#10
I am thinking it may be the bottom right edge of the windshield isn't sealed quite right, as it doesn't look the same as the driver side under where the plastic cowl connects. I don't know if the adhesive / sealant they use disintegrated over time or what. I did have the windshield replaced 8 yrs ago or so. I might put some sealant in it and see if that makes a difference.
I'd suggest this test next: Tape off the windshield and then do the same test where you just got the leak. If it says dry, then you may need to have your windshield re-installed. (I'm not an expert on stationary glass installation, but my expectation is that gooping up the seam isn't going to be reliable.)
10-04-2016, 12:18 PM
#11
Yeah I didn't want to do it myself, I made an appointment with the guys that installed it.
Anyway the short version is that although the seal on the side wasn't the greatest, it probably isn't actually leaking there. It appears like it may in fact be on the firewall. But as far as we could tell it doesn't seem to be the firewall wire grommet. It also doesn't look like it is coming out the bottom of the HVAC box. The guy resealed the side of the windshield anyway though.
At some point I guess I will need to pull the PCM and move junk out of the way to get a better look, but I don't really understand why anything should leak there if it really isn't the grommet or HVAC unless some of the seam filler junk somehow cracked. Or maybe a rust hole. I can't see anything obvious looking into there beside the PCM.
On that note, does GM recommend using dielectric grease when you reinstall the PCM connectors? I was thinking of using it regardless, unless there is a good reason I shouldn't. I don't want to have weird corroded pin problems. Funny that it didn't warrant any cover at all. I guess they really followed the gram strategy...
10-04-2016, 06:12 PM
#12
Pulled the PCM. I think I might have found the problem:
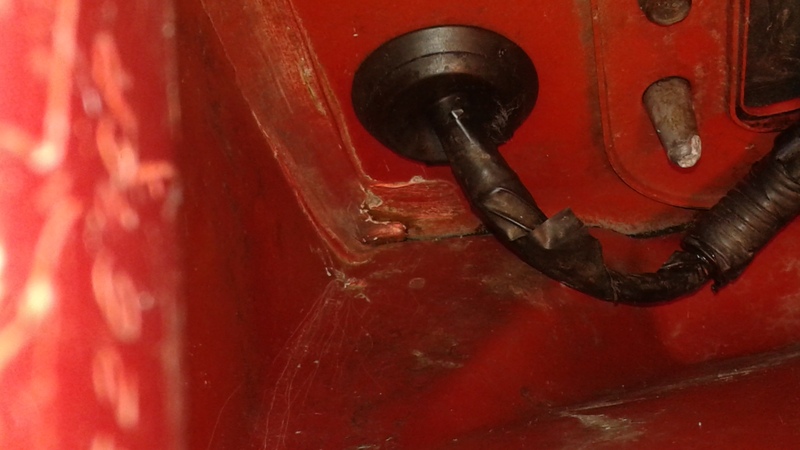
Not sure how great this photo shows it, but there is a crack in that seam sealer there, and some of it is missing (a little piece came off when I was trying to clean it).
Don't know how I am going to proceed with fixing it. The simple / cheap way would be jb weld or silicone sealant. The small bit of exposed metal there is a little rusty looking, which I could clean off with a knife. Problem is I obviously can't see anything under that, and unsure how much is painted. Obviously the part where the sealer was stuck on to it doesn't have paint under it.
10-04-2016, 06:53 PM
#13
Nice job.
No no no. There is special stuff for this kind of thing. Parts stores will sell this stuff on the shelf, which is do-it-yourself grade and safe for spoon feeding to baby seals: http://3mcollision.com/dynatron-auto...oreInfoDetails
I'd suggest going with the 3M 8300 series or heavy duty 8500 series stuff that the pros use. 8302 is the small tube version of the 8300 and you should be able to get it off of Amazon:
http://3mcollision.com/3m-autobody-s...302-clear.html
http://multimedia.3m.com/mws/media/7...8301-08302.pdf
(I've used this for the trunk seam TSB and it went really well.)
They also have the 8500, which is supposed to be heavy duty, but it looks like it only comes in larger cartridges. (I'm not directly familiar with this version.)
http://3mcollision.com/3m-all-around...ant-08500.html
10-04-2016, 06:55 PM
#14
On that note, does GM recommend using dielectric grease when you reinstall the PCM connectors? I was thinking of using it regardless, unless there is a good reason I shouldn't. I don't want to have weird corroded pin problems. Funny that it didn't warrant any cover at all. I guess they really followed the gram strategy...
https://ls1tech.com/forums/general-m...onnectors.html
10-04-2016, 06:57 PM
#15
Guess I should have learned my lesson about jumping to conclusions on this project...
Running water near that area and on the grommet didn't seem to cause any water to come into the cabin this evening, which makes this more mysterious to me. Earlier today it seemed like running the hose near the hood hinge to the side of the pcm so that water went to that area caused water to go into the cabin.
This is not making much sense to me. Can't run water on the windshield until tomorrow so maybe I am done with it for today. At least for dinner.
10-04-2016, 07:02 PM
#16
I didn't finish my thought earlier, I saw that the parts places carry the seam sealer and thought I might go that route. The main thing I was debating was if I should get some rust converter or just sand and put some SOM paint on the spots. That and how much of the seam to try and remove before refilling.
But now that I can't get it to leak tonight I am sort of stumped. I did clean out a little bit of gunk from there, and trying to clean that seam I might have pressed it further together than it was when I started. Grommet seems intact as far as I can tell, and the seal around the HVAC box seems decent.
But now that I can't get it to leak tonight I am sort of stumped. I did clean out a little bit of gunk from there, and trying to clean that seam I might have pressed it further together than it was when I started. Grommet seems intact as far as I can tell, and the seal around the HVAC box seems decent.
10-07-2016, 02:21 PM
#17
My previous tests were clearly flawed. But I think I have done a better job narrowing it down.
Looks like it is water that goes into that cowl that is leaking into the car. I am thinking it might be the seal for the hvac intake. This is still something of a guess, I don't really know how to inspect it.
I had taken the blower motor out and can reach up through the air box, and at the top there is a plastic lip. If I reach over that lip then it seems like there is some sort of squishy bit around the perimeter which I would assume is the seal, but I am not sure.
Still can't directly see where the water comes in, but at least I think I have rule out firewall, windshield, t-top, etc. Does half the car need to be taken apart to get to this seal? Can you see it at all if you take off the plastic dashpad piece?