
68 chevelle goes under the LS knife.
 02-25-2012, 04:27 PM
#1
TECH Apprentice
Thread Starter
iTrader: (12)
Join Date: Oct 2011
Location: Denton Md
Posts: 381
Likes: 0
Received 0 Likes
on
0 Posts
Hello guys after months of lurking and study Im going to attempt my first ls swap into my chevelle.
The victim:68 chevelle
New heart: 03 lq4 6.0
trans: th400 w/ 2800 stall
rear:12 bolt w/ 3.55
Ive already got the blown 454 out and started collecting parts what i got so far
03 lq4 6.0 with 65k
ls6 intake complete
holley oil pan
hooker ls swap headers (painted)
holley motor plates (stock location)
Energy Suspension tall motor mounts
-6an Braided fuel lines and fittings
corvette filter/regulator
Mercury Mariner dual Electric Fans (free)
4l80e flywheel spacer bolts

 02-26-2012, 09:39 AM
#5

Deciding on the accessory drive will dictate what way you can go with alot of things.....using the hooker mounts (stock location)the trk AC brkt is out of the question.
Personally, I would look into an overdrive tranny. It REALLY makes the car more enjoyable on road trips....If that's what your going to do with it.....You won't be sorry if you did......Good luck, It's addictive, I know, Im starting on my 2nd switch over in my 66 post chevelle.....
Rick
Personally, I would look into an overdrive tranny. It REALLY makes the car more enjoyable on road trips....If that's what your going to do with it.....You won't be sorry if you did......Good luck, It's addictive, I know, Im starting on my 2nd switch over in my 66 post chevelle.....
Rick
02-26-2012, 10:41 AM
#7
TECH Apprentice
Thread Starter
iTrader: (12)
Join Date: Oct 2011
Location: Denton Md
Posts: 381
Likes: 0
Received 0 Likes
on
0 Posts
Deciding on the accessory drive will dictate what way you can go with alot of things.....using the hooker mounts (stock location)the trk AC brkt is out of the question.
Personally, I would look into an overdrive tranny. It REALLY makes the car more enjoyable on road trips....If that's what your going to do with it.....You won't be sorry if you did......Good luck, It's addictive, I know, Im starting on my 2nd switch over in my 66 post chevelle.....
Rick
Personally, I would look into an overdrive tranny. It REALLY makes the car more enjoyable on road trips....If that's what your going to do with it.....You won't be sorry if you did......Good luck, It's addictive, I know, Im starting on my 2nd switch over in my 66 post chevelle.....
Rick
Trending Topics
02-28-2012, 08:47 PM
#9
TECH Apprentice
Thread Starter
iTrader: (12)
Join Date: Oct 2011
Location: Denton Md
Posts: 381
Likes: 0
Received 0 Likes
on
0 Posts
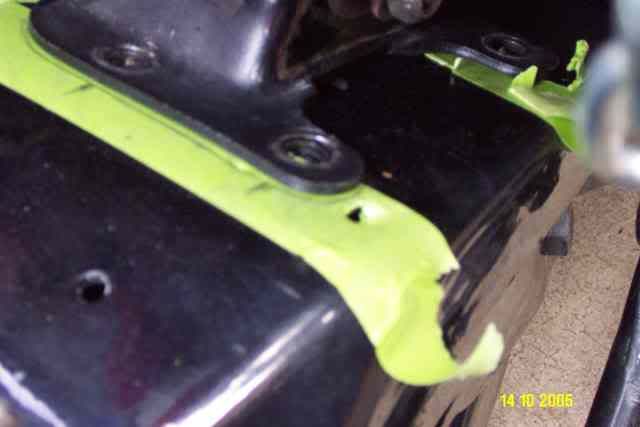
Welp made a lil bit more progress today got my flexplate all ready to and TC holes all enlarged. After getting it put on went in for the first test fit, and it was a FAIL . Got one bolt in the mount and the other is bout inch or two away from going in because the pan is sitting on the cross member.
. Got one bolt in the mount and the other is bout inch or two away from going in because the pan is sitting on the cross member.
02-28-2012, 08:51 PM
#10
TECH Apprentice
Thread Starter
iTrader: (12)
Join Date: Oct 2011
Location: Denton Md
Posts: 381
Likes: 0
Received 0 Likes
on
0 Posts
Only idea i got rate now is unbolting the frame stands and use 1" square tubing as a spacer? But trying to hold off on that idea cuz a previous owner also welded them to the frame.
02-29-2012, 05:53 AM
#11
TECH Fanatic
If you need it I have a list of the correct part #'s to make it all work. You will need to cut the welded mounts off the frame. If you are using truck accessory drive the PS pulley is a requirement.
PS pulley...Dorman 300-123
Frame brackets...3378 carpartsdiscount.com
Adapter brackets to engine...Dougs SK100 (most other similar should work)
Mounts....Energy Suspension 3-1117G
I used a Canton pan 13-274, pickup 13-275 and oil filter base 22-631.
PS pulley...Dorman 300-123
Frame brackets...3378 carpartsdiscount.com
Adapter brackets to engine...Dougs SK100 (most other similar should work)
Mounts....Energy Suspension 3-1117G
I used a Canton pan 13-274, pickup 13-275 and oil filter base 22-631.
02-29-2012, 04:13 PM
#13
TECH Apprentice
Thread Starter
iTrader: (12)
Join Date: Oct 2011
Location: Denton Md
Posts: 381
Likes: 0
Received 0 Likes
on
0 Posts
If you need it I have a list of the correct part #'s to make it all work. You will need to cut the welded mounts off the frame. If you are using truck accessory drive the PS pulley is a requirement.
PS pulley...Dorman 300-123
Frame brackets...3378 carpartsdiscount.com
Adapter brackets to engine...Dougs SK100 (most other similar should work)
Mounts....Energy Suspension 3-1117G
I used a Canton pan 13-274, pickup 13-275 and oil filter base 22-631.
PS pulley...Dorman 300-123
Frame brackets...3378 carpartsdiscount.com
Adapter brackets to engine...Dougs SK100 (most other similar should work)
Mounts....Energy Suspension 3-1117G
I used a Canton pan 13-274, pickup 13-275 and oil filter base 22-631.
03-04-2012, 05:00 PM
#16
TECH Apprentice
Thread Starter
iTrader: (12)
Join Date: Oct 2011
Location: Denton Md
Posts: 381
Likes: 0
Received 0 Likes
on
0 Posts
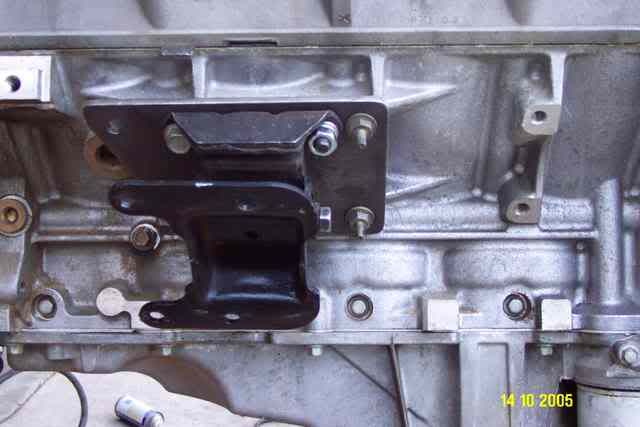
Well got back out to the garage this weekend to mess with the car some. Got the motor mounts grounded off and frame all cleaned up. Tried raising the motor with the 1" square tubing but it was going to be way to much. So a buddy had so 3/8 flat stock laying around so we stacked them on each other and they are going to work out good, plenty of clearance everywhere on pan, tie rods don't hit, headers have plenty of room. We will have to drill new holes in the cross member to get them to bolt up correctly.
03-04-2012, 06:48 PM
#18
The best thing to do would be to bolt the plates to the engine with the motor mount and then attached the frame stand to the mounts. Then drop it in, then move the engine around to where it needs to be and with any spacer required to raise the engine up as needed. Mark the frame stands and remove the engine and redrill for the new location of the Frame stands.
Also to raise the engine, I used tall and narrow engine mounts, narrow the frame stand so that Tall and narrow mount can be used. I also narrow the frame stand an extra 1/2" so that I could find tune or jack the engine up or back some. (yeah over kill).
BC
Also to raise the engine, I used tall and narrow engine mounts, narrow the frame stand so that Tall and narrow mount can be used. I also narrow the frame stand an extra 1/2" so that I could find tune or jack the engine up or back some. (yeah over kill).
BC
03-04-2012, 07:24 PM
#20
TECH Apprentice
Thread Starter
iTrader: (12)
Join Date: Oct 2011
Location: Denton Md
Posts: 381
Likes: 0
Received 0 Likes
on
0 Posts
The best thing to do would be to bolt the plates to the engine with the motor mount and then attached the frame stand to the mounts. Then drop it in, then move the engine around to where it needs to be and with any spacer required to raise the engine up as needed. Mark the frame stands and remove the engine and redrill for the new location of the Frame stands.
Also to raise the engine, I used tall and narrow engine mounts, narrow the frame stand so that Tall and narrow mount can be used. I also narrow the frame stand an extra 1/2" so that I could find tune or jack the engine up or back some. (yeah over kill).
BC
Also to raise the engine, I used tall and narrow engine mounts, narrow the frame stand so that Tall and narrow mount can be used. I also narrow the frame stand an extra 1/2" so that I could find tune or jack the engine up or back some. (yeah over kill).
BC
As for the frame stands i know they had 2 different ones 307 which were tall and wide and the sb/bb stand that was shorter and skinnier. Guess guys have had better luck with the 307 stand but ive seen you have to cut it and make it skinnier to fit the tall energy suspension mounts.