

corvette front drive alternator placement issue
 03-14-2013, 02:14 AM
#1
TECH Enthusiast
Thread Starter
iTrader: (15)
Join Date: Aug 2006
Location: DFW....TX
Posts: 624
Likes: 0
Received 0 Likes
on
0 Posts

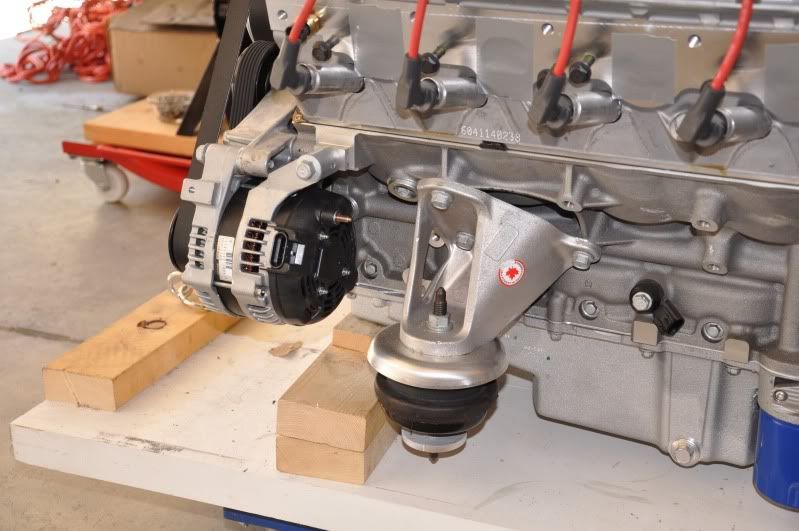
Okay guys here is the issue.
I have to run the corvette balancer, LS7 waterpump, and tensioner because I have zero room in my 32 Ford. I have the kwikperformance high mount bracket and I hate it!!! I need the alternator down where the F-body alternator is.
How can I get this to work???
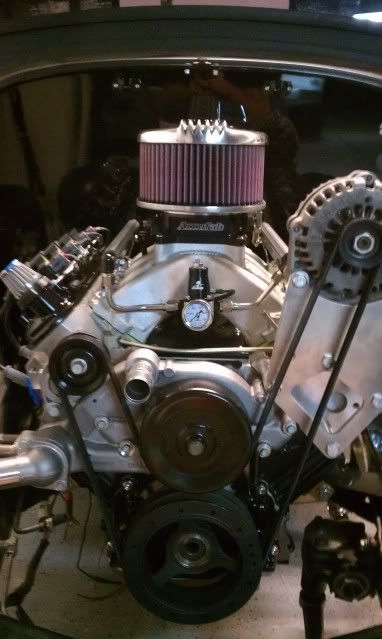
Also some have said I can cut a camaro bracket down, but I'm using a truck block that does not the 2 of the holes that are needed to do this. One hole I can drill and tap no problem but the third hole is not possible.
I have to run the corvette balancer, LS7 waterpump, and tensioner because I have zero room in my 32 Ford. I have the kwikperformance high mount bracket and I hate it!!! I need the alternator down where the F-body alternator is.
How can I get this to work???
Also some have said I can cut a camaro bracket down, but I'm using a truck block that does not the 2 of the holes that are needed to do this. One hole I can drill and tap no problem but the third hole is not possible.
 03-15-2013, 05:39 AM
#4
If you do a search there are probably a thousand threads on how to drill and tap the block for the F body alternator bracket.
The only difference between the F body and vette accessories is the vette stuff runs the belt 3/4 of and inch closer to the block. So all you need to do is mill down an F body alt bracket to bring it closer to the block. You lose the back bracket, but most guys do with out one anyway. This Holley link give dimensions
http://www.holley.com/data/Products/...10605rev11.pdf
Or, if you are interested, I have a F body bracket that I had machined for the vette spacing but then couldn't use cause the alternator interfered with my steering gear. PM me if you are interested and I will let you have it cheap.
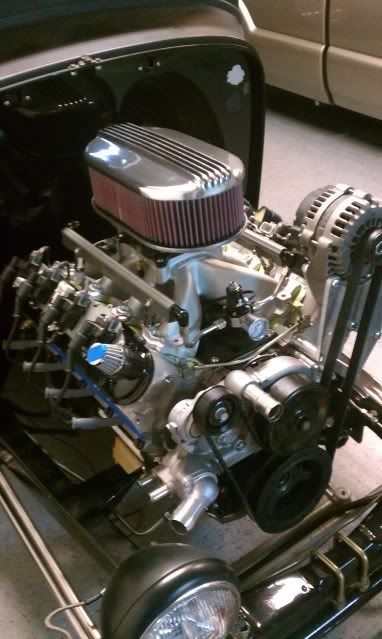
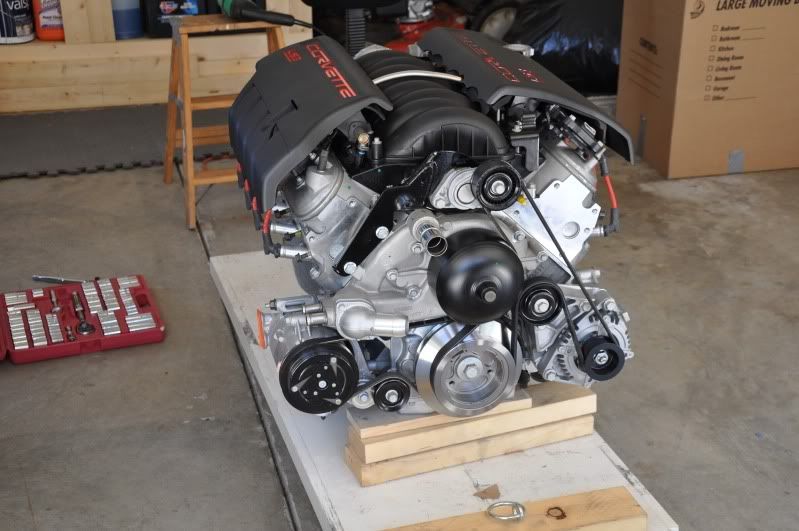
I see why you want to move the alt. That mounting makes it the most prominent thing on your otherwise beautiful motor.
The only difference between the F body and vette accessories is the vette stuff runs the belt 3/4 of and inch closer to the block. So all you need to do is mill down an F body alt bracket to bring it closer to the block. You lose the back bracket, but most guys do with out one anyway. This Holley link give dimensions
http://www.holley.com/data/Products/...10605rev11.pdf
Or, if you are interested, I have a F body bracket that I had machined for the vette spacing but then couldn't use cause the alternator interfered with my steering gear. PM me if you are interested and I will let you have it cheap.
I see why you want to move the alt. That mounting makes it the most prominent thing on your otherwise beautiful motor.
03-15-2013, 12:32 PM
#6
TECH Enthusiast
Thread Starter
iTrader: (15)
Join Date: Aug 2006
Location: DFW....TX
Posts: 624
Likes: 0
Received 0 Likes
on
0 Posts
Yeah the top mount bracket was an impulse buy and when I got it I wanted to punch myself repeatedly.... I'm still butt sore about that... Oh well ...live and learn.
I have a buddy that has one of those billet MSD alternators and I may try to see if that will fit. I have access to a mill so making something isn't hard... other than finding the time.
The vega box is coming out in favor of a unisteer crosslink steering system and that should allow me a bit more room.
I may shoot you a pm about that milled bracket.
03-17-2013, 06:46 PM
#7
TECH Enthusiast
Thread Starter
iTrader: (15)
Join Date: Aug 2006
Location: DFW....TX
Posts: 624
Likes: 0
Received 0 Likes
on
0 Posts
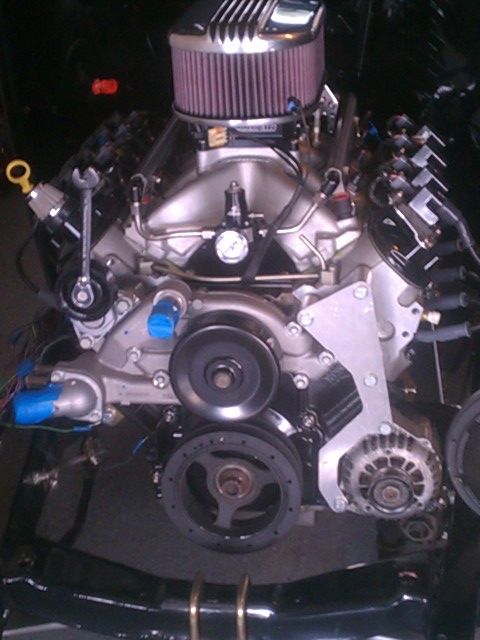
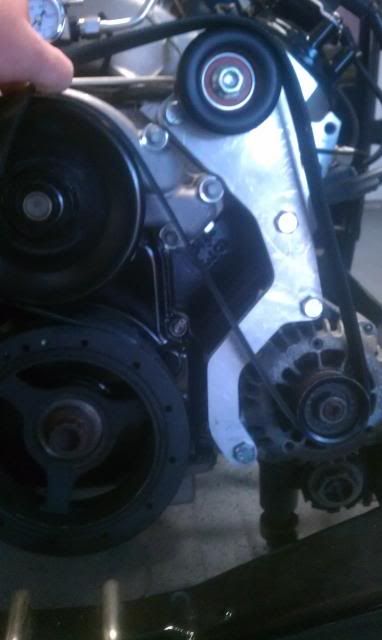
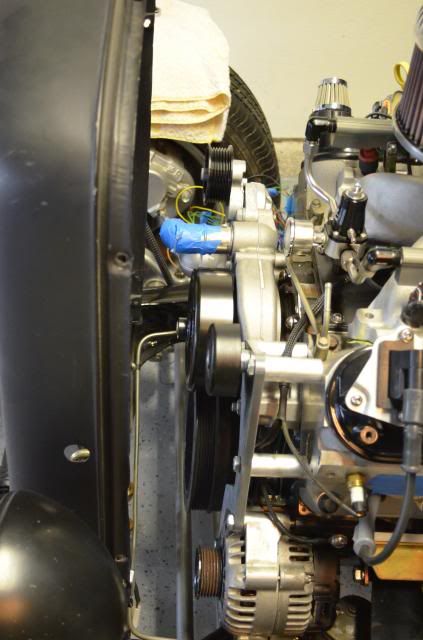
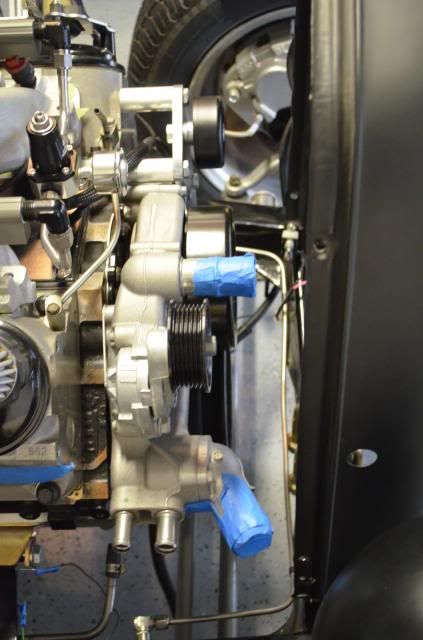
After tinkering for a bit I decided to make my own bracket.
This pic shows the mock up bracket cut out of .080" 5052 aluminum. I'm going in the morning to a friedns shop to cut it out of 3/8th 6061.
Thoughts? Also the idler will be at the top between the 2 mounting bolts basically a mirror of the tensioner pulley.
This pic shows the mock up bracket cut out of .080" 5052 aluminum. I'm going in the morning to a friedns shop to cut it out of 3/8th 6061.
Thoughts? Also the idler will be at the top between the 2 mounting bolts basically a mirror of the tensioner pulley.
Trending Topics
 03-18-2013, 05:28 AM
#10
That looks massively better than the old set up. You obviously have some skills.
With an idler up near the top are you at all worried about belt wrap on the alternator and crank pulley? You will run a pretty light load turning just the alt and WP but from that angle it seems like you are getting the alt farther down than pretty much any other set up I have seen.
With an idler up near the top are you at all worried about belt wrap on the alternator and crank pulley? You will run a pretty light load turning just the alt and WP but from that angle it seems like you are getting the alt farther down than pretty much any other set up I have seen.
03-18-2013, 09:48 AM
#11
That looks massively better than the old set up. You obviously have some skills.
With an idler up near the top are you at all worried about belt wrap on the alternator and crank pulley? You will run a pretty light load turning just the alt and WP but from that angle it seems like you are getting the alt farther down than pretty much any other set up I have seen.
With an idler up near the top are you at all worried about belt wrap on the alternator and crank pulley? You will run a pretty light load turning just the alt and WP but from that angle it seems like you are getting the alt farther down than pretty much any other set up I have seen.
 03-18-2013, 10:38 AM
#12

Well I'll be the stick in the mud, IMO it looks better than before but not by much, it still seems to be the first thing that sticks out like a sore thumb and will stick out more once you place the idler on there.
As mentioned before by Pop Wood I think I would try his milled down F-Body bracket, or with your machine shop skills just copy the F-Body bracket as Pop Wood said with 3/4 less back spacing, it appears you have sufficient clearance from the looks of your pictures of the alternator mounted with your bracket.
On your truck block there should only be (1) hole that needs to be drilled and tapped on your block, as said earlier it has been discussed on this forum with numerous threads on drill bit sizes and tap sizes needed.
03-18-2013, 11:02 AM
#13
On The Tree
iTrader: (3)

Join Date: Aug 2011
Location: WA
Posts: 125
Likes: 0
Received 0 Likes
on
0 Posts
I am suprised no one has mentioned the CTS-V Alternator/ bracket. It shares the same spacing/ beltline as the Covette, yet is low mount similar to a 98-02 Camaro. The GTO was mentioned but it shares the same beltline as the 98-02 f-body, not any better IMO. Sounds like you are on your way to a sloution though.
03-18-2013, 11:32 AM
#14
Teching In

Join Date: Jun 2011
Posts: 21
Likes: 0
Received 0 Likes
on
0 Posts
Ive used this one and it works good and takes up a small area.
http://www.cbrperformanceproducts.co...p/06072011.htm
http://www.cbrperformanceproducts.co...p/06072011.htm
03-18-2013, 11:41 AM
#15
The CTS pics look pretty good. Looks like the alt is unique to the CTS. Can't beat the price Nook and Tranny has for that bracket either ($36) BUT looks like you will give that all back if you need to buy the alternator ($343).
http://www.nookandtranny.com/mm5/mer...Category_Code=
http://www.nookandtranny.com/mm5/mer...Category_Code=
http://www.nookandtranny.com/mm5/mer...Category_Code=
http://www.nookandtranny.com/mm5/mer...Category_Code=
03-19-2013, 06:12 PM
#16
TECH Enthusiast
Thread Starter
iTrader: (15)
Join Date: Aug 2006
Location: DFW....TX
Posts: 624
Likes: 0
Received 0 Likes
on
0 Posts
That looks massively better than the old set up. You obviously have some skills.
With an idler up near the top are you at all worried about belt wrap on the alternator and crank pulley? You will run a pretty light load turning just the alt and WP but from that angle it seems like you are getting the alt farther down than pretty much any other set up I have seen.
With an idler up near the top are you at all worried about belt wrap on the alternator and crank pulley? You will run a pretty light load turning just the alt and WP but from that angle it seems like you are getting the alt farther down than pretty much any other set up I have seen.
03-19-2013, 06:14 PM
#17
TECH Enthusiast
Thread Starter
iTrader: (15)
Join Date: Aug 2006
Location: DFW....TX
Posts: 624
Likes: 0
Received 0 Likes
on
0 Posts
Well I'll be the stick in the mud, IMO it looks better than before but not by much, it still seems to be the first thing that sticks out like a sore thumb and will stick out more once you place the idler on there.
As mentioned before by Pop Wood I think I would try his milled down F-Body bracket, or with your machine shop skills just copy the F-Body bracket as Pop Wood said with 3/4 less back spacing, it appears you have sufficient clearance from the looks of your pictures of the alternator mounted with your bracket.
On your truck block there should only be (1) hole that needs to be drilled and tapped on your block, as said earlier it has been discussed on this forum with numerous threads on drill bit sizes and tap sizes needed.
As mentioned before by Pop Wood I think I would try his milled down F-Body bracket, or with your machine shop skills just copy the F-Body bracket as Pop Wood said with 3/4 less back spacing, it appears you have sufficient clearance from the looks of your pictures of the alternator mounted with your bracket.
On your truck block there should only be (1) hole that needs to be drilled and tapped on your block, as said earlier it has been discussed on this forum with numerous threads on drill bit sizes and tap sizes needed.
The other thing many forget is with the grille and radiator in place the only portion of the engine you will see is the top. You wont be able to see the front. I can snap a quick pic with the shell to give you an idea.
03-19-2013, 06:27 PM
#18
TECH Enthusiast
Thread Starter
iTrader: (15)
Join Date: Aug 2006
Location: DFW....TX
Posts: 624
Likes: 0
Received 0 Likes
on
0 Posts
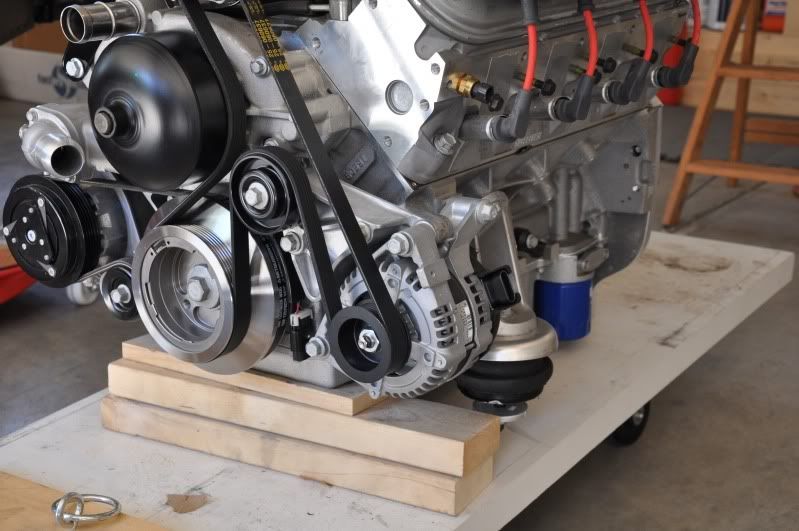
I agree. Well done. Let's hope there's no slippage - without a PS pump on there, it's a fairly good bet he'll be alright. If slippage does occur, it *might* be compensated for by adding an idler pully, like on the LS7 front drive, (see pic below-pulley beneath the PS reservoir), OR raising the alternator a bit to the PS pump position to avoid belt to belt contact. Just a thought. My suggested alternator position might be a bit wide for Sprayed99's intended fitment.
I have no idea why it would slip the way the belt routing will be.
 03-19-2013, 06:39 PM
#19
TECH Enthusiast
Thread Starter
iTrader: (15)
Join Date: Aug 2006
Location: DFW....TX
Posts: 624
Likes: 0
Received 0 Likes
on
0 Posts
Sorry for the crap pictures. I found the nikon for some better pics.
Here is the grille just sitting on the fram but you get the idea.
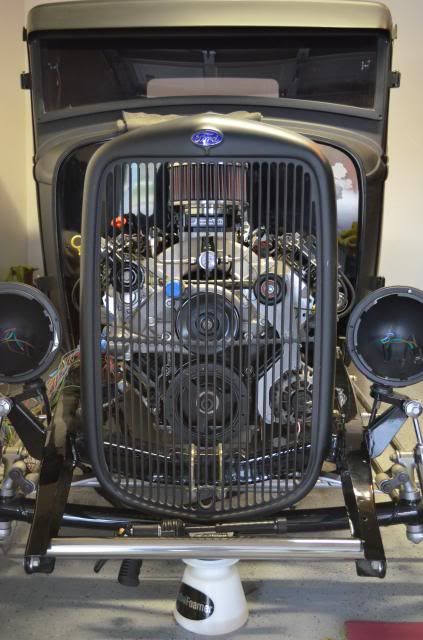
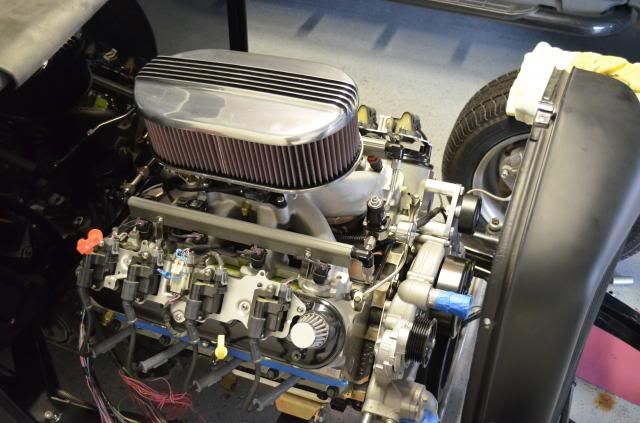
Now if the first thing you see is my bracket you obviously have a problem LOL.
Here is the grille just sitting on the fram but you get the idea.
Now if the first thing you see is my bracket you obviously have a problem LOL.
Last edited by sprayed99; 03-19-2013 at 07:19 PM.
03-19-2013, 07:14 PM
#20
TECH Enthusiast
Thread Starter
iTrader: (15)
Join Date: Aug 2006
Location: DFW....TX
Posts: 624
Likes: 0
Received 0 Likes
on
0 Posts
Ive used this one and it works good and takes up a small area.
http://www.cbrperformanceproducts.co...p/06072011.htm
http://www.cbrperformanceproducts.co...p/06072011.htm
Not trying to bust your *****, but damn man did you even read the thread?