
My Tick Perfromance Adjustable Master Install
 10-11-2008, 08:18 PM
#1
On The Tree
Thread Starter
Join Date: Feb 2006
Posts: 156
Likes: 0
Received 0 Likes
on
0 Posts
I have an 01 Z06 with a Tex OZ700 X grip clutch, I could not shift above 5000 RPMs at all. I replaced my transmission, slave and master and STILL could not shift.
Then I stumbled upon Tick Performance, quickly ordered myself the adjustable master and well...... HOLY **** I CAN BANG GEARS LIKE A MAD MAN! No more hitting a wall when i try to power shift gears, no grinding either. Now I can just grab the next gear and keep on going.
Add me to the list of satisfied Ticker Performance customers! This Master cyl does EXACTLY as advertised.
The pedal is firmer than stock, but nothing major, feels pretty good. You can really tell when the clutch is engaged/disengaged with this setup. The engagement point is up higher than the stock master and it really allows more room to smoothly slip the clutch so that it does not have such a ON/OFF only feeling.
The install was pretty easy, altho getting the clutch pedal assembly out a little tedious as there isnt much space to work with. I removed the senors from the pedals and popped off the master cyl rod to gain more clearance.
I cut the rubber gasket in half to be able to get around the new Master and used some RTV to seal it to the firewall. In hindsight it probably would have been better to not cut it in half, but I couldn't get it to seal right. Does not really matter how you do it, u just need to keep the water out of your floor if you ever drive thru puddles.
The one part that gave me a headache was the little clip that is supposed to clip onto the hem joint rod to keep the master cyl arm from pooping off the clutch pedal. There was not enough clearance ti slide it all the way on. So I just took a belt sander to the bottom of hte clip to reduce its width, slid it most of the way on, then bent the locking part over the edge of the rod so that it wouldn't pop off. I doubt it is going anywhere, but if it ever does pop off I have a dozen ways to fix it so its not a big deal.
As for bleeding the clutch, I was having a problem getting it to bleed. It did not seem to move any fluid when pumping and holding the pedal. I started out with the master in the shortest position as recommended, but this didn't let it bleed properly, so i lengthened the rod temporarily to get some longer pumps out of it and it worked. I finished bleeding, then moved the rod back to the shortest position and started my adjusting.
With the master in the shortest position I could get into gears easily but at WOT it was really notchy. I spent a total of about 10 minutes adjusting it to get the WOT shifting smooth as glass. On my car the Tick master needed to be adjusted to about the same height as the stock master when all was said and done to make the WOT shifts perfect.
I also have noticed the car shifts smoother at part throttle and I have way more control over the clutch engagement with the Tick unit.
Anyone that is having issues with WOT shifting and has wondering about the Tick Master....all I can say it, don't waste any more time contemplating. Just get one and install it...you will see. It REALLY fixes the WOT shifting problem.
Thanks,
-Taz
 10-13-2008, 10:46 AM
#2

I'm glad its doing good. I have been shaving the rod ends for the f-body kits because they didn't fit with the clip, but vettes we have done here at the shop all worked out. Either way I will shave them all down now just to be sure no one else has a problem.
Also, thanks for the tip on bleeding it. I will work that into the install instructions.
Also, thanks for the tip on bleeding it. I will work that into the install instructions.

 10-13-2008, 01:06 PM
#5
TECH Enthusiast
iTrader: (18)

Join Date: Nov 2004
Location: Salado, TX
Posts: 603
Likes: 0
Received 0 Likes
on
0 Posts
I cut the rubber gasket in half to be able to get around the new Master and used some RTV to seal it to the firewall. In hindsight it probably would have been better to not cut it in half, but I couldn't get it to seal right. Does not really matter how you do it, u just need to keep the water out of your floor if you ever drive thru puddles.
10-13-2008, 08:17 PM
#7
On The Tree
Thread Starter
Join Date: Feb 2006
Posts: 156
Likes: 0
Received 0 Likes
on
0 Posts
The gasket is on the factory slave unit, its more like a rubber boot/surround that seals around the firewall to keep noise/water out of the floor of the car.
In the vette you just pull it off the stock slave, carefully cut the opening slightly larger, then install it on the Tick Master. I put some clear RTV around the outside of mine. It's very simple, you will know what I am talking about when you get to that point.
In the vette you just pull it off the stock slave, carefully cut the opening slightly larger, then install it on the Tick Master. I put some clear RTV around the outside of mine. It's very simple, you will know what I am talking about when you get to that point.
Trending Topics
10-13-2008, 09:15 PM
#8

I'm guessing the Vette uses a U-bolt on the master? Does the Tick MC use the stock U-bolt or does it come with separate bolts like i've heard the Mcleod MC comes with? Either way i will be purchasing one from Tick when i come up with the money.
10-13-2008, 09:25 PM
#9
Launching!
iTrader: (1)
Join Date: Oct 2005
Location: Spanaway, WA
Posts: 231
Likes: 0
Received 0 Likes
on
0 Posts

The gasket is on the factory slave unit, its more like a rubber boot/surround that seals around the firewall to keep noise/water out of the floor of the car.
In the vette you just pull it off the stock slave, carefully cut the opening slightly larger, then install it on the Tick Master. I put some clear RTV around the outside of mine. It's very simple, you will know what I am talking about when you get to that point.
In the vette you just pull it off the stock slave, carefully cut the opening slightly larger, then install it on the Tick Master. I put some clear RTV around the outside of mine. It's very simple, you will know what I am talking about when you get to that point.

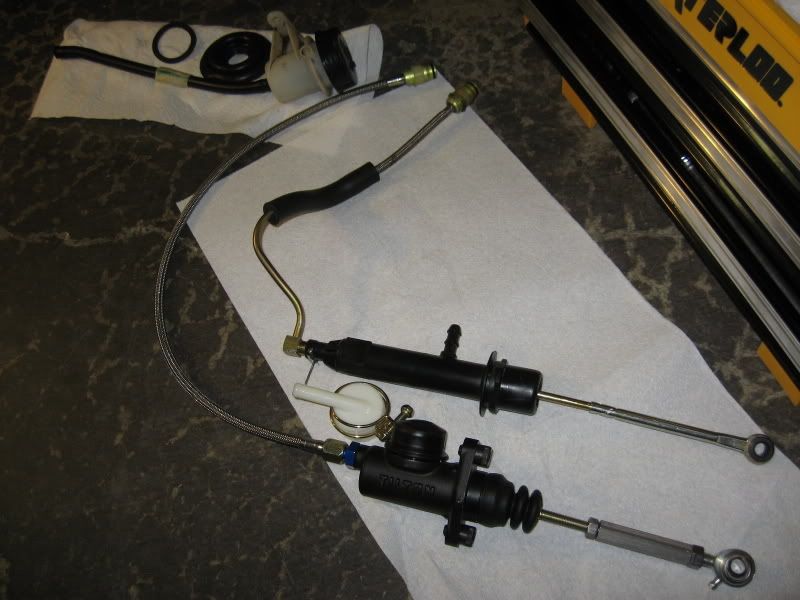
Here's some pics to give an idea. The boot is the fat donut in the top left, next to the resevoir.
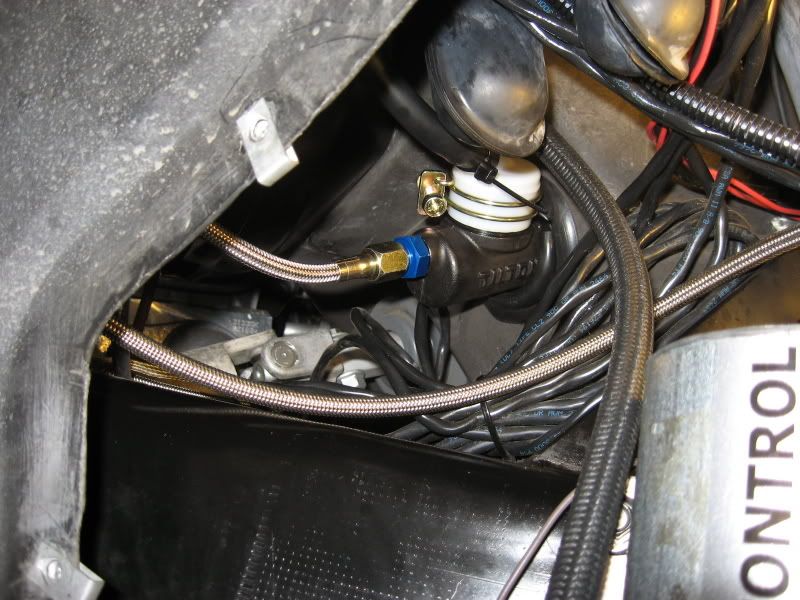
I clipped inside the boot, about halfway thru on opposite sides, so it could stretch over the new master. Here's a pic of mine in place.
 10-13-2008, 09:44 PM
#10
On The Tree
Thread Starter
Join Date: Feb 2006
Posts: 156
Likes: 0
Received 0 Likes
on
0 Posts
I'm pretty sure the F-body unit comes with everything you need. You should PM the guys over at Tick Performance for an accurate answer.
 10-14-2008, 02:09 PM
#13

I personally was not impressed with what I felt after driving BlackScreamin's after the install but he's happy because he said it's way better than it was, so that's all that really matters. I would personally give it a little more adjustment out to see if it helps, but he wanted to leave the pedal low like it says in the directions, so we kept it adjusted low.
If my RAM ever takes a crap or starts giving me issues, I'll probably pick up one of these, although I didn't like the fact that you don't seem to have much room to adjust the pedal height out if you want/need to. When I tried to adjust blackscreamin's out to a similar height just to see what it would feel like, I ran out of rod before the pedal got past the same height as the brake pedal (but like I said, he wanted it lower anyways).
10-14-2008, 02:16 PM
#14

But unfortunately it didn't come with the replacement bolts, so we had to go pick some up. No big deal.
10-14-2008, 06:47 PM
#15
Yup, BlackScreamin's didn't come with the bolts or washers so we had to hit up Home Depot. I also had to shave the rod end on his so that the clip would fit on. It wasn't even close, but luckily it's a simple fix with a grinder since the rod end just screws off.
I personally was not impressed with what I felt after driving BlackScreamin's after the install but he's happy because he said it's way better than it was, so that's all that really matters. I would personally give it a little more adjustment out to see if it helps, but he wanted to leave the pedal low like it says in the directions, so we kept it adjusted low.
If my RAM ever takes a crap or starts giving me issues, I'll probably pick up one of these, although I didn't like the fact that you don't seem to have much room to adjust the pedal height out if you want/need to. When I tried to adjust blackscreamin's out to a similar height just to see what it would feel like, I ran out of rod before the pedal got past the same height as the brake pedal (but like I said, he wanted it lower anyways).
We include all the hardware necessary to install these. If anyone has recieved one without the bolts I appologize. When we package the cylinder the mounting bolts are already started into the holes they go in and everything else is assembled. By doing it this way, we know that there isn't any problems with the threads on the bolt or bracket. Its very important that the bolts start easily when trying to line them up under the dash.
Also, I grind all the joints down to .475" thick and so far I haven't had any problems installing the clips. I think I'll grind them down a bit more since a couple of guys have mentioned it didn't quite go.
The rod shouldn't run out of adjustment any where near the brake pedal. If it did, make sure you weren't actually spinning the threaded rod that comes out of the cylinder. If it spins with the turnbuckle when you're adjusting the legnth out, you'll only get half of the adjustment its capable of. The heim joint is left hand threaded, and the rod on the cylinder is right hand. Simply hold the rod where it comes out of the cylinder while adjusting the turnbuckle and it will adjust at both ends simultaneously.
10-15-2008, 07:33 AM
#16
We include all the hardware necessary to install these. If anyone has recieved one without the bolts I appologize. When we package the cylinder the mounting bolts are already started into the holes they go in and everything else is assembled. By doing it this way, we know that there isn't any problems with the threads on the bolt or bracket. Its very important that the bolts start easily when trying to line them up under the dash.
Also, I grind all the joints down to .475" thick and so far I haven't had any problems installing the clips. I think I'll grind them down a bit more since a couple of guys have mentioned it didn't quite go.
The rod shouldn't run out of adjustment any where near the brake pedal. If it did, make sure you weren't actually spinning the threaded rod that comes out of the cylinder. If it spins with the turnbuckle when you're adjusting the legnth out, you'll only get half of the adjustment its capable of. The heim joint is left hand threaded, and the rod on the cylinder is right hand. Simply hold the rod where it comes out of the cylinder while adjusting the turnbuckle and it will adjust at both ends simultaneously.
a) The bolts were not included, but like I said, no big deal since we just picked them up at a Home Depot. Not a hard find for like $0.30 and the bolts we got threaded without issue.
b) Yeah, I would recommend grinding them down a bit more just from what I saw with Blackscreamin's. The clip wouldn't go on at all no matter how hard I tried to press it on, so we ended up having to grind it down a bit more. Again, no big deal. It's an easy fix since the end screws right off.
c) I did exactly what you're stating; it's pretty common sense stuff.
We just ran out of room. I adjusted both ends out as far as possible (and I know that each end threads opposite the other end) and this only brought the clutch pedal out to the same height as the brake pedal. And I did hold the other piece whenever I adjusted one to make sure it wouldn't move. If Blackscreamin wanted to try it out further, I'd love to take another look just to see if I'm wrong (it's been known to happen) but I made the adjustment multiple times as we played with the height and I know I'm not wrong.Just some feedback for you!
Last edited by PewterScreaminMach; 10-15-2008 at 07:39 AM.
10-15-2008, 08:24 AM
#17
We machine the turnbuckle here in house, so it is possible that Blackscreamin recieved one that was machined wrong. I know that they will adjust to the factory hieght or atleast close to it, because I did this for a customer at the LSx shootout attempting to get his clutch to release properly. As it turns out, his pressure plate was broken loose at one of the mounting bolt which was creating his problem. We then helped him with a clutch install at the track and he made it all the way to the semi-finals in the index shootout. The final adjustment was just slightly higher than the brake pedal.
We've recieved quite a few calls the last day or two asking if the hardware is included because of a few posts saying they didn't get their mounting bolts. I just wanted to make it clear that all the issues you had have been addressed.
Also, If you guys want to adjust the rod out farther and the current turnbuckle isn't long enough we can make one for you at any legnth you want. Just let me know, I'd be glad to make one a half inch longer or so for you guys to try.
10-15-2008, 11:06 AM
#18
We machine the turnbuckle here in house, so it is possible that Blackscreamin recieved one that was machined wrong. I know that they will adjust to the factory hieght or atleast close to it, because I did this for a customer at the LSx shootout attempting to get his clutch to release properly. As it turns out, his pressure plate was broken loose at one of the mounting bolt which was creating his problem. We then helped him with a clutch install at the track and he made it all the way to the semi-finals in the index shootout. The final adjustment was just slightly higher than the brake pedal.
We've recieved quite a few calls the last day or two asking if the hardware is included because of a few posts saying they didn't get their mounting bolts. I just wanted to make it clear that all the issues you had have been addressed.
Also, If you guys want to adjust the rod out farther and the current turnbuckle isn't long enough we can make one for you at any legnth you want. Just let me know, I'd be glad to make one a half inch longer or so for you guys to try.
We've recieved quite a few calls the last day or two asking if the hardware is included because of a few posts saying they didn't get their mounting bolts. I just wanted to make it clear that all the issues you had have been addressed.
Also, If you guys want to adjust the rod out farther and the current turnbuckle isn't long enough we can make one for you at any legnth you want. Just let me know, I'd be glad to make one a half inch longer or so for you guys to try.
I'll talk to Aaron to see if he's interested in the adjustment. If he is, I'll double check my adjustments like I said to make sure I'm not an idiot (again, always a possibility) and I'll let you guys know either way just for information's sake.
And I didn't mean to start the panic on the bolts not being there, they just weren't with the one he received but I was pretty clear on the fact that it was no big deal because they cost a few cents and are found at any local or big name hardware store.
Good luck with the sales, guys. They seem to be flying off your shelves from what I've been reading in this forum. If my RAM ever takes a crap on me, I may just pick one up and give it a shot.
Joe
